Programa
Fundamentos de agentes de IA
6 h
Google’s ADK Visual Agent Builder is a hands-on toolkit for designing, connecting, and running multi-agent workflows without building the whole pipeline yourself. It pairs a prompt-based agent builder with an ADK CLI, Gemini models, and built-in tools so you can turn a natural-language brief into a functioning agent.
In this tutorial, I’ll walk you through how to build a working Travel Planner using Google’s Agent Development Kit (ADK) Visual Agent Builder. You’ll learn how to:
By the end, you’ll have an agent that asks for your cities/dates/budget, runs three workers in parallel (Flights, Stays, Activities), and returns one or two clear itinerary options.
If you’re new to agentic AI, I recommend checking out the AI Agent Fundamentals skill track. You can also check out the Building AI Agents with Google ADK course.
Google’s ADK Visual Agent Builder is a canvas for designing multi-agent workflows powered by Gemini. You describe your intent to an AI Assistant, which proposes and materializes a complete agent architecture, renders it on a visual canvas, and lets you test it immediately in chat.
From there, you can inspect traces and, when ready, export production-ready YAML files.
Here are some key pieces about this Agent Builder:
google_search, along with function tools and file/context tools such as url_context and FilesRetrieval, make it easy for agents to stitch multiple utilities together.ADK handles model calls, tool integration, and state passing so you can focus on behavior.
In this section, we’ll build a Travel Planner with Google’s ADK Visual Agent Builder. The workflow uses a root LLM agent and a parallel agent that reaches out to three agents for flights, stays, and activities, then reconciles everything into clear trip options you can act on immediately.
Here’s how it works:
By the end, you’ll have a multi-agent workflow that turns a plain-English trip idea into a concrete, budget-aware itinerary with transparent reasoning.
Before we design any agents, we need the ADK CLI. It’s the command-line tool that launches the Visual Agent Builder and runs the local web UI.
pip install --upgrade google-adk
adk --version
The above code should return adk, version 1.18.0. It first fetches the latest ADK package and its dependencies. The --upgrade flag makes sure you’re not stuck on an older CLI that may lack the Visual Agent Builder features used in this tutorial.
Finally, we verify the install and that our shell can find the adk executable.
With ADK installed and verified, we’re ready to launch the Visual Agent Builder and create our Travel Planner workflow. In the next step, we’ll set up your API key and open the local UI so you can start assembling agents visually.
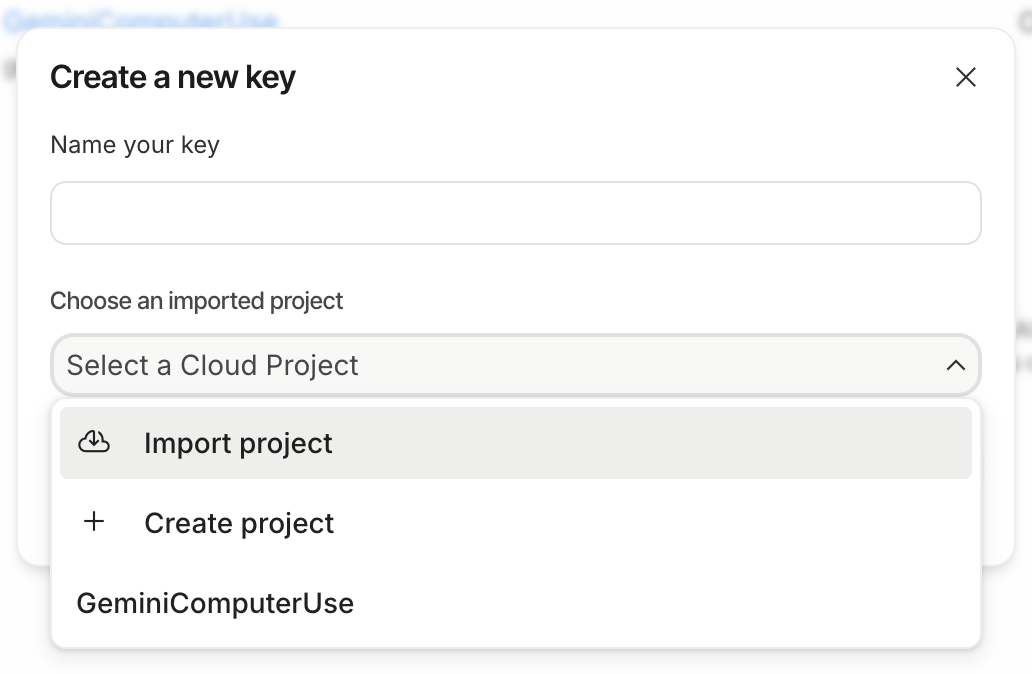
Start by opening Google AI Studio and in the bottom-left, click on Get API Key. Then select Create API Key and name your API key. Note that you’ll need to either create a new Google Cloud Project or use an existing one with billing enabled. Once set, return to Google AI Studio and copy the API Key and set it as an environment variable in your working directory.
export GOOGLE_API_KEY=YOUR_API_KEY —-> for macOS/Linux
setx GOOGLE_API_KEY "YOUR_KEY" —-> for Windows (PowerShell)
Restart your terminal so the change takes effect.
Optionally, you can also clone a starter repo that has an existing project to try on and comes with all the requirements set for you:
git clone https://github.com/thomas-chong/google-adk-visual-agent-builder-demo.git
cd google-adk-visual-agent-builder-demo
The above command clones a repo containing a starter research agent demo for you. Now that we have ADK installed, let's launch the web interface next.
With your API key set and ADK installed, you’re ready to open the Visual Agent Builder. Run the following command to start the local Dev UI server.
adk webBy default, it launches at http://127.0.0.1:8000. Open it in your browser.

The initial UI looks like this:
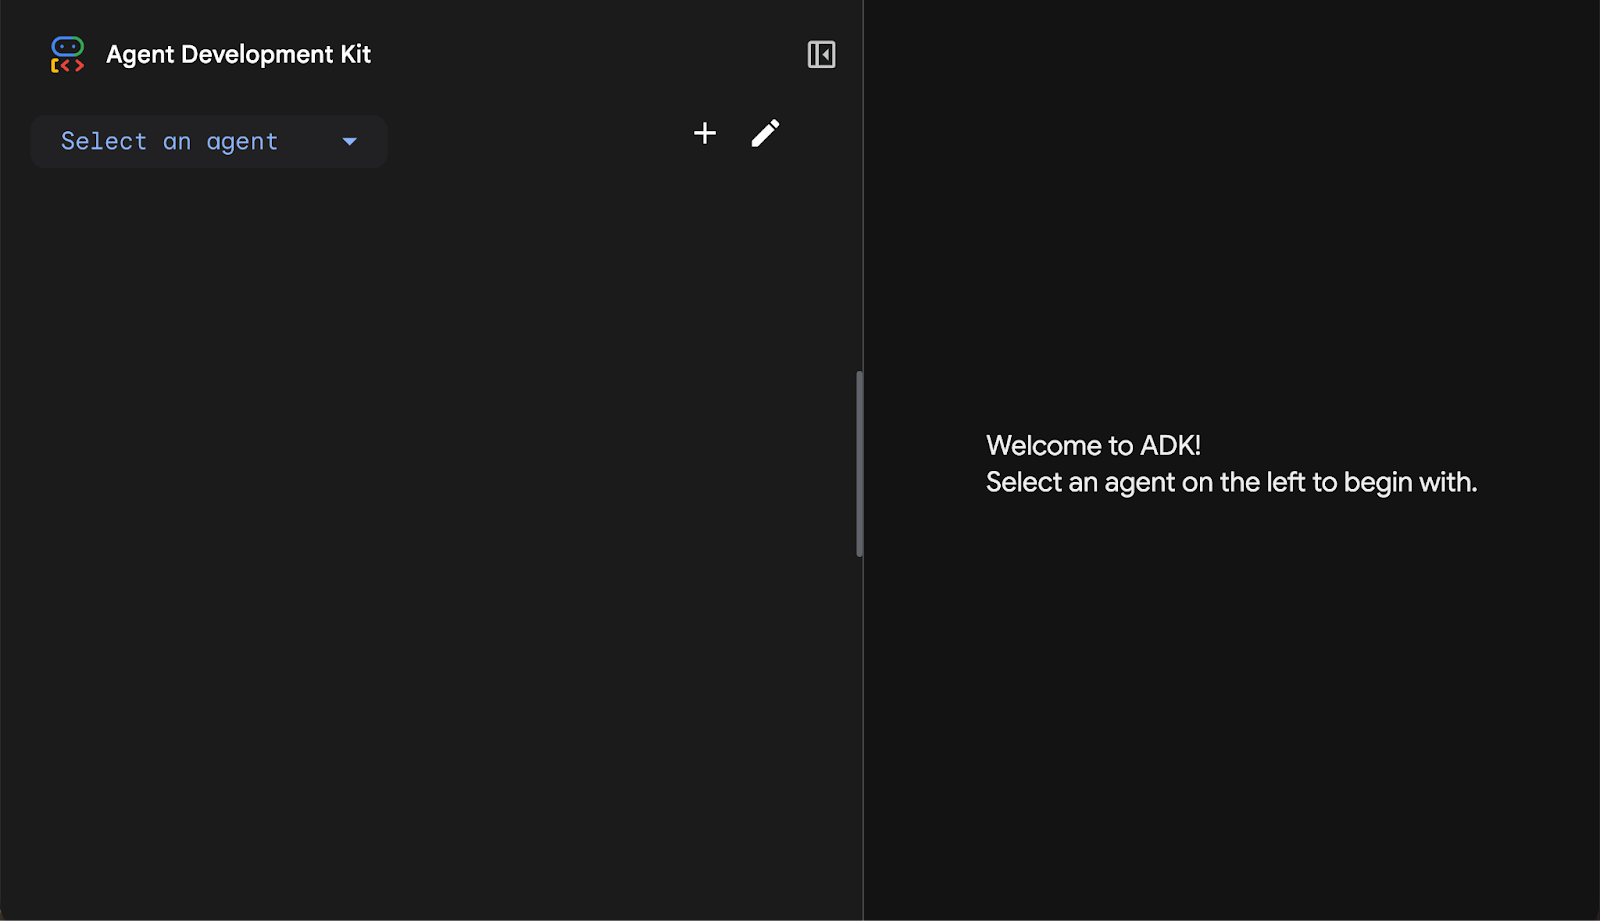
Click the + button to create a new agent, name it Travel_Agent, and you’ll land in the three-panel builder: Configuration (left), Canvas (center), and Assistant/Chat (right).
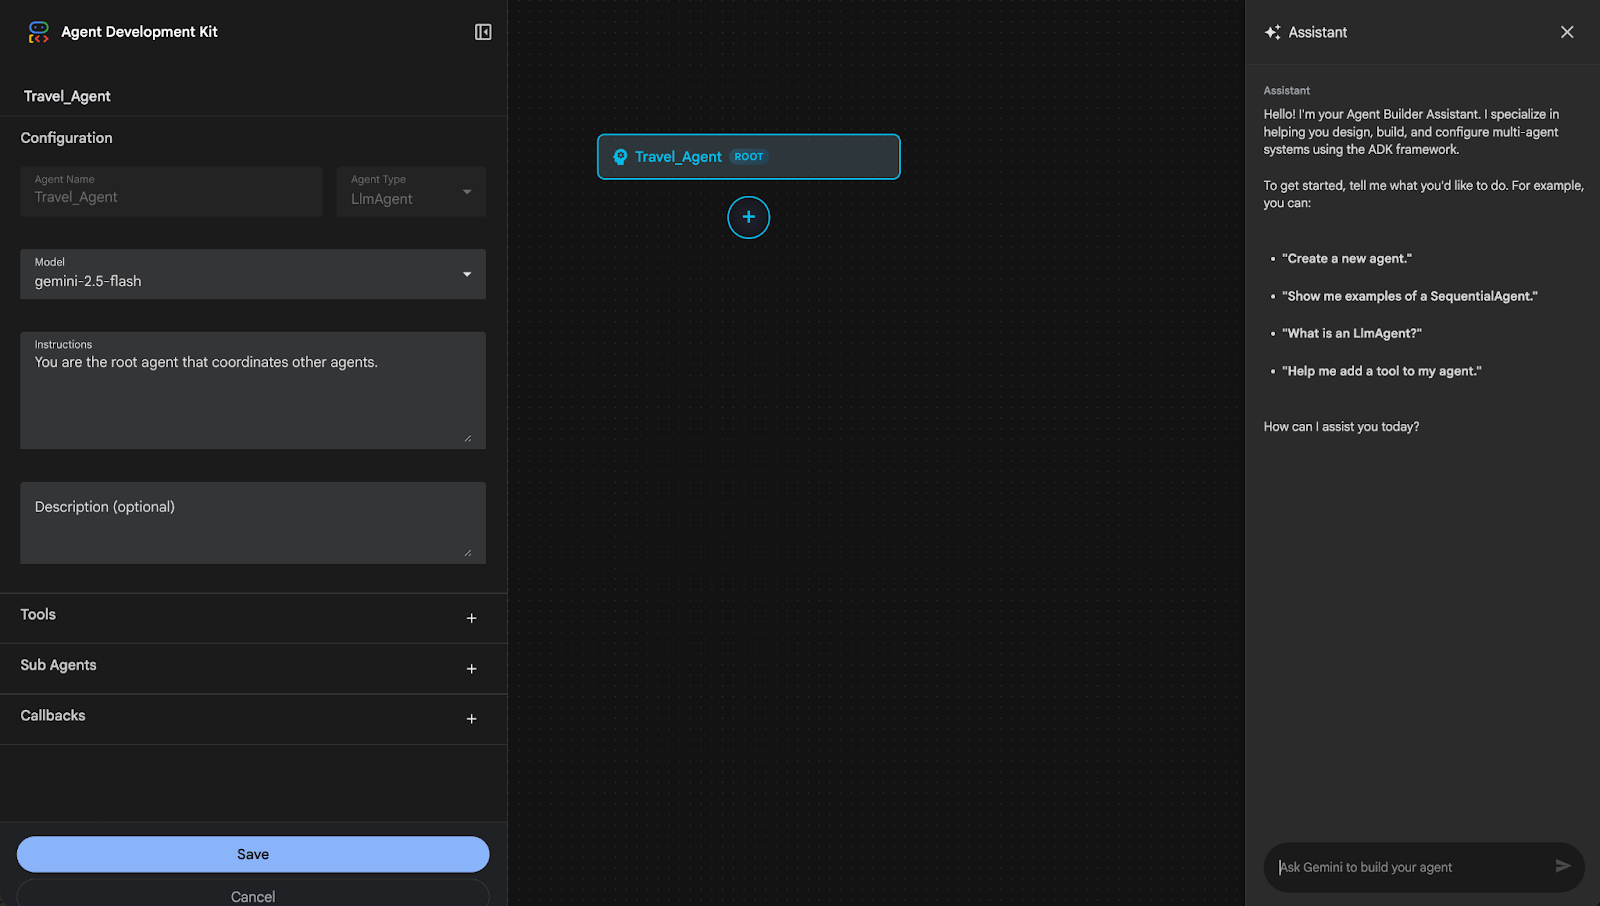
First, I sent a prompt to Gemini in the chat to auto-build the agent, similar to how you’d use OpenAI’s AgentKit to build a workflow.
Create a Travel Ops planner agent. Given user input (ordered cities, dates, budget, must/avoid prefs), run three workers in parallel—Flights, Stays, Activities—(use google_search where helpful).
Recommend up to 2 options. Prioritize stated preferences; if options are close, prefer lower cost and less total travel time.
Clearly explain the trade-offs. If options are nearly identical, return one best option and say why.
For each option, return text-only bullets: Cost (USD), Total travel time (h), Preference-fit (0–1), Pros/Cons (cost, time, experience), and a brief day-by-day (give the full day-by-day only for the recommended option).
Defaults: prices in USD, time in hours, max 2 options. Ask at most 2 clarifying questions; if data is thin, return a degraded single option with a warning.
Avoid fake booking links; provide sensible estimates and caveats.
To my surprise, Google ADK is quite efficient when thinking about model or sub-agent allocation for a specific task. After Gemini finishes drafting code and dumping it into specific agent files, it injects the instructions into your agent and auto-adds the appropriate sub-agents and tools.
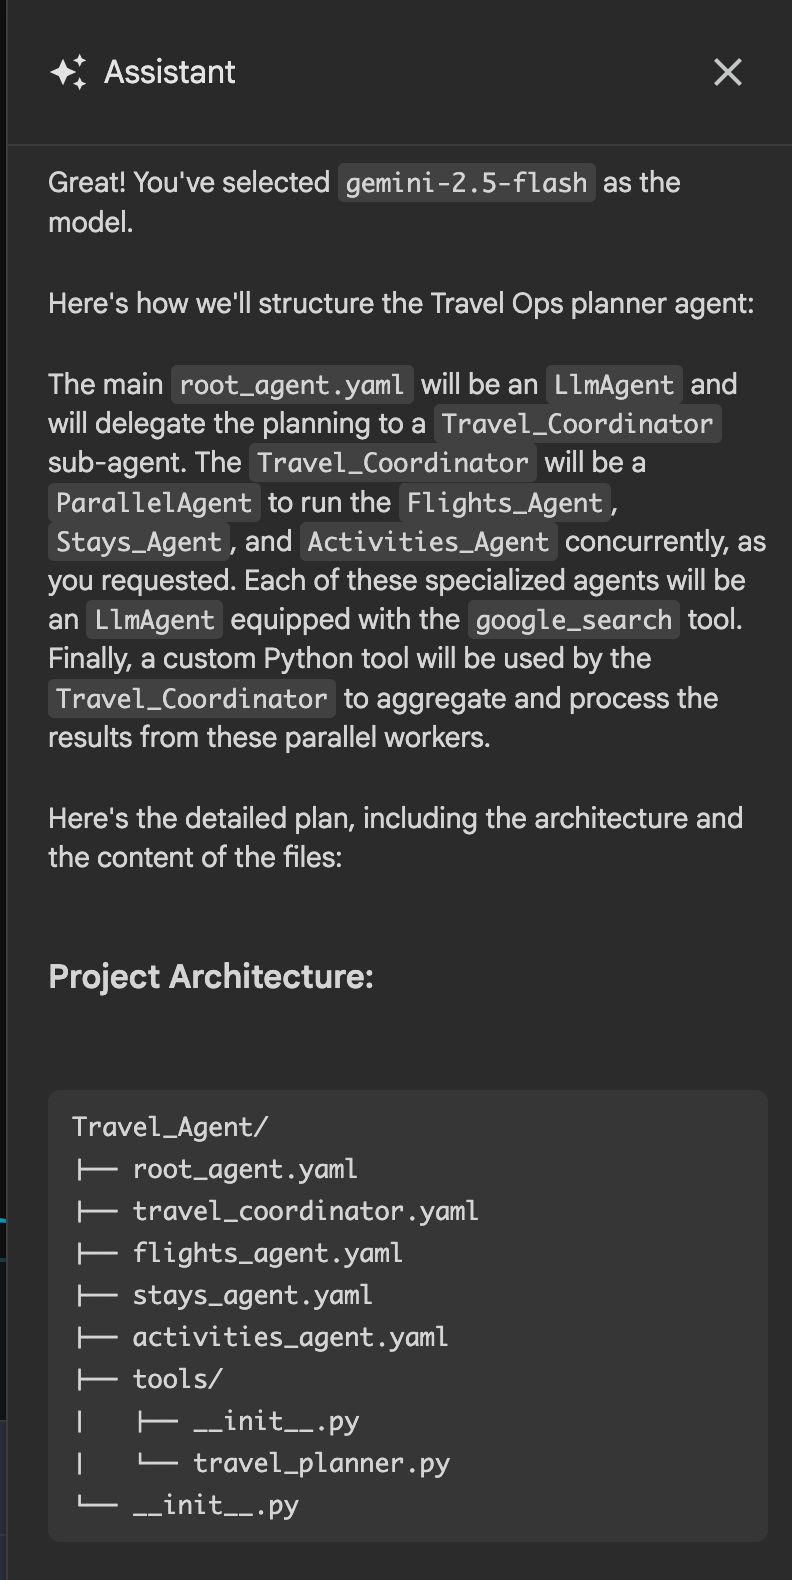
Here’s the end-to-end pipeline it generated from my prompt.
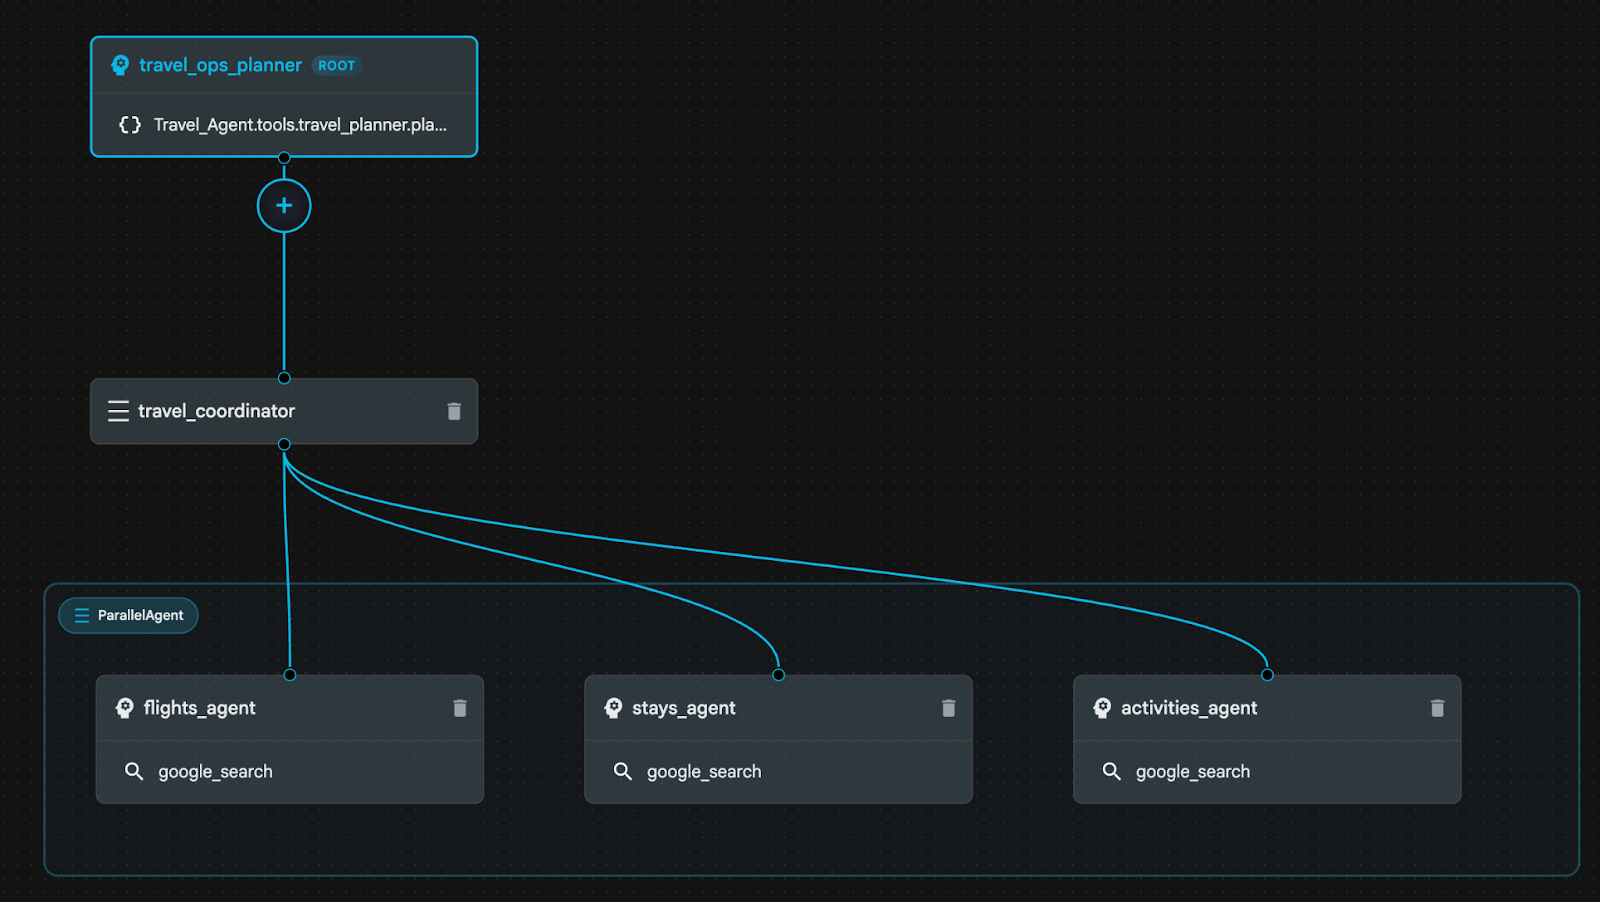
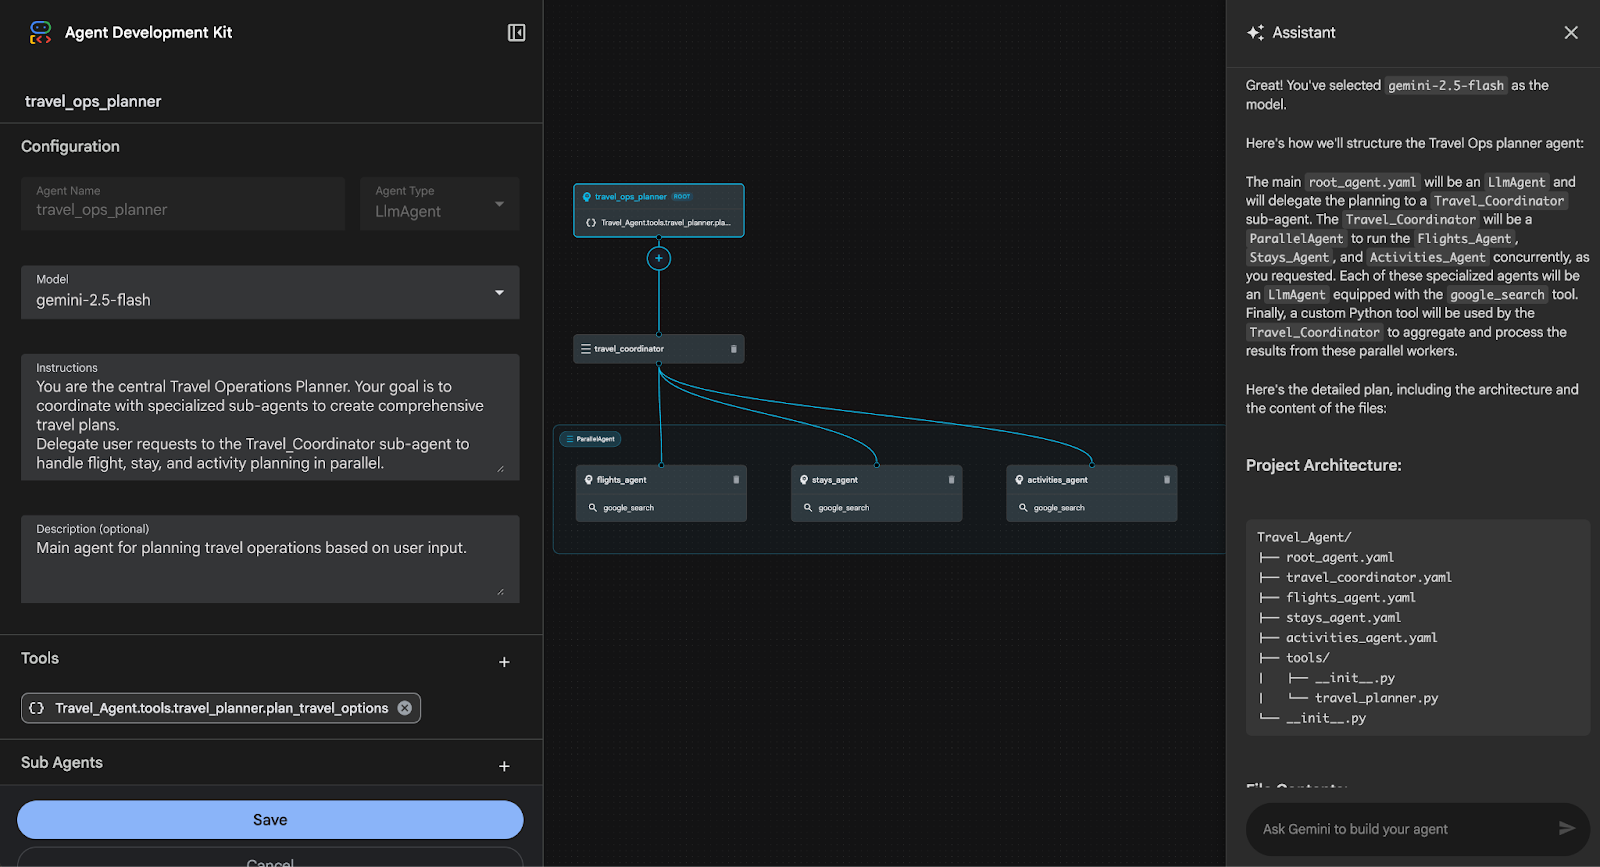
Here’s what the builder looks like after Gemini processes the prompt with instructions applied, tools wired up, sub-agents added, and the agent description filled in.
Finally, hit save, and your agent is ready. This will take you to the chat interface where I asked the agent a few travel questions.
Initially, I asked the agent:
I want to travel from New York to Dubai for New Year’s for a week long vacation. Help me plan my trip within a budget of $1000In the video below, you can see how the agent responded:
Here is what the agent returned:
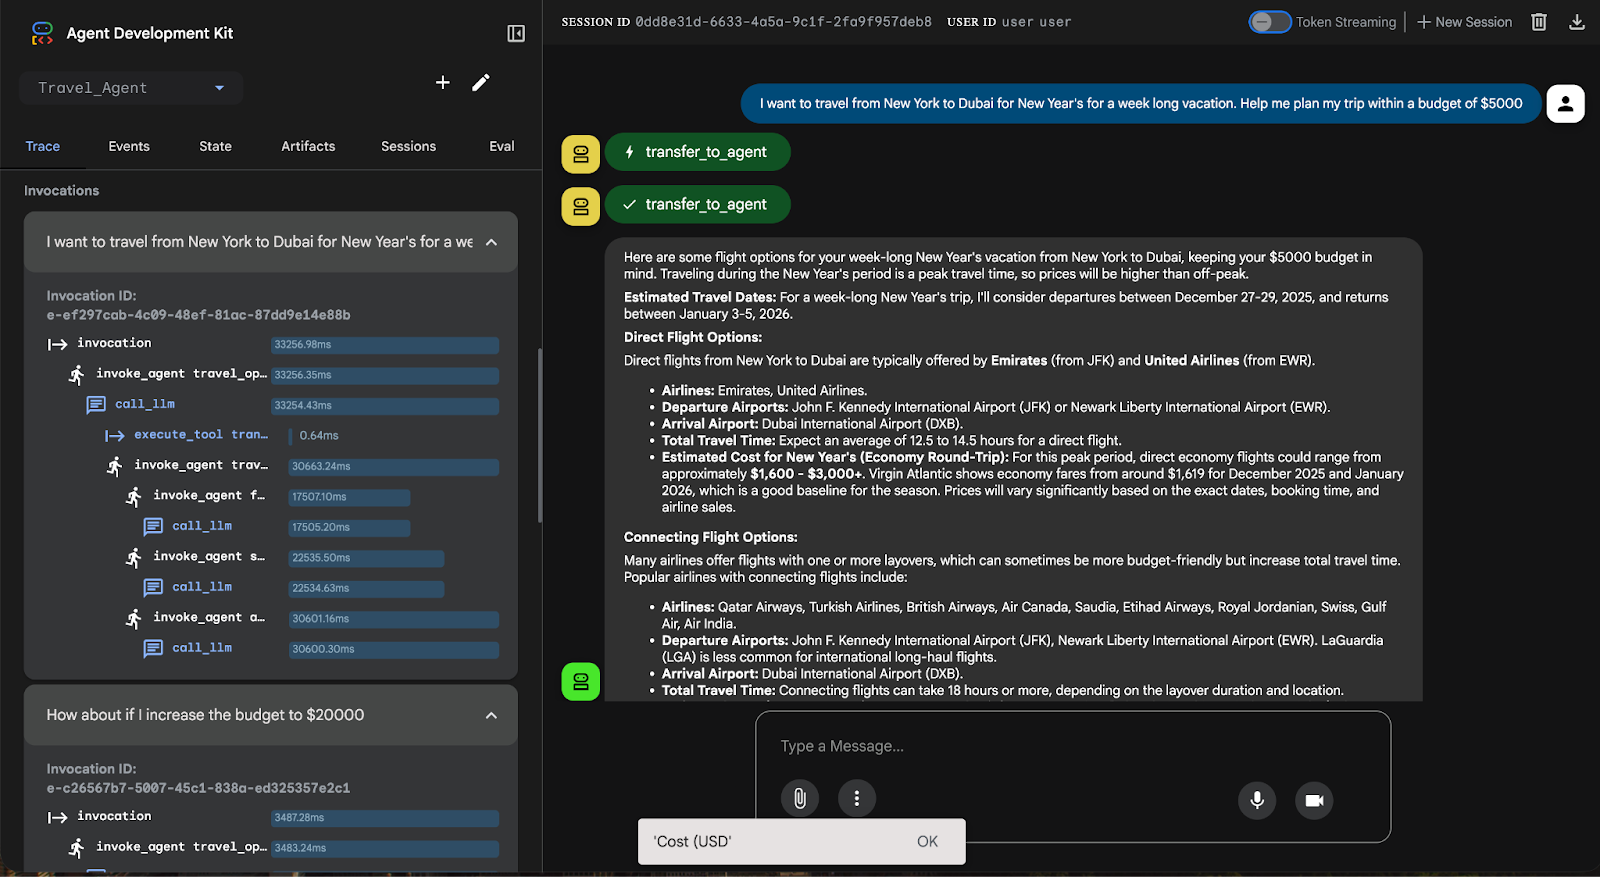
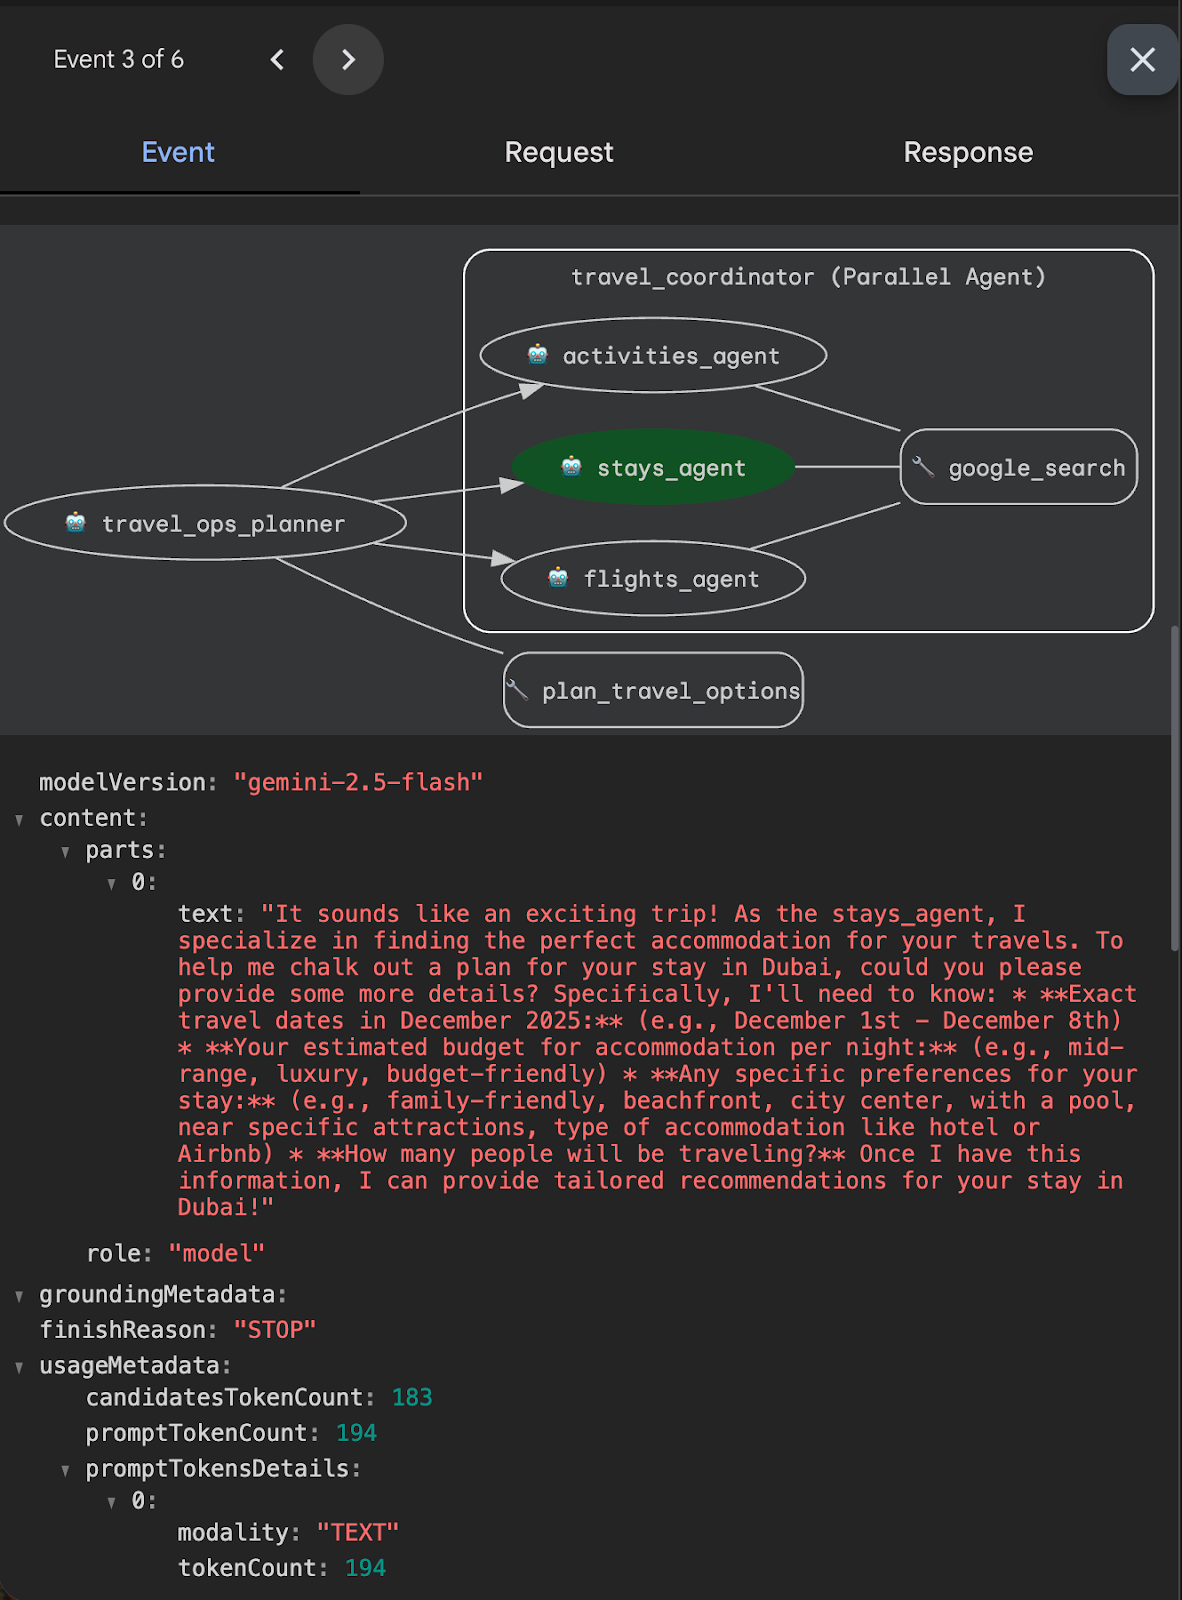
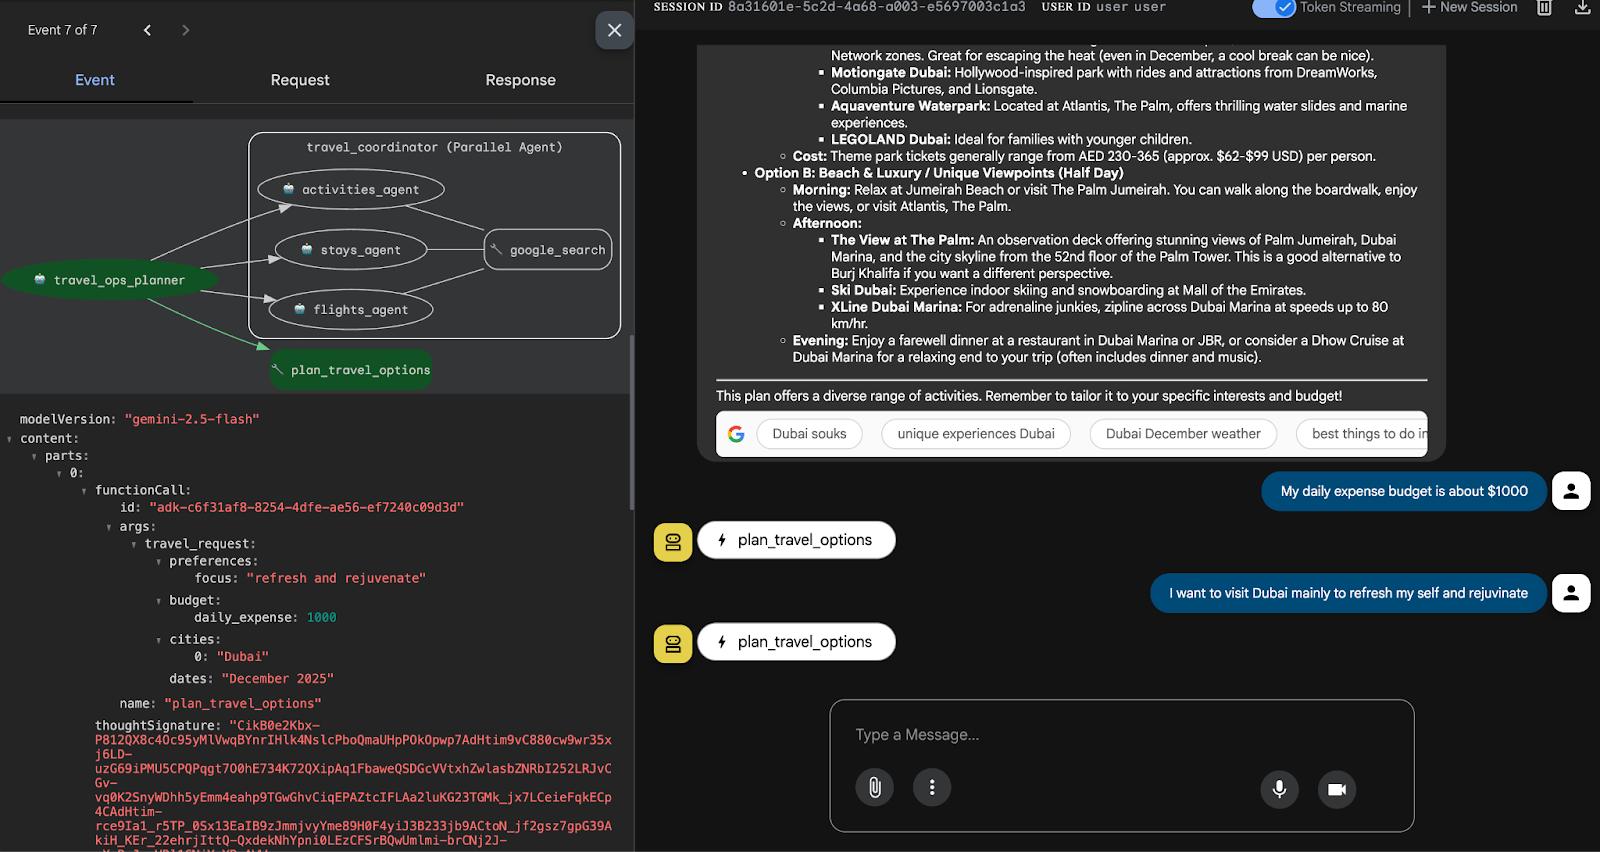
On the Trace panel, you can watch the orchestration:
travel_ops_planner (root) accepts your message and transfers control to the coordinator.travel_coordinator (Parallel Agent) calls out to three workers - namely, flights_agent, stays_agent, activities_agent.call_llm, which in this case is the Gemini default) and, when needed, the google_search tool (execute_tool), then returns structured snippets.Thus, with ADK, you get visible, inspectable control flow without writing the whole pipeline. If the answer feels off, you know which sub-agent to refine.
However, the setup was brittle after the first success. My next prompt triggered repeated errors. Inspecting the terminal showed the failure came from Gemini-generated tool code (a mismatched key in the formatter).
I tried the obvious loop, i.e., paste the stack trace back to Gemini and ask it to patch the file, but the assistant didn’t reliably overwrite the generated Python.
This led to a key takeaway: ADK’s builder is great for orchestration and prompts, but when it emits code, be prepared to open the file and edit it yourself (or regenerate the tool) rather than expecting in-chat hotfixes to apply cleanly.
Finally, if you need to abort the session, press Ctrl + C on your active terminal.
Google’s ADK Visual Agent Builder helps you quickly turn a plain description into a working multi-agent system.
In this tutorial, I walked you through how to use Google ADK Visual Agent Builder to build a Travel Planner that splits tasks into Flights, Stays, and Activities, combines the results, and reviews every step in the Trace view without writing all the wiring yourself.
The main benefits are fast iteration, clear workflow visibility, and built-in tools. The main caution is that automatically generated code can break, so you may need to open the files and fix small issues.
In short, the visual builder lets you focus on what the agent should do and how it should feel. Later, you can add reliability tests and real APIs.
If you’re looking for more hands-on practice, I recommend that you check out our Building AI Agents with Google ADK course.
Top DataCamp Courses
Programa
Curso
Curso
Tutorial
Aashi Dutt
Tutorial
Aashi Dutt
Tutorial
François Aubry
Tutorial
Aashi Dutt
Tutorial
Aashi Dutt
Tutorial
François Aubry