
Courses
Hiểu về Điện toán đám mây
2 giờ
235.6K
Your team has been deploying cloud resources for years through console clicks and shell scripts. Now you want to adopt Infrastructure as Code, but recreating everything from scratch seems overwhelming. I've been in this situation, and Terraform's import functionality is your solution to this challenge.
The risks of "ClickOps" and manual infrastructure management compound over time. Resources become undocumented, configurations drift from standards, and tribal knowledge replaces proper documentation. When team members leave, their infrastructure decisions leave with them.
This is why organizations adopt Infrastructure as Code (IaC). In this tutorial, I'll walk you through importing existing infrastructure into Terraform.
We'll compare the CLI-based import command with declarative import blocks introduced in Terraform 1.5, explore practical workflows for both approaches, and tackle common pitfalls that can turn a simple import into a production incident. By the end, you'll be confident in bringing your existing infrastructure under code management.
If you are new to IaC and cloud providers, consider taking one of our courses, such as AWS Concepts, Understanding Cloud Computing, or Understanding Microsoft Azure.
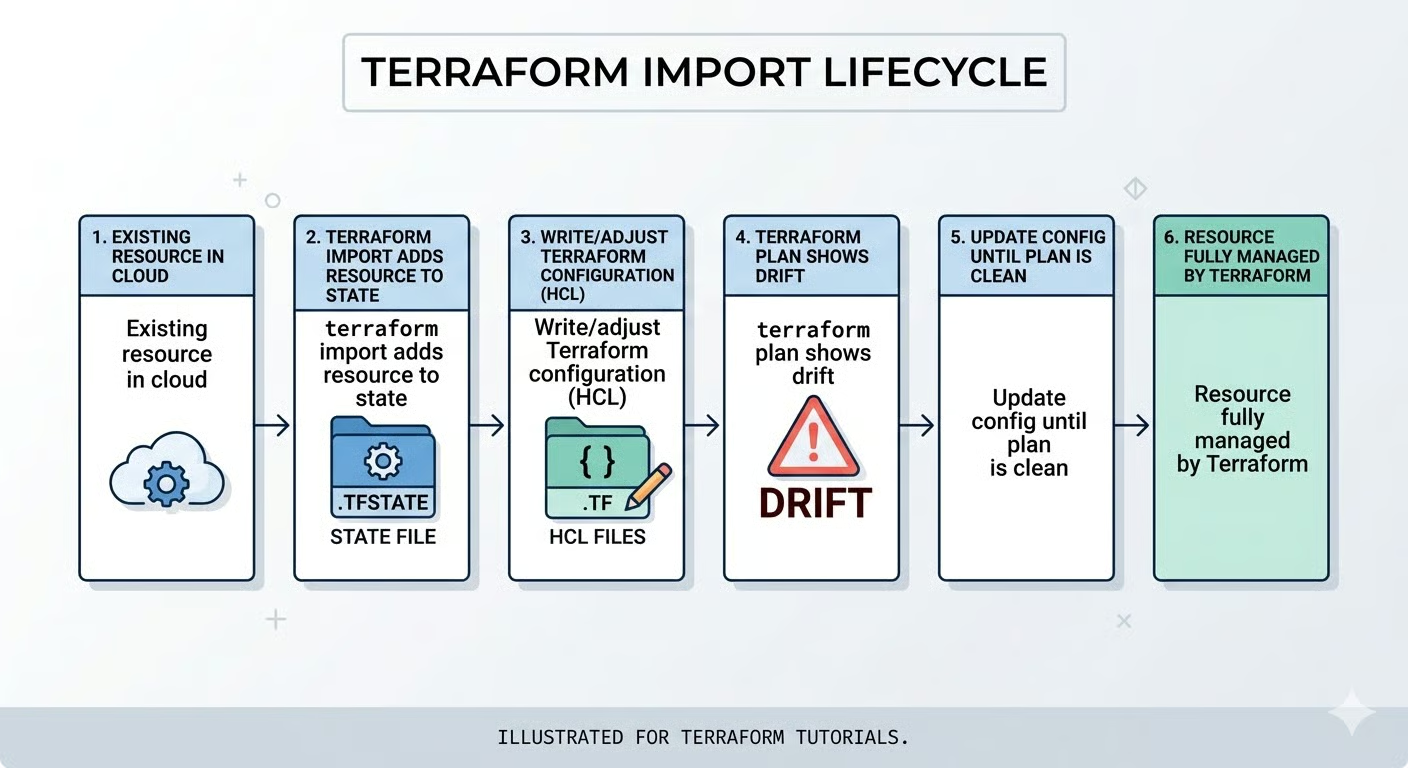
When you create infrastructure with Terraform from the start, everything flows smoothly. You write the configuration, run terraform plan, review the changes, and apply them. Terraform tracks everything in its state file, creating a perfect map between your code and your cloud resources.
But what happens when resources already exist outside Terraform's knowledge? Let's start by understanding exactly what import does and why it exists.
Terraform import maps existing real-world infrastructure to entries in Terraform's state file without creating new resources. Think of it as adoption: you're telling Terraform to start managing a resource that's already running.
This solves the "shadow IT" problem. Organizations accumulate infrastructure through various means: console deployments during outages, test resources that became permanent, or legacy systems predating IaC adoption. Import reconciles this reality with Infrastructure as Code principles.
Here's the crucial part: import is primarily a state operation. It doesn't automatically write configuration code unless you use generation features in Terraform 1.5+. You're responsible for ensuring your HCL configuration accurately reflects the imported resource.
Now that we understand what import does, let's explore when you should and shouldn't use it.
I recommend importing for three primary scenarios:
However, import isn't always the right choice. For temporary test resources or infrastructure with poor standardization, I often recommend a clean recreation instead.
Starting fresh lets you apply current best practices, implement proper naming conventions, and add security configurations that legacy resources might lack. The upfront effort of recreation often pays dividends in long-term maintainability.
It's crucial to distinguish import from Terraform data sources. Data sources let you reference read-only information from existing infrastructure without managing it. For example, you might use a data source to look up an existing VPC created by another team, then deploy your resources into it.
Import, by contrast, brings resources under full Terraform management, including the ability to modify or destroy them. Choose import when you need to manage a resource's full lifecycle, not just reference it.
Before you start importing, there are some fundamental constraints you need to understand.
Every imported resource requires a unique provider-specific identifier. For AWS, this might be i-0123456789abcdef0. For Azure, it's a full resource path like /subscriptions/{id}/resourceGroups/{rg}/providers/{provider}/{resource}. Getting this wrong is the top cause of import failures.
Import operations directly modify your state file, so backups are essential. If using versioned backends like S3, verify versioning is enabled. With local state, manually copy to terraform.tfstate.backup.
After import, you'll encounter "drift": the mismatch between the imported state and the local configuration. You'll update your HCL code iteratively until terraform plan shows zero pending changes.
Before importing anything, ensure you're set up for success. I've seen imports go wrong because teams skipped preparation steps.
Your first step is making sure your Terraform environment is properly configured.
Start by verifying your Terraform installation with terraform version. If you want access to declarative import blocks and automatic code generation, ensure you're on Terraform 1.5 or later. These features dramatically simplify the import process for complex resources.
Before importing, verify these prerequisites:
Provider credentials are active: For AWS, check that AWS_ACCESS_KEY_ID and AWS_SECRET_ACCESS_KEY are set, or your AWS CLI profile is configured. Test with aws sts get-caller-identity.
Correct workspace selected: Run terraform workspace show to verify you're not accidentally importing into the wrong environment.
State file is unlocked: Coordinate with team members and check CI/CD pipelines to ensure no concurrent operations.
Backend is accessible: If using remote state, verify connectivity to S3, Azure Storage, or Terraform Cloud.
A locked state file will cause your import to fail immediately with a lock acquisition error, so this coordination step is critical for team environments.
With your environment validated, the next critical step is finding the exact identifier for the resource you want to import.
Resource IDs vary significantly by provider and resource type, making this step trickier than it first appears. Here are examples of common providers:
|
Provider |
Resource Type |
ID Format |
Example |
|
AWS |
EC2 Instance |
Instance ID |
|
|
AWS |
S3 Bucket |
Bucket name |
|
|
AWS |
Security Group |
Group ID |
|
|
Azure |
Virtual Machine |
Full resource path |
|
|
GCP |
Compute Instance |
Project/zone/name |
|
For AWS resources, you can find IDs directly in the console. Navigate to the service (EC2, S3, etc.), select your resource, and copy the identifier from the details pane.
For Azure, use the Azure CLI to retrieve the full resource path:
az resource show --name myresource --resource-group mygroupThe output includes the complete resource ID you'll need for import.
Here's a common trap I've fallen into: attempting to import a resource from the wrong region or subscription. If your Terraform provider configuration points to us-east-1 but your EC2 instance lives in us-west-2, the import will fail with a "resource not found" error even though your instance ID is correct.
Always verify the scope matches your provider configuration before proceeding. Once you have the correct ID, you need to decide which import method to use.
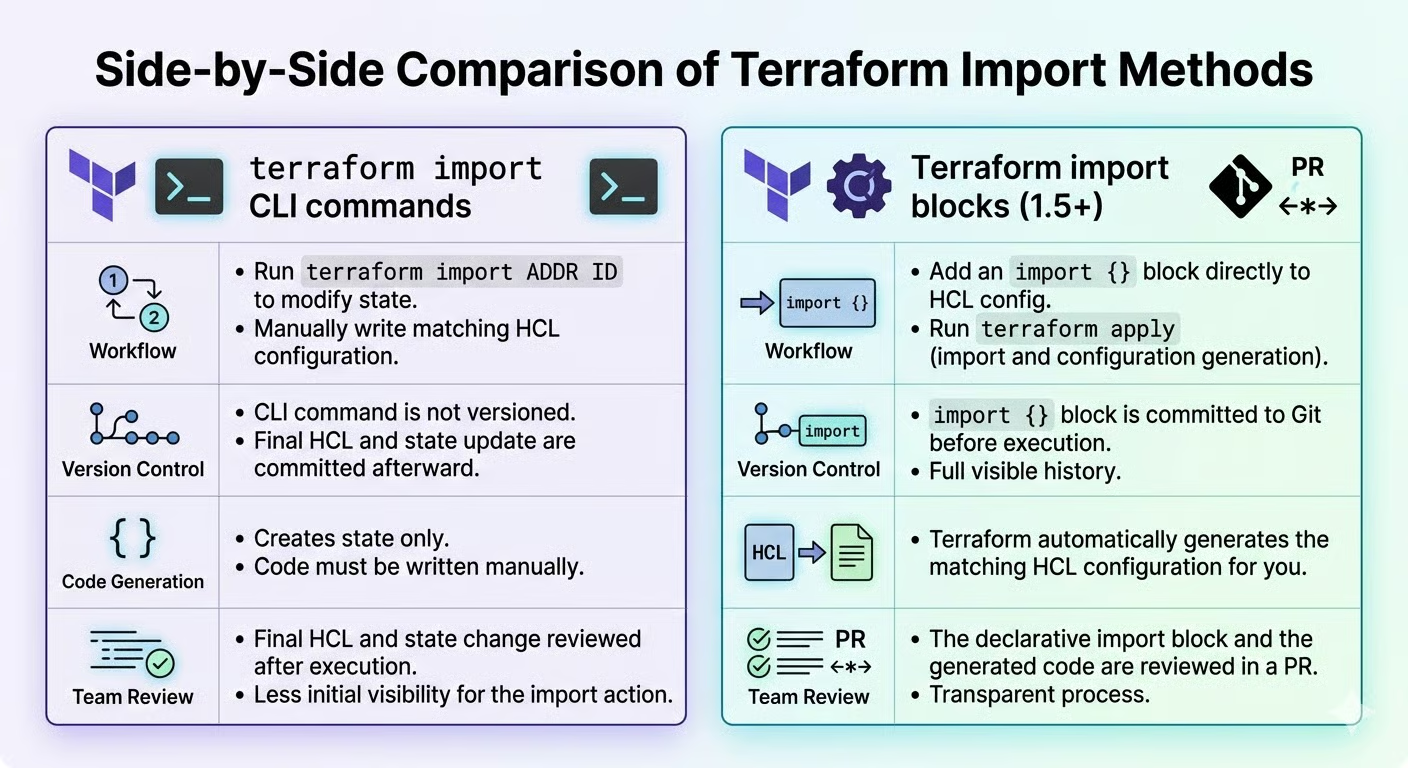
You have two paths: the terraform import CLI command or import blocks. Here's how they compare:
|
Feature |
CLI Command |
Import Blocks (1.5+) |
|
Terraform Version |
All versions |
1.5 or later |
|
Best For |
Quick, one-off imports |
Team workflows, bulk imports |
|
Version Control |
No record in code |
Fully documented in HCL |
|
Code Generation |
Not available |
Automatic with |
|
Code Review |
Difficult to review |
Standard PR process |
|
Reproducibility |
Manual re-execution |
Declarative, repeatable |
I recommend import blocks for teams requiring code reviews and reproducible plans, and the CLI for quick fixes on legacy versions.
Why does this matter? Import blocks treat infrastructure adoption as code, meaning your imports become part of your version-controlled workflow with the same rigor as any other infrastructure change. This reduces the risk of mistakes and creates an audit trail that's essential for compliance and team coordination.
Import blocks integrate seamlessly with your existing Git workflow, allowing teammates to review and approve imports just like any other infrastructure change. The CLI, while faster for individual tasks, leaves no audit trail and cannot be easily reproduced across environments.
With your strategy chosen, let's dive into each workflow in detail, starting with the traditional CLI approach.
Let me walk you through the traditional CLI-based import process. While declarative import blocks are becoming preferred, understanding the CLI method remains valuable for legacy Terraform versions and quick, one-off imports.
The first step in the CLI workflow is setting up your configuration file.
Before running terraform import, you must define a resource block in your configuration. This is a hard requirement: Terraform needs to know where to map the imported state. The block can be empty or partially filled.
Here's an example for importing an AWS S3 bucket:
resource "aws_s3_bucket" "legacy_data" {
  # Configuration to be filled after import
}
The resource type (aws_s3_bucket) must exactly match the type of infrastructure you're importing. The resource name (legacy_data) should follow your project's naming conventions. Use descriptive names like production_data_bucket rather than generic bucket1.
With your resource block in place, you're ready to run the import command.
Run terraform import <resource_address> <resource_id>. For our S3 bucket:
terraform import aws_s3_bucket.legacy_data my-existing-bucket-nameTerraform retrieves the bucket's current attributes from the provider API and records them in the state. You'll see:
aws_s3_bucket.legacy_data: Import complete!
Imported aws_s3_bucket
The state now contains the resource, but your configuration remains empty or incomplete.
This is where the real work begins, aligning your code with the imported state.
Run terraform plan to see differences between state and configuration. You'll see computed attributes (read-only values like timestamps) and explicit configuration requirements you need to declare.
Update your configuration incrementally using values from the plan output. If the plan proposes "replacing" the resource, stop. This indicates immutable argument mismatches, like region or availability zone. Adjust your configuration to match the existing resource's immutable attributes.
Now let's explore the modern approach introduced in Terraform 1.5. Import blocks transform import from an imperative command into a declarative configuration that lives alongside your infrastructure code.
The key advantage is reproducibility and team visibility. With CLI imports, there's no code record of what was imported. With import blocks, every import is documented, versioned, and reviewable through pull requests.
Let's start by creating the import block itself.
An import block has two components: to (target address) and id (resource identifier):
import {
  to = aws_instance.web_server
  id = "i-0123456789abcdef0"
}
This provides version control visibility. Teams can review import blocks in pull requests before execution. Place import blocks in imports.tf for easy cleanup after successful imports.
But here's where import blocks truly shine: Terraform can automatically generate the configuration code for you, eliminating the tedious guesswork of writing HCL from scratch.
Import blocks enable automatic configuration generation. Run terraform plan -generate-config-out=generated.tf to plan the import and write complete HCL code simultaneously.
The generated file contains every attribute with its current values. Review it, remove verbose defaults, and merge meaningful configuration into your codebase. This prevents common errors: misnamed attributes, incorrect types, and missing required fields. Especially for complex resources, this is valuable.
With your configuration ready, it's time to execute the import.
Finally, run terraform apply to execute the import and align the state with the configuration. Terraform will show you exactly what's being imported before making any changes to your state file.
After a successful application, remove the import blocks from your configuration. They've served their purpose, and keeping them would confuse future runs. Finally, run terraform plan one more time to verify zero pending changes, confirming that your configuration and state are perfectly synchronized.
The workflows we've covered so far work perfectly for simple, standalone resources. But production infrastructure is rarely that straightforward. Let's tackle the real-world complexity of modules, iteration, and dependencies.
Real-world infrastructure rarely consists of simple, standalone resources. Module-managed resources require special addressing syntax, which is our first challenge.
Module resources require full path addressing: module.<module_name>.<resource_type>.<resource_name>, which can look like this:
terraform import module.network.aws_vpc.main vpc-0abcdef123456789To find the correct address, use terraform state list after a normal apply. This shows you exactly how Terraform references module resources. Getting the address wrong creates duplicate state entries, which Terraform will then try to create on the next apply.
Additionally, when importing into module instances with count or for_each, you'll need to include the instance identifier in quotes:
terraform import 'module.network[0].aws_vpc.main' vpc-0abcdef123456789Beyond module addressing, resources that use the count or for_each meta-arguments present their own set of challenges.
When your Terraform configuration uses count to create multiple instances of a resource, you'll need array syntax for import. For example, if your configuration looks like this:
resource "aws_instance" "server" {
  count         = 3
  ami           = "ami-0c55b159cbfafe1f0"
  instance_type = "t3.micro"
}
You'd import each instance individually using its index:
terraform import 'aws_instance.server[0]' i-0123456789abcdef0
terraform import 'aws_instance.server[1]' i-1234567890abcdef1
terraform import 'aws_instance.server[2]' i-2345678901abcdef2
On the other hand, resources that use for_each in their configuration require string keys. Consider this example:
resource "aws_instance" "server" {
  for_each      = toset(["web", "api", "worker"])
  ami           = "ami-0c55b159cbfafe1f0"
  instance_type = "t3.micro"
}
Here, you'd import using the key names:
terraform import 'aws_instance.server["web"]' i-0123456789abcdef0
terraform import 'aws_instance.server["api"]' i-1234567890abcdef1
terraform import 'aws_instance.server["worker"]' i-2345678901abcdef2
If you encounter "index out of range" errors, it means your count value doesn't match the number of resources you're importing. The fix is straightforward: set the correct count or define appropriate for_each keys in your configuration before running the import.
Furthermore, you'll need to think about how resources relate to each other, especially when dealing with complex architectures.
Some cloud resources don't import as single entities. Instead, they import as multiple Terraform resources: Common examples include:
In these cases, always import "parent" resources first. For instance, import VPCs before subnets, IAM roles before policy attachments, and security groups before individual rules. This establishes the correct dependency chain in your state file.
After import, review your configuration and explicitly declare dependencies using depends_on where the provider doesn't automatically detect them. This ensures that future apply operations execute in the correct order, preventing errors like Terraform trying to create a subnet before its VPC exists.
With your resources successfully imported and properly configured, the next phase focuses on long-term maintenance and organization.
Importing resources is just the beginning. Long-term success requires proper state management and occasional refactoring.
Security should be your first concern when importing production resources.
Here's something that catches many teams off guard: importing databases or encryption keys pulls sensitive values, such as passwords, private keys, and connection strings, into your state file as plain text. This is a critical security consideration that you must address immediately.
The solution is to use encrypted remote backends. For AWS, this means S3 with the encrypt = true option and optionally KMS encryption enabled. For Azure, use Azure Storage with encryption at rest. If you're using HCP Terraform / Terraform Cloud, state is encrypted at rest and in transit by default, but you'll still want to verify access controls.
Furthermore, after importing production resources with sensitive data, take two additional steps: verify that state storage access controls are properly configured, and enable audit logging to track who accesses the state and when. These measures create a security audit trail that's invaluable for compliance.
As your infrastructure develops, you'll want to reorganize and rename imported resources.
You have two options for renaming resources: terraform state mv (imperative) or moved blocks (declarative). I prefer moved blocks because they document the change in your version control history:
moved {
  from = aws_instance.old_name
  to   = aws_instance.new_name
}
Beyond renaming, you should also replace hard-coded IDs with resource references. Instead of vpc_id = "vpc-123456", use vpc_id = aws_vpc.main.id. This approach builds proper dependency graphs that Terraform can use to determine the correct order of operations.
The final piece of state management is preventing future drift.
After import, the most important policy to establish is this: all changes go through Terraform, not the cloud console. This is the only way to prevent drift between your code and reality.
However, some attributes drift constantly but don't actually need management. For these, use the ignore_changes lifecycle argument:
lifecycle {
  ignore_changes = [tags["LastModified"]]
}
Finally, establish a "clean plan" standard where terraform plan shows only intentional changes. Make it a habit to run plans regularly, even when you're not deploying, to catch drift early before it becomes a major problem.
Despite careful preparation, import operations can fail. Let's diagnose and resolve the most common issues you'll encounter.
Address and ID mismatches are the most frequent issues.
Here are the most common import errors and their solutions:
Cause: Duplicate state entries. The resource is already tracked under a different name
Fix: Run terraform state list to find duplicates, then use terraform state rm to remove the old entry before re-importing
Once you've successfully imported resources, watch out for plans that want to replace them.
If terraform plan shows "forces replacement" after import, you need to identify which argument is causing the recreation. Common causes are immutable arguments like EC2 AMI IDs or availability zones. These can't be changed after resource creation.
The fix is straightforward: align your configuration to match reality. Copy the actual values from the plan output into your configuration file.
And here's a critical safety rule: never confirm or apply if it proposes destroying critical resources. That's your warning sign that something is wrong.
Sometimes the issue isn't with your configuration at all, but with how your providers are configured.
"Provider configuration depends on non-var" errors occur when your provider blocks the use of computed values during import. Terraform needs static provider configuration to locate the resource for import.
The workaround is temporary hard-coding: replace dynamic provider settings with literal values, run the import, then restore your dynamic configuration afterward. Alternatively, you can use environment variables for provider authentication, which Terraform can resolve during the import process.
If your resource ID seems correct but the import still fails, check the provider documentation's "Import" section for exact ID format requirements. Some resources use compound IDs with slashes or colons as separators, and getting the format exactly right is essential.
You've learned to bring existing infrastructure under Terraform management using both CLI commands and import blocks. Before every import, follow this safety checklist:
However, import doesn't end at terraform apply. The real work begins after import: establishing drift prevention policies, refactoring imported resources for consistency with your standards, and educating your team about managing infrastructure exclusively through code. This cultural shift is just as important as the technical implementation.
For your next step, I recommend exploring Terraform state manipulation with terraform state mv and terraform state rm. These commands complement import by helping you reorganize and refactor your state file as your infrastructure develops.
I also recommend checking out our guide on using Terraform with Docker, and preparing for your next interview with our top Terraform interview questions.
Cloud Courses
Courses
Courses
Courses
blogs
Marie Fayard
12 phút
Tutorials
Marie Fayard
Tutorials
Benito Martin
Tutorials
Karen Zhang
Tutorials
Benito Martin
Tutorials
Kenny Ang