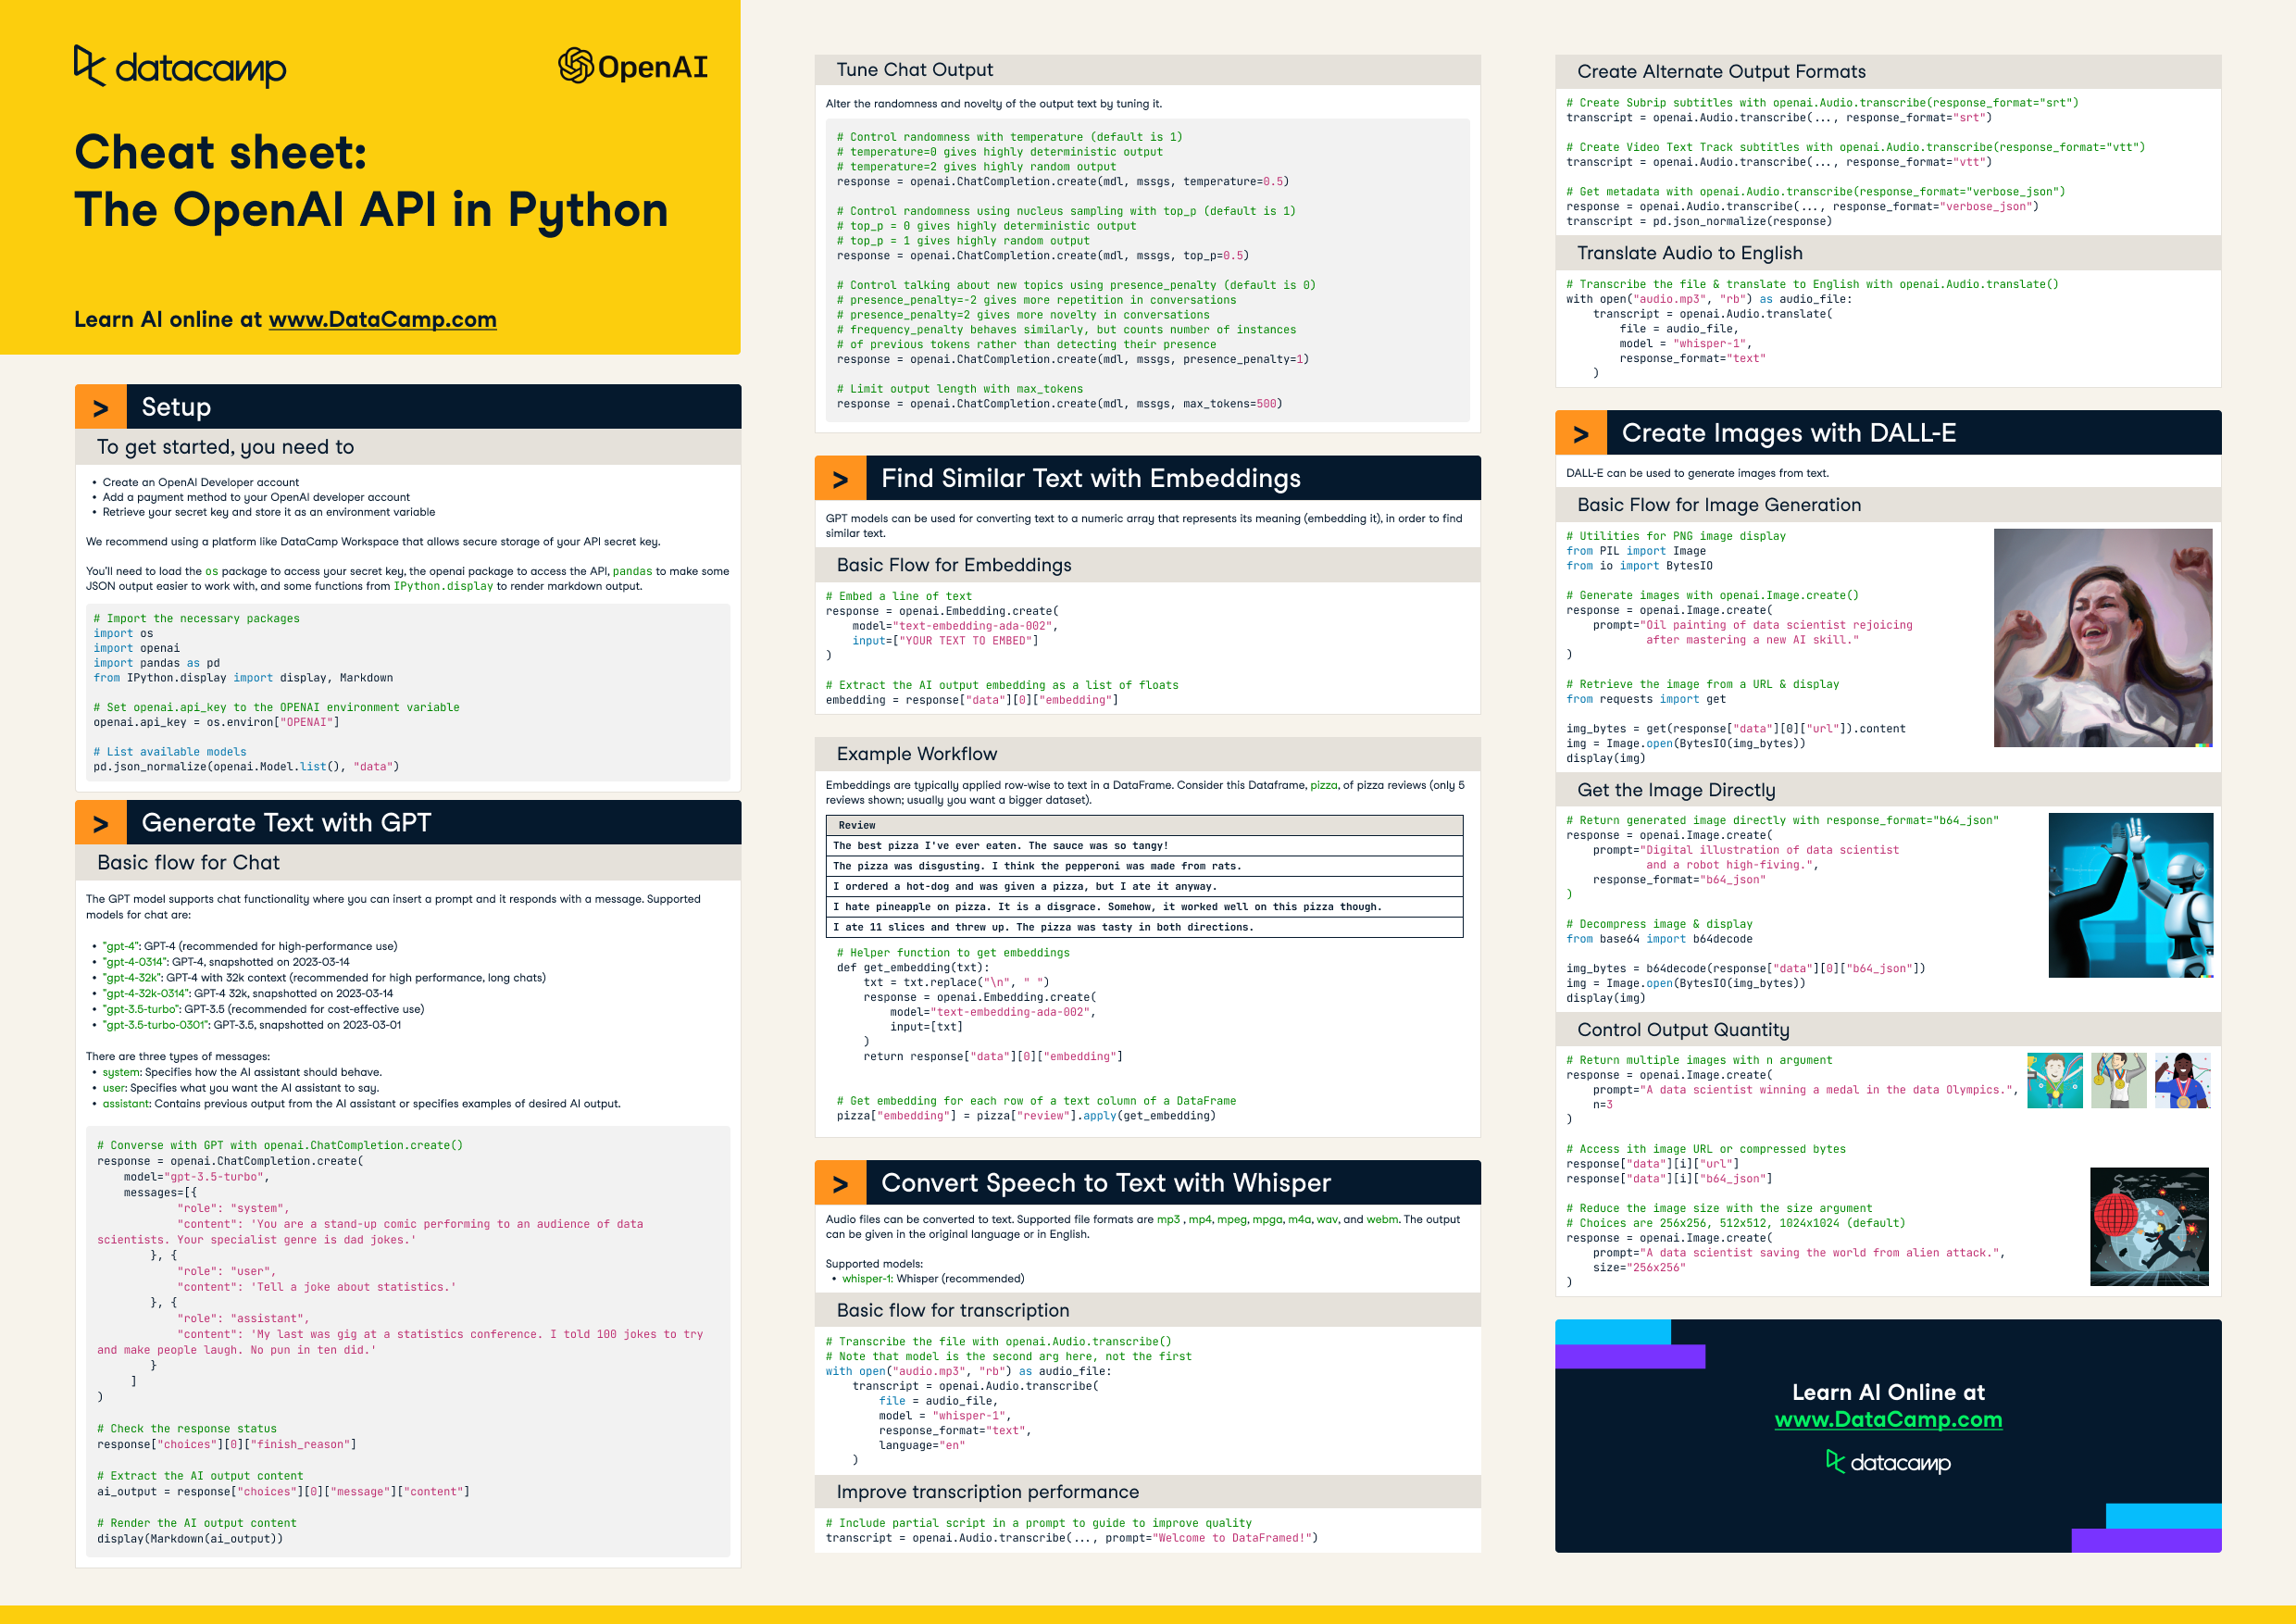
ChatGPT and large language models have taken the world by storm. In this cheat sheet, learn the basics on how to leverage one of the most powerful AI APIs out there, then OpenAI API.

Have this cheat sheet at your fingertips
Download PDFSetup
To get started, you need to
- Create an OpenAI Developer account
- Add a payment method to your OpenAI developer account
- Retrieve your secret key and store it as an environment variable
We recommend using a platform like DataCamp Workspace that allows secure storage of your API secret key.
You'll need to load the os package to access your secret key, the openai package to access the API, pandas to make some JSON output easier to work with, and some functions from IPython.display to render markdown output.
# Import the necessary packages
import os
import openai
import pandas as pd
from IPython.display import display, Markdown
# Set openai.api_key to the OPENAI environment variable
openai.api_key = os.environ["OPENAI"]
# List available models
pd.json_normalize(openai.Model.list(), "data")
Text Generation with GPT
Basic flow for Chat
The GPT model supports chat functionality where you can insert a prompt and it responds with a message. Supported models for chat are:
"gpt-4": GPT-4 (recommended for high-performance use)"gpt-4-0314": GPT-4, snapshotted on 2023-03-14"gpt-4-32k": GPT-4 with 32k context (recommended for high performance, long chats)"gpt-4-32k-0314": GPT-4 32k, snapshotted on 2023-03-14"gpt-3.5-turbo": GPT-3.5 (recommended for cost-effective use)"gpt-3.5-turbo-0301": GPT-3.5, snapshotted on 2023-03-01
There are three types of messages:
system: Specifies how the AI assistant should behave.user: Specifies what you want the AI assistant to say.assistant: Contains previous output from the AI assistant or specifies examples of desired AI output.
# Converse with GPT with openai.ChatCompletion.create()
response = openai.ChatCompletion.create(
    model="gpt-3.5-turbo",
    messages=[{
            "role": "system",
            "content": 'You are a stand-up comic performing to an audience of data    scientists. Your specialist genre is dad jokes.'
        }, {
            "role": "user",
            "content": 'Tell a joke about statistics.'
        }, {
            "role": "assistant",
            "content": 'My last was gig at a statistics conference. I told 100 jokes to try       and make people laugh. No pun in ten did.'
        }
     ]
)

# Check the response status
response["choices"][0]["finish_reason"]

# Extract the AI output content
ai_output = response["choices"][0]["message"]["content"]

# Render the AI output content
display(Markdown(ai_output))
Tune Chat Output
Alter the randomness and novelty of the output text by tuning it.
# Control randomness with temperature (default is 1)
# temperature=0 gives highly deterministic output
# temperature=2 gives highly random output
response = openai.ChatCompletion.create(mdl, mssgs, temperature=0.5)

# Control randomness using nucleus sampling with top_p (default is 1)
# top_p = 0 gives highly deterministic output
# top_p = 1 gives highly random output
response = openai.ChatCompletion.create(mdl, mssgs, top_p=0.5)

# Control talking about new topics using presence_penalty (default is 0)
# presence_penalty=-2 gives more repetition in conversations
# presence_penalty=2 gives more novelty in conversations
# frequency_penalty behaves similarly, but counts number of instances
# of previous tokens rather than detecting their presence
response = openai.ChatCompletion.create(mdl, mssgs, presence_penalty=1)

# Limit output length with max_tokens
response = openai.ChatCompletion.create(mdl, mssgs, max_tokens=500)
Find Similar Text with Embeddings
GPT models can be used for converting text to a numeric array that represents its meaning (embedding it), in order to find similar text.
Basic Flow for Embeddings
Supported models:
"text-embedding-ada-002": GPT-3 Ada 2nd generation (recommended)"text-embedding-ada-001","text-embedding-babbage-001","text-embedding-curie-001","text-embedding-davinci-001": Legacy models
# Embed a line of text
response = openai.Embedding.create(
    model="text-embedding-ada-002",
    input=["YOUR TEXT TO EMBED"]
)

# Extract the AI output embedding as a list of floats
embedding = response["data"][0]["embedding"]
Example Workflow
Embeddings are typically applied row-wise to text in a DataFrame. Consider this DataFrame, pizza, of pizza reviews (only 5 reviews shown; usually you want a bigger dataset).
|
review |
|
The best pizza I've ever eaten. The sauce was so tangy! |
|
The pizza was disgusting. I think the pepperoni was made from rats. |
|
I ordered a hot-dog and was given a pizza, but I ate it anyway. |
|
I hate pineapple on pizza. It is a disgrace. Somehow, it worked well on this pizza though. |
|
I ate 11 slices and threw up. The pizza was tasty in both directions. |
# Helper function to get embeddings
def get_embedding(txt):
    txt = txt.replace("\n", " ")
    response = openai.Embedding.create(
        model="text-embedding-ada-002",
        input=[txt]
)
return response["data"][0]["embedding"]


# Get embedding for each row of a text column of a DataFrame
pizza["embedding"] = pizza["review"].apply(get_embedding)
Convert Speech to Text with Whisper
Audio files can be converted to text. Supported file formats are mp3 , mp4, mpeg, mpga, m4a, wav, and webm. The output can be given in the original language or in English.
Supported models:
whisper-1: Whisper (recommended)
Basic flow for transcription
# Transcribe the file with openai.Audio.transcribe()
# Note that model is the second arg here, not the first
with open("audio.mp3", "rb") as audio_file:
    transcript = openai.Audio.transcribe(
        file = audio_file,
        model = "whisper-1",
        response_format="text",
        language="en"
)
Improve transcription performance
# Include partial script in a prompt to guide to improve quality
transcript = openai.Audio.transcribe(..., prompt="Welcome to DataFramed!")
Create alternate output formats
# Create Subrip subtitles with openai.Audio.transcribe(response_format="srt")
transcript = openai.Audio.transcribe(..., response_format="srt")

# Create Video Text Track subtitles with openai.Audio.transcribe(response_format="vtt")
transcript = openai.Audio.transcribe(..., response_format="vtt")

# Get metadata with openai.Audio.transcribe(response_format="verbose_json")
response = openai.Audio.transcribe(..., response_format="verbose_json")
transcript = pd.json_normalize(response)
Translate Audio to English
# Transcribe the file & translate to English with openai.Audio.translate()
with open("audio.mp3", "rb") as audio_file:
    transcript = openai.Audio.translate(
        file = audio_file,
        model = "whisper-1",
        response_format="text"
)
Create Images with DALL-E
DALL-E can be used to generate images from text.
Basic Flow for Image Generation
# Utilities for PNG image display
from PIL import Image
from io import BytesIO

# Generate images with openai.Image.create()
response = openai.Image.create(
    prompt="A data scientist rejoicing after mastering a new AI skill."
)

# Retrieve the image from a URL & display
from requests import get

img_bytes = get(response["data"][0]["url"]).content
img = Image.open(BytesIO(img_bytes))
display(img)
Get the Image Directly
# Return generated image directly with response_format="b64_json"
response = openai.Image.create(
    prompt="A data scientist and a robot high-fiving.",
    response_format="b64_json"
)

# Decompress image & display
from base64 import b64decode

img_bytes = b64decode(response["data"][0]["b64_json"])
img = Image.open(BytesIO(img_bytes))
display(img)
Control Output Quantity
# Return multiple images with n argument
response = openai.Image.create(
    prompt="A data scientist winning a medal in the data Olympics.",
    n=3
)

# Access ith image URL or compressed bytes
response["data"][i]["url"]
response["data"][i]["b64_json"]

# Reduce the image size with the size argument
# Choices are 256x256, 512x512, 1024x1024 (default)
response = openai.Image.create(
    prompt="A data scientist saving the world from alien attack.",
    size="256x256"
)


