


programa
Fundamentos de Git
7 h
git stash is a Git command that temporarily shelves your uncommitted changes so you can return to a clean working directory, without creating a Git commit. This makes it easy to switch branches or handle urgent work without losing progress.
Stashes are stored in a last-in, first-out (LIFO) stack. The most recent stash is always stash@{0}, followed by stash@{1}, and so on.
By default, git stash saves modified tracked files and staged changes (from the index). However, it does not include new untracked files and ignored files like those in .gitignore.
In this section, I’ll walk you through three common ways to stash changes. We’ll use this consistent scenario: assume you’re working on a data pipeline project with data_pipeline.py, config.yaml, and tests/test_pipeline.py files.
Since git stash saves modified or staged changes, run git status to check the status of the files in your working directory. After running git stash, both staged and unstaged tracked changes are saved, leaving you with a clean working directory.
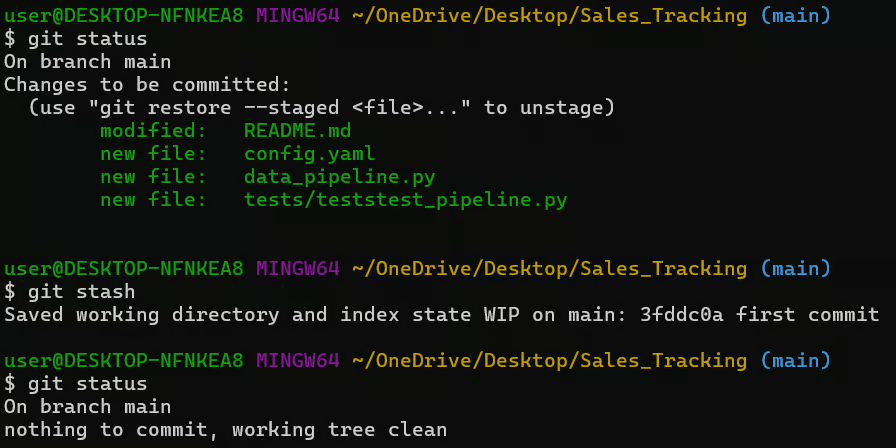
By default, git stash ignores files that have never been added to the repository. If you’ve created a new test file, a standard stash will leave it sitting in your directory, which can cause issues when switching branches.

If you run git stash, that file will remain. To include it, use -u or --include-untracked command:
git stash -u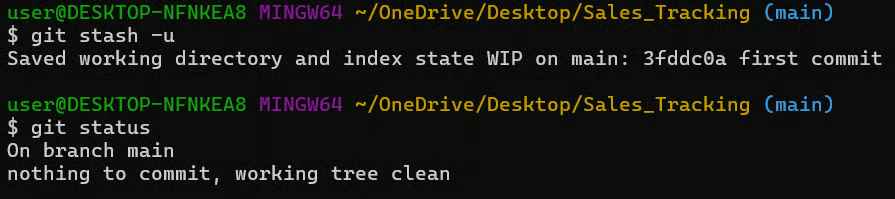
To include every single file, including those explicitly ignored by your .gitignore, you can use git stash --all or -a. However, you should be careful, as this can sweep up files like logs or build artifacts unintentionally.
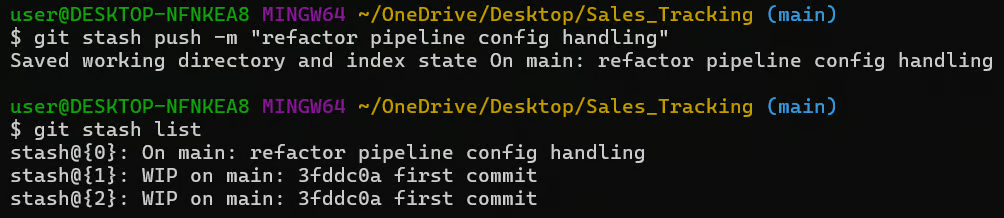
When using git stash, default messages like WIP on main will become confusing if you have multiple stashes. To avoid this issue, always add a descriptive message when you want to push the stashes.
git stash push -m "refactor pipeline config handling."You can use the git stash list command to view and compare the stash list. Notice the difference between the named stash and the default stashes.
Using clear messages makes it much easier to identify the right stash later, especially when juggling multiple tasks or collaborating with a team.
I recommend trying out our GitHub Foundations and Git Fundamentals skill tracks to learn version control with Git from basics to advanced workflows, including tracking changes, managing repositories, and collaborating efficiently.
Before blindly applying a stash, it’s important to verify what’s inside. This step is often skipped, but it helps prevent confusion or accidental overwrites.
Use the command below to see your stash stack:
git stash list
You should now know that stashes follow a LIFO (last-in, first-out) order. The most recent stash is always stash@{0}, and each new stash pushes older ones further down the stack.
To get a quick summary of changes in a stash, you can use the show command on a specific stash. For example, the command below shows the changes made on the latest stash:
git stash show stash@{0}
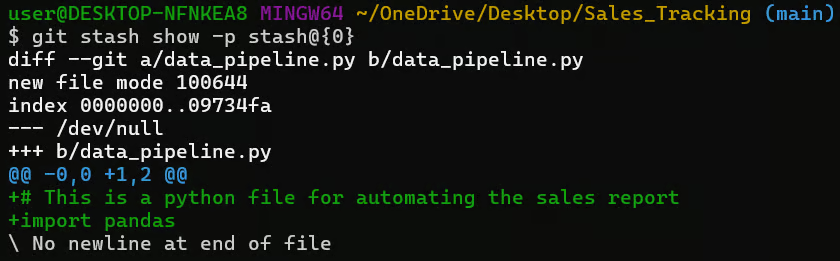
To see the actual code changes (the full diff), use the command below to display all line-by-line changes stored in that stash.
git stash show -p stash@{0}
As a best practice, always inspect a stash before applying it, especially if it’s a few days old or you’re not sure what it contains.
Once you’ve saved your work with git stash, you’ll need a way to bring it back. There are two main methods for restoring stashes, including how to target a specific stash by its index.
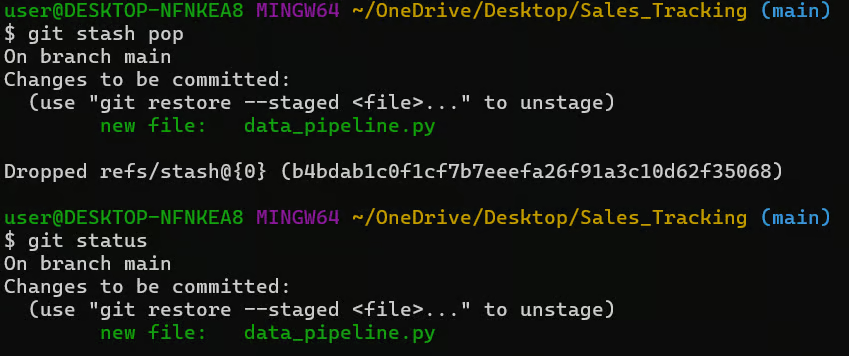
This is the most common way to restore a stash. It takes the top stash (stash@{0}), applies the changes to your current branch, and then deletes that stash from the stack.
git stash pop
After running pop, your changes are restored, and the stash is removed. Therefore, use pop when you are certain you are done with that saved state and want to keep your stash list tidy.
For a deeper understanding of the pop command, I recommend checking our Git Stash Pop tutorial to learn how to save uncommitted work when switching branches in your repo.
If you want to restore changes but keep the stash for reuse, use the apply command as follows:
git stash apply stash@{1}
Notice that referencing a stash by index stash@{1} targets the specific stash for restore. This method is useful when you want to apply the same changes across multiple branches, such as a shared config tweak that needs to go to both main and staging.
You can use git stash list to confirm if the stash is still there after using the apply command.
In real-world projects, your changes are often intermingled. For such scenarios, you may want to stash only part of your work while keeping the rest available. Git provides two methods for fine-grained control.
If you know exactly which files need to be sidelined, you can stash only selected files by specifying their paths:
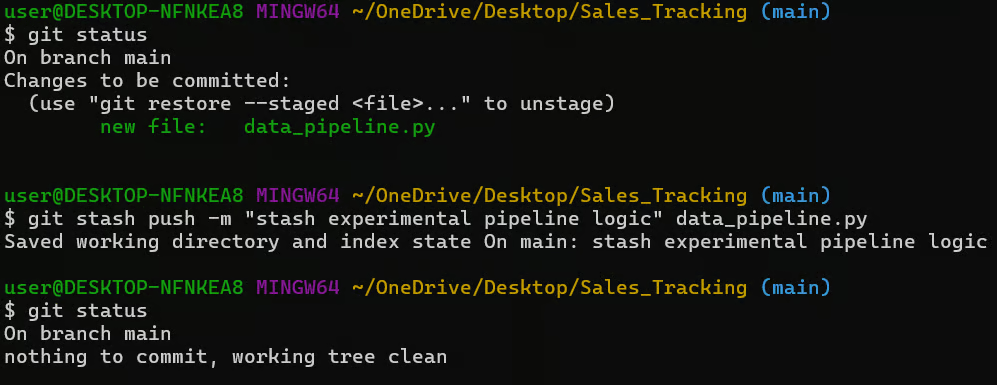
For example, the command below stashes only the data_pipeline.py file. This is useful when you want to pause work on an experimental feature while keeping a bug fix staged and ready to commit.
git stash push -m "stash experimental pipeline logic" data_pipeline.pyTo check if your command executed successfully, use git status to show before and after of your repo.
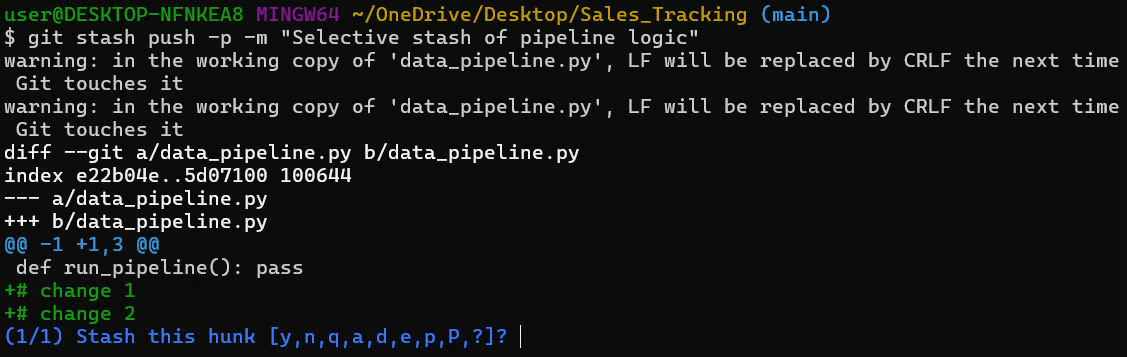
Sometimes, you may have the “good” code and the “WIP” code in the same file. In this case, use the -p or --patch flag to trigger an interactive session. This lets you choose specific chunks (“hunks”) of changes within a file.
git stash push -p -m "Selective stash of pipeline logic"
You will see “Stash this hunk” output with these options:
y: Yes, stash this hunk
n: No, skip this hunk
q: Quit; do not stash this hunk or any remaining ones.
a: All; stash this hunk and all subsequent hunks in the file.
d: Delete; do not stash this hunk or any subsequent hunks in the file.
?: help
You should note that this workflow is very similar to git add -p. It’s useful when changes within the same file are unrelated and need to be handled separately.
Stashes are meant to be short-lived. If you let them pile up, it will be harder to find the right one later, and it increases the risk of conflicts when you finally apply them.
To remove a single stash, use git stash drop with its index. For example, the command below drops the 4th stash in the list.
git stash drop stash@{3}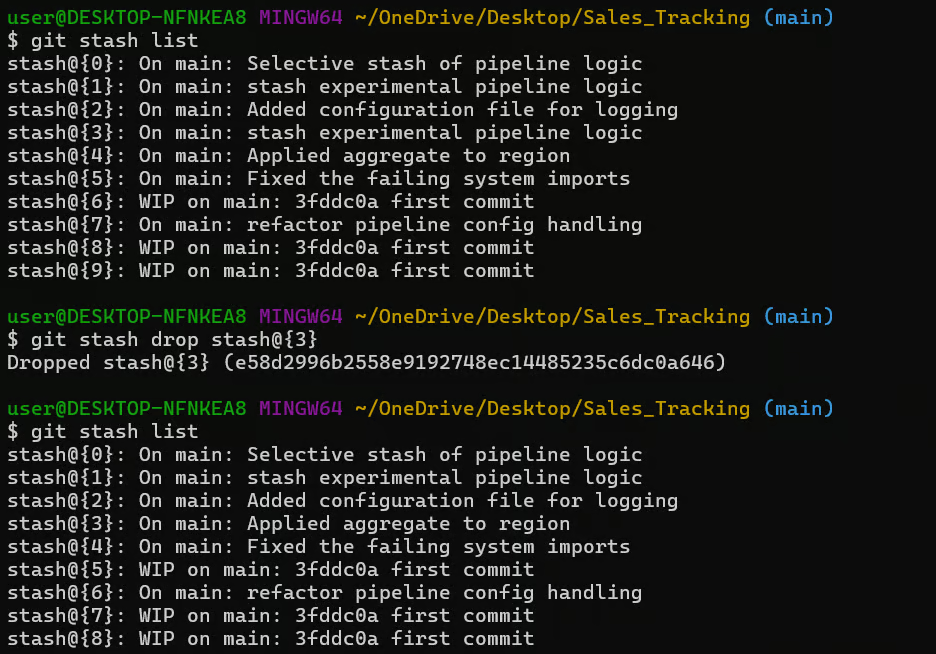
From the above example, you can see the stash list is reduced, and the remaining stashes are reindexed after the drop.
To remove all the stashes at once, use:
git stash clearThis command produces no output on success, and you can verify by running git stash list.
I recommend you take extra caution when using git stash clear since this action is permanent and there’s no built-in undo. Only run this when you’re sure you no longer need any stashed work.
If your current branch has diverged significantly since you created the stash, applying it may lead to merge conflicts. In that case, you can create a new branch directly from the stash:
git stash branch pipeline-fix stash@{1}
The above command does the following:
I recommend checking out our Git Branch tutorial to learn more about managing branches for better development and collaboration.
Beyond the common workflows, the following are some advanced git stash commands you should be aware of:
git stash create: Creates a stash object without adding it to the stash list
git stash store: Stores a stash created with create
git stash export: Exports a stash to a reference or prints it
git stash import: Imports a stash from an existing commit
Even though git stash is straightforward, a few common issues can trip you up. Here are some of the errors I have encountered and how to recognize and fix them quickly.
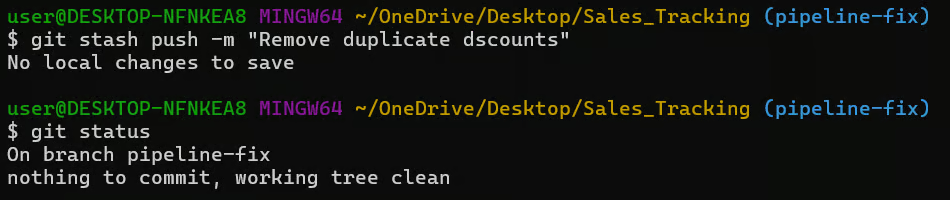
This is the most frequent “non-error” error. It occurs when you run git stash on a clean working directory where there are no modified or staged tracked files.
To fix this issue, run git status, and if nothing shows up, there’s nothing to stash.
Conflicts happen when the branch you are on has changed the same lines of code that exist in your stash. For example, when you run git stash pop on the new branch after modifying the file, you will likely get an error message:
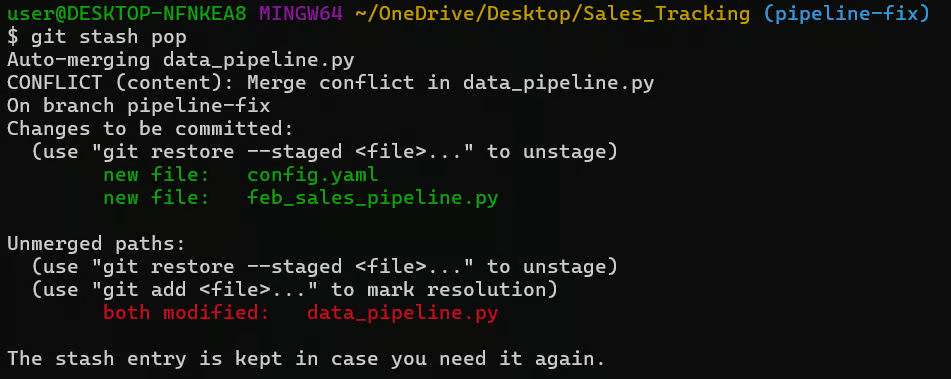
You may then see conflict markers inside the file:
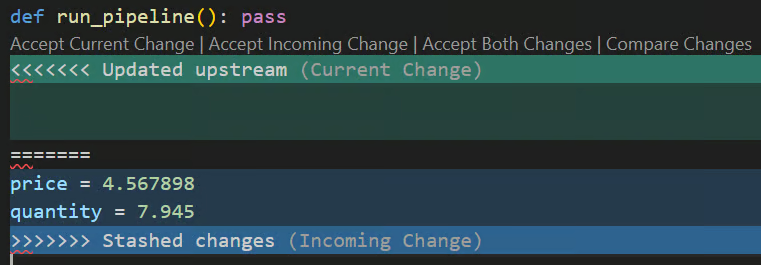
To fix this issue, you can perform any of the following:
git add data_pipeline.pygit stash drop (if it is NOT removed automatically on conflict)If conflicts are too messy, use the command below to apply the changes to a clean slate instead.
git stash branch recovery-branch stash@{0}Sometimes you may run git stash without checking your working directory, only to realize later that you’ve buried a fix you actually wanted to commit.
To avoid such mistakes, always be explicit about the files to stash. For example, the command below will stash only the file data_pipeline.py instead of everything in the working directory.
git stash push data_pipeline.pyYou can also use git stash -p to run interactive (patch) mode, allowing you to selectively stash parts of changes within files, not entire files.
As a preventive measure, always check git status before stashing.
As a rule of thumb, keep stashes short-lived and always use descriptive messages. If you won’t return to the work within a day, creating a WIP branch is a safer option since it can be pushed to a remote and won’t get lost.
To build stronger Git skills, I recommend taking our Intermediate Git course to learn about collaboration in Git. I also recommend our Advanced Git course to learn how to work with Git for large projects and handle complex version control scenarios and issues in data pipeline development.
Learn Git with DataCamp
programa
Curso
Curso
Tutorial
Dario Radečić
Tutorial
Kurtis Pykes
Tutorial
Khalid Abdelaty
Tutorial
Bex Tuychiev
Tutorial
Srujana Maddula
Tutorial
Patrick Brus