Curso
Conceitos de Grandes Modelos de Linguagem (LLMs)
2 h
100.3K
Building LLM applications gets messy fast. You start guessing about costs. Debugging failures becomes harder when you can’t see what happened. Prompts get scattered across your codebase. LangFuse fixes this with a platform that tracks everything, manages prompts, and measures quality.
In this tutorial, you’ll build a document Q&A tool and see how LangFuse organizes your development. You’ll learn to trace LLM calls for debugging, manage prompts with version control, and explore evaluation approaches.
LangFuse is an open-source platform that helps teams build better LLM applications. While you focus on building features, LangFuse handles the monitoring, testing, and debugging.
The platform covers three main areas:
You’ll want LangFuse when your LLM application moves beyond simple experiments. Here are the situations where it becomes valuable:
If you’re building a quick prototype or personal project, you probably don’t need it yet. But once your app handles real users or your team grows past one person, LangFuse becomes useful.
LangFuse works with your existing AI stack. It integrates with major frameworks like LangChain, LlamaIndex, AutoGen, and CrewAI. You can use it with any model provider — OpenAI, Anthropic, Google Gemini, Mistral, or Hugging Face models all work out of the box.
The platform offers native SDKs for Python and JavaScript, plus OpenTelemetry support for custom setups. Whether you’re using no-code agent builders or complex multi-agent frameworks, LangFuse plugs in without changing your core architecture.
Companies like Samsara, Twilio, and Khan Academy use it in production, and it meets enterprise security standards. The project has over 16,500 GitHub stars with Y Combinator backing. You can use the hosted version or run it on your own infrastructure.
Now that you understand what LangFuse does and when it helps, let’s build something with it. As promised, we’ll create a simple document Q&A tool that shows all three features in action.
You need some Python and LLM experience before diving into LangFuse.
Must have:
Nice to have:
Setup:
uv or pip)New to AI development? Start with our complete AI learning guide first.
For context on where LangFuse fits in the broader ecosystem, check out our LLMOps tools overview.
Now let’s build something. We’ll start with a simple document Q&A function and see how LangFuse tracks what happens when you run it. This basic example will show you all three main features — observability, prompt management, and evaluation — in a way that scales to more complex projects.
You’ll build a simple document Q&A system that answers questions from a PDF. This gives you something real to trace, manage, and evaluate. While we keep this example simple, the same patterns work for complex RAG systems and multi-agent workflows.
First, create a directory for the project and install the packages you need:
mkdir langfuse-qa-demo
cd langfuse-qa-demo
uv add langfuse langchain langchain-openai langchain-community pypdf python-dotenv
Sign up for a free LangFuse Cloud account at langfuse.com. After signing in, create a new organization and project. You’ll see a screen with your API keys:

Copy your Public Key and Secret Key. You’ll also need your OpenAI API key from platform.openai.com.
Now create a .env file in your project directory:
OPENAI_API_KEY=your_openai_key_here
LANGFUSE_PUBLIC_KEY=pk-lf-...
LANGFUSE_SECRET_KEY=sk-lf-...
LANGFUSE_HOST=https://cloud.langfuse.com
If you prefer to run LangFuse on your own infrastructure, you can use Docker Compose for local testing. The self-hosting guide walks through setting up PostgreSQL, ClickHouse, and the LangFuse services. For production deployments, use Kubernetes or cloud-specific Terraform templates.
You’ll build a retrieval chain that loads a PDF, splits it into chunks, stores them in a vector database, and answers questions based on retrieved context.
Create a file called qa_chain.py:
from langchain_community.document_loaders import PyPDFLoader
from langchain_text_splitters import RecursiveCharacterTextSplitter
from langchain_openai import OpenAIEmbeddings, ChatOpenAI
from langchain_core.vectorstores import InMemoryVectorStore
from langchain.chains import create_retrieval_chain
from langchain.chains.combine_documents import create_stuff_documents_chain
from langchain_core.prompts import ChatPromptTemplate
from dotenv import load_dotenv

load_dotenv()
This imports everything you need. The load_dotenv() call loads your API keys from the .env file.
# Load and split PDF
loader = PyPDFLoader("ai-security-landscape.pdf")
docs = loader.load()

text_splitter = RecursiveCharacterTextSplitter(chunk_size=1000, chunk_overlap=200)
splits = text_splitter.split_documents(docs)
Here, we are loading the ai-security-landscape.pdf document, which is one of the whitepapers written by Amazon Web Services. To run this example, you will need to download the file on your own and add it to your working directory with the correct name.
The PyPDFLoader reads the PDF and RecursiveCharacterTextSplitter breaks it into 1000-character chunks with 200-character overlap. The overlap helps maintain context across chunk boundaries.
Next, create the vector store:
# Create vector store
embeddings = OpenAIEmbeddings()
vectorstore = InMemoryVectorStore.from_documents(documents=splits, embedding=embeddings)
InMemoryVectorStore stores document embeddings in memory. In production, you'd use Pinecone, Weaviate, or another vector database.
Now build the QA chain:
# Build QA chain
llm = ChatOpenAI(model="gpt-4")
prompt = ChatPromptTemplate.from_messages([
   ("system", "Use the given context to answer the question. If you don't know the answer, say you don't know. Keep the answer concise.\n\n{context}"),
   ("human", "{input}"),
])

question_answer_chain = create_stuff_documents_chain(llm, prompt)
qa_chain = create_retrieval_chain(vectorstore.as_retriever(), question_answer_chain)
create_stuff_documents_chain takes retrieved documents and stuffs them into the prompt context. create_retrieval_chain combines retrieval and answering into one chain.
With the chain ready, let’s connect it to LangFuse for tracing.
Add a LangFuse callback handler to the script:
from langfuse.langchain import CallbackHandler

langfuse_handler = CallbackHandler()

response = qa_chain.invoke(
   {"input": "What are the main security risks discussed?"},
   config={"callbacks": [langfuse_handler]}
)

print(response["answer"])
The main security risks discussed in relation to generative artificial intelligence (AI) are context window overflow, agent mismanagement, indirect prompt injections and data leaks from overprivileged agents, logging, and caching.
Trace sent to LangFuse! Check your dashboard at https://cloud.langfuse.comWhen you run this, LangFuse captures the complete execution trace. Go to your LangFuse dashboard, and you’ll see it updated with new details:

Note that while we use a simple example here, LangFuse works with complex RAG pipelines that handle multiple document types, use re-ranking, or run multiple retrieval strategies in parallel.
With your Q&A system running and LangFuse tracing in place, you’re ready to understand what LangFuse captures and how to use that information to improve your application.
You just sent a trace to LangFuse. Now, let’s understand what that gets you and why it matters.
Traditional logging doesn’t work well for LLM apps. You can log that a function ran, but you can’t see what your model actually did with the user’s input. Did it retrieve the right documents? Did the prompt get formatted correctly? Which step took five seconds?
LLM observability tracks the whole execution path. You see every input, output, and intermediate step. When a user reports wrong answers, you pull up their trace and watch exactly what happened. You don’t guess. You know.
This matters more as your app gets complex. A simple Q&A chain has 4–5 steps. Production RAG systems have document loaders, chunking strategies, multiple retrievers, re-rankers, and generation steps. Without observability, debugging becomes impossible. With it, you pinpoint problems.
Open your LangFuse dashboard and click “Tracing” in the left sidebar. You’ll see your first trace listed in a table.
The table shows when the trace ran, what it was called (retrieval_chain), and what went in and out. Each row represents a complete execution of your Q&A chain.
Click on the trace to see what happened inside. You’ll get a detailed breakdown.
The left panel shows your execution tree. LangFuse tracked every step in your chain. The root retrieval_chain took 4.75 seconds in total. Below it, you see each operation that ran: document retrieval (retrieve_documents), vector search (VectorStoreRetriever), and answer generation (stuff_documents_chain). Each step shows its execution time.
This hierarchy tells you where your chain spent time. If your app runs slowly, you’ll know if it’s the embedding lookup, the vector search, or the LLM call.
The right panel shows the trace data. At the top, you get the metrics that matter: latency (4.75s), cost (~$0.016), and tokens used (426 input, 55 output). Below that, you see the actual input and output. The context section shows the four document chunks your retriever pulled from the vector store.
At the bottom, a flow diagram maps how your chain connects its operations. This helps when you’re debugging complex chains with multiple branches.
Now let’s talk about sessions. A trace captures one question-and-answer cycle. But real apps have conversations. A user might ask three related questions about security risks. You want to group those traces together.
That’s what sessions do. They bundle multiple traces into a single conversation thread. When a user reports a bug, you can pull up their entire session and see every question they asked and every answer they got.
Let’s see this in action. First, create a helper file called build_chain.py that wraps your chain-building logic:
from langchain_community.document_loaders import PyPDFLoader
from langchain_text_splitters import RecursiveCharacterTextSplitter
from langchain_openai import OpenAIEmbeddings, ChatOpenAI
from langchain_core.vectorstores import InMemoryVectorStore
from langchain.chains import create_retrieval_chain
from langchain.chains.combine_documents import create_stuff_documents_chain
from langchain_core.prompts import ChatPromptTemplate
from dotenv import load_dotenv

load_dotenv()

def build_qa_chain():
   # Load and split PDF
   loader = PyPDFLoader("ai-security-landscape.pdf")
   docs = loader.load()

   text_splitter = RecursiveCharacterTextSplitter(chunk_size=1000, chunk_overlap=200)
   splits = text_splitter.split_documents(docs)

   # Create vector store
   embeddings = OpenAIEmbeddings()
   vectorstore = InMemoryVectorStore.from_documents(documents=splits, embedding=embeddings)

   # Build QA chain
   llm = ChatOpenAI(model="gpt-4")
   prompt = ChatPromptTemplate.from_messages([
       ("system", "Use the given context to answer the question. If you don't know the answer, say you don't know. Keep the answer concise.\n\n{context}"),
       ("human", "{input}"),
   ])

   question_answer_chain = create_stuff_documents_chain(llm, prompt)
   qa_chain = create_retrieval_chain(vectorstore.as_retriever(), question_answer_chain)

   return qa_chain
This wraps everything in a function you can import. Now create sessions_demo.py:
from build_chain import build_qa_chain
from langfuse.langchain import CallbackHandler

# Build the Q&A chain
qa_chain = build_qa_chain()

# Set up LangFuse handler
langfuse_handler = CallbackHandler()
This imports your chain and sets up the LangFuse handler. Now add session tracking for the first conversation:
# Session 1: User asking about security risks
response1 = qa_chain.invoke(
   {"input": "What are the main security risks discussed?"},
   config={
       "callbacks": [langfuse_handler],
       "metadata": {"langfuse_session_id": "conversation-001"}
   }
)
print(f"Q1: {response1['answer']}\n")
The metadata field with langfuse_session_id tags this trace with a session ID. Run this and you'll see:
Q1: The main security risks discussed are context window overflow, agent mismanagement, and indirect prompt injections.Now add a follow-up question with the same session ID:
response2 = qa_chain.invoke(
   {"input": "How can these risks be mitigated?"},
   config={
       "callbacks": [langfuse_handler],
       "metadata": {"langfuse_session_id": "conversation-001"}
   }
)
print(f"Q2: {response2['answer']}\n")
This second question belongs to the same conversation, so it uses conversation-001 again. You'll see a longer response:
Q2: Risks can be mitigated through several strategies including:
1. Input Management: Limit and sanitize inputs going into the model.
2. Real-time Monitoring: Use systems that alert when the context window is nearing capacity.
3. Principle of Least Privilege: Implement this for all agents and external integrations.
....
Now simulate a second user with different questions. Add this to your script:
# Session 2: Different user asking about AI applications
response3 = qa_chain.invoke(
   {"input": "What AI applications are mentioned in the document?"},
   config={
       "callbacks": [langfuse_handler],
       "metadata": {"langfuse_session_id": "conversation-002"}
   }
)
print(f"Q3: {response3['answer']}\n")

response4 = qa_chain.invoke(
   {"input": "What are the benefits of these applications?"},
   config={
       "callbacks": [langfuse_handler],
       "metadata": {"langfuse_session_id": "conversation-002"}
   }
)
print(f"Q4: {response4['answer']}\n")
These two questions use conversation-002. Run the complete script:
uv run python sessions_demo.pyThe last two outputs will be:
Q3: The document does not specifically mention any AI applications. However, it discusses the concept of generative AI and its security considerations.

Q4: The context does not provide specific benefits of these applications.
Now go to your LangFuse dashboard and click “Sessions” in the left sidebar. You’ll see both conversations listed:
Two sessions appear: conversation-002 (~4 seconds duration) and conversation-001 (~14 seconds duration). LangFuse grouped your traces by session ID.
Click on conversation-001 to see the full conversation:
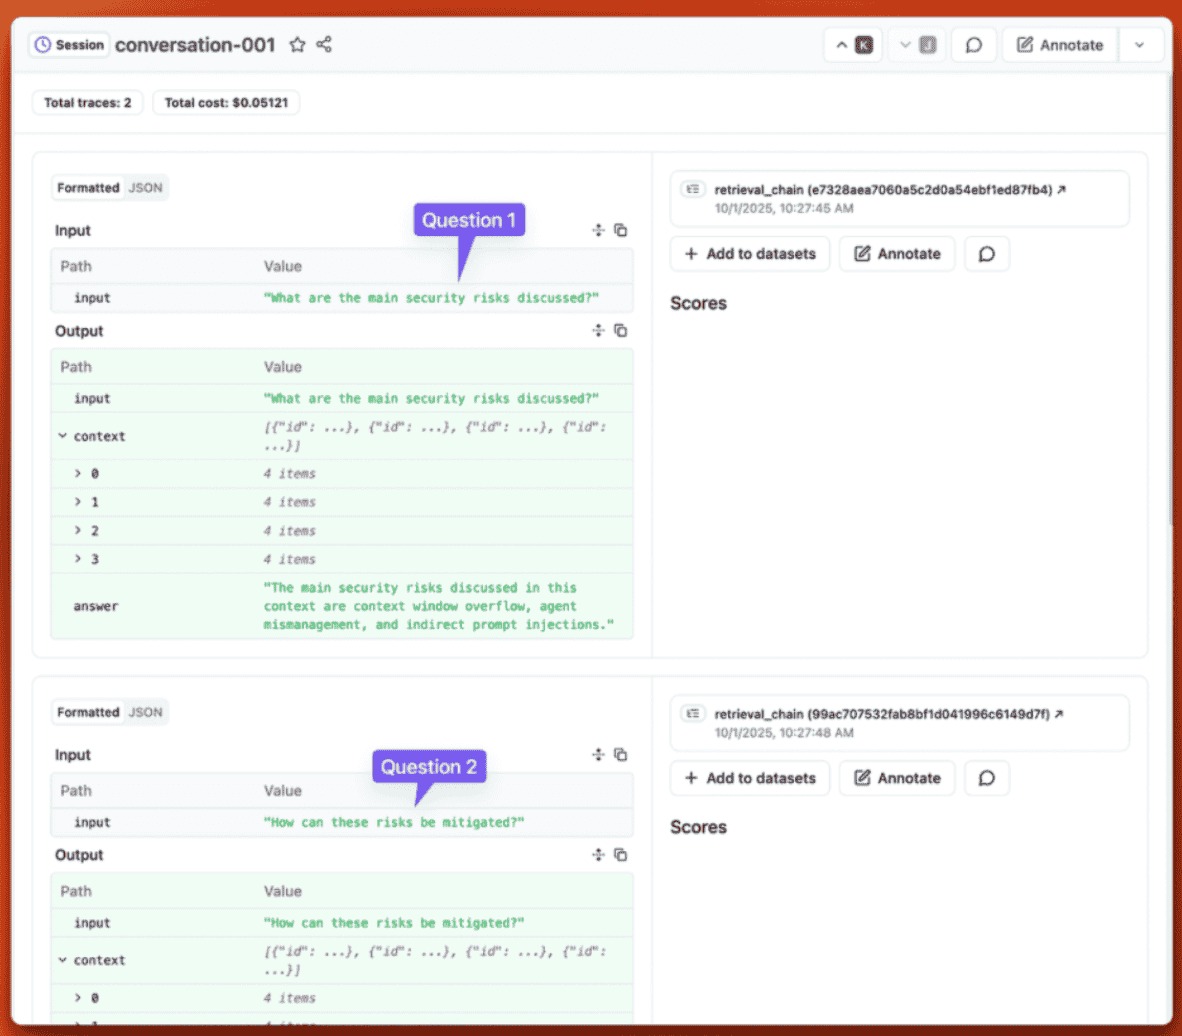
You see both traces in order: Question 1 about security risks, and Question 2 about mitigation. The session shows total cost ($0.05121 for both traces combined) and duration (14 seconds total). Each trace appears with its input, output, and retrieved context.
This session view shows you exactly what a user experienced during their interaction. If they report a problem, you don’t need to hunt through individual traces. You open their session and see the full conversation flow.
So far, you’ve tracked sessions, but what about individual users? Real LLM apps need to know which user made which request. When someone signs up, you generate a unique ID for them. Then you attach that ID to every LLM call they make.
LangFuse lets you group traces by user ID on top of session grouping. This gives you another way to organize your observability data.
Here’s how you add user tracking. Create user_tracking.py:
from build_chain import build_qa_chain
from langfuse.langchain import CallbackHandler

# Build the Q&A chain
qa_chain = build_qa_chain()

# Set up LangFuse handler
langfuse_handler = CallbackHandler()

# Simulate a new user asking a question
user_response = qa_chain.invoke(
   {"input": "What security controls are recommended for AI systems?"},
   config={
       "callbacks": [langfuse_handler],
       "metadata": {
           "langfuse_session_id": "conversation-003",
           "langfuse_user_id": "user-12345"
       }
   }
)
print(f"Response: {user_response['answer']}")
The langfuse_user_id field tags this trace with a user ID. Run the script:
uv run python user_tracking.pyYou’ll see:
Response: The recommended security controls for AI systems include:

1. Adaptive defenses: Incorporate machine learning-powered filters that continuously learn and adapt to new adversarial techniques.
2. Defense-in-depth: Introduce layered security mechanisms, such as refusal classifiers and real-time input monitoring, to fortify AI system integrity.
3. Data classification: Properly classify your data according to sensitivity.
......
Now go to your LangFuse dashboard. Click “Users” in the left sidebar, and you’ll see user-12345 listed. Click on the user to see all their traces across different sessions.
This user view helps you answer questions like “How much did user X cost us this month?” or “What questions does user Y keep asking?” You can track individual user behavior and debug issues specific to certain users.
Your Q&A system has a problem. The prompt is buried in your code. To change how the system responds, you need to edit qa_chain.py, test locally, and redeploy. If a teammate wants to try a different approach, they need to understand your code structure and create a new branch. You can't compare different prompt versions side by side or rollback to last week's version without digging through git history.
Prompt management solves this by storing prompts outside your code. You edit them in a UI, version them automatically, and fetch them at runtime. Your code stays the same while your prompts improve.
Look at the prompt in your Q&A chain:
prompt = ChatPromptTemplate.from_messages([
   ("system", "Use the given context to answer the question. If you don't know the answer, say you don't know. Keep the answer concise.\n\n{context}"),
   ("human", "{input}"),
])
This works for solo projects. But when you’re working with a team or running in production, hardcoded prompts cause problems:
LangFuse’s prompt management addresses these issues by treating prompts as data, not code.
LangFuse stores your prompts in a central location with automatic versioning. You can create prompts through the UI or via the SDK.
Go to your LangFuse dashboard and click “Prompts” in the left sidebar. Click “New Prompt” to create one.
You’ll see a form where you can:
document-qa-prompt)text or chat){{variable}} syntaxproduction or staging)For our Q&A system, create a chat prompt with two messages:
System message:
Use the given context to answer the question. If you don't know the answer, say you don't know. Keep the answer concise.

{{context}}
User message:
{{input}}LangFuse will detect the {{context}} and {{input}} variables automatically.
Next, set the config to:
{
 "model": "gpt-4",
 "temperature": 0.0
}
Add the production label to mark this as your production version.
Once you save, LangFuse creates version 1 of your prompt. Every time you edit and save, it creates a new version. The old versions stay available.
You can also create prompts using the Python SDK:
from langfuse import Langfuse

langfuse = Langfuse()

langfuse.create_prompt(
   name="document-qa-prompt",
   type="chat",
   prompt=[
       {"role": "system", "content": "Use the given context to answer the question. If you don't know the answer, say you don't know. Keep the answer concise.\n\n{{context}}"},
       {"role": "user", "content": "{{input}}"}
   ],
   labels=["production"]
)
This creates the same prompt programmatically. If you call create_prompt() again with the same name, LangFuse adds a new version instead of overwriting.
LangFuse tracks every prompt change with version numbers (v1, v2, v3). You can also assign labels to versions. Labels help you manage deployments:
production - The version your production app usesstaging - The version in your staging environmentlatest - Automatically points to the newest versionWhen you improve your prompt, you create a new version. Test it in staging first by giving it the staging label. Once it works well, move the production label to the new version. Your production app automatically picks up the change on the next prompt fetch.
The LangFuse UI includes a playground where you can test prompts before using them in code. You can:
This lets non-technical team members experiment with phrasing without touching code.
Here’s how to use LangFuse-managed prompts in your application. This workflow keeps your code stable while your prompts evolve.
In your application code, fetch the prompt from LangFuse instead of hardcoding it:
from langfuse import Langfuse

langfuse = Langfuse()

# Get the production version
prompt = langfuse.get_prompt("document-qa-prompt", type="chat")
This fetches the version labeled production. LangFuse caches prompts on the client side, so there's no latency impact on your LLM calls.
You can also fetch specific versions or labels:
# Get version 2 specifically
prompt = langfuse.get_prompt("document-qa-prompt", version=2, type="chat")

# Get staging version
prompt = langfuse.get_prompt("document-qa-prompt", label="staging", type="chat")

# Get latest version (automatically maintained by LangFuse)
prompt = langfuse.get_prompt("document-qa-prompt", label="latest", type="chat")The fetched prompt is a template with {{variables}}. Compile it by replacing variables with actual values:
compiled_messages = prompt.compile(
   context="Retrieved document context goes here",
   input="What are the main security risks?"
)
This returns a list of chat messages ready to send to your LLM:
[
   {
       "role": "system",
       "content": "Use the given context to answer the question. If you don't know the answer, say you don't know. Keep the answer concise.\n\nRetrieved document context goes here"
   },
   {
       "role": "user",
       "content": "What are the main security risks?"
   }
]Pass the compiled messages to your LLM call. The exact code depends on whether you’re using LangChain, the OpenAI SDK directly, or another framework.
When you make an LLM call with a LangFuse-managed prompt, link it to the trace. This lets you see which prompt version was used for each LLM call and track metrics by prompt version:
from langfuse.langchain import CallbackHandler

langfuse_handler = CallbackHandler()

response = qa_chain.invoke(
   {"input": "What are the main security risks?"},
   config={"callbacks": [langfuse_handler]}
)
In your LangFuse dashboard, you’ll see traces grouped by prompt name and version. This shows you which prompt versions cost more, run slower, or produce better results.
This is where prompt management pays off. To improve your prompt:
staging label to test in your staging environmentproduction label to deployYour code never changes. The next time it calls get_prompt(), it fetches the new version.
If the new prompt performs worse, rollback by moving the production label back to the previous version. No code deploy required.
This workflow separates prompt engineering from software engineering. Your team can iterate on prompts quickly while your application code remains stable.
Further Reading: LangFuse also supports A/B testing to automatically split traffic between prompt versions, webhooks that notify your systems when prompts change, and team collaboration features like comments and approval workflows. These advanced features help larger teams manage prompts at scale. Check the prompt management docs for details.
You’ve built a Q&A system, added observability, and set up prompt management. But how do you know if your answers are good? Right now, you’re probably testing manually. You ask a question, read the response, and decide if it makes sense. This works for a few examples, but it doesn’t scale.
What happens when you change your prompt? You need to re-test everything. What about edge cases? You can’t remember every question you’ve tested before. And when you deploy to production, you have no way to measure if version 2 of your prompt performs better than version 1.
Evaluation fixes this by systematically measuring your LLM’s performance. LangFuse gives you tools to score responses automatically, compare prompt versions with real metrics, and catch quality problems before users see them.
Manual testing tells you if one specific answer looks good. Systematic evaluation tells you if your entire system works well across hundreds or thousands of examples.
Here’s how systematic evaluation works in LangFuse:
This process replaces “I think this prompt is better” with “this prompt scores 0.85 on relevance vs. 0.72 for the old version.”
For a complete guide on evaluation approaches and how to implement them in LangFuse, check out the evaluation overview docs.
You need to score hundreds of responses. Doing this manually takes hours. LLM-as-a-judge automates it by using another LLM to grade your main LLM’s outputs.
You give a judge LLM three things: the original question, your Q&A system’s answer, and scoring criteria. The judge reads the answer and assigns a score.
For a Q&A system, you care about different quality dimensions. Here are three judges you might create:
Correctness judge: “Rate if this answer correctly reflects the information in the provided context. Score 1 if fully correct, 0.5 if partially correct, 0 if incorrect or hallucinated.”
This catches answers that contradict your documents or make things up.
Relevance judge: “Rate if this answer directly addresses the question asked. Score 1 if highly relevant, 0.5 if somewhat relevant, 0 if off-topic.”
This ensures your system stays on topic instead of giving accurate but irrelevant information.
Groundedness judge: “Rate if this answer is based only on the provided context. Score 1 if fully grounded in the context, 0.5 if partially grounded, 0 if it includes information not in the context.”
This prevents hallucinations where the LLM adds facts not in your documents.
Each judge looks at a specific quality dimension. You run all three judges on each response and get a complete quality profile. You could add more judges for style (is it concise?), tone (is it professional?), or refusal handling (does it say “I don’t know” when appropriate?).
LangFuse lets you configure LLM judges through the UI or API. The setup process:
The judges run asynchronously, so they don’t slow down your main application. You check scores in the LangFuse dashboard after your tests finish.
LLM judges work best for subjective criteria that are hard to measure with code. Things like tone, relevance, and style. They’re less reliable for objective facts. If you need to verify that “2+2=4,” write a deterministic check instead of using a judge.
For our Q&A system, judges work well for relevance and groundedness, but you might combine them with deterministic checks for things like “answer length is under 100 words.”
LLM judges aren’t perfect. They can disagree with each other, have biases toward certain answer styles, and make mistakes by giving high scores to confident-sounding but wrong answers.
You handle this by testing your judges on examples where you know the right score, using multiple judges and averaging their scores, and spot-checking results to catch judge errors.
Implementation note: Full evaluation workflows involve setting up datasets, configuring judges, running batch evaluations, and analyzing results. This requires more setup than we can cover in this tutorial while keeping things practical. The LLM-as-a-judge documentation provides complete implementation details, including code examples and best practices. For custom scoring approaches beyond LLM judges, see the custom scores guide.
The workflow we’ve outlined here shows you the evaluation mindset. Once you have traces and prompts managed in LangFuse, adding systematic evaluation follows naturally. You build test sets incrementally, start with simple judges, and refine your approach as you learn what metrics matter for your application.
Further Reading: LangFuse also supports dataset management for organizing test cases, custom scoring functions for deterministic checks, and continuous evaluation that runs automatically on production traffic. These features help you maintain quality as your system scales. Check the evaluation overview for the full picture.
You’ve built a document Q&A system and learned how LangFuse’s three pillars work together. Observability showed you what happens when your LLM runs. You see every trace, every cost, every token. Prompt management moved your prompts out of code and into a version-controlled system where you can iterate without deployments. Evaluation gave you ways to measure quality systematically instead of guessing. These features connect: traces feed into evaluation datasets, prompt versions link to performance metrics, and the whole system helps you understand if changes make things better or worse.
Start small with your own projects. Pick one feature. Maybe add tracing to see where your app spends money, or move one hardcoded prompt into LangFuse’s management system. The patterns you learned with our simple Q&A example scale to complex RAG pipelines, multi-agent systems, and production applications handling thousands of users. Check the LangFuse documentation for deeper dives into specific features, or try the example notebooks that show real-world implementations. The next time you build with LLMs, you’ll have the tools to see what’s happening, control what changes, and measure what matters.
Learn with DataCamp
Curso
Curso
Curso
Tutorial
Bex Tuychiev
Tutorial
Moez Ali
Tutorial
Stanislav Karzhev
Tutorial
Ryan Ong
Tutorial
Dr Ana Rojo-Echeburúa
code-along
Andrea Valenzuela