
Kurs
FastAPI'ye Giriş
4 sa
16.5K
It has become so easy to build your AI application with the OpenAI Agents SDK, integrate custom tools, and deploy the whole thing using FastAPI Cloud.
With Python, FastAPI, and the Agents SDK working together, you can go from a simple idea to a fully deployed AI application without setting up complicated infrastructure.
In this guide, I will show you how to do exactly that by building an autonomous financial research agent that can search the live web, read relevant sources, and generate a structured company research report.
FastAPI Cloud is an official deployment platform from the team behind FastAPI. It is designed to make it much easier to take a FastAPI application from your local machine and put it online.
Instead of manually configuring servers, containers, HTTPS, and scaling, you can deploy your application directly from the command line using fastapi deploy.
FastAPI Cloud handles the build, dependencies, deployment, and public URL for you.
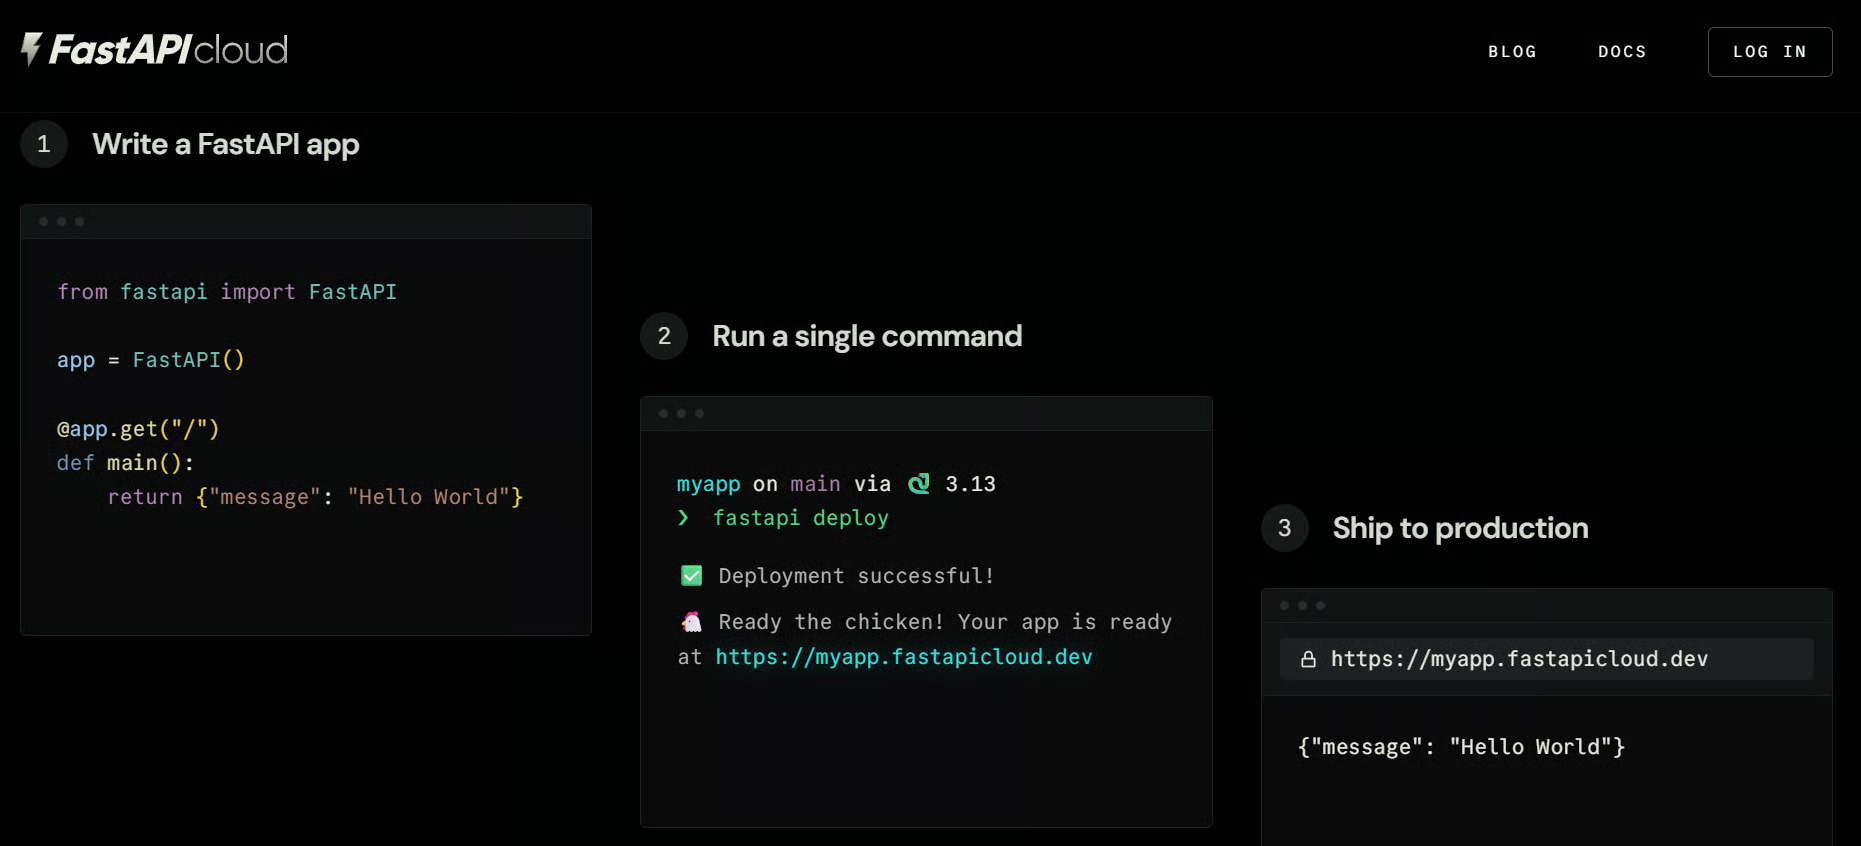
Source: FastAPI Cloud
It also supports features such as automatic scaling and secure environment variables.
For developers who mainly want to focus on building their Python application rather than managing cloud infrastructure, it provides a much simpler deployment experience.
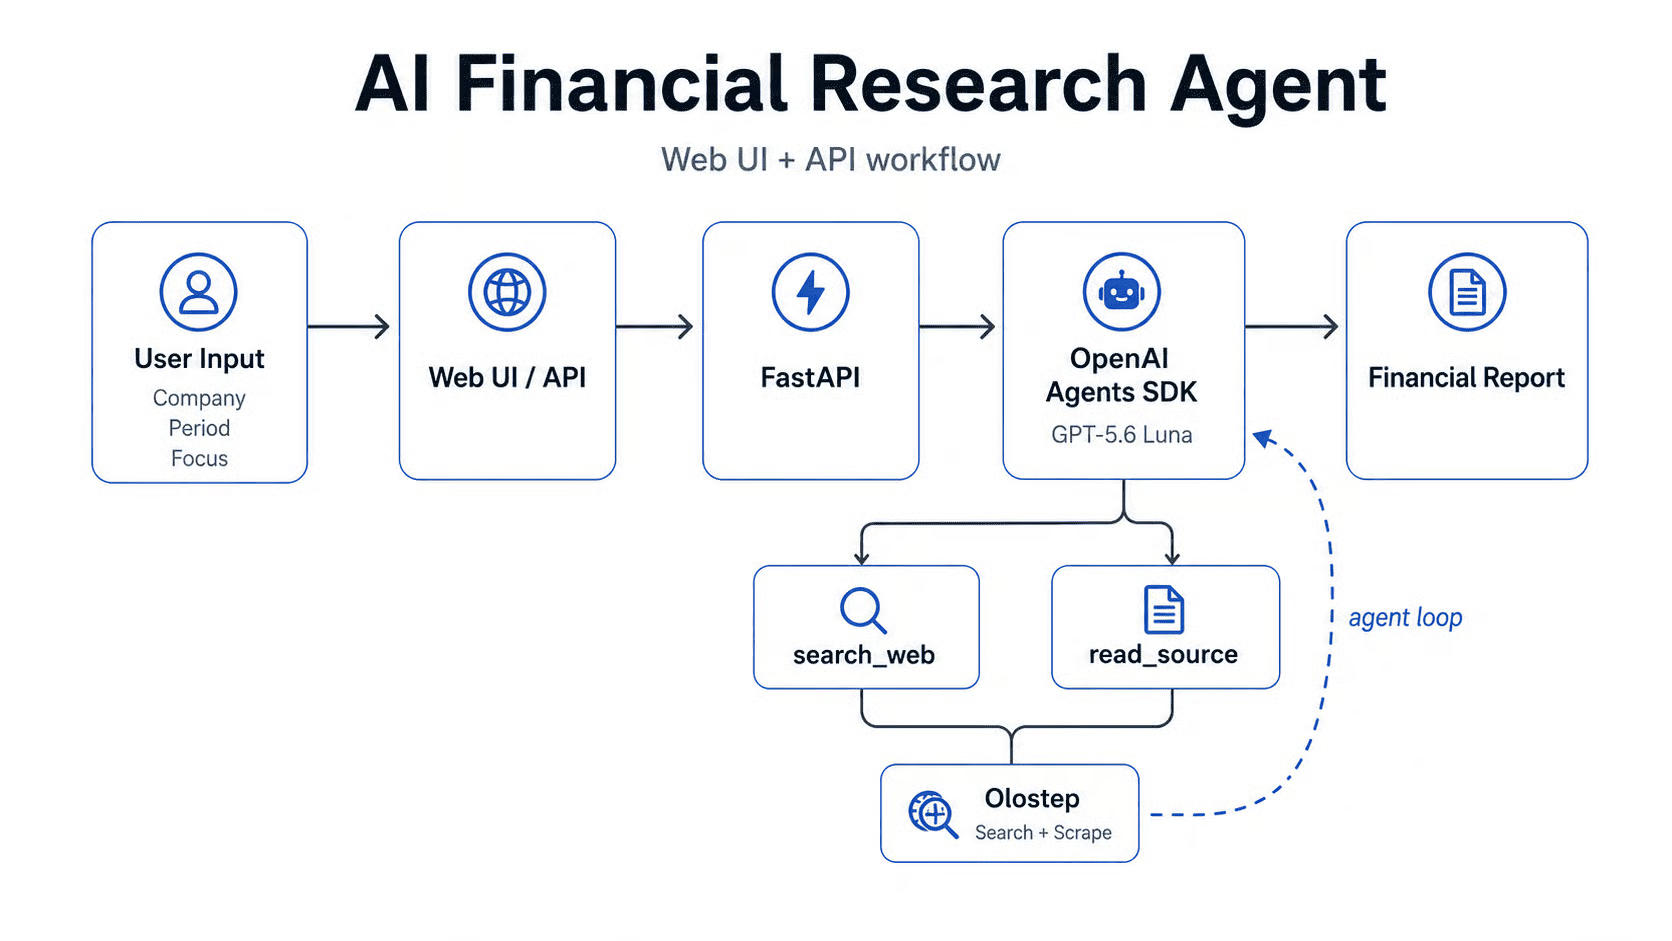
In this project, we will build an AI financial research agent that can decide what information it needs, search the live web, read relevant sources, and turn the findings into a structured financial research report.
The agent is powered by GPT-5.6 Luna through the OpenAI Agents SDK.
It can call tools when needed, allowing it to perform multiple research steps instead of relying on a single model response.
For live research, we will connect the agent to Olostep, which provides the search_web and read_source tools for discovering and extracting information from relevant webpages.
Our application will include both a web interface and REST API, so users can run research from a browser or integrate the same agent into another application.
The diagram above shows the complete workflow, from user input and FastAPI to the OpenAI agent, its research tools, and the final financial report.
We will first create the project, install the required Python packages, configure our API keys, and prepare a simple folder structure for the backend and frontend.
Create a new project and initialize it with uv:
mkdir financial-research-agent
cd financial-research-agent

uv init
Next, install FastAPI, the OpenAI Agents SDK, HTTPX, and python-dotenv:
uv add "fastapi[standard]" openai-agents httpx python-dotenvThe OpenAI Agents SDK allows us to turn normal Python functions into tools using @function_tool.
It can automatically generate the tool name, description, and input schema from the function and its docstring.
Now create a .env file and add the API keys we will use:
OPENAI_API_KEY=your_openai_api_key
OLOSTEP_API_KEY=your_olostep_api_key
You can also optionally define the model here, which makes it easy to switch models later without changing the Python code:
OPENAI_MODEL=gpt-5.6-lunaMake sure the .env file is added to .gitignore so your API keys are not committed to Git.
Finally, create a static directory for the frontend files.
Your project structure should look like this:
financial-research-agent/
│
├── static/
│   ├── index.html
│   ├── style.css
│   └── script.js
│
├── .env
├── .gitignore
├── main.py
├── pyproject.toml
└── uv.lock
Keeping the HTML, CSS, and JavaScript files separate from main.py gives us a cleaner structure and makes the frontend easier to update independently from the FastAPI backend.
We will now build the core of the application by bringing together FastAPI, GPT-5.6 Luna, the OpenAI Agents SDK, and Olostep to create an agent that can research a company using live information from the web.
Our stack is fairly simple.
Create a main.py file. Instead of writing the complete application at once, we will build it in a few smaller sections.
Start with the imports, environment variables, and FastAPI configuration:
import json
import os
from pathlib import Path
from typing import Any

import httpx
from agents import Agent, Runner, function_tool
from dotenv import load_dotenv
from fastapi import FastAPI, HTTPException
from fastapi.responses import FileResponse
from fastapi.staticfiles import StaticFiles
from openai import APIError
from pydantic import BaseModel, Field


load_dotenv(override=True)


app = FastAPI(
    title="Financial Research Agent",
    version="0.1.0",
)


BASE_DIR = Path(__file__).resolve().parent
STATIC_DIR = BASE_DIR / "static"


app.mount(
    "/static",
    StaticFiles(directory=STATIC_DIR),
    name="static",
)


MODEL = os.getenv(
    "OPENAI_MODEL",
    "gpt-5.6-luna",
)


OLOSTEP_URL = "https://api.olostep.com/v1"
FastAPI is the Python framework that runs our web application. It gives us a straightforward way to create REST API endpoints, validate requests, serve our frontend, and automatically generate interactive API documentation.
Later, the same FastAPI project can also be deployed directly to FastAPI Cloud.
We are using GPT-5.6 Luna as our default model.
Luna is the fastest and most affordable model in the GPT-5.6 family and supports tool use and multi-step workflows, which makes it a good fit for an agent that may need several model calls to complete one research request.
OpenAI reduced Luna's API price by 80% on July 30, 2026, bringing standard short-context pricing to $0.20 per million input tokens and $1.20 per million output tokens.
That price reduction makes a multi-step application like this much more practical to experiment with and run.
The application itself can run locally while we develop it, but Luna is still accessed through the OpenAI API rather than running directly on our computer.
Next, define the information that a user needs to provide:
class ResearchRequest(BaseModel):
    company: str = Field(
        min_length=1,
        max_length=200,
    )

    period: str = Field(
        default="6 months",
        min_length=1,
        max_length=100,
    )

    focus: str = Field(
        default="Full company research",
        min_length=1,
        max_length=1000,
    )
We keep the input intentionally simple.
The user only needs to provide a company name, a research period, and an optional research focus.
For example:
{
  "company": "NVIDIA",
  "period": "6 months",
  "focus": "Full company research"
}
The user tells the application what they want researched. The agent will decide how to perform that research.
A model alone does not necessarily have the latest financial information, so our agent needs a way to access the live web. This is where Olostep comes in.
Olostep is a web data platform for searching, scraping, crawling, and structuring public web content. Instead of building our own web scraping infrastructure, we can send requests to its API and receive clean content that is easier for an AI model to work with.
In this project, we will use Olostep for two jobs: finding relevant webpages and reading the contents of those webpages.
Create a reusable helper for sending requests to the Olostep API:
async def olostep(
    path: str,
    payload: dict[str, Any],
) -> dict[str, Any]:

    api_key = os.getenv("OLOSTEP_API_KEY")

    if not api_key:
        raise RuntimeError(
            "OLOSTEP_API_KEY is not configured"
        )

    async with httpx.AsyncClient(
        timeout=45
    ) as client:

        response = await client.post(
            f"{OLOSTEP_URL}{path}",
            headers={
                "Authorization": f"Bearer {api_key}"
            },
            json=payload,
        )

        response.raise_for_status()

        return response.json()
This helper handles authentication and HTTP requests in one place.
Both of our research tools can now reuse it instead of repeating the same request code.
Next, we will turn our web search and webpage reading functions into tools that the model can use.
The OpenAI Agents SDK provides the orchestration layer for our agent. An Agent defines its instructions, model, and available tools, while Runner manages the turns between the model and those tools.
The SDK can therefore handle much of the agent loop for us instead of requiring us to manually manage every model and tool call.
The first tool allows the agent to search the web:
@function_tool
async def search_web(query: str) -> str:
    """Search the live web for company research."""

    data = await olostep(
        "/searches",
        {
            "query": query,
            "limit": 5,
        },
    )

    return json.dumps(
        data.get(
            "result",
            {},
        ).get(
            "links",
            [],
        )
    )
The @function_tool decorator turns the Python function into a tool that the agent can call.
This means we do not have to decide every search query in advance—the agent can generate searches based on what it needs to investigate.
For NVIDIA, it might decide to search for:
Search results help the agent discover sources, but it also needs to read the important ones.
Create a second tool:
@function_tool
async def read_source(url: str) -> str:
    """Read an important source found during research."""

    data = await olostep(
        "/scrapes",
        {
            "url_to_scrape": url,
            "formats": ["markdown"],
            "remove_images": True,
        },
    )

    return (
        data.get("result", {})
        .get("markdown_content", "")
    )[:15000]
Olostep's scrape endpoint can convert a webpage into LLM-friendly Markdown, removing much of the unnecessary webpage formatting before the content is passed back to the model.
Our agent now has two simple actions:
Together, these tools allow the model to search for information, open useful sources, analyze what it finds, and continue researching when necessary.
Now we can define the agent itself:
research_agent = Agent(
    name="Financial Research Analyst",

    model=MODEL,

    instructions="""
    Research the public company provided by the user.

    Investigate its business, recent financial
    performance, latest earnings and guidance,
    major developments during the requested period,
    competitors, risks, and potential catalysts.

    Prioritize investor-relations pages, regulatory
    filings, earnings releases, and reputable
    financial publications.

    Verify important figures, separate facts from
    interpretation, and include source URLs.

    Return a concise, structured report.

    Do not provide personalized investment advice.
    """,

    tools=[
        search_web,
        read_source,
    ],
)
Here, we tell Luna what its role is, what kind of research it should perform, and which tools it is allowed to use.
The important part is that we are not hard-coding a fixed research workflow.
The model can decide when it needs search_web, which results are worth investigating with read_source, and whether it needs another round of research before producing the final report. The Agents SDK manages these turns for us.
Next, create a function that turns the user's inputs into a research task:
async def run_research(
    request: ResearchRequest,
) -> str:

    prompt = f"""
    Company: {request.company.strip()}
    Research period: {request.period.strip()}
    Focus: {request.focus.strip()}

    Research the company and produce a concise
    financial research report.
    """

    result = await Runner.run(
        research_agent,
        prompt,
        max_turns=12,
    )

    return str(result.final_output)
Runner.run() starts the agent and manages its interaction with the available tools.
The model may search, read a source, analyze the information, search again, and eventually return its final response.
The OpenAI Agents SDK supports this agent-and-runner pattern directly.
We also set max_turns=12so the agent has enough room to perform several research steps without continuing indefinitely.
Now that the agent works as a Python function, we need a way for our frontend or another application to use it.
Create a FastAPI /research endpoint:
@app.post("/research")
async def research(
    request: ResearchRequest,
) -> dict[str, str]:

    if (
        not os.getenv("OPENAI_API_KEY")
        or not os.getenv("OLOSTEP_API_KEY")
    ):
        raise HTTPException(
            status_code=503,
            detail=(
                "Set OPENAI_API_KEY and "
                "OLOSTEP_API_KEY before "
                "running research."
            ),
        )

    try:
        report = await run_research(request)

    except (
        APIError,
        httpx.HTTPError,
        RuntimeError,
    ) as exc:

        raise HTTPException(
            status_code=502,
            detail=(
                f"Research service failed: {exc}"
            ),
        ) from exc

    return {
        "company": request.company.strip(),
        "report": report,
    }
When a request reaches /research, FastAPI validates the input, passes it to our research agent, waits for the research to finish, and returns the completed report as JSON.
We also check that both API keys are available and catch common API or HTTP errors so the application can return a useful error message instead of simply crashing.
Finally, we will also serve the frontend from the same FastAPI application:
@app.get(
    "/",
    response_class=FileResponse,
)
async def home() -> FileResponse:

    return FileResponse(
        STATIC_DIR / "index.html"
    )
Our FastAPI application now has three main routes:
FastAPI automatically provides interactive OpenAPI documentation, so /docs will also give us a convenient way to test the /research endpoint directly from the browser.
To make the project easier to use, we also created a simple frontend inside a static directory:
static/
├── index.html
├── style.css
└── script.js
index.html contains the application interface, style.css handles the design, and script.js sends the company, research period, and focus to the /research endpoint and displays the completed report. The frontend is therefore simply another client of the same FastAPI API.
To keep the tutorial focused on building the AI agent, we will not reproduce all of the frontend code here. You can find the complete index.html, style.css, and script.js files in the accompanying GitHub repository:
GitHub: kingabzpro/fastapi-financial-agent
Once the application is running, the interface is available directly from:
http://127.0.0.1:8000You can still access the underlying REST API independently through /research, or use FastAPI's interactive Swagger interface at /docs.
We will now run the application locally and test both the web interface and the REST API before deploying it.
Start the FastAPI development server:
uv run fastapi dev main.py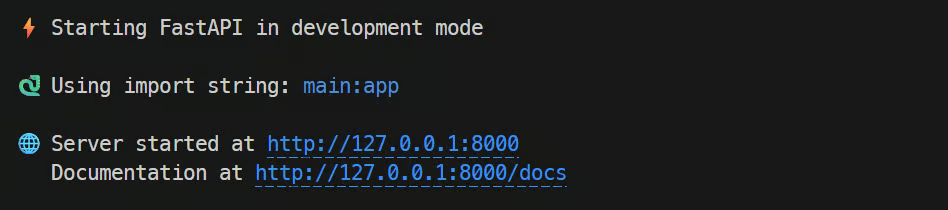
FastAPI should start the application at:
http://127.0.0.1:8000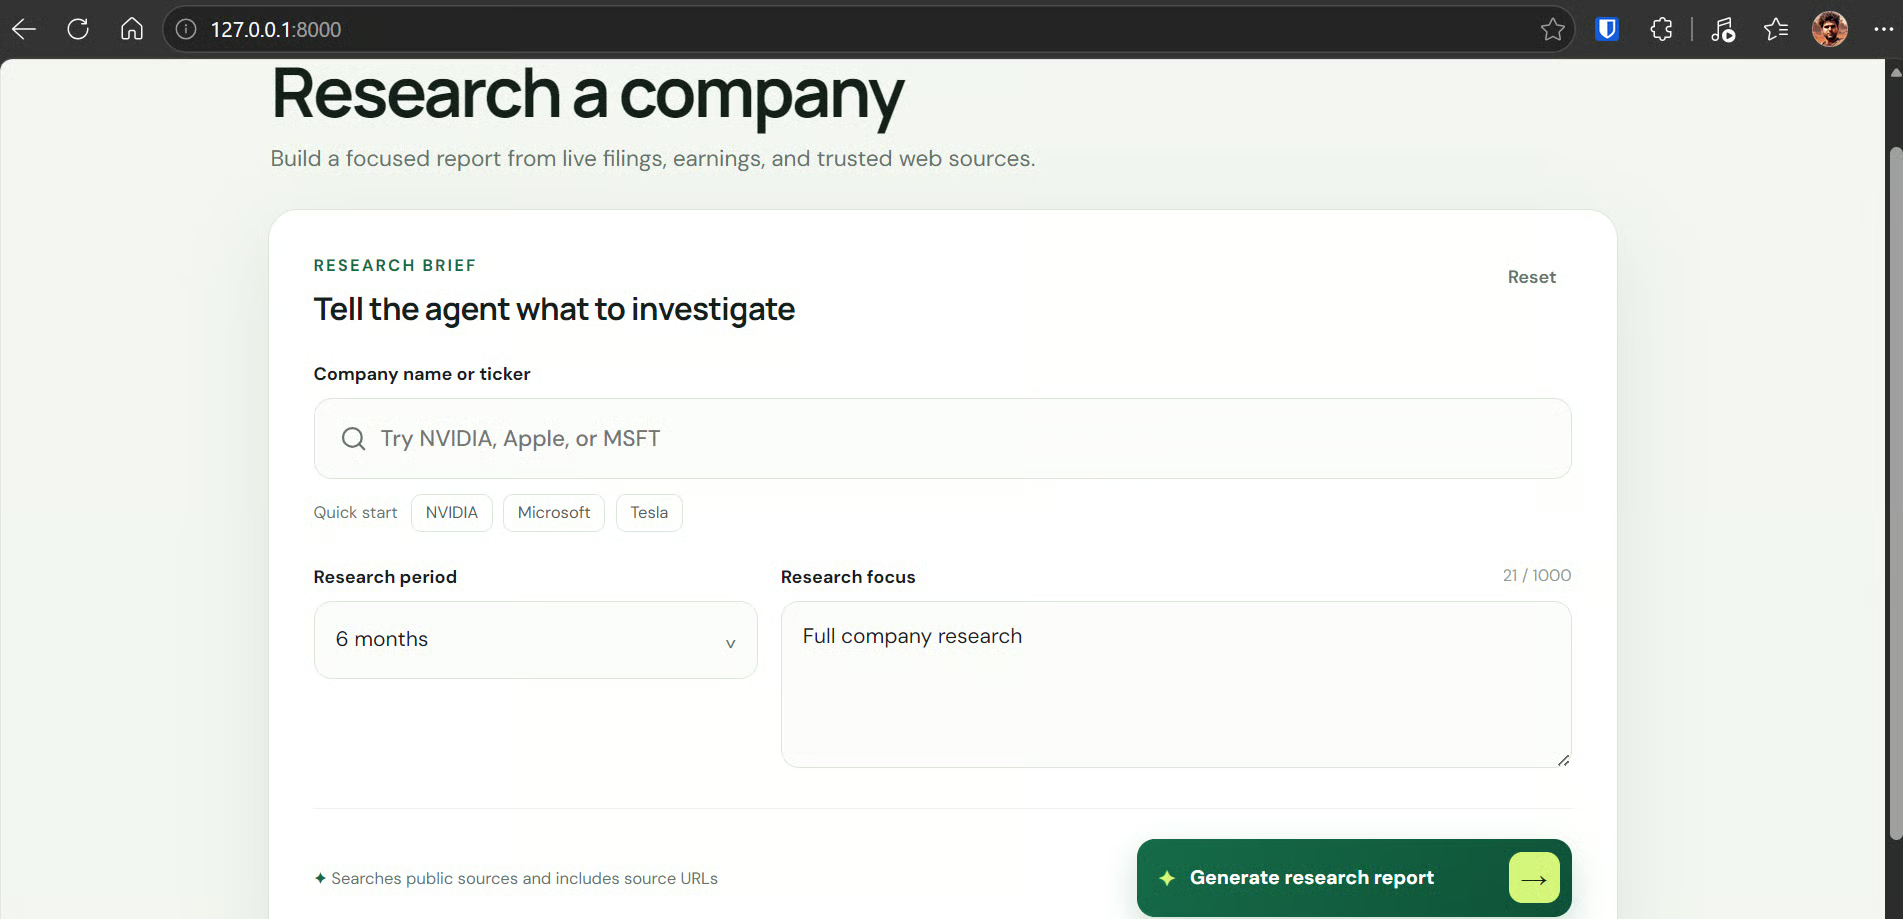
Open that URL in your browser and try:
Click Generate research report.
The report may take a few seconds to generate because the agent can call the search and source-reading tools multiple times to gather current information before producing the final response.
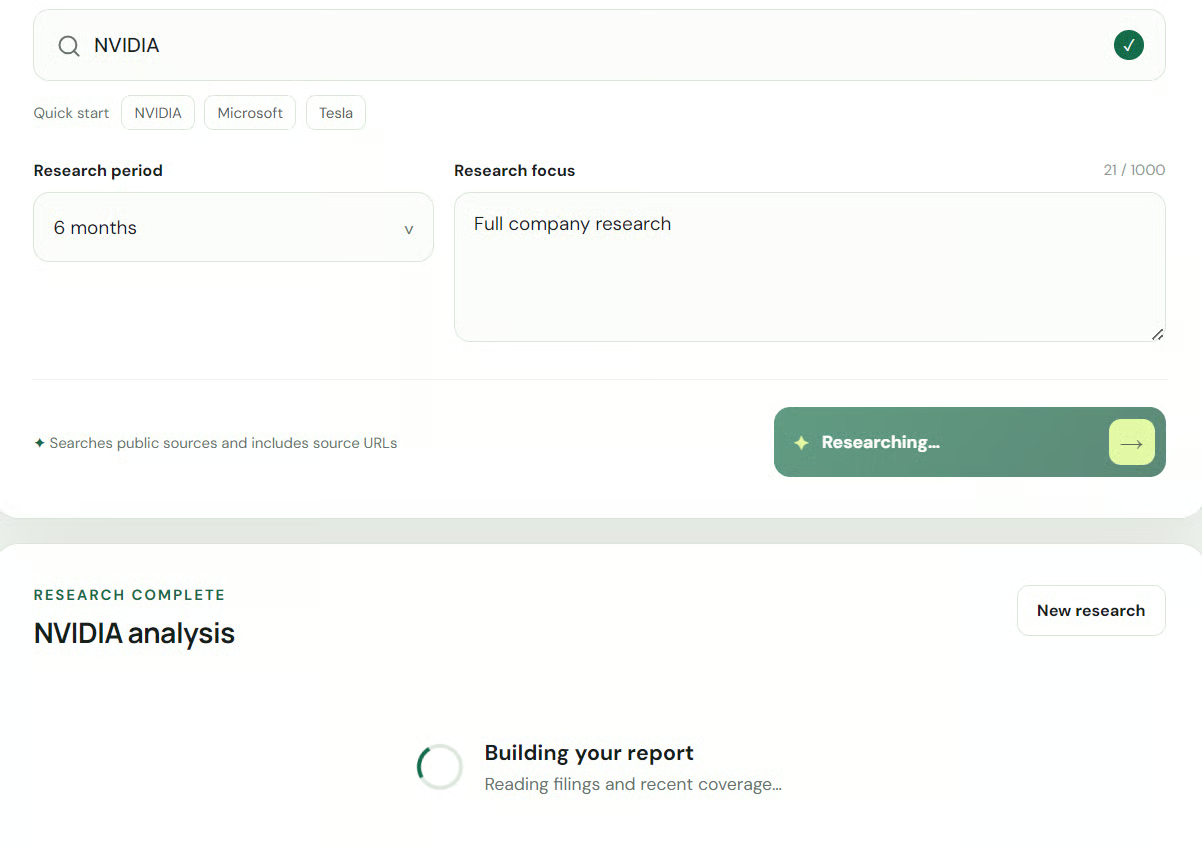
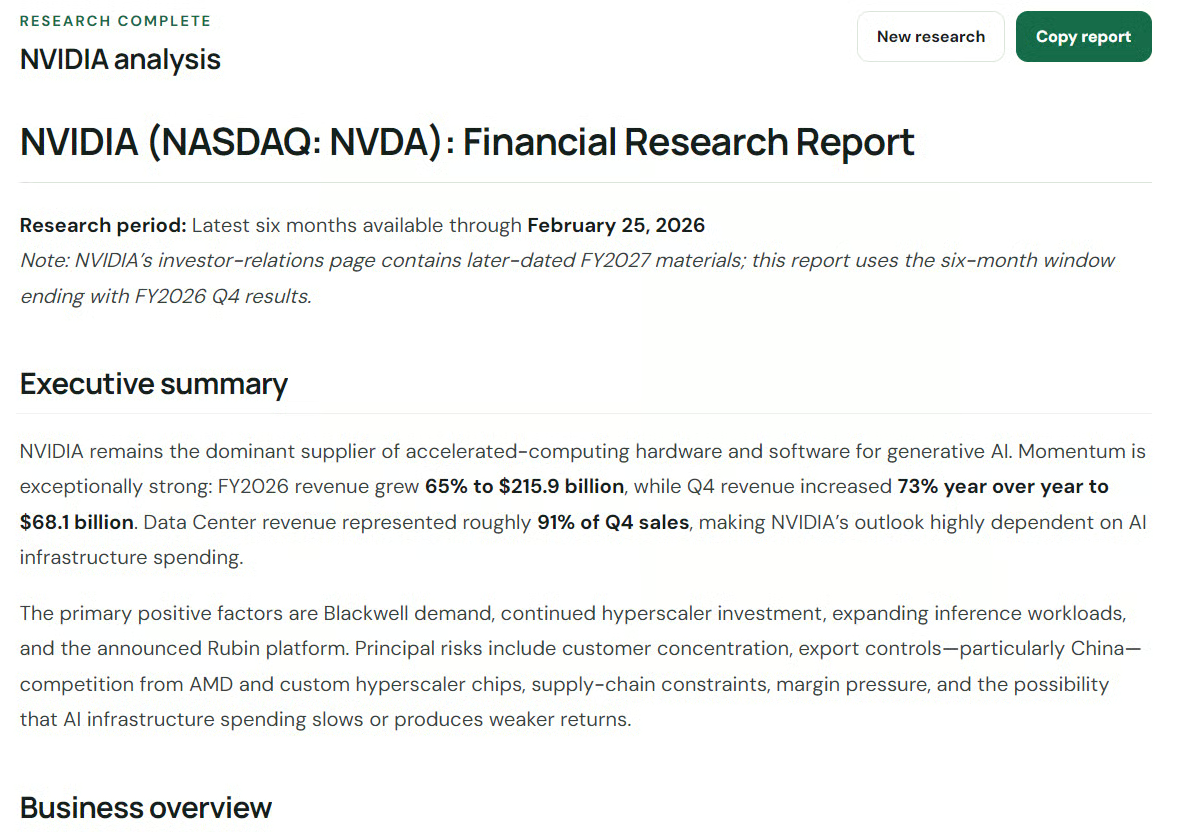
Once finished, you should see a structured research report based on the sources the agent discovered during its run.
You can also open FastAPI's automatically generated API documentation at:
http://127.0.0.1:8000/docs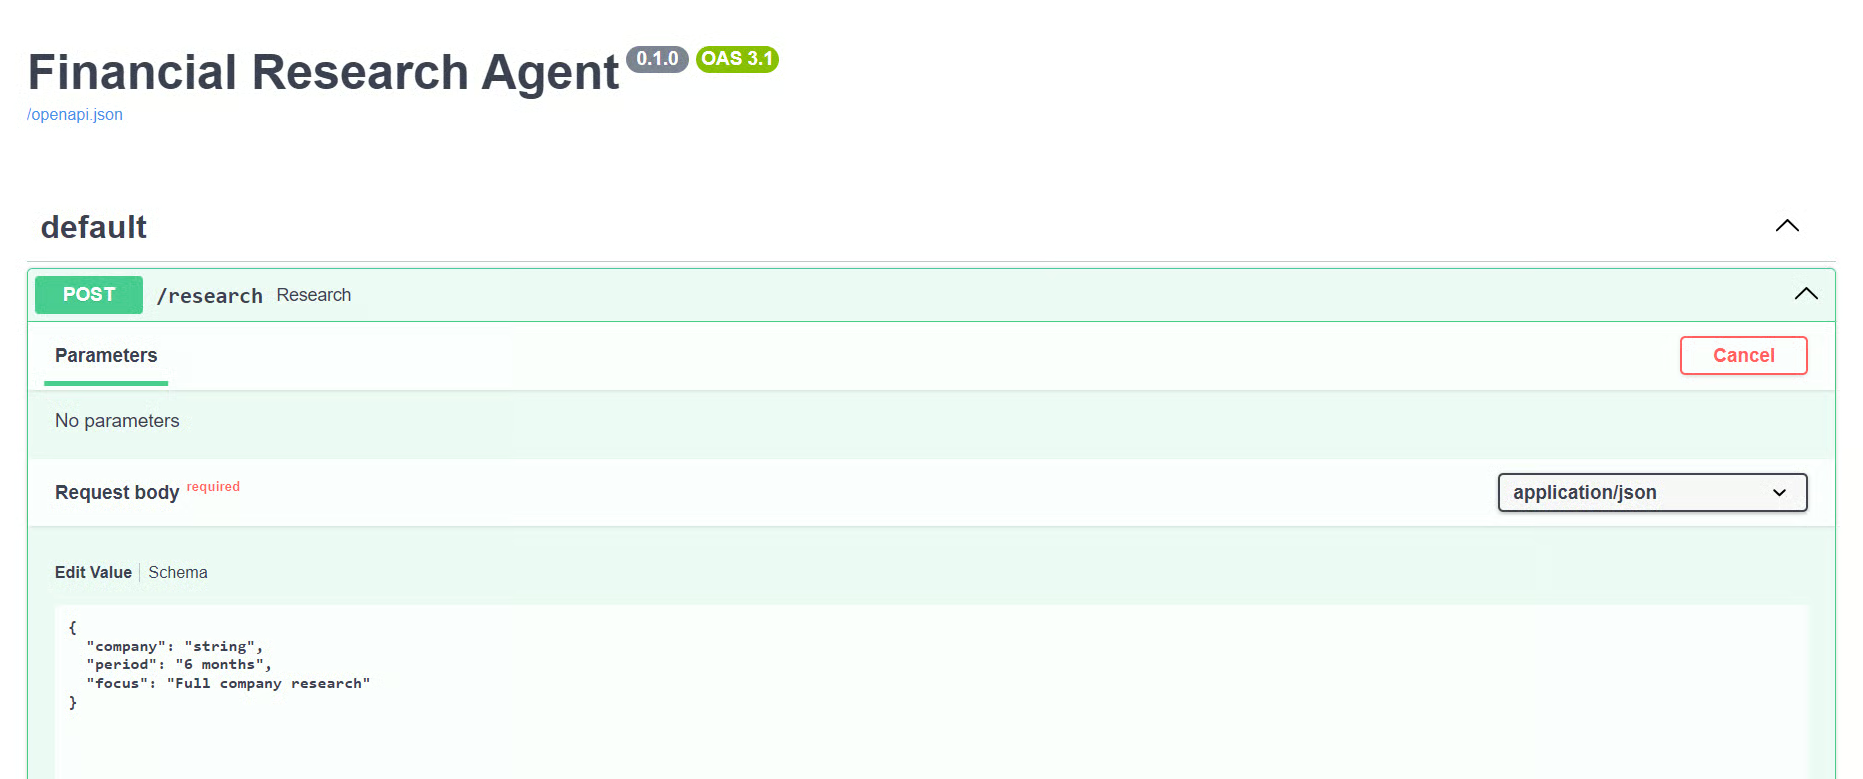
This gives you an interactive Swagger interface where you can test the /research endpoint directly without using the frontend.
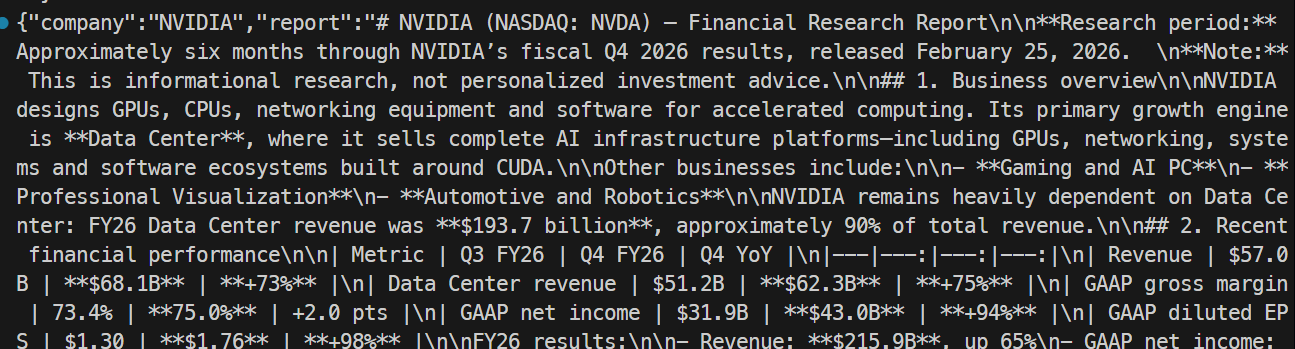
Finally, verify that the REST API works from the command line.
Keep the FastAPI server running, open another terminal, and run:
curl -X POST \
  http://127.0.0.1:8000/research \
  -H "Content-Type: application/json" \
  -d '{
    "company": "NVIDIA",
    "period": "6 months",
    "focus": "Full company research"
  }'
On Windows PowerShell, use curl.exe with the same request.
Once the application works locally, we can deploy the same project to FastAPI Cloud.
FastAPI Cloud's free Hobby tier currently supports up to three applications and does not require a credit card, making it suitable for personal projects and testing.
From the project directory, run:
uv run fastapi deployIf this is your first deployment and you are not already signed in, the CLI opens your browser and asks you to either create a new FastAPI Cloud account or sign in to an existing one.
After authentication, return to the terminal. The deployment wizard will guide you through selecting or creating a team and then creating a new application or linking the project to an existing one.
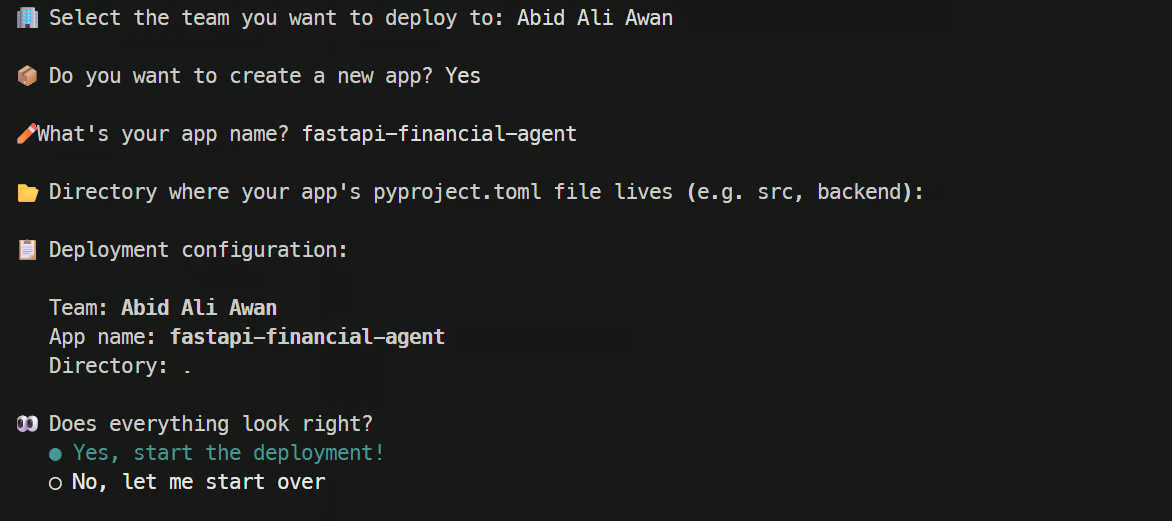
FastAPI Cloud then uploads the project, installs its dependencies, builds the application, deploys it, and verifies that everything is running correctly.
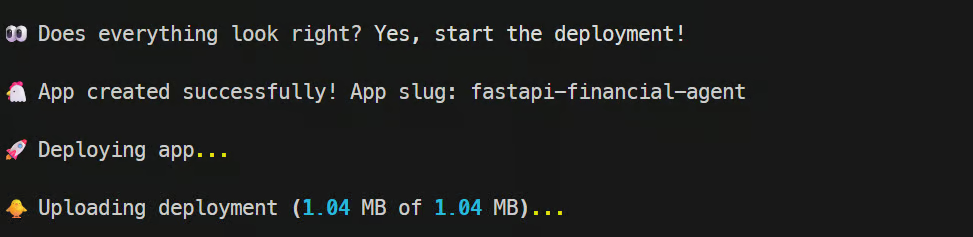
After the first deployment, a .fastapicloud directory is added to the project. This stores the local configuration that links the project to its FastAPI Cloud application.
Our deployed application still needs access to the OpenAI and Olostep API keys.
Instead of uploading the local .env file, we will add them as encrypted FastAPI Cloud secrets.
Add the OpenAI API key:
uv run fastapi cloud env set \
  --secret OPENAI_API_KEY
Enter the API key when prompted.
Next, add the Olostep API key:
uv run fastapi cloud env set \
  --secret OLOSTEP_API_KEY
FastAPI Cloud stores secret environment variables securely and hides their values after creation.
Because environment variable changes are applied on the next deployment, deploy the application again:
uv run fastapi deployOnce the deployment finishes, FastAPI Cloud provides a public URL for the application:

The financial research agent is now available online through both its web interface and REST API.
We will now test the live FastAPI Cloud application, verify the production API, and use the OpenAI Agents SDK tracing feature to see what happens behind the scenes.
Open your FastAPI Cloud deployment URL in a browser:
https://your-app.fastapicloud.dev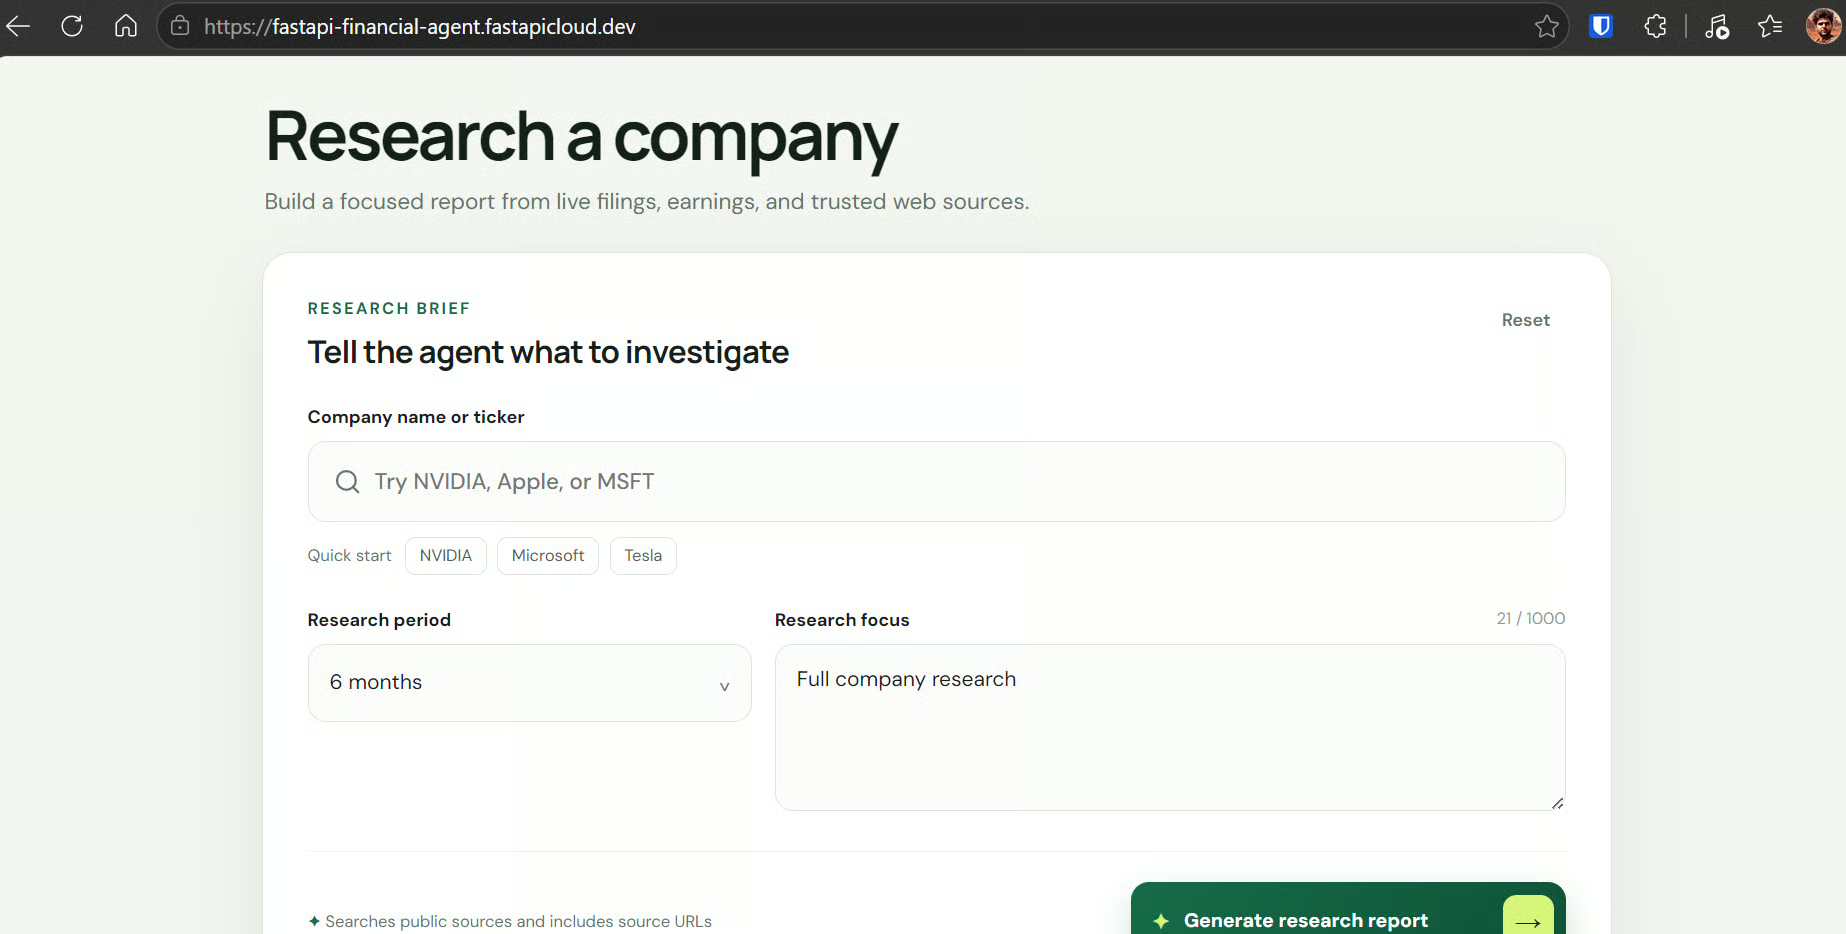
The same interface we tested locally should now be available online. Try another company, for example:
Click Generate research report and wait for the agent to complete its research.

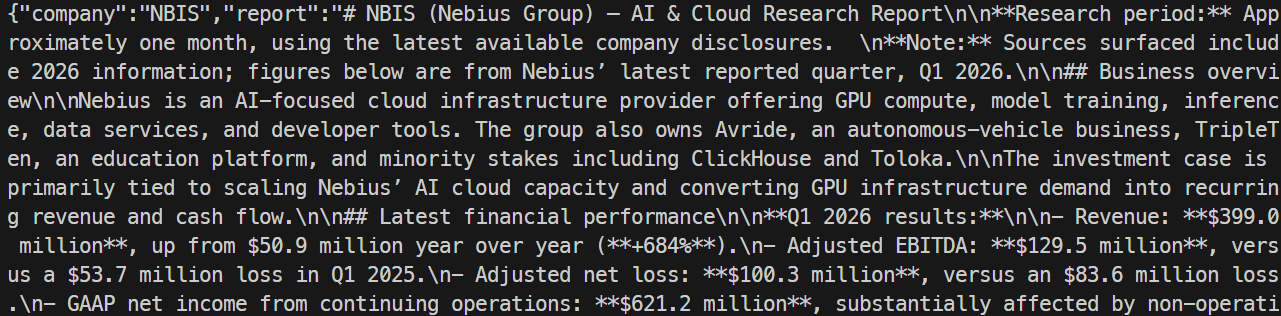
Next, test the production REST API directly. Replace the example domain with your actual FastAPI Cloud URL:
curl -X POST \
  https://your-app.fastapicloud.dev/research \
  -H "Content-Type: application/json" \
  -d '{
    "company": "NBIS",
    "period": "1 month",
    "focus": "AI and cloud business"
  }'
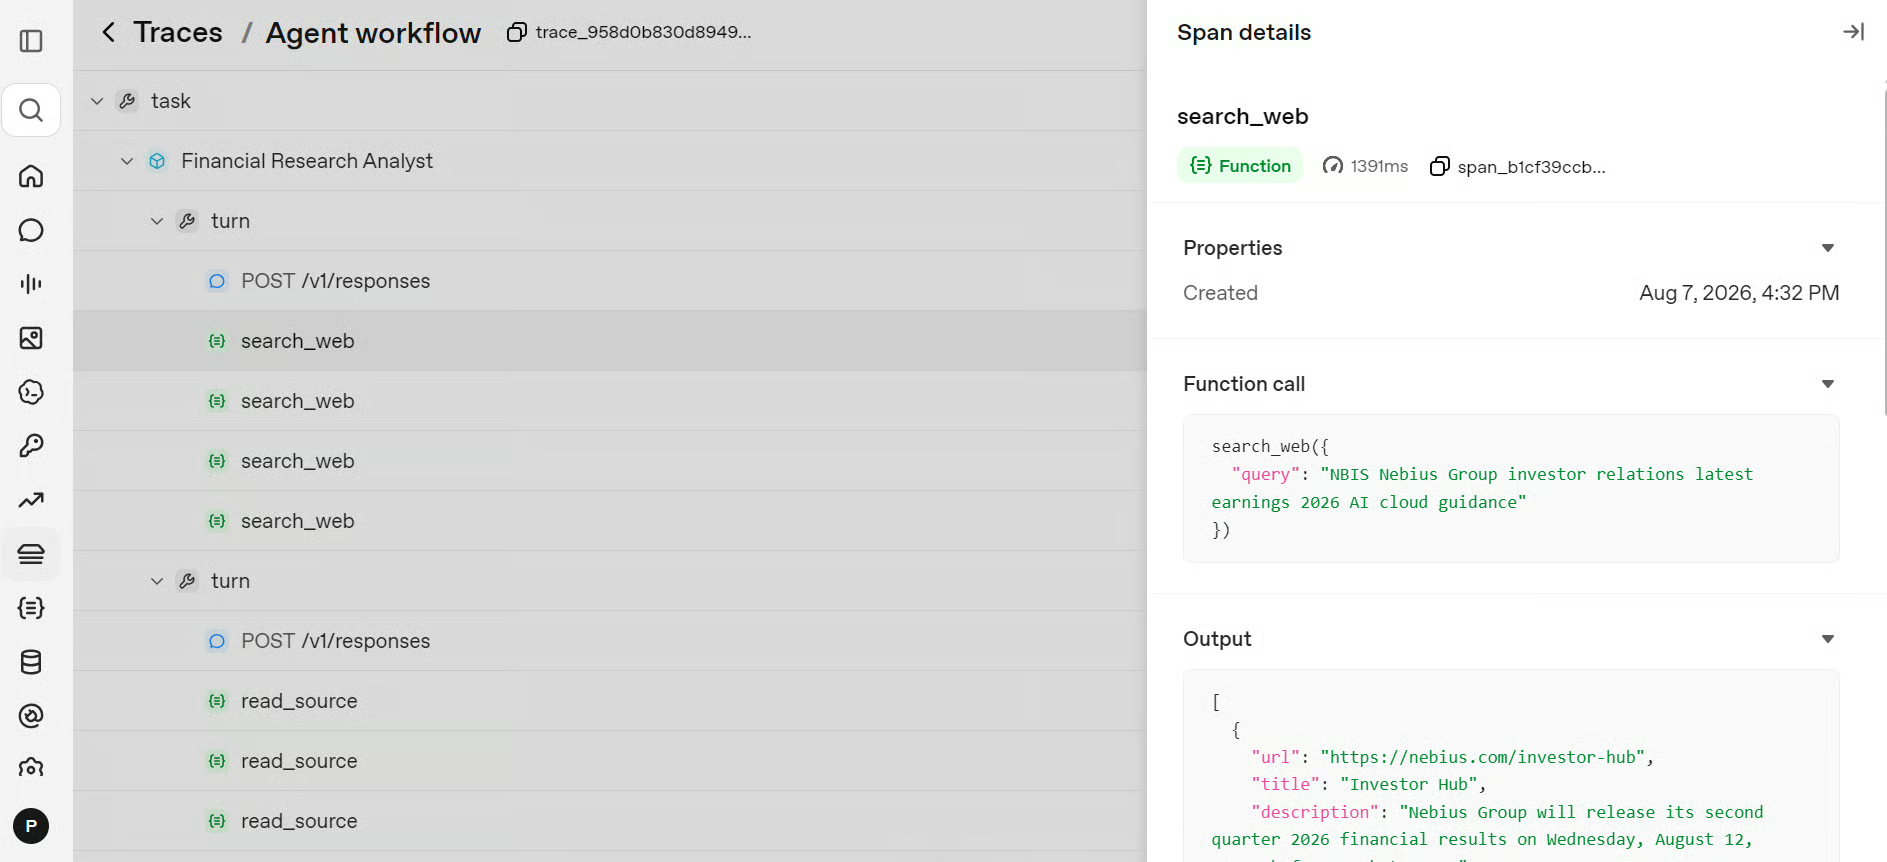
One of the most useful features of the OpenAI Agents SDK is built-in tracing.
Tracing is enabled by default and records what happens during an agent run, including model generations and tool calls, making it much easier to understand and debug the workflow.
Open the Trace viewer in the OpenAI Dashboard and select your latest run.
You can inspect the individual steps of the workflow, see which research tools the agent called, review the generated outputs, and examine how long different parts of the run took.
For our latest research test, the complete run took around 32 seconds, which is reasonable considering that the agent performs multiple live searches and source-reading steps before generating the final report.
Deploying this application was surprisingly simple.
Once it worked locally, I only needed to configure the API keys as secret environment variables and deploy it to FastAPI Cloud.
FastAPI Cloud handles the deployment and can automatically scale the application based on traffic.
The dashboard also gives you practical tools for managing the app.
You can inspect deployments and logs, monitor metrics and replicas, configure environment variables, add custom domains, and create deploy tokens for CI/CD.
My next step is to secure the web UI and protect the API endpoints so that only authorized users can access the application and run research requests.
After that, I plan to stress-test the API and monitor its performance and scaling under heavier traffic before considering it production-ready.
Overall, FastAPI Cloud feels similar to Vercel in terms of deployment simplicity, but it is built directly around the FastAPI and Python ecosystem, which makes taking a Python API from local development to the cloud remarkably straightforward.
I recommend checking out our guide to FastAPI interview questions if you're working towards a relevant job role.
Top DataCamp Courses
Kurs
Kurs
Program
Eğitim
Aashi Dutt
10 dk.
Eğitim
Bexruz (Bex) Tuychiev
Eğitim
Aashi Dutt
12 dk.
Eğitim
Aashi Dutt
9 dk.
Eğitim
François Aubry
8 dk.
Eğitim
Khalid Abdelaty
12 dk.