Install Anaconda on macOS (2026): Apple Silicon, conda init, and Common Fixes
A practical guide to installing Anaconda on a Mac with native ARM64 support, verifying the download, initializing conda, and setting up clean environments.
Updated Oct 28, 2025 · 7 min read
Installing Anaconda on a Mac used to be straightforward: download, click, done. Today, architecture differences (Apple Silicon vs. legacy Intel), shell initialization, and PATH conflicts make it easy to end up with “conda: command not found,” a slow Intel build running under Rosetta, or a Jupyter launch that never starts.
I avoid those failure modes by following a simple checklist: pick the correct installer, verify the checksum, let the installer run conda init, restart Terminal, and test with a fresh environment. The steps below reflect what works reliably on current macOS versions (Sonoma 14 and Sequoia 15).
What Is Anaconda?
Anaconda is a Python distribution that bundles Python and hundreds of scientific packages (NumPy, pandas, SciPy, scikit-learn, and more). It includes the conda package and environment manager so you can install prebuilt packages and keep project dependencies isolated.
Important Licensing Note (2026 Update)
As of July 2025, the free Anaconda Individual Edition supports use by individuals, educational institutions, non-profits, and for-profit organizations with 200 or fewer employees or contractors. Organizations with more than 200 employees or contractors must obtain a paid Business (or Enterprise) license under Anaconda’s terms.
Before downloading, confirm your Mac’s architecture and pick the matching installer from the official site.
Apple Silicon (M1/M2/M3): Use the macOS ARM64 build (osx-arm64). This runs natively and performs best.
Intel Macs: New Intel (osx-64) builds are largely discontinued as of mid-2025. You can use archived installers or consider Miniforge/Miniconda instead.
Check your architecture:
uname -m # prints 'arm64' on Apple Silicon, 'x86_64' on Intel
If output is x86_64, uninstall and reinstall the ARM64 build.
Intel Mac support ending
As of mid-2025, new Intel (osx-64) builds are no longer maintained. Use archived installers or Miniforge/Miniconda.
Installer cannot write to /opt
Re-run the installer and change the destination to your home directory (e.g., ~/anaconda3).
Homebrew installations
Avoid installing Anaconda via Homebrew — it’s deprecated and often breaks PATH resolution. Use official or community installers.
Duplicate Anaconda paths
Edit your shell profile and remove duplicates:
# Open your shell profile for editing
nano ~/.zshrc    # or: nano ~/.bash_profile

# (Inside the file) remove extra PATH entries for older Anaconda installs
# Then save and exit (Ctrl+O, Enter, Ctrl+X)

# Reload your updated profile
source ~/.zshrc

# Verify that conda is now pointing to the correct path
which conda
Jupyter fails to open
Ensure the environment is active and jupyterlab is installed there:
Master the basics of data analysis with Python in just four hours. This online course will introduce the Python interface and explore popular packages.
Learn how to install Python on your personal machine with this step-by-step tutorial. Whether you’re a Windows or macOS user, discover various methods for getting started with Python on your machine.
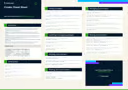
In this cheat sheet, learn all about the basics of working with Conda. From managing and installing packages, to working with channels & environments, learn the fundamentals of the conda package management tool suite.