HomeBlogPython

Tutorial: How to Install Python on macOS and Windows

Learn how to install Python on your personal machine with this step-by-step tutorial. Whether you’re a Windows or macOS user, discover various methods for getting started with Python on your machine.
Updated Sep 2023  · 14 min read
Read the Spanish version 🇪🇸 of this article.

Python is a powerful, general-purpose programming language that is widely used for web development, data science, artificial intelligence, and scientific computing. If you're new to programming and want to get started with Python, you'll need to install it on your computer. 

In this tutorial, we'll walk you through the process of installing Python on Windows and Mac using various methods, how to check which version of Python is on your machine, and how to get started with Python. We'll also showcase how to install Python packages, which are essential for any development work in Python. 

DataCamp Workspace

Skip the installation process, and get started with Python on your browser using DataCamp Workspace

Get Started
collaborate.png

How to Install Python on Windows

There are several ways to install Python on a Windows machine. Below are the options we’ll explore in this tutorial:

  • Install Python directly from the Microsoft Store: This quick and easy option will get you up and running with Python in no time. It is especially useful for beginners who want to use Python on their machine for learning purposes.
  • Install Python directly from the Python website: This method gives you more control over the installation process and allows you to customize your installation.
  • Install Python using an Anaconda distribution: Anaconda is a popular Python distribution that comes with a large number of pre-installed packages and tools, making it a good option for scientific computing and data science

No matter which method you choose, you'll be able to start using Python on your Windows machine in just a few steps. Sometimes, you can have Python already pre-installed on your machine. Here’s how you can check if your Windows machine has Python installed.

Checking if Python is Already Installed on Your Windows Machine

Python can be accessed via the terminal or the Start Menu.

To check if Python is installed on your Windows machine using the terminal, follow these steps:

  1. Open a command line tool such as Windows Terminal (the default on Windows 11) or Command Prompt (the default on Windows 10).
  2. In the command line, type `python`. If Python is installed, you should see a message like “Python 3.x.x” followed by the Python prompt, which looks like this “>>>”. Note that “3.x.x” represents the version number of Python.
  3. If Python is not installed on your machine, you will be automatically taken to the Microsoft Store installation of Python. Note that the page you are taken to may not be the latest version of Python.

To check if Python is installed on your Windows machine using the Start Menu, follow these steps:

  1. Press the Windows key or click on the Start button to open the Start Menu.
    Type "python".
  2. If Python is installed, it should show up as the best match. Press "Enter" or click on the version of Python you want to open. You should see a message like “Python 3.x.x” followed by the Python prompt, which looks like this “>>>”. Note that “3.x.x” represents the version number of Python.
  3. If Python is not installed on your machine, you will only see results for web searches for "python", or a suggestion to search the Microsoft Store for "python".

How to Install Python on Windows from the Microsoft Store

To install Python on your Windows machine using the Microsoft store, perform the following steps:

  1. Open the Microsoft Store app on your Windows machine. You can do this by clicking the Start menu and searching for "Microsoft Store."
  2. In the Microsoft Store app, search for "Python." You should see different "Python X.X" apps in the search results. With X.X referring to different versions of Python available on the Microsoft store. As a rule of thumb, choose the latest version of Python (at the time of writing this is 3.11).
  3. Click on the app to open the app page.
  4. Click the "Get" button to commence the installation process.
  5. The Microsoft Store will download and install Python on your machine. This may take a few minutes, depending on your internet connection speed.
  6. Once the installation is complete, follow the instructions in the section "Checking if Python is Already Installed on Your Windows Machine" to check that Python has been installed correctly.
  7. This Python installation also comes with the IDLE Shell, which is a simple IDE for running Python commands. To access it, search for the IDLE Shell in the all apps section of the Start menu. 

image4.png

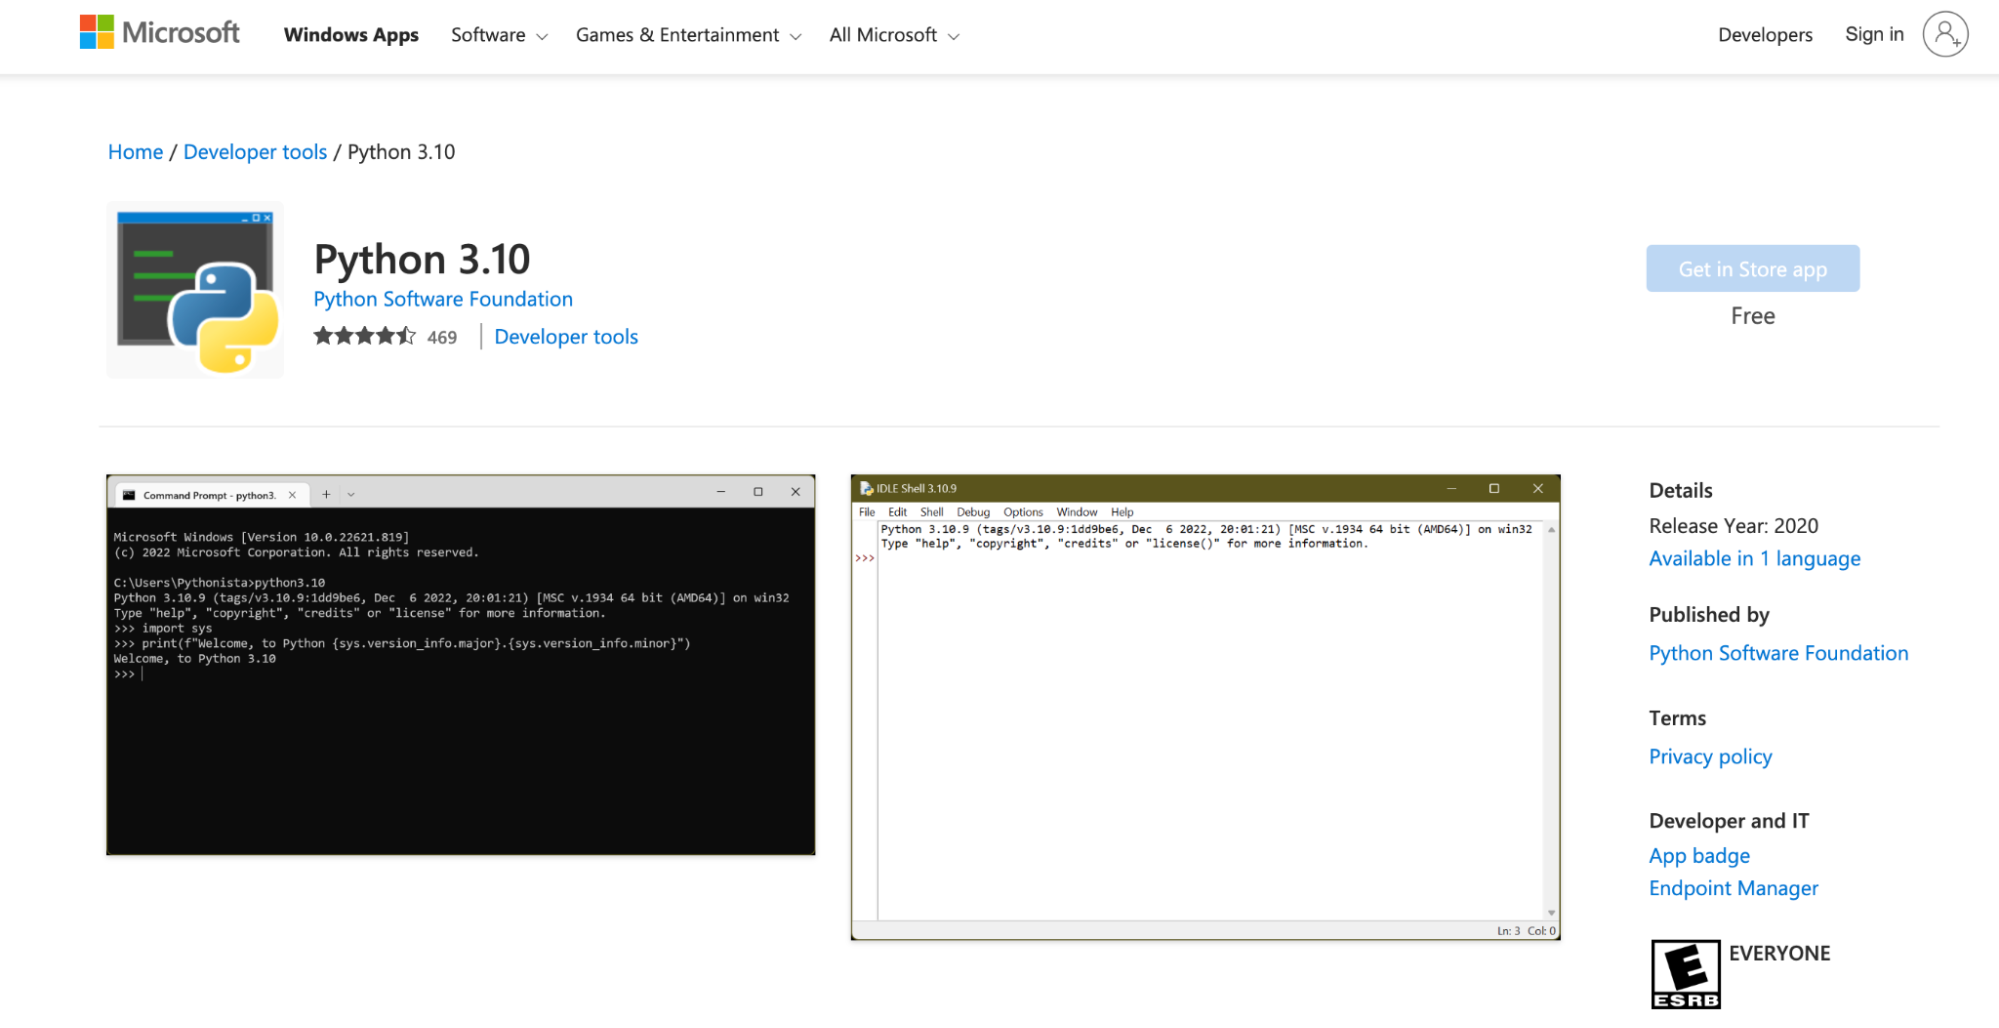
Access the Microsoft Store Installation of Python here

As discussed earlier, the Microsoft store installation of Python is predominantly useful for educational purposes. As outlined in the Python documentation itself, “The Microsoft Store package is an easily installable Python interpreter that is intended mainly for interactive use, for example, by students.”

How to Install Python on Windows from the Python Website

To install Python on your Windows machine using the full Python installer from the Python website, perform the following steps:

  1. Go to the Python download page.
  2. Under the "Python Releases for Windows" section, click the link for the latest version of Python (e.g., At the time of writing, the latest version of Python is Python 3.11.1).
  3. On the Python download page, click on the “Windows installer (64-bit)” version of Python.
  4. Once the download is complete, launch the installer file to begin the installation process.
  5. Once the installer opens, you will see an option to "Add Python 3.x to PATH". This is only recommended if you are only installing one Python version (rather than multiple versions) and you want to use Python from the terminal (rather than from an IDE).
  6. Click the "Install Now" button to begin the installation. The installation process will take a few minutes. Note that before clicking on “Install Now”, you may be asked to pick and choose features you want as part of the installation. Unless you have specific customization preferences, proceeding with the default installation is recommended.
  7. When the installation process is complete, You will be given the option to 'Disable path length limit'. For general Python use you do not need this, but for Python development, it is recommended as it can prevent problems with long auto-generated file paths.
  8. Click the "Close" button to close the installer.
  9. Once the installation is complete, follow the instructions in the section "Checking if Python is Already Installed on Your Windows Machine" to check that Python has been installed correctly.

image2.png

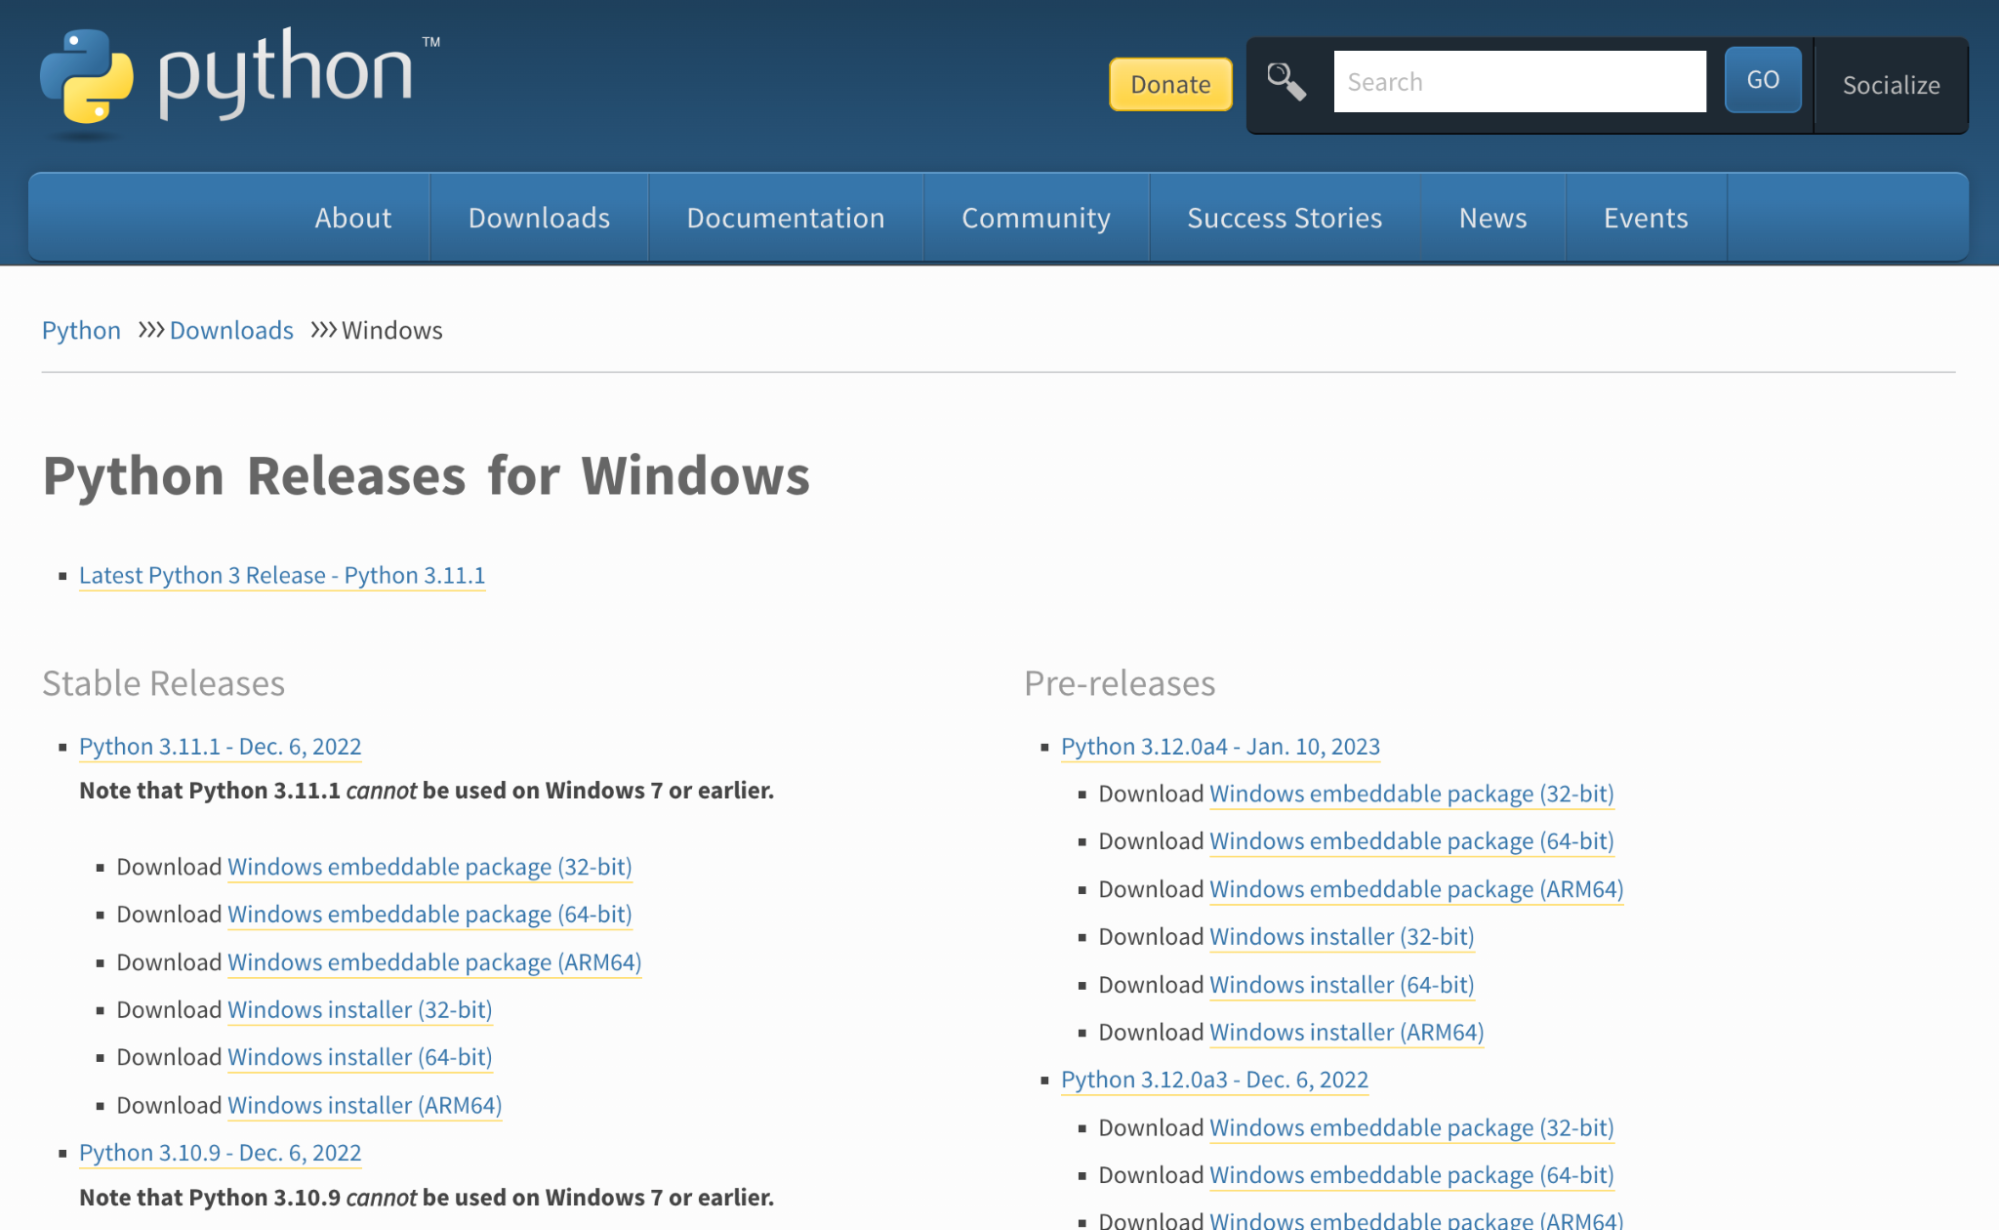
Access the Python Site Installation of Python here

How to Install Python on Windows Using Anaconda

There are different distributions of Python that come pre-installed with relevant packages and tools. One of the most popular distributions is the Anaconda Python distribution, which comes pre-installed with a host of data science packages and tools for scientific computing. To download Python using an Anaconda distribution, follow these steps:

  1. Go to the Anaconda download page.
  2. Scroll down to the “Anaconda Installers” section — there, you will find different versions of the Anaconda Installer. Click on the Windows installation for the latest version of Python (at the time of writing, it is "64-Bit Graphical Installer" for Python 3.9).
  3. Download the installer file to your local machine. Once the download is finalized, start the installation by clicking on the installer.
  4. Once the download is complete, double-click the file to begin the installation process.
  5. Complete the installation by clicking on Continue and ticking the license agreement until the installer starts extracting files and the installation process is complete.
  6. In the “Advanced Installations Options” screen, you have the option to “Add Anaconda3 to my PATH environment variable”. This is only recommended if you only have the Anaconda Python installation (rather than multiple versions) and you want to use the conda tool from the terminal (rather than from an IDE).
  7. The installer will extract the files and start the installation process. This may take a few minutes. When the installation is complete, you will be prompted to optionally install DataSpell, a data science IDE developed by JetBrains.
  8. Once the installation is successfully completed, you will see a “Thanks for installing Anaconda” screen. Press “Finish.”
  9. Once the installation is complete, follow the instructions in the section "Checking if Python is Already Installed on Your Windows Machine" to check that Python has been installed correctly.

image1.png

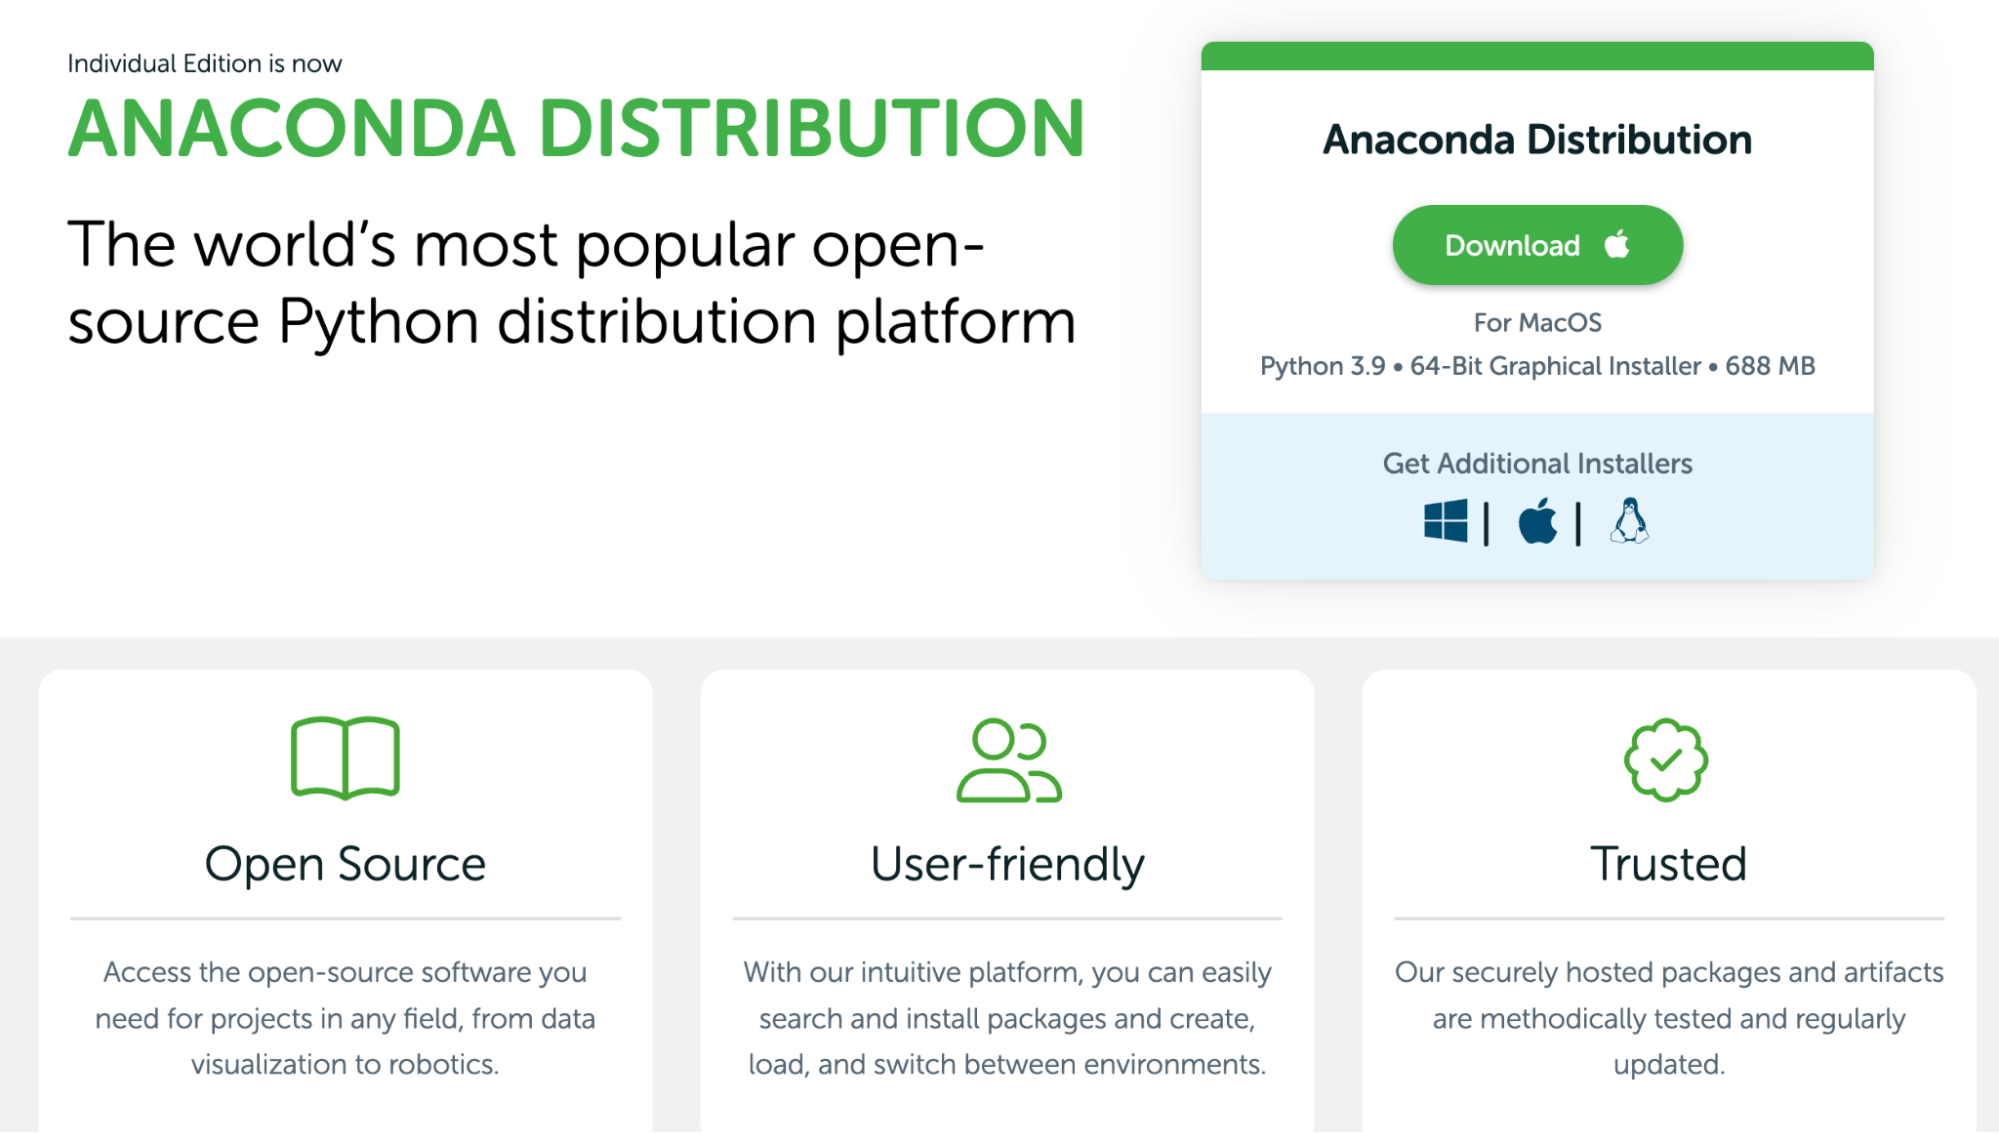
Access the Anaconda Installation of Python here

How to Install Python on macOS

Similar to installing Python on a Windows machine, there are a variety of ways to install Python we’ll be exploring in this tutorial:

  • Install Python directly from the Python website: This method gives you control over the installation process and allows you to customize your installation.
  • Install Python using an Anaconda distribution: Anaconda is a popular Python distribution that comes with a large number of pre-installed packages and tools, making it a good option for scientific computing and data science.

Checking if Python is Already Installed on Your macOS Machine

To check if Python is installed on your macOS machine, follow these steps:

  1. Open the Terminal app by going to the Applications folder or Spotlight search and searching for Terminal.
  2. In the command line, type python3. If Python is installed, you should see a message like “Python 3.x.x” followed by the Python prompt, which looks like this “>>>”. “3.x.x” represents the version number of Python.
  3. If Python is not installed on your machine, you will see an error message stating Python cannot be found.

How to Install Python on macOS from the Python Website

To install Python on your macOS machine using the full Python installer from the Python website, perform the following steps:

  1. Go to the Python download page.
  2. Under the "Python Releases for macOS" section, click the link for the latest version of Python (e.g., At the time of writing, the latest version of Python is Python 3.11.1).
  3. On the Python download page, in the "Files" section, click on “macOS 64-bit universal2 installer”.
  4. Once the download is complete, double-click the file to begin the installation process.
  5. Complete the installation by clicking on Continue and ticking the license agreement until the installer starts extracting files and the installation process is complete. You may need to provide your admin password to complete the installation.
  6. When the installation process is complete, click the "Close" button to close the installer.
  7. Once the installation is complete, follow the instructions in the section "Checking if Python is Already Installed on Your macOS Machine" to check that Python has been installed correctly.

How to Install Python on macOS Using Anaconda

There are different distributions of Python that come pre-installed with relevant packages and tools. One of the most popular distributions is the Anaconda Python distribution, which comes pre-installed with a host of data science packages and tools for scientific computing. To download Python using an Anaconda distribution, follow these steps:

  1. Determine the type of CPU in your Mac. Click on the Apple logo in the top left of your desktop and select "About This Mac". In the Overview pane, make a note of the value in the "Chip" row.
  2. Go to the Anaconda download page.
  3. Scroll down to the “Anaconda Installers” section — there, you will find different versions of the Anaconda Installer. If your Mac has a CPU of type "Apple M1", click on "64-Bit (M1) Graphical Installer". Otherwise click on "64-Bit Graphical Installer".
  4. Once the download is complete, double-click the file to begin the installation process.
  5. Complete the installation by clicking on Continue and ticking the license agreement until the installer starts extracting files and the installation process is complete.
  6. When the installation is complete, you will be also prompted to optionally install DataSpell, a data science IDE developed by JetBrains.
  7. Once the installation is successfully completed, you will see an “Installation was completed successfully” screen. Press “Finish”.
  8. Once the installation is complete, follow the instructions in the section "Checking if Python is Already Installed on Your macOS Machine" to check that Python has been installed correctly.

How to Install Python Packages

Python is modular, with a large ecosystem of packages that provide functionality for specific data science tasks. For example, the pandas package provides functionality for data manipulation, scikit-learn provides machine learning functionality, and PyTorch provides deep learning functionality.

There are two package management tools for installing Python packages: pip3 and conda. These tools allow you to install and upgrade Python packages.

Installing packages with pip3

Use pip3 if you installed Python from the Python website or the Microsoft Store.   

To install packages with pip3, follow these steps:

  1. Before you attempt to install Python packages, make sure Python is installed on your machine. To install Python, follow the instructions in one of the previous sections (such as downloading and installing from the website using the Microsoft Store).
  2. To install a package using pip3, open a Terminal on macOS or Command Prompt on Windows and type the following command: 
    pip3 install {package_name}
    The {package_name} here refers to a package you want to install. For example, to install the numpy package, you would type:
    pip3 install numpy
  3. If the package has dependencies (i.e., it requires other packages for it to function), pip3 will automatically install them as well.
  4. Once the installation is complete, you can import the package into your Python code. For example, if you installed the numpy package, you could import it and use it like this:
    import numpy as np 
    arr = np.array(["I", "love", "Python", "package", "management"])
  5. If you want to update a package to the latest version, you can use the pip3 install --upgrade command. 
    pip3 install --upgrade {package_name}
    For example, you update the numpy package to the latest version by following this command:
    pip3 install --upgrade numpy
  6. If you want to uninstall a package, you can use the pip3 uninstall command. 
    pip3 uninstall {package_name}
    For example, the following will uninstall numpy.
    pip3 uninstall numpy
  7. To list all the packages that are installed, use the pip3 freeze command.
    pip3 freeze

Installing packages with conda

Use conda if you installed Python from Anaconda. conda comes with many Python packages for data science installed, so you don't need to install common packages yourself.

To install packages with conda, follow these steps:

  1. Before you attempt to install Python packages, make sure Python is installed on your machine. To install Python, follow the instructions in one of the previous sections (such as downloading and installing from Anaconda).
  2. To install a package using conda, open a Terminal on macOS or Command Prompt on Windows and type the following command:
    conda install {package_name}
    for example, to install the pytorch package, type the following.
    conda install pytorch
  3. If you want to update a package to the latest compatible version, you can use the conda update command. 
    conda update {package_name}
    For example, to update the pytorch package to the latest version, you would type:
    conda update pytorch
  4. If you want to uninstall a package, you can use the conda remove command.
    conda remove {package_name}
  5. For example, to uninstall the pytorch package, you would type:
    conda remove pytorch
  6. To list all the packages that are installed, use conda's list command.
    conda list

Become a Python Expert

We hope you enjoyed this tutorial! However, installing Python is just the first step in becoming a Python expert. For more resources on learning Python, check out the following resources below.

Topics

Become a Python Expert

Course

Introduction to Python

4 hr
5.4M
Master the basics of data analysis with Python in just four hours. This online course will introduce the Python interface and explore popular packages.
See DetailsRight Arrow
Start Course
See MoreRight Arrow
Related

Mastering the Pandas .explode() Method: A Comprehensive Guide

Learn all you need to know about the pandas .explode() method, covering single and multiple columns, handling nested data, and common pitfalls with practical Python code examples.
Adel Nehme's photo

Adel Nehme

5 min

Python NaN: 4 Ways to Check for Missing Values in Python

Explore 4 ways to detect NaN values in Python, using NumPy and Pandas. Learn key differences between NaN and None to clean and analyze data efficiently.
Adel Nehme's photo

Adel Nehme

5 min

Seaborn Heatmaps: A Guide to Data Visualization

Learn how to create eye-catching Seaborn heatmaps
Joleen Bothma's photo

Joleen Bothma

9 min

Test-Driven Development in Python: A Beginner's Guide

Dive into test-driven development (TDD) with our comprehensive Python tutorial. Learn how to write robust tests before coding with practical examples.
Amina Edmunds's photo

Amina Edmunds

7 min

Exponents in Python: A Comprehensive Guide for Beginners

Master exponents in Python using various methods, from built-in functions to powerful libraries like NumPy, and leverage them in real-world scenarios to gain a deeper understanding.
Satyam Tripathi's photo

Satyam Tripathi

9 min

Python Linked Lists: Tutorial With Examples

Learn everything you need to know about linked lists: when to use them, their types, and implementation in Python.
Natassha Selvaraj's photo

Natassha Selvaraj

9 min

See MoreSee More