What Auto-Embeddings Simplify
In a typical retrieval-augmented generation (RAG) setup, you generate embeddings when you insert a document, regenerate them when the content changes, and embed every query yourself. Automated Embedding simplifies the process of building semantic search, as MongoDB Atlas handles embedding generation, updates, and querying natively, and Vector Search stores generated vector embeddings on your cluster.
How MongoDB does automatic embedding
When a vector search index of type autoEmbed is created, MongoDB generates embeddings for the chosen field, uses the VoyageAI model, keeps them in sync when there are changes to the document, and embeds the query text at search time with the same model. The generated embeddings are stored asynchronously on the MongoDB cluster in a separate internal database.
In this tutorial, we will build a Q&A Docs Assistant with MongoDB autoembeddings. The Django MongoDB backend will be used to define the models and ingest documents, and MongoDB will be used for lookups, generating and syncing embeddings automatically, and the LLM will return documents based on the retrieved results.
By the end of this tutorial, you’ll build the retrieval stage of a RAG pipeline: a semantic search over Federal Register documents where auto-embeddings handle the embedding work for you. The documents are embedded when you insert them, re-embedded when they change, and your queries are embedded at search time, all without writing embedding code.
There are two ways to follow this tutorial.
Setup
Before starting, make sure you have:
Once these prerequisites are complete, the next step is to create your project folder.
Create a project and virtual environment
Create an empty folder for your project and cd into it.
mkdir regulations_qa
cd regulations_qa
This is your project’s root directory. Create and activate your virtual environment here, if you haven’t already:
To activate the virtual environment on macOS or Linux, run:
source .venv/bin/activate
On Windows, run:
Install Dependencies
Create a requirements.txt file at the root of the project with the following contents:
# requirements.txt
django-mongodb-backend
python-dotenv
requests #to fetch documents from the Federal Register API.
Then install everything:
pip install -r requirements.txt
Create Django Project and Django App
From your project's root directory, run the following command to create a new Django project and app. Add the trailing . in the startproject command, which tells Django to install the project into the current directory instead of creating a new nested folder.
django-admin startproject regulations_qa --template https://github.com/mongodb-labs/django-mongodb-project/archive/refs/heads/6.0.x.zip .
Create the documents app
python manage.py startapp documents
Register the app in regulations_qa/settings.py by adding it to INSTALLED_APPS:
INSTALLED_APPS = [
    'regulations_qa.apps.MongoAdminConfig',
    'regulations_qa.apps.MongoAuthConfig',
    'regulations_qa.apps.MongoContentTypesConfig',
    'django.contrib.sessions',
    'django.contrib.messages',
    'django.contrib.staticfiles',
    'django_mongodb_backend',
    'documents',
]
Create a .env file at the root of the project with your own values, and list it in .gitignore so it isn’t committed when you push.
# .env
SECRET_KEY=[REPLACE_WITH_YOUR_SECRET_KEY]
MONGODB_URI="mongodb+srv://<username>:<password>@<cluster>.mongodb.net/?retryWrites=true&w=majority"
DB_NAME=regulations_qa
VECTOR_INDEX_NAME=autoembed_index
Delete the original hardcoded SECRET_KEY = '...' line from settings.py, copy the value Django generated in settings.py when you run startproject and replace it in your .env file. It’s hardcoded there by default, and we move it into .env to keep it out of version control, since Django uses it to sign session cookies, CSRF tokens, and other security-sensitive data.
Open regulations_qa/settings.py and make sure it contains all of the following. The import lines and load_dotenv() go at the top. Replace the existing SECRET_KEY and DATABASES definitions, and add the VECTOR_INDEX_NAME line:
import os
from dotenv import load_dotenv

load_dotenv()

SECRET_KEY = os.getenv("SECRET_KEY")
VECTOR_INDEX_NAME = os.getenv("VECTOR_INDEX_NAME")

DATABASES = {
    'default': {
        'ENGINE': 'django_mongodb_backend',
        'HOST': os.getenv("MONGODB_URI"),
        'NAME': os.getenv("DB_NAME"),
    },
}
Create folders for management commands
Next, we create folders with empty __init__.py files for management commands, because Django only discovers custom commands in a management/commands/ package.
mkdir -p documents/management/commands documents/services && touch documents/management/__init__.py documents/management/commands/__init__.py documents/services/__init__.py
The source of data: The Federal Register documents
In this tutorial, we will index documents from the Federal Register; the US government’s daily publications of rules, proposed rules, and notices. The source of data is a public API consisting of documents that have a title and a short prose abstract, which works well with semantic search.
API documentation: https://www.federalregister.gov/developers/documentation/api/v1
The records have fields such as title, type, abstract, document_number (a unique ID), publication_date, html_url, and an agencies list.
- Some documents contain null values, so we will omit them.
- Abstracts contain markup like
<INF>2.5</INF> in “PM2.5”, so we strip tags before saving.
- Results are paged at up to 100 per request, and each page includes a
next_page_url (cursor-based) to follow.
Test the endpoint via shell
curl -g "https://www.federalregister.gov/api/v1/documents.json?conditions[agencies][]=environmental-protection-agency&per_page=2"
NB: This is public US government data used for demonstration. It is not a legal source; for legal research, use the official edition.
Ingest the Data
We will start by creating models in the models.py file.
from django.db import models
class Document(models.Model):
document_number = models.CharField(max_length=32, unique=True)
title = models.TextField()
doc_type = models.CharField(max_length=32)
agency = models.CharField(max_length=128)
publication_date = models.DateField()
abstract = models.TextField()
source_url = models.URLField(max_length=500)
def __str__(self):
return f"{self.document_number}: {self.title[:60]}"
Next, we create and run migrations.
python manage.py makemigrations documents
python manage.py migrate
Next, let’s move to the ingest part.
import re
import time
import requests
from django.core.management.base import BaseCommand
from documents.models import Document
API_URL = "https://www.federalregister.gov/api/v1/documents.json"
TAG_PATTERN = re.compile(r"<[^>]+>")
class Command(BaseCommand):
help = "Load Federal Register documents into MongoDB."
def add_arguments(self, parser):
parser.add_argument("--agency", default="environmental-protection-agency")
parser.add_argument("--limit", type=int, default=300)
def handle(self, *args, **options):
params = [
("conditions[agencies][]", options["agency"]),
("conditions[type][]", "RULE"),
("conditions[type][]", "PRORULE"),
("per_page", "100"),
]
headers = {"User-Agent": "regulations-qa-tutorial"}
url, processed = API_URL, 0
while url and processed < options["limit"]:
response = requests.get(
url,
params=params if url == API_URL else None,
headers=headers,
timeout=30,
)
response.raise_for_status()
page = response.json()
for item in page["results"]:
abstract = TAG_PATTERN.sub("", item.get("abstract") or "").strip()
if not abstract:
continue
agencies = item.get("agencies") or [{}]
Document.objects.update_or_create(
document_number=item["document_number"],
defaults={
"title": TAG_PATTERN.sub("", item["title"]),
"doc_type": item["type"],
"agency": agencies[0].get("name", ""),
"publication_date": item["publication_date"],
"abstract": abstract,
"source_url": item["html_url"],
},
)
processed += 1
if processed >= options["limit"]:
break
url = page.get("next_page_url")
time.sleep(1)
self.stdout.write(f"Documents in database: {Document.objects.count()}")
Run the command:
python manage.py ingest_federal_register --limit 100
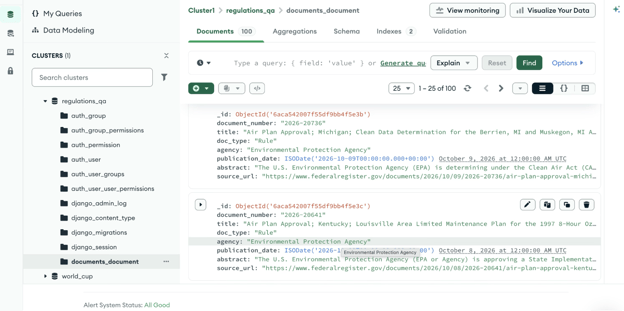
You can confirm the import in the MongoDB Atlas UI:
Define the Auto-Embed Index
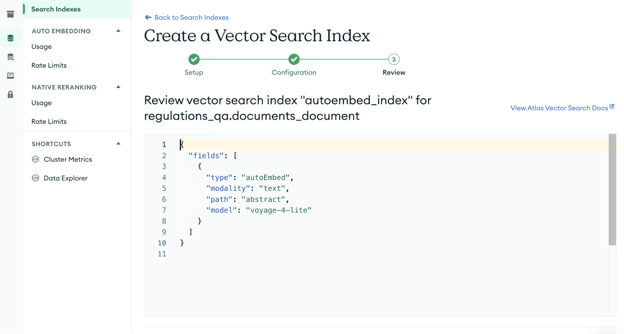
The vector search index tells MongoDB which field to perform embeddings on and specifies what model should be used. After that, MongoDB automatically generates and stores the embeddings.
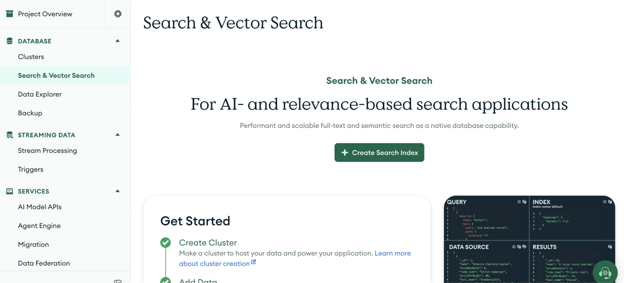
- In the Atlas UI, open your cluster, go to Search & Vector Search, and click Create Search Index.
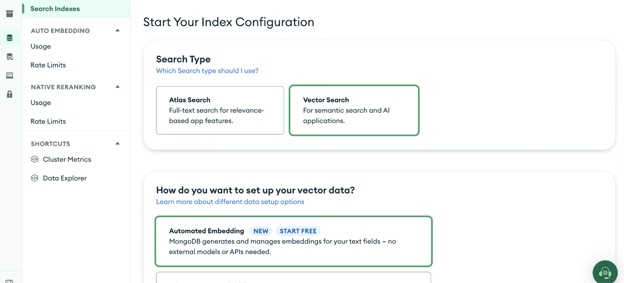
- Choose Vector Search as the search type and Automated Embedding as the way to set up your vector data.
- Choose the JSON editor, select your database and the
documents_document collection, and name the index autoembed_index (the name must match VECTOR_INDEX_NAME in your .env). Paste this definition:
{
  "fields": [
    {
      "type": "autoEmbed",
      "modality": "text",
      "path": "abstract",
      "model": "voyage-4-lite"
    }
  ]
}
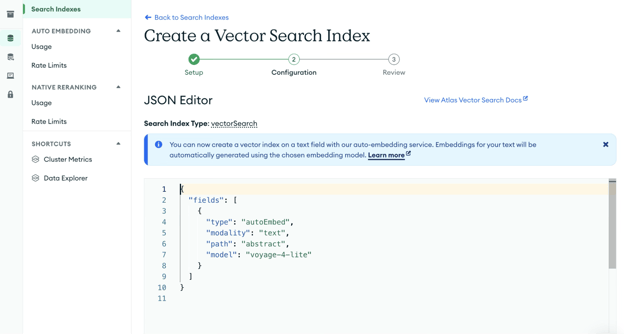
Review the definition, then create the index.
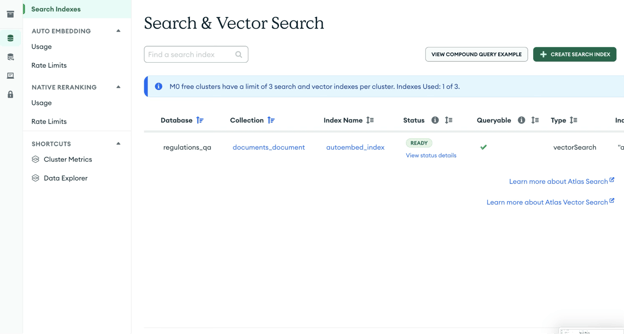
- Wait until the index status shows it’s ready to query, as the embeddings are being generated in the background.
Query in Plain Text
For auto-embeddings, we use the $vectorSearch stage with a plain-text query and embed the question with the same model the index uses, so there’s no embedding call in our code.
To achieve this, we will create a service module.
from functools import lru_cache
from django.conf import settings
from pymongo import MongoClient
from documents.models import Document
DEFAULT_LIMIT = 5
@lru_cache(maxsize=1)
def _get_client():
return MongoClient(settings.DATABASES["default"]["HOST"])
def _get_collection():
db_name = settings.DATABASES["default"]["NAME"]
return _get_client()[db_name][Document._meta.db_table]
def _get_index_name():
index_name = settings.VECTOR_INDEX_NAME
if not index_name:
raise ValueError("VECTOR_INDEX_NAME is not set. Add it to your .env file.")
return index_name
def semantic_search(question: str, limit: int = DEFAULT_LIMIT) -> list:
"""Search with a plain-text question.
There is no query vector to pass in: MongoDB embeds the question
with the index's model.
"""
pipeline = [
{
"$vectorSearch": {
"index": _get_index_name(),
"path": "abstract",
"query": question,
"numCandidates": limit * 20,
"limit": limit,
}
},
{
"$project": {
"_id": 0,
"document_number": 1,
"title": 1,
"abstract": 1,
"source_url": 1,
"score": {"$meta": "vectorSearchScore"},
}
},
]
return list(_get_collection().aggregate(pipeline))
_get_client() creates the connection to MongoDB once and reuses it. lru_cache remembers the result of the first call, so every search shares one client instead of opening a new connection each time._get_collection() picks the regulations_qa database and the documents_document collection, using the same settings Django uses._get_index_name() reads the index name from settings and gives a clear error if it’s missing.semantic_search() sends the question as text in the query field. The second stage trims the output to the fields we need and adds the similarity score.
Then we add a helper to search the docs:
from django.core.management.base import BaseCommand
from documents.services.search_service import semantic_search
class Command(BaseCommand):
help = "Run a plain-text search."
def add_arguments(self, parser):
parser.add_argument("question")
def handle(self, *args, **options):
for hit in semantic_search(options["question"]):
self.stdout.write(
f"{hit['score']:.3f} {hit['document_number']} {hit['title'][:80]}"
)
Now, to test, run:
python manage.py search_docs "limits on pollution from factories"
With the example, we select questions that don’t share keywords with the abstracts. A question about “limits on pollution from factories” should retrieve documents about emission standards.
NB: On a free (M0) cluster without a payment method, query embedding requests may be rate limited.
Demo: Edit a Document and Watch It Re-Sync
For the demo, we can either use the Search Tester in MongoDB Atlas, which is tied to the autoembed_index we created previously on the regulations_qa.documents_document collection, or the Python shell.
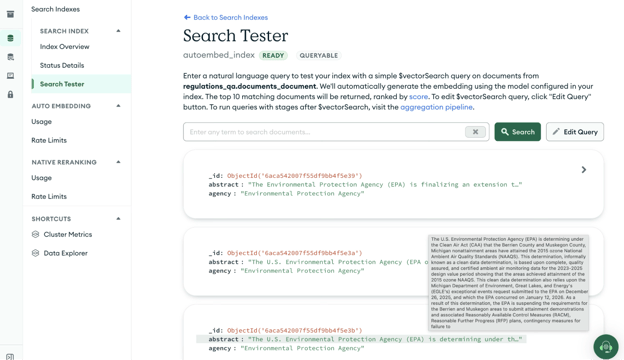
Step 1: Search via MongoDB Atlas and the shell
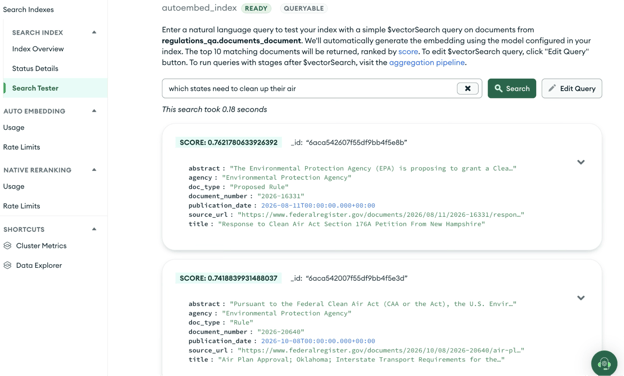
To test this in the MongoDB Atlas UI, enter this query:
which states need to clean up their air
To test via the shell:
Open the shell with python manage.py shell, then run:
from documents.models import Document
from documents.services.search_service import semantic_search
Q = "which states need to clean up their air"
hits = semantic_search(Q, limit=10)
print("\n".join(f"{i}  {h['score']:.3f}  {h['document_number']}  {h['title'][:70]}" for i, h in enumerate(hits, 1)))
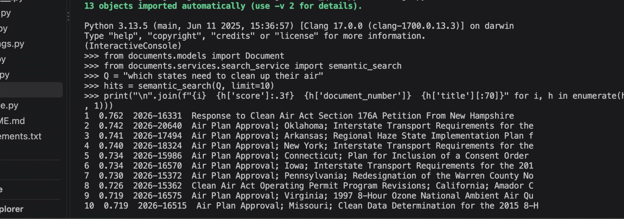
The output should be the same as what we saw via the GUI.
Step 2: Edit the document
target = hits[-1]
doc = Document.objects.get(document_number=target["document_number"])
original = doc.abstract
doc.abstract = original + " This action also identifies which states and areas must clean up their air to meet health-based standards."
doc.save()
print(target["document_number"], "edited")

Step 3: Search again
Auto-embeddings are generated asynchronously, so wait 30–60 seconds, then run the query again:
hits = semantic_search(Q, limit=10)
print("\n".join(f"{i}  {h['score']:.3f}  {h['document_number']}  {h['title'][:70]}" for i, h in enumerate(hits, 1)))
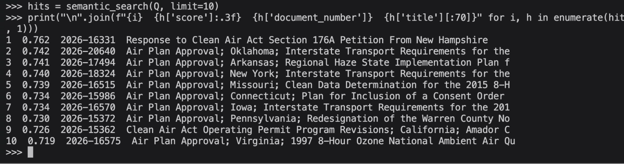
Now, we should expect to see the edited document rank higher than before.
Run the same query in the Search Tester to see the results via the GUI.
What happened was that MongoDB noticed that the indexed field changed and regenerated that document’s embedding, so document 2026-16515, which was the 10th document in the sample, was ranked higher and placed at the 5th position after the edit and sync.
Wrap-up
Congratulations for making it to this point! We have a docs Q&A assistant using data where MongoDB handles the embedding workflow. This was achieved in the following steps:
- Insert: documents loaded through the Django ORM
- Index: one index definition, created in the Atlas UI, naming the field and the model.
- Query: plain-text questions through a small service without adding a separate embedding call.
- Edit: changes to the indexed field are re-synced without a re-embedding script.
NB: Data in this tutorial comes from the Federal Register, which publishes US government documents. This tutorial is independent and not affiliated with or endorsed by the Federal Register.
References




What Auto-Embeddings Simplify
In a typical retrieval-augmented generation (RAG) setup, you generate embeddings when you insert a document, regenerate them when the content changes, and embed every query yourself. Automated Embedding simplifies the process of building semantic search, as MongoDB Atlas handles embedding generation, updates, and querying natively, and Vector Search stores generated vector embeddings on your cluster.
How MongoDB does automatic embedding
When a vector search index of type
autoEmbedis created, MongoDB generates embeddings for the chosen field, uses theVoyageAImodel, keeps them in sync when there are changes to the document, and embeds the query text at search time with the same model. The generated embeddings are stored asynchronously on the MongoDB cluster in a separate internal database.In this tutorial, we will build a Q&A Docs Assistant with MongoDB autoembeddings. The Django MongoDB backend will be used to define the models and ingest documents, and MongoDB will be used for lookups, generating and syncing embeddings automatically, and the LLM will return documents based on the retrieved results.
By the end of this tutorial, you’ll build the retrieval stage of a RAG pipeline: a semantic search over Federal Register documents where auto-embeddings handle the embedding work for you. The documents are embedded when you insert them, re-embedded when they change, and your queries are embedded at search time, all without writing embedding code.
There are two ways to follow this tutorial.
Setup
Before starting, make sure you have:
Once these prerequisites are complete, the next step is to create your project folder.
Create a project and virtual environment
Create an empty folder for your project and
cdinto it.This is your project’s root directory. Create and activate your virtual environment here, if you haven’t already:
To activate the virtual environment on macOS or Linux, run:
On Windows, run:
Install Dependencies
Create a
requirements.txtfile at the root of the project with the following contents:Then install everything:
Create Django Project and Django App
From your project's root directory, run the following command to create a new Django project and app. Add the trailing
.in thestartprojectcommand, which tells Django to install the project into the current directory instead of creating a new nested folder.Create the
documentsappRegister the app in
regulations_qa/settings.pyby adding it toINSTALLED_APPS:Configure environment variables
Create a
.envfile at the root of the project with your own values, and list it in.gitignoreso it isn’t committed when you push.Delete the original hardcoded
SECRET_KEY = '...'line fromsettings.py, copy the value Django generated insettings.pywhen you runstartprojectand replace it in your.envfile. It’s hardcoded there by default, and we move it into.envto keep it out of version control, since Django uses it to sign session cookies, CSRF tokens, and other security-sensitive data.Open
regulations_qa/settings.pyand make sure it contains all of the following. The import lines andload_dotenv()go at the top. Replace the existingSECRET_KEYandDATABASESdefinitions, and add theVECTOR_INDEX_NAMEline:Create folders for management commands
Next, we create folders with empty
__init__.pyfiles for management commands, because Django only discovers custom commands in amanagement/commands/package.The source of data: The Federal Register documents
In this tutorial, we will index documents from the Federal Register; the US government’s daily publications of rules, proposed rules, and notices. The source of data is a public API consisting of documents that have a title and a short prose abstract, which works well with semantic search.
API documentation: https://www.federalregister.gov/developers/documentation/api/v1
The records have fields such as
title,type,abstract,document_number(a unique ID),publication_date,html_url, and anagencieslist.<INF>2.5</INF>in “PM2.5”, so we strip tags before saving.next_page_url(cursor-based) to follow.Test the endpoint via shell
NB: This is public US government data used for demonstration. It is not a legal source; for legal research, use the official edition.
Ingest the Data
We will start by creating models in the
models.pyfile.Next, we create and run migrations.
Next, let’s move to the ingest part.
Run the command:
You can confirm the import in the MongoDB Atlas UI:
Define the Auto-Embed Index
The vector search index tells MongoDB which field to perform embeddings on and specifies what model should be used. After that, MongoDB automatically generates and stores the embeddings.
documents_documentcollection, and name the indexautoembed_index(the name must matchVECTOR_INDEX_NAMEin your.env). Paste this definition:Review the definition, then create the index.
Query in Plain Text
For auto-embeddings, we use the
$vectorSearchstage with a plain-text query and embed the question with the same model the index uses, so there’s no embedding call in our code.To achieve this, we will create a service module.
_get_client()creates the connection to MongoDB once and reuses it.lru_cacheremembers the result of the first call, so every search shares one client instead of opening a new connection each time._get_collection()picks theregulations_qadatabase and thedocuments_documentcollection, using the same settings Django uses._get_index_name()reads the index name from settings and gives a clear error if it’s missing.semantic_search()sends the question as text in thequeryfield. The second stage trims the output to the fields we need and adds the similarity score.Then we add a helper to search the docs:
Now, to test, run:
With the example, we select questions that don’t share keywords with the abstracts. A question about “limits on pollution from factories” should retrieve documents about emission standards.
NB: On a free (M0) cluster without a payment method, query embedding requests may be rate limited.
Demo: Edit a Document and Watch It Re-Sync
For the demo, we can either use the
Search Testerin MongoDB Atlas, which is tied to theautoembed_indexwe created previously on theregulations_qa.documents_documentcollection, or the Python shell.Step 1: Search via MongoDB Atlas and the shell
To test this in the MongoDB Atlas UI, enter this query:
To test via the shell:
Open the shell with
python manage.py shell, then run:The output should be the same as what we saw via the GUI.
Step 2: Edit the document
Step 3: Search again
Auto-embeddings are generated asynchronously, so wait 30–60 seconds, then run the query again:
Now, we should expect to see the edited document rank higher than before.
Run the same query in the Search Tester to see the results via the GUI.
What happened was that MongoDB noticed that the indexed field changed and regenerated that document’s embedding, so document
2026-16515, which was the 10th document in the sample, was ranked higher and placed at the 5th position after the edit and sync.Wrap-up
Congratulations for making it to this point! We have a docs Q&A assistant using data where MongoDB handles the embedding workflow. This was achieved in the following steps:
NB: Data in this tutorial comes from the Federal Register, which publishes US government documents. This tutorial is independent and not affiliated with or endorsed by the Federal Register.
References