
Course
Foundations of PySpark
4 hr
157.5K
Imagine you manage an e-commerce platform that processes thousands of transactions daily. You want to analyze sales trends, track revenue growth, and forecast future income. Traditional database queries can’t handle this scale or speed. So you need a faster way to process large datasets and gain real-time insights.
Apache Spark lets you analyze massive volumes of data efficiently. In this tutorial, I’ll show you how to connect Django, MongoDB, and Apache Spark to analyze e-commerce transaction data.
You’ll set up a Django project with MongoDB as the database and store transaction data in it. Then, you’ll use PySpark, the Python API for Apache Spark, to read and filter the data. You’ll also perform basic calculations and save the processed data in MongoDB. Finally, you’ll display the processed data in your Django application.
To get the best out of this tutorial, you should have a basic understanding of Python and the Django web framework.
Now, let's dive in.
django-mongodb-backend to connect Django to MongoDB Atlas with native support for ObjectId primary keysadmin, auth, contenttypes) with custom app configs to use MongoDB-compatible fieldsspark.read.format('mongodb').load() to load MongoDB collections into PySpark DataFrames.write.format('mongodb').save() and display results in Django templatesStart by creating a virtual environment for your Django project:
python -m venv venv
source venv/bin/activate
Ensure you have Python 3.10 or later installed in your virtual environment. Then, install Django MongoDB Backend:
pip install django-mongodb-backendThe preceding command also installs the latest versions of PyMongo 4.x and Django 5.2.x.
Once you've downloaded Django MongoDB Backend, create a new Django project:
django-admin startproject pyspark_tutorialNow, navigate to the project folder and run the development server to confirm your project is properly set up:
cd pyspark_tutorial
python manage.py runserver
Visit http://127.0.0.1:8000/ to verify that your Django project is running successfully.
By default, Django uses AutoField integer IDs for primary keys, which works well with SQL databases. However, MongoDB uses ObjectId for document IDs. To make your models compatible, you need Django to generate primary keys as ObjectId instead of integers.
Open pyspark_tutorial/settings.py and update the DEFAULT_AUTO_FIELD setting:
DEFAULT_AUTO_FIELD = 'django_mongodb_backend.fields.ObjectIdAutoField'Even with this global setting, Django’s built-in apps such as admin, auth, and contenttypes will still default to AutoField. To ensure consistency across all apps, create custom app configurations to make them use ObjectId.
Create a pyspark_tutorial/apps.py file and add the following:
from django.contrib.admin.apps import AdminConfig
from django.contrib.auth.apps import AuthConfig
from django.contrib.contenttypes.apps import ContentTypesConfig


class MongoAdminConfig(AdminConfig):
    default_auto_field = 'django_mongodb_backend.fields.ObjectIdAutoField'

class MongoAuthConfig(AuthConfig):
    default_auto_field = 'django_mongodb_backend.fields.ObjectIdAutoField'

class MongoContentTypesConfig(ContentTypesConfig):
    default_auto_field = 'django_mongodb_backend.fields.ObjectIdAutoField'
Now, in pyspark_tutorial/settings.py, update your INSTALLED_APPS setting:
INSTALLED_APPS = [
    'pyspark_tutorial.apps.MongoAdminConfig',
    'pyspark_tutorial.apps.MongoAuthConfig',
    'pyspark_tutorial.apps.MongoContentTypesConfig',
    'django.contrib.sessions',
    'django.contrib.messages',
    'django.contrib.staticfiles',
]
Because all models must use ObjectIdAutoField, each third-party and contrib app you use needs to have its own migrations specific to MongoDB. So add the following to your pyspark_tutorial/setting.py file:
MIGRATION_MODULES = {
    'admin': 'mongo_migrations.admin',
    'auth': 'mongo_migrations.auth',
    'contenttypes': 'mongo_migrations.contenttypes',
}
Create a mongo_migrations folder in your project folder, on the same level as your manage.py file. Your folder structure at this stage should resemble this:
pyspark_tutorial/
├── pyspark_tutorial/
├── mongo_migrations/
└── manage.py
Stop the server with Ctrl + C, then generate your migrations:
python manage.py makemigrations admin auth contenttypesIf you check your mongo_migrations folder, you’ll see a folder for each built-in app. Each folder contains its migrations.
For a Django project template that has all the preceding MongoDB configurations, run:
django-admin startproject pyspark_tutorial --template https://github.com/mongodb-labs/django-mongodb-project/archive/refs/heads/5.2.x.zipNote: If you’re using a version of Django other than 5.2.x, replace the two numbers to match the first two numbers from your version.
The next step is to create a Django app to store your raw and processed transaction records.
python manage.py startapp salesTo configure your new app to use ObjectId, open sales/apps.py and replace the line default_auto_field = 'django.db.models.BigAutoField':
from django.apps import AppConfig


class SalesConfig(AppConfig):
    # Use ObjectId as the default primary key field type for MongoDB:
    default_auto_field = 'django_mongodb_backend.fields.ObjectIdAutoField'
    name = 'sales'
Alternatively, you can use the following startapp template, which includes the preceding change:
python manage.py startapp sales --template https://github.com/mongodb-labs/django-mongodb-app/archive/refs/heads/5.2.x.zipNow, in pyspark_tutorial/settings.py, add your sales app to the INSTALLED_APPS list:
INSTALLED_APPS = [
    # Add your sales app:
    'sales.apps.SalesConfig',
    ...
]Since you’ll be storing your data in MongoDB, I’ll walk you through how to create a free-tier deployment on MongoDB Atlas to store and manage your data in the cloud.
Register for an Atlas account using your Google account or an email address.
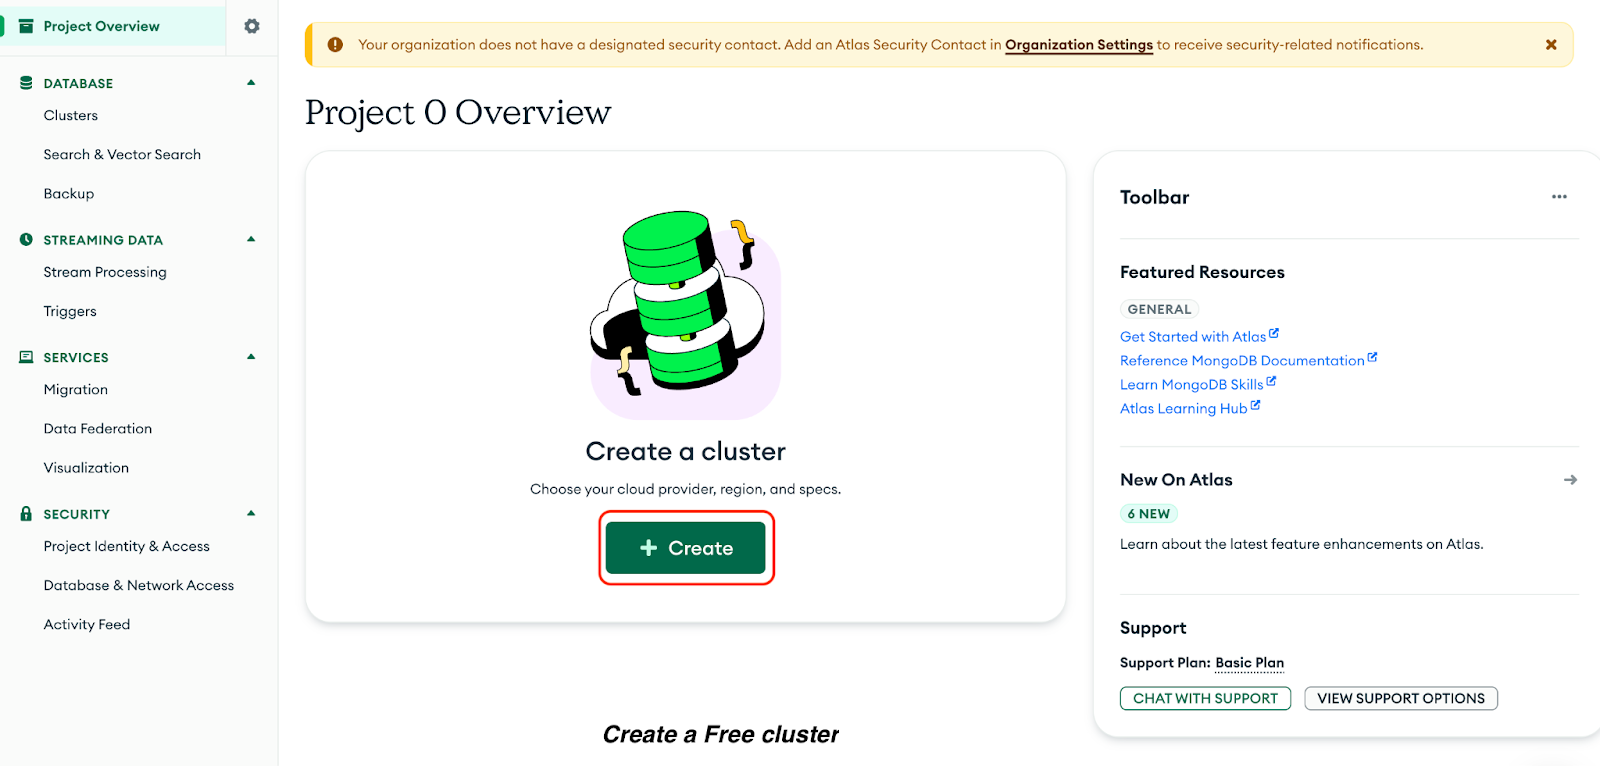
Click Create to create a Free cluster:
Now, select the following options in the resulting page:
Click Create Deployment:

You’ll see your username and password. Do the following:
1. Copy your username and password to a secure document.
2. Click Create Database User.
3. Click Choose a connection method to set a connection IP address.
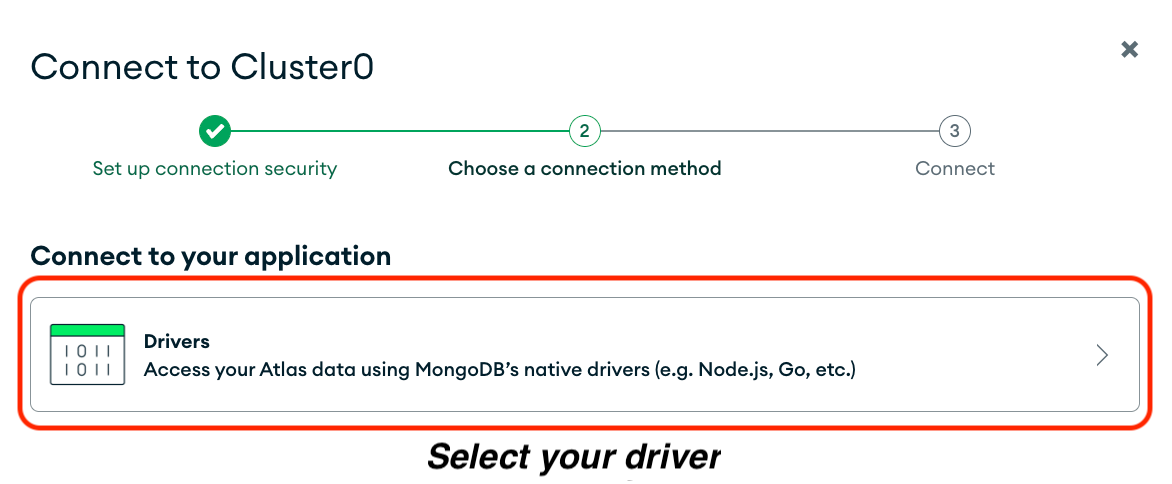
Do the following on the resulting page:
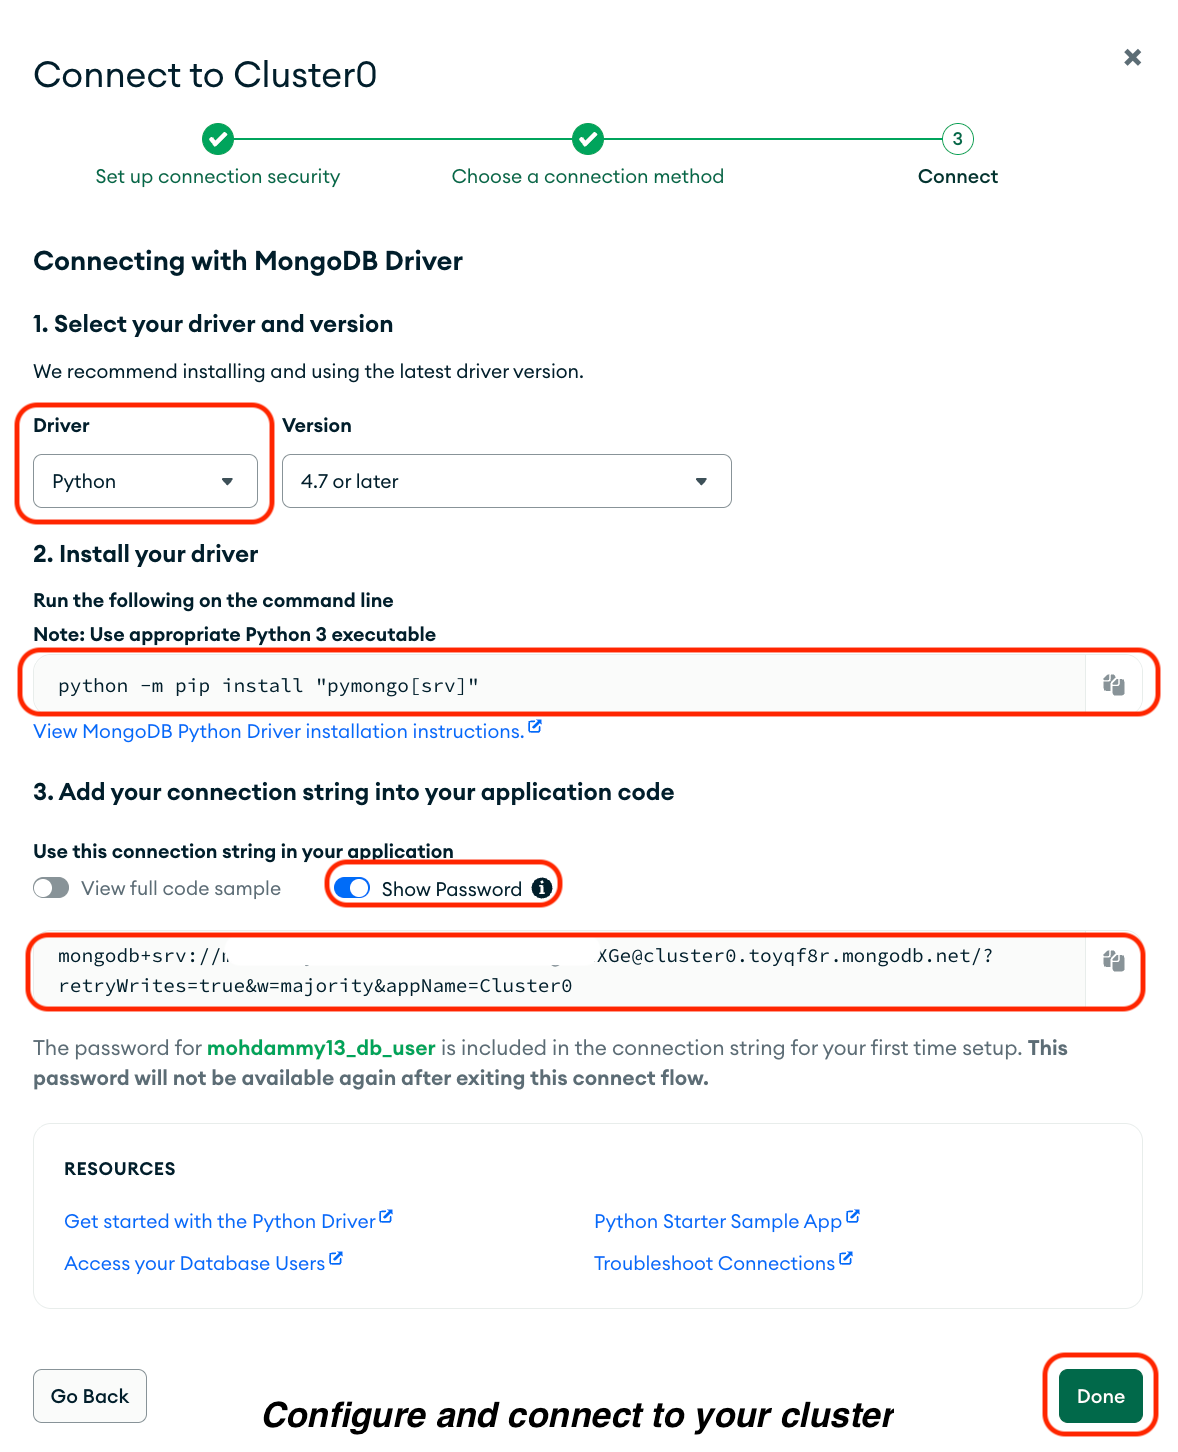
1. Select Drivers.
2. Select Python as your driver.
3. Copy the command in the Install your driver option and run it in your terminal.
4. Copy your connection string, including your password, under Add your connection string into your application code, and save it in a secure document.
5. Click Done.
Open pyspark_tutorial/settings.py, and update the DATABASES setting to use Django MongoDB Backend with your saved connection string. Set a database name as well:
DATABASES = {
    'default': {
        # Change to use Django MongoDB Backend:
        'ENGINE': 'django_mongodb_backend',
        # Use your saved connection string:
        'HOST': '<connection string>',
        # Set a database name:
        'NAME': 'pyspark_tutorial',
    },
}
In the preceding code, ensure you replace <connection string> with your saved connection string.
This configuration connects Django to your MongoDB Atlas cluster. The ENGINE points to the MongoDB backend, HOST stores your connection string, and NAME defines the database name that Django will use.
Now that your app is configured, you'll create the models, views, URLs, and templates needed to display transaction data in your browser.
Models describe the structure of your data. Create a model to represent transaction records. Open sales/models.py and replace the code:
from django.db import models

# Define a model to represent each transaction record:
class Transaction(models.Model):
    order_id = models.CharField(max_length=50, unique=True)
    user_id = models.CharField(max_length=50)
    product = models.CharField(max_length=100)
    price = models.DecimalField(max_digits=10, decimal_places=2)
    quantity = models.PositiveIntegerField()
    timestamp = models.DateTimeField()
    country = models.CharField(max_length=50)

    class Meta:
        # Sort transactions by order ID:
        ordering = ['order_id']
        # Add indexes to improve query performance for common lookup fields
        indexes = [
            models.Index(fields=['timestamp']),
            models.Index(fields=['country']),
            models.Index(fields=['product']),
        ]

    def __str__(self):
        return f'{self.order_id} - {self.product}'

    @property
    def total_amount(self):
        # Calculate and return the total transaction amount:
        return self.price * self.quantity
This model defines each transaction with fields for product details, price, quantity, and country. It sorts the transactions by order_id. It also includes an index on key fields to improve query performance and a property that calculates the total transaction amount.
Views control how those records appear in the browser. Create a view to display the transaction records. Open sales/views.py and replace the code:
from django.shortcuts import render
from .models import Transaction

# Define a view to display all transactions and total revenue:
def transaction_list_view(request):
    # Retrieve all transaction records from the database:
    transactions = Transaction.objects.all()
    # Calculate the total revenue from all transactions:
    total_revenue = sum(t.total_amount for t in transactions)
    # Render the transaction list template with context data
    return render(request, 'sales/transaction_list.html', {
        'transactions': transactions,
        'total_revenue': total_revenue,
    })
The preceding view fetches all transaction records from MongoDB using the Transaction model. It calculates the total revenue by summing the total_amount field for each transaction. Then, it sends two values to a transaction_list.html template, which we’d create later:
* transactions: a list of all transaction records to display in a table
* total_revenue: the total amount generated from all transactions
The template will use these values to show each transaction and the total revenue.
You need to create routes so Django knows which view to load when users visit a URL. Create a sales/urls.py file and add the following:
from django.urls import path
from . import views

# Define URL patterns for the sales app:
urlpatterns = [
    # Route the root URL to the transaction list view:
    path('', views.transaction_list_view, name='transaction_list'),
]
Include your app’s URLs in your project URL configuration. Open pyspark_tutorial/urls.py and update it like this:
from django.contrib import admin
from django.urls import path, include

urlpatterns = [
    path('admin/', admin.site.urls),
    # Include your app’s URLs:
    path("", include('sales.urls')),
]Templates define how your data appear in the browser. Create a sales/templates/sales folder and add a file named transaction_list.html inside it.
Your sales app structure should resemble this:
sales/
├── __init__.py
├── admin.py
├── apps.py
├── migrations/
├── models.py
├── views.py
├── tests.py
├── urls.py
└── templates/
   └── sales/
       └── transaction_list.html
Add the following to your transaction_list.html file:
<!DOCTYPE html>
<html>
<head>
    <title>Transactions</title>
</head>
<body>
    <h1>E-commerce Transactions</h1>
    <h3>Total Revenue: ${{ total_revenue }}</h3>

    <table>
        <thead>
            <tr>
                <th>Order ID</th>
                <th>User ID</th>
                <th>Product</th>
                <th>Price</th>
                <th>Quantity</th>
                <th>Country</th>
                <th>Timestamp</th>
            </tr>
        </thead>
        <tbody>
            {% for t in transactions %}
            <tr>
                <td>{{ t.order_id }}</td>
                <td>{{ t.user_id }}</td>
                <td>{{ t.product }}</td>
                <td>${{ t.price }}</td>
                <td>{{ t.quantity }}</td>
                <td>{{ t.country }}</td>
                <td>{{ t.timestamp }}</td>
            </tr>
            {% empty %}
            <tr><td colspan="7">No transactions available.</td></tr>
            {% endfor %}
        </tbody>
    </table>
</body>
</html>
The preceding template uses Django’s templating language to dynamically display data passed from the view.
At the top, the total revenue is shown using {{ total_revenue }}. Then, the template loops through all the transaction records in transactions using the {% for t in transactions %} tag and displays each record as a row in the table. Each column shows a specific attribute of a transaction, such as order_id, product, price, quantity, and country. If there are no records, the {% empty %} tag ensures that a message, “No transactions available”, appears instead of an empty table.
To make your transaction page more visually appealing and easier to read, you’ll add custom CSS styling. Django serves static files, such as CSS, JavaScript, and images, through a special directory called static. This keeps design files separate from your code.
Now, create a sales/static/sales folder and add a file named styles.css inside it. Your folder sales folder structure should look like this:
sales/
├── __init__.py
├── admin.py
├── apps.py
├── migrations/
├── models.py
├── views.py
├── tests.py
├── urls.py
├── templates/
│   └── sales/
│       └── transaction_list.html
└── static/
   └── sales/
       └── styles.css
In pyspark_tutorial/settings.py, ensure STATIC_URL is defined:
STATIC_URL = 'static/'Add this to your sales/static/sales/styles.css file:
table {
  width: 100%;
  border-collapse: collapse;
  margin-top: 20px;
}

th, td {
  border: 1px solid #ddd;
  padding: 8px;
  text-align: left;
}

th {
  background-color: #f5f5f5;
}

body {
  font-family: Arial, sans-serif;
  margin: 20px;
}

h1 {
  color: #333;
}

a {
  text-decoration: none;
  color: #007bff;
}
a:hover {
  text-decoration: underline;
}
Finally, tell Django to load the static files and include the CSS file in your HTML template.
At the top of sales/templates/sales/transaction_list.html, add {% load static %}, and then update the <head> element to link to the styles.css file:
<!-- Load static files:-->
{% load static %}
<!DOCTYPE html>
<html>
<head>
    <title>Transactions</title>
    <!-- Link the CSS file for styling the template:-->
    <link rel="stylesheet" href="{% static 'sales/styles.css' %}">
</head>Generate and apply your migrations so Django can create the necessary collections in MongoDB:
python manage.py makemigrations
python manage.py migrateNow, let's use your application's models to add transaction records to your pyspark_tutorial database using the Django interactive shell:
python manage.py shellThen, import the Transaction model from your sales app and timezone from Django’s utilities:
from sales.models import Transaction
from django.utils import timezone
Now, insert transaction records using bulk_create():
Transaction.objects.bulk_create([
    Transaction(order_id='T1001', user_id='U001', product='Laptop', price=1000.00, quantity=1, timestamp=timezone.now(), country='US'),
    Transaction(order_id='T1002', user_id='U002', product='Smartphone', price=800.00, quantity=2, timestamp=timezone.now(), country='NG'),
    Transaction(order_id='T1003', user_id='U003', product='Headphones', price=150.00, quantity=1, timestamp=timezone.now(), country='UK'),
    Transaction(order_id='T1004', user_id='U004', product='Laptop', price=1200.00, quantity=1, timestamp=timezone.now(), country='US'),
    Transaction(order_id='T1005', user_id='U005', product='Keyboard', price=45.00, quantity=3, timestamp=timezone.now(), country='DE'),
    Transaction(order_id='T1006', user_id='U006', product='Monitor', price=300.00, quantity=2, timestamp=timezone.now(), country='FR'),
    Transaction(order_id='T1007', user_id='U007', product='Smartwatch', price=199.00, quantity=1, timestamp=timezone.now(), country='IN'),
    Transaction(order_id='T1008', user_id='U008', product='Speaker', price=150.00, quantity=2, timestamp=timezone.now(), country='CA'),
    Transaction(order_id='T1009', user_id='U009', product='Camera', price=800.00, quantity=1, timestamp=timezone.now(), country='NG'),
    Transaction(order_id='T1010', user_id='U010', product='Tablet', price=350.00, quantity=1, timestamp=timezone.now(), country='UK'),
    Transaction(order_id='T1011', user_id='U011', product='Headphones', price=75.00, quantity=2, timestamp=timezone.now(), country='US'),
    Transaction(order_id='T1012', user_id='U012', product='Laptop', price=1300.00, quantity=1, timestamp=timezone.now(), country='NG'),
    Transaction(order_id='T1013', user_id='U013', product='Mouse', price=30.00, quantity=3, timestamp=timezone.now(), country='IN'),
    Transaction(order_id='T1014', user_id='U014', product='Smartphone', price=950.00, quantity=1, timestamp=timezone.now(), country='KE'),
    Transaction(order_id='T1015', user_id='U015', product='Keyboard', price=55.00, quantity=2, timestamp=timezone.now(), country='CA'),
    Transaction(order_id='T1016', user_id='U016', product='Smartwatch', price=250.00, quantity=1, timestamp=timezone.now(), country='DE'),
    Transaction(order_id='T1017', user_id='U017', product='Speaker', price=180.00, quantity=1, timestamp=timezone.now(), country='FR'),
    Transaction(order_id='T1018', user_id='U018', product='Monitor', price=400.00, quantity=2, timestamp=timezone.now(), country='NG'),
    Transaction(order_id='T1019', user_id='U019', product='Laptop', price=1250.00, quantity=1, timestamp=timezone.now(), country='IN'),
    Transaction(order_id='T1020', user_id='U020', product='Camera', price=780.00, quantity=1, timestamp=timezone.now(), country='US'),
])
Verify that the records were successfully added:
Transaction.objects.count()If the count returns 20, your records were saved successfully.
Now, exit the shell by running exit(), and start your Django server to view your transactions in the browser:
python manage.py runserverVisit http://127.0.0.1:8000/ to confirm that your data is displayed.
Now that your records are stored in your MongoDB database, you'll use Apache Spark to process your data. Apache Spark comes with a Python API, PySpark, that you can use in your Django project to process large datasets. If you're new to PySpark, check out our PySpark installation guide.
You'll create a Python script that uses PySpark to connect to MongoDB and read your transaction records. You'll perform basic operations on this data, like filtering it. You'll then group them by country and calculate the total revenue for each. Finally, you'll write the processed data into a new MongoDB collection in your database.
Stop your server and install the version of PySpark that is compatible with the latest MongoDB Spark connector:
pip install pyspark==3.5.0Verify the successful installation:
pyspark --versionYou should get a response welcoming you to Spark.
Next, create a transactions.py file in your project folder, on the same level as manage.py. Your folder structure should now look like this:
pyspark_tutorial/
├── mongo_migrations/
├── pyspark_tutorial/
├── sales/
├── manage.py
└── transactions.pyTo connect PySpark to MongoDB, you must build a connection string that includes your database name and collection name. A collection in MongoDB is similar to a table in relational databases and stores related documents. Your collection name is composed of your app name and model name, separated by an underscore (_).
Use the built connection string in your transactions.py file. The correct format is:
mongodb+srv://<mongodb username>:<mongodb password>@<cluster address>/<database name>.<app name>_<model name>?retryWrites=true&w=majority&appName=Cluster0Here is the explanation of the placeholder values:
<mongodb username> and <mongodb password> are your MongoDB Atlas username and password.<cluster address> is the domain shown in your Atlas connection string—for example, cluster0.2rvn82q.mongodb.net.<database name> is the name you gave your database in settings.py.<app name>_<model name> is the name of the collection generated from your Django app and model—for example, sales_transaction.In this section, the connection string you’ll use in your PySpark code will look like this:
mongodb+srv://db_user:password@cluster.mongodb.net/pyspark_tutorial.sales_transaction?retryWrites=true&w=majority&appName=Cluster0Add the following code to your transactions.py file:
from pyspark.sql import SparkSession

# Initialize SparkSession with MongoDB connector:
spark = SparkSession.builder \
    .appName('ReadTransactions') \
    .config(
        'spark.mongodb.read.connection.uri',
        # Replace with your built MongoDB connection string:
        '<built connection string>'
    ) \
    .config(
        # Add the MongoDB Spark connector package:
        'spark.jars.packages',
        'org.mongodb.spark:mongo-spark-connector_2.12:10.4.1'
    ) \
    .getOrCreate()

# Read data from MongoDB into a Spark DataFrame:
df = spark.read.format('mongodb').load()

# Show result:
df.show()

# Stop the Spark session:
spark.stop()
from pyspark.sql import SparkSession is the entry point for using PySpark. It allows you to interact with Spark and perform data operations.
The spark = SparkSession.builder initializes a new Spark session and gives it a name, ReadTransactions. The two .config() options define how Spark should connect to MongoDB:
spark.mongodb.read.connection.uri: the MongoDB connection string that tells Spark where your database is locatedspark.jars.packages: downloads the MongoDB Spark connector package so Spark can communicate with MongoDBdf = spark.read.format('mongodb').load() loads all documents from the collection defined in your connection string into a PySpark DataFrame, making it easy to query and transform your data..show() prints a preview of your MongoDB data in tabular format right in the terminal.spark.stop() ends the Spark application and releases system resources once the job is done.Finally, replace <built connection string> with your built MongoDB connection string. Also, ensure that your current IP address is whitelisted in your MongoDB Atlas network access list before connecting.
Now, run python transactions.py, and you’ll get the stored transaction records from your database in your terminal.
You can also filter your records using PySpark SQL functions—for example, to show only transactions from Nigeria (NG). Modify the code in your transactions.py file:
from pyspark.sql import SparkSession

# Import col to reference DataFrame column names:
from pyspark.sql.functions import col

spark = SparkSession.builder \
    .appName('ReadTransactions') \
    .config(
        'spark.mongodb.read.connection.uri',
        # Replace with your built MongoDB connection string:
        '<built connection string>'
    ) \
    .config(
        'spark.jars.packages',
        'org.mongodb.spark:mongo-spark-connector_2.12:10.4.0'
    ) \
    .getOrCreate()

df = spark.read.format('mongodb').load()

# Filter transactions from Nigeria:
ng_df = df.filter(col('country') == 'NG')

# Show filtered results:
ng_df.show()

# Stop the Spark session:
spark.stop()
Run python transactions.py again, and you'll see transactions from NG.
You can also group your transaction records by country and calculate total revenue for each. Modify the code in your transactions.py:
from pyspark.sql import SparkSession
# Import col to reference DataFrame columns and import sum as _sum to avoid naming conflicts:
from pyspark.sql.functions import col, sum as _sum

spark = SparkSession.builder \
    .appName('ReadTransactions') \
    .config(
        'spark.mongodb.read.connection.uri',
        # Replace with your built MongoDB connection string:
        '<Built Connection String>'
    ) \
    .config(
        'spark.jars.packages',
        'org.mongodb.spark:mongo-spark-connector_2.12:10.4.0'
    ) \
    .getOrCreate()

df = spark.read.format('mongodb').load()

# Calculate total revenue per country:
revenue_per_country = df.groupBy('country').agg(
   _sum(col('price') * col('quantity')).alias('total_revenue')
)

# Show total revenue per country:
revenue_per_country.show()

# Stop the Spark session:
spark.stop()
Run python transactions.py. You'll see a table showing total revenue per country.
Now that you understand how to use PySpark to read and process your data, I’ll show you how to write the processed data into a MongoDB collection.
Here, you’ll write the DataFrame containing the total revenue per country in a new collection.
Modify the code in your transactions.py file:
from pyspark.sql import SparkSession
from pyspark.sql.functions import col, sum as _sum

spark = SparkSession.builder \
    .appName('ReadTransactions') \
    .config(
        'spark.mongodb.read.connection.uri',
        # Replace with your built MongoDB connection string:
        '<Built Connection String>'
    ) \
    .config(
        'spark.jars.packages',
        'org.mongodb.spark:mongo-spark-connector_2.12:10.4.0'
    ) \
    .getOrCreate()

df = spark.read.format('mongodb').load()

# Calculate total revenue per country
revenue_per_country = df.groupBy('country').agg(
   _sum(col('price') * col('quantity')).alias('total_revenue')
)

# Write aggregated records into a new MongoDB collection:
revenue_per_country.write \
    .format('mongodb') \
    .mode('overwrite') \
    .option(
        'spark.mongodb.write.connection.uri',
        # Replace with your built MongoDB connection string:
        '<Built Connection String>'
    ) \
    .option(
        # Specify the target database name:
        'spark.mongodb.write.database',
        'pyspark_tutorial'
    ) \
    .option(
        # Specify the target collection name:
        'spark.mongodb.write.collection',
        'revenue_per_country'
    ) \
    .save()

# Stop the Spark session:
spark.stop()
In the preceding code, Spark writes the aggregated DataFrame, revenue_per_country, to a new collection named revenue_per_country in your pyspark_tutorial database on MongoDB.
Finally, ensure you replace '<built connection string>' in both connection configurations with your built MongoDB connection string. Then, run python transactions.py.
Now, let’s display your total revenue by country on a Django page.
First, let's create a new model for the revenue per country. Add this to the bottom of your sales/models.py file:
class RevenuePerCountry(models.Model):
    country = models.CharField(max_length=50)
    total_revenue = models.DecimalField(max_digits=15, decimal_places=2)

    class Meta:
        # Define the collection (table) name in MongoDB:
        db_table = 'revenue_per_country'
        # Order results by total_revenue when querying:
        ordering = ['total_revenue']

    def __str__(self):
        # Return a readable string representation of the record:
        return f'{self.country}: ${self.total_revenue}'
Next, modify your sales/views.py file to fetch and display the revenue_per_country collection:
from django.shortcuts import render
from .models import Transaction

# Import the RevenuePerCountry model:
from .models import RevenuePerCountry

def transaction_list_view(request):
    transactions = Transaction.objects.all()
    total_revenue = sum(t.total_amount for t in transactions)
    return render(request, 'sales/transaction_list.html', {
        'transactions': transactions,
        'total_revenue': total_revenue,
    })

# Add a new view to fetch and display your revenue per country:
def revenue_per_country_view(request):
    revenue_per_country = RevenuePerCountry.objects.all()
    return render(request, 'sales/revenue_per_country.html', {'revenue_per_country': revenue_per_country})
Include a route to the new view in sales/urls.py:
from django.urls import path
from . import views

urlpatterns = [
    path('', views.transaction_list_view, name='transaction_list'),

    # Add new URL route:
    path('revenue_per_country/', views.revenue_per_country_view, name='revenue_per_country'),
]
Next, create a new template to display the total revenue by country.
In the sales/templates/sales folder, create a revenue_per_country.html file and add the following:
{% load static %}
<!DOCTYPE html>
<html lang="en">
<head>
    <title>Transactions</title>
    <link rel="stylesheet" href="{% static 'sales/styles.css' %}">
</head>
<body>
    <h1>Total Revenue by Country</h1>
    <a href="{% url 'transaction_list' %}">← Back to Transactions</a>
    <table>
        <tr>
            <th>Country</th>
            <th>Total Revenue (USD)</th>
        </tr>
        {% for r in revenue_per_country %}
        <tr>
            <td>{{ r.country }}</td>
            <td>${{ r.total_revenue|floatformat:2 }}</td>
        </tr>
        {% endfor %}
    </table>
</body>
</html>
You also need to modify the sales/templates/sales/transaction_list.html template to include a link to the revenue per country page. Add the following code after <h3> but before <table>:
<a href="{% url 'revenue_per_country' %}">View Total Revenue by Country</a>Run the Django server:
python manage.py runserverVisit http://127.0.0.1:8000/revenue_per_country/ to confirm the new page displays correctly.
Congratulations! You’ve successfully used Apache Spark to process your data, stored it in MongoDB, and displayed the processed data on a web page using Django.
Top DataCamp Courses
Course
Course
Course
blog
Patrick Brus
15 min
Tutorial
Karlijn Willems
Tutorial
Derrick Mwiti
Tutorial
Nilesh Soni
Tutorial
Jake Roach
Tutorial
Bex Tuychiev