Course
Exploratory Data Analysis in SQL
4 hr
180.5K
Installing the tool is a straightforward process. You just have to download the right installer from the official website, depending on the operating system of your computer, whether macOS, Windows, or Linux.
Once you have downloaded the MySQL package installer, follow the instructions in the installer wizard. You can follow the standard installation, although you can also customize the components to install by clicking on the “Customize” button.
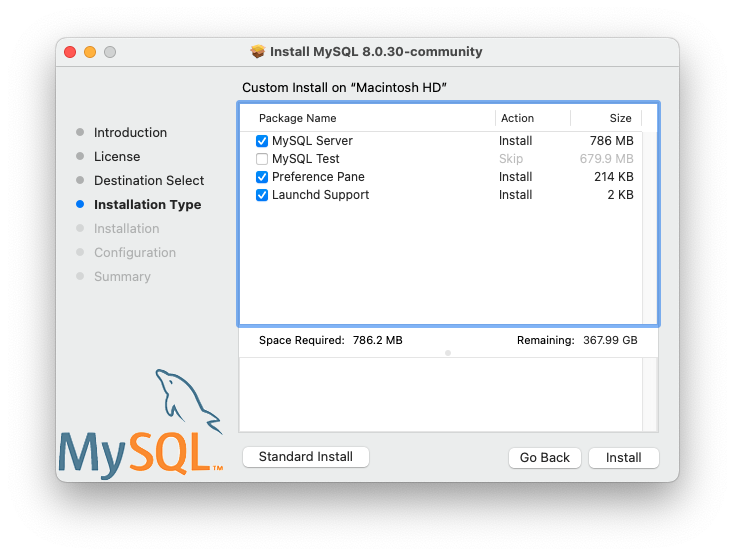
MySQL Package Installer Wizard: Customize. Source: MySQL
After a successful new MySQL Server installation, complete the configuration steps by choosing the default encryption type for passwords, defining the root password, and enabling (or disabling) the MySQL server at startup.
When installing using the package installer, the files are installed into a directory within /usr/local matching the name of the installation version and platform.
Installing MySQL in Windows is quite straightforward. The recommended method is to download Windows Installer and let it install and configure a specific version of MySQL. If you use the default installation, Windows will automatically start MySQL as a local host.
Linux supports a number of different solutions for installing MySQL. MySQL recommends that you use one of the distributions from Oracle, for which several methods for installation are available, as you can find in the documentation.
Before you start using MySQL, it’s worth analyzing how MySQL works. Let’s analyze some of its core concepts.
Like many other popular relational databases, MySQL is designed as a client-server architecture.
Under this computing model, a server is designed to host data, manage database permission and configurations, and handle most of the resources and services requested by the client.
In most common client-server architectures, there is one centralized server and multiple clients. Any computer can be a server if it is set up to provide a service. However, servers are generally very powerful and large machines because they are best equipped to handle a high volume of requests and data.
By contrast, clients can be situated on any kind of computer.

Client-server architecture. Source: DataCamp
In MySQL, these two components are the MySQL client and MySQL server.
Data types are used to determine the values a column can hold. It works as a kind of metadata that helps SQL understand what type of data to expect in each column and how to process queries against a specific column.
MySQL supports regular SQL data types in three main categories:
In the following tables, you can find an overview of the main data types in MySQL.
|
Data Type |
Description |
|
TINYINT |
A very small integer. |
|
SMALLINT |
A small integer. |
|
MEDIUMINT |
A medium-sized integer. |
|
INT or INTEGER |
A standard integer. |
|
BIGINT |
A large integer. |
|
FLOAT |
A floating-point number. |
|
DOUBLE |
A double-precision floating-point number. |
|
DECIMAL or NUMERIC |
A fixed-point number. |
|
Data Type |
Description |
|
DATE |
A date value in YYYY-MM-DD format. |
|
TIME |
A time value in HH:MM:SS format. |
|
DATETIME |
A date and time value in YYYY-MM-DD HH:MM:SS format. |
|
TIMESTAMP |
A timestamp value in YYYY-MM-DD HH:MM:SS format. |
|
YEAR |
A year value in YYYY or YY format. |
|
Data Type |
Description |
|
CHAR |
A fixed-length string. |
|
VARCHAR |
A variable-length string. |
|
TINYTEXT |
A very small text string. |
|
TEXT |
A small text string. |
|
MEDIUMTEXT |
A medium-sized text string. |
|
LONGTEXT |
A large text string. |
|
ENUM |
A string object that can have only one value, chosen from a list of predefined values. |
|
SET |
A string object that can have zero or more values, chosen from a list of predefined values. |
Once you have installed MySQL on your computer, you can start using it from your terminal. To launch MySQL, you can access it with your username and its associated password. In this case, we will access MySQL with the root account, together with the root password we set during installation. Since we are logging in on the same machine that MySQL is running on, we don’t need to provide information in the host (-h) parameter:
> mysql -uroot -pIf you want to add new users, type:
> CREATE USER 'username' IDENTIFIED BY 'password';Once you have created a new user, you could enter MySQL using this command and a welcome message will be displayed, followed by a mysql> prompt:
> mysql -u username -p
Welcome to the MySQL monitor.  Commands end with; or \g.
Your MySQL connection id is 25
Server version: 8.1.0 MySQL Community Server - GPL

Copyright (c) 2000, 2023, Oracle and/or its affiliates.

Oracle is a registered trademark of Oracle Corporation and/or its
affiliates. Other names may be trademarks of their respective
Owners.

Type 'help;' or '\h' for help. Type '\c' to clear the current input statement.

mysql>
It’s time to create your first database in MySQL. For this tutorial, we want to create a database called “datacamp_courses”, that will contain information about some DataCamp courses. The database is hosted locally.
To create a database, use the following command:
mysql> CREATE DATABASE datacamp_courses;To check that the database is created, type the following and a table with all the available databases will be displayed:
mysql> SHOW databases;
+--------------------+
| Database           |
+--------------------+
| datacamp_courses   |
| mysql              |
+--------------------+
5 rows in set (0,00 sec)
Now you’re ready to access your brand new database.
mysql> USE datacamp_courses;
Database changedSo far, you have created your first database. But it’s still empty. Now, we’re going to create the first table of the database. We want to create a table called ‘courses’, with information about several courses available in the DataCamp course catalog.
It’s time to create your first table in the “datacamp_courses” database. We want to create a table with information about some of the courses in the DataCamp Course Catalog.
The table's primary key should be course_id (note that only this one is bold), and its data type should be an integer. A primary key is a constraint that enforces the column values to be non-null and unique. It lets you uniquely identify a specific or a set of instances present in the table.
The remaining columns provide information about the course name, the course instructor, the topic of the course, and url.
To create the first table of the “datatacamp_courses” database, use the following command:
mysql> CREATE TABLE courses (
  course_id int NOT NULL,
  course_name varchar(250) NOT NULL,
  instructor_name varchar(250) NOT NULL,
  technology varchar(50) NOT NULL,
  topic varchar(50) NOT NULL,
  PRIMARY KEY (course_id)
);You have your first database and your first table. Great! Now it’s time to add some data to the table.
Let’s add some rows with some popular courses available in our catalog with the INSERT statement. The following code will make the magic.
INSERT INTO
    courses (course_id, course_name, instructor_name, technology, topic) VALUES
    (1, 'Introduction to SQL', 'Izzy Weber', 'SQL','Data Manipulation'),
    (2, 'Database Design', 'Lis Sulmont', 'SQL', 'Data Engineering'),
    (3, 'Data Manipulation with pandas', 'Richie Cotton', 'R','Programming'),
    (4, 'Generative AI Concepts', 'Daniel Tedesco', 'Theory', 'AI & Machine Learning');
To check that the rows were correctly added, let’s view all the rows in the table with the SELECT statement:
SELECT * FROM courses;
+-----------+-------------------------------+-----------------+------------+-----------------------+
| course_id | course_name                   | instructor_name | technology | topic                 |
+-----------+-------------------------------+-----------------+------------+-----------------------+
|         1 | Introduction to SQL           | Izzy Weber      | SQL        | Data Manipulation     |
|         2 | Database Design               | Lis Sulmont     | SQL        | Data Engineering      |
|         3 | Data Manipulation with pandas | Richie Cotton   | R          | Programming           |
|         4 | Generative AI Concepts        | Daniel Tedesco  | Theory     | AI & Machine Learning |
+-----------+-------------------------------+-----------------+------------+-----------------------+
4 rows in set (0,00 sec)
You may have noticed that there is a mistake in the data we’ve just added. The technology of the Data Manipulation with pandas course is a Python, nor R. Let’s fix the error with the UPDATE statement together with the WHERE clause to specify the row to update
UPDATE courses SET technology = 'Python' WHERE course_id = 3;SELECT * FROM courses;
+-----------+-------------------------------+-----------------+------------+-----------------------+
| course_id | course_name | instructor_name | technology | topic |
+-----------+-------------------------------+-----------------+------------+-----------------------+
| 1 | Introduction to SQL | Izzy Weber | SQL | Data Manipulation |
| 2 | Database Design | Lis Sulmont | SQL | Data Engineering |
| 3 | Data Manipulation with pandas | Richie Cotton | Python | Programming |
| 4 | Generative AI Concepts | Daniel Tedesco | Theory | AI & Machine Learning |
+-----------+-------------------------------+-----------------+------------+-----------------------+
4 rows in set (0,00 sec)Finally, you may want to delete one of the records in your table. For example, let’s delete the course Generative AI Concepts:
DELETE from courses WHERE course_name = 'Generative AI Concepts';SELECT * FROM courses;
+-----------+-------------------------------+-----------------+------------+-------------------+
| course_id | course_name | instructor_name | technology | topic |
+-----------+-------------------------------+-----------------+------------+-------------------+
| 1 | Introduction to SQL | Izzy Weber | SQL | Data Manipulation |
| 2 | Database Design | Lis Sulmont | SQL | Data Engineering |
| 3 | Data Manipulation with pandas | Richie Cotton | Python | Programming |
+-----------+-------------------------------+-----------------+------------+-------------------+
3 rows in set (0,00 sec)By default, when MySQL has to find some rows, it will start from the first one and then read from head to tail. This behavior can be problematic when your databases have millions of rows, as the process can be very slow.
A great way to speed up the way MySQL looks for rows in your tables is by creating an index. An index of a component of your tables that MySQL uses to retrieve rows with specific columns more quickly.
Let’s create an index in our course table called “idx_course” on the “course_id” column.
CREATE INDEX idx_course
ON courses (course_id);Up to this point, we’ve only worked with the course table. But you only start leveraging the full potential of relational databases, like MySQL, when you work with multiple tables at once.
The magic tool to combine multiple tables is the JOIN operation. Imagine that we have a second table in our database called ‘instructors” that contains basic information about the DataCamp course instructors. The following script creates the table and adds some (fictional) rows:
mysql> CREATE TABLE instructors (
  instructor_id int NOT NULL,
  instructor_name varchar(250) NOT NULL,
  role varchar(500) NOT NULL,
  number_courses int NOT NULL,
  PRIMARY KEY (instructor_id)
);
INSERT INTO
instructors (instructor_id, instructor_name, role, number_courses) VALUES
(1, 'Lis Sulmont', 'Data Scientist', 4),
(2, 'Daniel Tedesco', 'Business Analyst', 1),
(3, 'Richie Cotton', 'Data Evangelist',5),
(4, 'Izzy Weber', 'Data Engineer', 2),
(5, 'James Chapman', 'Data Analyst',3);Imagine you want to merge the two tables to get the information of the courses, as well as the data associated with the instructor. We will use an INNER JOIN to get only the information of the courses that appear in the course table. The common column to make the join is “instructor_name”.
mysql> SELECT * FROM courses
    -> INNER JOIN instructors
    -> ON courses.instructor_name = instructors.instructor_name;
+-----------+-------------------------------+-----------------+------------+-------------------+---------------+-----------------+-----------------+----------------+
| course_id | course_name                   | instructor_name | technology | topic             | instructor_id | instructor_name | role            | number_courses |
+-----------+-------------------------------+-----------------+------------+-------------------+---------------+-----------------+-----------------+----------------+
|         2 | Database Design               | Lis Sulmont     | SQL        | Data Engineering  |             1 | Lis Sulmont     | Data Scientist  |              4 |
|         3 | Data Manipulation with pandas | Richie Cotton   | Python     | Programming       |             3 | Richie Cotton   | Data Evangelist |              5 |
|         1 | Introduction to SQL           | Izzy Weber      | SQL        | Data Manipulation |             4 | Izzy Weber      | Data Engineer   |              2 |
+-----------+-------------------------------+-----------------+------------+-------------------+---------------+-----------------+-----------------+----------------+
3 rows in set (0,00 sec)
This is only one type of join, but there are others that are equally useful depending on your use-case. Our Joining Data in SQL Course and cheat sheet on JOINS will help you get started.
Modern databases can store tables with millions of rows. With so much data and applications based on it, keeping this data secure is vital.
Databases are subject to common risks, including database access mismanagement, weak passwords, and SQL injections. To address these threats and weaknesses, a number of strategies and measures can be implemented, including configuring access privileges depending on the user, building triggers in SQL servers, and putting in place encryption methodologies. A great place to get started in SQL security is our Database Design Course.
As you progress in your SQL coding journey, you will start realizing the importance of performance. A SQL query can be written in different ways. All of them work, but some are more efficient than others.
There are many strategies and tricks that can help you improve the performance of your SQL code, including sub-queries and SQL clauses, like WHERE, HAVING, and DISTINCT.
But efficiency is not only a technical issue; it’s also a matter of order and readability. With little changes in the way you write SQL, like using aliases and comments, you can make a big difference that will help you and the rest of your team.
Willing to learn more about SQL performance optimization? Check out our Improving Query Performance in SQL Server Course
Congratulations on making it to the end of this MySQL tutorial. We hope you enjoyed this introduction to MySQL and its capabilities. If you are interested in database management, learning MySQL is a smart move.
But this is just the beginning of your journey. If you want to learn more about MySQL and SQL in general, Datacamp gets you covered. Here are some resources to help you get started:
Start Your SQL Journey Today!
Course
Course
Course
blog
Summer Worsley
13 min
blog
Kelsey McNeillie
9 min
cheat-sheet
Richie Cotton
Tutorial
Kurtis Pykes
Tutorial
DataCamp Team
code-along
Adel Nehme