

Tracks
Cơ bản về Trợ lý Trí tuệ Nhân tạo
6 giờ
Nếu bạn là một chuyên gia dữ liệu, có lẽ bạn phải xử lý nhiều tác vụ mã lặp đi lặp lại mỗi ngày. Những việc như lập hồ sơ cho các tập dữ liệu hoàn toàn mới, xây dựng pipeline dữ liệu từ đầu, hoặc tự tay viết các bài kiểm thử cho bước chuyển đổi dữ liệu. Những việc này là cần thiết, nhưng ngốn rất nhiều thời gian.
Nhưng điều gì sẽ xảy ra nếu terminal của bạn có thể quản lý và viết toàn bộ phần mã khuôn mẫu lặp lại đó, để bạn tập trung năng lượng vào động não và ra quyết định? Đó là lúc Codex-CLI của OpenAI xuất hiện. Đây là một tác nhân AI viết mã rất mạnh, được tích hợp trực tiếp vào dòng lệnh của bạn và, như chúng ta sẽ thấy, nó rất hữu ích để tinh gọn các quy trình dữ liệu.
Trong hướng dẫn này, chúng ta sẽ tìm hiểu cách các nhà phân tích và khoa học dữ liệu có thể dùng Codex-CLI để tăng tốc những tác vụ dữ liệu thường ngày phổ biến nhất. Chúng ta sẽ đi từ phân tích khám phá dữ liệu ban đầu đến xây dựng các pipeline dữ liệu hoàn chỉnh, và thậm chí tạo kiểm thử tự động cho các phép chuyển đổi của bạn — tất cả đều thực hiện ngay trong terminal.
Nếu bạn muốn tìm hiểu thêm về xây dựng hệ thống AI tác nhân, tôi rất khuyến nghị đăng ký lộ trình kỹ năng AI Agent Fundamentals của chúng tôi, bao quát mọi điều bạn cần biết.
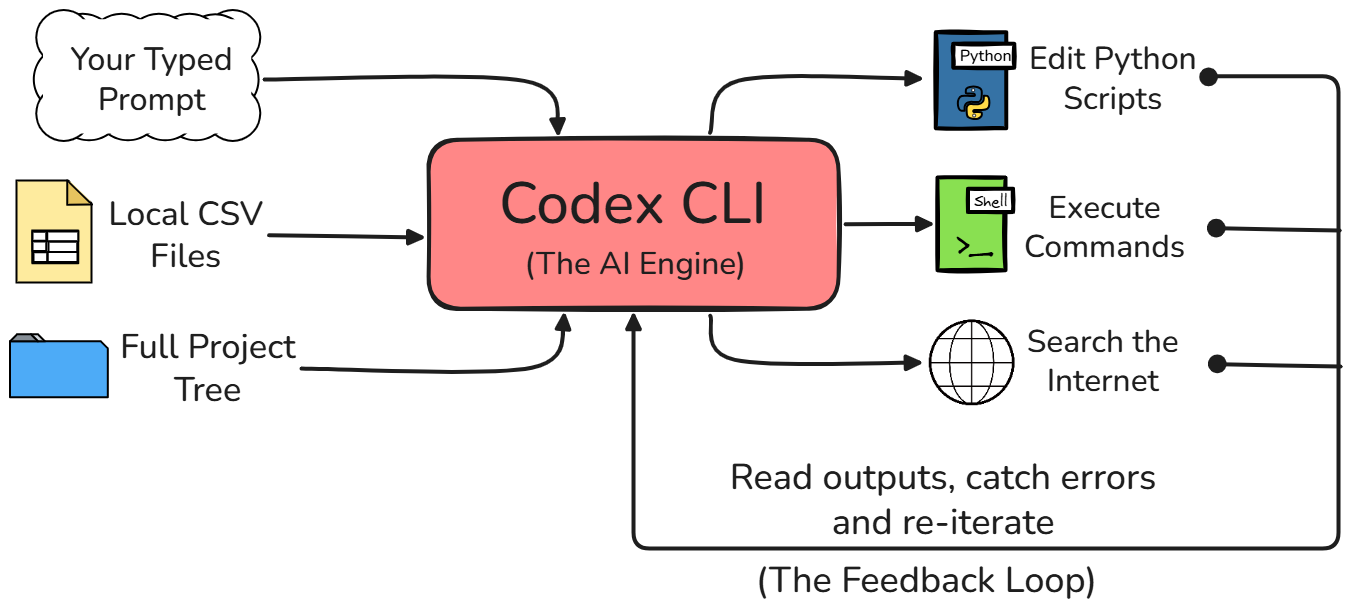
Trước hết, hãy hiểu Codex CLI là gì. Về cốt lõi, Codex CLI là một tác nhân viết mã mã nguồn mở, chạy trên terminal, do OpenAI phát triển.
Nó được xây dựng bằng ngôn ngữ lập trình Rust, giúp tốc độ nhanh và hiệu quả. Nhưng điều quan trọng nhất cần hiểu là nó hoạt động ngay trong dòng lệnh của bạn, nhờ đó có khả năng đọc tệp, chỉnh sửa mã và thậm chí thực thi lệnh cục bộ trên máy.
Dù bạn có thể đã quen dùng giao diện web tiêu chuẩn của ChatGPT cho công việc, Codex CLI rất khác. Khi dùng giao diện web, mô hình AI bị tách rời hoàn toàn khỏi môi trường bạn đang làm việc.
Với Codex CLI, tác nhân thực sự có quyền truy cập trực tiếp vào hệ thống tệp cục bộ của bạn. Nó có thể chạy script Python, xem đầu ra hoặc lỗi trả về, và duy trì nhận thức đầy đủ về toàn bộ cấu trúc dự án của bạn mà không cần bạn phải giải thích mọi thứ từ đầu.
|
Bước quy trình / Tính năng |
ChatGPT (Trình duyệt web) |
Codex CLI (Terminal) |
|
Truy cập dữ liệu |
Bạn phải tự mở tệp CSV và sao chép-dán vài hàng dữ liệu thô vào đoạn chat để giúp mô hình hiểu. |
Nó có thể tự mở và đọc tệp CSV trực tiếp từ hệ thống tệp cục bộ của bạn. |
|
Thực thi mã |
Bạn phải tự sao chép script được tạo, dán vào trình soạn thảo mã cục bộ rồi tự chạy. |
Nó tự động viết script Python cần thiết, chạy và hiển thị đầu ra cuối cùng ngay trong terminal. |
|
Trải nghiệm tổng thể |
Liên quan rất nhiều thao tác qua lại nặng nề, sao chép và dán giữa các cửa sổ. |
Mọi thứ diễn ra trong một luồng duy nhất, liên tục và liền mạch bên trong terminal. |
Tất nhiên, vì tác nhân Codex có quyền trực tiếp chỉnh sửa tệp và chạy lệnh trên máy của bạn, nó đi kèm các chế độ phê duyệt khác nhau để đảm bảo bạn luôn kiểm soát. Ba chế độ phê duyệt gồm:
Khi mới bắt đầu, tôi khuyến nghị khởi đầu với chế độ Chỉ đọc, sau đó nâng lên khi bạn tin tưởng quy trình.
Bạn có thể chuyển chế độ phê duyệt trong một phiên Codex đang chạy bằng /permissions. Đây là cách dễ nhất để chuyển từ Chỉ đọc sang Auto khi bạn đã quen.
/permissionsNếu bạn muốn khởi động Codex ở chế độ nghiêm ngặt hơn ngay từ đầu, bạn có thể đặt cờ sandbox và chính sách phê duyệt khi chạy. Ví dụ, lệnh sau khởi chạy ở chế độ chỉ đọc thận trọng nhưng vẫn nhắc khi cần.
codex --sandbox read-only --ask-for-approval on-requestCó một vài điều kiện tiên quyết bạn cần có để có thể theo dõi hướng dẫn đúng cách.
Trước hết, bạn cần cài Codex CLI trên máy. Để làm vậy, chỉ cần mở terminal và cài CLI toàn cục trong hệ thống bằng lệnh sau:
npm install -g @openai/codexBước tiếp theo là xác thực tài khoản của bạn để công cụ biết bạn là ai. Bạn có thể kiểm tra mọi thứ đã được cài đúng và khởi chạy tác nhân lần đầu chỉ bằng cách gõ codex trong terminal. Nó sẽ hiển thị như sau:
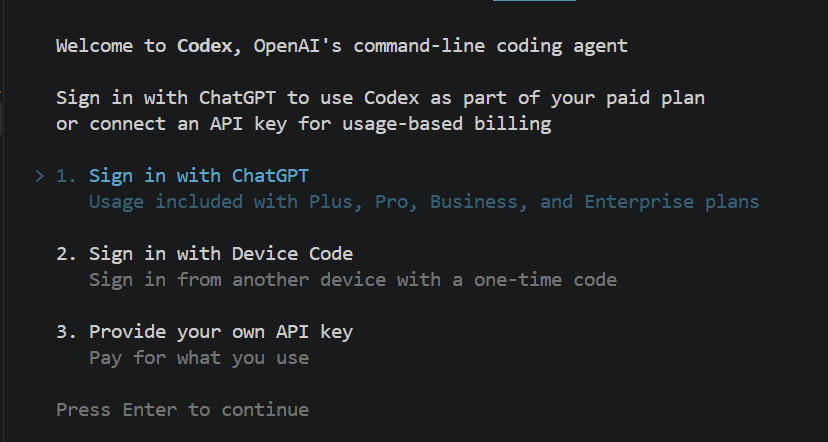
Khi nhấn Enter, nó sẽ mở cửa sổ trình duyệt, nơi bạn được nhắc đăng nhập bằng tài khoản ChatGPT. Khi đăng nhập xong, bạn sẵn sàng sử dụng công cụ.
Nếu bạn không có gói thuê bao ChatGPT trả phí và muốn sử dụng khóa API, cũng có lựa chọn trả phí theo mức dùng. Bạn có thể lấy khóa từ bảng điều khiển OpenAI.
Trước khi bắt đầu yêu cầu AI phân tích dữ liệu, điều quan trọng là cấu hình đúng môi trường dữ liệu Python. Điều này thiết yếu vì Codex CLI hoạt động bên trong bất kỳ môi trường nào nó đang chạy. Vậy nên, nếu tác nhân cần viết script dùng các thư viện khoa học dữ liệu như pandas, scikit-learn hoặc matplotlib, bạn phải đảm bảo các thư viện đó đã được cài và sẵn sàng để dùng.
Chúng ta có thể làm điều này bằng cách kích hoạt một môi trường ảo Python trước khi khởi chạy Codex. Dưới đây là script thiết lập mẫu với các lệnh chính xác mà bạn có thể chạy trong terminal để tạo môi trường ảo, cài các gói dữ liệu cần thiết, kích hoạt môi trường, rồi khởi chạy tác nhân:
python3 -m venv data_env
source data_env/bin/activate
pip install pandas scikit-learn matplotlib
codexMột bước quan trọng nữa trong thiết lập dự án là tạo tệp tên AGENTS.md bên trong thư mục dự án chính. Hãy coi tệp này như bộ hướng dẫn cố định mà tác nhân Codex sẽ đọc tự động mỗi lần mở dự án của bạn. Nó cho AI biết bạn muốn nó cư xử thế nào và viết mã ra sao cho không gian làm việc cụ thể này.
Đối với công việc dữ liệu, chúng ta muốn đảm bảo mã AI tạo ra sạch, dễ đọc và chuyên nghiệp. Dưới đây là tệp AGENTS.md mẫu được điều chỉnh riêng cho dự án dữ liệu. Bạn chỉ cần tạo tệp này và dán đoạn văn bản sau vào:
# Data Project Guidelines


When writing Python code for this project, please strictly follow these rules:
- Enforce PEP 8 formatting standards for all Python code.
- Always use highly descriptive variable names. Do not use generic, lazy names like df, data, x, or y. Instead, use specific names like transaction_data or revenue_series.
- Prefer pandas best practices, such as using vectorized operations instead of iterating through rows.
- Generate clear, descriptive docstrings for every single function.
- Always include Python type hints for function arguments and return values.
Vì tệp này sẽ được đọc mỗi lần, bất kể tác vụ là gì, tốt nhất nên giữ súc tích và chỉ tập trung vào các hướng dẫn áp dụng cho mọi lời nhắc. Với hướng dẫn cụ thể hơn, bạn nên dùng kỹ năng thay thế.
Giờ chuyển sang công việc dữ liệu thực tế, chúng ta sẽ bắt đầu với Exploratory Data Analysis (EDA) — phân tích khám phá dữ liệu. Như bạn đã biết, đây gần như luôn là điểm xuất phát phổ biến nhất cho bất kỳ dự án dữ liệu mới nào. Trước khi xây dựng mô hình hay pipeline, bạn phải biết dữ liệu trông thế nào.
Điều tuyệt vời là với Codex CLI, một lời nhắc ngôn ngữ tự nhiên đơn giản có thể tạo ra một script EDA hoàn chỉnh, hoạt động cho bạn.
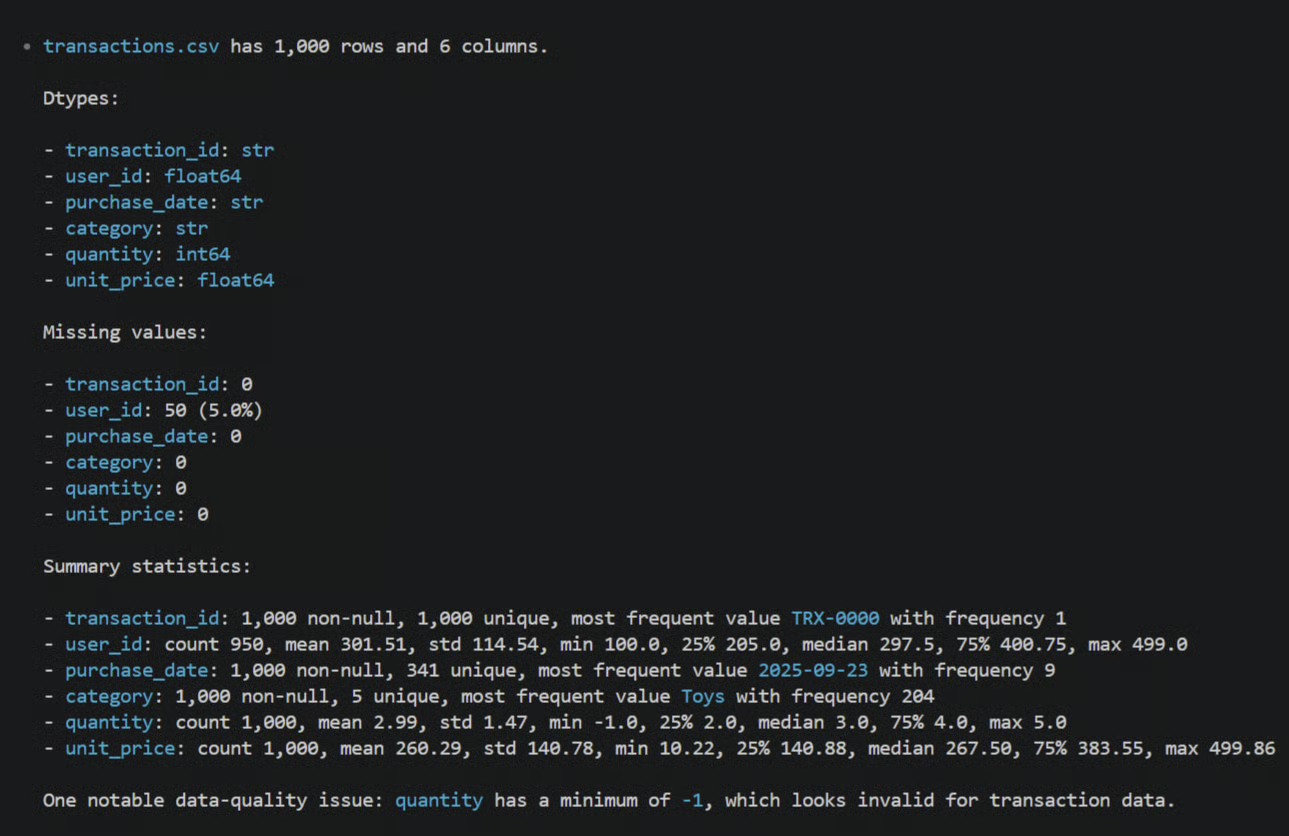
Kịch bản: Cho ví dụ hôm nay, hãy hình dung chúng ta làm việc với một tập dữ liệu tổng hợp nhưng thực tế. Giả sử có một tập dữ liệu thương mại điện tử tên transactions.csv nằm ngay trong thư mục dự án. Nó chứa dữ liệu kinh doanh thực tế như mã đơn hàng, mã người dùng, dấu thời gian mua hàng và số tiền giao dịch.
Khi nhận tệp mới như vậy, việc đầu tiên bạn muốn làm là lập hồ sơ để hiểu cấu trúc cơ bản. Thay vì tự viết mã pandas lặp lại, bạn chỉ cần mở terminal — nơi phiên Codex đang chạy — và gõ một lời nhắc như sau:
Profile the transactions.csv file. Show shape, dtypes, missing values, and summary statistics.Khi nhấn Enter, Codex đọc vài dòng đầu của tệp transactions.csv trực tiếp từ hệ thống tệp cục bộ. Sau đó, nó sẽ tạo một script Python hoàn chỉnh để lập hồ sơ và trong chế độ "gợi ý", nó sẽ hỏi bạn có muốn chạy không.
Bạn sẽ ngay lập tức thấy kích thước dữ liệu, kiểu dữ liệu của từng cột thương mại điện tử cụ thể, và chính xác có bao nhiêu giá trị thiếu cần xử lý (ví dụ như dưới đây), mà không phải tự viết một dòng mã nào.
Những con số trong terminal rất hữu ích, nhưng cuối cùng bạn vẫn cần nhìn dữ liệu một cách trực quan. Bạn có thể tạo ra các biểu đồ phức tạp đáng ngạc nhiên chỉ bằng cách mô tả điều bạn muốn bằng tiếng Anh đơn giản.
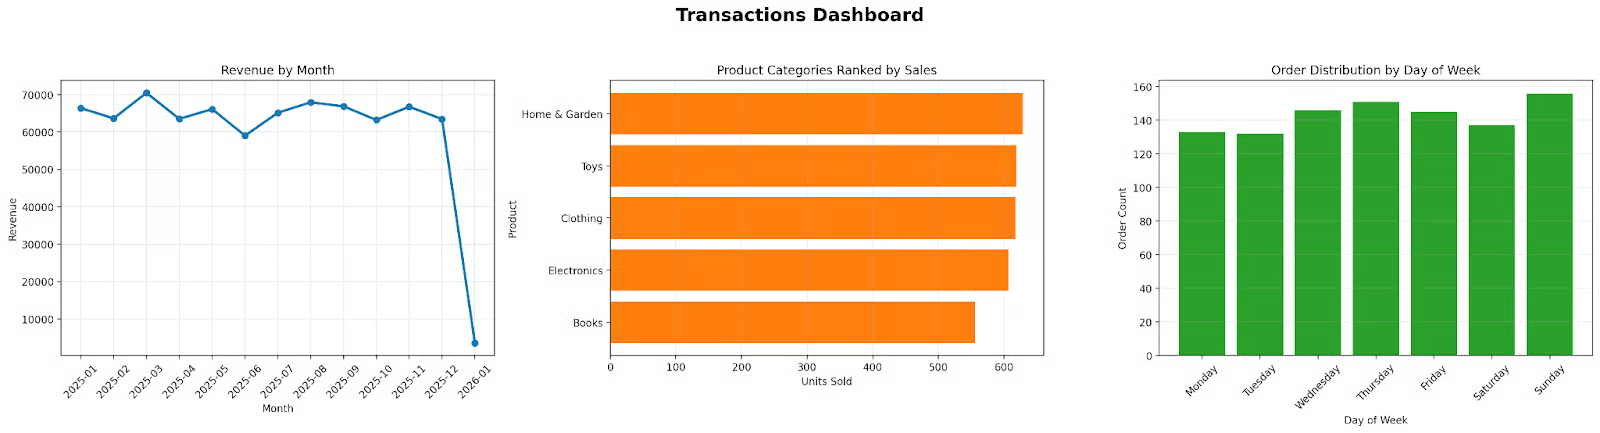
Ví dụ, nếu bạn muốn có cái nhìn toàn cảnh về doanh nghiệp thương mại điện tử, bạn có thể đưa cho Codex một lời nhắc như sau:
Create a matplotlib dashboard with 3 subplots showing revenue by month, product categories ranked by sales, and order distribution by day of week.Đó là một yêu cầu khá phức tạp. Nhưng Codex sẽ phân tích cả lời nhắc và tệp dữ liệu của bạn, tìm cách nhóm theo ngày tháng và cộng doanh thu, lập kế hoạch từng bước, rồi chuyển thành script matplotlib vững vàng để tạo đúng các subplot đó.
Và đây là một điểm then chốt khi làm việc với các tác nhân AI như thế này: bản chất là một quy trình lặp. Khi Codex đề xuất phiên bản đầu tiên của mã vẽ biểu đồ, bạn cứ phê duyệt để xem trông như thế nào.
Có thể phiên bản đầu tạo được biểu đồ, nhưng bạn nhận thấy nhãn trục x bị chồng chéo khó đọc, hoặc màu hơi quá chói. Bạn không cần mở script để chỉnh tham số matplotlib thủ công.
Bạn chỉ cần trả lời bằng lời nhắc tiếp theo, kiểu như: "Các nhãn phía dưới bị chồng lên nhau, vui lòng xoay 45 độ và làm mềm màu của chú giải." Codex sẽ tinh chỉnh script, chạy lại và đưa cho bạn dashboard đã được trau chuốt.
Sau khi đã khám phá dữ liệu và làm phân tích ban đầu, cuối cùng bạn sẽ cần rời khỏi các script ngẫu hứng lộn xộn đó.
Điều bạn thực sự muốn là tiến tới xây dựng mã thực sự có thể tái lập và mô-đun. Trong thế giới dữ liệu, điều này thường có nghĩa là xây dựng một pipeline ETL (Extract, Transform, Load). Đây là cách tiêu chuẩn để lấy dữ liệu vào, làm sạch và lưu kết quả cho lần sử dụng sau.
Để minh họa cách hoạt động, chúng ta sẽ dùng một kịch bản rất thực tế. Chúng ta muốn nạp dữ liệu giao dịch thương mại điện tử từ tệp CSV, làm sạch dữ liệu lộn xộn, tính một số tổng hợp kinh doanh, rồi lưu kết quả cuối cùng vào một tệp mới sạch sẽ.
Thay vì tự viết toàn bộ kiến trúc khuôn mẫu đó, bạn có thể dùng Codex CLI để scaffold (dựng khung) toàn bộ từ một mô tả cấp cao.
Bước đầu tiên là thiết lập cấu trúc dự án thực tế. Một pipeline dữ liệu tốt được tách thành các tệp riêng, giúp dễ đọc và bảo trì về sau. Bạn có thể nhờ tác nhân Codex làm việc nặng này. Trong terminal, bạn đưa lời nhắc như sau:
Create a project layout for an ETL pipeline. I need separate Python modules for extraction, transformation, and loading, plus a main entry point script to run them all.Codex sẽ tạo các tệp đó ngay trong thư mục của bạn. Nếu bạn xem cây tệp sau khi phê duyệt hành động, bạn sẽ thấy một kiến trúc sạch, chuyên nghiệp, trông như sau:
etl_pipeline/
├──__init__.py
├── extract.py
├── transformation.py
└── loading.py
– run_etl.py
Lý do Codex chọn kiến trúc này là để tách biệt các mối quan tâm trong mã. Logic đọc dữ liệu tách rời hoàn toàn khỏi logic tính toán và nghiệp vụ — đúng như cách các kỹ sư dữ liệu nên cấu trúc công việc.
Giờ hãy mô tả phép chuyển đổi chúng ta muốn dữ liệu trải qua. Trong pipeline ETL, logic chuyển đổi thường là phần khó nhất, nhưng ta có thể nhờ Codex xử lý chi tiết. Giả sử ta cần làm sạch một số giá trị thiếu và tính chính xác số tiền mỗi đơn hàng tạo ra.
Bạn có thể gõ một lời nhắc trực tiếp trong CLI như sau:
In transformation.py, write a function that takes the transactions data, drops any rows where the user ID is missing, and creates a new derived column called 'revenue' by multiplying the 'quantity' column by the 'unit_price' column.Vì Codex có thể đọc tệp transactions.csv của bạn, nó biết tên cột thực. Nó sẽ không chỉ đoán và viết df['qty'] * df['price'] rồi hy vọng. Nó sẽ xem tệp, thấy cột thực sự tên là quantity và unit_price, rồi viết đúng mã pandas để script chạy được.
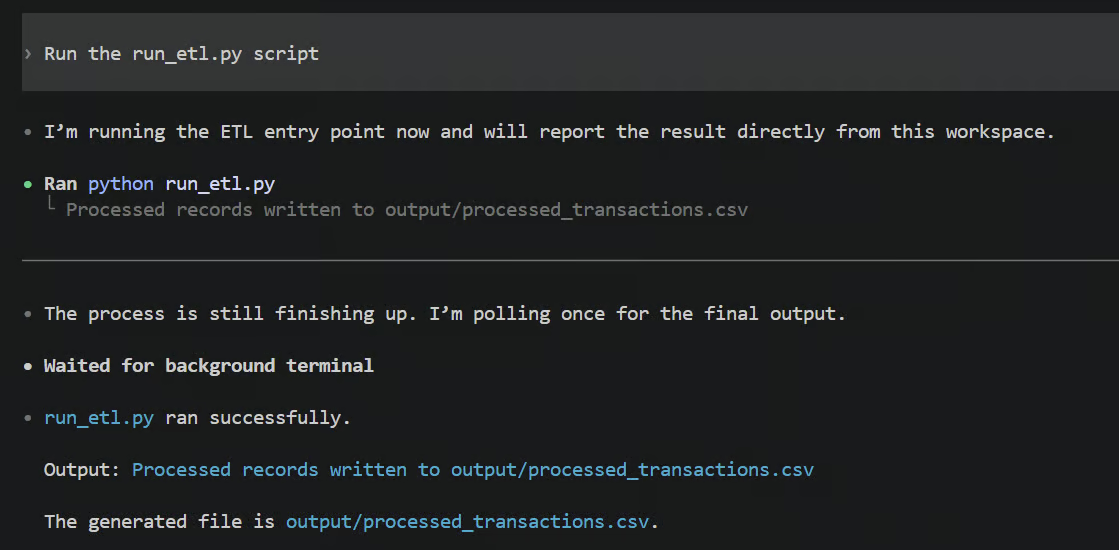
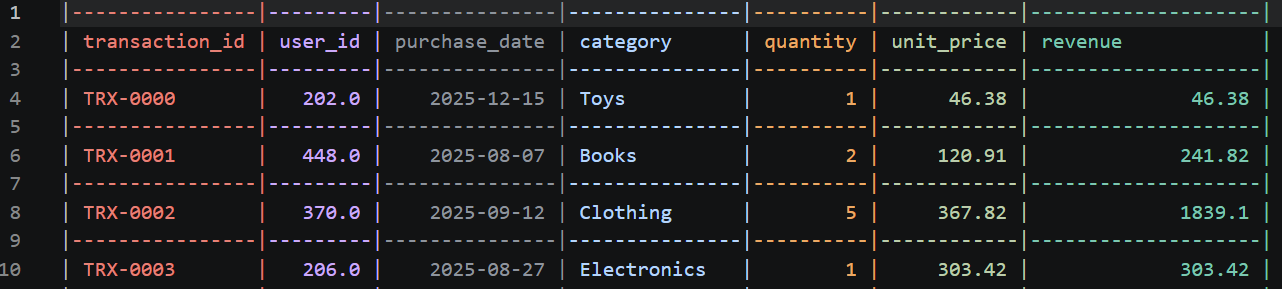
Sau khi mã được tạo, bước cuối là chạy pipeline end-to-end để đảm bảo nó hoạt động. Bạn chỉ cần bảo Codex, "Run the run_etl.py script."
Khi chạy, bạn sẽ thấy toàn bộ đầu ra terminal in ra ngay trước mắt, và có thể trông như thế này:
Tệp processed_transactions.csv mới sẽ trông như thế này:
Trong thực tế, mọi thứ có thể lỗi. Có thể có một chuỗi lạ ẩn trong cột số, gây ra TypeError. Nếu vậy, bạn không cần hoảng hay sao chép-dán lỗi vào trình duyệt. Codex CLI sẽ tự động bắt lỗi đó, đọc traceback Python và thường tự sửa mã của chính nó bằng cách đề xuất bản vá ngay lập tức.
Điều này thực sự làm nổi bật vòng lặp cốt lõi khi làm việc với tác nhân viết mã AI:
Đó là một vòng lặp hợp tác liên tục, tạo phần mềm hoạt động nhanh hơn nhiều so với gõ tay tất cả.
Kiểm thử mã là tối quan trọng để bạn không vô tình phá hỏng hệ thống khi đưa vào sản xuất, nhưng đây vẫn là bước gần như luôn bị bỏ qua.
Viết kiểm thử thật tẻ nhạt, nhất là khi bạn chỉ muốn có cái nhìn nhanh từ tập dữ liệu mới; dừng lại để viết unit test thường mang cảm giác như một việc vặt lớn. Nhưng khi có Codex CLI ngay trong terminal, rào cản đó gần như biến mất.
Nếu bạn muốn tạo kiểm thử cho mã chuyển đổi chúng ta vừa viết ở phần trước, bạn thậm chí không phải rời terminal hay mở tệp trống. Chúng ta có thể dùng framework kiểm thử Python tiêu chuẩn như pytest. Bạn có thể làm bằng cách đưa cho Codex một lời nhắc đơn giản như sau:
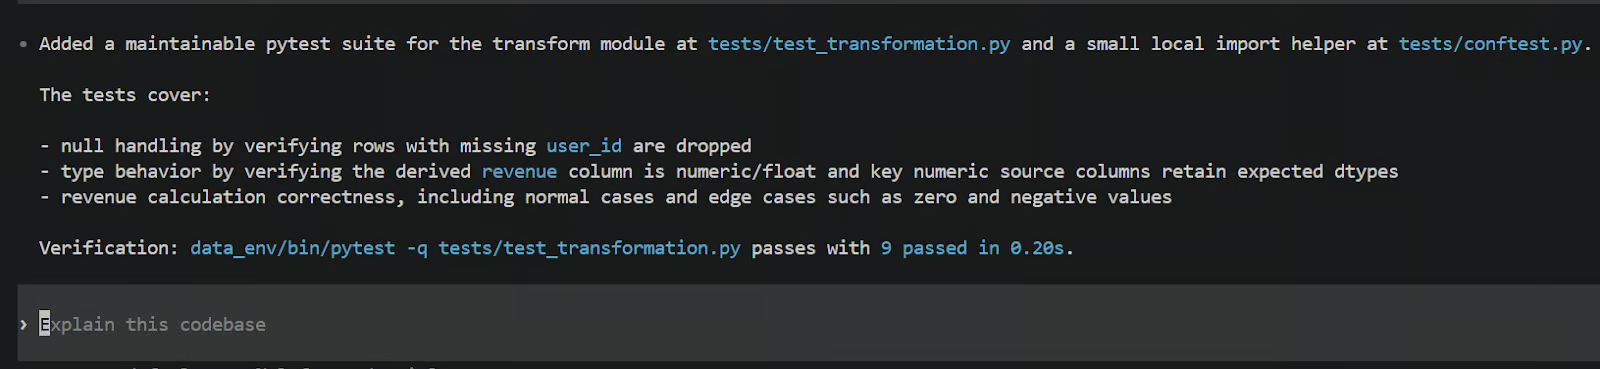
Write high-quality, maintainable pytest tests for the transform module. Test null handling, extreme edge cases like zeroes or negative values, type casting, and revenue calculation.Codex sẽ quay lại xem tệp transformation.py mà nó đã tạo trước đó. Nó đọc logic, hiểu các hàm cần làm gì, rồi tạo một tệp kiểm thử mới cho bạn. Dưới đây là những gì bạn có thể thấy trong terminal sau khi Codex tạo xong kiểm thử.
Trong trường hợp của tôi, nó tạo script test_transformation.py bên trong thư mục tests mới, với nhiệm vụ kiểm tra xem các hàm chuyển đổi chỉ định có làm đúng việc không.
Codex không chỉ viết các khẳng định chung chung, mà còn tạo dữ liệu nhỏ tổng hợp rất thực tế (gọi là fixture) để đưa vào các hàm của bạn nhằm kiểm tra độ bền. Nó cố tình tạo các trường hợp biên như hàng bị thiếu toàn bộ user_id hoặc số lượng mua âm, để đảm bảo logic chuyển đổi của bạn xử lý các tình huống lạ, hỏng một cách vững vàng và chính xác.
Kiểm thử chính mã Python là một chuyện, nhưng với các chuyên gia dữ liệu, chúng ta cũng cần kiểm thử chính dữ liệu đi qua mã. Điều này thường gọi là xác thực dữ liệu. Bạn muốn tạo các khẳng định thực sự để kiểm tra chất lượng tổng thể của dữ liệu trước khi bàn giao cho các bên liên quan hoặc nạp vào dashboard.
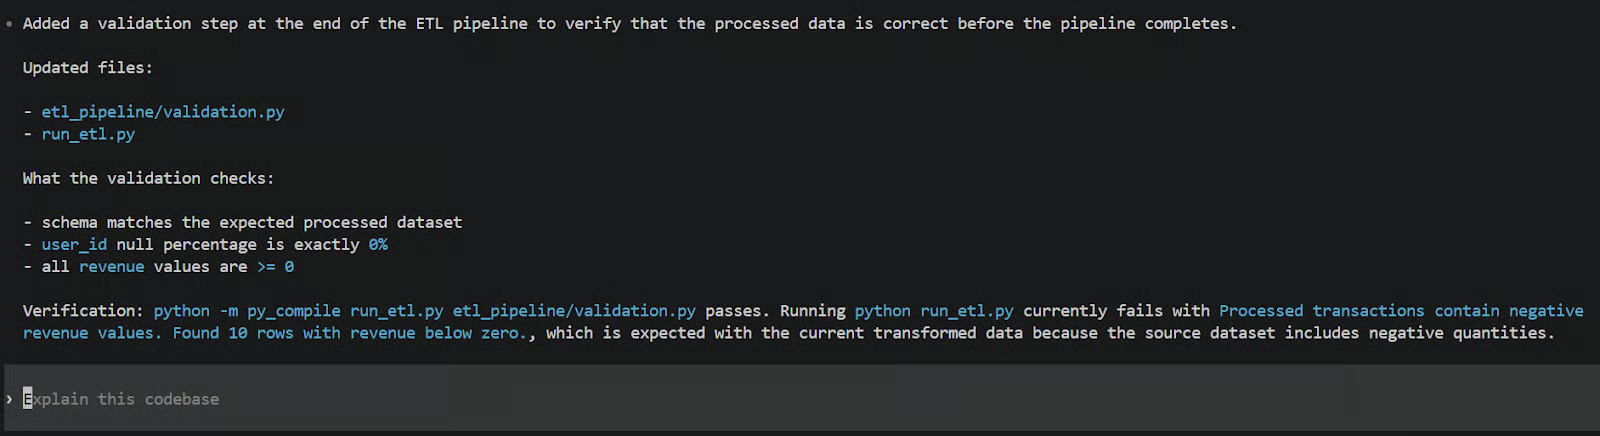
Bạn có thể minh họa điều này bằng cách yêu cầu Codex tạo một script xác thực dữ liệu cụ thể. Bạn chỉ cần gõ một lời nhắc như sau:
Create a data validation script that runs after the very end of the pipeline. It should check that the schema matches our expectations, ensure the null-percentage for user_id is exactly 0%, and verify that all revenue values are greater than or equal to zero.Sau đó, Codex sẽ xuất một script xác thực chuyên biệt, đóng vai trò như tấm lưới an toàn cuối cùng cho dự án. Bạn có thể dễ dàng cấu hình để nó chạy như bước hậu kiểm ở cuối pipeline.
Bằng cách đó, nếu dữ liệu CSV thô đột nhiên đổi cấu trúc vào ngày mai, hoặc có lỗi lạ khiến doanh thu âm xuất hiện từ hư không, script này sẽ bắt được và ném lỗi ngay. Nó đảm bảo pipeline của bạn không âm thầm đẩy dữ liệu xấu xuống dòng cho người dùng doanh nghiệp.
Đến giờ, chúng ta chủ yếu xem cách dùng Codex CLI theo kiểu tương tác, gõ qua lại. Nhưng với các chuyên gia dữ liệu muốn tích hợp công cụ này vào quy trình làm việc thường nhật, có một số cách dùng nâng cao có thể đưa phần việc nhàm chán của bạn vào chế độ tự động.
Jupyter Notebook rất tuyệt để khám phá dữ liệu ban đầu, nhưng lại khá tệ khi đến lúc chạy mã ổn định trong sản xuất. Thông thường, bạn phải mất hàng giờ sao chép từng ô, dán vào tệp Python và sửa các vấn đề biến toàn cục kỳ quặc.
Với Codex CLI, bạn chỉ cần trỏ tác nhân vào notebook và nhờ nó làm phần nặng. Bạn mở terminal và gõ lời nhắc như sau:
Refactor analysis.ipynb into a modular Python package with separate files for data loading, transformation, visualization, and a main.py entry point.Khi bạn phê duyệt, Codex đọc cấu trúc JSON của tệp notebook, trích xuất mã Python thực, bỏ qua log đầu ra linh tinh và tái tổ chức toàn bộ.
Nếu nhìn cấu trúc trước và sau, chúng rất khác nhau. Trước đó, bạn chỉ có một tệp analysis.ipynb khổng lồ nơi mọi thứ rối rắm với nhau.
Sau khi Codex hoàn tất, bạn sẽ thấy một thư mục sạch, chuyên nghiệp với các tệp data_loader.py, transformer.py và visualizer.py riêng (tên có thể khác), tất cả được gắn kết gọn gàng bởi script main.py. Nó ngay lập tức bắc cầu khoảng cách giữa phân tích khám phá lộn xộn và kỹ nghệ phần mềm sẵn sàng sản xuất.
Đôi khi bạn không muốn ngồi tương tác với giao diện chat chút nào. Nếu bạn đang xây dựng các pipeline tự động, như các kiểm tra tự động chạy trước khi chia sẻ mã với đội, bạn cần AI chỉ làm việc của nó ở nền, hoàn toàn tự động.
Đó là lúc lệnh codex exec phát huy tác dụng. Nó được thiết kế riêng để chạy Codex trong script và môi trường không tương tác mà không hỏi quyền của bạn ở mỗi bước.
Để đưa ra ví dụ thực tế, hãy chạy một kiểm thử nhanh. Chúng ta có thể dùng codex exec như một kiểm tra CI/CD mô phỏng để tự động phát hiện/xác thực dữ liệu xấu.
Mở terminal và gõ chính xác lệnh sau:
codex exec --skip-git-repo-check "Read transactions.csv. Write and run a quick python script to check if the 'quantity' column contains any negative numbers. If it does, print 'DATA VALIDATION FAILED: Negative quantities detected.' If it is clean, print 'DATA VALIDATION PASSED'." 2> /dev/nullKhi nhấn Enter, Codex sẽ chạy ở chế độ không tương tác. Nó sẽ không mở giao diện chat tương tác như thường lệ, và hành vi phê duyệt phụ thuộc vào các cờ và mặc định được cấu hình; bạn vẫn có thể cần cho phép một số hành động trừ khi bạn tắt phê duyệt. Để biết thêm, tôi khuyến nghị đọc Tài liệu Codex.
Nó sẽ nhanh chóng viết script xác thực, thực thi với tệp CSV cục bộ của bạn, rồi sốt ra kết quả cuối cùng trực tiếp lên đầu ra terminal tiêu chuẩn miễn là thư mục được coi là đáng tin và phê duyệt được cấu hình để cho phép. Bạn sẽ thấy một đầu ra in trên console trông như sau:
Câu lệnh này có rất nhiều trường hợp sử dụng. Hãy tưởng tượng dùng nguyên lệnh này trong pre-commit hook hoặc workflow GitHub Actions. Nếu pipeline của bạn gặp dữ liệu thiếu cột, có giá trị NaN hay hành vi bất ngờ khác, Codex có thể bắt ngay tại đó, mà bạn không phải tự viết các script PyTest và xác thực.
Khi dùng công cụ AI cho công việc dữ liệu, cách bạn tương tác với tác nhân ảnh hưởng trực tiếp đến chất lượng mã Python nhận được. Hãy xem một số thực hành tốt nhất để quy trình của bạn trơn tru và chuyên nghiệp.
Điều đầu tiên cần nắm là viết lời nhắc hiệu quả. Bạn không thể chỉ bảo AI "làm sạch dữ liệu" rồi mong kết quả hoàn hảo. Dưới đây là cách bạn nên cấu trúc yêu cầu:
Cụ thể: Bạn phải cụ thể về tên cột, kiểu dữ liệu mong muốn và định dạng đầu ra kỳ vọng. Ví dụ, thay vì yêu cầu mơ hồ, bạn nên nói rõ như: "ép kiểu cột 'purchase_date' thành datetime và xuất ra một tệp CSV đã tổng hợp."
Tham chiếu trực tiếp tệp: Một mẹo hữu ích là tham chiếu tệp trực tiếp bằng cú pháp @ trong lời nhắc. Nếu bạn gõ @transactions.csv, nó buộc Codex đọc chính tệp đó vào ngữ cảnh ngay lúc đó.
Chia nhỏ tác vụ phức tạp: Quan trọng hơn cả, bạn nên luôn chia tác vụ thành các phần nhỏ thay vì để Codex hành động theo một siêu-lời-nhắc khổng lồ. Dùng chế độ lập kế hoạch riêng của Codex để tạo bản nháp trước rồi thực thi từng bước là cách tối ưu cho tác vụ phức tạp.
Nếu bạn muốn nâng cao kỹ năng nhắc lệnh, tôi khuyến nghị khóa học Prompt Engineering with the OpenAI API.
Như đã đề cập, CLI có các chế độ phê duyệt khác nhau, và biết chính xác khi nào dùng từng chế độ rất quan trọng. Sau đây là hướng dẫn thời điểm nên dùng chế độ nào:
Cuối cùng, đảm bảo quy trình dữ liệu có thể tái lập là rất quan trọng với mọi chuyên gia dữ liệu. Một trong những nguyên tắc lớn bạn nên theo là luôn chạy Codex bên trong một kho Git đã khởi tạo. Bởi vì Codex sẽ viết và chỉnh sửa tệp trên máy bạn, việc Git theo dõi các thay đổi giúp bạn dễ dàng thấy chính xác AI đã làm gì và hoàn tác nếu có sự cố.
Bạn cũng nên chắc chắn commit tệp AGENTS.md chúng ta đã tạo trước đó cùng với mã dự án. Bằng cách đó, nếu một nhà khoa học dữ liệu khác trong nhóm clone repo và mở Codex, cả đội sẽ hưởng lợi từ cùng tiêu chuẩn và hướng dẫn mã hóa.
Điều tương tự áp dụng cho bất kỳ kỹ năng tác nhân nào bạn đã định nghĩa cho từng tác vụ. Để lấy cảm hứng, hãy xem hướng dẫn của chúng tôi về hơn một trăm kỹ năng tác nhân hàng đầu cho Codex và các công cụ mã hóa dạng tác nhân khác.
Và nếu bạn đang làm một phân tích nặng trong nhiều ngày, bạn không phải bắt đầu lại mỗi sáng. Chỉ cần dùng lệnh codex resume trong terminal để tiếp tục các dự án dữ liệu nhiều phiên. Nó tải lại phiên chat trước đó của bạn, hoàn toàn không mất ngữ cảnh quý giá về những gì bạn và tác nhân đã làm hôm qua.
Nếu bạn đang thực hiện một phân tích nặng trong nhiều ngày, bạn không cần bắt đầu lại mỗi sáng. Chỉ cần dùng lệnh codex resume trong terminal để tiếp tục các dự án nhiều phiên. Lệnh này mở lại phiên Codex gần nhất trong dự án để bạn tiếp tục công việc đang dở, với cuộc hội thoại, kế hoạch và thay đổi tệp trước đó vẫn còn trong ngữ cảnh (tuân theo giới hạn mô hình và lịch sử thông thường).
Để tìm hiểu thêm thực hành tốt nhất khi mã hóa dạng tác nhân, bạn cũng có thể xem hướng dẫn Claude Code Best Practices. Dù Claude Code và Codex khác nhau, như chúng tôi đã chỉ ra trong bài so sánh Codex vs Claude Code, nhiều khái niệm nền tảng cũng áp dụng cho Codex.
Chúng ta đã thiết lập Codex CLI dành riêng cho công việc dữ liệu và môi trường Python cục bộ của bạn. Từ đó, chúng ta đi qua việc tạo script phân tích khám phá dữ liệu từ đầu, xây dựng pipeline dữ liệu ETL có thể tái lập, viết kiểm thử chuyển đổi tự động (thường bị bỏ qua quá nhiều), và cuối cùng khám phá các cách nâng cao để tự động hóa những tác vụ dữ liệu hằng ngày siêu lặp lại.
Điều quan trọng nhất cần nhớ là chúng ta đã làm tất cả ngay từ dòng lệnh, hoàn toàn không cần nhảy qua lại trình duyệt web. Codex CLI về cơ bản bắc cầu qua khoảng cách khó chịu giữa phân tích khám phá lộn xộn và kỹ thuật dữ liệu chất lượng sản xuất.
Nếu bạn muốn học cách xây dựng một tác nhân phức tạp hơn với Codex CLI, tôi khuyến nghị xem Hướng dẫn Codex CLI MCP của chúng tôi. Bài này hướng dẫn bạn tạo một tác nhân dashboard danh mục đầu tư tài chính.
Khóa học AI
Tracks
Courses
Courses