

项目说明
开发与部署 AI 应用主要有两种思路:
- 完全开源:强调隐私和数据保护。
- 完全闭源:集成多个 API 和云服务。
两种方式各有优劣。本文选择第二种,集成多种 AI 服务。这使我们可以在几秒内构建并部署一个响应快速的 AI 应用。我们的核心目标是尽可能减小 Docker 镜像体积,而通过整合多项 AI 服务可以有效实现这一点。
如需使用开源工具和框架构建 LLM 应用并强化隐私保护,请查看 使用 Docker、n8n、Qdrant 和 Ollama 的本地 AI 教程。
我们将构建一个通用问答聊天机器人,允许用户上传文档并与之实时对话。这与 Google 的 NotebookLM 十分类似。
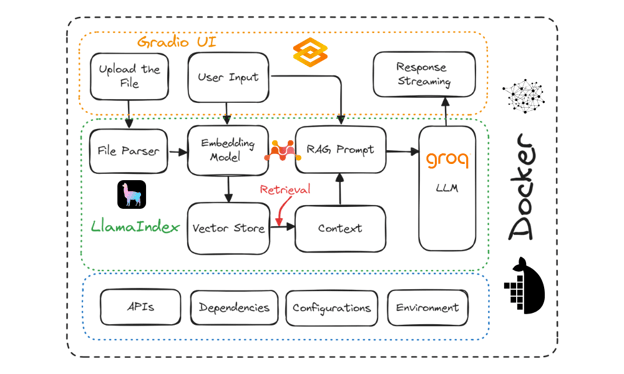
项目示意图。作者制图
本项目将使用以下工具:
- Gradio Blocks:用于创建用户界面,便于用户上传任意文本文档并轻松与文档对话。
- LlamaCloud:用于解析文件并以 Markdown 形式提取文本数据。
- MixedBread AI:将已加载文档和聊天消息转换为向量嵌入,以便进行上下文检索。
- Groq Cloud:用于获取高速 LLM 响应。本项目将使用 llama-3.1-70b 模型。
- LlamaIndex:用于创建编排所有 AI 服务的 RAG(检索增强生成)流水线。该流水线将结合上传文件和用户消息生成具备语境的答案。
- Docker:用于封装应用、依赖、环境与配置。
- Hugging Face Cloud:我们将把所有文件推送到 Spaces 仓库,Hugging Face 会基于 Dockerfile 自动构建镜像并部署到服务器。
如果您是 LLM 新手,建议先学习 Master Large Language Models (LLMs) Concepts 课程,了解基础术语、方法论、伦理考量与最新研究。
1. 环境搭建
在构建 LLM 应用之前,请先从官网下载并安装 Docker。
- 在本地系统使用默认选项安装 Docker。
- 接着,使用您喜欢的 IDE 创建一个项目目录,并添加
.env文件。我们将用该文件存储 LlamaCloud、MixedBread AI 和 Groq Cloud 的 API 密钥。 - 随后注册 LlamaCloud 并生成 API 密钥。我们将用 LlamaCloud 解析多种文本格式,包括 Excel、txt、Word 和 PDF。
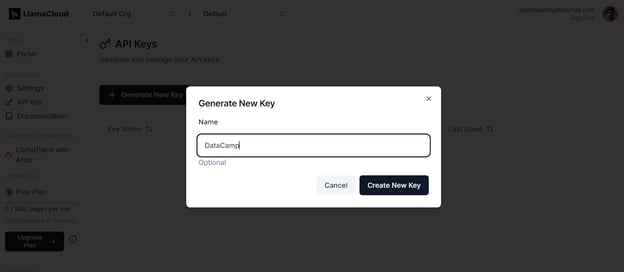
在 LlamaCloud 生成新密钥。图片来源:LlamaCloud
- 接着注册 MixedBread AI 并生成 API 密钥。我们将使用该密钥免费访问其顶级嵌入模型。
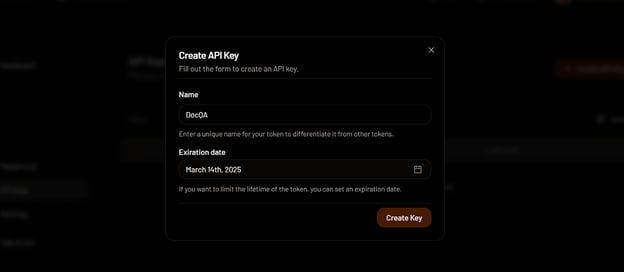
在 MixedBread 创建 API 密钥。图片来源:MixedBread
- 前往 GroqCloud 注册并免费生成 API 密钥。我们将通过 GroqCloud 访问高速 LLM。
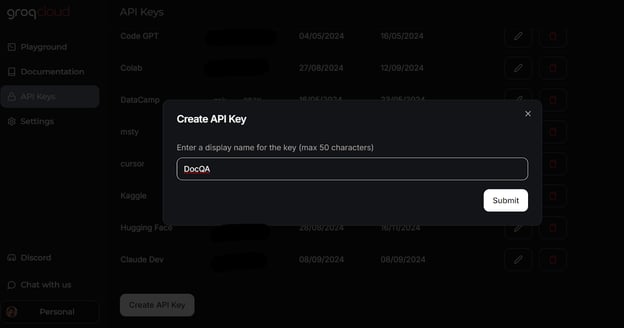
在 GroqCloud 创建 API 密钥。图片来源:GroqCloud
通过阅读Groq LPU 推理引擎一文,全面了解 GroqCloud。您将结合代码示例学习 Groq API 及其特性,并了解如何借助 Groq API 与 LlamaIndex 构建具备语境感知的 AI 应用。
您的 .env 文件应如下所示:
LLAMA_CLOUD_API_KEY=llx-XXXXXX
GROQ_API_KEY=gsk_XXXXXXX
MXBAI_API_KEY=emb_XXXXXX请记得将 .env 文件加入 .gitignore,以避免不慎将 API 密钥暴露给公众。
2. 构建 LLM 应用
现在我们将创建名为 app.py 的 Python 脚本,添加用户界面组件,并通过 LlamaParser 集成所有 AI 服务,使用 LlamaIndex 构建 RAG(检索增强生成)流水线。
app.py 脚本将执行以下操作:
- 加载所有必要的 Python 包。
- 从
.env文件安全读取所有 API 密钥。 - 使用 LlamaCloud API 密钥初始化 LlamaParser。
- 定义可处理多种常见文件扩展名的文件解析器。
- 使用 MixedBread AI 的 API 密钥初始化嵌入模型,具体模型为
mixedbread-ai/mxbai-embed-large-v1。 - 使用 Groq Cloud 的 API 密钥初始化大语言模型,具体模型为
llama-3.1-70b-versatile。
接下来会实现以下 Python 函数:
load_files():加载文件,使用 LlamaParser 进行解析,将其转换为嵌入,并存入向量库。包含异常处理,用于应对上传的非文件或不受支持的文件格式。respond():接收用户输入,从向量库中检索内容,并使用 Groq 模型生成响应。响应以流式输出形式返回,并在未上传任何文件的情况下进行异常处理。
最后,将构建 UI 组件,包括文件上传器、按钮、聊天框以及整体对话界面。
想进一步了解 LlamaIndex 框架,请参阅更为简明的 LlamaIndex 教程。
以下是 app.py 脚本:
import os
import gradio as gr
from llama_index.core import SimpleDirectoryReader, VectorStoreIndex
from llama_index.embeddings.mixedbreadai import MixedbreadAIEmbedding
from llama_index.llms.groq import Groq
from llama_parse import LlamaParse
# API keys
llama_cloud_key = os.environ.get("LLAMA_CLOUD_API_KEY")
groq_key = os.environ.get("GROQ_API_KEY")
mxbai_key = os.environ.get("MXBAI_API_KEY")
if not (llama_cloud_key and groq_key and mxbai_key):
raise ValueError(
"API Keys not found! Ensure they are passed to the Docker container."
)
# models name
llm_model_name = "llama-3.1-70b-versatile"
embed_model_name = "mixedbread-ai/mxbai-embed-large-v1"
# Initialize the parser
parser = LlamaParse(api_key=llama_cloud_key, result_type="markdown")
# Define file extractor with various common extensions
file_extractor = {
".pdf": parser,
".docx": parser,
".doc": parser,
".txt": parser,
".csv": parser,
".xlsx": parser,
".pptx": parser,
".html": parser,
".jpg": parser,
".jpeg": parser,
".png": parser,
".webp": parser,
".svg": parser,
}
# Initialize the embedding model
embed_model = MixedbreadAIEmbedding(api_key=mxbai_key, model_name=embed_model_name)
# Initialize the LLM
llm = Groq(model="llama-3.1-70b-versatile", api_key=groq_key)
# File processing function
def load_files(file_path: str):
global vector_index
if not file_path:
return "No file path provided. Please upload a file."
valid_extensions = ', '.join(file_extractor.keys())
if not any(file_path.endswith(ext) for ext in file_extractor):
return f"The parser can only parse the following file types: {valid_extensions}"
document = SimpleDirectoryReader(input_files=[file_path], file_extractor=file_extractor).load_data()
vector_index = VectorStoreIndex.from_documents(document, embed_model=embed_model)
print(f"Parsing completed for: {file_path}")
filename = os.path.basename(file_path)
return f"Ready to provide responses based on: {filename}"
# Respond function
def respond(message, history):
try:
# Use the preloaded LLM
query_engine = vector_index.as_query_engine(streaming=True, llm=llm)
streaming_response = query_engine.query(message)
partial_text = ""
for new_text in streaming_response.response_gen:
partial_text += new_text
# Yield an empty string to cleanup the message textbox and the updated conversation history
yield partial_text
except (AttributeError, NameError):
print("An error occurred while processing your request.")
yield "Please upload the file to begin chat."
# Clear function
def clear_state():
global vector_index
vector_index = None
return [None, None, None]
# UI Setup
with gr.Blocks(
theme=gr.themes.Default(
primary_hue="green",
secondary_hue="blue",
font=[gr.themes.GoogleFont("Poppins")],
),
css="footer {visibility: hidden}",
) as demo:
gr.Markdown("# DataCamp Doc Q&A 🤖📃")
with gr.Row():
with gr.Column(scale=1):
file_input = gr.File(
file_count="single", type="filepath", label="Upload Document"
)
with gr.Row():
btn = gr.Button("Submit", variant="primary")
clear = gr.Button("Clear")
output = gr.Textbox(label="Status")
with gr.Column(scale=3):
chatbot = gr.ChatInterface(
fn=respond,
chatbot=gr.Chatbot(height=300),
theme="soft",
show_progress="full",
textbox=gr.Textbox(
placeholder="Ask questions about the uploaded document!",
container=False,
),
)
# Set up Gradio interactions
btn.click(fn=load_files, inputs=file_input, outputs=output)
clear.click(
fn=clear_state, # Use the clear_state function
outputs=[file_input, output],
)
# Launch the demo
if __name__ == "__main__":
demo.launch()- 在终端使用以下命令运行上述 Python 文件以启动 Gradio 服务器:
$ python app.py 输出:

- 复制并粘贴生成的 URL 到浏览器即可访问 Grodio 界面。随后您可上传文件并开始就其内容提问。
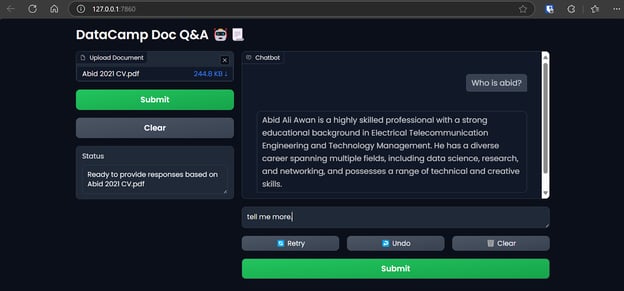
在浏览器中访问 Gradio 应用。作者供图
本教程使用 LlamaIndex 来构建与部署 LLM 应用。您也可以通过短课程 Developing LLM Applications with LangChain 使用 LangChain 构建类似应用。
3. 创建 Dockerfile
- 在项目中创建
Dockerfile,用于打包应用脚本、Python 依赖和服务器配置,并初始化 Gradio 服务器。
Dockerfile 将完成以下任务:
- 设置 Python 3.9 环境。
- 定义工作目录。
- 将
requirements.txt复制到/app目录。该文件包含所需 Python 包名称。 - 安装
requirements.txt中指定的所有依赖。 - 将
app.py复制到/app目录。 - 暴露端口并设置 Gradio 服务器 URL。
- 运行应用文件以启动服务器。
Dockerfile 示例:
# Dockerfile
# Use the official Python image with the desired version
FROM python:3.9-slim
# Set the working directory inside the container
WORKDIR /app
# Copy the requirements file to the working directory
COPY requirements.txt /app
# Install the dependencies
RUN pip install --no-cache-dir -r requirements.txt
# Copy the rest of the application code to the working directory
COPY app.py /app
# Expose the port that Gradio will run on (default is 7860)
EXPOSE 7860
ENV GRADIO_SERVER_NAME="0.0.0.0"
# Command to run your application
CMD ["python", "app.py"]- 以下是
requirements.txt的内容,请一并添加到项目:
gradio
llama-index-embeddings-mixedbreadai
llama-index-llms-groq
llama-index4. 构建 Docker 镜像并运行容器
- 在终端输入以下命令构建
docqa镜像。它会使用Dockerfile创建 Docker 镜像。
$ docker build -t docqa . 构建 Docker 镜像时可查看相关过程日志:
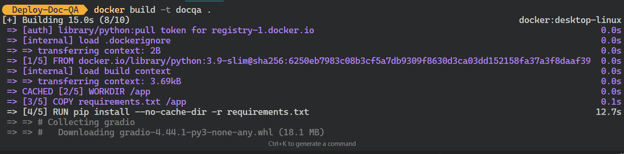
构建 LLM Docker 镜像。作者供图
- 镜像构建成功后,打开 Docker Desktop,点击 Images 标签,选择该镜像以查看日志和运行指令。
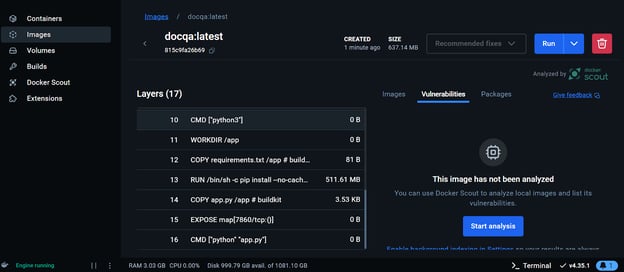
在 Docker Desktop 查看镜像。作者供图
现在我们将基于该镜像在本地运行 Docker 容器。需要提供端口号、用于设置环境变量的 .env 文件、容器名称以及镜像标签。
- 在终端运行如下命令:
$ docker run -p 7860:7860 --env-file .env --name docqa-container docqa容器启动后,您可以在浏览器中粘贴 URL 访问 Gradio 应用,例如 http://0.0.0.1:7860/。
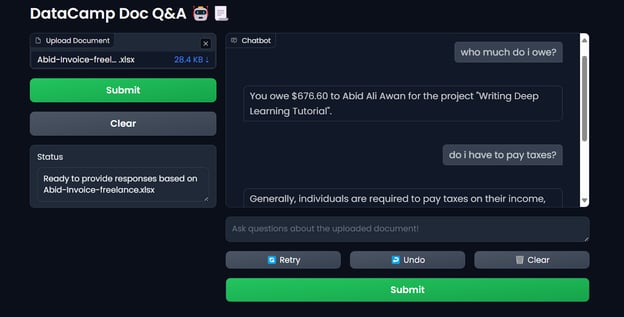
测试 Docker 容器中的 LLM 应用。作者供图
- 查看本地正在运行的所有容器信息,请输入:
$ docker ps输出:
CONTAINER ID IMAGE COMMAND CREATED STATUS PORTS NAMES
ff2a11da13d7 docqa "python app.py" 17 seconds ago Up 16 seconds 0.0.0.0:7860->7860/tcp docqa-container- 可使用
stop命令停止容器:
$ docker stop docqa-container - 也可使用
rm命令将其移除:
$ docker rm docqa-container 构建出 Docker 镜像后,您即可将 LLM 应用部署到任意平台:GCP、AWS、Azure 或任何支持 Docker 的云服务器。
5. 使用 Docker 将 LLM 应用部署到 Hugging Face
为便于初学者,我们将通过 Hugging Face Cloud(Spaces)使用 Docker 部署应用。
- 前往 Hugging Face 仪表板,点击个人头像并选择 + New Space。
- 为 Space 命名,添加简短描述,选择许可证与 SDK,并创建 Space 仓库。
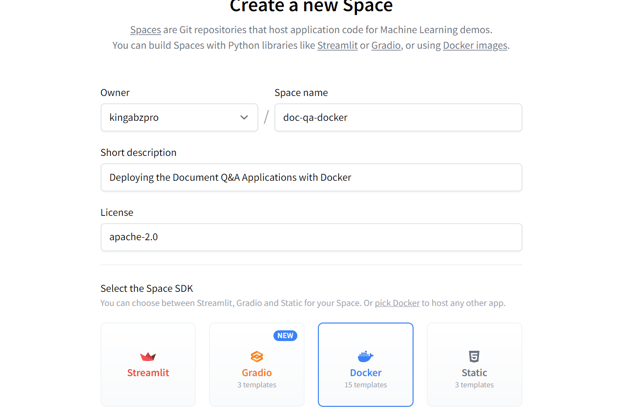
使用 Docker 创建新的 Hugging Face Space。图片来源:Hugging Face
Space 仓库创建完成后,您将收到如何克隆并添加必要文件的说明。
- 克隆仓库请使用以下命令(将 URL 替换为您 Space 的地址):
$ git clone https://huggingface.co/spaces/kingabzpro/doc-qa-docker- 将项目目录中的所有文件复制粘贴到新仓库:
项目目录应包含如下文件。务必确保不要推送 .env 文件,请将其加入 .gitignore。
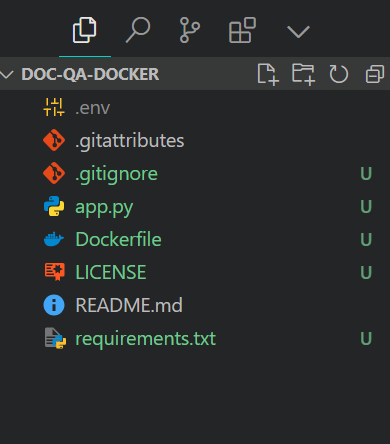
项目文件结构。作者供图
- 暂存文件、提交信息并推送到 Hugging Face Space:
$ git add .
$ git commit -m "Deploying the App"
$ git push输出:
Enumerating objects: 8, done.
Counting objects: 100% (8/8), done.
Delta compression using up to 16 threads
Compressing objects: 100% (7/7), done.
Writing objects: 100% (7/7), 7.60 KiB | 7.60 MiB/s, done.
Total 7 (delta 0), reused 0 (delta 0), pack-reused 0 (from 0)
To https://huggingface.co/spaces/kingabzpro/doc-qa-docker
afb20ad..5ca6388 main -> main- 前往您的 Hugging Face Space 访问应用。系统将构建 Docker 镜像并启动服务:
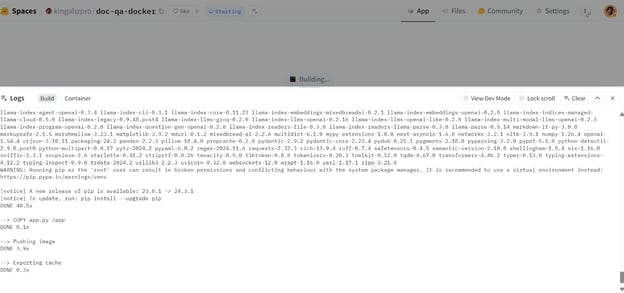
在 Hugging Face Cloud 构建 Docker 镜像。图片来源:Doc Qa Docker
如果看到如下错误,不必担心。这是由于缺少环境变量。只需在 Hugging Face Space 中设置这些变量即可。
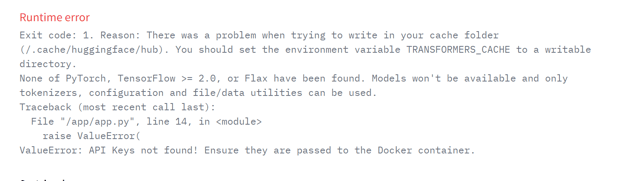
已部署应用的运行时错误。图片来源:Doc Qa Docker
- 要在 Space 中添加新的环境变量,前往 Settings,下滑并点击 New secret 按钮。然后按下图所示提供名称和值。本例中我们添加所需的 API 密钥:
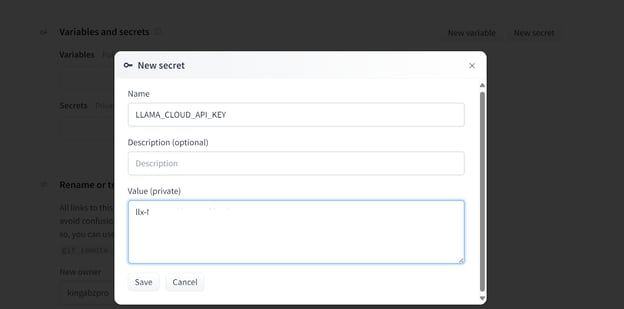
为已部署应用添加密钥。图片来源: Doc Qa Docker settings。
添加所有必要 API 密钥为环境变量后,密钥列表应如下所示:
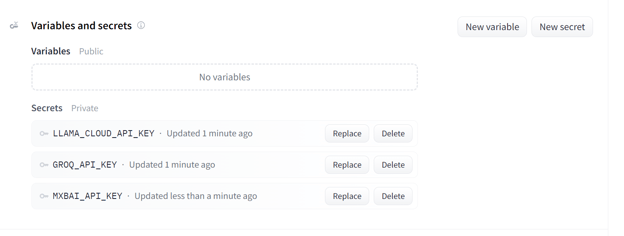
已部署应用的密钥。图片来源: Doc Qa Docker settings。
设置密钥后,应用会自动重启,您应能看到应用已成功运行。尽情在云端使用您的文档问答应用吧!
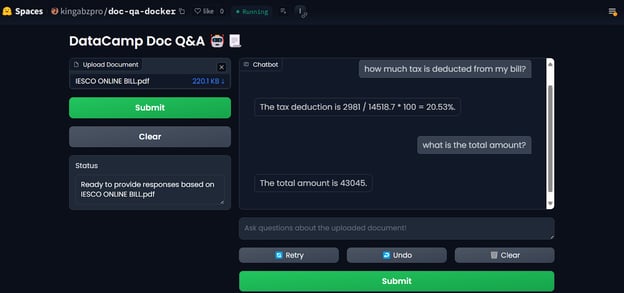
Hugging Face Spaces 上的 LLM 应用。图片来源:Doc Qa Docker
如需复现结果,所有文件与配置可在 GitHub 仓库中找到:kingabzpro/Deploy-Doc-QA。
6. 监控已部署的应用
使用 AI 服务有诸多优势:无需自建或运维服务、吞吐高,而且提供带日志的仪表板。
在 LlamaCloud 仪表板中,所有被解析的文档都会被记录。您可以查看请求历史并对用量进行比较。
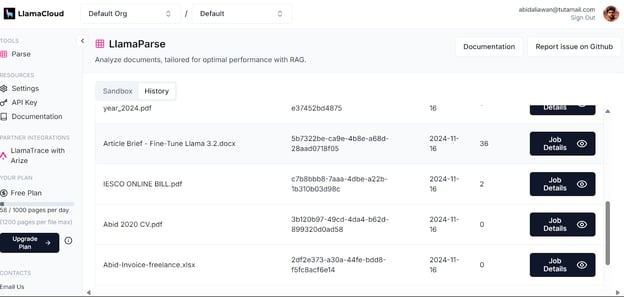
Llama Cloud 仪表板。图片来源:LlamaCloud
同样,您也可以查看我们在嵌入模型上的 token 使用量以及产生的请求数。
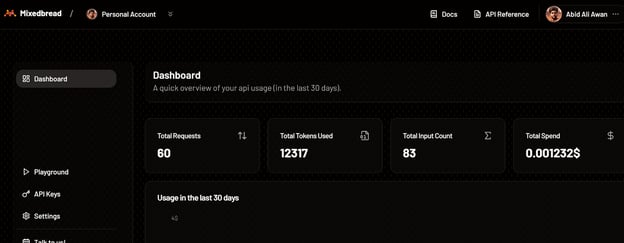
Mixedbread 仪表板。图片来源:Mixedbread
最详尽的各 API 日志可在 GroqCloud 中查看,包括延迟、token 数、AI key 和请求 ID,便于您调试系统。
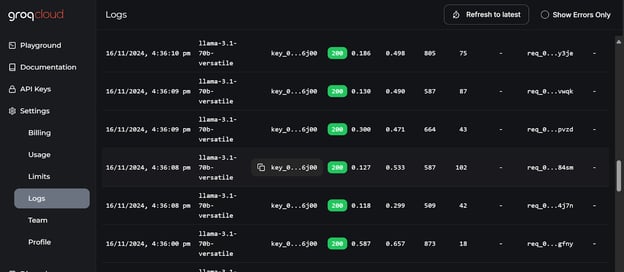
GroqCloud 日志。图片来源:GroqCloud
总结
本指南介绍了如何组合多项服务,在资源占用与计算开销最小化的前提下,构建高效的文档问答应用。文中使用的所有服务和工具均可免费试用,便于您搭建自己的应用。
通过使用多种开箱即用的 AI 服务,我们将 Docker 镜像体积减少了 600MB;若完全自建部署,镜像体积可能达到约 20GB 或更大。
作为下一步学习建议,您可以选择 LLMOps Concepts: From Ideation to Deployment 课程,深入理解 LLM 开发生命周期与部署挑战,并学习如何有效应用相关理念。

作为一名持证的数据科学家,我热衷于利用前沿技术打造创新的机器学习应用。凭借在语音识别、数据分析与报告、MLOps、对话式人工智能以及自然语言处理方面的扎实背景,我不断打磨构建智能系统的能力,力求带来切实影响。除技术专长外,我也擅长沟通,能够将复杂概念提炼为清晰、简明的表述。因此,我成为数据科学领域备受关注的博主,与不断壮大的数据专业人士社区分享洞见与实践经验。目前,我专注于内容创作与编辑,借助大语言模型打造有力且吸引人的内容,帮助企业与个人更好地发挥数据价值。
Docker 可用于创建一致、可移植且隔离的环境,是 LLMOps(大型语言模型运维)的关键工具。通过将各种 LLM 应用及其依赖封装进容器,Docker 简化了部署、确保跨系统兼容,并加速测试流程。
本教程将带您构建一个“文档问答”聊天机器人应用,并使用 Docker 将其部署到云端。我们将使用 Gradio 构建用户界面,使用 LlamaIndex 进行编排,用 LlamaParse 解析文档,Mixedbread AI 生成向量嵌入,通过 Groq 访问大型语言模型,并用 Docker 打包应用及其依赖,最终通过 Hugging Face Spaces 将应用部署到云端。
本教程力求简明,即便您对 AI 应用原理了解不多,也能免费动手搭建。