
Kurs
Feinabstimmung mit Llama 3
2 Std.
3.7K
In this tutorial, we will learn how to run the FLUX.2 image generation model locally. We will set up the GPU environment, download a quantized version of FLUX.2, load it efficiently into GPU and RAM memory, run inference, and then experiment with different configuration options.
Running a model of this size on an RTX 3090 can be challenging, and this tutorial focuses on the simplest, most practical way to get FLUX.2 working locally without unnecessary complexity.
If you’re interested in advanced techniques in model management and optimization, including pruning, quantization, and logging, I recommend taking the Scalable AI Models with PyTorch Lightning course.
FLUX.2 is an image generation model built for real creative work, not just experiments. It creates high-quality, realistic images while keeping characters, styles, and products consistent across multiple reference images. Building on the original FLUX model, it follows prompts accurately, renders text clearly, and handles lighting, layouts, and branding well.
FLUX.2 also supports image editing at high resolution and is available both as ready-to-use APIs and open models you can run locally, making it practical, flexible, and easy to fit into real production workflows.
FLUX.2 comes in four main variants:
Each is designed for different levels of control, performance, and deployment needs.
In broader leaderboard comparisons, all three FLUX.2 variants rank within the top 10 image editing models on the Artificial Analysis leaderboard, with FLUX.2 [max] and FLUX.2 [pro] outperforming models like GPT-5 and the previous generation FLUX.1 Kontext variants.
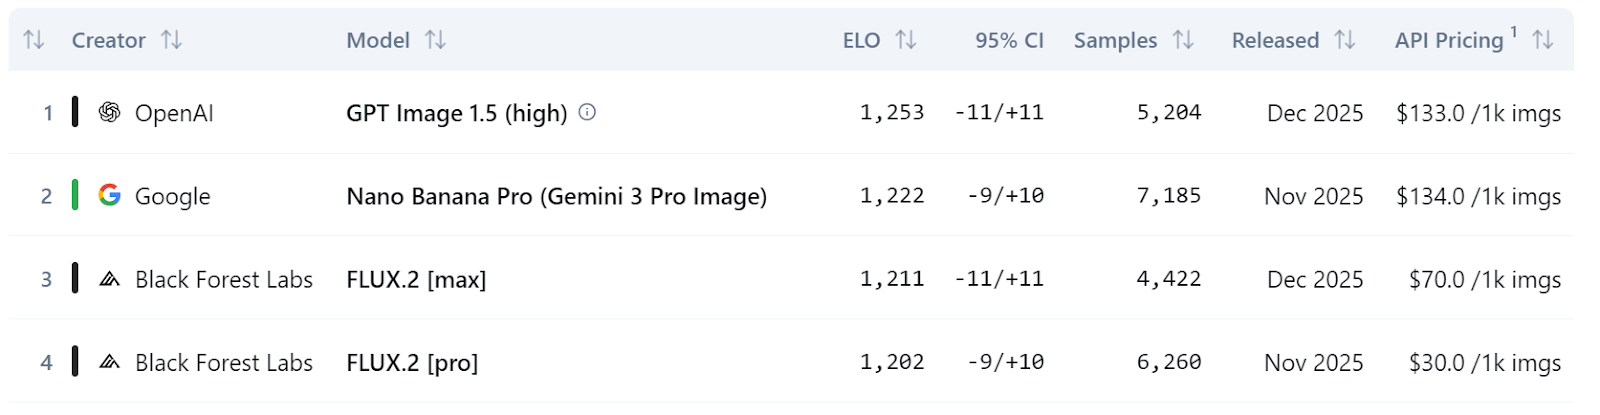
Source: Text to Image Leaderboard | Artificial Analysis
In the steps below, I’ll explain everything you need to know to run FLUX.2 locally using an RTX 3090 GPU.
Before running FLUX.2 locally, make sure your system is set up correctly for GPU inference.
Run the following command in the terminal to verify the installation:
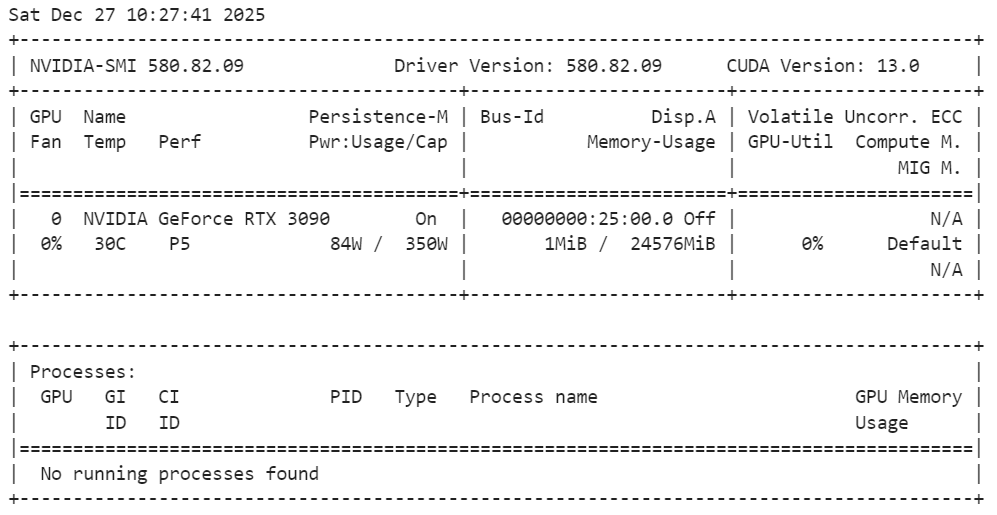
nvidia-smiAs we can see, we have an RTX 3090 GPU with CUDA version 13.
pip install jupyterlab notebookNote: We are using Jupyter Notebook as our coding environment, which makes it easier to experiment, run inference step by step, and iteratively generate and edit images directly within the notebook.
In this step, we install PyTorch with CUDA support so inference runs on the GPU instead of the CPU. The command below installs PyTorch, TorchVision, and TorchAudio with precompiled CUDA binaries, removing the need to build CUDA from source.
!pip install torch torchvision torchaudio --index-url https://download.pytorch.org/whl/cu130After installation, PyTorch will automatically use the GPU if it is available and correctly configured.
Next, we install the core libraries required to run FLUX.2 locally. These packages handle model loading, inference, GPU acceleration, quantization, and efficient data transfer.
!pip install -q diffusers transformers accelerate bitsandbytes huggingface_hub protobuf sentencepiece hf_transferOnce installed, your environment is ready to load FLUX.2 and start running image generation and editing inference.
Before loading FLUX.2, we verify that PyTorch can see the GPU and that 4-bit quantization is supported. This step is important to ensure the model can run efficiently within the memory limits of an RTX 3090.
import torch
import bitsandbytes as bnb

print(f"PyTorch Version: {torch.__version__}")
print(f"CUDA Version: {torch.version.cuda}")
print(f"Is CUDA available? {torch.cuda.is_available()}")
print(f"GPU Name: {torch.cuda.get_device_name(0)}")

# Check if 4-bit quantization is supported (Ampere 3090 supports this natively)
try:
    print(f"BitsAndBytes Version: {bnb.__version__}")
    print("4-bit quantization check: PASSED")
except ImportError:
    print("BitsAndBytes not installed correctly.")
The output confirms that PyTorch is correctly installed with CUDA support, your RTX 3090 GPU is detected, and bitsandbytes is working properly with 4-bit quantization enabled, so the system is ready for efficient GPU inference.
PyTorch Version: 2.8.0+cu128
CUDA Version: 12.8
Is CUDA available? True
GPU Name: NVIDIA GeForce RTX 3090
BitsAndBytes Version: 0.49.0
4-bit quantization check: PASSEDIn this step, we load FLUX.2 [dev] using a 4-bit quantized checkpoint to reduce GPU memory usage while keeping image quality high. This is essential for running a large model like FLUX.2 on an RTX 3090.
We start by importing the required libraries and defining a few key settings.
repo_id points to the 4-bit FLUX.2 dev checkpoint.device selects your GPU (first CUDA device).torch_dtype sets the compute precision used during inference. bfloat16 is commonly used because it reduces memory and can improve speed while still keeping outputs stable.import torch
from transformers import Mistral3ForConditionalGeneration
from diffusers import Flux2Pipeline, Flux2Transformer2DModel
repo_id = "diffusers/FLUX.2-dev-bnb-4bit"
device = "cuda:0"
torch_dtype = torch.bfloat16Next, we load the FLUX.2 image transformer backbone (the main component responsible for generating the image latents) onto the CPU first. This avoids filling up VRAM during the initial load and gives the pipeline more flexibility to move modules onto the GPU only when needed.
transformer = Flux2Transformer2DModel.from_pretrained(
  repo_id, subfolder="transformer", torch_dtype=torch_dtype, device_map="cpu"
)
Then we load the text encoder onto the CPU as well. The text encoder converts your prompt into embeddings that guide the image generation. Keeping it on CPU during setup helps keep GPU memory free for the heavier parts of the generation process.
text_encoder = Mistral3ForConditionalGeneration.from_pretrained(
  repo_id, subfolder="text_encoder", dtype=torch_dtype, device_map="cpu"
)
Finally, we assemble the full Diffusers pipeline by injecting the transformer and text encoder we loaded.
The key line here is enable_model_cpu_offload(): it turns on automatic CPU ↔ GPU offloading, meaning the pipeline moves parts of the model onto the GPU only when they are actively needed, then moves them back to the CPU afterward. This is one of the easiest ways to run large models on consumer GPUs without manually managing device placement.
pipe = Flux2Pipeline.from_pretrained(
  repo_id, transformer=transformer, text_encoder=text_encoder, torch_dtype=torch_dtype
)
pipe.enable_model_cpu_offload()We are now ready to generate our first image using FLUX.2. To keep things simple, we start with a single text prompt that describes a hyper-realistic macro photograph of a ladybug.
prompt = (
    "Realistic macro photo of a ladybug perched on the edge of a dew-covered rose petal, "
    "early morning mist, soft natural light, shallow depth of field, crisp detail, creamy bokeh."
)
Next, we pass the prompt to the pipeline and run inference.
image = pipe(
prompt=prompt,
generator=torch.Generator(device=device).manual_seed(42),
num_inference_steps=28,
guidance_scale=4,
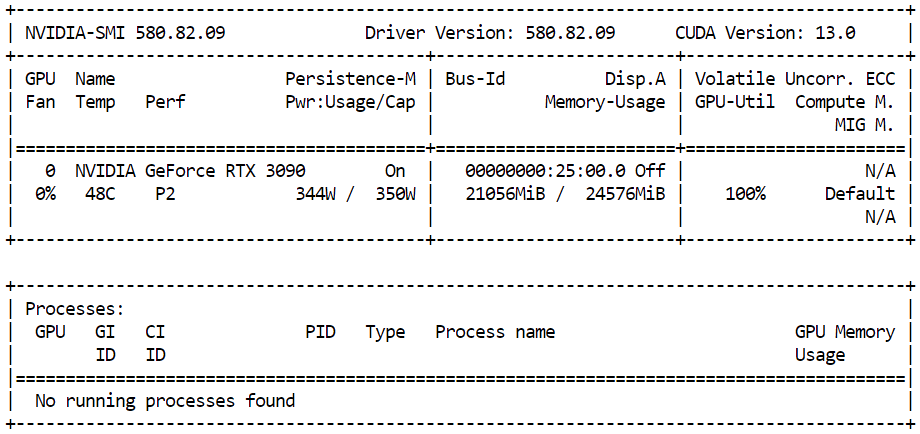
).images[0]To monitor how much GPU memory is being used during inference, open a terminal and run:
nvidia-smiYou should see close to 21 GB of GPU VRAM in use with high GPU utilization, which indicates that the model is efficiently using available resources and running at full performance on the RTX 3090.
Once inference completes, you can view the generated image directly inside the Jupyter Notebook by simply displaying the image object:
imageThe result is highly detailed and realistic. The model follows the prompt closely while also adding subtle details, such as lighting and texture, that were not explicitly specified.

Finally, we save the generated image locally:
output_path = "flux2_local_full.png"
image.save(output_path)
print(f"Image saved to {output_path}")
Output:
Image saved to flux2_local_full.pngFLUX.2 supports advanced prompting techniques that go beyond plain text, allowing much finer control over the final image. Using structured JSON prompts, you can explicitly define scene layout, subjects, lighting, camera settings, mood, and even color palettes using precise hex codes.
In this section, we use a structured JSON prompt to describe the scene in detail. Instead of a single sentence, we define the environment, subjects, style, colors, lighting, camera properties, and negative constraints in a clear and organized format.
This helps FLUX.2 better understand complex instructions and produce more predictable, high-quality results.
advanced_prompt = """
{
  "scene": "New Year's Eve night on a rooftop overlooking a glowing city skyline",
  "subjects": [
    {
      "description": "Group of close friends including men and women in winter clothing, natural facial proportions, diverse appearances",
      "position": "center and slightly spread across the frame",
      "action": "standing together in a loose circle, some smiling softly, others quietly reflective, sharing the moment before midnight"
    }
  ],
  "style": "Cinematic semi-realistic illustration with grounded realism, subtle painterly softness",
  "color_palette": ["#0B132B", "#1C2541", "#EAEAEA", "#F4D35E"],
  "lighting": "Soft moonlight as ambient key light, warm glow from sparklers and nearby string lights illuminating faces, gentle contrast",
  "mood": "Warm, intimate, reflective, hopeful",
  "background": "Out-of-focus city skyline with distant fireworks softly lighting the sky, minimal visual noise",
  "composition": "Wide medium shot, balanced framing, friends forming a natural arc, negative space above for sky and fireworks",
  "camera": {
    "angle": "eye-level",
    "lens": "50mm cinematic look",
    "depth_of_field": "sharp focus on group, gentle background blur"
  },
  "details": [
    "subtle breath vapor in cold air",
    "soft fabric textures on coats and scarves",
    "sparklers emitting warm golden particles",
    "natural body language and expressions",
    "no exaggerated poses or faces"
  ],
  "negative_prompt": [
    "cartoon style",
    "emote proportions",
    "chibi",
    "oversized heads",
    "text",
    "watermark",
    "logo",
    "overcrowded scene",
    "harsh neon lighting",
    "over-saturation",
    "extra limbs",
    "distorted faces"
  ]
}
"""
We then run inference with a higher number of steps to capture more detail while keeping the guidance scale moderate for a natural look.
image_2 = pipe(
  prompt=advanced_prompt,
  generator=torch.Generator(device=device).manual_seed(42),
  num_inference_steps=50,
  guidance_scale=4,
).images[0]
To display the generated image inside the Jupyter Notebook:
image_2The resulting image closely follows the structured prompt, capturing the scene, mood, lighting, and composition exactly as specified.

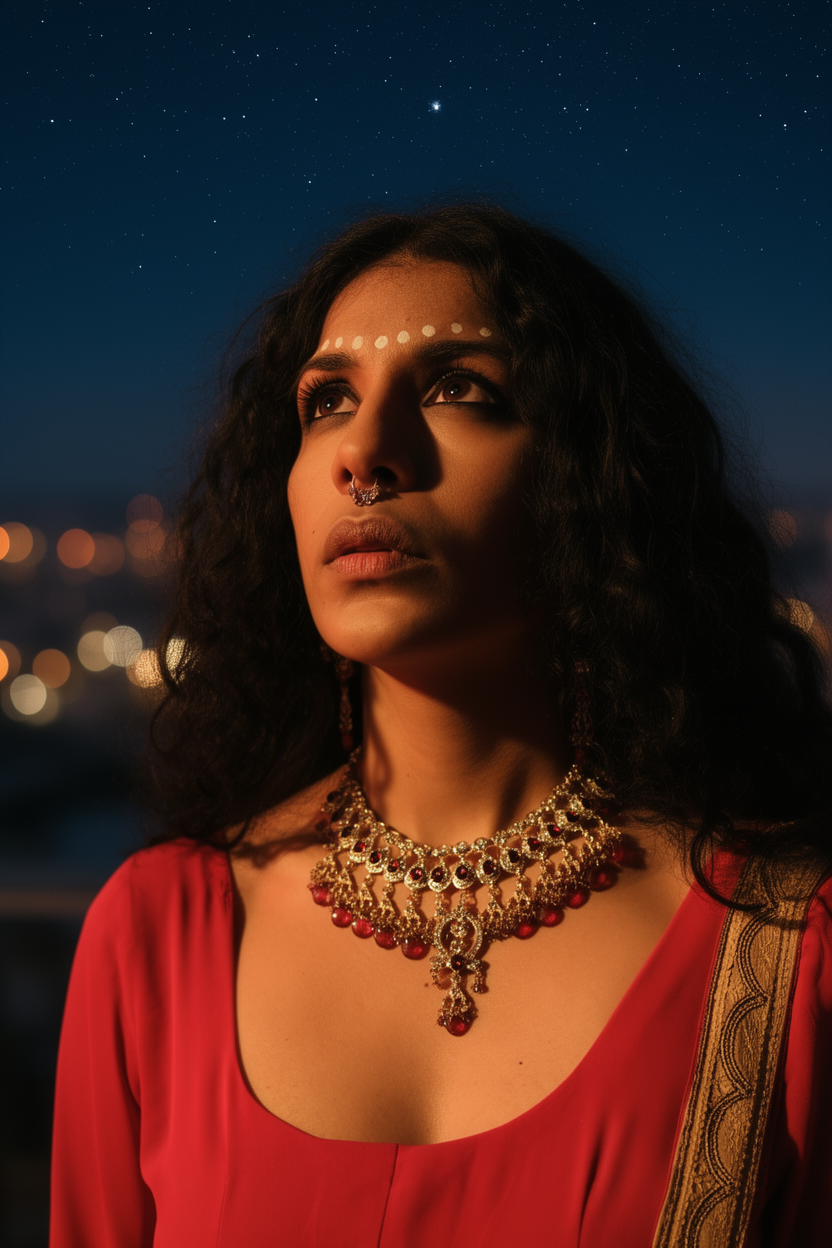
FLUX.2 also supports image editing, where a reference image is used as the base, and the model applies changes guided by a text prompt. This is especially useful when you want to preserve identity, facial features, and skin tone, while changing the scene, mood, or environment around the subject.
For this example, we use a photo of an Indian woman sourced from Pexels.com as the reference image:
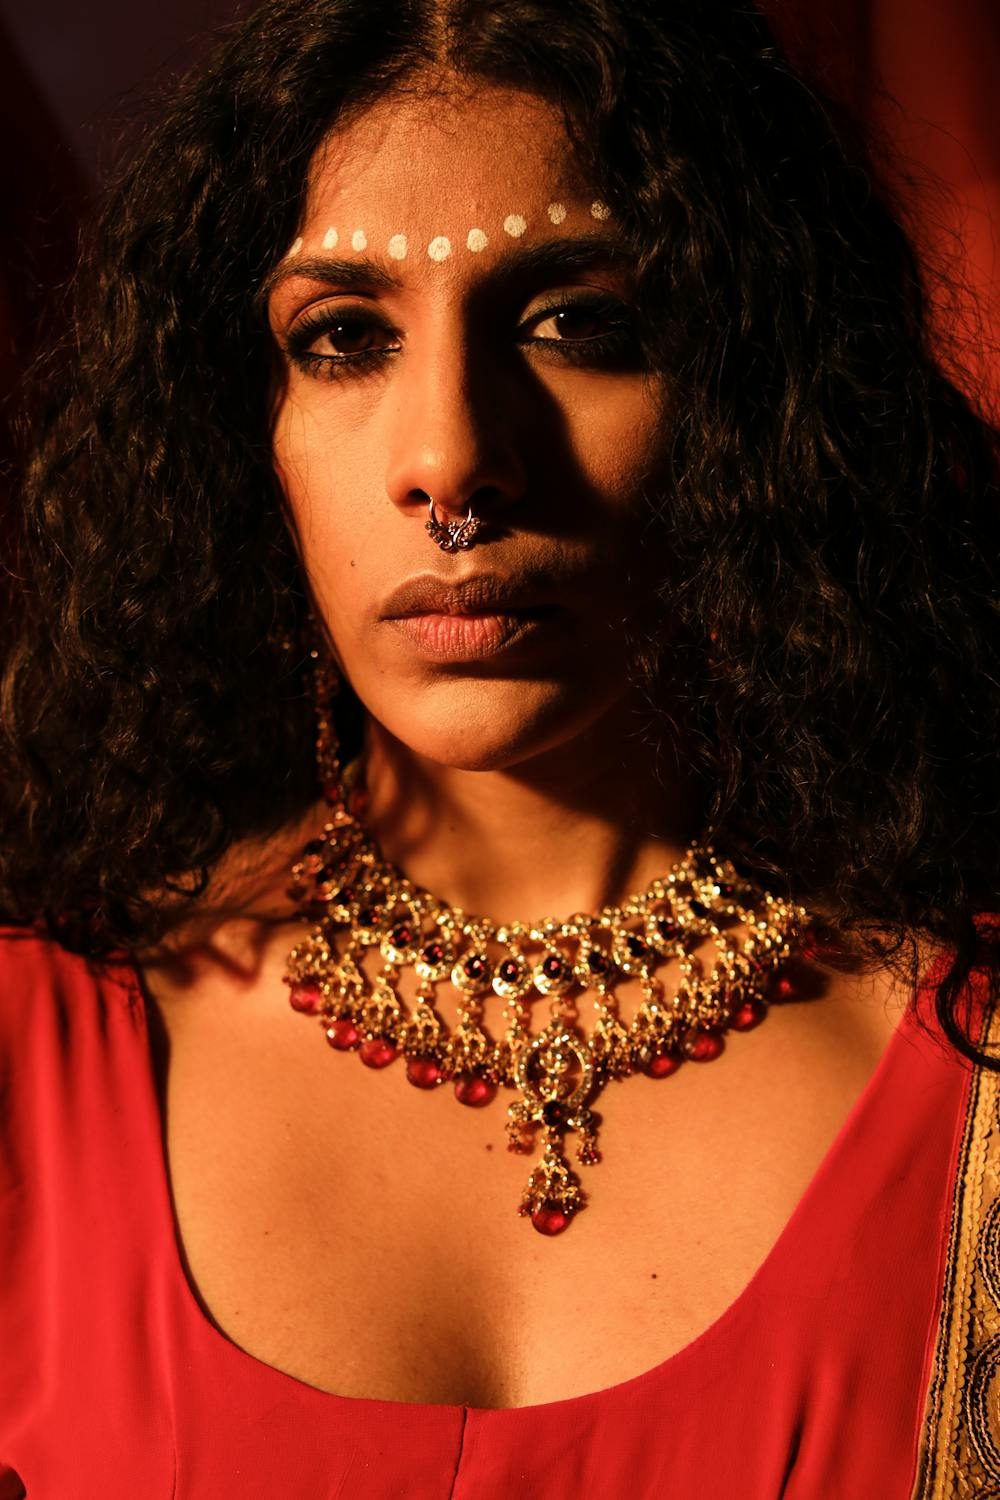
Photo by cottonbro studio: https://www.pexels.com/photo/a-woman-with-a-nose-piercing-9317190/
We carefully design the prompt to instruct the model to keep the woman’s face and natural skin tones intact, while changing the setting, lighting, and emotional expression. The goal is to edit the image without altering her identity.
from diffusers.utils import load_image

prompt = (
    "Using the provided reference image, generate a realistic photograph of a woman with a similar face, "
    "standing at night and looking up at the sky with stars with a subtle, sad expression. "
    "Natural skin tones, soft moonlight, gentle shadows, shallow depth of field, "
    "with blurred city lights in the background."
)
Next, we load the reference image and pass it to the pipeline. FLUX.2 supports multiple reference images, but here we use a single image to guide the edit.
indian_woman = load_image("https://images.pexels.com/photos/9317190/pexels-photo-9317190.jpeg")
image_3 = pipe(
    prompt=prompt,
    image=[indian_woman],
    generator=torch.Generator(device=device).manual_seed(42),
    num_inference_steps=28,
    guidance_scale=4,
).images[0]
To view the edited result inside the Jupyter Notebook:
image_3The output is highly realistic. The model preserves the woman’s facial structure and skin tone while naturally placing her into a new scene with different lighting, mood, and background.
The result feels less like an AI edit and more like a photograph taken by a professional photographer in a different location and moment.
From my experience, running FLUX.2 locally became reliable only after switching to the 4-bit quantized model and using a code-first setup with Transformers and Diffusers.
Earlier, I kept hitting out-of-memory errors on a 24 GB RTX 3090 when I tried to load too much directly onto CUDA.
UI tools like Stable Diffusion WebUI and ComfyUI can also hit memory limits more easily because they often keep extra intermediate buffers, previews, and workflow state in memory, unless you tune their low-VRAM options carefully.
VRAM optimization tips (what actually helped me):
device_map="cpu") and avoid pushing everything to CUDA upfront.pipe.enable_model_cpu_offload()) so only active parts live on the GPU.nvidia-smi and close any other GPU-heavy applications.If you are still facing out-of-memory issues after following these steps, please refer to this DataLab notebook for additional troubleshooting and memory optimization examples.
I am genuinely impressed by how far open-source image generation models have come.
Models like FLUX.2 are now clearly competitive with proprietary systems, both in terms of visual quality and prompt understanding. With the right setup, some experimentation, and a bit of memory optimization, it’s possible to generate high-quality, realistic images locally and for free, even on consumer GPUs.
What stands out most is the level of control. Advanced prompting, structured JSON, multi-reference editing, and image-to-image workflows make it easy to go beyond simple generations.
You can create cinematic scenes, evolve images for storytelling, perform professional-grade image editing, and iterate quickly without relying on closed platforms.
For creators, researchers, and developers, this opens up a lot of creative freedom and makes high-end image generation more accessible than ever.
Top DataCamp Courses
Kurs
Kurs
Kurs
Tutorial
Bhavishya Pandit
Tutorial
Abid Ali Awan
Tutorial
Abid Ali Awan
Tutorial
Aashi Dutt
Tutorial
Abid Ali Awan
Tutorial
Abid Ali Awan
