
Course
Software Development with Cursor
1 hr 30 min
4.1K
Cursor started as VS Code with AI features stitched in, and it still looks like that on the surface. The editor, the file tree, the terminal, the extensions, all familiar.
What's been rebuilt underneath is the assumption that the AI isn't just answering questions on the side but is actually doing work alongside you, which is why you get agent mode, codebase indexing, a model picker that lets you swap between frontier models mid-session, and inline completions that predict your next move based on the full context of what you've been doing.
If you’re interested in exploring Cursor’s newest features further, I recommend reading our tutorials on Cursor Automations and Cursor SDK.
GPT-5.6 is OpenAI's newest model generation, and it isn't one model but three: Sol, Terra, and Luna. Those names are three distinct capability tiers, replacing the old "Instant" label.
Here's the family in short:
Sol is the flagship and the strongest of the three. It's the only tier that unlocks the new max reasoning effort and ultra mode, and it's where the coding, biology, and cybersecurity gains are largest.
Terra is the everyday default. OpenAI positions it as competitive with GPT-5.5 at roughly half the price.
Luna is the fast, cheap tier for high-volume or latency-sensitive work, and it's stronger than its price tag suggests.
For a coding walkthrough, Sol is the tier that matters, so that's what we're using here. Two settings on Sol are new, and it's worth knowing which one you'll actually touch. max is a reasoning-effort level above xhigh that lets a single agent spend longer on one hard problem, and it's the top of the ladder you set in Cursor. ultra, which splits work across parallel subagents, posts OpenAI's best benchmark numbers (91.9% on Terminal-Bench 2.1) but runs only in Codex and the API, so you won't find it in the Cursor picker.
For the full benchmark table and the three-tier pricing, check out our GPT-5.6 Sol, Terra, and Luna guide.
GPT-5.6 Sol is available in the Cursor model picker, and there's one thing to know upfront: like Cursor's other recent frontier models, Sol runs in Cursor’s Max Mode only. That means it uses the full context window and all tools, and it's billed by usage rather than per request, so keep an eye on token spend during long runs.
To select the model:
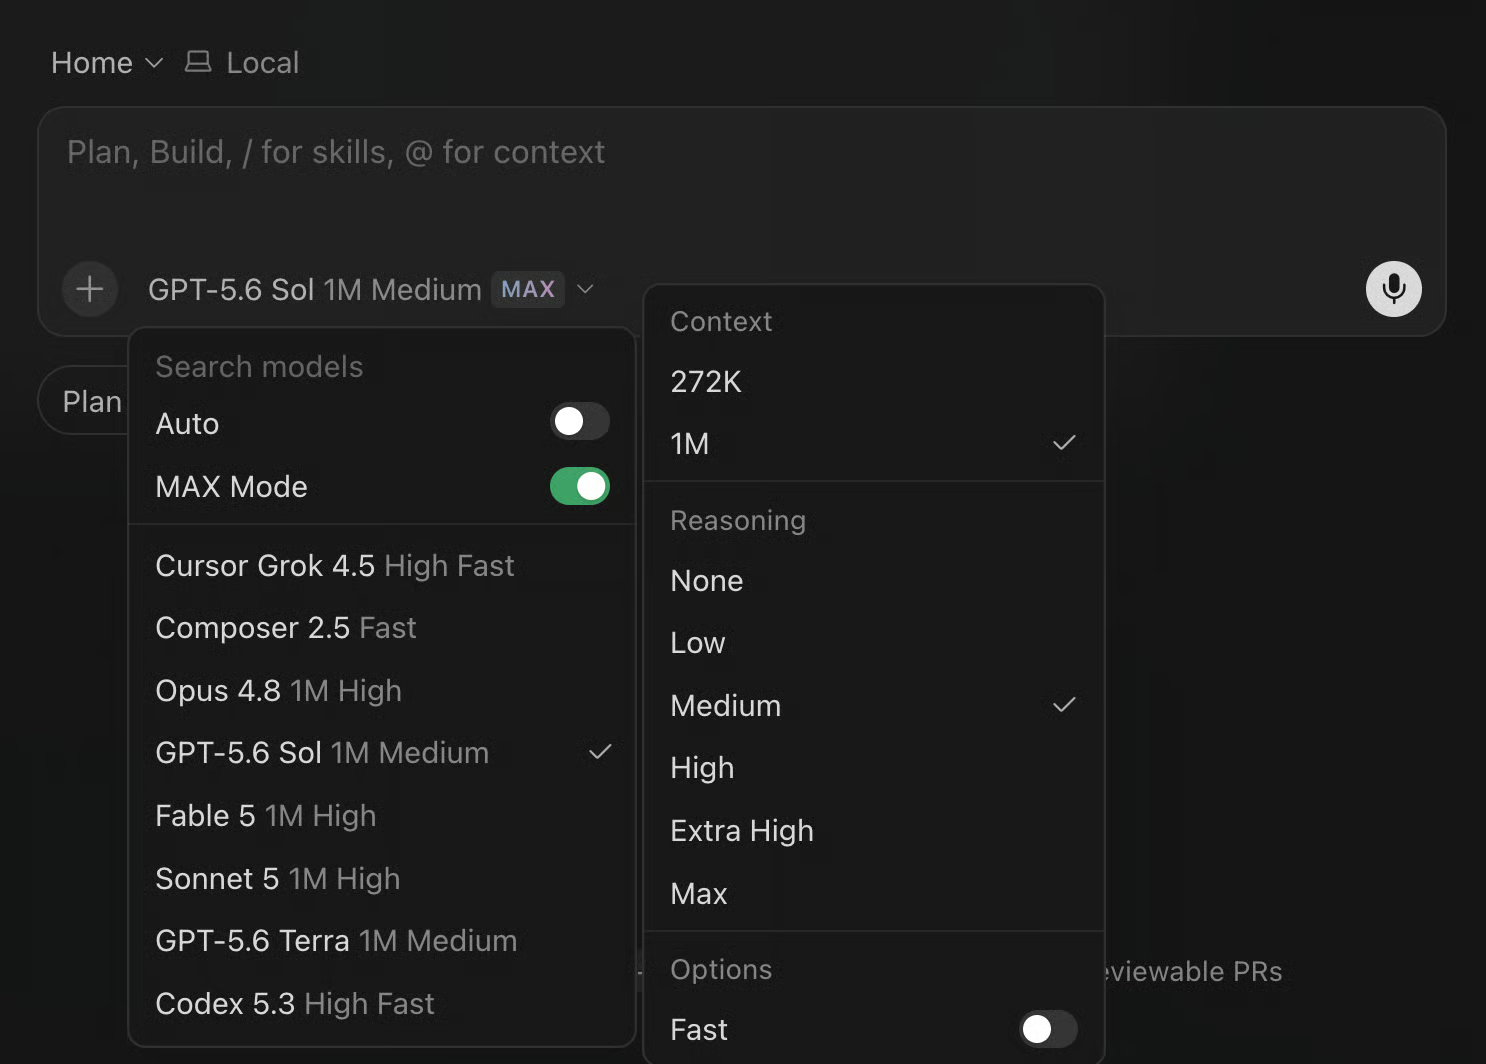
Selecting Sol picks the model; the reasoning effort decides how hard it thinks on a given task. You can choose between:
None and Low are the quickest and cheapest, good enough for autocomplete work or a mechanical refactor where you basically already know what you want.
High and Extra High take longer because they actually think through the problem first, and you notice that difference most when you're asking the agent to plan something that crosses multiple files or debug a failure where the source isn't immediately obvious.
Max is sitting above Extra High and gives a single agent the most time to work on a hard problem. Sol's ultra multi-agent mode exists only in Codex and the API, so you won't see it in Cursor's picker.
One warning if you're coming from GPT-5.5: the levels don't map across. OpenAI's own guidance is to start one level lower than you're used to on a familiar task and only turn it up if the result needs it. I've followed that below, so a few of these steps run at a lower effort than the equivalent 5.5 tutorial would have.
Throughout the hands-on steps below, I'll suggest which reasoning level makes the most sense for each task, but feel free to experiment with different settings yourself and see how the output changes.
You can also choose between a 272K and 1M context window, and toggle Fast mode on to generate tokens at roughly 1.5x speed for about 2.5x the credit cost. For interactive back-and-forth where you're waiting on responses, Fast is often worth it. For a longer background task where you've handed something off and are doing other things while it runs, leaving it off is fine.
Let’s set up the project in Cursor.
A paid Cursor plan (Pro or above) is required for GPT-5.6 Sol, and because Sol runs in Max Mode, usage-based pricing needs to be enabled on your account. Python 3.11+ is the only other local dependency you need for this project. If Cursor isn't installed yet, grab it at cursor.com, sign in, and then from a terminal:
mkdir budget-api && cd budget-api
git init
cursor .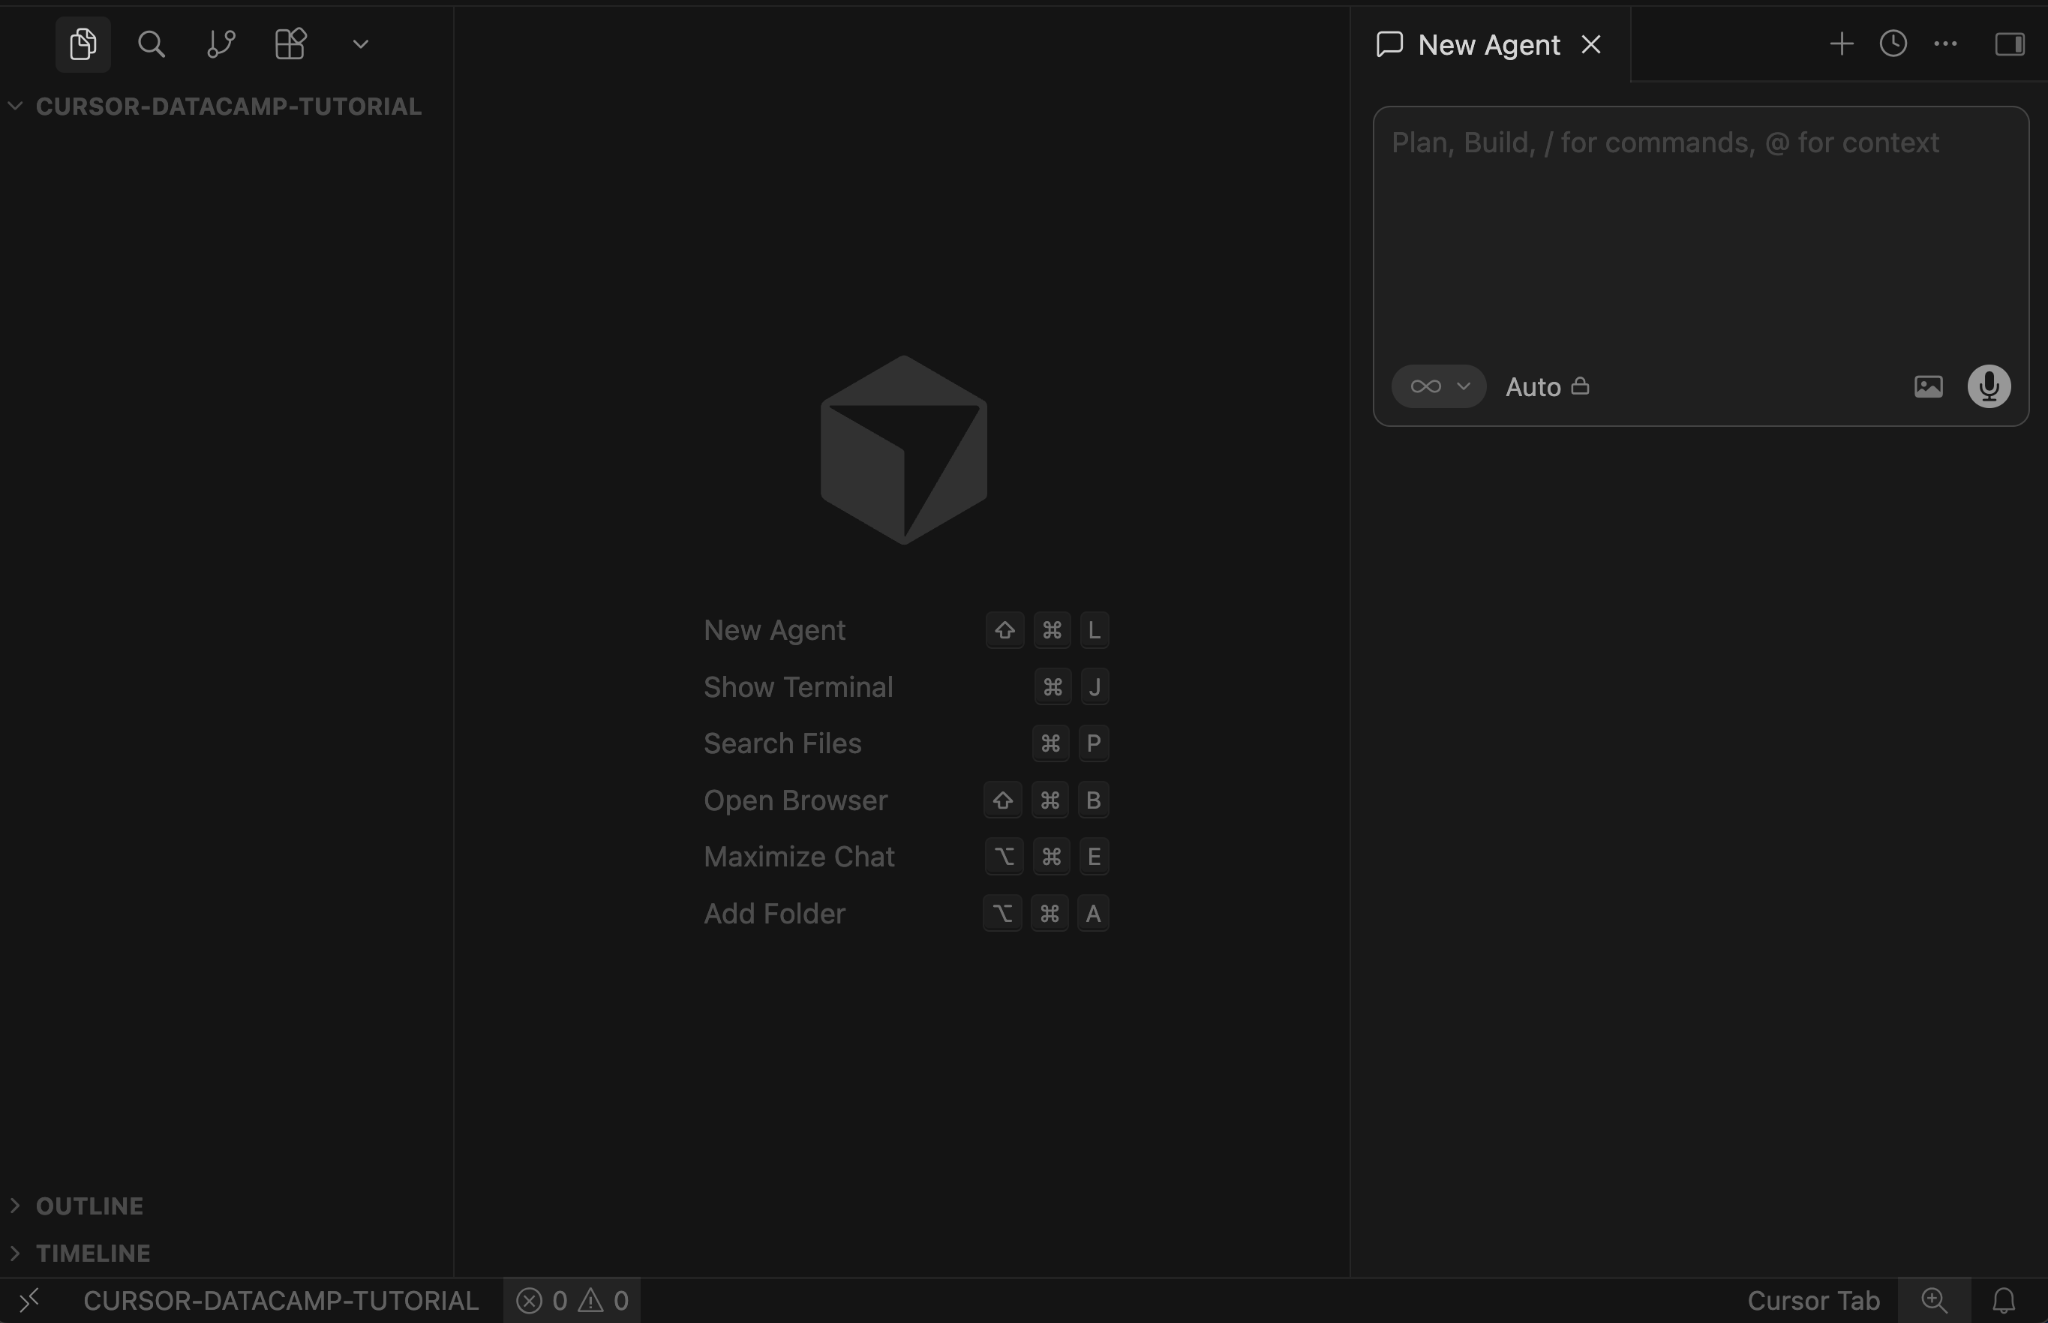
The Agent panel is on the right, and the file explorer on the left shows no files yet, exactly where you want to start before letting the agent build the structure.
Before getting into the actual build, it's worth knowing what the three main interaction modes are and when each one makes sense, because using the wrong one creates friction that's easy to avoid.
Inline completion is the background autocomplete layer. As you type, greyed-out suggestions appear based on what you're writing and the surrounding context in the file, and you accept them with Tab. You don't invoke it; it just shows up. This is the right mode when you're writing code by hand and want the model to reduce keystrokes without interrupting your flow.
Ask mode is where you can have the model read your files and answer questions without it making any changes. Think of it as asking a colleague to look at the code and tell you what they see. It's particularly useful when you're in an unfamiliar codebase, trying to understand why something was written a certain way, or just thinking through an approach before committing to it.
Agent mode is what drives this whole tutorial. In an agent session, the model edits files, runs terminal commands, installs packages, executes your test suite, reads the output, and loops back on failures, all inside one continuous thread. This is the mode where you hand off a task rather than just ask about it, and the quality of what you get back scales directly with how much context you give it upfront. You can see the Agent mode selector at the bottom left of the panel in the screenshot above.
You're writing this file yourself, so no model yet. Switch to High first, since the next prompt is when the agent reads it. Most agent sessions go sideways, not because the model erred, but because it didn't know something project-specific and guessed: your framework, your naming conventions, which files are off-limits, how to verify changes.
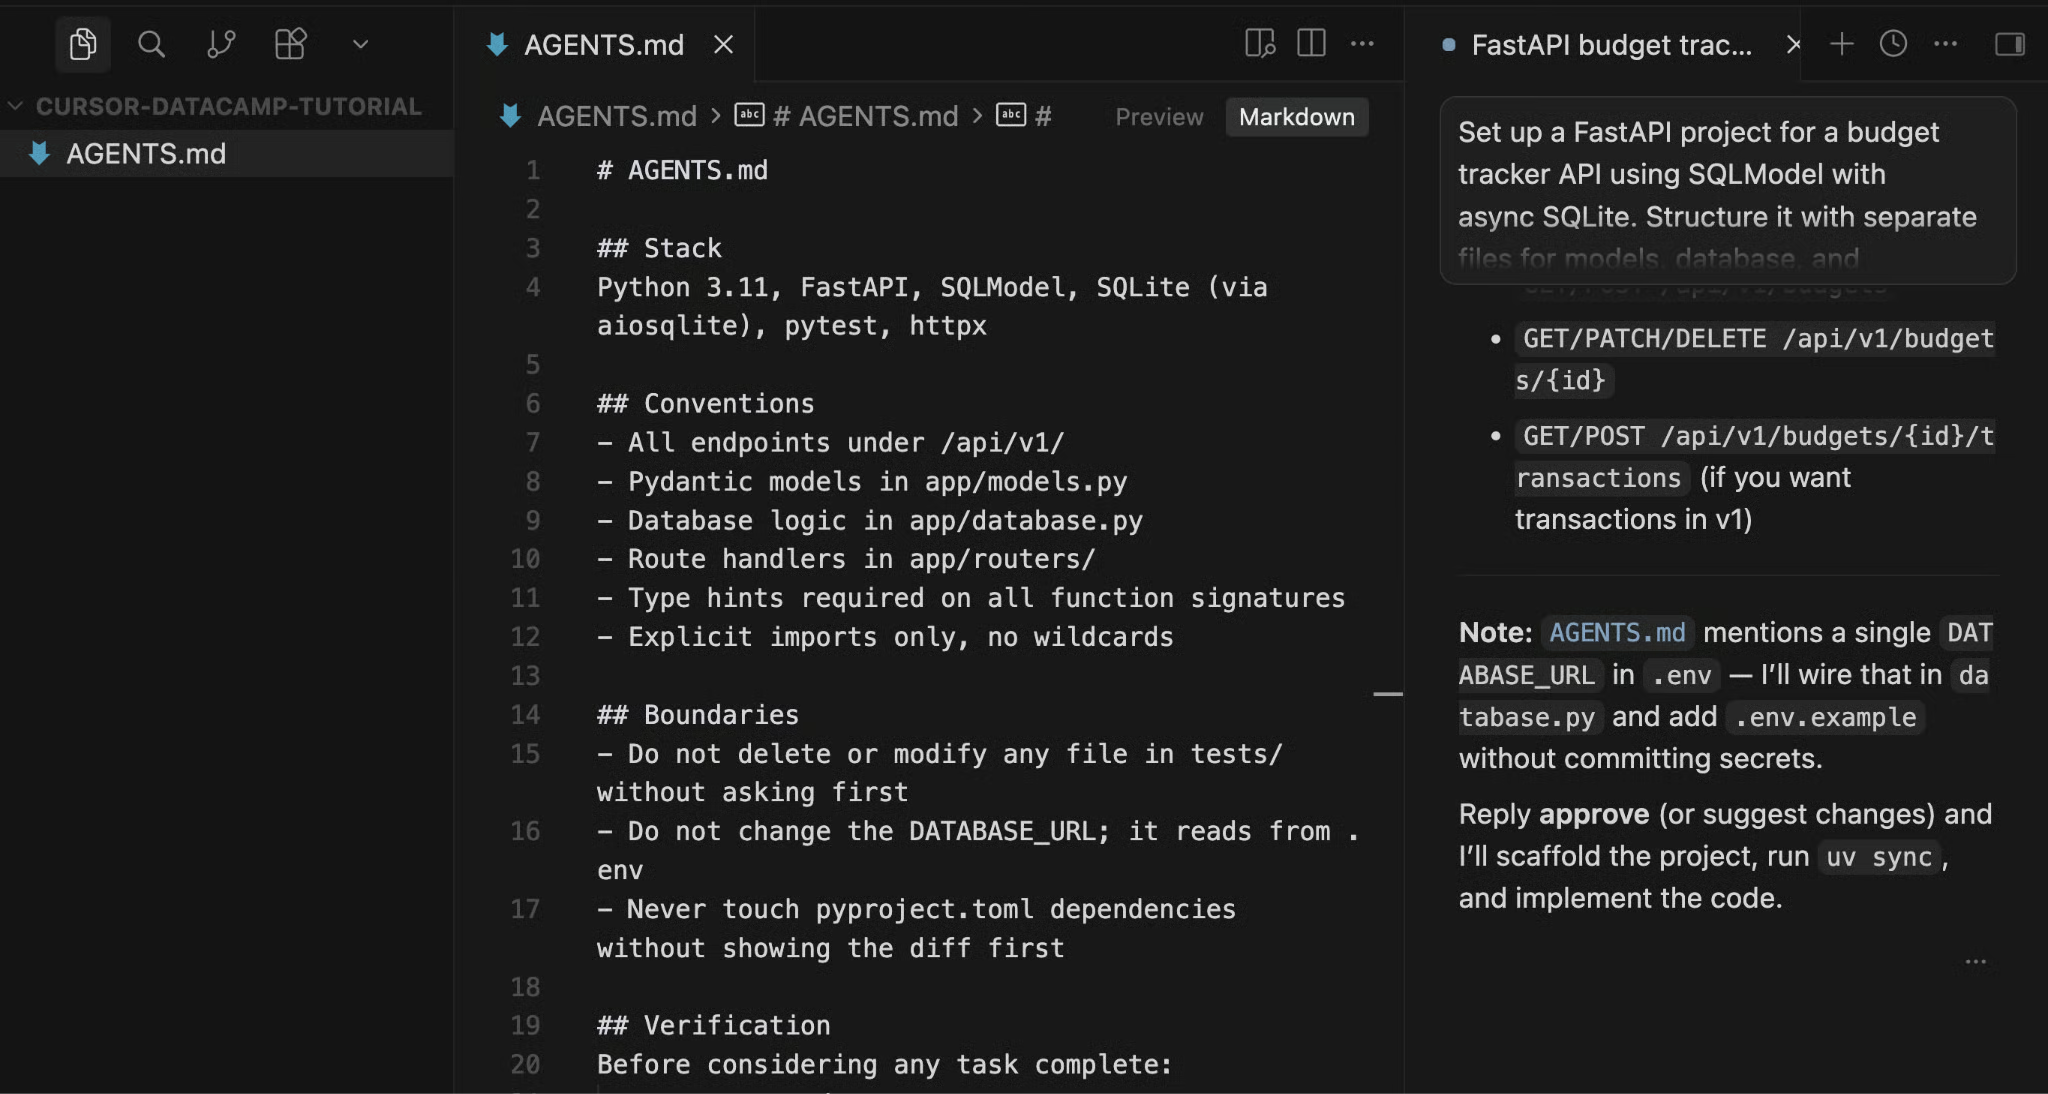
That's what AGENTS.md is for: a README for the agent, where you write down what's obvious to you but invisible to the model. AGENTS.md started as an OpenAI initiative in 2025 and is now the cross-tool standard for agent instruction files (part of the Linux Foundation's Agentic AI Foundation, alongside Anthropic's MCP), so it's worth learning once and using everywhere.
Create a file called AGENTS.md at the project root with the following to set your project tool stack, coding conventions, and boundaries:
# AGENTS.md

## Stack
Python 3.11, FastAPI, SQLModel, SQLite (via aiosqlite), pytest, httpx

## Conventions
- All endpoints under /api/v1/
- Pydantic models in app/models.py
- Database logic in app/database.py
- Route handlers in app/routers/
- Type hints required on all function signatures
- Explicit imports only, no wildcards

## Boundaries
- Do not delete or modify any file in tests/ without asking first
- Do not change the DATABASE_URL; it reads from .env
- Never touch pyproject.toml dependencies without showing the diff first

## Verification
Before considering any task complete:
  pytest tests/ -v
  ruff check .
Both must pass.
The boundaries section is the part people most often skip, and it's also the most important. Without it, agents occasionally decide to "help" by reorganizing or cleaning up things you didn't ask them to touch. Telling the model what's off-limits is just as useful as telling it what to do.
AGENTS.md is the cross-tool standard, but if you want the Cursor-native equivalent that does the same job through scoped .mdc files, our Cursor Rules tutorial walks through building a set for a Python web project.
The project is a REST API for tracking personal budget entries. You can create entries, list them with optional category filtering, delete them, and pull a monthly spending summary.
It's simple enough to follow without getting lost in domain logic, but the implementation involves a database layer, input validation, typed response models, and several route handlers working together, which is enough to show what the agent actually does across a real multi-file session.
Open the agent panel and set the reasoning effort to High before sending anything. The plan the agent produces before writing any code is only as useful as the reasoning behind it, and a shallow answer at this stage means structural decisions you'll be untangling later. Proceed by sending this as your first prompt:
Set up a FastAPI project for a budget tracker API using SQLModel with
async SQLite. Structure it with separate files for models, database, and
routes under an app/ directory. Set up pyproject.toml with uv, install
dependencies, and create a main.py that starts the app.

Before writing any code, show me the planned directory structure
and wait for my approval.
That last line is worth keeping in all your non-trivial agent prompts. Asking for the plan before execution costs you maybe 15 seconds of reading, but it lets you catch structural decisions before they've propagated across a dozen files.
GPT-5.6 Sol at High reasoning produces plans specific enough to actually be useful, not vague summaries, and reviewing the structure now is much faster than reorganizing later.
The agent proposes the project layout and waits for approval before writing a single file.
Once you reply with something like "Looks good, go ahead", the agent starts building. You can watch the file tree on the left populate in real time as it creates files, while the terminal at the bottom shows uv installing packages.
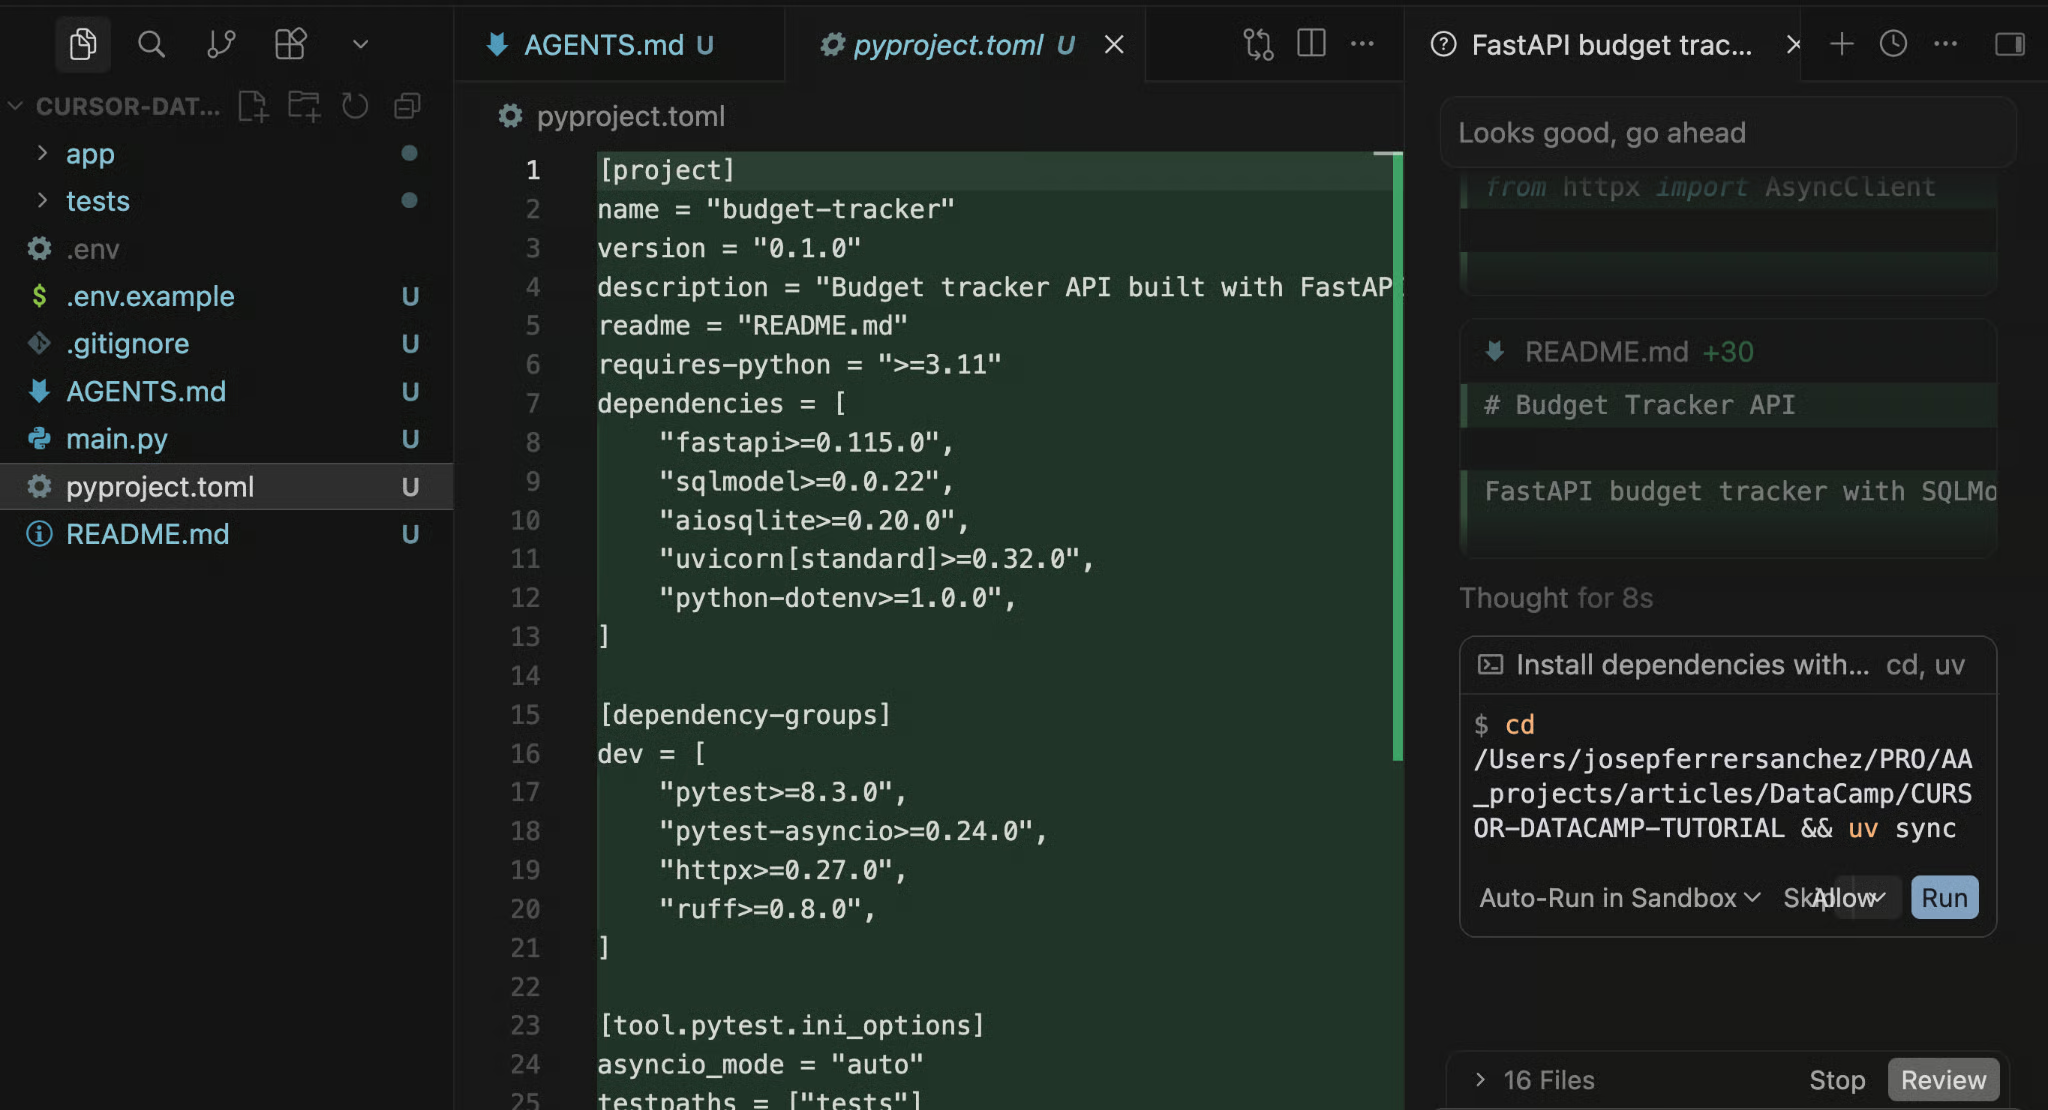
The agent created a pyproject.toml as part of the scaffold, with the file content shown as a new addition.
After the scaffold finishes, take a minute to open app/models.py and app/database.py before moving on. Confirm the BudgetEntry model has at least the following fields id, amount, description, category, and date fields, and that database.py sets up the async SQLite engine without anything unusual.
If something looks off, say so in the next message rather than continuing. Corrections at this stage are cheap; after twenty files have been modified, they are not.
Keep effort at High, or try Medium first, since Sol at Medium handles coordinated multi-file work that would have needed High on GPT-5.5. Send the implementation prompt:
Implement endpoints for budget entries under /api/v1/entries/. Include:
- POST /api/v1/entries/ to create a new entry, returning 201
- GET /api/v1/entries/ to list all entries, with an optional ?category= filter
- DELETE /api/v1/entries/{id} to delete an entry, returning 404 if not found

Use typed Pydantic response models and dependency injection for the DB session.
After implementing, start the app and confirm the /docs endpoint loads.
The agent touches models.py, database.py, routers/entries.py, and main.py in a single coordinated pass. As it finishes each file, Cursor shows the new content highlighted in the editor so you can review it before accepting. You'll see the Undo/Keep controls at the bottom of each changed file.
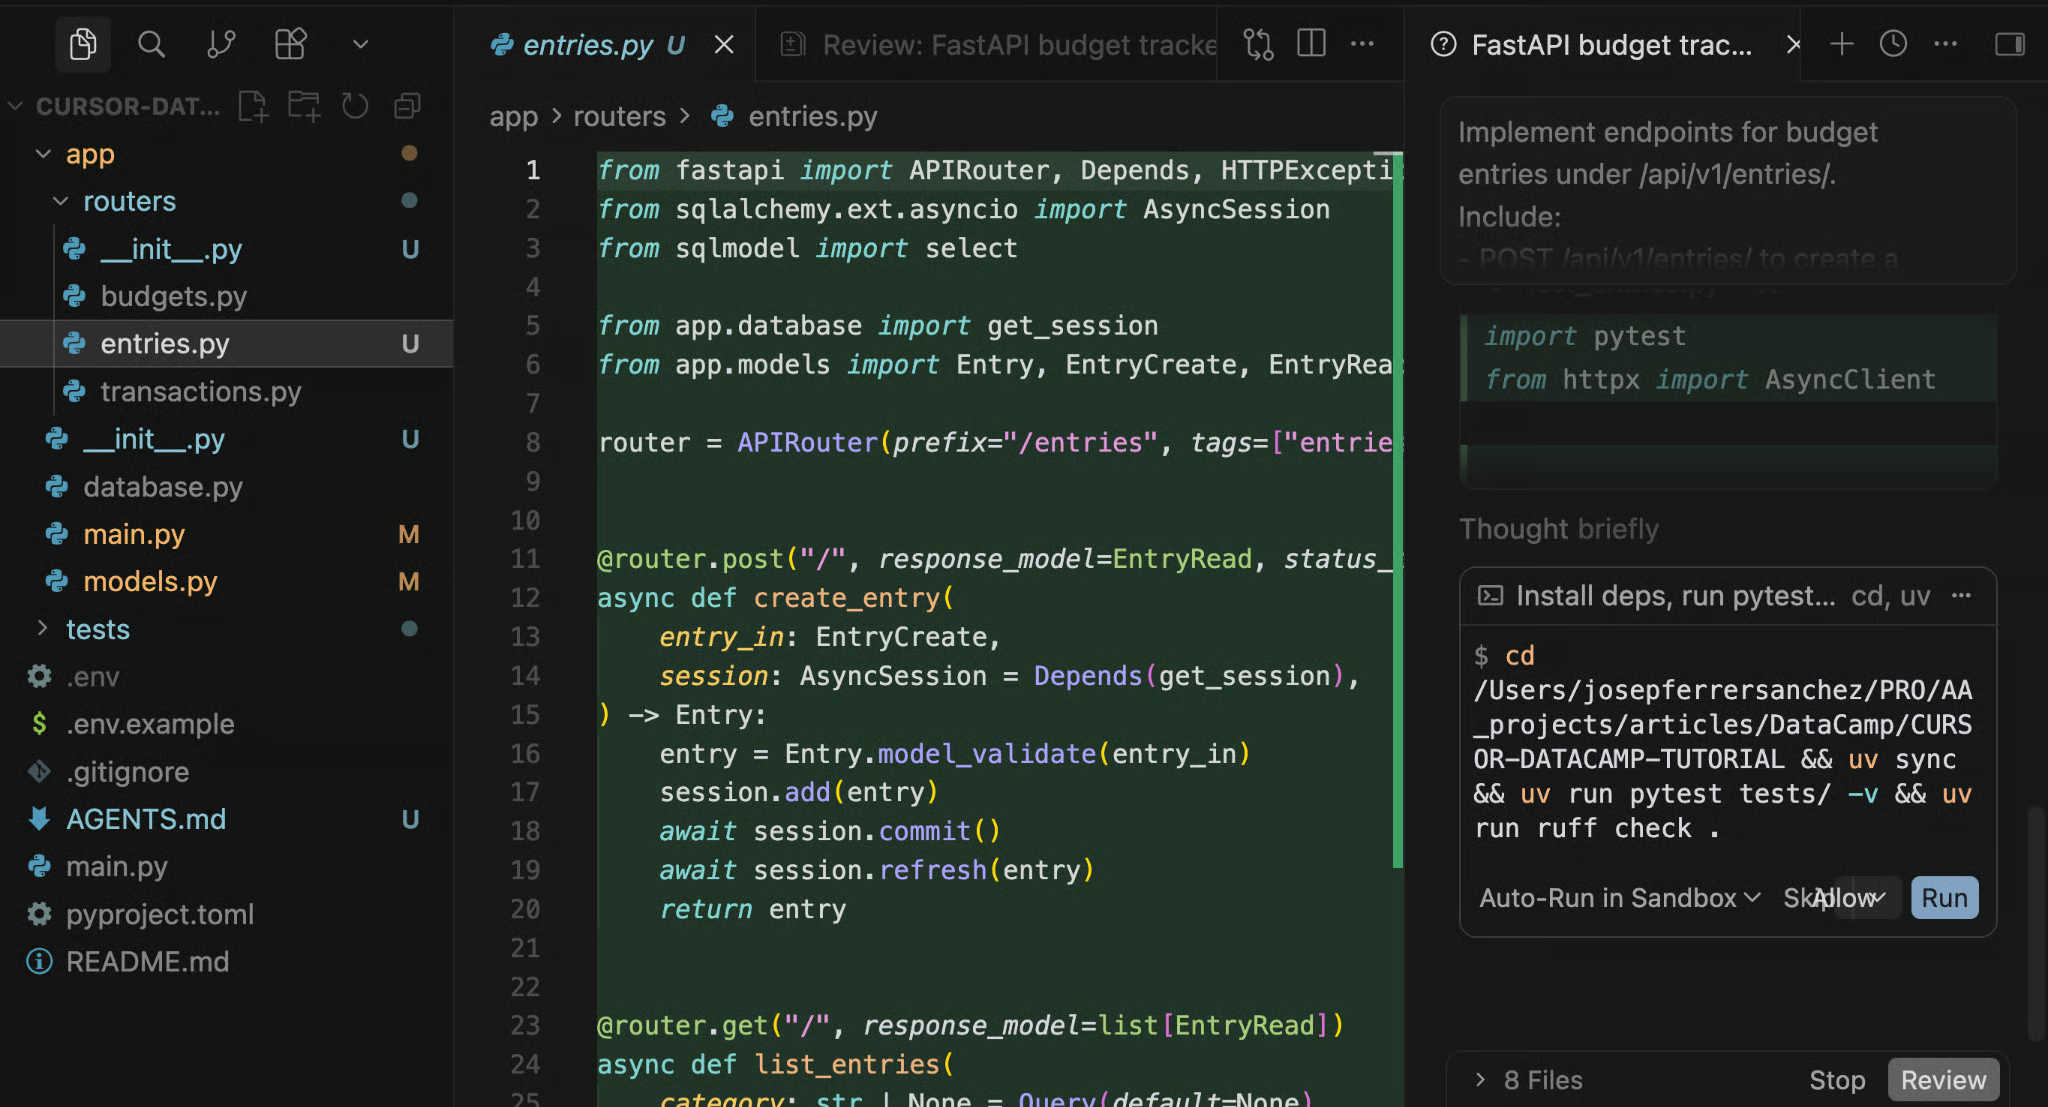
The screenshot shows the entries.py router after the agent implements it, along with the agent's confirmation that it started the server and that the /docs endpoint loaded correctly.
Once the implementation is accepted and the server is running, open http://localhost:8000/docs in your browser to confirm everything is wired up correctly.
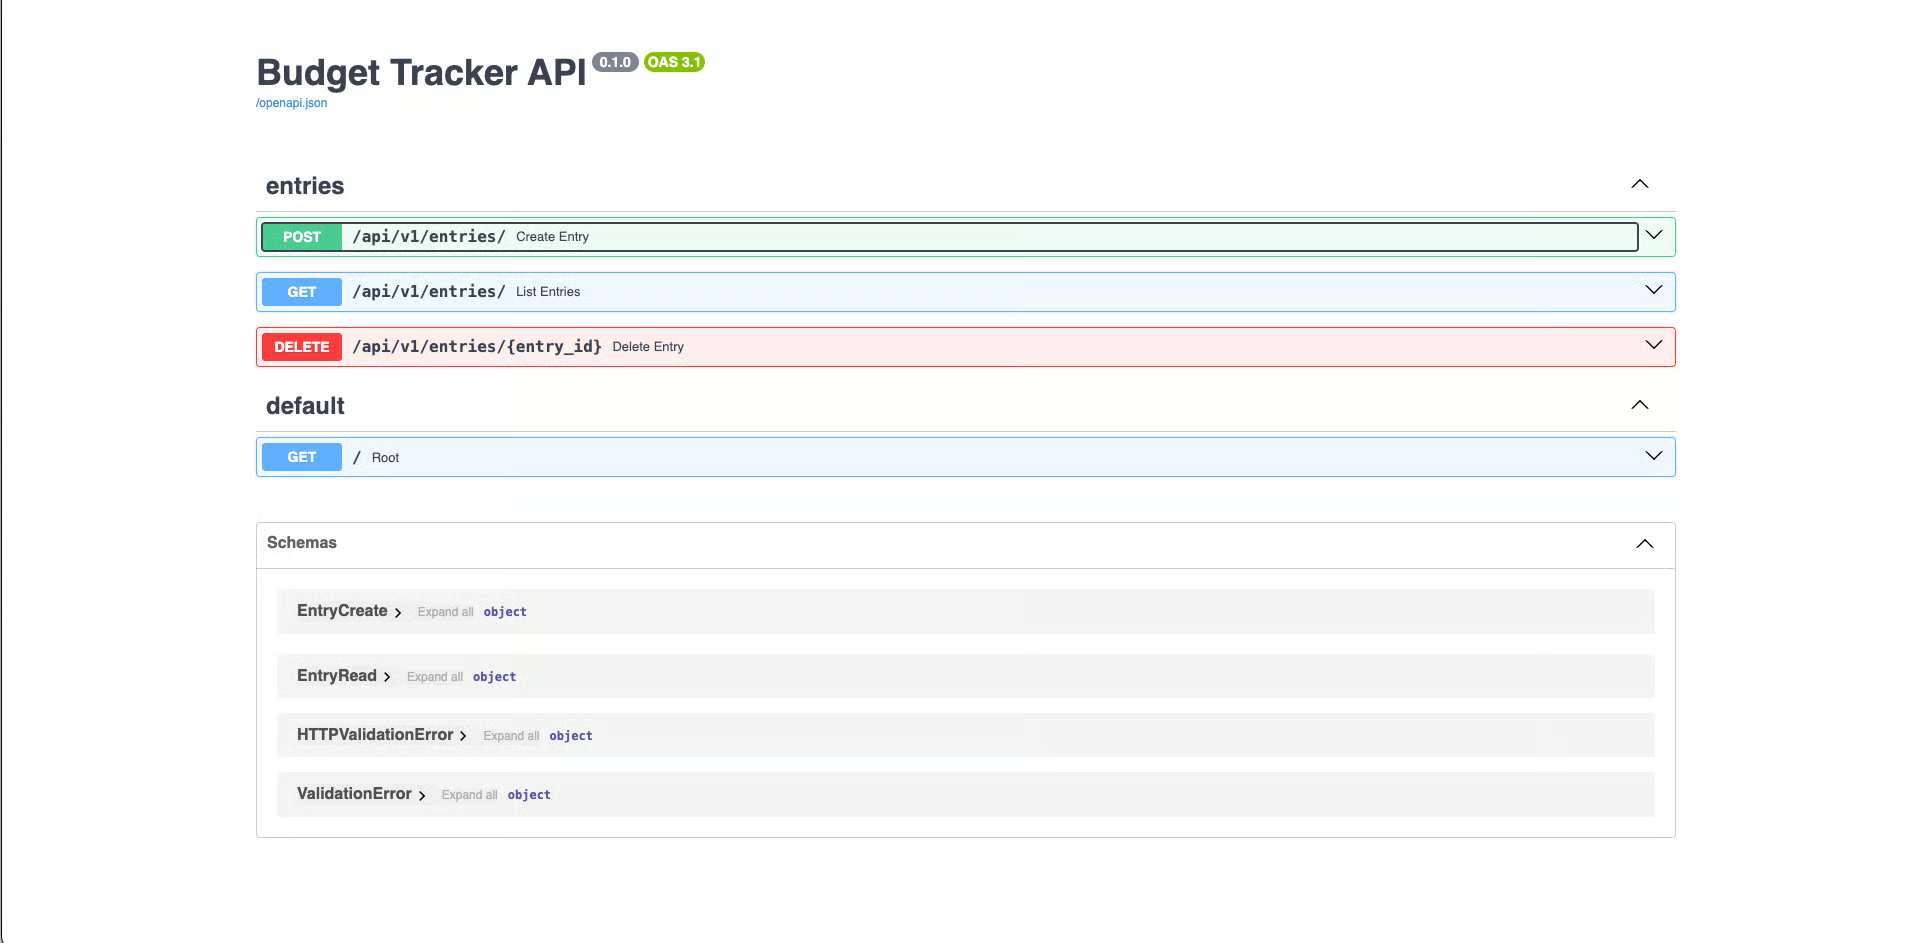
The FastAPI auto-generated docs at /docs, showing all three endpoints correctly registered.
For this third step, you can drop the model reasoning to Low or Medium. Adding an enum and two tests is self-contained and predictable enough that you don't need the model to burn extra deliberation cycles on it.
Currently, the API accepts any string as a category, which means you'll end up with inconsistent data pretty quickly. Let's fix that:
Budget entries should only accept these categories:
food, transport, housing, entertainment, health, other.

Reject any entry with an invalid category using a 422 status and a clear
error message. Use a Python Enum for the category type.
Add tests for both a valid category submission and an invalid one in tests/test_entries.py.
The agent will add a category enum to models.py and update the Pydantic model to use it. Because Pydantic automatically validates against the enum, invalid categories are rejected before the route handler even runs.
It should write two tests alongside: one confirming a valid category saves correctly, another confirming an invalid one comes back with a 422.
After accepting those changes, try Cursor's @ context feature to ask a quick verification question:
@app/models.py Does the CategoryEnum cover all six categories I listed?Typing @ in the agent panel opens a file picker, and once you select app/models.py, that file's content gets pulled directly into the prompt without the agent needing to search for it or make assumptions about the path.
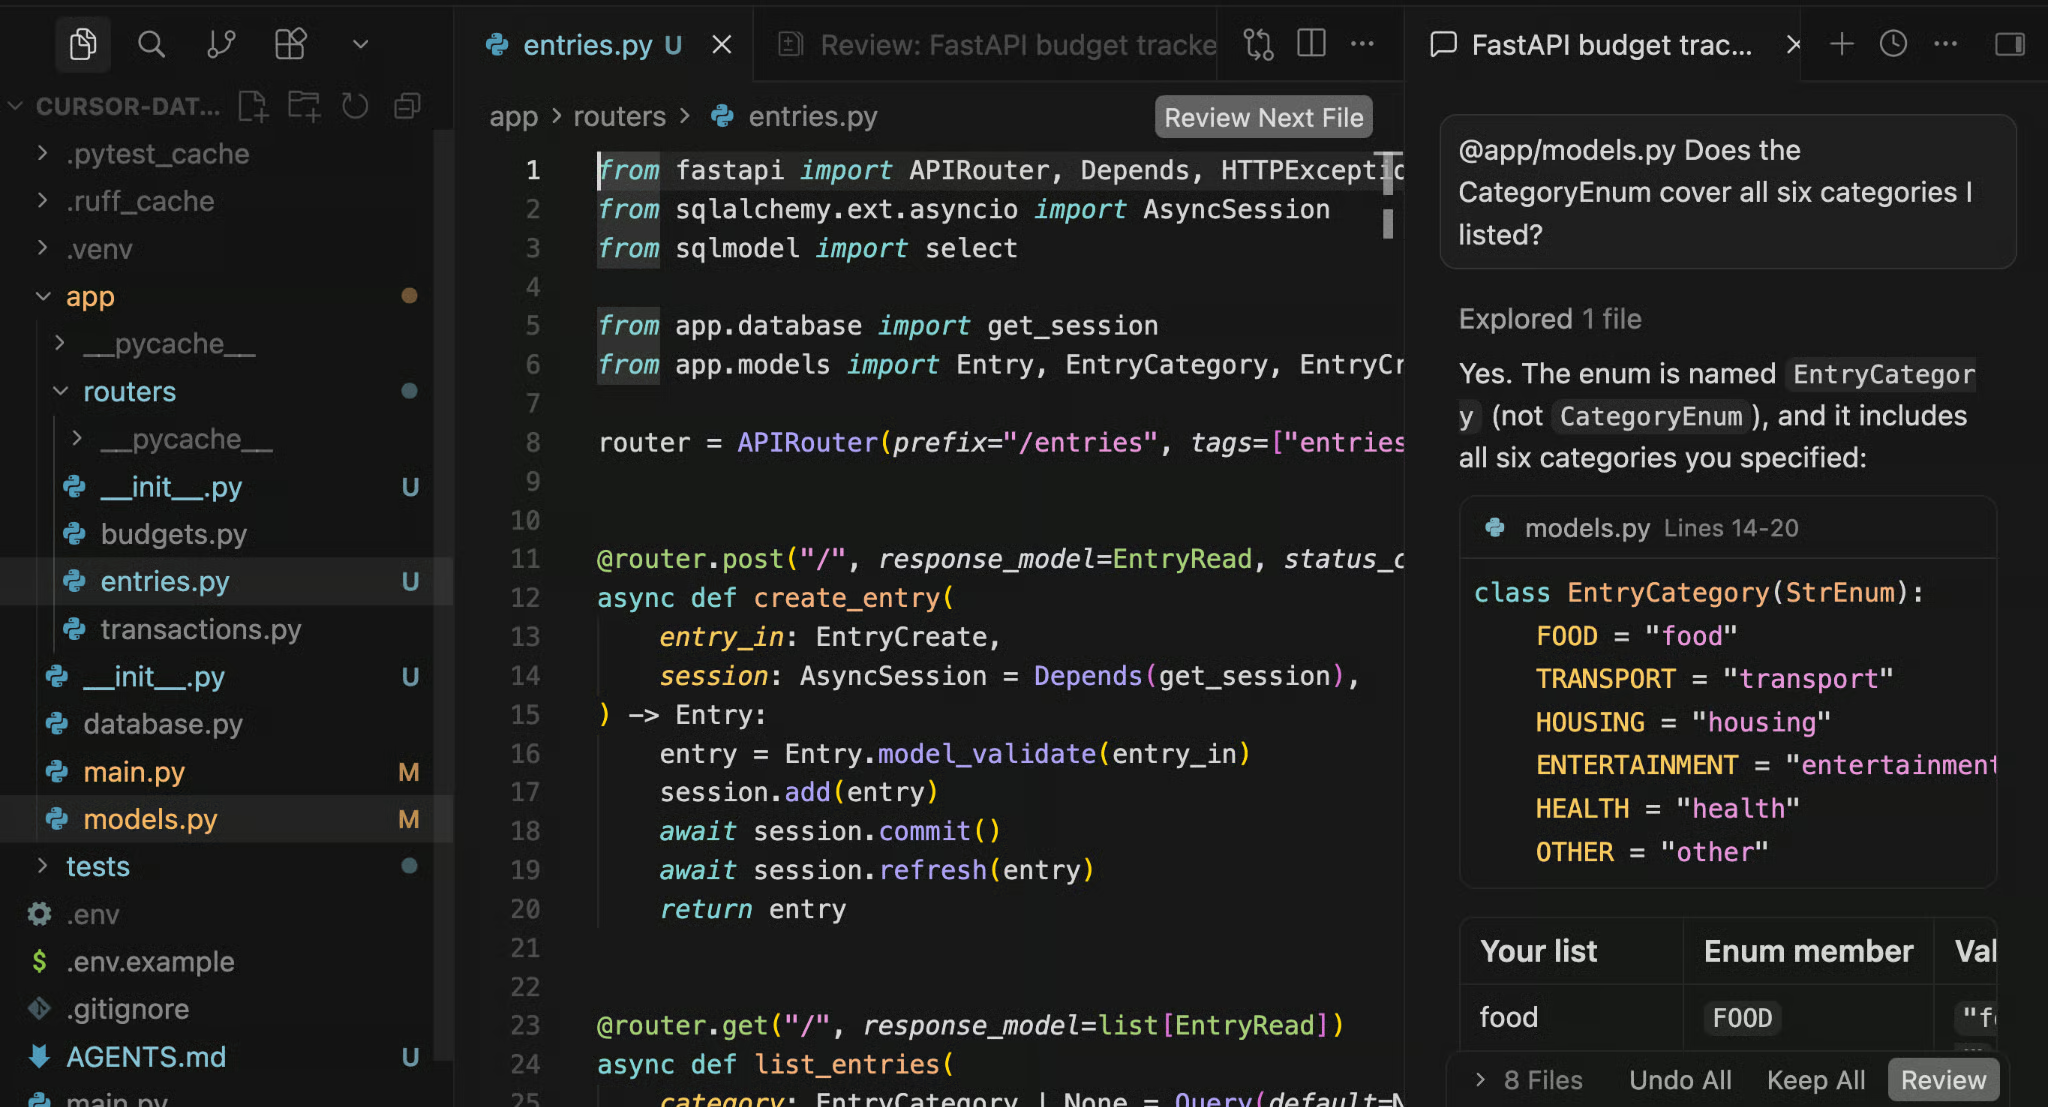
Switch back to High here. The aggregation query requires the agent to reason about filtering, grouping, and response model design together, and getting any one of those wrong means touching all three files again. With the core CRUD working, add the summary endpoint:
Add a GET /api/v1/entries/summary endpoint that accepts month (1-12) and year as query parameters.
It should return total spending per category for that month and an overall total.
Use a typed Pydantic response model.
If no entries exist for the requested month, return an empty summary with zero totals rather than a 404.
This is a more interesting database task because it requires a filtered query with aggregation rather than a plain select-all. Watch how the agent structures the query in database.py; it should use SQLModel's query interface rather than raw SQL, and the result should map cleanly onto the response model it defines in models.py.
After accepting the changes, write one test for this endpoint yourself in test_entries.py. Create two entries in a specific month, call the summary endpoint for that month, and assert the totals match. Writing this one manually rather than asking the agent is a good way to get familiar with how the test client and fixtures are structured.
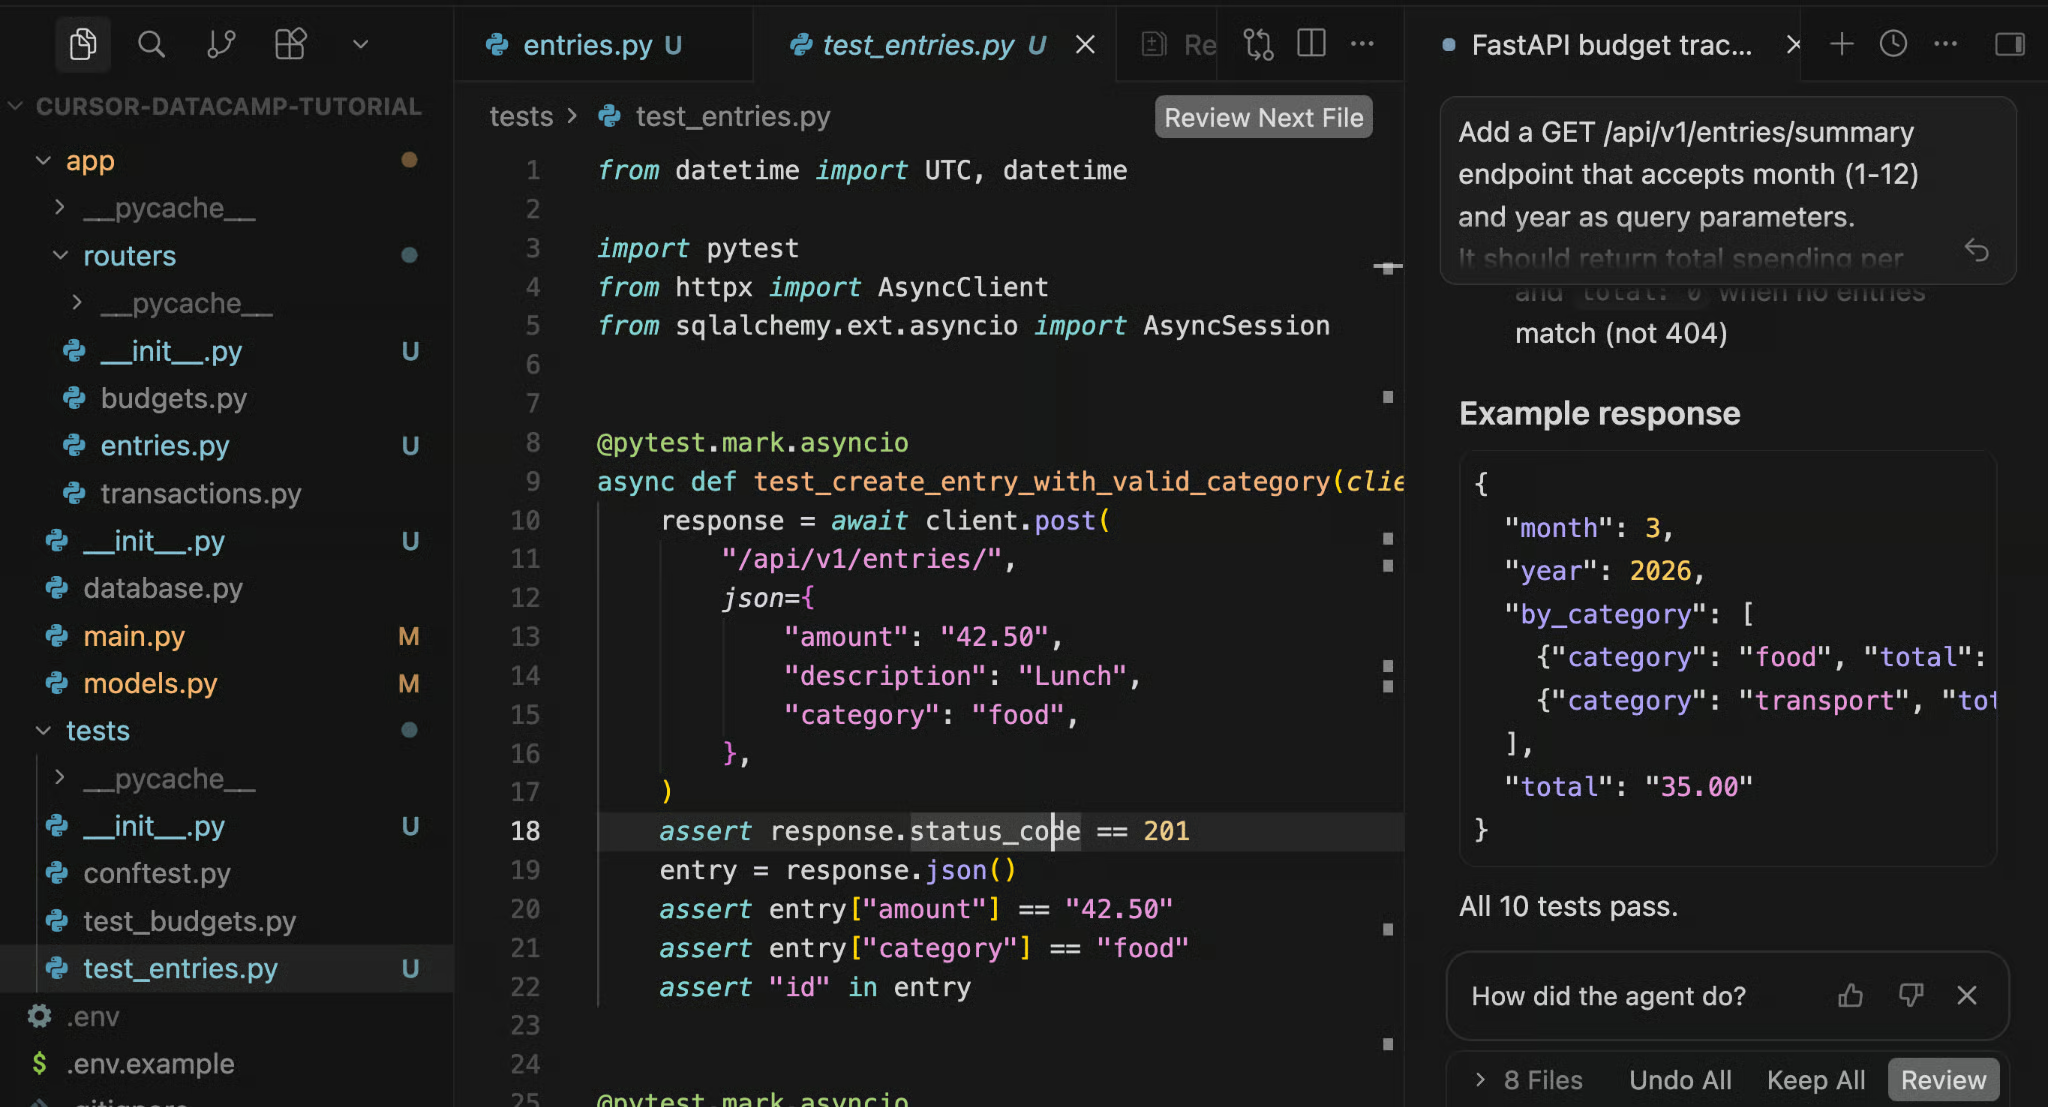
The test_entries.py file shows the agent-written category validation tests alongside the manually written test_monthly_summary function.
Low or Medium reasoning works fine here, running tests and fixing lint issues is reactive work, the agent is reading error output and applying targeted fixes rather than making any real architectural decisions. Hand the testing back to the agent:
Run pytest tests/ -v and fix any failing tests.
Do not modify test assertions to make them pass, fix the implementation instead.
Once all tests pass, run ruff check . and fix any linting issues.
Watch the agent panel as it streams the pytest output.
If something fails, the agent reads the traceback, identifies which file introduced the problem, and applies the fix, all within the same session. You don't copy-paste the error into a new message; the whole debugging and fixing loop happens within a single continuous thread.
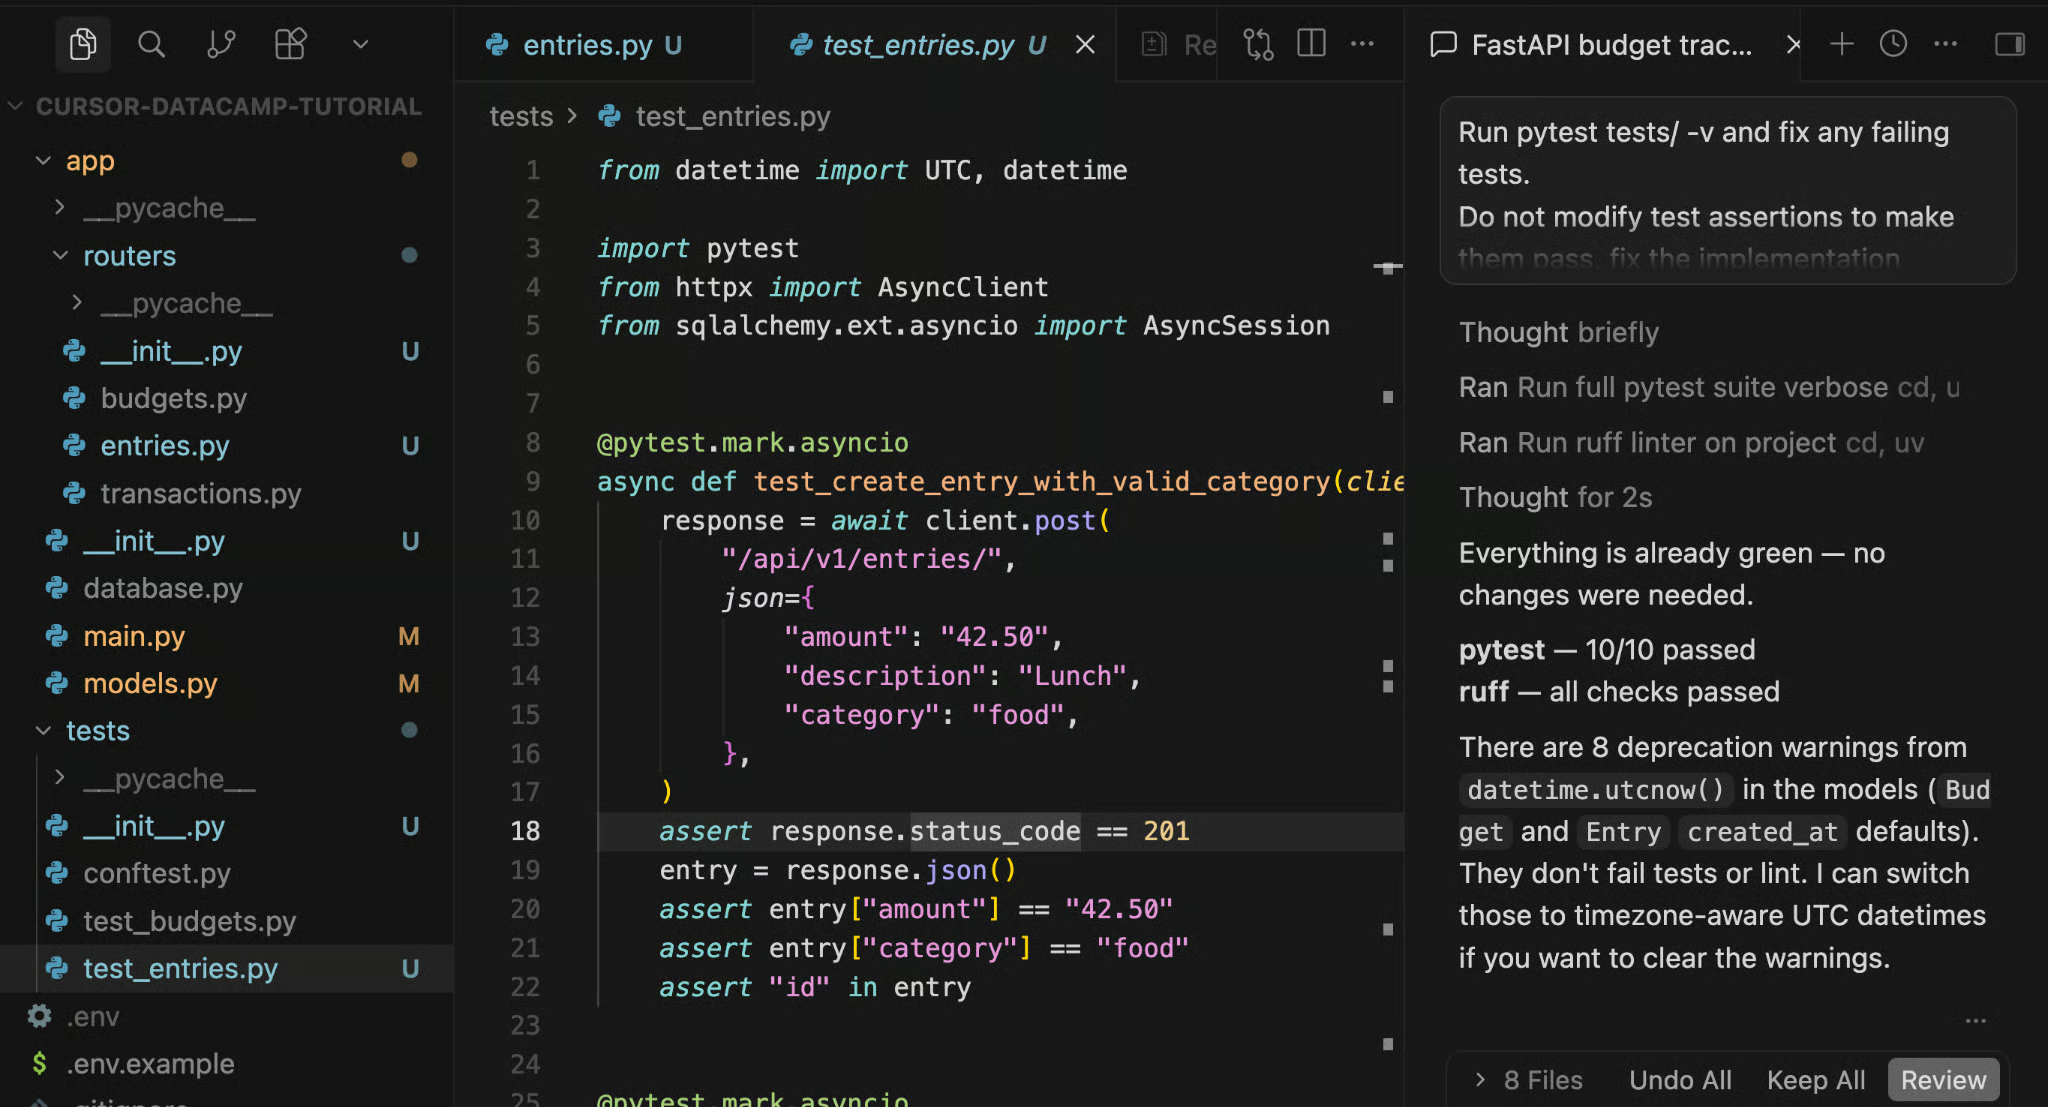
The screenshot shows the agent reporting back after the full validation loop. In this case, the ruff check hit an interpreter resolution issue caused by a pyenv/.python-version mismatch on the local machine, not a code problem.
It's worth noting what happened here: the agent encountered an environment issue unrelated to the code we wrote, reasoned through its cause, and found a workaround without being prompted. That kind of contextual problem-solving across tool failures is exactly where GPT-5.6 Sol pulls ahead of earlier models.
It's also worth including "do not modify test assertions to make them pass" in every validation prompt you write. Without that instruction, agents occasionally take the path of least resistance and weaken what a test checks rather than fixing the actual behavior.
Set reasoning back to High before sending this one, or Extra High/Max if you want Sol to grind through edge cases a single High pass might skim. At this step, shallow reasoning creates a false sense of security; you want the model to actually work through all potential issues, not only pattern-match against the most obvious ones.
Before calling the project done, use the agent for a review:
Review the current codebase and report on:
1. Query params or path params that are missing validation
2. Database sessions that might not be closing properly
3. Endpoints returning incorrect HTTP status codes
4. Any places where user input reaches the database without going
   through the ORM

Do not make any changes yet. List each issue with file and line number.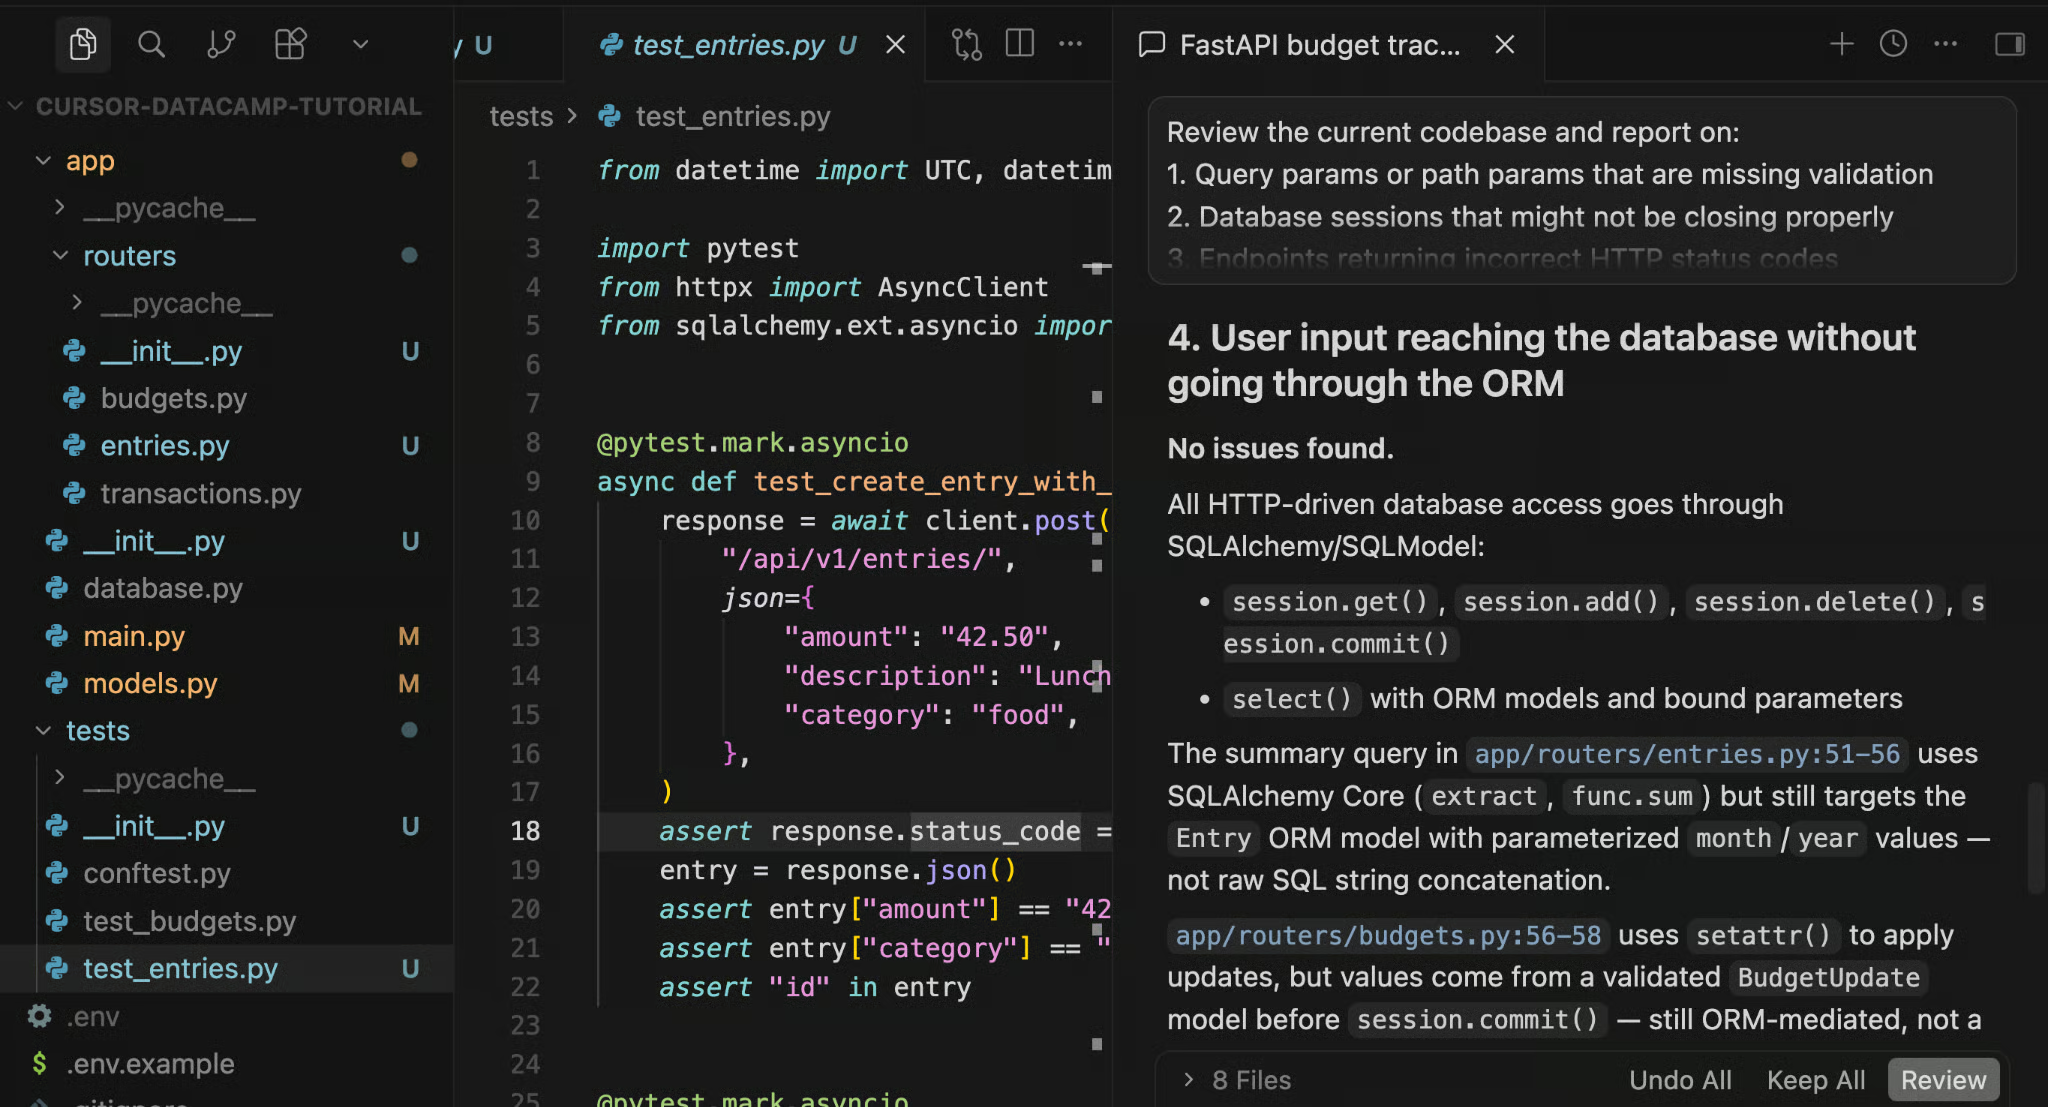
The agent found that DELETE /api/v1/entries/{entry_id} correctly returns codes 204 and 404 (with file:line references), that GET routes rely on correct 200 defaults, and confirmed no user input reaches the database outside the ORM.
Once you've reviewed the list, send the follow-up to apply the fixes:
Apply the fixes for the status code issues and the session handling.
Skip any rate-limiting suggestions, that's out of scope for this version.
Run the tests again after applying.Two finishing touches to wrap the project up properly. You can drop the model's reasoning to Low for both of these. The README structure is predictable, and the CI YAML is essentially boilerplate, so there's nothing to reason through, and paying for high reasoning here is just wasted credits.
Write a README.md with setup instructions, a table of all endpoints (method, path, description), and example curl commands for each endpoint.And then:
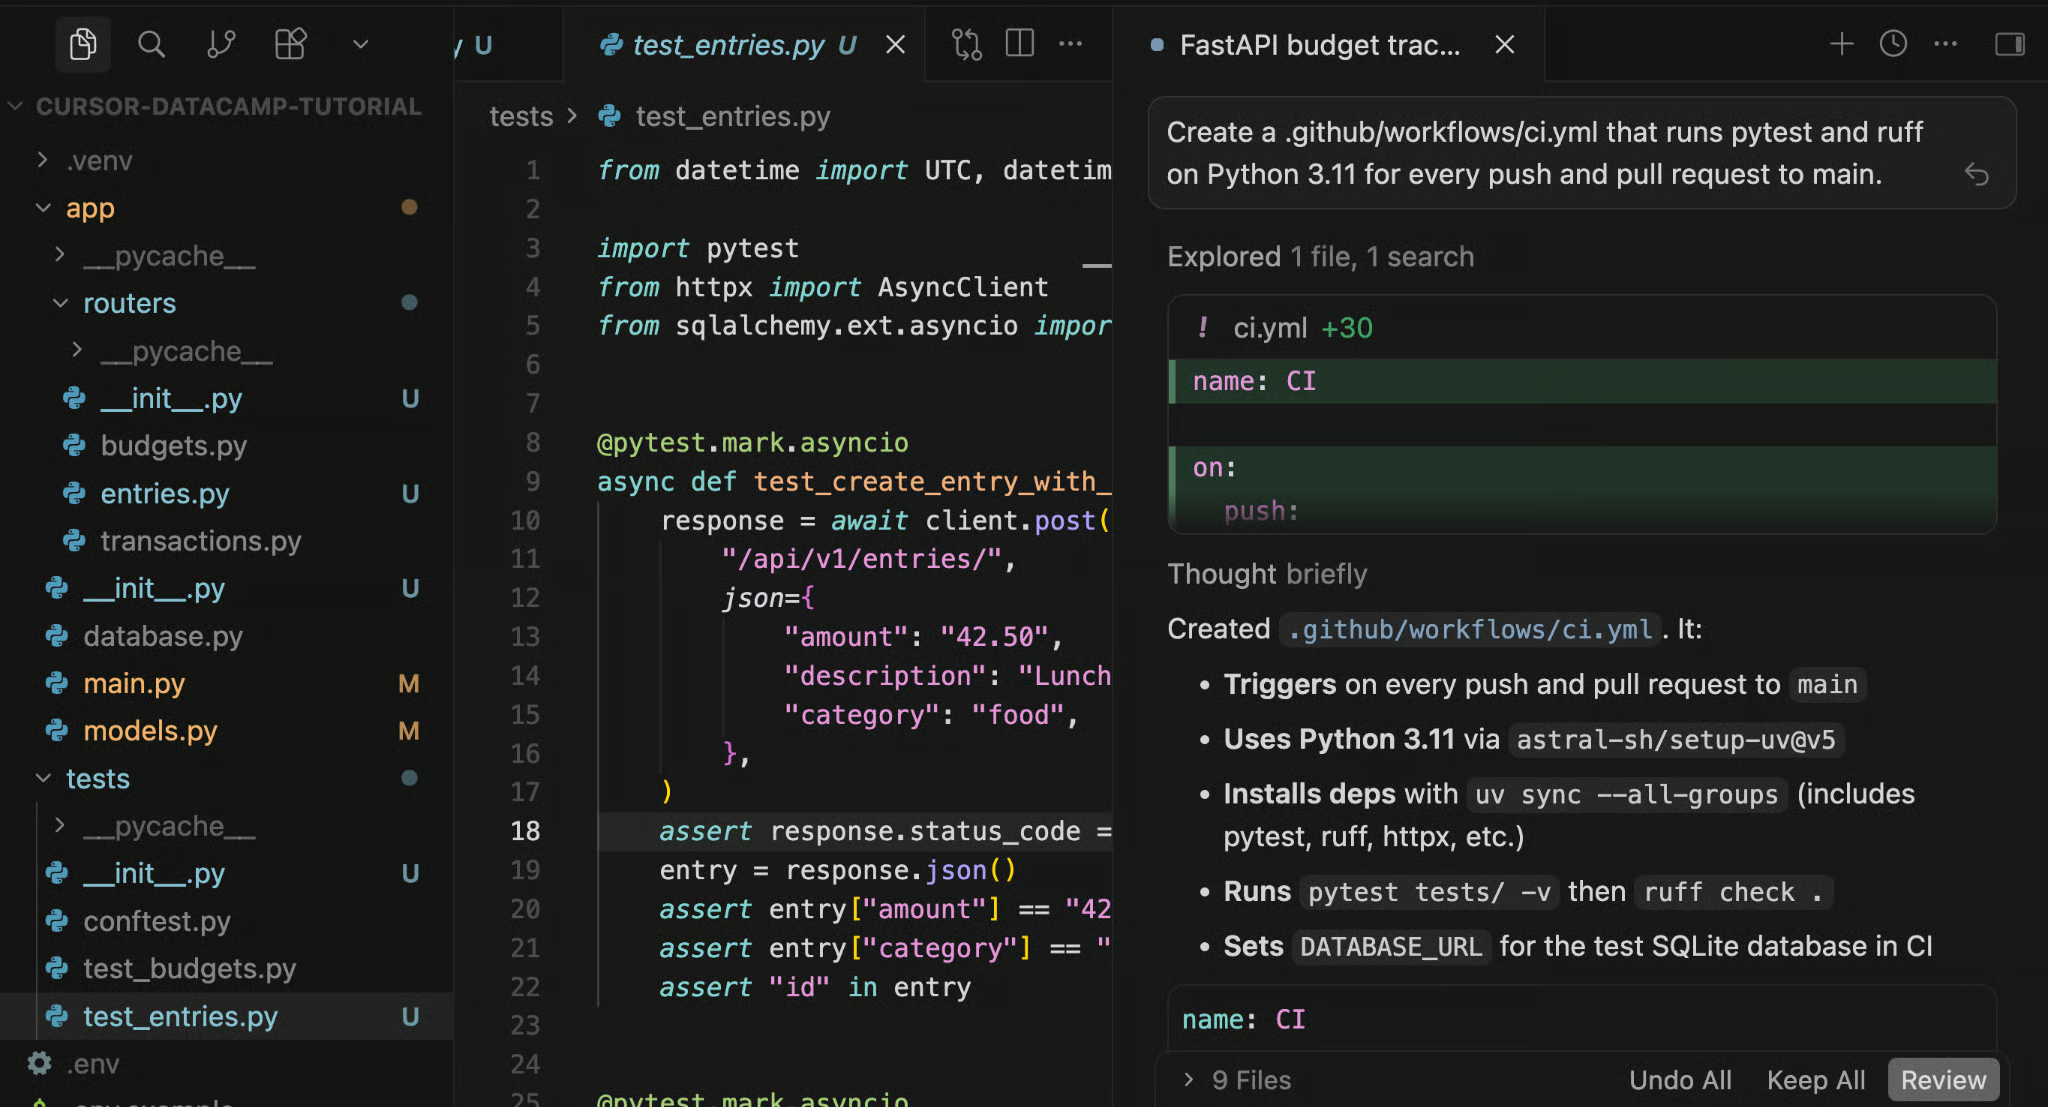
Create a .github/workflows/ci.yml that runs pytest and ruff on Python 3.11 for every push and pull request to main.After all seven steps, the project structure looks like this:
What we built here is a small API, but the workflow scales to anything.
Get the AGENTS.md in place before the agent touches a single file. Ask for the plan before execution on anything non-trivial. Stage your prompts, so you have natural checkpoints rather than one giant diff to review all at once. Use @filename when you want to ask something targeted about a specific file. And run a review pass before you consider a task done, because you'll nearly always catch something.
GPT-5.6 Sol in Cursor is noticeably better than earlier combinations at staying on task across long sessions, catching cross-file inconsistencies, and knowing when to pause and check in rather than charging ahead on something destructive. But the model is only part of the picture. The context you give it upfront, the validation loops you run, and the review pass at the end, that's where the real improvement in output quality comes from.
A good rule of thumb on reasoning levels: use High for architecture decisions, multi-file coordination, and debugging something non-obvious; use Medium or Low for documentation, boilerplate, and single-file edits where you're just asking the model to do the typing. Consider Extra High or Max for code reviews and where mistakes are more costly than a thorough agent run.
Learn Agentic AI for Coding with DataCamp!
Course
Course
Track
blog
Khalid Abdelaty
15 min
Tutorial
Brian Mutea
Tutorial
Khalid Abdelaty
12 min
Tutorial
Abid Ali Awan
10 min
Tutorial
Abid Ali Awan
9 min
Tutorial
Bex Tuychiev
8 min