Course
While DataCamp's Introduction to Deep Learning in Python course gives you everything you need for doing deep learning on your laptop or personal computer, you’ll eventually find that you want to run deep learning models on a Graphical Processing Unit (GPU).
This post will help you take the next steps!
Most users don’t have GPU’s on their own computer, so this blog post will show you how to run one from the Amazon Web Services (AWS) cloud.
Running your models on a GPU as we describe costs about $0.90 an hour. So, if your laptop or personal computer has a GPU, you can set up your computer to use that GPU, and that will save you some money.
There are quite a few steps to get your cloud computing environment set up the first time. But once you’ve set it up, you’ll find it easy to keep using it in the future.
Getting an Amazon Web Services Account
Go to https://aws.amazon.com/ to sign up for an AWS account. Follow the link to Create an AWS Account.
Select the button I am a new user and enter your email address. You will be guided through some forms filling in information like your name, email address and a password.

Setting Up your Cloud Computing Server
The process of setting up your server has quite a few steps. Fortunately, we will show you how to stop your instance, so you aren’t paying for it when you aren’t using it, and so you can easily restart it quickly once it is set up.
Now that you have an account, you can use it any time by returning to https://aws.amazon.com/ and clicking Sign In To Console.

Amazon offers an enormous range of cloud computing services, and it can be overwhelming to most new users. You will be focused on their EC2 service (short for Elastic Cloud Compute). The upper left part of your browser window offers a menu for services.

Open this menu and select EC2, which should be the first option. This brings you to a page with information about status of all EC2 computing instances you have running. Select the button in the middle of this page to Launch Instance.

Each computing instance comes preloaded with different software (in “machine images”), and we need to decide what we want preloaded. In our case, we want to use an image from the AWS Marketplace that is optimized for deep learning.
Select AWS Marketplace on the left menu bar.
Then enter deep learning ubuntu in the search space:
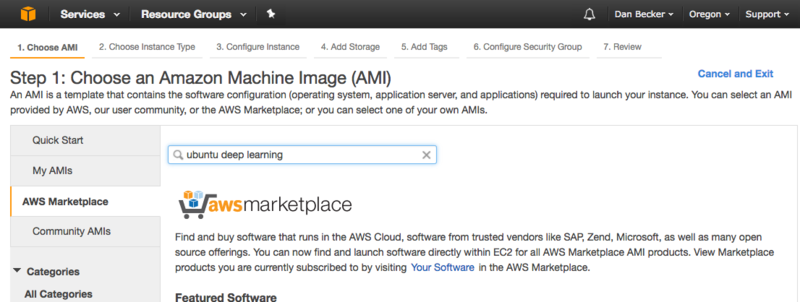
This will bring up some options including Amazon’s official Deep Learning AMI Ubuntu Version. Select this one.

You will now be presented with a menu of instance types. Each instance type has a different price, and a different computational capabilities.
The instances with GPU’s are those that start with either g2 or p2. We recommend the p2.xlarge, which costs a little less than a dollar an hour. If you want something less expensive, the g2.2xlarge is about $0.65/hr, though it isn’t quite as fast or as powerful.
After you have selected your instance type, select Configure Instance Details at the bottom of the page. Then select 6. Configure Security Group on the menu towards the top of the page.
Here, we will set up your instance to make it easy to access from your computer.
Each row describes rules for how one can access your instance.
We will use Jupyter notebooks, which are served on port 8888. If you don’t understand this yet, you will see how to make it work soon.
For now, click the Add Rule button. In the new column select TCP for the protocol, 8888 for the Port, and 0.0.0.0/0 for the last column, which is the source.
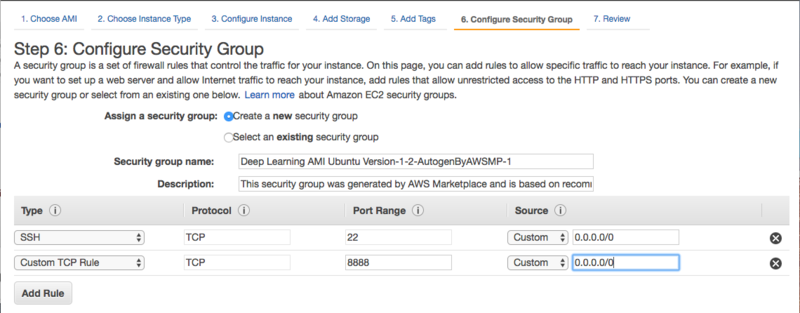
Finally click the Review and Launch button on the bottom of your screen. Then press Launch again.
You will now get to the last bit of security… which is selecting a key pair. The key is a file you have on your computer, which must match a file stored on the server. This is how you prevent others from using the server you just set up. So, don’t share keys with others or put the file anywhere public.
Select Create a new key pair and type in a name for your key. Then press the Download Key Pair button to get a copy of your key, which you will need to access your server.

You will soon be brought to a screen that looks like what you this:

The long string of characters in blue is the name of your instance. You can select that to see your EC2 dashboard, which shows this server running.
Congratulations! You now have a deep learning server running in the cloud.
Connecting to your Server
We will now connect to our server using a protocol called ssh. From there, we will start a Jupyter notebook server, which we can use through the browser.
On a mac or linux computer, you can use the ssh command. In Windows, many people use an application called PuTTY for ssh connections.
You may need to change the access priveleges for the file for your key. In MacOS and Linux this can be done with the command
chmod 400 my_private_key.pemThen, still at the command line, specify that you want this key to be available for authentication when logging into your server with
ssh-add my_private_key.pemTo log into our server, we will need the servers IP address. This can be found in the EC2 dashboard in your browser.

Log into this at the command line with the command
ssh ubuntu@34.208.222.118You will want to replace 34.208.222.118 with your server’s IP address.
Once logged into your server, use the ipython command to start an IPython shell. Once in IPython, try importing keras to ensure everything works. You will see some message indicating the CUDA is being used… which mean keras is accessing the GPU.
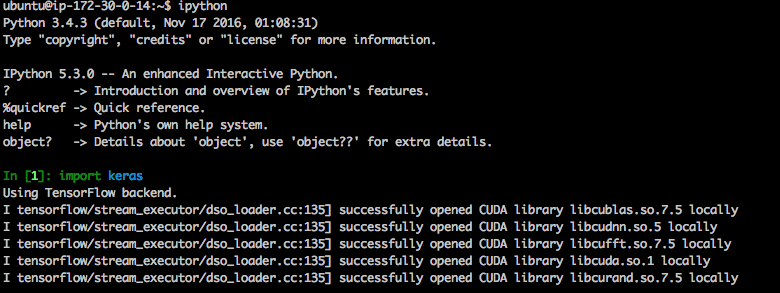
If you are comfortable with Linux, IPython, and a Linux text editor, you can work from here. Some people choose to use two windows. One to ssh to my server and use IPython, and another to ssh to the server and use the text editor.
Setting up your Jupyter Notebook
However, most people will find it easier to set up Jupyter notebooks and program through the browser. For this, we will want to set up a new password.
The first step is to get the hash of whatever password you want to use. You do that with the following in IPython:

Copy the hash that is output after you set your password. You will need that again in a moment.
Type exit to get out of IPython.
Now we need to tell Jupyter to use your chosen password. To do that, issue the following set of commands
jupyter notebook --generate-configmkdir certscd certssudo openssl req -x509 -nodes -days 365 -newkey rsa:1024 -keyout mycert.pem -out mycert.pemThen use a text editor to edit ~/.jupyter/jupyter_notebook_config.py. I like vim, and would use the command:
vim ~/.jupyter/jupyter_notebook_config.pyAt the top of that file, paste the following:
c = get_config()c.IPKernelApp.pylab = 'inline' c.NotebookApp.certfile = u'/home/ubuntu/certs/mycert.pem' c.NotebookApp.ip = '*' c.NotebookApp.open_browser = False # Your password below will be whatever you copied earlier c.NotebookApp.password = u'sha1:941c93244463:0a28b4a9a472da0dc28e79351660964ab81605ae' c.NotebookApp.port = 8888You can copy all of this exactly, and just replace the password. Remember, don’t use your actual password. Copy in the hash of your password that you created earlier.
Connecting to Jupyter in the Browser
Go to the browser of your choice, and enter the address of your instance (available in the EC2 dashboard) followed by :8888.

You may see a security message at this point. You shouldn’t need to worry about this. In Chrome, you can click an “advanced” button in your main browser window to bypass this security message.
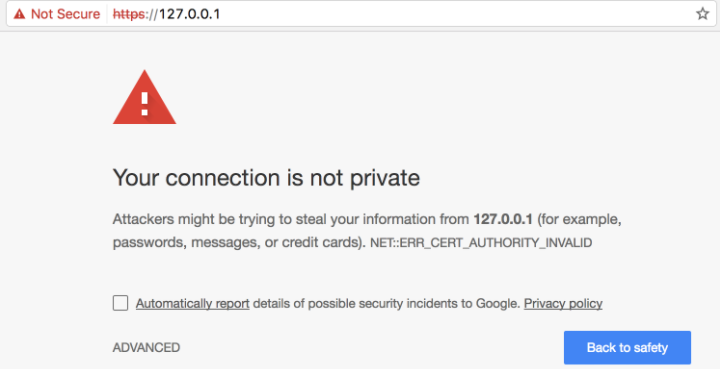
You will now be prompted for your password.

Type in your password. This is not the hash of your password, but rather the raw password that you previously typed into IPython to get the hash value.
Congrats, you are logged in!
Using the Notebook
From within the browser, select on the menu to create a new Python notebook.
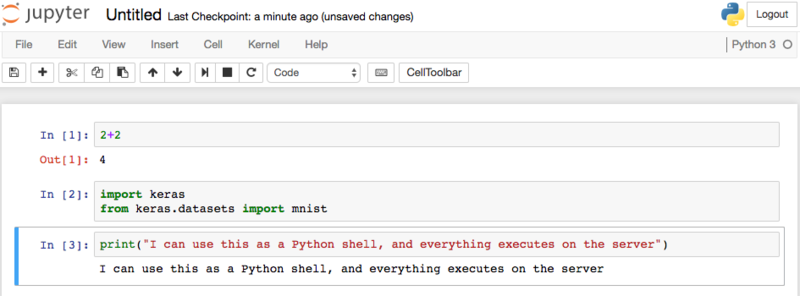
Whew… That wasn’t Easy. But it will Be from Now on
Getting these notebook capabilities required a lot of setup. Fortunately, it’s mostly a 1-time effort. You can now stop your server in the EC2 dashboard whenever you aren’t using it, and you will stop paying for it.
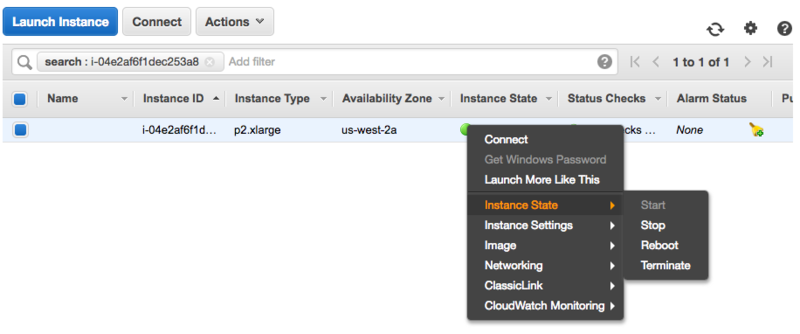
Stopping an instance will keep all of your setup effort, but the instance will stop working until you restart it. In some ways, this is like a pause button. If you selected terminate it would lose all information about that instance, and you would have to redo the setup next time.
Since you selected stop, you can now go back to the ec2 dashboard on another day and click start.
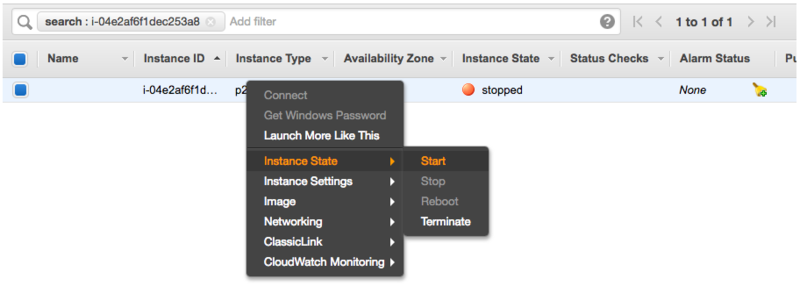
Once you click start, it’s pretty easy to get up and running again. Your instance will get a new IP address. You will need to ssh into that new IP address
ssh ubuntu@34.208.26.73In the window where you have accessed your server through ssh, type
jupyter notebookYou can then go back to your browser, and immediately start working again.
It was a lot of work to set up, but hopefully, you will get a lot of use out of this as you keep practicing and doing more exciting deep learning projects.
If you're interested in learning more, make sure to check out these DataCamp courses:

