What is FLAN-T5?
FLAN-T5 is an open-source, sequence-to-sequence, large language model that can be also used commercially. The model was published by Google researchers in late 2022, and has been fine-tuned on multiple tasks.
The T5 model reframes various tasks into a text-to-text format, such as translation, linguistic acceptability, sentence similarity, and document summarization, as shown below:
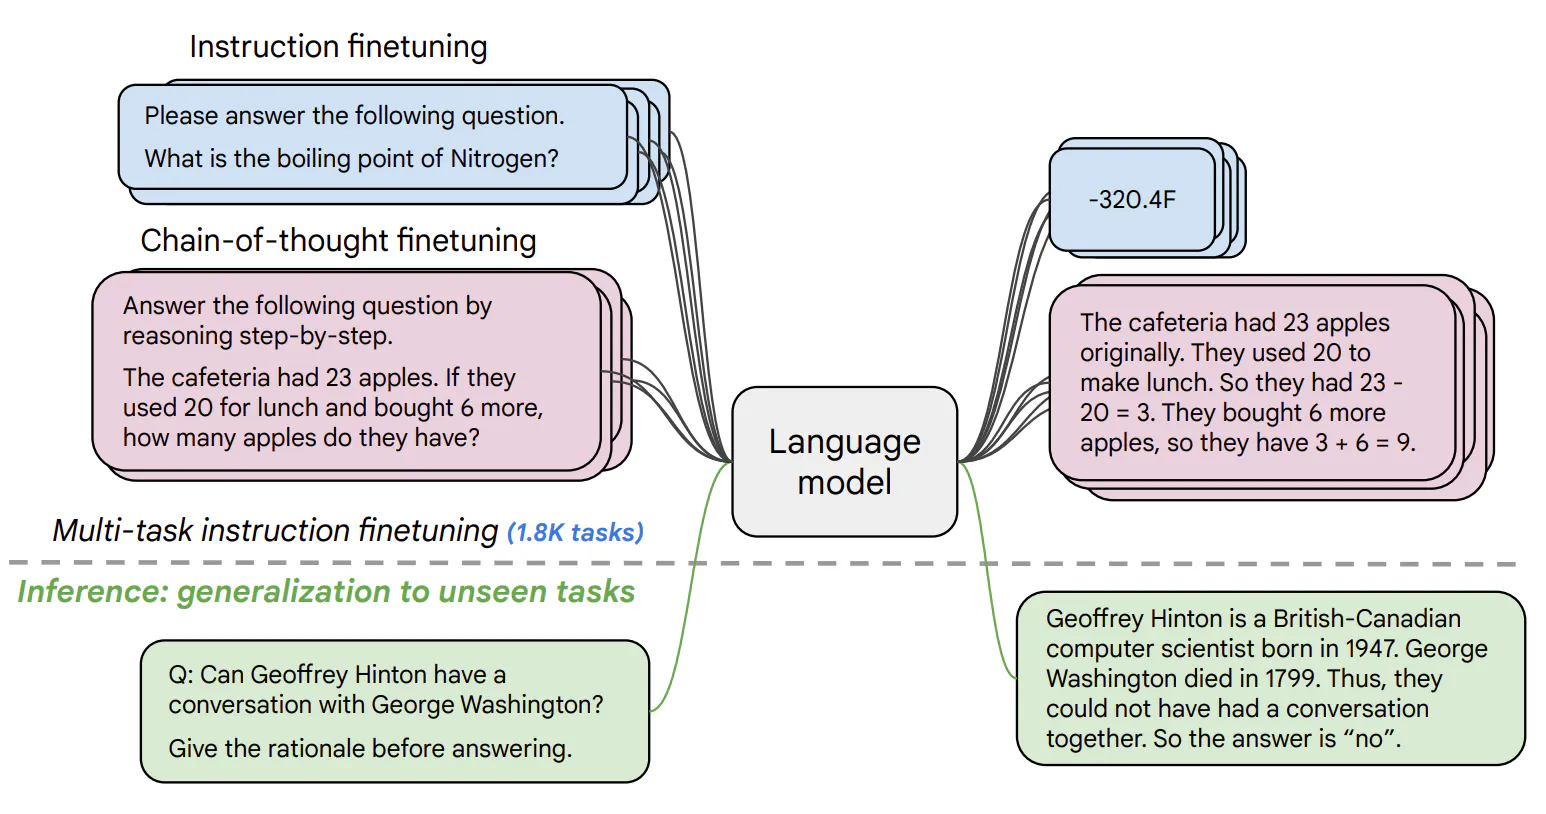
Examples of how T5 reframes a range of tasks into text-to-text framework (source)
Similarly, the architecture of the T5 model closely aligns with the encoder-decoder structure utilized in the original Transformer paper. The primary distinction lies in the size and nature of the training data; T5 was trained on an extensive 750GB corpus of text known as the Colossal Clean Crawled Corpus (C4).
In contrast, the original Transformer was specifically designed for language translation and, therefore, was trained on a dataset consisting of 1.4 GB of English-German sentence pairs.
Our article An Introduction to Using Transformers and Hugging Face guides the reader in understanding transformers and harnessing their power to solve real-life problems.
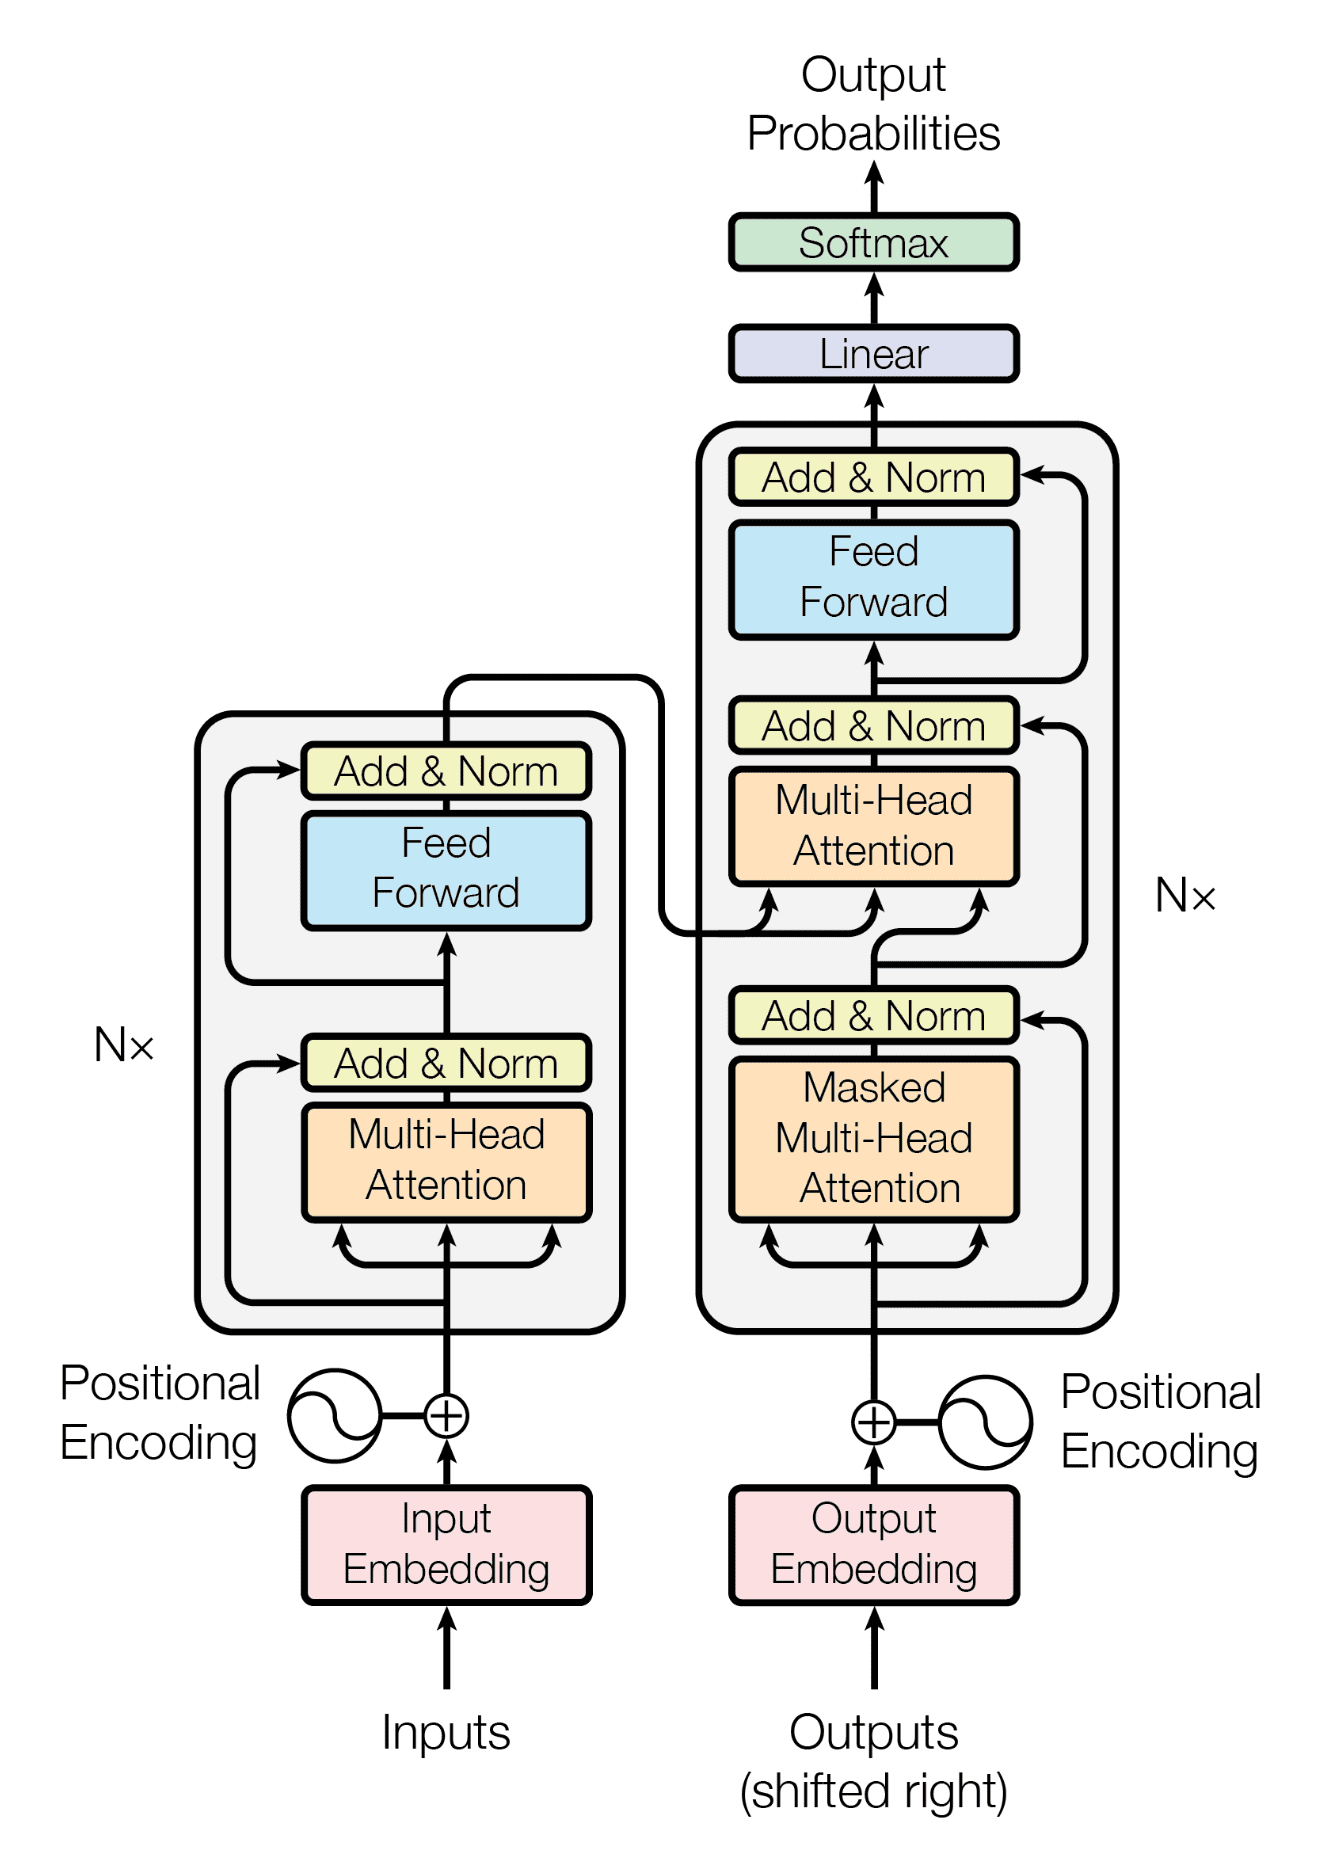
The Transformer model architecture (source)
How important is fine-tuning FLAN-T5?
There is no doubt that FLAN-T5 can be used for various Natural Language Processing tasks.
However, to leverage its full potential and ensure optimal performance for specific applications, fine-tuning is a crucial step. Below are the main points highlighting the importance of fine-tuning FLAN-T5:
- Fine-tuning FLAN-T5 is important to adapt the model to specific tasks and improve its performance on those tasks.
- Fine-tuning allows for customization of the model to better suit the user's needs and data.
- The ability to fine-tune FLAN-T5 on local workstations with CPUs makes it accessible to a wider range of users.
- This accessibility is beneficial for smaller organizations or individual researchers who may not have access to GPU resources.
- Overall, fine-tuning FLAN-T5 is a valuable step in optimizing the model for specific use cases and maximizing its potential benefits.
The goal of this tutorial is to provide a complete guide to fine-tuning FLAN-T5 on a question-answering scenario.
In this tutorial, we will cover a range of topics to help you understand and implement fine-tuning for FLAN-T5. We will start by discussing the required libraries and tools that are necessary for this process, followed by the steps to set up the environment for fine-tuning.
Next, we will guide you through the process of loading the FLAN-T5 model and preparing your data for fine-tuning. Once the data is ready, we will walk you through the steps to train and fine-tune the model to suit your specific needs.
Finally, we will explore some potential applications of the fine-tuned FLAN-T5 model, demonstrating how it can be used in various scenarios to achieve better performance and more accurate results.
Potential Applications of Fine-Tuned FLAN-T5
Before diving into the technical implementation, let’s explore some of the potential applications of fine-tuned FLAN-T5, and below are some examples for chat and dialogue summarization, text classification, and Fast Healthcare Interoperability Resources (FHIR).
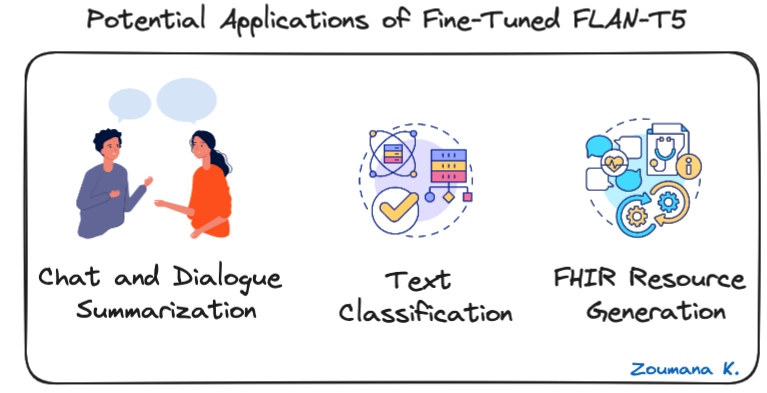
Three Potential Applications of Fine-Tuned FLAN-T5
- Chat and dialogue summarization: FLAN-T5 can condense conversations, providing a quick recap of customer service interactions or business meetings.
- Text classification: useful for automating the categorization of text into predefined classes, such as sentiment analysis, spam detection, or topic modeling.
- FHIR resource generation: FLAN-T5 can convert clinical text into structured FHIR (Fast Healthcare Interoperability Resources) for easy sharing and integration into healthcare systems.
Before digging into the core technical aspects of the article, our tutorial, How to Build LLM Applications with LangChain, guides the reader to explore the untapped potential of Large Language Models with LangChain, an open-source Python framework for building advanced AI applications.
Prerequisites
Now that we have a better understanding of FLAN-T5, let’s see how to fine-tune it for a question-answering use case, and the full notebook is available on GitHub.
To begin, the following libraries and tools are required:
- Hugging Face: A platform that provides access to the FLAN-T5 model, facilitating its download and usage for fine-tuning
- Transformers: This is used to simplify the process of loading the pre-trained FLAN-T5 model and provides useful functions for fine-tuning
- Datasets: a collection of ready-to-use datasets, crucial for sourcing relevant data for fine-tuning
- Sentencepiece: a tokenization tool mainly used for handling large and multilanguage text data
- Tokenizers: a tokenization library for converting text into a suitable format for the use case
- Evaluate: This library provides a wide range of metrics for model evaluation, ensuring that the fine-tuned model meets the desired performance standard
- Rouge score: specific metric used to evaluate the quality of text generated by large language models
- NLTK: useful for data preprocessing steps such as tokenization and stemming
Installation of the libraries
The installation can be performed as follows, using pip, the Python package manager from Jupyter notebook.
%%bash
pip install nltk
pip install datasets
pip install transformers[torch]
pip install tokenizers
pip install evaluate
pip install rouge_score
pip install sentencepiece
pip install huggingface_hub
The %%bash command is used in the notebook to run the corresponding cell as a bash script instead of running each command individually.
Import libraries
After the installation of all the libraries, we can import each one as follows:
import nltk
import evaluate
import numpy as np
from datasets import load_dataset
from transformers import T5Tokenizer, DataCollatorForSeq2Seq
from transformers import T5ForConditionalGeneration, Seq2SeqTrainingArguments, Seq2SeqTrainer
Loading the FLAN-T5 Model
Multiple formats of FLAN-T5 models are available on Hugging Face, from small to extra-large models, and the bigger the model, the more parameters it has.
Below are the different model sizes available from the Hugging Face model card:
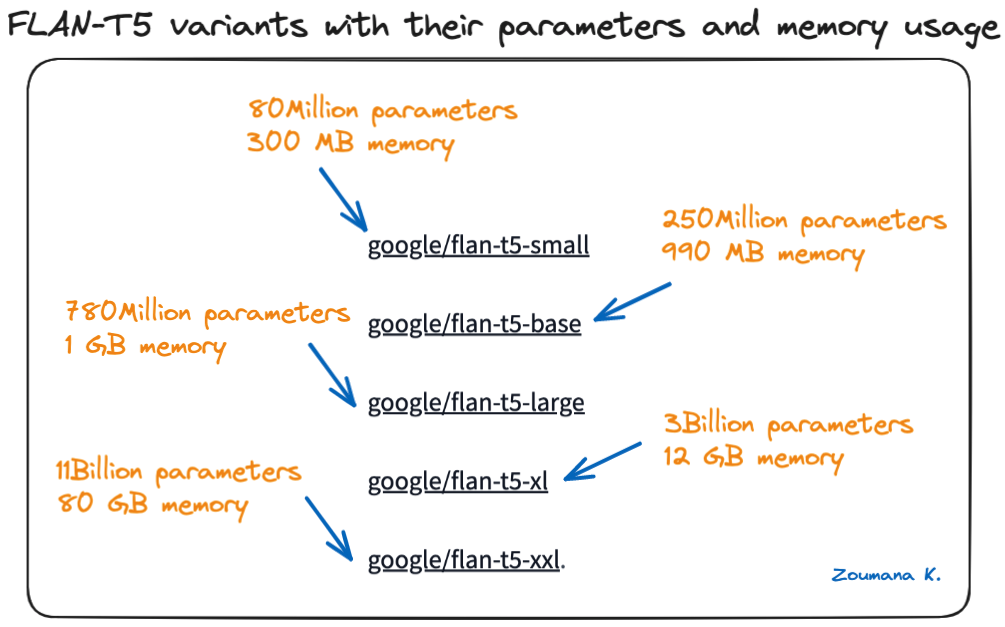
FLAN-T5 variants with their parameters and memory usage
Choosing the right model size
The choice of the right model size among the variants of FLAN-T5 highly depends on the following criteria:
- The specific requirements of the project
- The available computational resources
- The level of performance expected
An NVIDIA A100 GPU is being used for this experimentation, and the google/flan-t5-base model will strike a balance between computational efficiency and performance compatibility.
Model and Tokenizer initialization
The following three instructions are required to create the model.
# Load the tokenizer, model, and data collator
MODEL_NAME = "google/flan-t5-base"

tokenizer = T5Tokenizer.from_pretrained(MODEL_NAME)
model = T5ForConditionalGeneration.from_pretrained(MODEL_NAME)
data_collator = DataCollatorForSeq2Seq(tokenizer=tokenizer, model=model)- The tokenizer is instantiated using the T5Tokenizer module and the name of the model
- Using the from_pretrained function from T5ForConditionalGeneration, the model is loaded
- With the DataCollectorForSeq2Seq, a data collector is created to be used for the question-answering task
Preparing Data for Fine-Tuning
With the model, the tokenizer, and data collector available, the next step is loading the experimentation for fine-tuning, and the data being used is the Yahoo discussion data available on Hugging Face.
The loading process of the data is straightforward and can be performed using the load_dataset function, which takes the name of the dataset as a parameter. In this specific case, the focus is on the training data.
# Acquire the training data from Hugging Face
DATA_NAME = "yahoo_answers_qa"
yahoo_answers_qa = load_dataset(DATA_NAME)
Once the data is acquired, it is split into training and testing datasets, respectively, at the proportion of 70% and 30%, and this is achieved using the train_test_split function.
yahoo_answers_qa = yahoo_answers_qa["train"].train_test_split(test_size=0.3)The following statement shows the total number of observations in both training and testing data.
# Check the length of the data and its structure
yahoo_answers_qa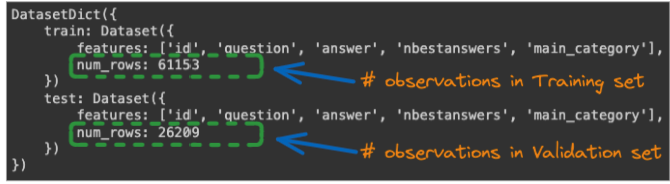
Total number of observations for both training and validation datasets
Data formatting and tokenization
We have a significant amount of data in both training and testing datasets for the fine-tuning process. But, before that we need to process the data to fit the fine-tuning format.
Most of the functions being used for the next step are inspired by the Toughdata article.
During the inference mode, the process of calling the model will be in this format:
“Please answer this question: <USER_QUESTION>”
Where the <USER_QUESTION> is the question the user would like the answer about. To achieve that functionality, we need to format the training data by prefixing the task with the string “Please answer this question,” and this is done with the preprocess_function function below.
In addition to the formatting, the function also applies the tokenization of the inputs and outputs using the tokenizer function.
# We prefix our tasks with "answer the question"
prefix = "Please answer this question: "

# Define the preprocessing function

def preprocess_function(examples):
   """Add prefix to the sentences, tokenize the text, and set the labels"""
   # The "inputs" are the tokenized answer:
   inputs = [prefix + doc for doc in examples["question"]]
   model_inputs = tokenizer(inputs, max_length=128, truncation=True)

   # The "labels" are the tokenized outputs:
   labels = tokenizer(text_target=examples["answer"],
                      max_length=512,
                      truncation=True)

   model_inputs["labels"] = labels["input_ids"]
   return model_inputs
Next, the function is applied to the whole dataset using the map function below:
# Map the preprocessing function across our dataset
tokenized_dataset = yahoo_answers_qa.map(preprocess_function, batched=True)
FLAN-T5 Training and Fine-Tuning
Before diving into the training process, it is better to identify the metrics to evaluate the overall performance of the fine-tuning.
Good evaluation metrics are important in any deep learning and machine learning project to evaluate the performance of models, not only during training but also later in production.
Two of the most common metrics to evaluate the performance of a text generation model are BLEU and ROUGE, and in this case, to evaluate the quality of an answer by comparing it to a reference answer.
The focus of this tutorial is ROUGE, but this wikipedia article provides more information about the BLEU score.
What is ROUGE score?
ROUGE stands for Recall-Oriented Understudy for Gisting Evaluation. Some key components of ROUGE for question-answering include:
- ROUGE-L: Measures the longest common subsequence between the candidate and reference answers. This focuses on recall of the full text.
- ROUGE-1, ROUGE-2, ROUGE-SU4: Compare unigram, bigram, 4-gram overlaps between candidate and reference. Focus on recall of key parts/chunks
- Higher ROUGE scores generally indicate better performance for question answering. Scores close to or above 0.70+ are considered strong
- When using this metric, processing like stemming, and removing stopwords can help improve the overall performance
With this understanding, the following helper function compute_metrics can help compute the underlying ROUGE score. Prior to the implementation of the function, it is necessary to set up ROUGE and NLTK.
nltk.download("punkt", quiet=True)
metric = evaluate.load("rouge")
Below is the implementation of the function.
def compute_metrics(eval_preds):
   preds, labels = eval_preds

   # decode preds and labels
   labels = np.where(labels != -100, labels, tokenizer.pad_token_id)
   decoded_preds = tokenizer.batch_decode(preds, skip_special_tokens=True)
   decoded_labels = tokenizer.batch_decode(labels, skip_special_tokens=True)

   # rougeLSum expects newline after each sentence
   decoded_preds = ["\n".join(nltk.sent_tokenize(pred.strip())) for pred in decoded_preds]
   decoded_labels = ["\n".join(nltk.sent_tokenize(label.strip())) for label in decoded_labels]

   result = metric.compute(predictions=decoded_preds, references=decoded_labels, use_stemmer=True)

   return result
Training process
To trigger the fine-tuning, we need to set some hyperparameters and the main ones are given below:
- Learning rate: to control how quickly the model learns from the data and the typical values are 1e-5 to 5e-5, and for this use case, the value is set to 3e-4
- Batch size: the total number of samples processed before the update of the model’s weights. Using larger batches can speed up the process, but the downside is that it can lead to poor performance. We use 8 for this use case
- Per device train batch size: this one is similar to batch size, but it is specified per each device (GPU)
- Weight decay: the goal of using this is to prevent the model from overfitting. 0.01 is an acceptable value for weight size
- Save total limit: this is the total number of checkpoints to be saved during the training. The more saves there are, the higher the possibilities there are to roll back but uses more disk. We are performing 3 saves for this case
- Number of epochs: the total number of passes through the training dataset. The more epochs, the longer the training time, but could also improve the model performance. Typically, a value from 3 to 10 is chosen, and 3 is used for this use case.
The above parameters are defined below, and used for setting up the model training arguments, and the overall training artifacts are saved in the folder results :
# Global Parameters
L_RATE = 3e-4
BATCH_SIZE = 8
PER_DEVICE_EVAL_BATCH = 4
WEIGHT_DECAY = 0.01
SAVE_TOTAL_LIM = 3
NUM_EPOCHS = 3

# Set up training arguments
training_args = Seq2SeqTrainingArguments(
   output_dir="./results",
   evaluation_strategy="epoch",
   learning_rate=L_RATE,
   per_device_train_batch_size=BATCH_SIZE,
   per_device_eval_batch_size=PER_DEVICE_EVAL_BATCH,
   weight_decay=WEIGHT_DECAY,
   save_total_limit=SAVE_TOTAL_LIM,
   num_train_epochs=NUM_EPOCHS,
   predict_with_generate=True,
   push_to_hub=False
)
Next, the trainer is set up to trigger the training process of the model.
trainer = Seq2SeqTrainer(
   model=model,
   args=training_args,
   train_dataset=tokenized_dataset["train"],
   eval_dataset=tokenized_dataset["test"],
   tokenizer=tokenizer,
   data_collator=data_collator,
   compute_metrics=compute_metrics
)
Finally, the model training is triggered using the train function as follows:
trainer.train()After almost four hours, the overall performance of the training process for each epoch is provided below.
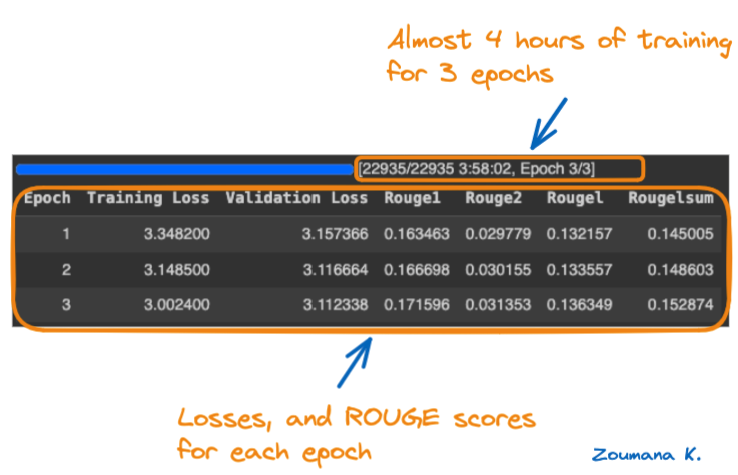
Training epochs and the corresponding performance scores
Let’s understand the above performance metrics board.
- Training Loss and Validation Loss: Lower values in these metrics are preferable as they indicate a better fit of the model to the data. The training and validation loss has decreased over the epochs, with the lowest values recorded in epoch 3.
- Rouge Metrics (Rouge1, Rouge2, Rougel, and Rougelsum): Higher values in these metrics are preferable as they indicate better text summarization performance. Across all four Rouge metrics, the values have increased over the epochs, with the highest values recorded in epoch 3.
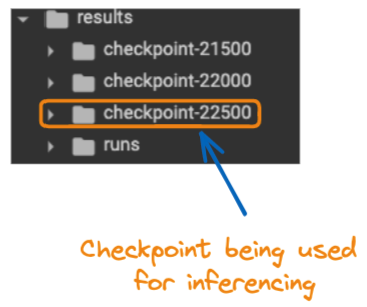
Overall, the model performed well during the third epoch, since it shows the lowest training loss and validation loss, along with the highest values across all ROUGE metrics. Below is the content of the results folder with all the checkpoints:
Content of the “results” folder
Model Inference
Now that the model has been fine-tuned, wouldn’t it be nice to apply it to a real-life scenario?
That’s what the model inference is all about. Use an existing model to solve a real-world problem, and this is what is being used with the fine-tuned model.
Before that, we need to perform a few steps:
- Load the fine-tuned model for the last checkpoint
last_checkpoint = "./results/checkpoint-22500"

finetuned_model = T5ForConditionalGeneration.from_pretrained(last_checkpoint)
tokenizer = T5Tokenizer.from_pretrained(last_checkpoint)- Define a specific question to answer
my_question = "What do you think about the benefit of Artificial Intelligence?"
inputs = "Please answer to this question: " + my_question- Run the prediction
inputs = tokenizer(inputs, return_tensors="pt")
outputs = finetuned_model.generate(**inputs)
answer = tokenizer.decode(outputs[0])
from textwrap import fill

print(fill(res, width=80))
Below is the result of the fine-tuned model, and it looks pretty good. And the fill method from textwrap is used to limit the maximum number of characters to 80 per line, instead of having the whole string in a single line.

Fine-tuned model response to the question
Conclusion and Next Steps
This article has provided a complete guide to fine-tuning a FLAN-T5 model. First, it introduced the reader to a better understanding of the model and its potential use cases, before walking through the overall technical implementation, from loading the experimentation data and the model from hugging face to training the model on a GPU. The best model, as per the ROUGE scores, is tested on a real-world scenario
Where to go from here?
Our articles 12 GPT-4 Open-Source Alternatives, and How to Train a LLM with PyTorch could be a great next step for upskilling purposes. The first one highlights GPT-4 open-source alternatives that can offer similar performance and require fewer computational resources to run. These projects come with instructions, code sources, model weights, datasets, and chatbot UI.
The second article helps the reader master the process of training large language models using PyTorch, from initial setup to final implementation. You can also eEnhance your skills with the powerful deep learning framework used by AI professionals. Join the Deep Learning with PyTorch course today.