Course
Describing H2O
There is a lot of buzz for machine learning algorithms as well as a requirement for its experts. We all know that there is a significant gap in the skill requirement. The motive of H2O is to provide a platform which made easy for the non-experts to do experiments with machine learning.
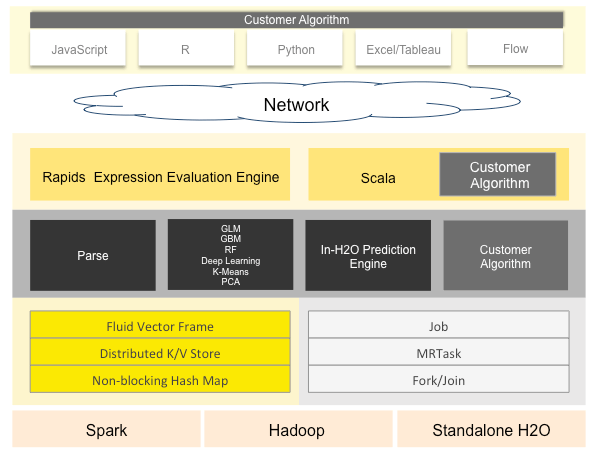
H2O architecture can be divided into different layers in which the top layer will be different APIs, and the bottom layer will be H2O JVM.

H2O’s core code is written in Java that enables the whole framework for multi-threading. Although it is written in Java, it provides interfaces for R, Python and few others shown in the architecture, thus enabling it to be used efficiently.
In crux, we can say that H2O is an open source, in memory, distributed, fast and scalable machine learning and predictive analytics that allow building machine learning models to be an ease.
Installation Process
R
If you want to use H2O functionality in R, you can simply install package H2O using command install.packages("h2o").
library(h2o)
##
## ----------------------------------------------------------------------
##
## Your next step is to start H2O:
##     > h2o.init()
##
## For H2O package documentation, ask for help:
##     > ??h2o
##
## After starting H2O, you can use the Web UI at http://localhost:54321
## For more information visit http://docs.h2o.ai
##
## ----------------------------------------------------------------------

##
## Attaching package: 'h2o'

## The following objects are masked from 'package:stats':
##
##     cor, sd, var

## The following objects are masked from 'package:base':
##
##     %*%, %in%, &&, ||, apply, as.factor, as.numeric, colnames,
##     colnames<-, ifelse, is.character, is.factor, is.numeric, log,
##     log10, log1p, log2, round, signif, trunc
h2o.init()
##  Connection successful!
##
## R is connected to the H2O cluster:
##     H2O cluster uptime:         32 minutes 57 seconds
##     H2O cluster timezone:       Asia/Kolkata
##     H2O data parsing timezone:  UTC
##     H2O cluster version:        3.20.0.2
##     H2O cluster version age:    3 months and 22 days !!!
##     H2O cluster name:           H2O_started_from_R_NSingh1_wou076
##     H2O cluster total nodes:    1
##     H2O cluster total memory:   1.55 GB
##     H2O cluster total cores:    4
##     H2O cluster allowed cores:  4
##     H2O cluster healthy:        TRUE
##     H2O Connection ip:          localhost
##     H2O Connection port:        54321
##     H2O Connection proxy:       NA
##     H2O Internal Security:      FALSE
##     H2O API Extensions:         Algos, AutoML, Core V3, Core V4
##     R Version:                  R version 3.5.1 (2018-07-02)
Initializing H2O might throw an error in your system in the case where you don’t have Jdk of 64 bit. If such issue arises, please install latest Jdk of 64 bits, it will work without issue afterward.
Python
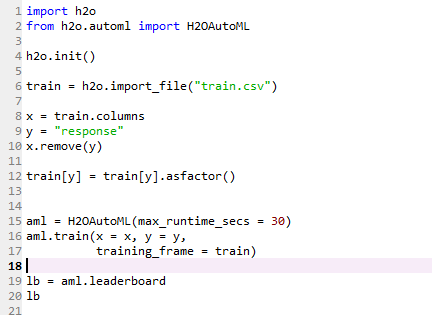
If you are using python the same method is applied in it too, from command line pip install -U h2o and h2o will be installed for your python environment. The same process will go on for Initializing h2o.

The h2o.init() command is pretty smart and does a lot of work. At first, it looks for any active h2o instance before starting a new one and then starts a new one when instance are not present.
It does have arguments which helps to accommodate resources to the h2o instance frequently used are:
-
nthreads: By default, the value of nthreads will be -1 which means the instance can use all the cores of the CPU, we can set the number of cores utilized by passing the value to the argument.
-
max_mem_size: By passing a value to this argument you can restrict the maximum memory allocated to the instance. Its od string type can pass an argument as ‘2g’ or ‘2G’ for 2 GBs of memory, same when you want to allocate in MBs.
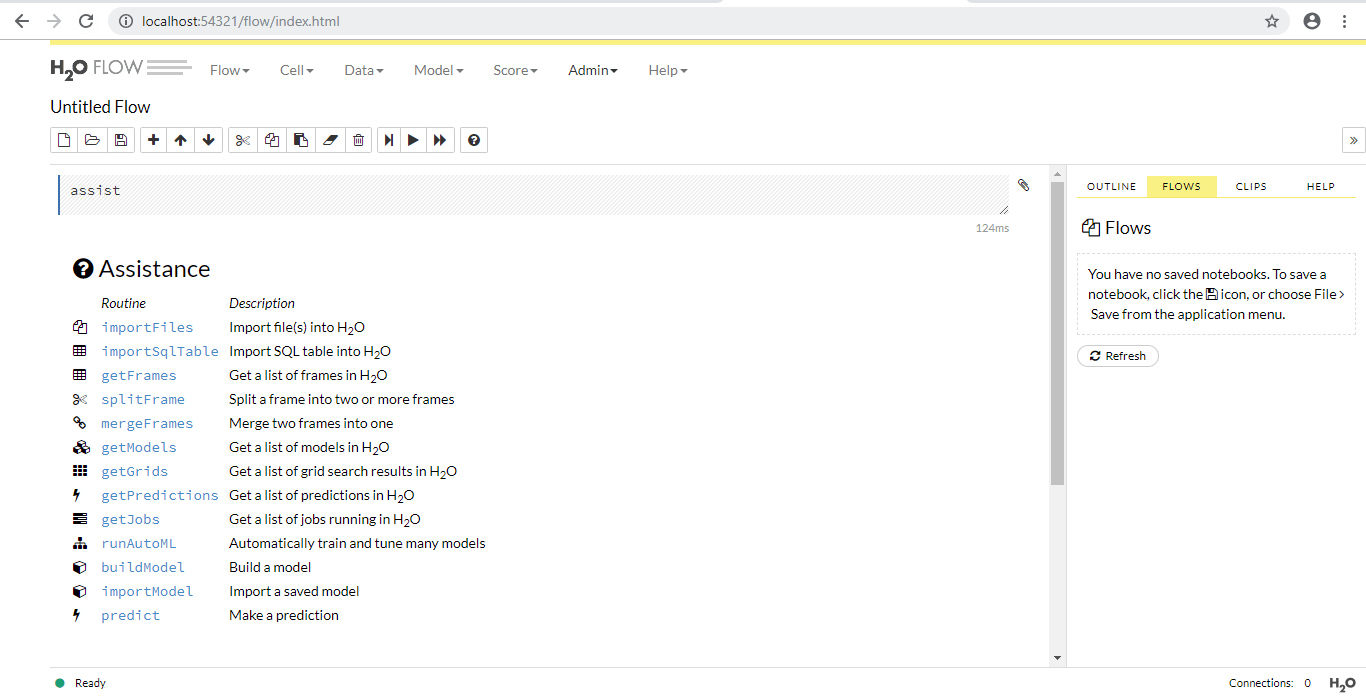
Once instance is created, you can access the flow by typing http://localhost:54321 in your browser. Flow is the name of the web interface that is part of h2o which does not require any extra installations which is written in CoffeeScript(a JavaScript like language). You can use it for doing the following things:
- Upload data directly
- View data uploaded by the client
- Create models directly
- View models created by you or your client
- view predictions
- Run predictions directly

The interface is quite useful and provides an ease of use to non-experts, I would recommend to try it and perform some experiments of your own.
AutoML
Now talking about AutoML part of H2O, AutoML helps in automatic training and tuning of many models within a user-specified time limit.
The current version of AutoML function can train and cross-validate a Random Forest, an Extremely-Randomized Forest, a random grid of Gradient Boosting Machines (GBMs), a random grid of Deep Neural Nets, and then trains a Stacked Ensemble using all of the models.
When we say AutoML, it should cater to the aspects of data preparation, Model generation, and Ensembles and also provide few parameters as possible so that users can perform tasks with much less confusion. H2o AutoML does perform this task with ease and the minimal parameter passed by the user.
In both R and Python API, it uses the same data related arguments x, y, training_frame, validation frame out of which y and training_frame are required parameter and rest are optional. You can also configure values for max_runtime_sec and max_models here max_runtime_sec parameter is required, and max_model is optional if you don’t pass any parameter it takes NULL by default.
The x parameter is the vector of predictors from training_frame if you don’t want to use all predictors from the frame you passed you can set it by passing it to x.
Now let's talk about some optional and miscellaneous parameters, try to tweak the parameters even if you don’t know about it, it will lead you to gain knowledge over some advanced topics:
-
validation_frame: This parameter is used for early stopping of individual models in the automl. It is a dataframe that you pass for validation of a model or can be a part of training data if not passed by you.
-
leaderboard_frame: If passed the models will be scored according to the values instead of using cross-validation metrics. Again the values are a part of training data if not passed by you.
-
nfolds: K-fold cross-validation by default 5, can be used to decrease the model performance.
-
fold_columns: Specifies the index for cross-validation.
-
weights_column: If you want to provide weights to specific columns you can use this parameter, assigning weight 0 means you are excluding the column.
-
ignored_columns: Only in python, it is converse of
x. -
stopping_metric: Specifies a metric for early stopping of the grid searches and models default value is logloss for classification and deviation for regression.
-
sort_metric: The parameter to sort the leaderboard models at the end. This defaults to AUC for binary classification, mean_per_class_error for multinomial classification, and deviance for regression.
The validation_frame and leaderboard_frame depend on the cross-validation parameter that is nfolds.
The following scenarios can generate in two cases:
when we are using cross-validation in the automl: * Only training frame is passed - Then data will split into 80-20 of training and validation frame. * training and leaderboard frame is passed - No change in the 80-20 split of data in training and validation frame. * When training and validation frame is passed - No split. * when all three frames are passed - No splits.
When we are not using cross-validation which will affect the leaderboard frame a lot(nfolds = 0): * Only training frame is passed - The data is split into 80/10/10 training, validation, and leaderboard. * training and leaderboard frame is passed - Data split into 80-20 of training and validation frames. * When training and validation frame is passed - The validation_frame data is split into 50-50 validation and leaderboard. * when all three frames are passed - No splits.
Implementation in R and Python
R
H2O imports data as Frame which is different from a data frame which we use in R and Python for different manipulations.
train <- h2o.importFile("train.csv")
##
  |
  |                                                                 |   0%
  |
  |=================================================================| 100%
test <- h2o.importFile("test.csv")
##
  |
  |                                                                 |   0%
  |
  |=================================================================| 100%
Setting predictors and the response.
y <- "response"
x <- setdiff(names(train), y)
Create an automl object by passing the mandatory parameters. We are passing only the training frame, and the nfolds parameter has its default value. You can increase the runtime of the model as per your needs.
train[,y] <- as.factor(train[,y])

aml <- h2o.automl(x = x, y = y,
                  training_frame = train,
                  max_runtime_secs = 30)
##
  |
  |                                                                 |   0%
  |
  |=                                                                |   1%
  |
  |=                                                                |   2%
  |
  |==                                                               |   3%
  |
  |===                                                              |   4%
  |
  |===                                                              |   5%
  |
  |====                                                             |   6%
  |
  |=====                                                            |   8%
  |
  |======                                                           |   9%
  |
  |======                                                           |  10%
  |
  |========                                                         |  13%
  |
  |==========                                                       |  15%
  |
  |==========                                                       |  16%
  |
  |===========                                                      |  16%
  |
  |===========                                                      |  17%
  |
  |===========                                                      |  18%
  |
  |============                                                     |  18%
  |
  |==============================================================   |  95%
  |
  |=================================================================| 100%
Viewing the leaderboard of different models.
lb <- aml@leaderboard
lb
##                                                model_id       auc
## 1    StackedEnsemble_AllModels_0_AutoML_20181008_110411 0.7823564
## 2 StackedEnsemble_BestOfFamily_0_AutoML_20181008_110411 0.7789898
## 3             GBM_grid_0_AutoML_20181008_110411_model_0 0.7738653
## 4             GBM_grid_0_AutoML_20181008_110411_model_1 0.7720842
## 5             GBM_grid_0_AutoML_20181008_110411_model_2 0.7713380
## 6                          DRF_0_AutoML_20181008_110411 0.7456390
##     logloss mean_per_class_error      rmse       mse
## 1 0.5596939            0.3197364 0.4359927 0.1900896
## 2 0.5628477            0.3112125 0.4374262 0.1913417
## 3 0.5662489            0.3164375 0.4393990 0.1930715
## 4 0.5679111            0.3192612 0.4402417 0.1938127
## 5 0.5679935            0.3297330 0.4405557 0.1940894
## 6 0.5985811            0.3611326 0.4520878 0.2043834
##
## [8 rows x 6 columns]
Python

If you would like to learn more in Python, take DataCamp's Parallel Computing with Dask course.
