
Track
Python Data Fundamentals
28 hr
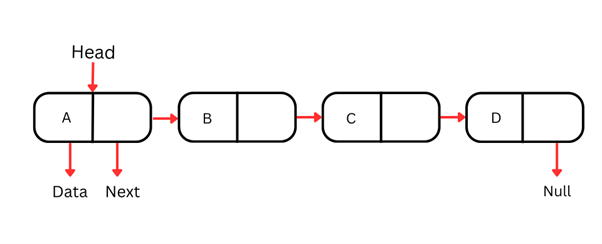
A linked list is a data structure that plays a crucial role in data organization and management. It contains a series of nodes that are stored at random locations in memory, allowing for efficient memory management. Each node in a linked list contains two main components: the data part and a reference to the next node in the sequence.
If this concept sounds complex at first glance, don’t fret!
We’ll break it down to its fundamentals to explain what linked lists are, why we use them, and the unique advantages they offer.
Linked lists were created to overcome various drawbacks associated with storing data in regular lists and arrays, as outlined below:
In lists, inserting or deleting an element at any position other than the end requires shifting all the subsequent items to a different position. This process has a time complexity of O(n) and can significantly degrade performance, especially as the list size grows. If you aren’t already familiar with how lists work or their implementation, you can read our tutorial on Python lists.
Linked lists, however, operate differently. They store elements in various, non-contiguous memory locations and connect them through pointers to subsequent nodes. This structure allows linked lists to add or remove elements at any position by simply modifying the links to include a new element or bypass the deleted one.
Once you have a direct reference to the node at the insertion or deletion point, the operation itself is O(1). Still, finding that position still requires O(n) traversal, so the O(1) benefit only applies when you already hold a pointer to the relevant node (such as when working at the head of the list).
Python lists are dynamic arrays, which means that they provide the flexibility to modify size.
However, this process involves a series of complex operations, including reallocating the array to a new, larger memory block. Such reallocation is inefficient since elements are copied over to a new block, potentially allocating more space than is immediately necessary.
In contrast, linked lists can grow and shrink dynamically without the need for reallocation or resizing. This makes them a preferable option for tasks that require high flexibility.
Lists allocate memory for all of its elements in a contiguous block. If a list needs to grow beyond its initial size, it must allocate a new, larger block of contiguous memory and then copy all existing elements to this new block. This process is time-consuming and inefficient, especially for large lists. On the other hand, if the initial size of the list is overestimated, the unused memory is wasted.
In contrast, linked lists allocate memory for each element separately. This structure leads to better memory utilization since memory for new elements can be allocated as they are added.
While linked lists provide certain benefits over regular lists and arrays, such as dynamic size and memory efficiency, they also have their limitations. Since pointers for each element must be stored to reference the next node, the memory usage per element is higher when using linked lists. Also, this data structure does not allow direct access to data. Accessing an element requires sequential traversal from the beginning of the list, resulting in O(n) search time complexity.
The choice between using a linked list or an array depends on the specific needs of the application. Linked lists are most useful when:
There are three types of linked lists, each offering unique advantages for different scenarios. These types are:
Singly-linked list
A singly-linked list is the simplest type of linked list, where each node contains some data and a reference to the next node in the sequence. They can only be traversed in a single direction - from the head (the first node) to the tail (the last node).
Each node in a singly-linked list typically consists of two parts:
Since these data structures can only be traversed in a single direction, accessing a specific element by value or index requires starting from the head and sequentially moving through the nodes until the desired node is found. This operation has a time complexity of O(n), making it less efficient for large lists.
Inserting and deleting a node at the beginning of a singly-linked list is highly efficient with a time complexity of O(1). However, insertion and deletion in the middle or at the end requires traversing the list until that point, leading to an O(n) time complexity.
The design of singly-linked lists makes them a useful data structure when performing operations that occur at the beginning of the list.
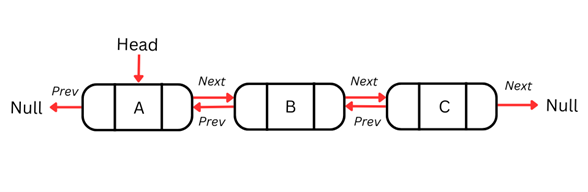
Doubly-linked list
One disadvantage of singly-linked lists is that we can only traverse them in a single direction and cannot iterate back to the previous node if required. This constraint limits our ability to perform operations that require bidirectional navigation.
Doubly-linked lists solve this problem by incorporating an additional pointer within each node, ensuring that the list can be traversed in both directions. Each node in a doubly linked list contains three elements: the data, a pointer to the next node, and a pointer to the previous node.
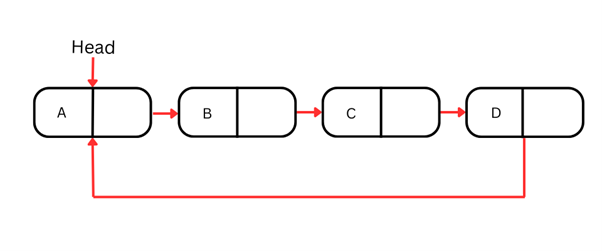
Circular linked list
Circular linked lists are a specialized form of linked list where the last node points back to the first node, creating a circular structure. This means that, unlike the singly and doubly linked lists we’ve seen so far, the circular linked list does not end; instead, it loops around.
The cyclical nature of circular linked lists makes them ideal for scenarios that need to be looped through continuously, such as board games that loop back from the last player to the first, or in computing algorithms such as round-robin scheduling.
It's useful to see how linked lists compare to Python lists at a glance:
| Operation | Singly Linked List | Array/Python List |
|---|---|---|
| Access by index | O(n) | O(1) |
| Search by value | O(n) | O(n) |
| Insert at beginning | O(1) | O(n) |
| Insert at end | O(n) | O(1) amortized |
| Insert at middle | O(n) | O(n) |
| Delete at beginning | O(1) | O(n) |
| Delete at end | O(n) | O(1) amortized |
The main takeaway: linked lists win on insertions and deletions at the head (O(1)), but lose on everything else. If you're not frequently adding or removing elements at the beginning of your data structure, a regular Python list is likely the better choice.
Now that we understand what linked lists are, why we use them, and their variations, let’s proceed to implement these data structures in Python. The notebook for this tutorial is also available in this DataLab workbook; if you create a copy you can edit and run the code. This is a great option if you encounter any issues running the code on your own!
As we learned previously, a node is an element in the linked list that stores data and a reference to the next node in the sequence. Here is how you can define a node in Python:
class Node:
    def __init__(self, data):
        self.data = data
        self.next = None

    def __repr__(self):
        return f"Node({self.data})"
The above code initializes a node by performing two primary actions: The “data” attribute of the node is assigned a value representing the actual information the node is intended to contain. The “next” attribute represents the address of the next node. This is currently set to None, signifying that it does not link to any other node in the list. As we continue to add new nodes to the linked list, this attribute will be updated to point to the subsequent node.
Next, we need to create the linked list class. This will encapsulate all the operations for managing the nodes, such as insertion and removal. We will start by initializing the linked list:
class LinkedList:
    def __init__(self):
        self.head = None  # Initialize head as None
By setting self.head to None, we are stating that the linked list is initially empty and that there are no nodes in the list to point to. We will now proceed to populate the list by inserting new nodes.
Within the LinkedList class, we are going to add a method to create a new node and place it at the start of the list:
    def insertAtBeginning(self, new_data):
        new_node = Node(new_data)  # Create a new node
        new_node.next = self.head  # Next for new node becomes the   current head
        self.head = new_node  # Head now points to the new node
Every time you call the above method, a new node is created with your specified data. The next pointer of this new node is set to the current head of the list, which will place this node in front of the existing nodes. Finally, the newly created node is made the head of the list.
We are now going to populate this linked list with a series of words to get a better understanding of how the insertion operation works. To accomplish this, let’s first create a method designed to traverse and print the list’s contents:
    def printList(self):
        temp = self.head # Start from the head of the list
        while temp:
            print(temp.data,end=' ') # Print the data in the current node
            temp = temp.next # Move to the next node
        print()  # Ensures the output is followed by a new line
The above method will print the contents of our linked list. Let’s now proceed to use the methods we’ve defined to populate our list with a series of words: “the quick brown fox.”
if __name__ == '__main__':
    # Create a new LinkedList instance
    llist = LinkedList()

    # Insert each letter at the beginning using the method we created
    llist.insertAtBeginning('fox')
    llist.insertAtBeginning('brown')
    llist.insertAtBeginning('quick')
    llist.insertAtBeginning('the')

    # Now 'the' is the head of the list, followed by 'quick', then 'brown' and 'fox'

    # Print the list
    llist.printList()
The above lines of code should render the following output:
"the quick brown fox"
We will now create a method called insertAtEnd within the LinkedList class, to create a new node at the end of the list. If the list is empty, the new node will become the head of the list. Otherwise, it will be appended to the current last node in the list. Let’s see how this works in practice:
    def insertAtEnd(self, new_data):
        new_node = Node(new_data)
        if self.head is None:
            self.head = new_node
            return
        last = self.head
        while last.next:
            last = last.next
        last.next = new_node
The above method starts by creating a new node. It then checks if the list is empty, and if so, the new node is assigned as the head of that list. Otherwise, it traverses the list to find the last node and sets the pointer of this node to the new node.
We now need to include this method in our LinkedList class and use it to add a word to the end of our list. To accomplish this, amend your main function to look like this:
if __name__ == '__main__':
    llist = LinkedList()

    # Insert words at the beginning
    llist.insertAtBeginning('fox')
    llist.insertAtBeginning('brown')
    llist.insertAtBeginning('quick')
    llist.insertAtBeginning('the')

    # Insert a word at the end
    llist.insertAtEnd('jumps')

    # Print the list
    llist.printList()
Notice that we have simply called the insertAtEnd method to print the word “jumps” at the end of the list. The above code should render the following output:
"the quick brown fox jumps"
Deleting the first node of a linked list is easy since it simply involves pointing the head of this list to the second node. This way, the first node will no longer be a part of the list. To accomplish this, include the following method in the LinkedList class:
def deleteFromBeginning(self):
    if self.head is None:
        return "The list is empty" # If the list is empty, return this string
self.head = self.head.next # Otherwise, remove the head by making the next node the new headTo delete the last node of a linked list, we must traverse the list to find the second-last node and change its next pointer to None. This way, the last node will no longer be a part of the list. Copy and paste the following method into your LinkedList class to accomplish this:
def deleteFromEnd(self):
    if self.head is None:
        return "The list is empty"
    if self.head.next is None:
        self.head = None  # If there's only one node, remove the head by making it None
        return
    temp = self.head
    while temp.next.next:  # Otherwise, go to the second-last node
        temp = temp.next
    temp.next = None  # Remove the last node by setting the next pointer of the second-last node to None
The above method first checks if the linked list is empty, returning a message to the user if it is. Otherwise, if the list contains a single node, that node is removed. For lists with multiple nodes, the method locates the second-last node, and its next node reference is updated to None.
Let’s now update the main function to delete elements from the start and end of the linked list:
if __name__ == '__main__':
    llist = LinkedList()

    # Insert words at the beginning
    llist.insertAtBeginning('fox')
    llist.insertAtBeginning('brown')
    llist.insertAtBeginning('quick')
    llist.insertAtBeginning('the')

    # Insert a word at the end
    llist.insertAtEnd('jumps')

    # Print the list before deletion
    print("List before deletion:")
    llist.printList()

    # Deleting nodes from the beginning and end
    llist.deleteFromBeginning()
    llist.deleteFromEnd()

    # Print the list after deletion
    print("List after deletion:")
    llist.printList()
The above code will print the list before and after deletion, showcasing how the insert and delete operations work in linked lists. You should see the following output after running this code:
List before deletion:
the quick brown fox jumps
List after deletion:
quick brown foxThe final operation we will learn in this chapter is the retrieval of a specific value in the linked list. To accomplish this, the method should start at the head of the list and iterate through each node, checking if the node’s data matches the search value. Here is a practical implementation of this operation:
def search(self, value):
    current = self.head  # Start with the head of the list
    position = 0  # Counter to keep track of the position
    while current: # Traverse the list
        if current.data == value: # Compare the list's data to the search value
            return f"Value '{value}' found at position {position}" # Print the value if a match is found
        current = current.next
        position += 1
    return f"Value '{value}' not found in the list"
To find specific values in the linked list we’ve created, update your main function to include the search method we’ve just created:
if __name__ == '__main__':
    llist = LinkedList()

    # Insert words at the beginning
    llist.insertAtBeginning('fox')
    llist.insertAtBeginning('brown')
    llist.insertAtBeginning('quick')
    llist.insertAtBeginning('the')

    # Insert a word at the end
    llist.insertAtEnd('jumps')

   # Print the list before deletion
    print("List before deletion:")
    llist.printList()

    # Deleting nodes from beginning and end
    llist.deleteFromBeginning()
    llist.deleteFromEnd()

    # Print the list after deletion
    print("List after deletion:")
    llist.printList()

        # Search for 'quick' and 'lazy' in the list
    print(llist.search('quick'))  # Expected to find
    print(llist.search('lazy'))   # Expected not to find
The above code will render the following output:
List before deletion:
the quick brown fox jumps
List after deletion:
quick brown fox
Value 'quick' found at position 0
Value 'lazy' not found in the list
The word “quick” has been successfully located within the linked list since it exists in the first position of the list. However, the word “lazy” isn’t part of the list, which is why it hasn’t been found.
If you’ve made it this far, congratulations! You now have a solid understanding of the basic principles of linked lists, including their structure, types, how to add and remove elements, and how to traverse them.
But the journey doesn’t stop here. Linked lists are just the beginning of the world of data structures and algorithms. Here are some potential next steps for you to deepen your understanding of the subject:
Dive into the practical applications of linked lists by integrating them into a coding or data science project. Linked lists are used to develop file systems, construct hash tables, and even create GPS navigation systems and board games. To get started with your own projects, check out our free guided data science projects that teach you how to solve real-world problems in Python, R, and SQL.
Learning other data structures, such as trees, stacks, and queues, is a natural progression from understanding linked lists. These structures build upon the principles of linked lists, helping you solve a wider range of computational problems efficiently. Trees and binary search trees, for instance, extend the concept of linked lists into a hierarchical form, allowing each node to connect to multiple elements in the data structure.
If these concepts sound unfamiliar to you, don’t fret! Datacamp has an entire course on data structures and algorithms in Python that will take you through these concepts in greater detail. You will first learn about data structures such as stacks, trees, hash tables, queues, and graphs. As you progress through the course, you will gain an understanding of searching and sorting algorithms, which will help you become a more efficient programmer and problem-solver.
We have implemented singly-linked lists in this tutorial, covering operations like insertion, deletion, and traversal.
You can take this knowledge a step further by learning the implementation of doubly and circular linked lists. Skip lists are another extension of linked lists that allow for faster search operations by facilitating quicker access to elements.
Learning about these advanced data structures will take your technical skills to the next level and dramatically improve your programming capabilities, preparing you for more complex challenges in fields like data science, software development, and machine learning engineering.
If you’d like a more beginner-friendly introduction to programming prior to tackling these advanced topics, explore our Python Programmer career track. It offers a series of courses which will teach you the fundamentals of the language.
Keep Learning Python!
Track
Track
Course
Tutorial
Bex Tuychiev
Tutorial
Abid Ali Awan
Tutorial
Sejal Jaiswal
Tutorial
Sejal Jaiswal
Tutorial
Sejal Jaiswal
Tutorial
DataCamp Team