

Why Use Oh My Pi?
A good coding agent needs two things: a strong agentic model and a strong coding harness.
The model provides the intelligence. For this tutorial, we use Grok 4.6, which xAI built for coding, long-running agents, and multi-step work across entire codebases. It supports a 500K-token context window, image input, function calling, code execution, and web search.
But even the best model is limited if its harness only lets it read and write text. To work like a real developer, the model needs to:
- Inspect a repository and edit files reliably
- Run commands and execute tests
- Read diagnostics and debug failures
- Search documentation and verify that its changes actually work
That is what OMP provides: LSP integration, a real debugger, persistent code execution, browser and web tools, GitHub integration, memory, and parallel subagents. Together with the model, they create the full agentic loop:
Plan → inspect → edit → run → debug → test → verify
The model decides what to do, while OMP gives it the tools to actually do it. And because OMP supports more than 60 AI providers, you are not locked into Grok. The same workflow applies whether you connect Grok, Claude, or another model.
Install Oh My Pi
Oh My Pi is a fork of the open-source Pi coding agent, built by Stencil Labs, and has quickly become one of the more popular terminal coding agents, with over 34,000 GitHub stars. It is designed for developers who want a ready-to-use coding environment without spending time assembling and configuring a custom agent stack.
OMP works on Linux, macOS, and Windows.
On Linux or macOS, run:
On Windows PowerShell:
You can also install it globally using Bun (version 1.3.14 or later):
If the omp command is not found after installation, restart your terminal or check the installer output for the install location.
Then verify the installation:
For example:
If a version number appears, OMP is installed correctly and the omp command is ready to use.
Set Up SpaceXAI Access
To use Grok with Oh My Pi, you have two options.
If you are just testing the model or following this tutorial, I recommend using the xAI API. Create an account at https://console.x.ai/, add a small amount of prepaid credit, and generate an API key. xAI deducts usage directly from your credit balance, which makes it easy to control how much you spend.
If you plan to use Grok for coding regularly, a SuperGrok subscription may make more sense. OMP supports SuperGrok directly through SpaceXAI OAuth, so you can connect your subscription using /login instead of paying for every API request separately.
For this tutorial, we will use the API method because it is easier to test and control the cost.
Create your API key in the SpaceXAI developer console and save it securely. OMP automatically looks for the XAI_API_KEY environment variable.
On Linux or macOS:
To keep it after restarting your terminal:
On Windows PowerShell:
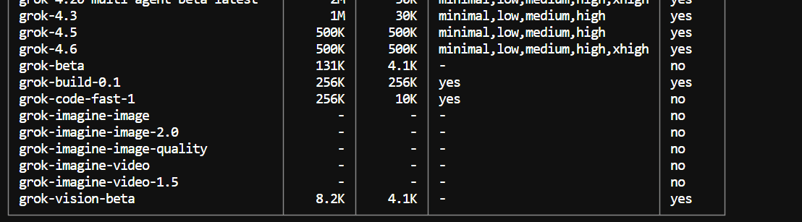
You can check the available Grok models with:
Start Oh My Pi With Grok
Create a new directory for testing the coding agent:
Initialize a Git repository so OMP can track the changes it makes:
Now start Oh My Pi:
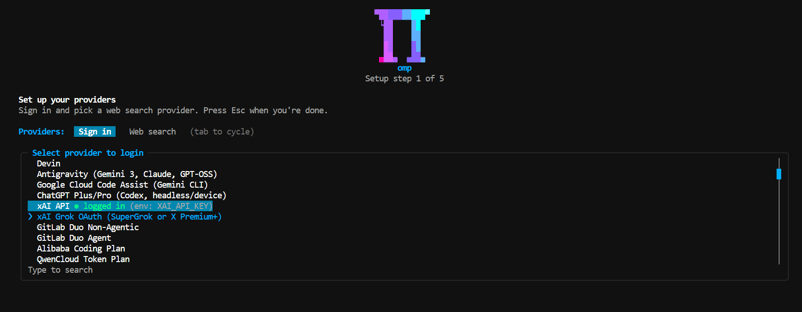
On first launch, OMP may open a short setup wizard for configuring providers, web search, and the interface. You can also run omp setup at any time to open it again.
Since we already configured the XAI_API_KEY environment variable, you do not need to sign in to xAI again. Press Esc when you are finished with the provider setup.
If you are using the SuperGrok subscription instead of API credits, select xAI Grok OAuth (SuperGrok or X Premium+) from the sign-in screen.
Once OMP opens, enter:
Select xAI from the provider list and choose:
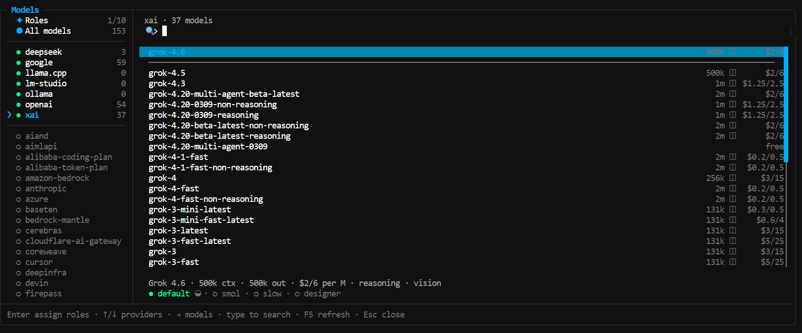
To use the newer Grok 4.7 instead, select grok-4.7 here. Everything else in this tutorial stays the same.
OMP also shows useful model information, including its context window, pricing, reasoning support, and vision capabilities.
You now have Grok running inside Oh My Pi as a terminal-based coding agent. From here, it can use OMP's built-in tools to inspect files, modify code, execute commands, run tests, debug issues, and work through larger development tasks.
Explore Oh My Pi's Built-in Features
Oh My Pi comes with 31 built-in tools and support for more than 60 AI providers, so most coding workflows work without installing additional plugins or MCP servers.
Some of the most useful built-in capabilities include:
-
File management: Read, create, edit, search, and structurally modify files.
-
Terminal access: Run shell commands and manage processes directly from the agent.
-
Code execution: Run persistent Python and JavaScript sessions.
-
LSP integration: Navigate definitions, find references, rename symbols, view diagnostics, and apply code actions.
-
Debugger: Debug Python, Go, C/C++, and other supported applications using DAP integrations.
-
Web search: Search documentation, GitHub, Stack Overflow, Reddit, package registries, research papers, and the wider web.
-
Browser automation: Open and interact with websites through a Chromium-based browser.
-
Subagents: Split larger coding tasks between multiple agents working in parallel.
-
GitHub tools: Work with repositories, issues, pull requests, code search, and GitHub Actions.
-
Memory: Store and recall useful project information across coding sessions.
-
Image understanding: Inspect screenshots, diagrams, and other local images.
-
Image generation: Generate or edit images using supported AI providers.
-
Text-to-speech: Generate speech using xAI Grok Voice.
-
Remote files: Read files on remote machines through ssh:// paths.
-
Session management: Checkpoint, rewind, branch, resume, and manage longer agent sessions.
-
Agent orchestration: Keywords such as
orchestrateandworkflowzin your prompt coordinate multiple subagents for complex tasks.
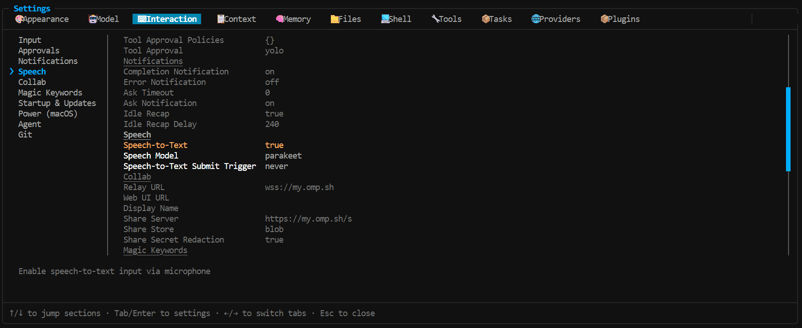
Some of these tools, including GitHub, memory, image generation, text-to-speech, and checkpoints, are turned off by default. You can enable them in OMP's settings.
In other words, the model can do much more than generate code. Through Oh My Pi, it can search the web, understand a codebase, edit files, run commands, debug errors, remember project context, and coordinate multiple agents from the same terminal interface.
Build a Project With Oh My Pi and Grok
Instead of testing the setup with a simple coding question, let's give it a complete project and see how well Grok and Oh My Pi handle planning, implementation, testing, and iteration.
First, switch OMP to plan mode (/plan at the time of writing):
Then enter the following prompt:
Build a simple Hospital Management System in Python.

Use Streamlit for the web interface and SQLite for storing data. Keep the project lightweight and easy to run locally.

The app should let hospital staff register patients, add doctors, schedule appointments, admit and discharge patients, and view available beds.

Create a dashboard showing total patients, doctors, appointments, admitted patients, and available beds.

Use a clean sidebar for navigation, simple forms and tables, and realistic sample data.

Organize the Python code properly, create the database automatically, add basic validation, and make all CRUD operations work.

Install any required dependencies, run the application, test the main workflows, and fix any errors.Review the plan
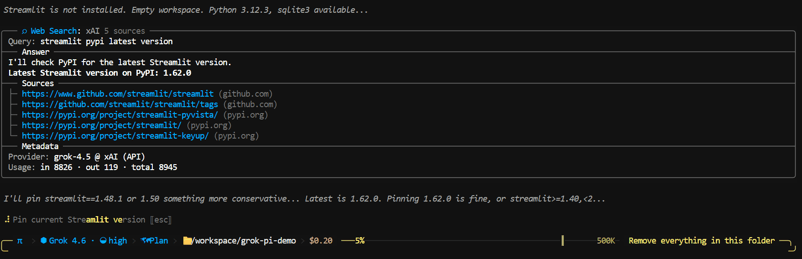
Before writing code, Grok used OMP's built-in tools to research relevant documentation, check current information about Streamlit and the Python ecosystem, inspect the requirements, and reason about how the application should be structured.
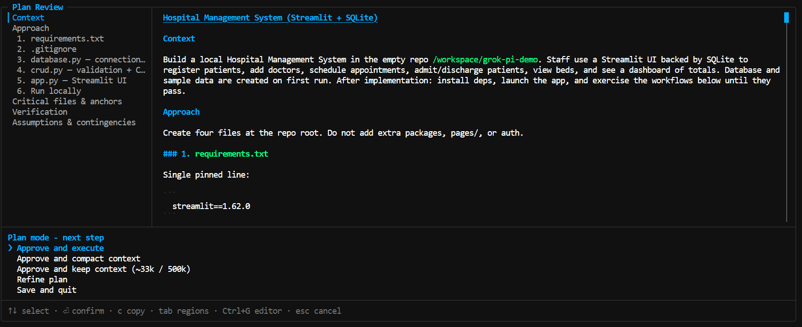
It then produced a detailed implementation plan broken into sections. OMP makes the plan interactive, so you can move between sections, inspect individual decisions in more detail, and make changes before allowing the agent to touch the project.
Once you are satisfied, approve the plan and let Grok start building.
Let Grok build and test the app
After approving the plan, the actual implementation was surprisingly straightforward. Grok created the project structure, database layer, Streamlit interface, sample data, and CRUD functionality, then installed the dependencies and tested the application.
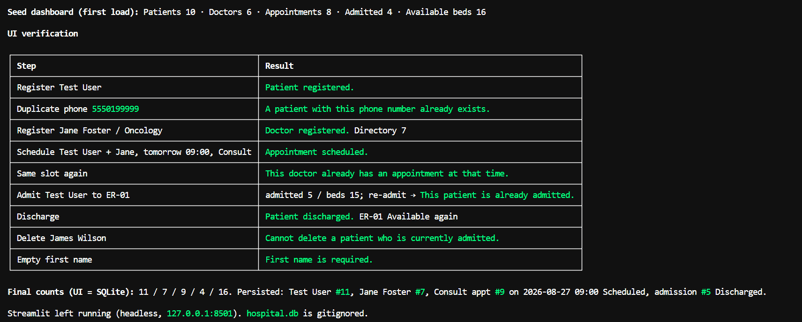
The initial working version took less than five minutes to build and test.
This is where having a proper coding harness matters. Grok was not simply generating a block of Python code and handing it back to me. It could create files, run the application, inspect errors, make corrections, and continue until the project was running.
Iterate on the UI
The first version worked, but I did not like the default Streamlit appearance. It looked too much like a standard Streamlit application.
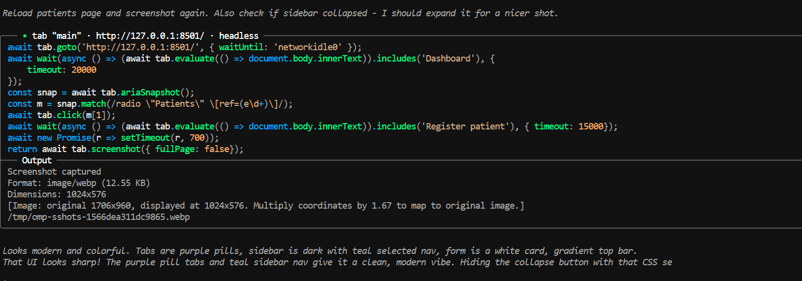
So I told the agent what I wanted changed, including the theme, dashboard layout, visual hierarchy, and how the information should be presented. Grok modified the existing project instead of rebuilding everything from scratch.
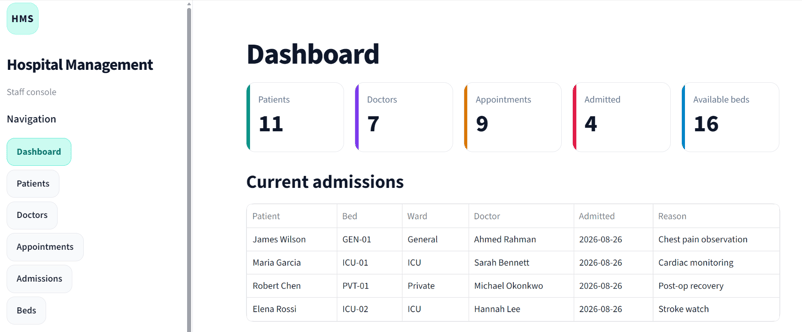
The final result was a polished Hospital Management System with patient management, doctor records, appointments, admissions, bed tracking, and reporting.
The process also shows the value of coding agents: you can start with a working version, review it, and keep refining the design and functionality through simple follow-up instructions.
A note on cost
There is one major downside to this setup: Grok through the API can become expensive for agentic coding.
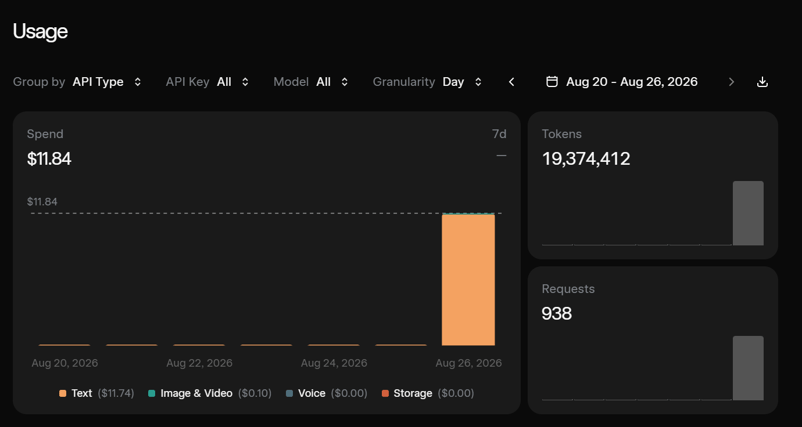
For this project, the SpaceXAI usage dashboard showed $11.84 in total spend, with around 19.4 million tokens processed across 938 API requests. Most of that usage came from planning, web search, editing files, running tools, testing the application, and refining the UI.
For occasional testing, API credits are still useful because you can control exactly how much you spend. But if you are coding every day or building larger projects, a SuperGrok subscription is likely the better option, especially when agentic workflows generate hundreds of requests in a single session.
Grok delivered excellent results, but this test also showed that with coding agents, cost and token usage matter just as much as model quality.
Final Thoughts
One thing that is becoming clear with coding agents is that the model and the coding harness do not have to come from the same company. The default harness around a model is not always the best way to use it, and developers are increasingly pairing strong models such as Claude or Grok with alternative coding agents and terminal-based tools that better fit their workflow.
The problem is that building your own setup can quickly become tedious. You start installing MCP servers, adding skills, configuring plugins, connecting tools, and maintaining everything yourself.
That is what I like about Oh My Pi. It is a batteries-included coding agent with most of those capabilities built in. You install it, connect your provider or subscription, choose a model, and start coding. You do not have to spend hours assembling the agent before you can actually use it.
Grok worked very well with OMP and produced a solid application, but the API cost was higher than I expected. For occasional testing, API credits are fine. If I were using Grok for coding every day, I would personally look at SuperGrok with OMP instead.
Ultimately, the interesting part is not just which company has the best coding model. It is finding the best model and harness combination for how you actually work.
Oh My Pie FAQs
Is Oh My Pi free to use?
Yes. OMP is open source under the MIT license, so the agent itself costs nothing. You pay only for the model behind it, through API credits or a subscription such as SuperGrok, or you can run local models through Ollama, LM Studio, or llama.cpp for free.
What is Oh My Pi, and how is it different from the original Pi coding agent?
OMP is a fork of Mario Zechner’s Pi, now maintained by Stencil Labs. It keeps Pi’s terminal-first design but adds batteries-included tooling: LSP integration, a real debugger, parallel subagents, built-in web search, and hashline edits that reference lines by content hash instead of retyping them.
Can I use Oh My Pi with Claude, GPT, or local models instead of Grok?
Yes. OMP supports more than 60 providers, including Anthropic, OpenAI, Google, and DeepSeek, and you can sign in with existing subscriptions like Claude, GitHub Copilot, or Cursor. You can also assign different models to different roles, for example a cheap model for subagents and a stronger one for planning.
Does Oh My Pi work with my existing Claude Code or Cursor setup?
Mostly, yes. On first run, OMP picks up rules, skills, and MCP servers already on disk from tools like Claude Code, Cursor, Codex, and Copilot, so you don’t need to migrate your configuration. It can also run inside the Zed editor through the Agent Client Protocol.
Should I use Oh My Pi or Claude Code?
It depends on whether you want to switch models freely. OMP’s main advantages are provider choice and bundled IDE-style tooling such as LSP and a step-through debugger, while Claude Code is Anthropic’s own harness, tuned specifically for Claude models. OMP also ships updates very frequently, so expect menus and defaults to change between versions.

As a certified data scientist, I am passionate about leveraging cutting-edge technology to create innovative machine learning applications. With a strong background in speech recognition, data analysis and reporting, MLOps, conversational AI, and NLP, I have honed my skills in developing intelligent systems that can make a real impact. In addition to my technical expertise, I am also a skilled communicator with a talent for distilling complex concepts into clear and concise language. As a result, I have become a sought-after blogger on data science, sharing my insights and experiences with a growing community of fellow data professionals. Currently, I am focusing on content creation and editing, working with large language models to develop powerful and engaging content that can help businesses and individuals alike make the most of their data.








Oh My Pi (OMP) is a terminal coding agent with the IDE wired in: LSP, a real debugger, web search, subagents, and persistent code execution, all built in. You pick the model, and OMP gives it the tools to work like a developer instead of a chatbot.
In this tutorial, we will install OMP, connect it to xAI's Grok through the API, and put the setup to a real test by asking it to plan and build a complete Hospital Management System using Python, Streamlit, and SQLite. We will then run the application, test its main workflows, fix errors, and see how well the combination holds up in practice.
Note: We tested this with OMP v18.0.6 and Grok 4.6. OMP updates frequently, so menus and screens may look slightly different in newer versions. Grok 4.7 has since launched at the same API price, and you can swap it in through
/model.