Track
AI Agent Fundamentals
6 hr
To get started, you’ll need a SpaceXAI API key and install the xai-sdk.
To create a Grok 4.6 API key, we navigate to the SpaceX AI console API key creation page. Next, we click the Create API Key button in the top-right corner.
The API key creation form is straightforward. We give the key a name to recognize which project it belongs to. I also recommend always setting an expiration date for API keys as a failsafe in case they get compromised.
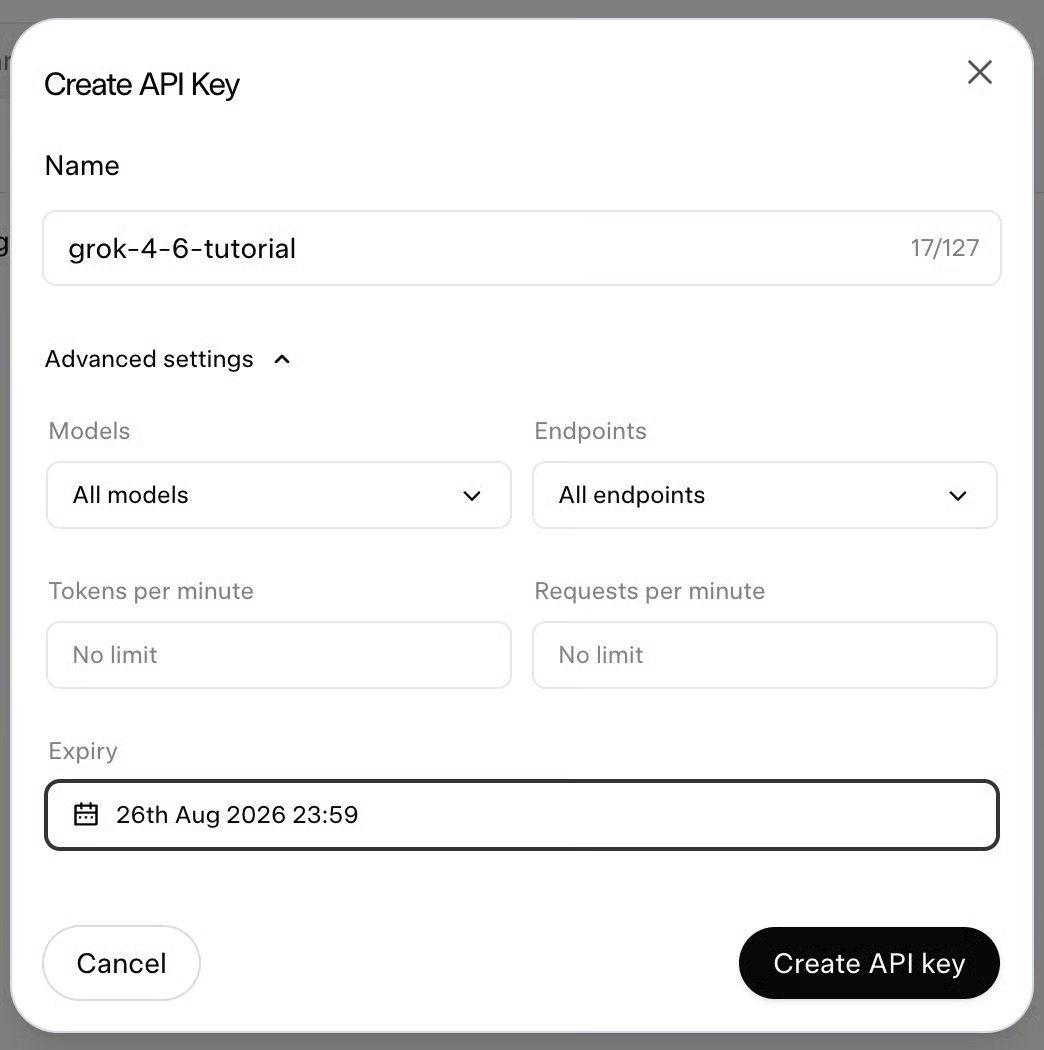
Once the key is generated, we copy it and paste it into a file named .env that we create in the same folder where we’ll write our Python scripts. Doing so makes it easy to load the key in our script without it having to live in the code file, which would easily lead us to accidentally expose the key when sharing or uploading the code to the cloud.
The .env file should have the following content:
XAI_API_KEY=replace_with_the_api_keyTo connect to SpaceXAI with the API key, we use the xai-sdk package. It’s good practice to create a separate environment for each project to prevent Python packages from conflicting with those in other projects we might have. To do so, we’ll use Anaconda with the following command:
conda create -yn grok-46 python=3.10
```
This creates an environment named grok-46 that we can activate using:
```bash
conda activate grok-46
Once active, we can install the packages we want. For now, let’s start with:
xai-sdk: The official SpaceXAI package used to make requests to their API.
python-dotenv: A utility package that makes it easy to load the API key from the .env file.
To install them, we use the command:
pip install xai-sdk python-dotenvHere’s how we can load the API key and create a SpaceXAI Client in Python:
from dotenv import load_dotenv
from xai_sdk import Client

load_dotenv()

client = Client()
Note that this code doesn’t make a request yet. We learn how to do that next.
To use the Grok 4.6 API, we also need to buy credits on their API platform. Without these, the API requests will be rejected. To do so, go to Credits at the bottom of the sidebar, click on Add credits, and add your preferred amount.
Requests to Grok 4.6 are billed per token. The base pricing is $2 per million input tokens and $6 per million output tokens.
| Usage | Price |
|---|---|
| Input tokens | $2 / 1M tokens |
| Output tokens (includes reasoning tokens) | $6 / 1M tokens |
| Cached input tokens | $0.50 / 1M tokens |
| Server-side tools (web search, X search, code execution) | $5 / 1,000 calls |
| Prompts above 200K tokens | 2× the standard token rate |
It is important to note that Grok 4.6 is a reasoning model. The reasoning is done as a self-dialog and also consumes tokens, which are billed as output tokens. We will learn later how to control the amount of reasoning the model performs for a given request.
Cached tokens are much cheaper, costing only $0.5 per million tokens.
As we’ll learn, Grok has three built-in tools that are billed separately from the tokens: web search, X search, and code execution. All of these are priced at $5.00 per 1,000 calls.
For long contexts, it is worth noting that all tokens in prompts exceeding the 200K threshold are billed at double the rate.
Let’s build on the previous code to use the SpaceXAI client to send a request to Grok 4.6.
To send a request to Grok 4.6, we initialize a chat session targeting grok-4.6 with client.chat.create() and add our prompt to the conversation history using chat.append(user()).
Finally, calling chat.sample() sends the conversation to the model to generate a response, which we display by printing response.content.
from dotenv import load_dotenv
from xai_sdk import Client
from xai_sdk.chat import user

load_dotenv()

client = Client()

chat = client.chat.create(model="grok-4.6")
chat.append(user("Explain how the Transformer attention mechanism works using a simple analogy."))

response = chat.sample()
print(response.content)
When using Grok like this, we get the response all at once, so we need to wait until Grok finishes generating the entire response before we get anything. We can get a word-by-word reply using streaming.
Instead of waiting for the complete response with chat.sample(), we can use chat.stream() to receive the model’s output in real time.
# … Same code as before

chat.append(user("Explain how the Transformer attention mechanism works using a simple analogy."))

for response, chunk in chat.stream():
    print(chunk.content, end="", flush=True)

print()
This code iterates over the stream, yielding incremental chunk objects and printing each new piece of text (chunk.content) to the console as soon as it arrives, creating a responsive token-by-token streaming experience.
When executing this code, we notice that it still takes the model some time to start producing tokens. The reason is that Grok 4.6 is a reasoning model. By default, before it generates the first visible word of the final answer, the model goes through an internal "chain-of-thought" reasoning phase.
We can update the code above to also display the model’s reasoning process, like so:
# … Same code as before

chat.append(user("Explain how the Transformer attention mechanism works using a simple analogy."))

print("--- Reasoning ---")
is_first_content = True

for response, chunk in chat.stream():
    if chunk.reasoning_content:
        print(chunk.reasoning_content, end="", flush=True)
    if chunk.content:
        if is_first_content:
            print("\n\n--- Response ---")
            is_first_content = False
        print(chunk.content, end="", flush=True)

print()
The Grok 4.6 stream following this snippet delivers two types of tokens:
This script distinguishes between the two by checking chunk.reasoning_content to stream Grok’s step-by-step thinking process first, and then printing chunk.content once the final response begins.
As we saw above, like other frontier AI models, Grok 4.6 relies on a hidden chain of thought. Before it outputs a single word of its final answer, it generates thousands of reasoning tokens to explore solutions, double-check logic, and correct its own mistakes.
The reasoning_effort parameter allows us to control how much effort the model puts into this reasoning process. Because we also pay for the reasoning tokens, not just the final answer, this is an important parameter to manage if we want to reduce costs.
Grok 3 mini already let developers tune reasoning_effort, but Grok 4 removed that control. Its reasoning was always on and couldn't be adjusted. SpaceXAI reintroduced the control across the Grok 4.x line (4.3 and 4.5), and Grok 4.6 supports it too, with low, medium, high (the default), and xhigh.
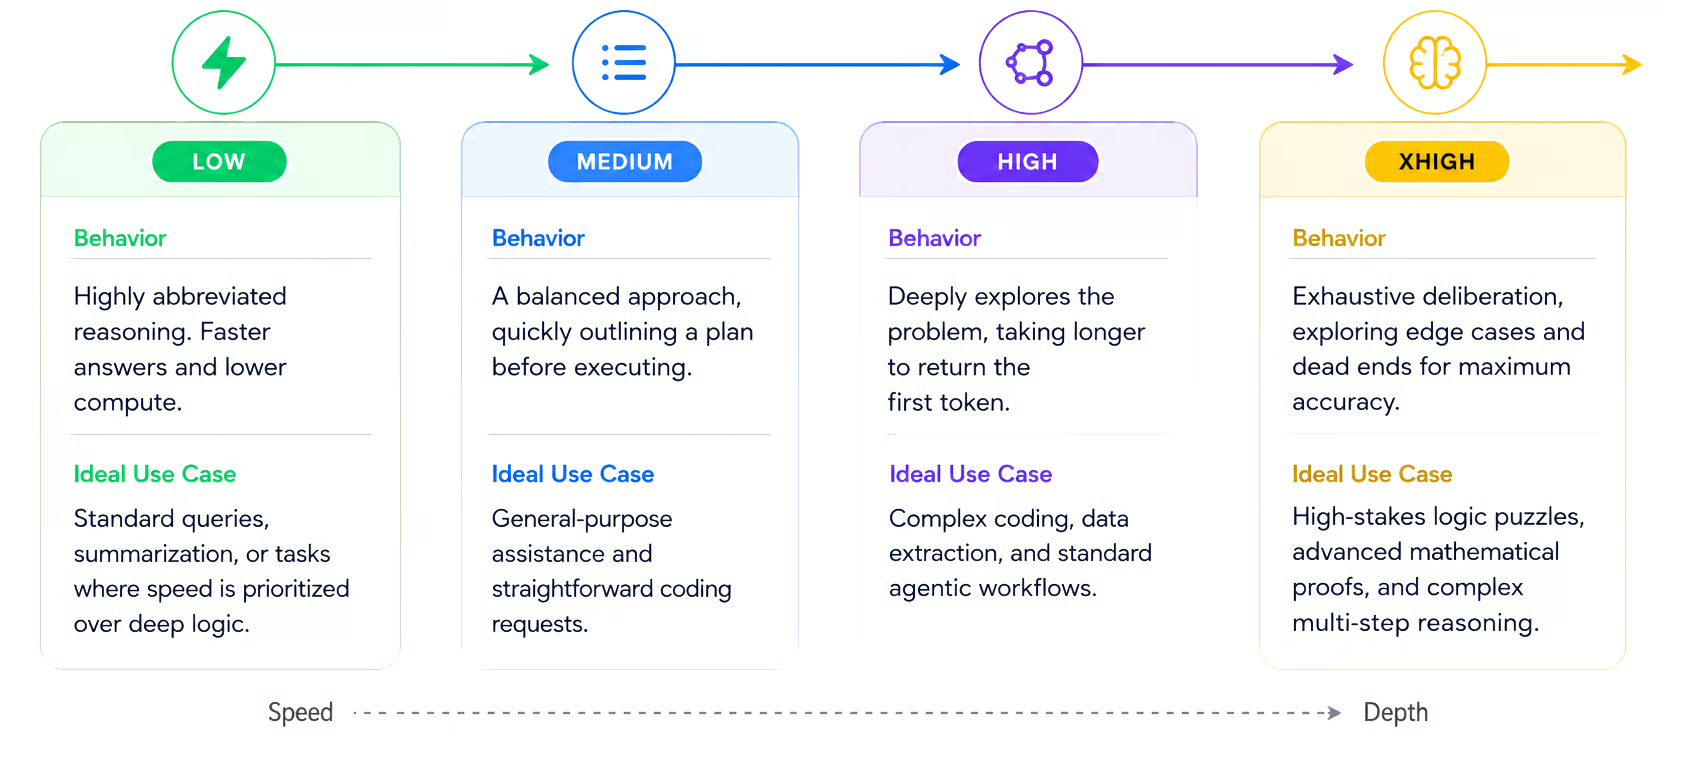
To set the reasoning effort, we use the reasoning_effort parameter when initializing the chat with client.chat.create(). The value is a string with the effort we want. The default value is "high". Here’s an example of how we can set it to "low":
chat = client.chat.create(
    model="grok-4.6",
    reasoning_effort="low"
)I’ve tried many tasks using both the low and high reasoning, such as building a small game, creating a script to analyze payroll data with multiple badly formatted currency formats, and solving logic puzzles.
In all these cases, the model was able to provide similar solutions with either low or high reasoning.
To make a difference, we need a task where stopping mid-reasoning fails. So I turned to a puzzle with many solutions. Here’s the prompt I used:
Solve the following alphametic puzzle, in which each letter represents a unique digit from 0 to 9. The leading digits cannot be zero.

GROK + DATA = CAMP

Provide a list of all solutions. For each solution, show a single line with the final addition to prove it works.
At both levels of reasoning, Grok 4.6 found correct solutions. However, when it was set to low, its reasoning budget ran out before it could complete the task. Therefore, it responded with an incomplete solution. With a high level of reasoning, Grok 4.6 found all 264 solutions.
For comparison, with low reasoning, it used 16,422 reasoning tokens, while it used 56,455 with high reasoning.
If the high setting can successfully brute-force complex logic puzzles and data-parsing scripts, why would anyone pay for xhigh's massive token consumption?
I believe that for 99% of daily programming and data science tasks, xhigh is overkill that will simply burn through your API budget.
However, xhigh becomes indispensable when you shift from asking the model to act as a coding assistant to asking it to act as an autonomous agent. You are essentially paying for the model to aggressively review its own work, hit dead ends, and rewrite its logic before ever showing you the final output.
My advice would be to start with low and only increase it if the model is systematically failing at a task. It’s true that in some cases this means we’ll pay multiple times for the same problem, but most of the time we’ll get away with a good solution, paying only a fraction of the cost.
Grok 4.6 is multimodal and, as such, can handle image data.
The easiest way to provide an image to the model is by using a URL. We can provide it as a second argument to the user message:
from dotenv import load_dotenv
from xai_sdk import Client
from xai_sdk.chat import image, user

load_dotenv()
client = Client()

chat = client.chat.create(model="grok-4.6")

image_url = "https://images.pexels.com/photos/25810993/pexels-photo-25810993.jpeg"

chat.append(
    user(
        "Describe what you see in this image in detail.",
        image(image_url=image_url),
    )
)

for response, chunk in chat.stream():
    print(chunk.content, end="", flush=True)

print()Often, we want to use local images rather than URLs. This can be done by loading the image as a base64 string. The function encode_image() can do that for us:
import base64
import mimetypes

def encode_image(image_path: str) -> str:
    mime_type, _ = mimetypes.guess_type(image_path)
    if not mime_type:
        mime_type = "image/jpeg"
    with open(image_path, "rb") as image_file:
        encoded_string = base64.b64encode(image_file.read()).decode("utf-8")
    return f"data:{mime_type};base64,{encoded_string}"
Once the image is encoded, we provide it to the model in the same way:
chat.append(
    user(
        "Describe what you see in this image in detail.",
        image(image_url=encode_image("image.png")),
    )
)
Despite supporting image input, Grok 4.6 only outputs text. If you want to learn more about SpaceXAI image generation, I recommend reading our Grok Imagine API tutorial.
Grok 4.6 provides access to three useful server-side tools and offers the possibility to create custom tools.
Grok 4.6 comes equipped with three server tools:
These tools run on SpaceXAI servers, and each tool call is billed independently of the tokens.
To enable these, we need to import them and provide them when we instantiate the chat with client.chat.create():
from xai_sdk.tools import code_execution, web_search, x_search
chat = client.chat.create(
    model="grok-4.6",
    tools=[web_search(), x_search(), code_execution()],
)
When streaming the responses, we can know whether the agent is using a tool by checking the chunk.tool_calls flag.
Here’s a snippet on how to process the streaming response in a way that shows the user when the agent is using a tool:
for response, chunk in chat.stream():
    for tool_call in chunk.tool_calls:
        print(f"\n--> Agent is calling tool: {tool_call.function.name}\n", flush=True)
    if chunk.content:
        print(chunk.content, end="", flush=True)
A full example script with server tools can be found in my accompanying GitHub repo.
On top of the above server tools, we can also equip our Grok 4.6 agent with custom tools. Let’s see how we can implement tools that allow the agent to read and write to local files.
To implement a custom tool, we need two things:
A tool specification using the official tool() object from the SpaceXAI SDK.
A Python implementation of the tool, in other words, the code we want to execute when the tool is called.
A tool specification consists of:
Below is a function we can use to implement a tool that reads local files:
def execute_read_file(file_path: str) -> str:
    print(f"\n🔒 [Permission Request] Grok wants to read local file: '{file_path}'")
    confirm = input("Allow access? [y/N]: ").strip().lower()
    if confirm not in ("y", "yes"):
        print(f"❌ Denied access to '{file_path}'")
        return f"Permission denied by user. Access to file '{file_path}' was not granted."

    if not os.path.exists(file_path):
        return f"Error: File '{file_path}' does not exist."

    try:
        with open(file_path, "r", encoding="utf-8") as f:
            content = f.read()
        print(f"✅ Read {len(content)} characters from '{file_path}'\n")
        return content
    except Exception as e:
        return f"Error reading file '{file_path}': {e}"
For safety reasons, we implemented the tool to always ask the user for permission before reading a file. This prevents accidentally providing private data to the agent.
Here’s the tool specification for this function:
from xai_sdk.chat import tool
read_file_tool = tool(
    name="read_local_file",
    description="Reads the text contents of a local file given its relative or absolute path. Use this whenever the user asks to inspect, summarize, or analyze a local file.",
    parameters={
        "type": "object",
        "properties": {
            "file_path": {
                "type": "string",
                "description": "The path to the local file to read.",
            }
        },
        "required": ["file_path"],
    },
)
The code for writing to a file is similar and can be found in the tools.py file from the repository.
In this section, we put everything we’ve learned together to build a Grok 4.6 agentic loop where we can talk to an agent with the ability to perform actual work by acting on local files while grounding the answers with online data via search.
The agent will work as shown in the diagram below. The user sends in a prompt, then the agent replies using tools if needed. Then the answer is sent back to the user, and the user can continue interacting with the agent.
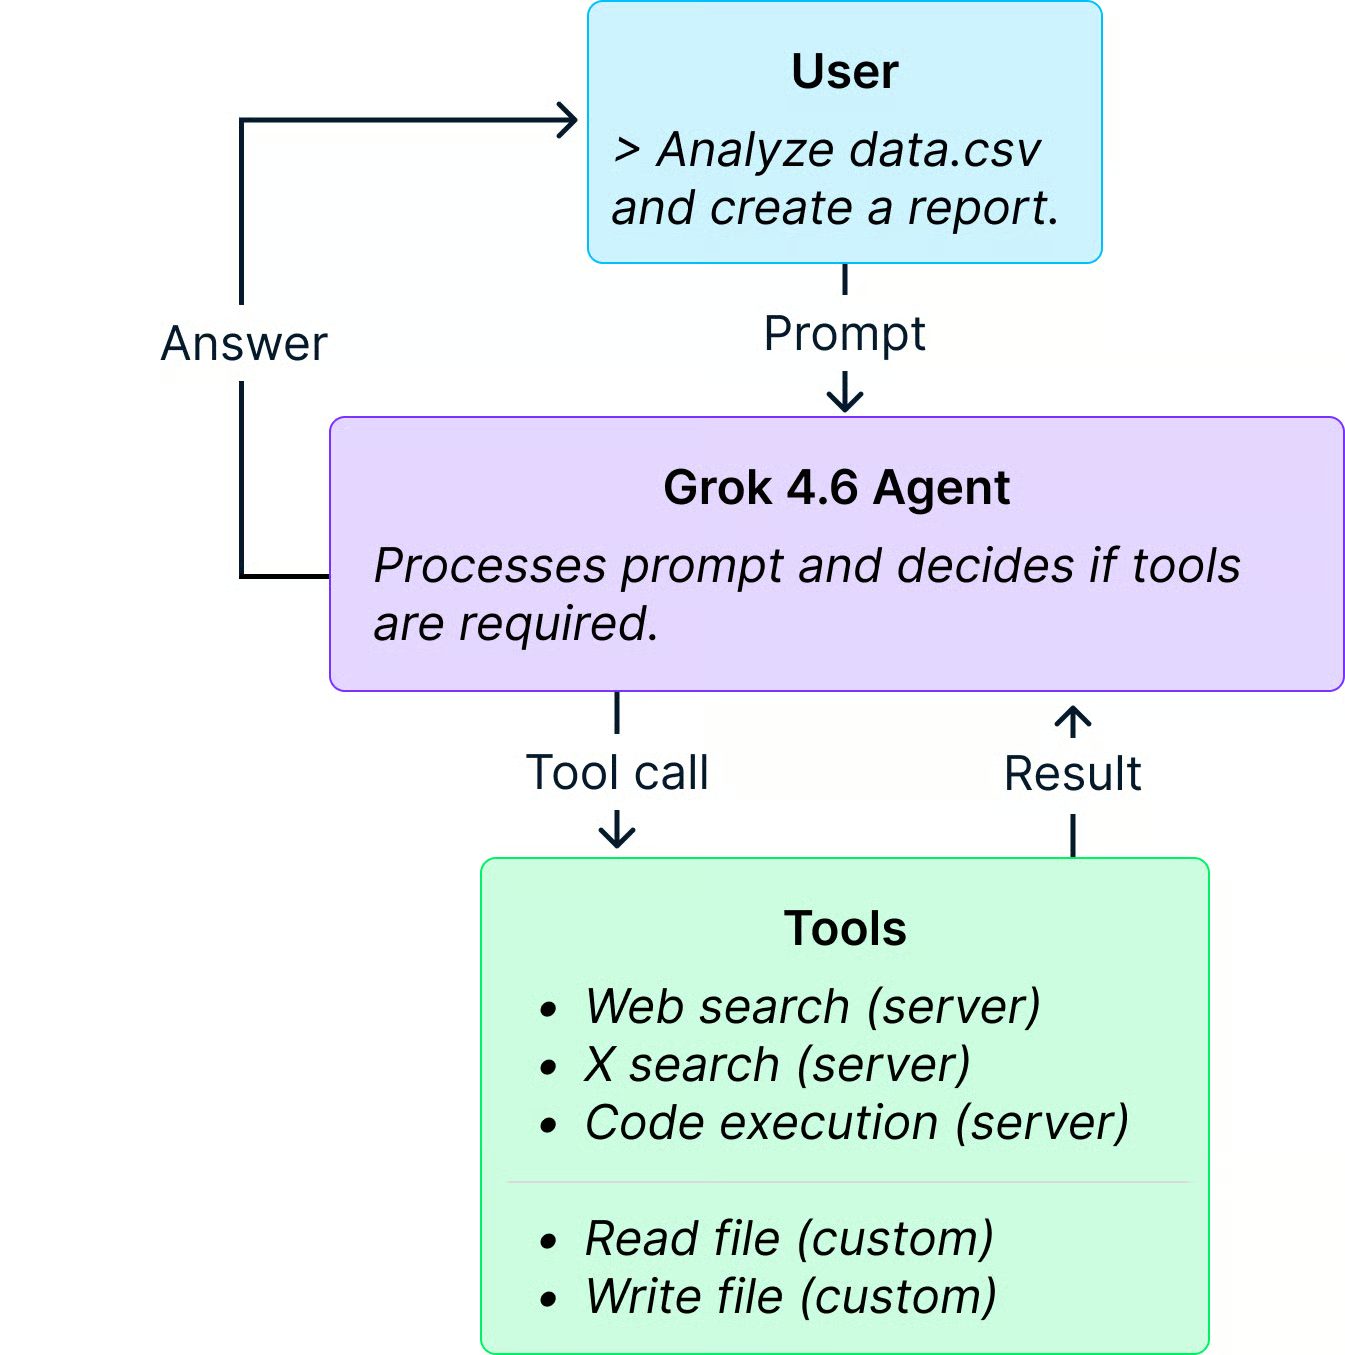
The agent keeps track of the whole conversation by using the chat.append() function to append user prompts, responses, and tool results. A tool result must be wrapped in an instance of tool_result().
Here’s the full agent implementation:
import json
from dotenv import load_dotenv
from xai_sdk import Client
from xai_sdk.chat import tool_result, user
from xai_sdk.tools import code_execution, web_search, x_search
from tools import (
    execute_read_file,
    execute_write_file,
    read_file_tool,
    write_file_tool,
)

load_dotenv()

# 1. Initialize the chat client with both server-side and client-side tools
client = Client()
chat = client.chat.create(
    model="grok-4.6",
    tools=[web_search(), x_search(), code_execution(), read_file_tool, write_file_tool],
)

# 2. Interactive chat loop
while True:
    try:
        prompt = input("> ")
    except (EOFError, KeyboardInterrupt):
        print()
        break

    if not prompt.strip():
        continue
    if prompt.strip().lower() in ("exit", "quit"):
        break

    # Append the user prompt to the conversation
    chat.append(user(prompt))

    # Agent loop: keeps running until Grok finishes (no further client tool calls)
    print("How can I help you?\n")
    while True:
        response = None
        announced_tools = set()
        started_content = False

        for response, chunk in chat.stream():
            # Announce tool calls
            if chunk.tool_calls:
                for tc in chunk.tool_calls:
                    name = getattr(tc.function, "name", "")
                    tc_id = getattr(tc, "id", None) or name
                    if tc_id and tc_id not in announced_tools:
                        announced_tools.add(tc_id)
                        display_name = name or "tool"
                        print(f"\n⚙️  [Agent Tool] Calling: {display_name}...", flush=True)

            # Stream generated content
            if chunk.content:
                if not started_content:
                    print("\nGrok > ", end="", flush=True)
                    started_content = True
                print(chunk.content, end="", flush=True)

        if response:
            chat.append(response)

        # Check if Grok triggered client-side tools
        client_tool_executed = False
        if response and response.tool_calls:
            for tool_call in response.tool_calls:
                fn_name = tool_call.function.name
                if fn_name == "read_local_file":
                    client_tool_executed = True
                    try:
                        args = json.loads(tool_call.function.arguments)
                        file_path = args.get("file_path", "")
                    except Exception:
                        file_path = tool_call.function.arguments or ""

                    result = execute_read_file(file_path)
                    chat.append(tool_result(result, tool_call_id=tool_call.id))

                elif fn_name == "write_local_file":
                    client_tool_executed = True
                    try:
                        args = json.loads(tool_call.function.arguments)
                        file_path = args.get("file_path", "")
                        content = args.get("content", "")
                    except Exception:
                        file_path = ""
                        content = ""

                    result = execute_write_file(file_path, content)
                    chat.append(tool_result(result, tool_call_id=tool_call.id))

        # If Grok called a client-side tool, re-enter the loop so Grok processes the tool result
        if client_tool_executed:
            continue

        break

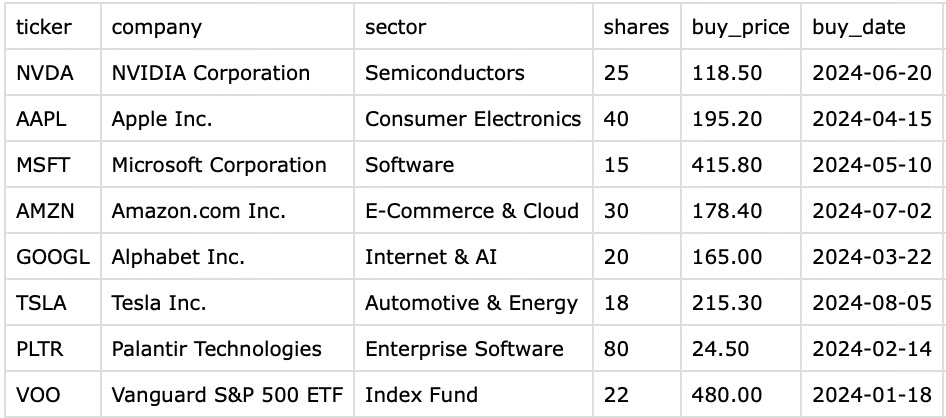
print("\n")To test the agent, I created a sample stock portfolio CSV file. The file is quite simple and lists stocks, showing in particular the purchase date and buy price.
The idea is to ask the agent to:
Below is a screenshot of the interaction with the Agent for steps 1 through 3.
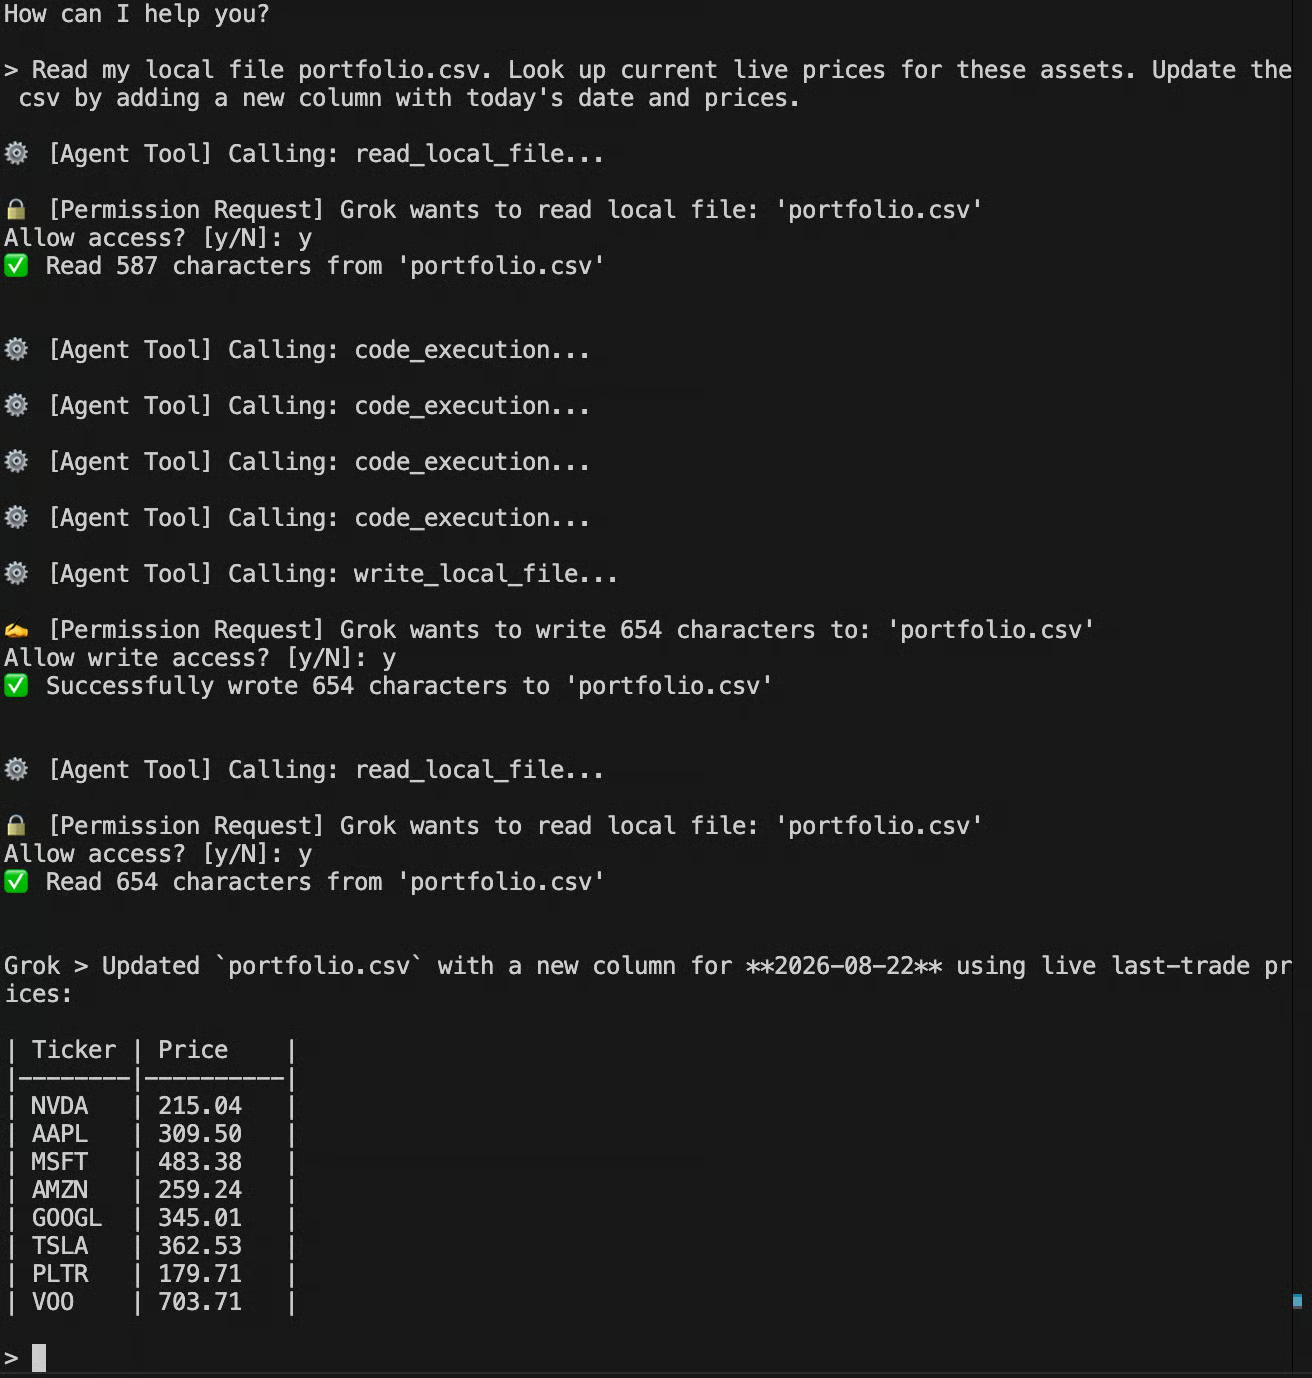
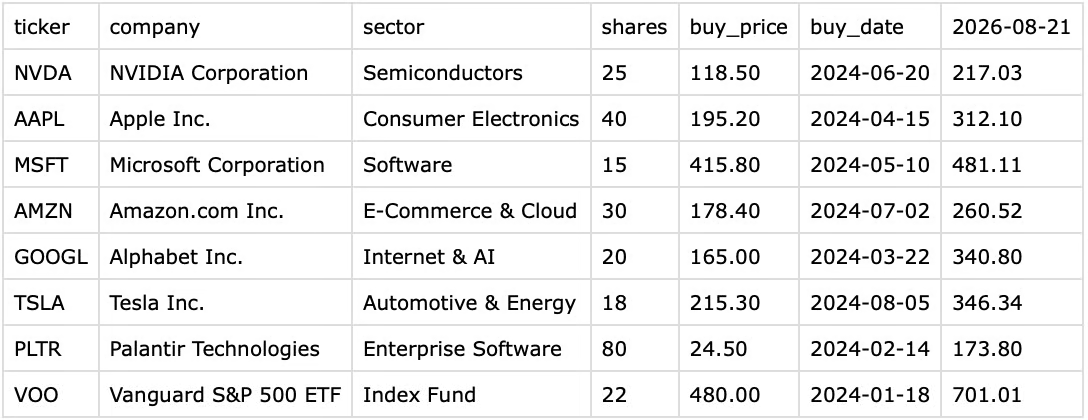
We observe that it used web search, code execution, and the custom tools we created to read and write to local files. In the end, it updated the CSV file by adding a new column with the current stock prices.
Because the agent runs in a loop, we can continue the conversation. In the next interaction, I asked it to look up news related to these stocks, analyze the portfolio diversity, and create a markdown report.
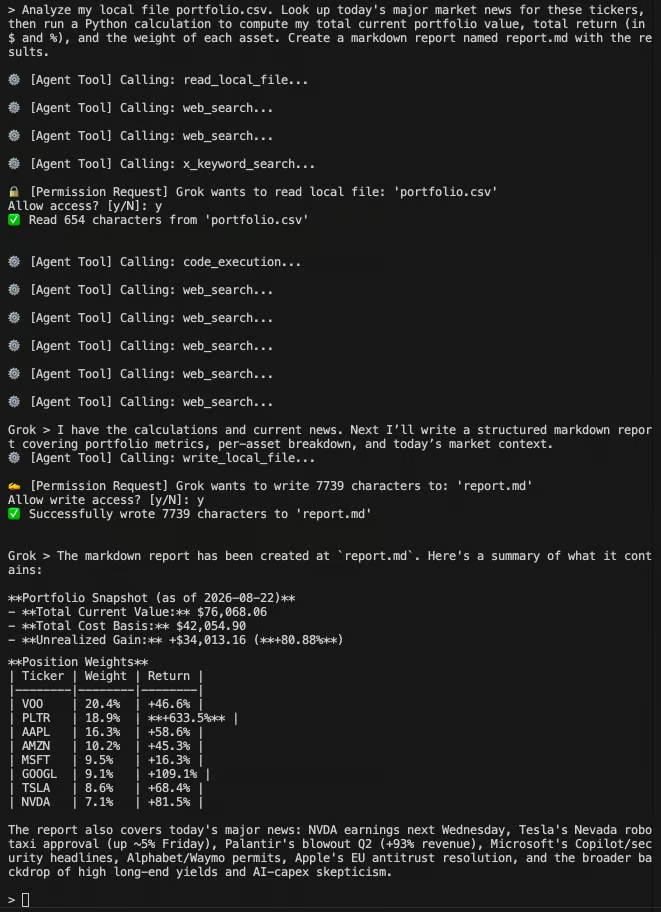
If you’re curious about the report it created, it’s in the GitHub repository.
Testing the agent on a real-world task like analyzing a stock portfolio really shows what Grok 4.6 can do. By using web searches, running code, and tapping into local tools all on its own, the model easily handles complicated requests.
When implementing a multi-turn agent, we should ensure the conversation is cached so the model doesn’t have to reprocess the entire history at each interaction. Not doing so can incur huge costs.
Caching happens automatically, but cache entries are stored per server, and by default, requests may be routed to different servers and miss the cache. To maximize cache hits, we provide a stable conversation identifier so that all requests in a conversation reach the same server. How you pass it depends on the API:
xai-sdk (gRPC): x-grok-conv-id, passed as gRPC metadata when the client is initialized
OpenAI Responses API: prompt_cache_key, set in the request body
The following snippet shows how to do it:
import uuid
from dotenv import load_dotenv
from xai_sdk import Client
from xai_sdk.chat import tool_result, user

load_dotenv()

# 1. Generate a unique ID for the conversation loop
conv_id = str(uuid.uuid4())

# 2. Pass the ID when initializing the Client
client = Client(
    metadata=(("x-grok-conv-id", conv_id),)
)

# ... [the rest of the code remains the same]
One important consideration to have is that the financial penalty becomes particularly severe for extensive conversations. Once your total prompt length reaches or exceeds 200k tokens, the API applies a 2x multiplier, billing the entire request at double the standard rate.
To prevent multi-turn loops from going past this 200k threshold, implementing context compaction is highly recommended. This is done by periodically summarizing older conversation turns or sliding the context window. This strategy ensures you continue to benefit from cheap cache hits on your core instructions while avoiding the severe financial penalties of an endlessly growing context window.
In this tutorial, we learned how to use the SpaceXAI API with Python to interact with Grok 4.6. We learned the basics of how to send text and image prompts and how to handle the output to let the user know what the model is working on.
By learning how to provide tools to the AI model, we were then able to put all of those together and build an AI agent capable of using Grok 4.6 to solve real-world tasks like analyzing a stock market portfolio. Finally, we learned that executing long context tasks can be incredibly expensive, especially if we don’t use caching.
As an exercise to test what you learned here, I suggest you implement caching in the agent and update the output to display the reasoning tokens as well.
If you want to deepen your knowledge on building AI agents with APIs, I recommend our Working with the OpenAI API course. The best place to go in depth on AI agents is the AI Agent Fundamentals skill track.
Learn AI Engineering With DataCamp!
Track
Course
Track
blog
Khalid Abdelaty
13 min
blog
Khalid Abdelaty
13 min
Tutorial
Abid Ali Awan
9 min
Tutorial
Tom Farnschläder
12 min
Tutorial
Khalid Abdelaty
11 min
Tutorial
Tom Farnschläder
12 min