Imagine you’ve spent hours writing a piece of content.
You’re satisfied with the final product, so you push it out to the public.
After a while of being in the public domain, you realize you’re turning away a huge audience since many people don’t feel they have time to sit down and read through your work.
You contemplate narrating the content yourself, but time isn’t on your side. You flirt with the idea of hiring a narrator, but the quotes you’ve been getting are way beyond your budget, and the time it takes to find someone with the “right” voice is also a burden.
In typical 21st-century fashion, you look to technology for a solution. That’s when you learn about OpenAI’s Text-to-Speech (TTS) API.
For the remainder of this tutorial, we will cover OpenAI’s TTS API, namely, its key features, how to get started, customization, and real-world use cases.
What is OpenAI's TTS API?
Text-to-speech (TTS) is a type of assistive technology used to convert natural language, provided in text format, into speech. Namely, text-to-speech systems take words written on a computer (or any other digital device) and read the text aloud.
OpenAI’s TTS API is an endpoint that enables users to interact with their TTS AI model that converts text to natural-sounding spoken language. The model has two variations:
- TTS-1: The latest AI model optimized for real-time text-to-speech use cases.
- TTS-1-HD: The latest AI model optimized for quality.
The endpoint comes prebuilt with six voices and, according to the OpenAI TTS Documentation, can be used to:
- Narrate a written blog post
- Produce spoken audio in multiple languages
- Give real-time audio output using streaming
However, it’s important to note that OpenAI’s Usage Policies require users to provide clear discloser to end users that the TTS voice they hear is AI-generated and not a human voice.
Getting Started with the TTS API
Let’s look at how you can get started using the OpenAI Text-to-Speech API, covering the prerequisites and the steps you need to follow:
Prerequisites
- A funded OpenAI account - see more in Understanding API Limits and Pricing below.
- Python 3.7+
- IDE
Step 1: Generate an API key
Once logged into your OpenAI account, you’ll be directed to the home screen. From here, navigate to the OpenAI logo in the top left-hand corner of the page to toggle the sidebar.
Select “API Keys.”
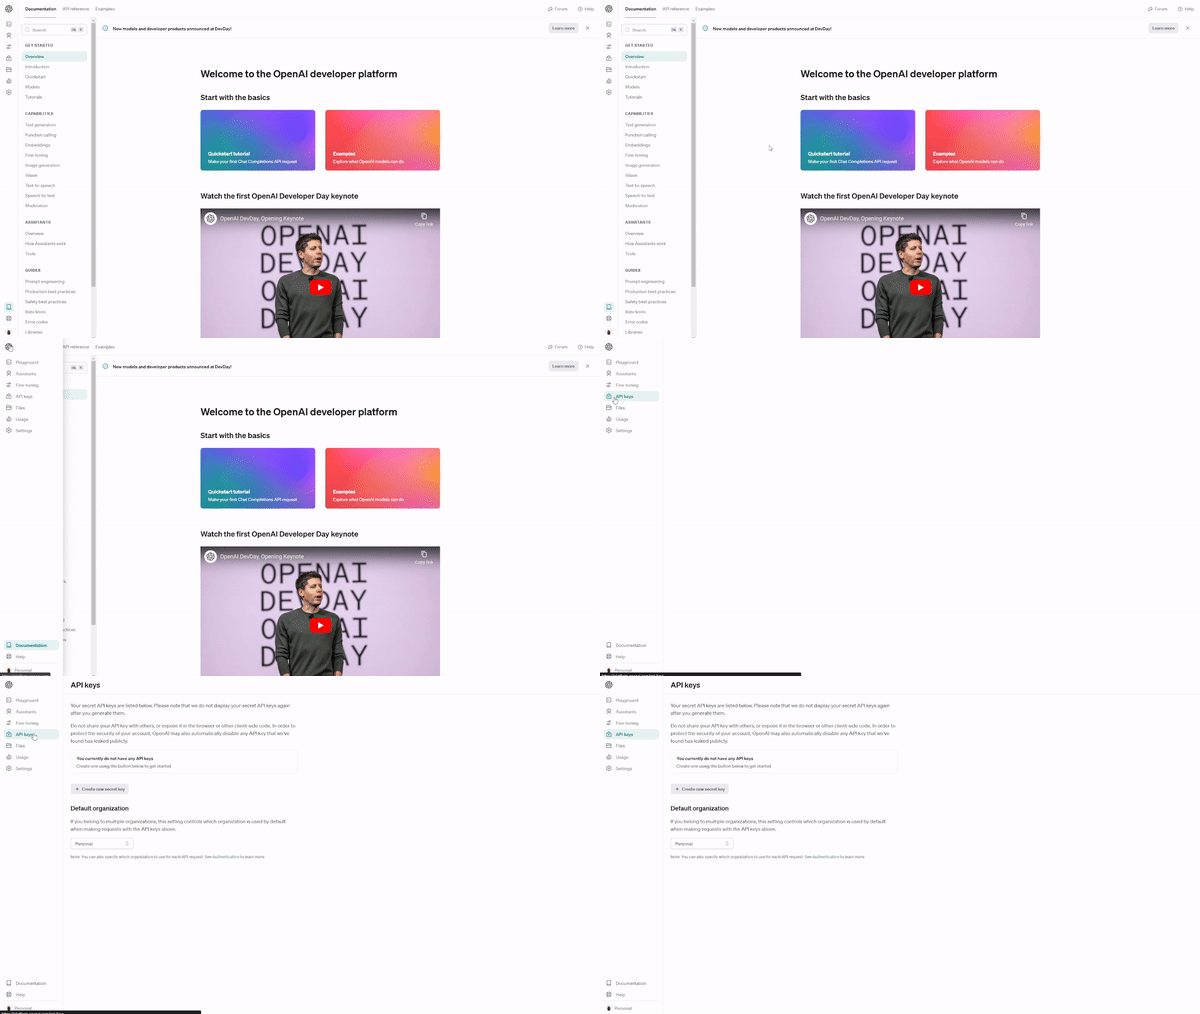
Select “Create new secret key” and give your API key a name – we named ours “tts-example.”
When you create your API key, a secret key will be generated. Be sure to save the key somewhere safe and secure.
Now you’ve got the key, you’re ready to get started!
Step 2: Create a virtual environment
A Virtual Environment is used to create a container or isolated environment where the Python-related dependencies are installed for a specific project. One can work with many different versions of Python with its various packages.
Getting into more depth with virtual environments is beyond the scope of this article. Check out the Virtual Environment in Python tutorial to learn more about creating one.
Step 3: The code
There’s three key inputs the speech endpoint takes:
- The model name
- The text that should be turned into audio
- The voice to be used for the audio generation.
In OpenAI’s text-to-speech documentation, there’s a sample request; thus, we don’t have to reinvent the wheel.
Here’s how a sample request looks:
from pathlib import Path
from openai import OpenAI

client = OpenAI()

speech_file_path = Path(__file__).parent / "speech.mp3"
response = client.audio.speech.create(
  model="tts-1",
  voice="alloy",
  input="Today is a wonderful day to build something people love!"
)

response.stream_to_file(speech_file_path)
As things stand, the code won’t run.
The reason it won’t run is that we haven’t passed the API key we generated in step one to our OpenAI client…
Step 4: Passing the API key
The easiest way to solve this problem is to add an api_key parameter where we can pass our secret key to the OpenAI() object.
For example:
client = OpenAI(api_key="secret key goes here")
Doing this is bad practice in Python.
Instead, we will use dotenv to read the secret key from a .env file.
Step 4.1: Installing dotenv
The first thing you must do is install dotenv into your virtual environment. Run this command from your virtual environment:
pip install python-dotenv
Step 4.2: Calling the environment variables
Now dotenv is installed, we can create a .env file, which contains key-value pairs, and set the values as environment variables.
This allows us to conceal our secret key, even if the code is shared publicly.
First things first, we must create a .env file and insert the following:
SECRET_KEY = "insert your secret key token here"
In our main.py file, we can now call our environment variables using dotenv.
Here’s how the code looks.
import os
from pathlib import Path
from openai import OpenAI
from dotenv import load_dotenv

load_dotenv()
SECRET_KEY = os.getenv("SECRET_KEY")

client = OpenAI(api_key=SECRET_KEY)

speech_file_path = Path(__file__).parent / "speech.mp3"
response = client.audio.speech.create(
  model="tts-1",
  voice="alloy",
  input="Today is a wonderful day to build something people love!"
)

response.stream_to_file(speech_file_path)
Now the code runs.
The default behavior of the code is to output an MP3 file of the spoken audio. If you would prefer a different file format, you can configure the output to any of the supported formats.
Customizing Voice and Output
There are tons of different voices and accents in the world.
While it may be impossible to capture each and every single one, OpenAI’s TTS attempted to reflect the diverse world we live in by integrating six unique built-in voices into the API:
- Alloy
- Echo
- Fable
- Onyx
- Nova
- Shimmer
These can convey different personalities, or you may use them based on your preference. All you have to do is set the voice you wish to use using the voice parameter in the client object.
response = client.audio.speech.create(
model="tts-1",
voice="alloy",
input="Today is a wonderful day to build something people love!"
)
Check out the OpenAI text-to-speech API documentation to learn more about the available voices.
You can also alter the output format.
The default response of the API is an MP3 file of your converted text. However, OpenAI provides a range of other formats to cater to your needs and preferences. Such as:
- Advanced Audio Coding (AAC). AAC is great for digital audio compression as it’s widely adopted and recognized for its compression efficiency. Hence, it’s the preferred file format for software and applications like YouTube, Android, and iOS. It’s a good choice to opt for AAC format if a balance between quality and file size is required. It’s also a good solution if you expect users to listen to audio on various devices.
- Free Lossless Audio Coded (FLAC). Regarding lossless audio compression, FLAC is the go-to — this means it can reduce file size without losing quality. Audio enthusiasts typically tend to favor FLAC since it’s ideal for archival purposes and in events where there’s enough bandwidth to handle larger file sizes.
- Opus. If you want low latency and good compression at various bitrates for internet streaming and communication, choose Opus file formatting.
- MP3. You don’t need to be much of a tech head to know about MP3. This is the most universally supported audio file format and it’s known for its compatibility across all devices and software. It’s a great default since it’s ideal for general use.
TLDR: the choice of output you select may impact the audio quality, file size, and the file's compatibility with various devices, as well as applications.
In terms of language support, the text-to-speech model follows the Whisper model used for speech-to-text; the voices are optimized for English but have support for several other languages.
Real-World Use Cases of the OpenAI Text-To-Speech API
Now that we know how to set up the TTS API, let’s have a look at some examples of how you can use it.
Narrate a written blog post or book
Let’s say you’ve written a book or blog post and want to expand its reach to a wider audience by converting it to audio. If you did things the old-fashioned way, you would have to find a narrator (or narrate it yourself), which can be a long process.
The OpenAI TTS API can be used to shorten this process; all you would do is pass the text document to the API, and it will convert it to speech.
Produce spoken audio in multiple languages.
Instead of teaching group lessons, language teachers can use OpenAI’s text-to-speech API to create personalized lessons for students using various languages and dialects. Despite the voices being optimized for the English language, the API can still be used to generate audio content in several languages.
Real-time audio output using streaming
The OpenAI TTS API can be used to create AI voices that sound more realistic and expressive than traditional TTS systems. Video game developers may leverage this capability and apply it to characters to make the experience more immersive for players.
Another use case may be to create virtual assistants and chatbots that are more engaging than the traditional ones in existence.
Understanding the API Limits and Pricing
The rate limits for the OpenAI TTS API begin at 50 Request Per Minute (RPM) for paid accounts, and the maximum input size is 4096 characters – equivalent to approximately 5 minutes of audio at default speed.
With regards to the TTS models, pricing is as follows:
- Standard TTS Model: At $0.015 per 1,000 characters.
- TTS HD Model: For $0.030 per 1,000 characters.
If you’re looking for a cost-effective way to integrate the TTS API into a small project, you may be better off opting for the standard TTS model. The TTS HD model is slightly more pricey but offers high-definition audio, which is ideal when the quality of your audio is paramount – learn more about pricing for OpenAI’s audio models.
Conclusion
OpenAI’s text-to-speech API is an endpoint for users to generate high-quality spoken audio from text. It comes with six built-in voices, and users can select one of two models, TTS-1 and TTS-1-HD, depending on their use case; the TTS-1 model is optimized for real-time text-to-speech, while TTS-1-HD is optimized for quality.
In this blog post, we’ve covered:
- What is OpenAI’s TTS API?
- How to use it
- Customizing the voice and output
- Real-world use cases
- API Limits and pricing
Check out these cool resources to continue your learning:



 Austin Chia · 11 min

 Abid Ali Awan · 9 min

 François Aubry · 12 min



Imagine you’ve spent hours writing a piece of content.
You’re satisfied with the final product, so you push it out to the public.
After a while of being in the public domain, you realize you’re turning away a huge audience since many people don’t feel they have time to sit down and read through your work.
You contemplate narrating the content yourself, but time isn’t on your side. You flirt with the idea of hiring a narrator, but the quotes you’ve been getting are way beyond your budget, and the time it takes to find someone with the “right” voice is also a burden.
In typical 21st-century fashion, you look to technology for a solution. That’s when you learn about OpenAI’s Text-to-Speech (TTS) API.
For the remainder of this tutorial, we will cover OpenAI’s TTS API, namely, its key features, how to get started, customization, and real-world use cases.
What is OpenAI's TTS API?
Text-to-speech (TTS) is a type of assistive technology used to convert natural language, provided in text format, into speech. Namely, text-to-speech systems take words written on a computer (or any other digital device) and read the text aloud.
OpenAI’s TTS API is an endpoint that enables users to interact with their TTS AI model that converts text to natural-sounding spoken language. The model has two variations:
The endpoint comes prebuilt with six voices and, according to the OpenAI TTS Documentation, can be used to:
However, it’s important to note that OpenAI’s Usage Policies require users to provide clear discloser to end users that the TTS voice they hear is AI-generated and not a human voice.
Getting Started with the TTS API
Let’s look at how you can get started using the OpenAI Text-to-Speech API, covering the prerequisites and the steps you need to follow:
Prerequisites
Step 1: Generate an API key
Once logged into your OpenAI account, you’ll be directed to the home screen. From here, navigate to the OpenAI logo in the top left-hand corner of the page to toggle the sidebar.
Select “API Keys.”
Select “Create new secret key” and give your API key a name – we named ours “tts-example.”
When you create your API key, a secret key will be generated. Be sure to save the key somewhere safe and secure.
Now you’ve got the key, you’re ready to get started!
Step 2: Create a virtual environment
A Virtual Environment is used to create a container or isolated environment where the Python-related dependencies are installed for a specific project. One can work with many different versions of Python with its various packages.
Getting into more depth with virtual environments is beyond the scope of this article. Check out the Virtual Environment in Python tutorial to learn more about creating one.
Step 3: The code
There’s three key inputs the speech endpoint takes:
In OpenAI’s text-to-speech documentation, there’s a sample request; thus, we don’t have to reinvent the wheel.
Here’s how a sample request looks:
As things stand, the code won’t run.
The reason it won’t run is that we haven’t passed the API key we generated in step one to our OpenAI client…
Step 4: Passing the API key
The easiest way to solve this problem is to add an
api_keyparameter where we can pass our secret key to theOpenAI()object.For example:
Doing this is bad practice in Python.
Instead, we will use dotenv to read the secret key from a
.envfile.Step 4.1: Installing dotenv
The first thing you must do is install dotenv into your virtual environment. Run this command from your virtual environment:
Step 4.2: Calling the environment variables
Now dotenv is installed, we can create a
.envfile, which contains key-value pairs, and set the values as environment variables.This allows us to conceal our secret key, even if the code is shared publicly.
First things first, we must create a .env file and insert the following:
In our
main.pyfile, we can now call our environment variables using dotenv.Here’s how the code looks.
Now the code runs.
The default behavior of the code is to output an MP3 file of the spoken audio. If you would prefer a different file format, you can configure the output to any of the supported formats.
Customizing Voice and Output
There are tons of different voices and accents in the world.
While it may be impossible to capture each and every single one, OpenAI’s TTS attempted to reflect the diverse world we live in by integrating six unique built-in voices into the API:
These can convey different personalities, or you may use them based on your preference. All you have to do is set the
voiceyou wish to use using the voice parameter in the client object.Check out the OpenAI text-to-speech API documentation to learn more about the available voices.
You can also alter the output format.
The default response of the API is an MP3 file of your converted text. However, OpenAI provides a range of other formats to cater to your needs and preferences. Such as:
TLDR: the choice of output you select may impact the audio quality, file size, and the file's compatibility with various devices, as well as applications.
In terms of language support, the text-to-speech model follows the Whisper model used for speech-to-text; the voices are optimized for English but have support for several other languages.
Real-World Use Cases of the OpenAI Text-To-Speech API
Now that we know how to set up the TTS API, let’s have a look at some examples of how you can use it.
Narrate a written blog post or book
Let’s say you’ve written a book or blog post and want to expand its reach to a wider audience by converting it to audio. If you did things the old-fashioned way, you would have to find a narrator (or narrate it yourself), which can be a long process.
The OpenAI TTS API can be used to shorten this process; all you would do is pass the text document to the API, and it will convert it to speech.
Produce spoken audio in multiple languages.
Instead of teaching group lessons, language teachers can use OpenAI’s text-to-speech API to create personalized lessons for students using various languages and dialects. Despite the voices being optimized for the English language, the API can still be used to generate audio content in several languages.
Real-time audio output using streaming
The OpenAI TTS API can be used to create AI voices that sound more realistic and expressive than traditional TTS systems. Video game developers may leverage this capability and apply it to characters to make the experience more immersive for players.
Another use case may be to create virtual assistants and chatbots that are more engaging than the traditional ones in existence.
Understanding the API Limits and Pricing
The rate limits for the OpenAI TTS API begin at 50 Request Per Minute (RPM) for paid accounts, and the maximum input size is 4096 characters – equivalent to approximately 5 minutes of audio at default speed.
With regards to the TTS models, pricing is as follows:
If you’re looking for a cost-effective way to integrate the TTS API into a small project, you may be better off opting for the standard TTS model. The TTS HD model is slightly more pricey but offers high-definition audio, which is ideal when the quality of your audio is paramount – learn more about pricing for OpenAI’s audio models.
Conclusion
OpenAI’s text-to-speech API is an endpoint for users to generate high-quality spoken audio from text. It comes with six built-in voices, and users can select one of two models, TTS-1 and TTS-1-HD, depending on their use case; the TTS-1 model is optimized for real-time text-to-speech, while TTS-1-HD is optimized for quality.
In this blog post, we’ve covered:
Check out these cool resources to continue your learning: