
แทร็ก
วิศวกร AI ระดับ Associate สำหรับนักพัฒนา
26 ชม.
If you've ever run an open-weight model inside a coding agent built for a different model, you know it isn't the best idea.
The model usually misreads tool schemas and runs the same failed command until you stop it. After you go back to the model the agent was built for, the same task goes through without any issues. The problem usually isn't in the model, but in the agent harness around it, since its prompts and tool formats were tuned for someone else.
Open Interpreter solves this by emulating the harness each model was tuned for, such as Claude Code or Kimi Code. It's an open-source AI coding agent that runs from your terminal, and the current version is a Rust project built on OpenAI's Codex, not the Python-based computer assistant you might remember.
In this article, I'll walk you through installation, model and harness setup, a hands-on coding workflow, and how Open Interpreter compares to Claude Code, OpenCode, and Codex.
Are you new to AI agents? Enroll in our Introduction to AI Agents course and learn the fundamentals in one afternoon.
Open Interpreter gives an AI model access to your project and the tools a developer would use on it.
You just need to describe a task in plain English, and the agent works on your code. It can work with:
The project is open source under the Apache 2.0 license. It also isn't limited to one model provider. You can connect it to hosted models, open-weight models, or models that run locally on your own machine.
The main repository has more than 68,000 GitHub stars as of September 2026.
Open Interpreter works in a loop:
Some of these steps need your approval first, depending on the permission settings. I'll cover them in the security section.
Here's a more visual overview:

How Open Interpreter works
The thing to remember here is that you don't talk to the model directly. Open Interpreter sends your task to the model, formatted with the prompts and tool definitions of the active harness. The model asks for tool calls, and Open Interpreter runs them against your codebase. Then the results go back to the model for the next step.
Since the model and the harness are separate layers, you can change either one without doing anything the rest of the setup.
Open Interpreter installs as a standalone binary, so you don't need Python or pip.
If an older blog post tells you to run pip install open-interpreter, it's describing the legacy Python version. That command won't give you the Rust-based coding agent I cover in this article.
You'll also want Git on your machine. Open Interpreter runs without it, but Git gives it a repository-aware session and diffs.
Run the install script from your terminal:
curl -fsSL https://www.openinterpreter.com/install | shThe script downloads the right release for your platform and places the interpreter command in ~/.local/bin.
Open PowerShell and run:
irm https://www.openinterpreter.com/install.ps1 | iexWSL is also supported if you prefer a Linux-style setup. In that case, run the macOS and Linux command inside your WSL terminal.
Restart your terminal so it picks up the new PATH, then check the version:
interpreter --versionIf you see a version number, the install worked.
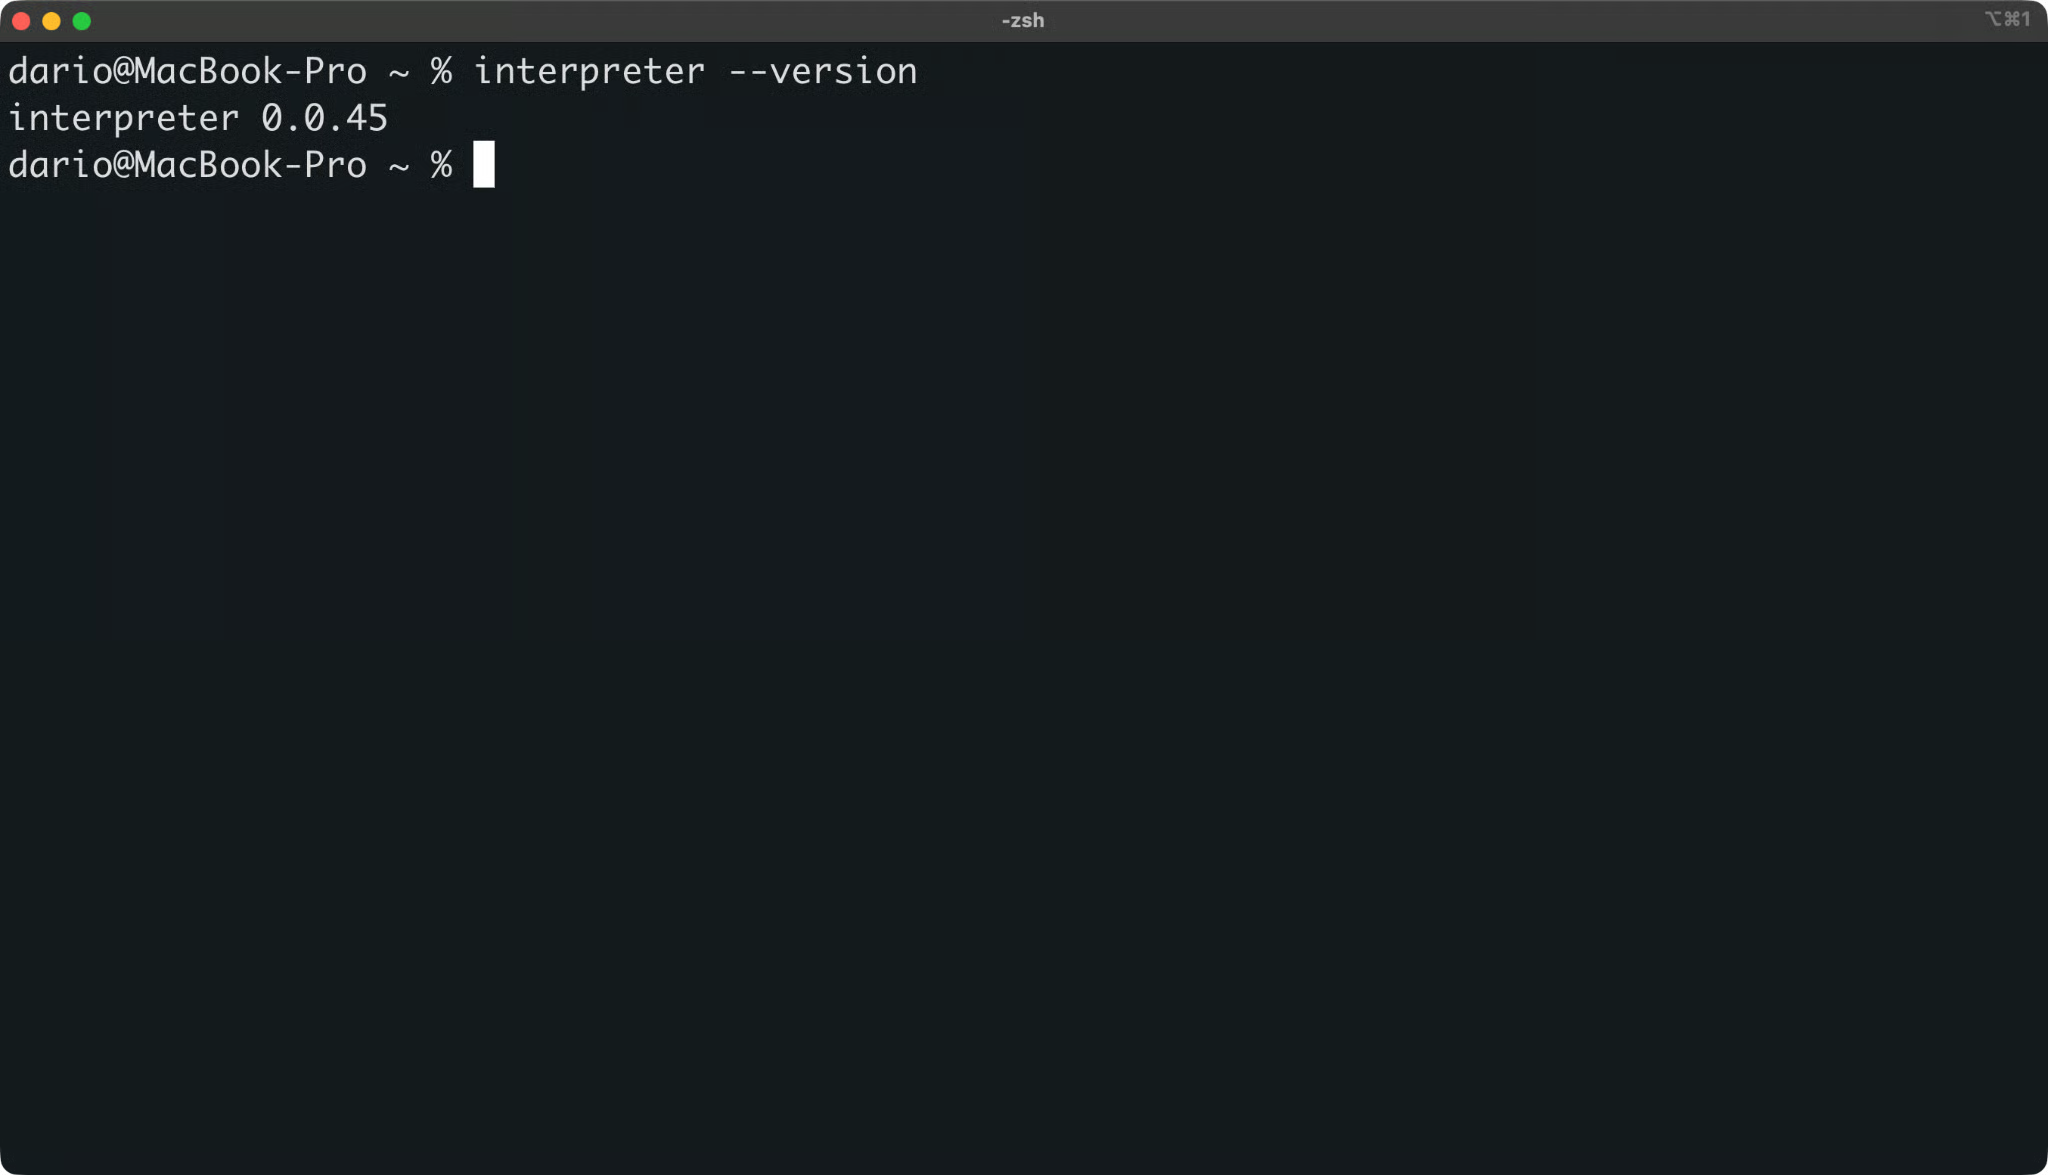
Open Interpreter version check
Start a session from any directory:
interpreterYou can also type i, which is a short alias for the same command.
Open Interpreter opens a terminal UI where you describe tasks in plain English. The first time you start it, it asks you to connect a model provider. I'll use a local model through Ollama in the next section, so you can skip this step for now.
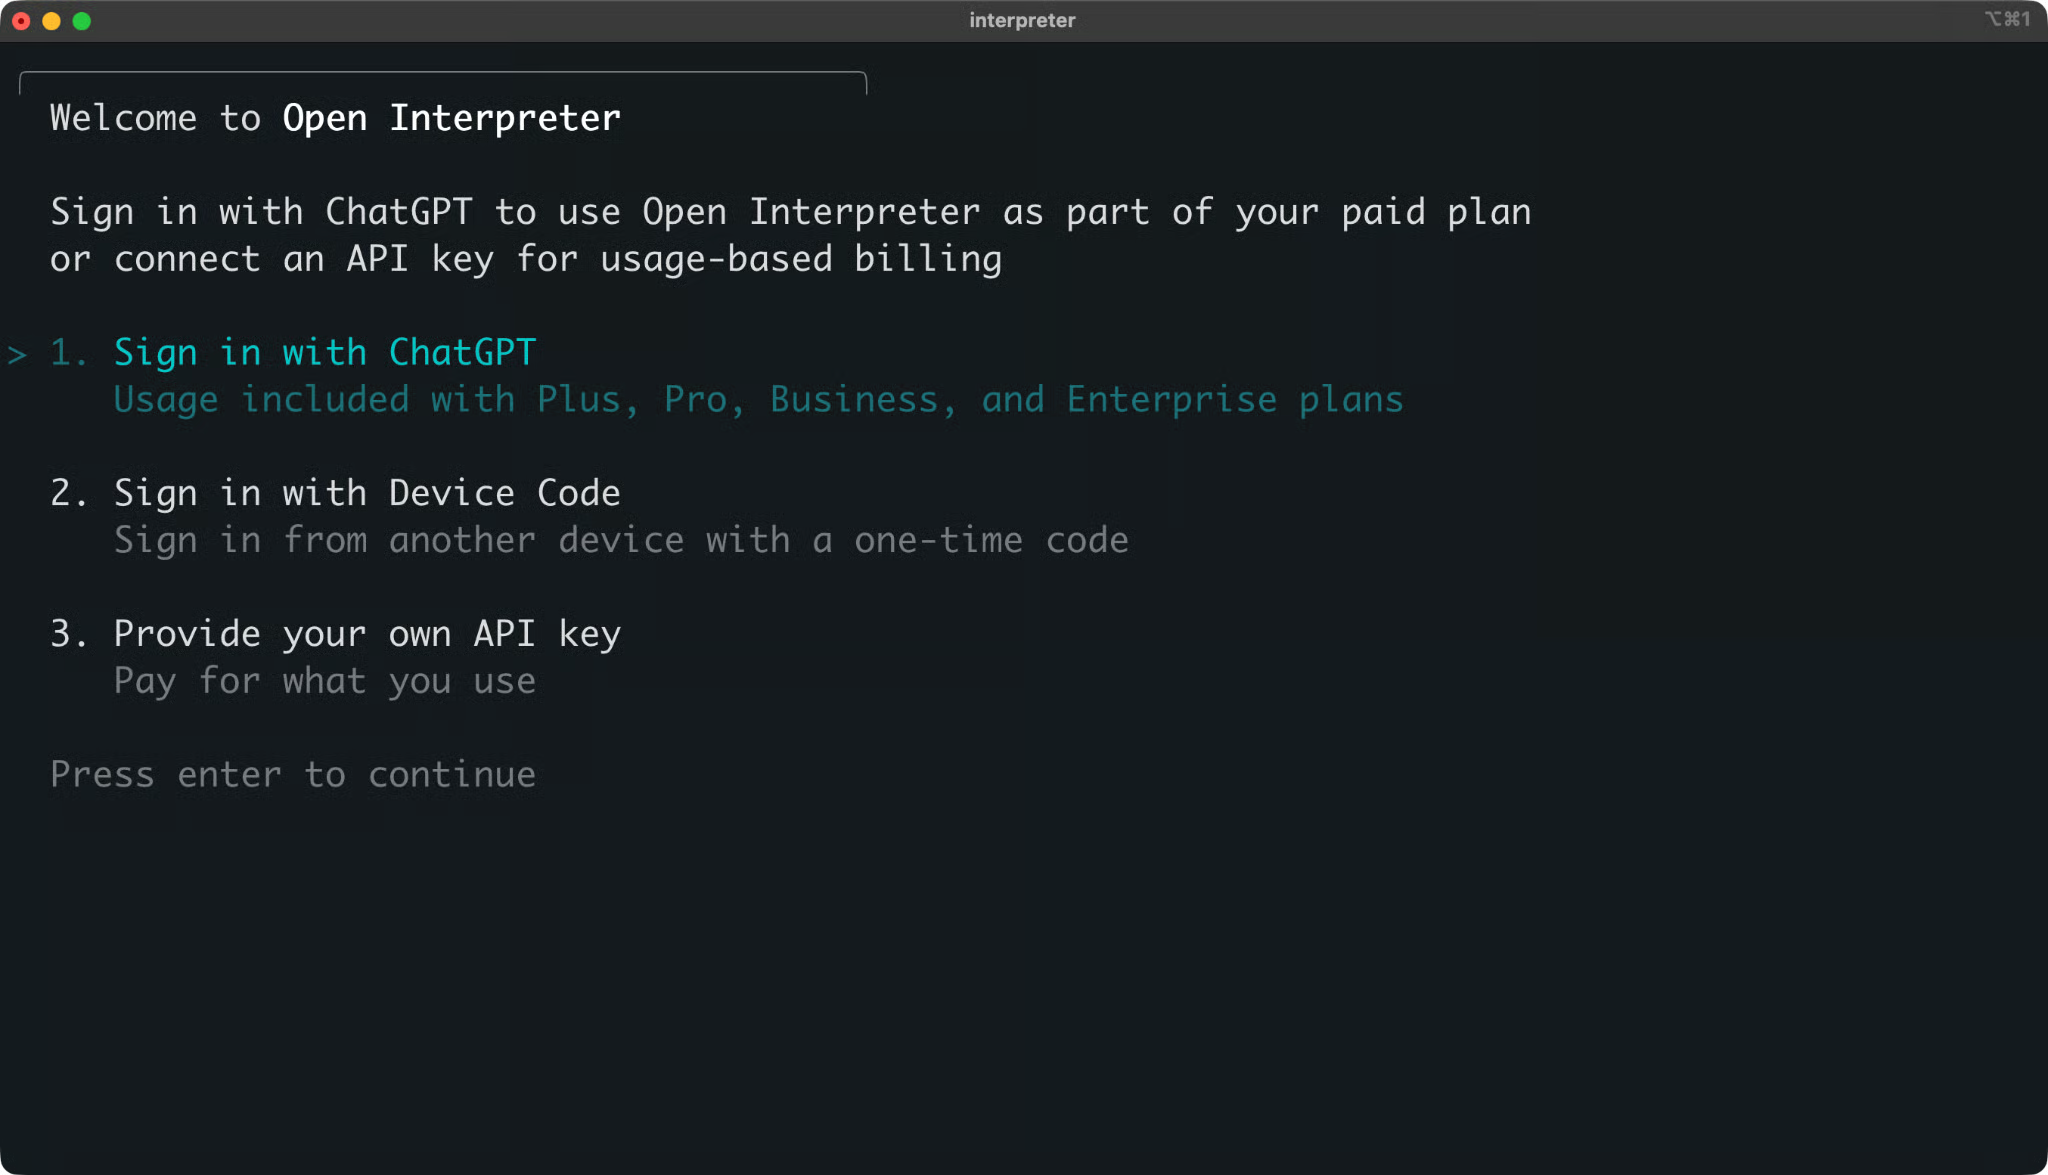
Open Interpreter interactive session
To leave the session, type /exit.
The fastest way to understand a coding agent is to give it a task and see what it does with it.
I'll use a small habit tracker project for this entire section. It has one function, one test file, and one bug.
The project calculates the longest streak of consecutive days for a habit. For example, it counts how many days in a row you exercised.
Start with a project folder and a virtual environment:
mkdir habit-tracker && cd habit-tracker
python3 -m venv .venv
source .venv/bin/activate
pip install pytest
Create habits.py with the following code:
def longest_streak(dates):
    """Return the longest run of consecutive days.

    Each date is a 'YYYY-MM-DD' string, for example "2026-03-14".
    Duplicate dates count once.
    """
    days = sorted(set(dates))
    if not days:
        return 0

    longest = current = 1
    for previous, today in zip(days, days[1:]):
        if int(today[8:10]) - int(previous[8:10]) == 1:
            current += 1
            longest = max(longest, current)
        else:
            current = 1
    return longest
Then create test_habits.py:
from habits import longest_streak


def test_streak_within_one_month():
    dates = ["2026-03-01", "2026-03-02", "2026-03-03", "2026-03-10"]
    assert longest_streak(dates) == 3


def test_duplicate_dates_count_once():
    dates = ["2026-03-01", "2026-03-01", "2026-03-02"]
    assert longest_streak(dates) == 2


def test_streak_across_month_boundary():
    dates = ["2026-01-30", "2026-01-31", "2026-02-01"]
    assert longest_streak(dates) == 3
The function has a bug. I won't point it out, because finding it is the agent's job.
Add a .gitignore file so the virtual environment and cache files stay out of the repository:
.venv/
__pycache__/
.pytest_cache/
Now commit the project:
git init
git add .
git commit -m "Initial commit"
This commit gives you a clean starting point. Later, you'll use it to see exactly what the agent changed.
Run the tests to confirm the bug:
python -m pytest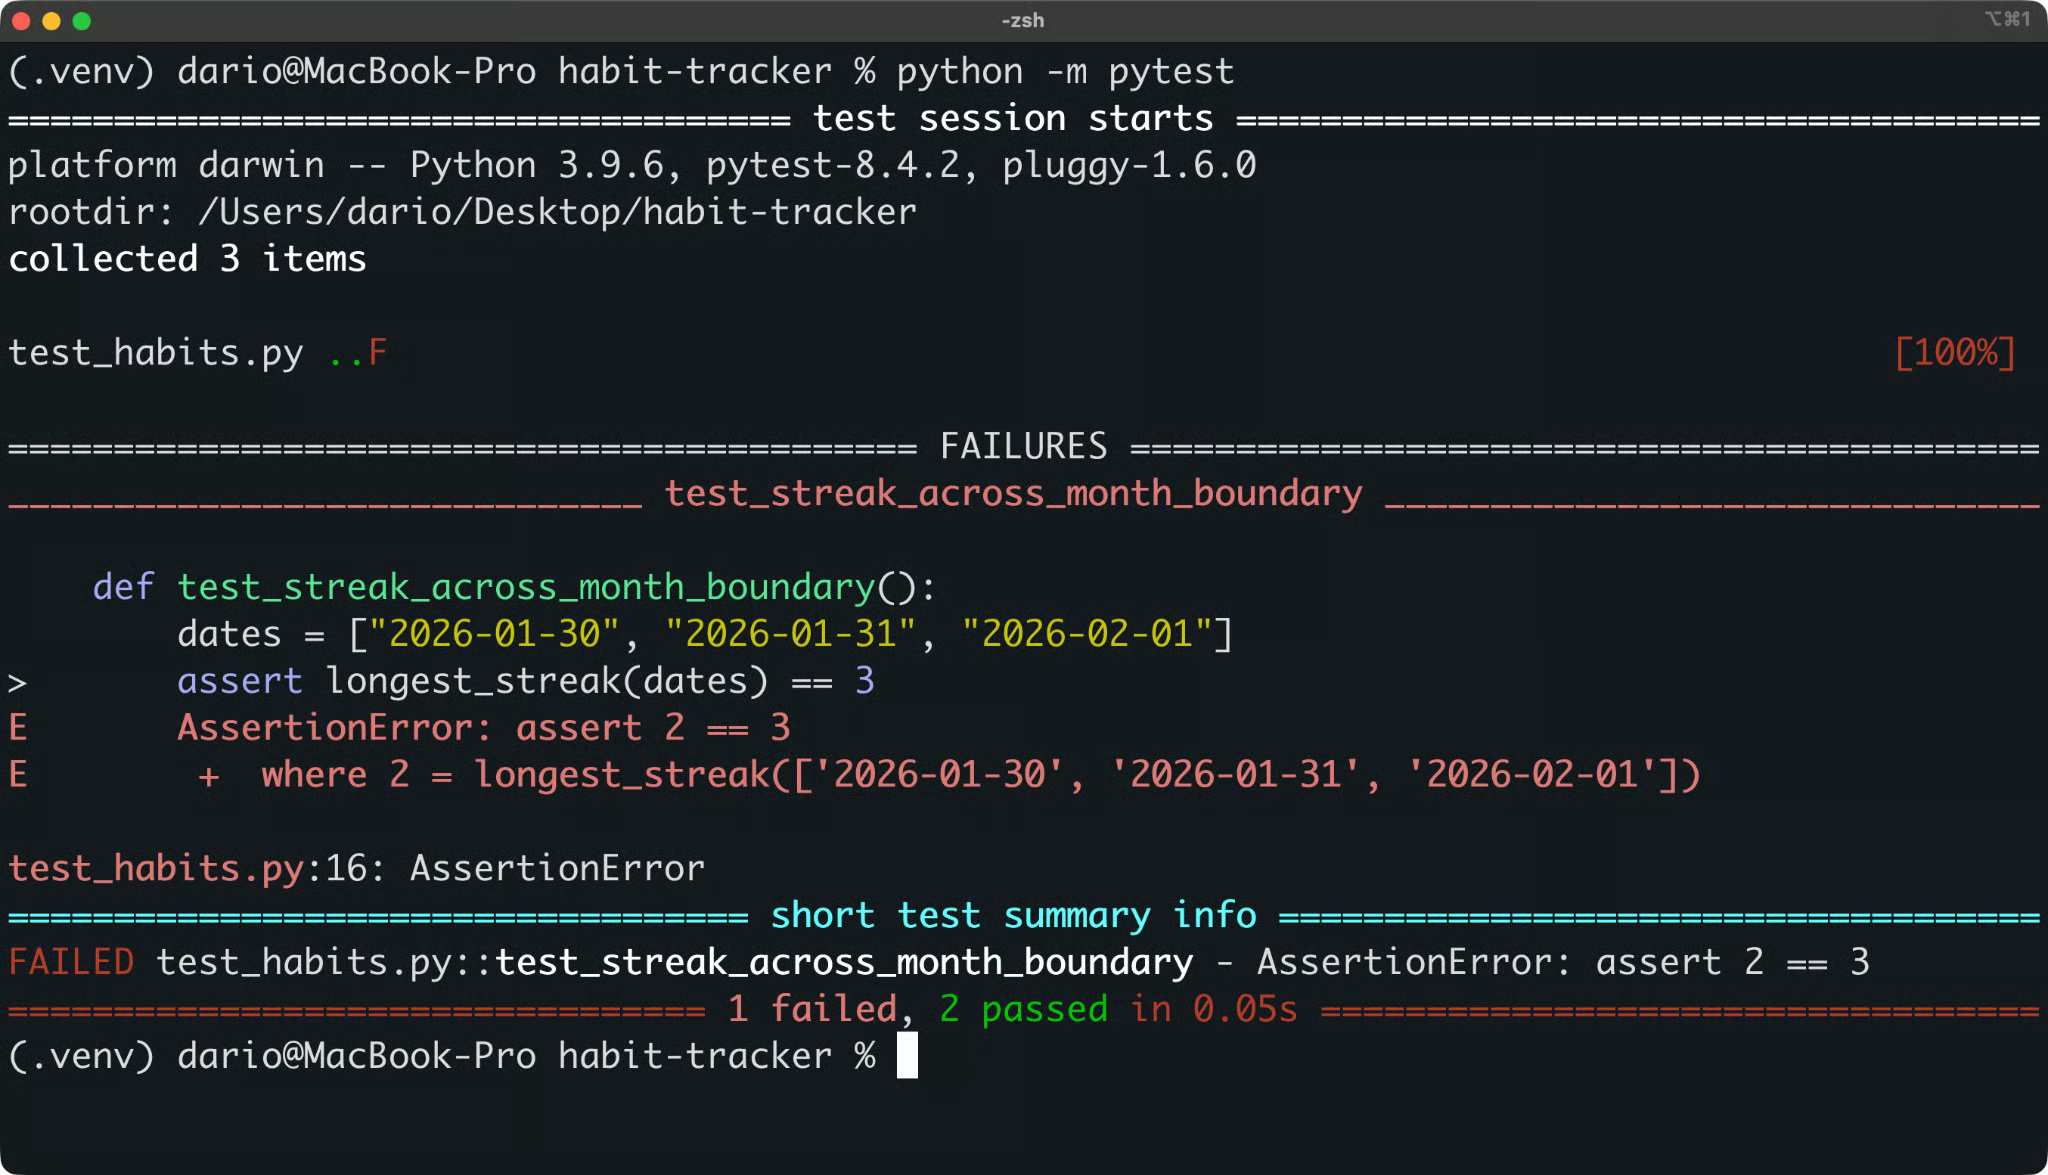
Habit tracker test result
Two tests pass, and one fails. That's the problem Open Interpreter needs to solve.
You'll need Ollama installed and running. You'll also need a model that supports tool calling, so pull it:
ollama pull qwen3-coder:30bThen start Open Interpreter from the project folder. Use the same terminal, so the agent can use the pytest install from your virtual environment:
interpreter --oss --local-provider ollama -m qwen3-coder:30bHere's what each flag does:
--oss: Uses a local open source provider
--local-provider ollama: Chooses Ollama over LM Studio
-m qwen3-coder:30b: Sets the model for this run
Run /status to confirm the active provider, model, sandbox mode, and approval policy.
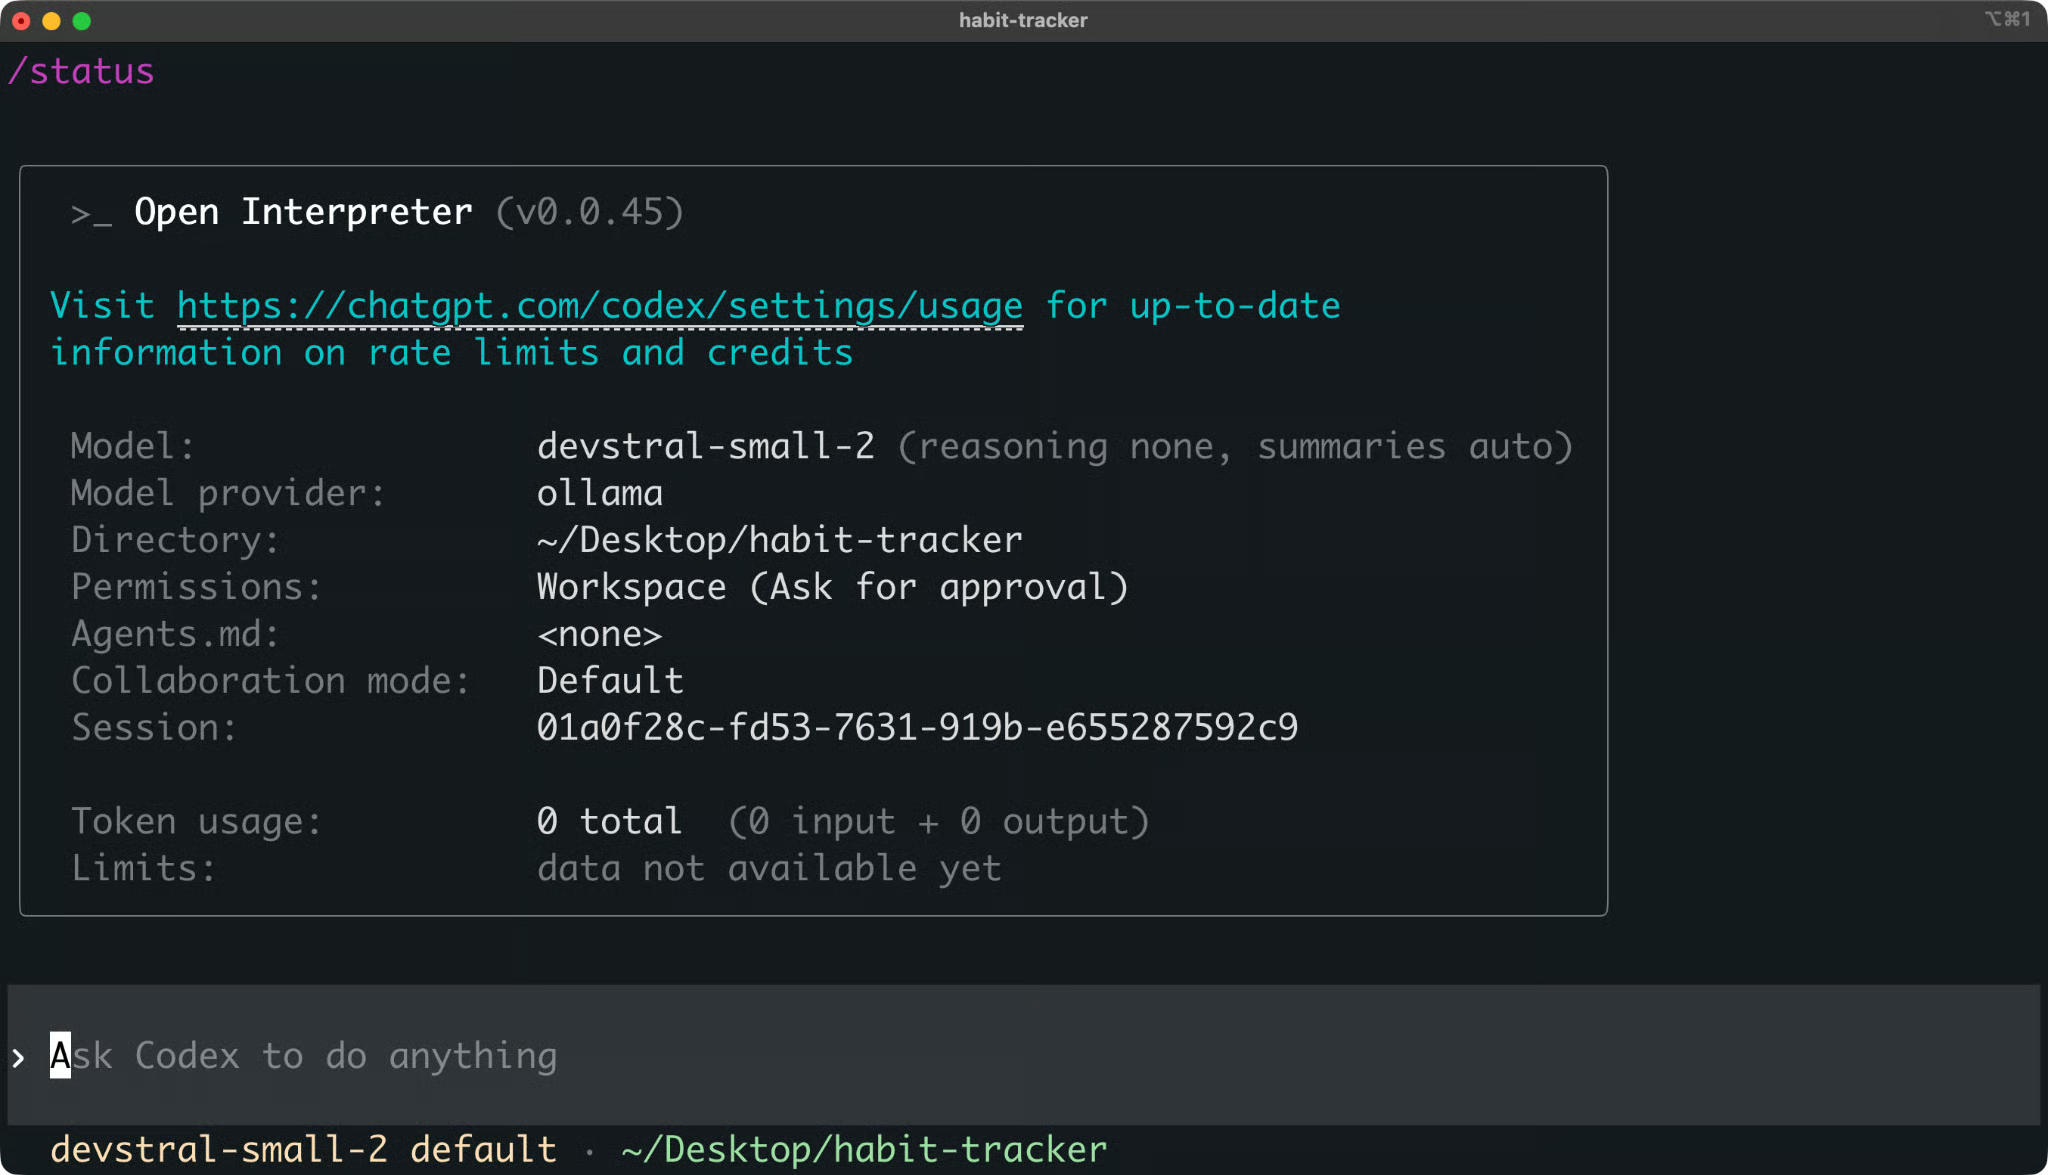
Open Interpreter session with a local Ollama model
You don't want the agent to edit anything yet. Ask for a diagnosis first:
The tests in this project are failing. Find the cause and explain how you'd fix it. Don't edit any files yet.The agent will usually read the files and run the tests before it answers. Commands run inside the sandbox, and if the agent needs more access than the sandbox allows, it asks for your approval first.
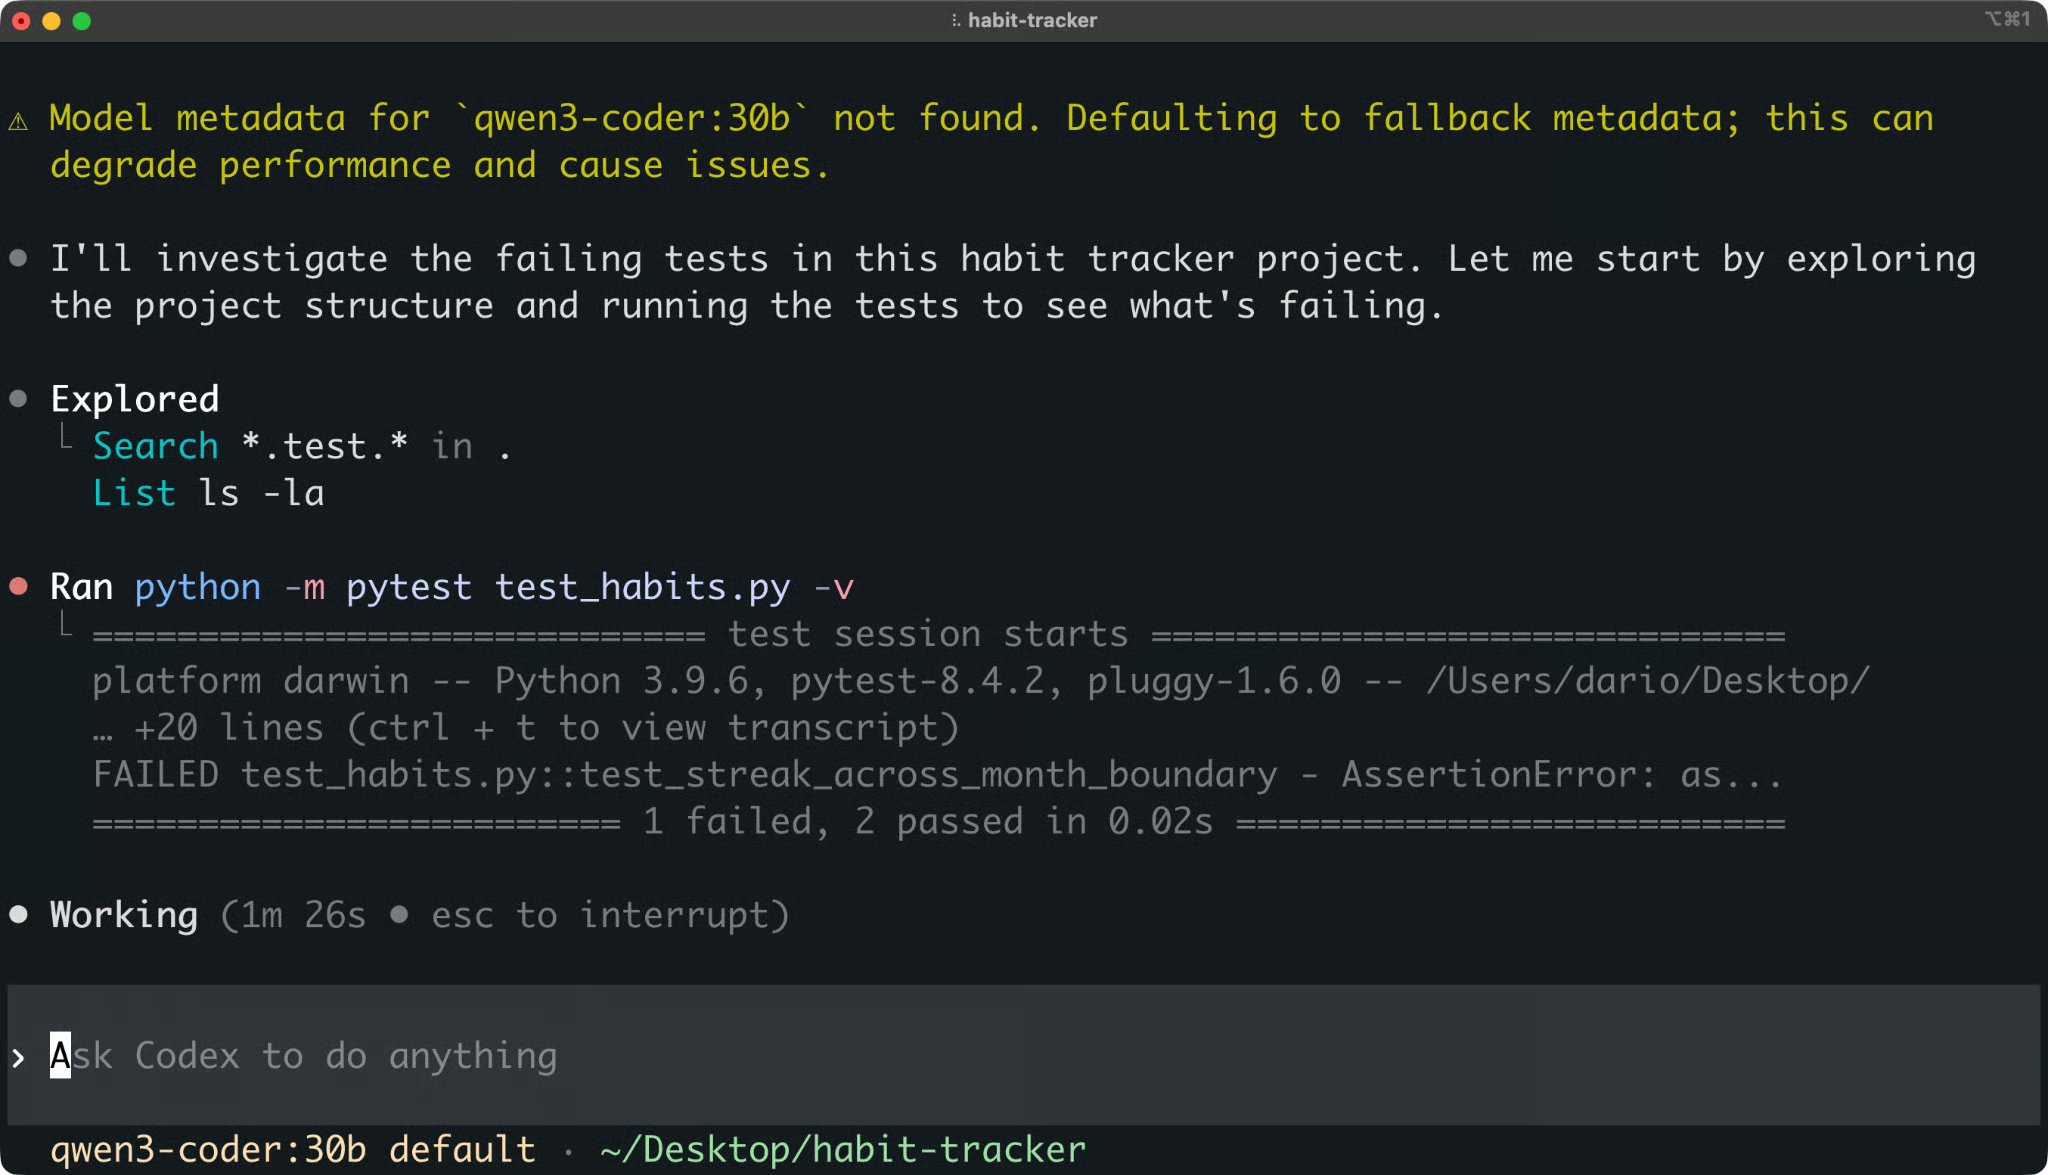
Open Interpreter output
Read the explanation before you approve anything.
A correct diagnosis says the function compares only the day of the month, so a streak breaks when it crosses into a new month. A good fix compares full dates, for example with date.fromisoformat() from Python's datetime module.
If the diagnosis is wrong, correct it in the same session before the agent edits any code.
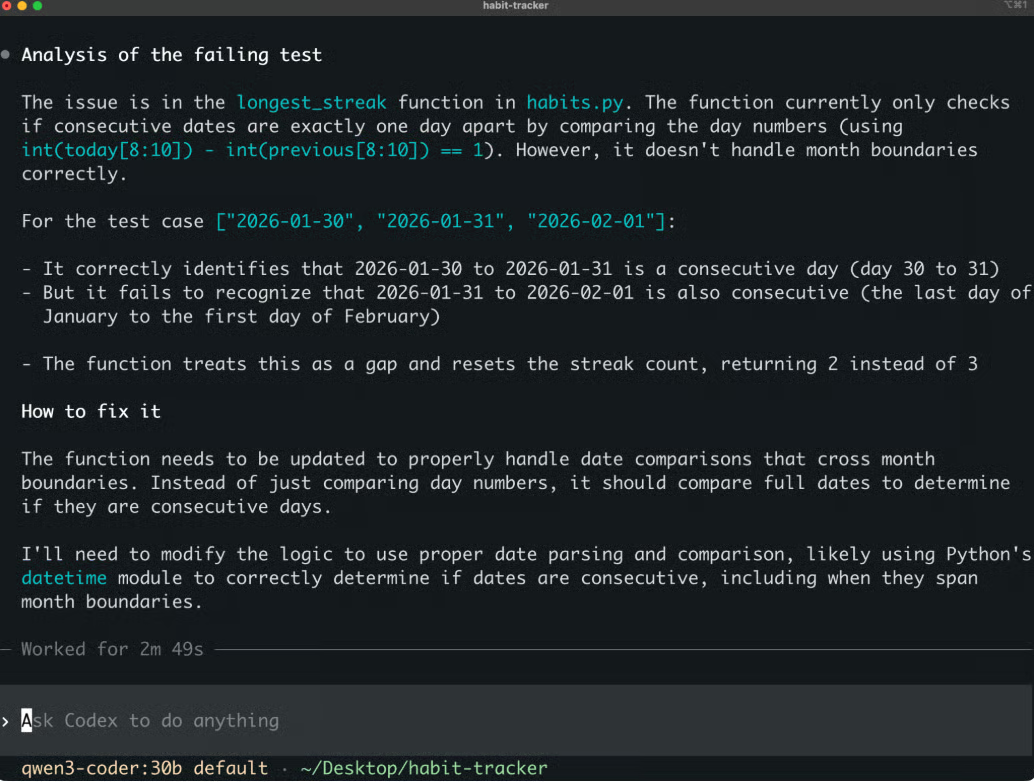
Open Interpreter fix proposition
Once you're happy with the plan, implement the fix:
Apply the fix to habits.py, then run the tests.The agent edits the file and reruns pytest. You want to see all three tests pass.
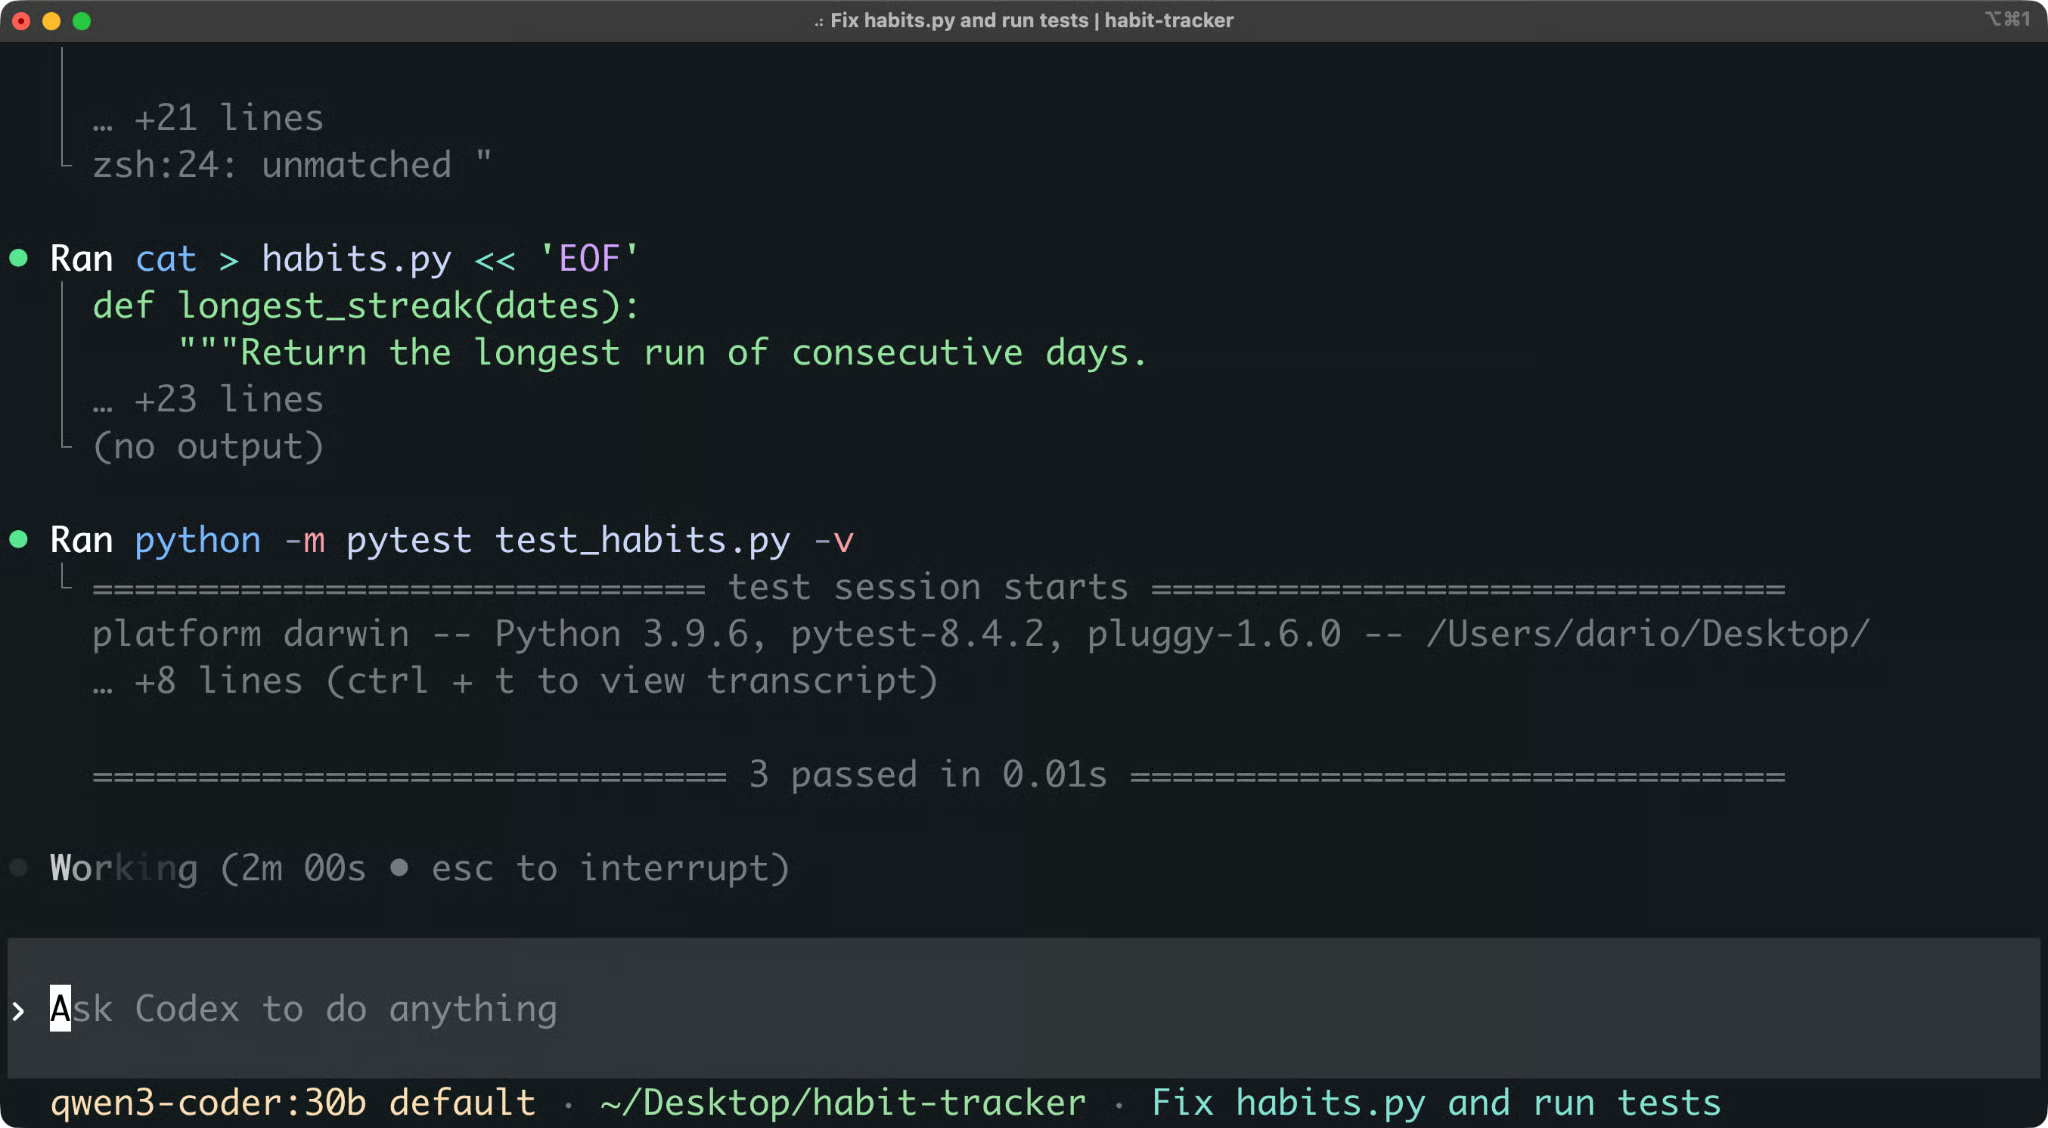
All tests pass after the fix
A passing test doesn't necessarily mean the bug in your code is resolved. Maybe the test was updated to work around the bug. You still need to review the code.
Run /diff inside the session to see the working-tree changes. You can also run git diff after you exit.
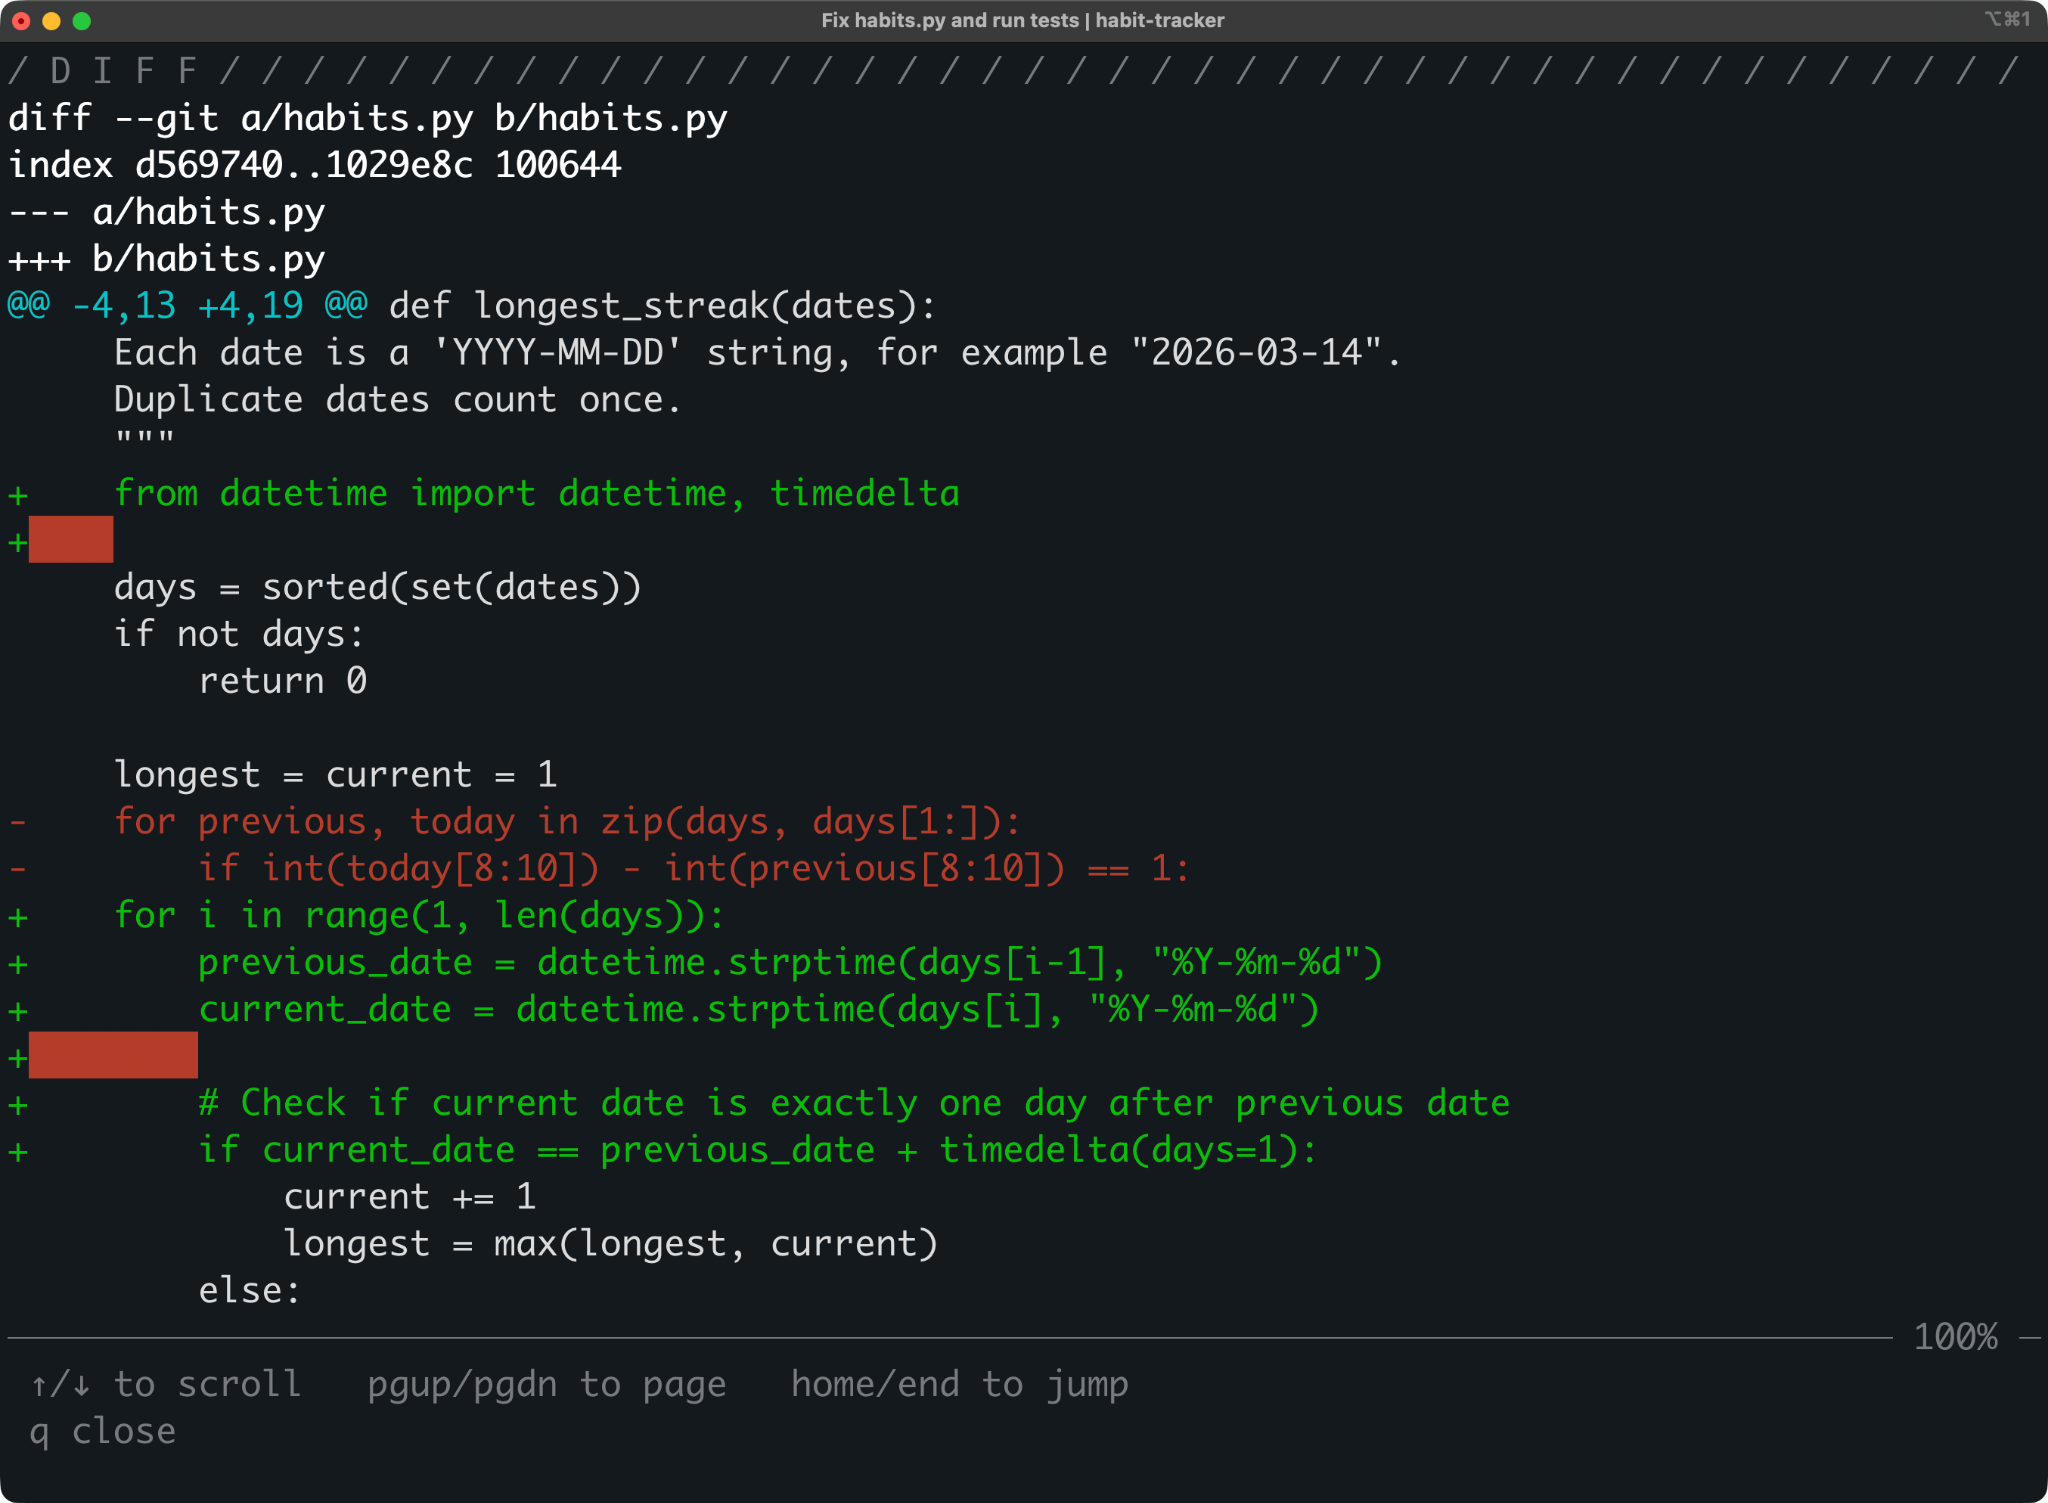
The diff of changes made by Open Interpreter
The exact diff depends on the model, so yours might not match the one above line by line. If you like the change, commit it, and if you don't, restore the original file:
git restore habits.pyAnd that's the idea. You describe the problem, the agent investigates and fixes it, and you review every change before it becomes part of your code.
Open Interpreter requires you to bring your own model.
Every request goes through these three layers:
| Layer | Example | What it controls |
|---|---|---|
| Provider | ollama | Where requests go and how you authenticate |
| Model | devstral-small-2 | The model that does the work |
| Harness | native | The prompts, tools, and message format around the model |
Request layers
Here's what you can connect:
The provider list is generated from a public model catalog, and it only keeps models that support tool calling. If a model you expect is missing, that's usually the reason.
Remember to watch out for ollama-cloud. It's a separate hosted provider, so your requests leave your machine. Only the built-in ollama provider runs models locally.
You can change the model at three levels:
Inside a session: Run /model to choose the provider, model, and reasoning effort
For a single run: Pass the -m flag, like in the previous section
As a default: Set it in your config file
You can run /status at any time to see which provider and model are active.
Open Interpreter reads its settings from ~/.openinterpreter/config.toml. To make the Ollama setup from the previous section your default, add these two lines:
model_provider = "ollama"
model = "qwen3-coder:30b"
After that, interpreter starts with this model, and you don't need any flags.
Hosted providers read their API keys from environment variables. For example, DeepSeek expects DEEPSEEK_API_KEY:
export DEEPSEEK_API_KEY="your-api-key"You can also add any OpenAI-compatible endpoint as a custom provider:
model_provider = "my-provider"
model = "my-model"

[model_providers.my-provider]
name = "My Provider"
base_url = "https://api.example.com/v1"
env_key = "MY_PROVIDER_API_KEY"
wire_api = "chat"
The wire_api setting tells Open Interpreter which request format the endpoint expects. Use chat for OpenAI-compatible Chat Completions, responses for the OpenAI Responses API, and messages for Anthropic-style endpoints.
A trusted project can also have its own .openinterpreter/config.toml, which overrides your user config. Command-line flags override both. If you're not sure which value wins, run /debug-config to see the effective settings and where they come from.
The model decides how well the agent understands your code. The harness decides how the model sees the task and the tools.
You need both. A good model inside a mismatched harness sends malformed tool calls and misreads results. And a good harness can't make up for a model that doesn't understand the code.
That's why Open Interpreter chooses a harness when you choose a model. For example:
Claude models get the claude-code harness
Kimi models get kimi-code
Qwen models get qwen-code
DeepSeek models get claude-code-bare
For other model families, you can choose the harness yourself with /harness.
A thing to remember here is that a weak result doesn't always mean a weak model. Before you switch models, try the same model with a different harness, which I'll cover in detail in the next section.
Harness emulation is the main reason the current version of Open Interpreter exists.
An agent harness is everything around the model that turns it into an agent. It includes:
In plain English, the harness decides how the model sees the task and how its decisions turn into actions.
Open Interpreter has a set of built-in harness modes. These are the ones you'll use most:
native: Open Interpreter's own harness, inherited from Codex
claude-code: Emulates the prompts and tool surface of Anthropic's Claude Code
kimi-code: A Rust reimplementation of the Kimi Code harness that Moonshot recommends for its Kimi models
qwen-code: Emulates Alibaba's Qwen Code CLI for Qwen models
swe-agent: Emulates SWE-agent, a research agent built to resolve GitHub issues
The full list also has variants like claude-code-bare, kimi-cli, deepseek-tui, zcode, and minimal. Run /harness in a session to see what your version supports.
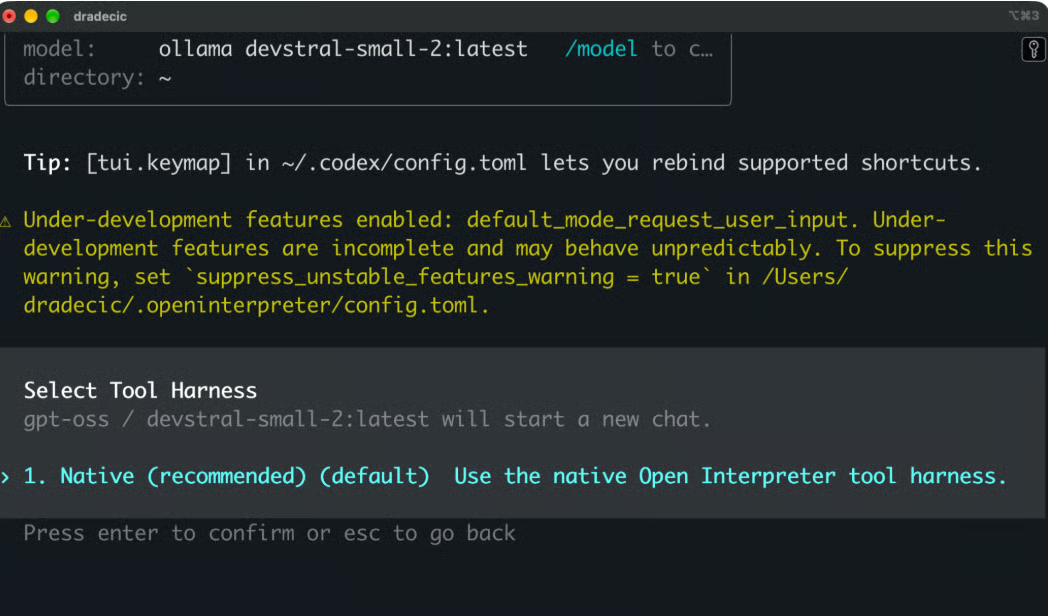
You can switch harnesses mid-session with /harness, or set a default in ~/.openinterpreter/config.toml:
harness = "kimi-code"
harness_guidance = true
The harness_guidance setting adds a reliability guidance where the harness allows it. Set it to false if you want stricter emulation. If you leave harness unset, Open Interpreter chooses one based on the model family, as you saw in the previous section.
Most model vendors tune their coding models inside a specific agent setup, and they publish a recommended harness to go with it.
The model gets used to that harness. It learns its prompt style, its tool names, its file edit format, and the way tool results come back.
Let's say you run a model tuned for search-and-replace edits inside a harness that expects full patch files. The model knows which change to make, but it keeps describing the change in the wrong format. The agent loop uses up tokens without any progress.
Tool results work the same way. If the harness returns results in a format the model hasn't seen, the model misreads them. If the harness deletes the model's reasoning between turns, a thinking model loses track of its own plan.
This means that the same model can look good in one agent and bad in another, with no change to its weights. It's also why coding benchmark results usually name the harness used for each run.
Frontier models tend to recover from an unfamiliar harness, but smaller and cheaper models usually don't. Open Interpreter doesn't force every model into one format, but changes the format to fit the model.
You can test this yourself with the demo project. Restore the original file with git restore habits.py, switch the harness with /harness, and give the agent the same prompt again. Then compare how many steps it takes and how it formats its edits.
You've already seen most of these features in the article. Here's what each one gives you in day-to-day development.
Open Interpreter works inside your Git repository. It reads the project structure and tracks what it changed.
Two slash commands help here. /diff shows the working-tree changes, and /review asks the agent to check the current changes for bugs and regressions before you commit. You can run the same review without opening a session:
interpreter exec review --uncommittedSessions are saved too. If you stop in the middle of a task, interpreter resume --last picks it up where you left off.
The agent runs the same commands you would, for example test suites, linters, build scripts, and package managers. All of them run inside native sandboxing on macOS, Linux, and Windows.
Long-running commands can run in the background. Use /ps to list them and /stop to end them.
For scripts and CI pipelines, interpreter exec runs a task without the interactive UI:
interpreter exec "fix the failing test"You can switch providers and models at any point with /model. Your config, AGENTS.md, and skills still apply after the switch.
Profiles are helpful here. Let's say you want a cheap model for routine work and a stronger one for code reviews. You can define both in your config:
[profiles.review]
model_provider = "deepseek"
model = "deepseek-v4-pro"
sandbox_mode = "read-only"
Then start with interpreter --profile review when you need it.
/harness changes how the model sees the task without changing the model. It's the first thing to try when a model struggles with tool calls, before you move to a bigger model.
The Model Context Protocol (MCP) connects the agent to tools it wasn't designed to work with, such as documentation servers or databases. You add servers in your config:
[mcp_servers.docs]
command = "npx"
args = ["-y", "your-docs-mcp-server"]
default_tools_approval_mode = "prompt"
Run /mcp to see the configured servers and their tools. The default_tools_approval_mode setting makes the agent ask before it uses a tool from that server.
It also works the other way around. interpreter mcp-server exposes Open Interpreter as an MCP server, and interpreter acp runs it inside editors that support the Agent Client Protocol, an open standard for connecting editors to coding agents.
AGENTS.md is a Markdown file in your repository with project rules the agent reads on every task. For the habit tracker, it could look like this:
# AGENTS.md
- Run the tests with python -m pytest before you finish a task.
- Use the Python standard library only. Don't add new dependencies.
You can also run /init, and the agent writes a first version for you.
Skills are reusable workflows, packaged as folders in .agents/skills inside your project or ~/.agents/skills for your user. The agent picks up a skill automatically when a task matches it. Run /skills to see which ones are available.
Both are shared formats, so the same files work with other coding agents that support them. Open Interpreter also supports hooks, which run your own commands at set points in a session. You review and trust them with /hooks.
Two settings control what the agent can do:
Sandbox mode: read-only, workspace-write, or danger-full-access
Approval policy: untrusted, on-request, or never
The sandbox decides what's possible, and the approval policy decides when the agent asks first. With workspace-write and on-request, the agent can edit your project and run tests, but it asks before it needs access beyond that.
You can change both with /permissions or with the -s and -a flags. There's also a --yolo flag that bypasses both, and the docs label it as dangerous. I'll cover these settings in more detail in the security section.
Open Interpreter describes itself as a coding agent built for low-cost models.
The biggest proprietary coding agents are built around their vendor's own models. Open Interpreter gives you one agent that works with proprietary models, hosted open-weight models, and local models.
Open-weight models like Kimi, DeepSeek, GLM, and Qwen have public weights. You can use them through a third-party provider or on your own hardware.
That gives you two advantages. Hosted open-weight models usually cost less per token than frontier proprietary models. And you're not limited to one host, because the same model runs anywhere its weights do.
Open Interpreter has dedicated provider guides for Kimi K3, DeepSeek, and GLM. It also chooses the matching harness for these model families.
Ollama and LM Studio are built-in providers, so you can run a model on your own machine without an API key or per-token costs.
The cost is hardware. When I tested devstral-small-2 on my MacBook Pro M1 Max with 64GB of unified memory, the model alone took 26 GB of it. The default Ollama context window was too small for the agent loop, and at 128k tokens, memory usage kept rising and falling until the session stalled.
Coding agents need a large context window, because the system prompt, tool definitions, file contents, and command output all have to fit. Ollama recommends at least 64k tokens for Codex-style agents. And a larger context window uses more memory on top of the model itself.
Open Interpreter runs on your machine, but the model doesn't have to.
Where your code goes depends on the provider:
Your config, sessions, and logs are stored locally under ~/.openinterpreter no matter what.
If you need more control, you can add a custom provider that points to your own inference server. Any server with an OpenAI-compatible API works, for example a vLLM deployment on your company's GPUs. This way, you get a hosted setup where the infrastructure is yours.
Open models aren't equally good at tool calling. You'll see weak tool use showing up as malformed calls, loops, early stops, or ignored command output.
The right harness helps, but it can't fix a model that can't plan a multi-step task. Smaller local models have the most problems here.
Before you point a new model at a real project, test it on a small repository like the habit tracker I showed in this article. If it shows any weakness, try a different harness before you switch to a bigger model.
Here's a quick recap of your options:
| Where inference runs | Cost | Code leaves your machine? | |
|---|---|---|---|
| Proprietary hosted model | Vendor's server | Per token or subscription | Yes |
| Open-weight hosted model | Provider's server | Per token, usually lower | Yes |
| Open-weight local model | Your hardware | Hardware and electricity | No |
Open Interpreter options for local and open models
Open Interpreter shares a lot with other terminal coding agents. The differences are in who owns the tool and which models it's built for.
Claude Code is Anthropic's terminal coding agent. The first difference is ownership - Claude Code is proprietary, while Open Interpreter is open source under the Apache 2.0 license. You can read and change every part of Open Interpreter.
Model choice is the second difference. Claude Code is built for Claude models. You can point it at Anthropic-compatible endpoints from other providers, but its harness stays tuned for Claude. Open Interpreter treats model choice as a core feature.
The harness comparison is where it gets interesting. Claude Code is itself one of the harnesses Open Interpreter emulates. With the claude-code mode, any model gets Claude Code-style prompts and tools inside Open Interpreter's runtime. The UI and slash commands are still Open Interpreter's, so it's not the same product with a different model.
Both tools are terminal-first. Each has an interactive session and a non-interactive mode for scripts and CI. For project instructions, Claude Code reads CLAUDE.md, while Open Interpreter uses the shared AGENTS.md format.
Claude Code has a bigger ecosystem. It comes with IDE extensions, desktop and web apps, a plugin marketplace, subagents, and an SDK. Open Interpreter is younger, and it relies on shared standards like MCP, skills, AGENTS.md, and the Agent Client Protocol instead of its own ecosystem.
If you work with Claude models and want the most polished experience, Claude Code is the safer choice. If you want to run other models or avoid a proprietary tool, go with Open Interpreter.
OpenCode is the closest match. Both are open source, terminal-first, and built to work with a long list of model providers.
Model support is similar on paper. OpenCode supports more than 75 providers, and Open Interpreter generates its provider list from a public model catalog. Both run local models through Ollama.
The terminal experience differs more. OpenCode has its own TUI with Language Server Protocol (LSP) integration, which feeds code diagnostics like type errors back to the model. Open Interpreter's TUI comes from Codex.
As for configuration, OpenCode uses an opencode.json file, and Open Interpreter uses config.toml with profiles.
The agent architecture is the main difference. OpenCode runs as a client and server, where the TUI is one client of a local server that other clients can also connect to. It has built-in build and plan agents, and it supports custom agents and subagents. It adjusts its system prompt for each model family, but the tools and the loop stay OpenCode's own. Open Interpreter goes further and swaps the whole harness, including tool schemas and message format. Newer builds even include an opencode harness mode.
On the development side, OpenCode is its own codebase, built by its team and community. Open Interpreter builds on a Codex fork, so a large part of its runtime comes from upstream. That's a trade-off. Open Interpreter gets Codex's sandbox and runtime for free, while OpenCode controls its entire stack.
These two aren't competitors in the usual sense. Open Interpreter is a fork of Codex.
They share the Rust runtime, the TUI, sandboxing, approvals, AGENTS.md, skills, MCP, exec mode, and most slash commands. When I ran Open Interpreter, the session resume hint still said codex resume.
Codex is OpenAI's agent, built around OpenAI models. It supports local models with --oss and custom providers, but the default experience targets OpenAI.
Open Interpreter extends Codex in a couple of directions:
Harness emulation: It changes prompts, tool schemas, and message format to fit each model family
Provider support: It has a generated provider catalog and dedicated guides for Kimi K3, DeepSeek, and GLM
Chat Completions: The --chat-completions flag runs any OpenAI-compatible provider
Codex SDK override: Apps built on the Codex SDK can run through Open Interpreter instead
Open Interpreter also stores its config and sessions under ~/.openinterpreter, so it doesn't clash with a Codex install.
If you mostly use OpenAI models, Codex is a better choice. If you use other models, Open Interpreter gives you the same workflow with better support for them.
Here's a quick recap:
| License | Models | Harness approach | Config | |
|---|---|---|---|---|
| Open Interpreter | Open source (Apache 2.0) | Any provider, hosted or local | Emulates harness per model | config.toml |
| Claude Code | Proprietary | Built for Claude models | Claude Code's own harness | settings.json and CLAUDE.md |
| OpenCode | Open source (MIT) | 75+ providers, hosted or local | One harness with model-specific prompts | opencode.json |
| Codex | Open source (Apache 2.0) | Built for OpenAI models with --oss | Codex's own harness | config.toml |
Open Interpreter compared to other AI coding agents
The worst a chatbot can do is give you a bad answer, which you can ignore. A coding agent runs commands on your machine, reads and writes files, and can reach the network. A bad decision from the model, or a prompt injection, can do some actual damage. Prompt injection means instructions hidden in content the agent reads, such as a README file or a web page.
Open Interpreter inherits its security model from the Codex runtime. It has two layers - a sandbox that limits what's possible, and an approval policy that decides when the agent asks you first.
Every command the agent runs goes through an OS-level sandbox on macOS, Linux, and Windows. There are three sandbox modes:
read-only: The agent can read files, but can't change anything
workspace-write: The agent can edit files and run commands inside your project folder
danger-full-access: No sandbox at all
With workspace-write, file writes are limited to the active workspace. The agent can fix your code, but it can't edit files elsewhere on your machine.
In workspace-write mode, commands don't have network access by default. This blocks downloads and stops the agent from sending your code anywhere.
Some tasks need the network, for example installing a package. You can turn network access on in your config:
sandbox_mode = "workspace-write"

[sandbox_workspace_write]
network_access = true
Only turn it on for projects where you need it.
The approval policy decides when the agent stops and asks:
untrusted: Asks before it runs commands that aren't on the trusted list
on-request: Asks when a task needs more access than the sandbox allows
never: Never asks
For version-controlled projects, workspace-write with on-request is a good default. The agent works inside your project and asks before it goes further. Git gives you a way back if something goes wrong.
The --yolo flag turns off both the sandbox and approvals. Use it only in a disposable environment, like a container or a VM.
Commands the agent runs inherit your shell environment. If your API keys are in environment variables, those commands can see them.
You can limit this with shell_environment_policy:
[shell_environment_policy]
inherit = "core"
exclude = ["AWS_*", "*_TOKEN"]
The core setting passes only basic variables like HOME and PATH, and exclude removes anything that matches the patterns.
Files are another risk. The agent can read a .env file in your project even in read-only mode. With a hosted provider, anything the agent reads goes to that provider's servers.
A thing to remember here is that the sandbox limits damage, but you should still treat it as a safety net, not a guarantee.
Before you let the agent run on its own, run /status and check the sandbox mode and approval policy.
If you find an Open Interpreter article that starts with pip install, it's not wrong. It's describing a different project.
The original Open Interpreter launched in 2023 as a Python project. It let language models run Python, JavaScript, and shell code on your machine, and people knew it as an open-source alternative to ChatGPT's Code Interpreter. Later versions added computer control, so the model could work with your desktop too.
The current main project is a Rust rewrite based on Codex. It focuses on coding agents and harness emulation, not general computer control.
The Python version didn't disappear. It continues as a community fork at endolith/open-interpreter.
Both versions use the same name, the same GitHub repository history, and the same interpreter command, so it's easy to mix them up.
But a really obvious tell is:
pip install open-interpreter: The legacy Python version
curl or PowerShell installer: The current Rust version
Open Interpreter isn't the right tool for every setup. Here's where it makes sense and where it doesn't.
Open source: It's licensed under Apache 2.0, so you can read, audit, and fork the entire codebase
Model choice: You can use hosted, open-weight, and local models from one agent, and switch between them mid-session
Multiple agent harnesses: You get closer to the performance a model was tuned for, which few other coding agents offer
Terminal-native development: It fits into your existing shell and Git workflow, and exec mode works in scripts and CI
Open and lower-cost models: The project is built around them, with dedicated provider guides and matching harnesses
Extensibility: MCP, skills, hooks, AGENTS.md, the Agent Client Protocol, and the Codex SDK override let you connect it to other tools
Model quality varies: The agent is only as good as the model behind it, and no harness fixes a model that can't plan a multi-step task
Local models need serious hardware: In my tests, devstral-small-2 alone took 26 GB of memory, before the large context window a coding agent needs
Setup takes more work: You manage providers, context windows, harnesses, and sandbox settings yourself. There are also rough edges, like leftover Codex branding and metadata warnings for Ollama models
Command execution is a risk: The sandbox and approvals reduce the risk, but they don't remove it
Code still needs review: Passing tests don't guarantee a correct fix, so you have to read every diff
Open Interpreter is an open-source coding agent that works with the model you choose, whether that model is hosted, open-weight, or running on your own machine.
The workflow is simple. You pick a model and a harness, point the agent at a project, and let it inspect, edit, and run commands until the task is done. Then you review its work.
Harness emulation makes it different from the competitors. Open Interpreter doesn't force every model into one agent setup. It changes the setup to fit the model, and that can be the difference. The model also decides how good the work is, and permissions decide what the agent can modify. Your review is the last check before any change reaches your codebase.
If you want to get an AI engineer certification, enroll in our Associate AI Engineer for Developers track and transition into the world of AI at your own pace.
Learn with DataCamp
แทร็ก
แทร็ก
แทร็ก
บล็อก
Khalid Abdelaty
14 นาที
บทแนะนำ
Dario Radečić
15 นาที
บทแนะนำ
Adel Nehme
9 นาที
บทแนะนำ
Bexruz (Bex) Tuychiev
12 นาที
บทแนะนำ
Aashi Dutt
7 นาที
บทแนะนำ
Abid Ali Awan
9 นาที