
Course
Efficient AI Model Training with PyTorch
4 hr
1.5K
First introduced in the paper Attention is All You Need by Vaswani et al., Transformers have since become a cornerstone of many NLP tasks due to their unique design and effectiveness.
At the heart of Transformers is the attention mechanism, specifically the concept of 'self-attention,' which allows the model to weigh and prioritize different parts of the input data. This mechanism enables Transformers to manage long-range dependencies in data. It is fundamentally a weighting scheme that allows a model to focus on different parts of the input when producing an output.
The self-attention mechanism allows the model to consider different words or features in the input sequence, assigning each one a 'weight' that signifies its importance for producing a given output. For instance, in a sentence translation task, while translating a particular word, the model might assign higher attention weights to words that are grammatically or semantically related to the target word. This process allows the Transformer to capture dependencies between words or features, regardless of their distance from each other in the sequence.
Transformers' impact in the field of NLP cannot be overstated. They have outperformed traditional models in many tasks, demonstrating a superior capacity to comprehend and generate human language in a more nuanced way.
For a deeper understanding of NLP, DataCamp's Introduction to Natural Language Processing in Python course is a recommended resource.
Before building a Transformer, it is essential to set up the working environment correctly. First and foremost, PyTorch needs to be installed. PyTorch be installed through the pip or conda package managers.
For pip, use the command:
pip3 install torch torchvision torchaudioFor conda, use the command:
conda install pytorch torchvision -c pytorchFor other options for installing and running PyTorch, refer to the official website.
Additionally, it is beneficial to have a basic understanding of deep learning concepts, as these will be fundamental to understanding the operation of Transformers. For those who need a refresher, the DataCamp course Deep Learning in Python is a valuable resource that covers key concepts in deep learning.
To build the Transformer model, the following steps are necessary:
We’ll start with importing the PyTorch library for core functionality, the neural network module for creating neural networks, the optimization module for training networks, and the data utility functions for handling data. Additionally, we’ll import the standard Python math module for mathematical operations and the copy module for creating copies of complex objects.
These tools set the foundation for defining the model's architecture, managing data, and establishing the training process.
import torch
import torch.nn as nn
import torch.optim as optim
import torch.utils.data as data
import math
import copyBefore we get into building our components, take a look at the following table, which describes the different components of a Transformer and their purpose:
| Component | Description | Purpose |
|---|---|---|
| Multi-Head Attention | Mechanism to focus on different parts of the input | Captures dependencies across different positions in the sequence |
| Feed-Forward Networks | Position-wise fully connected layers | Transforms the attention outputs, adding complexity |
| Positional Encoding | Adds positional information to embeddings | Provides sequence order context to the model |
| Layer Normalization | Normalizes inputs to each sub-layer | Stabilizes training, improves convergence |
| Residual Connections | Shortcuts between layers | Helps in training deeper networks by minimizing gradient issues |
| Dropout | Randomly zeroes some network connections | Prevents overfitting by regularizing the model |
The multi-head attention mechanism computes the attention between each pair of positions in a sequence. It consists of multiple “attention heads” that capture different aspects of the input sequence.
To learn more about multi-head attention, check out the attention mechanisms section of the Large Language Models (LLMs) Concepts course.
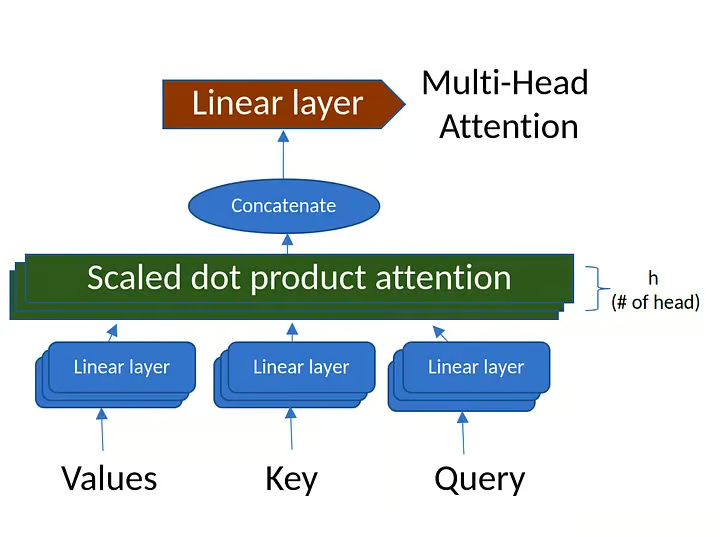
Figure 1. Multi-Head Attention (source: image created by author)
class MultiHeadAttention(nn.Module):
    def __init__(self, d_model, num_heads):
        super(MultiHeadAttention, self).__init__()
        # Ensure that the model dimension (d_model) is divisible by the number of heads
        assert d_model % num_heads == 0, "d_model must be divisible by num_heads"

        # Initialize dimensions
        self.d_model = d_model # Model's dimension
        self.num_heads = num_heads # Number of attention heads
        self.d_k = d_model // num_heads # Dimension of each head's key, query, and value

        # Linear layers for transforming inputs
        self.W_q = nn.Linear(d_model, d_model) # Query transformation
        self.W_k = nn.Linear(d_model, d_model) # Key transformation
        self.W_v = nn.Linear(d_model, d_model) # Value transformation
        self.W_o = nn.Linear(d_model, d_model) # Output transformation

    def scaled_dot_product_attention(self, Q, K, V, mask=None):
        # Calculate attention scores
        attn_scores = torch.matmul(Q, K.transpose(-2, -1)) / math.sqrt(self.d_k)

        # Apply mask if provided (useful for preventing attention to certain parts like padding)
        if mask is not None:
            attn_scores = attn_scores.masked_fill(mask == 0, -1e9)

        # Softmax is applied to obtain attention probabilities
        attn_probs = torch.softmax(attn_scores, dim=-1)

        # Multiply by values to obtain the final output
        output = torch.matmul(attn_probs, V)
        return output

    def split_heads(self, x):
        # Reshape the input to have num_heads for multi-head attention
        batch_size, seq_length, d_model = x.size()
        return x.view(batch_size, seq_length, self.num_heads, self.d_k).transpose(1, 2)

    def combine_heads(self, x):
        # Combine the multiple heads back to original shape
        batch_size, _, seq_length, d_k = x.size()
        return x.transpose(1, 2).contiguous().view(batch_size, seq_length, self.d_model)

    def forward(self, Q, K, V, mask=None):
        # Apply linear transformations and split heads
        Q = self.split_heads(self.W_q(Q))
        K = self.split_heads(self.W_k(K))
        V = self.split_heads(self.W_v(V))

        # Perform scaled dot-product attention
        attn_output = self.scaled_dot_product_attention(Q, K, V, mask)

        # Combine heads and apply output transformation
        output = self.W_o(self.combine_heads(attn_output))
        return output
Class definition and initialization:
class MultiHeadAttention(nn.Module):
    def __init__(self, d_model, num_heads):
The class is defined as a subclass of PyTorch's nn.Module.
d_model: Dimensionality of the input.num_heads: The number of attention heads to split the input into.The initialization checks if d_model is divisible by num_heads, and then defines the transformation weights for query, key, value, and output.
Scaled dot-product attention:
def scaled_dot_product_attention(self, Q, K, V, mask=None):attn_scores = torch.matmul(Q, K.transpose(-2, -1)) / math.sqrt(self.d_k). Here, the attention scores are calculated by taking the dot product of queries (Q) and keys (K), and then scaling by the square root of the key dimension (d_k).V).Splitting heads:
def split_heads(self, x):This method reshapes the input x into the shape (batch_size, num_heads, seq_length, d_k). It enables the model to process multiple attention heads concurrently, allowing for parallel computation.
Combining heads:
def combine_heads(self, x):After applying attention to each head separately, this method combines the results back into a single tensor of shape (batch_size, seq_length, d_model). This prepares the result for further processing.
Forward method:
def forward(self, Q, K, V, mask=None):The forward method is where the actual computation happens:
Q), keys (K), and values (V) are first passed through linear transformations using the weights defined in the initialization.Q, K, V are split into multiple heads using the split_heads method.scaled_dot_product_attention method is called on the split heads.combine_heads method.In summary, the MultiHeadAttention class encapsulates the multi-head attention mechanism commonly used in transformer models. It takes care of splitting the input into multiple attention heads, applying attention to each head, and then combining the results. By doing so, the model can capture various relationships in the input data at different scales, improving the expressive ability of the model.
class PositionWiseFeedForward(nn.Module):
    def __init__(self, d_model, d_ff):
        super(PositionWiseFeedForward, self).__init__()
        self.fc1 = nn.Linear(d_model, d_ff)
        self.fc2 = nn.Linear(d_ff, d_model)
        self.relu = nn.ReLU()

    def forward(self, x):
        return self.fc2(self.relu(self.fc1(x)))
Class definition:
class PositionWiseFeedForward(nn.Module):The class is a subclass of PyTorch's nn.Module, which means it will inherit all functionalities required to work with neural network layers.
Initialization:
def __init__(self, d_model, d_ff):
    super(PositionWiseFeedForward, self).__init__()
    self.fc1 = nn.Linear(d_model, d_ff)
    self.fc2 = nn.Linear(d_ff, d_model)
self.relu = nn.ReLU()d_model: Dimensionality of the model's input and output.d_ff: Dimensionality of the inner layer in the feed-forward network.self.fc1 and self.fc2: Two fully connected (linear) layers with input and output dimensions as defined by d_model and d_ff.self.relu: ReLU (Rectified Linear Unit) activation function, which introduces non-linearity between the two linear layers.Forward Method:
def forward(self, x):
return self.fc2(self.relu(self.fc1(x)))x: The input to the feed-forward network.self.fc1(x): The input is first passed through the first linear layer (fc1).self.relu(...): The output of fc1 is then passed through a ReLU activation function. ReLU replaces all negative values with zeros, introducing non-linearity into the model.self.fc2(...): The activated output is then passed through the second linear layer (fc2), producing the final output.In summary, the PositionWiseFeedForward class defines a position-wise feed-forward neural network that consists of two linear layers with a ReLU activation function in between. In the context of transformer models, this feed-forward network is applied to each position separately and identically. It helps in transforming the features learned by the attention mechanisms within the transformer, acting as an additional processing step for the attention outputs.
Positional Encoding is used to inject the position information of each token in the input sequence. It uses sine and cosine functions of different frequencies to generate the positional encoding.
class PositionalEncoding(nn.Module):
    def __init__(self, d_model, max_seq_length):
        super(PositionalEncoding, self).__init__()

        pe = torch.zeros(max_seq_length, d_model)
        position = torch.arange(0, max_seq_length, dtype=torch.float).unsqueeze(1)
        div_term = torch.exp(torch.arange(0, d_model, 2).float() * -(math.log(10000.0) / d_model))

        pe[:, 0::2] = torch.sin(position * div_term)
        pe[:, 1::2] = torch.cos(position * div_term)

        self.register_buffer('pe', pe.unsqueeze(0))

    def forward(self, x):
        return x + self.pe[:, :x.size(1)]
Class definition:
class PositionalEncoding(nn.Module):The class is defined as a subclass of PyTorch's nn.Module, allowing it to be used as a standard PyTorch layer.
Initialization:
def __init__(self, d_model, max_seq_length):
    super(PositionalEncoding, self).__init__()

    pe = torch.zeros(max_seq_length, d_model)
    position = torch.arange(0, max_seq_length, dtype=torch.float).unsqueeze(1)
    div_term = torch.exp(torch.arange(0, d_model, 2).float() * -(math.log(10000.0) / d_model))

    pe[:, 0::2] = torch.sin(position * div_term)
    pe[:, 1::2] = torch.cos(position * div_term)

self.register_buffer('pe', pe.unsqueeze(0))d_model: The dimension of the model's input.max_seq_length: The maximum length of the sequence for which positional encodings are pre-computed.pe: A tensor filled with zeros, which will be populated with positional encodings.position: A tensor containing the position indices for each position in the sequence.div_term: A term used to scale the position indices in a specific way.pe.pe is registered as a buffer, which means it will be part of the module's state but will not be considered a trainable parameter.Forward method:
def forward(self, x):
    return x + self.pe[:, :x.size(1)]
The forward method simply adds the positional encodings to the input x.
It uses the first x.size(1) elements of pe to ensure that the positional encodings match the actual sequence length of x.
Summary
The PositionalEncoding class adds information about the position of tokens within the sequence. Since the transformer model lacks inherent knowledge of the order of tokens (due to its self-attention mechanism), this class helps the model to consider the position of tokens in the sequence. The sinusoidal functions used are chosen to allow the model to easily learn to attend to relative positions, as they produce a unique and smooth encoding for each position in the sequence.
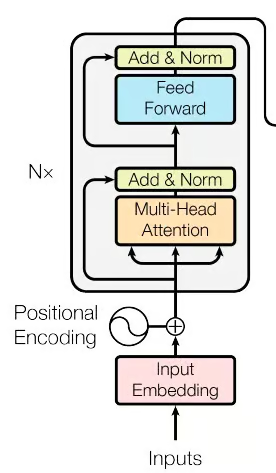
Figure 2. The Encoder part of the transformer network (Source: image from the original paper)
class EncoderLayer(nn.Module):
    def __init__(self, d_model, num_heads, d_ff, dropout):
        super(EncoderLayer, self).__init__()
        self.self_attn = MultiHeadAttention(d_model, num_heads)
        self.feed_forward = PositionWiseFeedForward(d_model, d_ff)
        self.norm1 = nn.LayerNorm(d_model)
        self.norm2 = nn.LayerNorm(d_model)
        self.dropout = nn.Dropout(dropout)

    def forward(self, x, mask):
        attn_output = self.self_attn(x, x, x, mask)
        x = self.norm1(x + self.dropout(attn_output))
        ff_output = self.feed_forward(x)
        x = self.norm2(x + self.dropout(ff_output))
        return x
Class definition:
class EncoderLayer(nn.Module):The class is defined as a subclass of PyTorch's nn.Module, which means it can be used as a building block for neural networks in PyTorch.
Initialization:
def __init__(self, d_model, num_heads, d_ff, dropout):
    super(EncoderLayer, self).__init__()
    self.self_attn = MultiHeadAttention(d_model, num_heads)
    self.feed_forward = PositionWiseFeedForward(d_model, d_ff)
    self.norm1 = nn.LayerNorm(d_model)
    self.norm2 = nn.LayerNorm(d_model)
    self.dropout = nn.Dropout(dropout)
Parameters:
d_model: The dimensionality of the input.num_heads: The number of attention heads in the multi-head attention.d_ff: The dimensionality of the inner layer in the position-wise feed-forward network.dropout: The dropout rate used for regularization.Components:
self.self_attn: Multi-head attention mechanism.self.feed_forward: Position-wise feed-forward neural network.self.norm1 and self.norm2: Layer normalization, applied to smooth the layer's input.self.dropout: Dropout layer, used to prevent overfitting by randomly setting some activations to zero during training.Forward method:
def forward(self, x, mask):
    attn_output = self.self_attn(x, x, x, mask)
    x = self.norm1(x + self.dropout(attn_output))
    ff_output = self.feed_forward(x)
    x = self.norm2(x + self.dropout(ff_output))
    return x
Input:
x: The input to the encoder layer.mask: Optional mask to ignore certain parts of the input.Processing steps:
x is passed through the multi-head self-attention mechanism.norm1.norm2.Summary:
The EncoderLayer class defines a single layer of the transformer's encoder. It encapsulates a multi-head self-attention mechanism followed by the position-wise feed-forward neural network, with residual connections, layer normalization, and dropout applied as appropriate. Together, these components allow the encoder to capture complex relationships in the input data and transform them into a useful representation for downstream tasks. Typically, multiple such encoder layers are stacked to form the complete encoder part of a transformer model.

class DecoderLayer(nn.Module):
    def __init__(self, d_model, num_heads, d_ff, dropout):
        super(DecoderLayer, self).__init__()
        self.self_attn = MultiHeadAttention(d_model, num_heads)
        self.cross_attn = MultiHeadAttention(d_model, num_heads)
        self.feed_forward = PositionWiseFeedForward(d_model, d_ff)
        self.norm1 = nn.LayerNorm(d_model)
        self.norm2 = nn.LayerNorm(d_model)
        self.norm3 = nn.LayerNorm(d_model)
        self.dropout = nn.Dropout(dropout)

    def forward(self, x, enc_output, src_mask, tgt_mask):
        attn_output = self.self_attn(x, x, x, tgt_mask)
        x = self.norm1(x + self.dropout(attn_output))
        attn_output = self.cross_attn(x, enc_output, enc_output, src_mask)
        x = self.norm2(x + self.dropout(attn_output))
        ff_output = self.feed_forward(x)
        x = self.norm3(x + self.dropout(ff_output))
        return x
Class definition:
class DecoderLayer(nn.Module):Initialization:
def __init__(self, d_model, num_heads, d_ff, dropout):
    super(DecoderLayer, self).__init__()
    self.self_attn = MultiHeadAttention(d_model, num_heads)
    self.cross_attn = MultiHeadAttention(d_model, num_heads)
    self.feed_forward = PositionWiseFeedForward(d_model, d_ff)
    self.norm1 = nn.LayerNorm(d_model)
    self.norm2 = nn.LayerNorm(d_model)
    self.norm3 = nn.LayerNorm(d_model)
self.dropout = nn.Dropout(dropout)Parameters:
d_model: The dimensionality of the input.num_heads: The number of attention heads in the multi-head attention.d_ff: The dimensionality of the inner layer in the feed-forward network.dropout: The dropout rate for regularization.Components:
self.self_attn: Multi-head self-attention mechanism for the target sequence.self.cross_attn: Multi-head attention mechanism that attends to the encoder's output.self.feed_forward: Position-wise feed-forward neural network.self.norm1, self.norm2, self.norm3: Layer normalization components.self.dropout: Dropout layer for regularization.Forward method:
ef forward(self, x, enc_output, src_mask, tgt_mask):
    attn_output = self.self_attn(x, x, x, tgt_mask)
    x = self.norm1(x + self.dropout(attn_output))
    attn_output = self.cross_attn(x, enc_output, enc_output, src_mask)
    x = self.norm2(x + self.dropout(attn_output))
    ff_output = self.feed_forward(x)
    x = self.norm3(x + self.dropout(ff_output))
return xInput:
x: The input to the decoder layer.enc_output: The output from the corresponding encoder (used in the cross-attention step).src_mask: Source mask to ignore certain parts of the encoder's output.tgt_mask: Target mask to ignore certain parts of the decoder's input.Processing steps:
Summary:
The DecoderLayer class defines a single layer of the transformer's decoder. It consists of a multi-head self-attention mechanism, a multi-head cross-attention mechanism (that attends to the encoder's output), a position-wise feed-forward neural network, and the corresponding residual connections, layer normalization, and dropout layers. This combination enables the decoder to generate meaningful outputs based on the encoder's representations, taking into account both the target sequence and the source sequence. As with the encoder, multiple decoder layers are typically stacked to form the complete decoder part of a transformer model.
Next, the Encoder and Decoder blocks are combined to construct the comprehensive Transformer model.
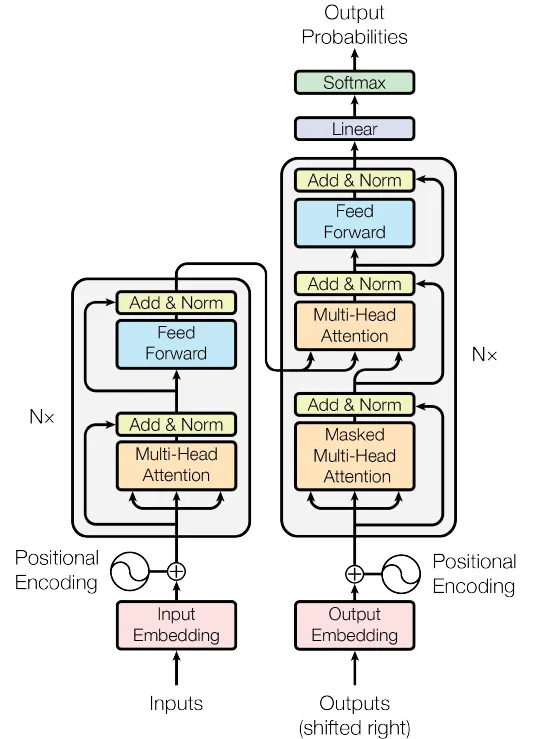
Figure 4. The Transformer Network (Source: Image from the original paper)
class Transformer(nn.Module):
    def __init__(self, src_vocab_size, tgt_vocab_size, d_model, num_heads, num_layers, d_ff, max_seq_length, dropout):
        super(Transformer, self).__init__()
        self.encoder_embedding = nn.Embedding(src_vocab_size, d_model)
        self.decoder_embedding = nn.Embedding(tgt_vocab_size, d_model)
        self.positional_encoding = PositionalEncoding(d_model, max_seq_length)

        self.encoder_layers = nn.ModuleList([EncoderLayer(d_model, num_heads, d_ff, dropout) for _ in range(num_layers)])
        self.decoder_layers = nn.ModuleList([DecoderLayer(d_model, num_heads, d_ff, dropout) for _ in range(num_layers)])

        self.fc = nn.Linear(d_model, tgt_vocab_size)
        self.dropout = nn.Dropout(dropout)

    def generate_mask(self, src, tgt):
        src_mask = (src != 0).unsqueeze(1).unsqueeze(2)
        tgt_mask = (tgt != 0).unsqueeze(1).unsqueeze(3)
        seq_length = tgt.size(1)
        nopeak_mask = (1 - torch.triu(torch.ones(1, seq_length, seq_length), diagonal=1)).bool()
        tgt_mask = tgt_mask & nopeak_mask
        return src_mask, tgt_mask

    def forward(self, src, tgt):
        src_mask, tgt_mask = self.generate_mask(src, tgt)
        src_embedded = self.dropout(self.positional_encoding(self.encoder_embedding(src)))
        tgt_embedded = self.dropout(self.positional_encoding(self.decoder_embedding(tgt)))

        enc_output = src_embedded
        for enc_layer in self.encoder_layers:
            enc_output = enc_layer(enc_output, src_mask)

        dec_output = tgt_embedded
        for dec_layer in self.decoder_layers:
            dec_output = dec_layer(dec_output, enc_output, src_mask, tgt_mask)

        output = self.fc(dec_output)
        return output
Class definition:
class Transformer(nn.Module):Initialization:
def __init__(self, src_vocab_size, tgt_vocab_size, d_model, num_heads, num_layers, d_ff, max_seq_length, dropout):The constructor takes the following parameters:
src_vocab_size: Source vocabulary size.tgt_vocab_size: Target vocabulary size.d_model: The dimensionality of the model's embeddings.num_heads: Number of attention heads in the multi-head attention mechanism.num_layers: Number of layers for both the encoder and the decoder.d_ff: Dimensionality of the inner layer in the feed-forward network.max_seq_length: Maximum sequence length for positional encoding.dropout: Dropout rate for regularization.And it defines the following components:
self.encoder_embedding: Embedding layer for the source sequence.self.decoder_embedding: Embedding layer for the target sequence.self.positional_encoding: Positional encoding component.self.encoder_layers: A list of encoder layers.self.decoder_layers: A list of decoder layers.self.fc: Final fully connected (linear) layer mapping to target vocabulary size.self.dropout: Dropout layer.Generate mask method:
def generate_mask(self, src, tgt):This method is used to create masks for the source and target sequences, ensuring that padding tokens are ignored and that future tokens are not visible during training for the target sequence.
Forward method:
def forward(self, src, tgt):This method defines the forward pass for the Transformer, taking source and target sequences and producing the output predictions.
Output:
The final output is a tensor representing the model's predictions for the target sequence.
Summary:
The Transformer class brings together the various components of a Transformer model, including the embeddings, positional encoding, encoder layers, and decoder layers. It provides a convenient interface for training and inference, encapsulating the complexities of multi-head attention, feed-forward networks, and layer normalization.
This implementation follows the standard Transformer architecture, making it suitable for sequence-to-sequence tasks like machine translation, text summarization, etc. Including masking ensures that the model adheres to the causal dependencies within sequences, ignoring padding tokens and preventing information leakage from future tokens.
These sequential steps empower the Transformer model to efficiently process input sequences and produce corresponding output sequences.
For illustrative purposes, a dummy dataset will be crafted in this example. However, in a practical scenario, a more substantial dataset would be employed, and the process would involve text preprocessing along with the creation of vocabulary mappings for both the source and target languages.
src_vocab_size = 5000
tgt_vocab_size = 5000
d_model = 512
num_heads = 8
num_layers = 6
d_ff = 2048
max_seq_length = 100
dropout = 0.1

transformer = Transformer(src_vocab_size, tgt_vocab_size, d_model, num_heads, num_layers, d_ff, max_seq_length, dropout)

# Generate random sample data
src_data = torch.randint(1, src_vocab_size, (64, max_seq_length))  # (batch_size, seq_length)
tgt_data = torch.randint(1, tgt_vocab_size, (64, max_seq_length))  # (batch_size, seq_length)
Hyperparameters:
These values define the architecture and behavior of the transformer model:
src_vocab_size, tgt_vocab_size: Vocabulary sizes for source and target sequences, both set to 5000.d_model: Dimensionality of the model's embeddings, set to 512.num_heads: Number of attention heads in the multi-head attention mechanism, set to 8.num_layers: Number of layers for both the encoder and the decoder, set to 6.d_ff: Dimensionality of the inner layer in the feed-forward network, set to 2048.max_seq_length: Maximum sequence length for positional encoding, set to 100.dropout: Dropout rate for regularization, set to 0.1.For reference, the following table describes the most common hyperparameters for Transformer models and their values:
| Hyperparameter | Typical values | Impact on performance |
|---|---|---|
| d_model | 256, 512, 1024 | Higher values increase model capacity but require more computation |
| num_heads | 8, 12, 16 | More heads can capture diverse aspects of data, but are computationally intensive |
| num_layers | 6, 12, 24 | More layers improve representation power, but can lead to overfitting |
| d_ff | 2048, 4096 | Larger feed-forward networks increase model robustness |
| dropout | 0.1, 0.3 | Regularizes the model to prevent overfitting |
| learning rate | 0.0001 - 0.001 | Impacts convergence speed and stability |
| batch size | 32, 64, 128 | Larger batch sizes improve learning stability but require more memory |
Creating a Transformer instance:
transformer = Transformer(src_vocab_size, tgt_vocab_size, d_model, num_heads, num_layers, d_ff, max_seq_length, dropout)This line creates an instance of the Transformer class, initializing it with the given hyperparameters. The instance will have the architecture and behavior defined by these hyperparameters.
Generating random sample data:
The following lines generate random source and target sequences:
src_data: Random integers between 1 and src_vocab_size, representing a batch of source sequences with shape (64, max_seq_length).tgt_data: Random integers between 1 and tgt_vocab_size, representing a batch of target sequences with shape (64, max_seq_length).Summary:
The code snippet demonstrates how to initialize a Transformer model and generate random source and target sequences that can be fed into it. The chosen hyperparameters determine the Transformer's specific structure and properties. This setup could be part of a larger script where the model is trained and evaluated on actual sequence-to-sequence tasks, such as machine translation or text summarization.
Next, the model will be trained utilizing the aforementioned sample data. However, in a real-world scenario, a significantly larger dataset would be employed, which would typically be partitioned into distinct sets for training and validation purposes.
criterion = nn.CrossEntropyLoss(ignore_index=0)
optimizer = optim.Adam(transformer.parameters(), lr=0.0001, betas=(0.9, 0.98), eps=1e-9)

transformer.train()

for epoch in range(100):
    optimizer.zero_grad()
    output = transformer(src_data, tgt_data[:, :-1])
    loss = criterion(output.contiguous().view(-1, tgt_vocab_size), tgt_data[:, 1:].contiguous().view(-1))
    loss.backward()
    optimizer.step()
    print(f"Epoch: {epoch+1}, Loss: {loss.item()}")
Loss function and optimizer:
criterion = nn.CrossEntropyLoss(ignore_index=0): Defines the loss function as cross-entropy loss. The ignore_index argument is set to 0, meaning the loss will not consider targets with an index of 0 (typically reserved for padding tokens).optimizer = optim.Adam(...): Defines the optimizer as Adam with a learning rate of 0.0001 and specific beta values.Model training mode:
transformer.train(): Sets the transformer model to training mode, enabling behaviors like dropout that only apply during training.Training loop:
The code snippet trains the model for 100 epochs using a typical training loop:
for epoch in range(100): Iterates over 100 training epochs.optimizer.zero_grad(): Clears the gradients from the previous iteration.output = transformer(src_data, tgt_data[:, :-1]): Passes the source data and the target data (excluding the last token in each sequence) through the transformer. This is common in sequence-to-sequence tasks where the target is shifted by one token.loss = criterion(...): Computes the loss between the model's predictions and the target data (excluding the first token in each sequence). The loss is calculated by reshaping the data into one-dimensional tensors and using the cross-entropy loss function.loss.backward(): Computes the gradients of the loss with respect to the model's parameters.optimizer.step(): Updates the model's parameters using the computed gradients.print(f"Epoch: {epoch+1}, Loss: {loss.item()}"): Prints the current epoch number and the loss value for that epoch.Summary:
This code snippet trains the transformer model on randomly generated source and target sequences for 100 epochs. It uses the Adam optimizer and the cross-entropy loss function. The loss is printed for each epoch, allowing you to monitor the training progress. In a real-world scenario, you would replace the random source and target sequences with actual data from your task, such as machine translation.
After training the model, its performance can be evaluated on a validation dataset or test dataset. The following is an example of how this could be done:
transformer.eval()

# Generate random sample validation data
val_src_data = torch.randint(1, src_vocab_size, (64, max_seq_length))  # (batch_size, seq_length)
val_tgt_data = torch.randint(1, tgt_vocab_size, (64, max_seq_length))  # (batch_size, seq_length)

with torch.no_grad():

    val_output = transformer(val_src_data, val_tgt_data[:, :-1])
    val_loss = criterion(val_output.contiguous().view(-1, tgt_vocab_size), val_tgt_data[:, 1:].contiguous().view(-1))
    print(f"Validation Loss: {val_loss.item()}")
Evaluation mode:
transformer.eval(): Puts the transformer model in evaluation mode. This is important because it turns off certain behaviors like dropout that are only used during training.Generate random validation data:
val_src_data: Random integers between 1 and src_vocab_size, representing a batch of validation source sequences with shape (64, max_seq_length).val_tgt_data: Random integers between 1 and tgt_vocab_size, representing a batch of validation target sequences with shape (64, max_seq_length).Validation loop:
with torch.no_grad(): Disables gradient computation, as we don't need to compute gradients during validation. This can reduce memory consumption and speed up computations.val_output = transformer(val_src_data, val_tgt_data[:, :-1]): Passes the validation source data and the validation target data (excluding the last token in each sequence) through the transformer.val_loss = criterion(...): Computes the loss between the model's predictions and the validation target data (excluding the first token in each sequence). The loss is calculated by reshaping the data into one-dimensional tensors and using the previously defined cross-entropy loss function.print(f"Validation Loss: {val_loss.item()}"): Prints the validation loss value.Summary:
This code snippet evaluates the transformer model on a randomly generated validation dataset, computes the validation loss, and prints it. In a real-world scenario, the random validation data should be replaced with actual validation data from the task you are working on. The validation loss can give you an indication of how well your model is performing on unseen data, which is a critical measure of the model's generalization ability.
For further details about Transformers and Hugging Face, our tutorial, An Introduction to Using Transformers and Hugging Face, is useful.
In conclusion, this tutorial demonstrated how to construct a Transformer model using PyTorch, one of the most versatile tools for deep learning. With their capacity for parallelization and the ability to capture long-term dependencies in data, Transformers have immense potential in various fields, especially NLP tasks like translation, summarization, and sentiment analysis.
For those eager to deepen their understanding of advanced deep learning concepts and techniques, consider exploring the course Advanced Deep Learning with Keras on DataCamp. You can also read about building a simple neural network with PyTorch in a separate tutorial.
Learn more about PyTorch with these courses!
Course
Course
Course
Tutorial
Karlijn Willems
Tutorial
Bex Tuychiev
Tutorial
Josep Ferrer
Tutorial
Sayak Paul
Tutorial
Vaibhav Mehra
Tutorial
Javier Canales Luna