Course
Working with Geospatial Data in Python
4 hr
17.7K
In this section, we will learn about audio, text, image, and advanced data augmentation techniques.
Learn more about image transformation and manipulation with hands-on exercises in our Image Processing with Python skill track.
Data augmentation can apply to all machine learning applications where acquiring quality data is challenging. Furthermore, it can help improve model robustness and performance across all fields of study.
Acquiring and labeling medical imaging datasets is time-consuming and expensive. You also need a subject matter expert to validate the dataset before performing data analysis. Using geometric and other transformations can help you train robust and accurate machine-learning models.
For example, in the case of Pneumonia Classification, you can use random cropping, zooming, stretching, and color space transformation to improve the model performance. However, you need to be careful about certain augmentations as they can result in opposite results. For example, random rotation and reflection along the x-axis are not recommended for the X-ray imaging dataset.
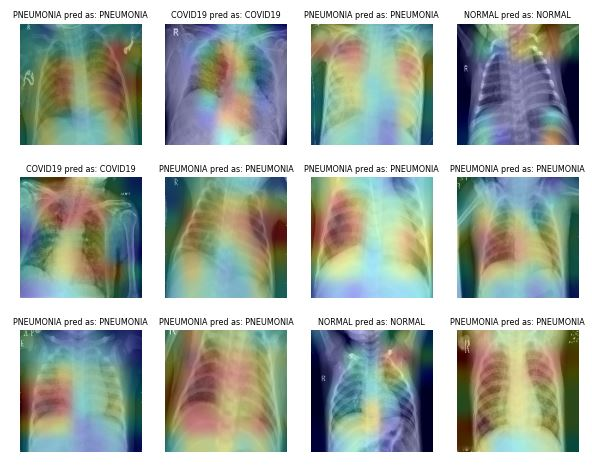
Image from ibrahimsobh.github.io | kaggle-COVID19-Classification
There is limited data available on self-driving cars, and companies are using simulated environments to generate synthetic data using reinforcement learning. It can help you train and test machine learning applications where data security is an issue.
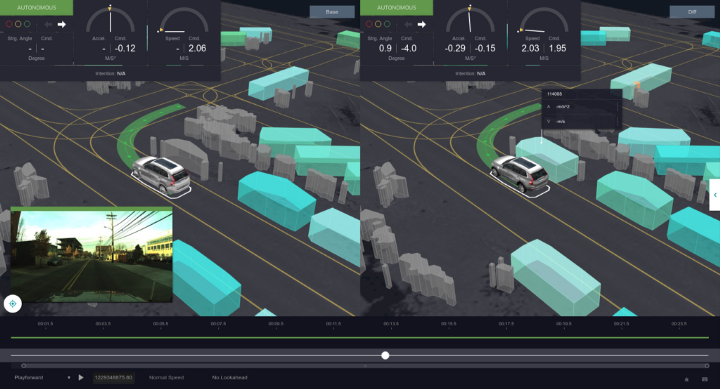
Image by David Silver | Autonomous Visualization System from Uber ATG
The possibilities of augmented data as a simulation are endless, as it can be used to generate real-world scenarios.
Text data augmentation is generally used in situations with limited quality data, and improving the performance metric takes priority. You can apply synonym augmentation, word embedding, character swap, and random insertion and deletion. These techniques are also valuable for low-resource languages.
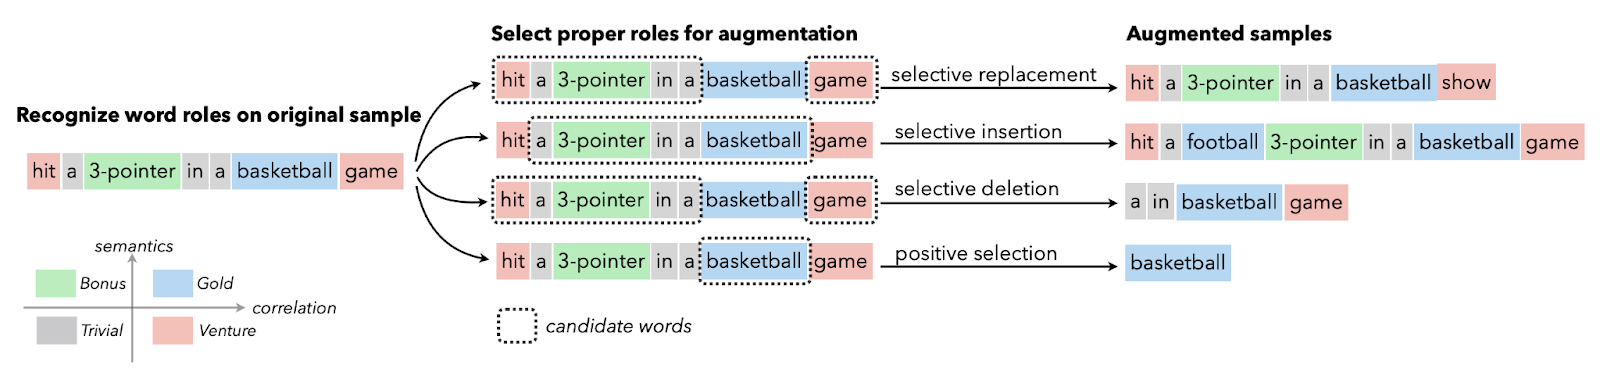
Image from Papers With Code | Selective Text Augmentation with Word Roles for Low-Resource Text Classification.
Researchers use text augmentation for the language models in high error recognition scenarios, sequence-to-sequence data generation, and text classification.
In sound classification and speech recognition, data augmentation works wonders. It improves the model performance even on low-resource languages.

Image by Edward Ma | Noise Injection
The random noise injection, shifting, and changing the pitch can help you produce state-of-the-art speech-to-text models. You can also use GANs to generate realistic sounds for a particular application.
While data augmentation is a powerful tool for enhancing machine learning models, it raises several ethical concerns that require careful consideration:
To responsibly leverage data augmentation, practitioners should validate augmented data, address biases, and ensure compliance with relevant ethical and legal standards.
In this tutorial, we are going to learn how to augment image data using Keras and Tensorflow. Furthermore, you will learn how to use your augmented data to train a simple binary classifier. The code mentioned below is the modified version of TensorFlow’s official example.
We recommend following the coding tutorial by practicing on your own. The code source with outputs is available in this DataLab workbook.
We will be using TensorFlow and Keras for data augmentation and matplotlib for displaying the images.
%%capture
import matplotlib.pyplot as plt
import numpy as np
import tensorflow as tf
from tensorflow.keras import layers
from tensorflow.keras.models import Sequential
The TensorFlow Dataset collection is huge. You can find text, audio, video, graph, time-series, and image datasets. In this tutorial, we will be using the cats_vs_dogs dataset. The dataset size is 786.68 MiB, and we will apply various image augmentation and train the binary classifier.
In the code below, we have loaded 80% training, 10% validation, and a 10% test set with labels and metadata.
%%capture
(train_ds, val_ds, test_ds), metadata = tfds.load(
    'cats_vs_dogs',
    split=['train[:80%]', 'train[80%:90%]', 'train[90%:]'],
    with_info=True,
    as_supervised=True,
)There are two classes in the dataset ‘cat’ and ‘dog’.
num_classes = metadata.features['label'].num_classes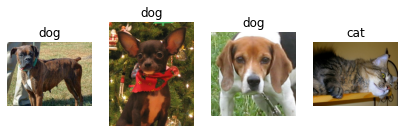
print(num_classes)2We will use iterators to extract only four random images with labels from the training set and display them using the matplotlib `.imshow()` function.
try:
    get_label_name = metadata.features['label'].int2str
    train_iter = iter(train_ds)
    fig = plt.figure(figsize=(7, 8))
    for x in range(4):
        image, label = next(train_iter)
        fig.add_subplot(1, 4, x + 1)
        plt.imshow(image)
        plt.axis('off')
        plt.title(get_label_name(label))
except StopIteration:
    print("Dataset iterator is empty!")
As we can see, we got various dog images and a cat image.
We usually use keras.Sequential() to build the model, but we can also use it to add augmentation layers.
In the example, we are resizing and rescaling the image using Keras Sequential and image augmentation layers. We will first resize the image to 180X180 and then rescale it by 1/255. The small image size will help us save time, memory, and computing.
As we can see, we have successfully passed the image through the augmentation layer, and the final output is resized and rescaled.
IMG_SIZE = 180

resize_and_rescale = keras.Sequential([
  layers.Resizing(IMG_SIZE, IMG_SIZE),
  layers.Rescaling(1./255)
])

result = resize_and_rescale(image)
plt.axis('off')
plt.imshow(result);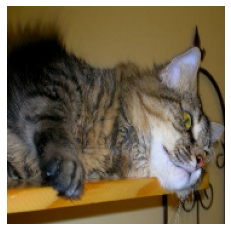
1
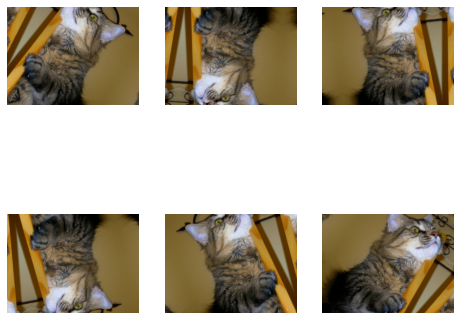
Let’s apply random flip and rotation to the same image. We will use loop, subplot, and imshow to display six images with random geometric augmentation.
data_augmentation = keras.Sequential([
  layers.RandomFlip("horizontal_and_vertical"),
  layers.RandomRotation(0.4),
])


plt.figure(figsize=(8, 7))
for i in range(6):
  augmented_image = data_augmentation(image)
  ax = plt.subplot(2, 3, i + 1)
  plt.imshow(augmented_image.numpy()/255)
plt.axis("off")Note: if you are experiencing “WARNING:matplotlib.image:Clipping input data to the valid range for imshow with RGB data ([0..1] for floats or [0..255] for integers).”, try to convert your image to numpy and divide it by 255. It will show you the clear output instead of a washed-out image.
Apart from simple augmentation,you can also apply RandomContrast, RandomCrop, CenterCrop, and RandomZoom to the images.
There are two ways to apply augmentation to the images. The first method is by directly adding the augmentation layers to the model.
model = keras.Sequential([
  # Add the preprocessing layers you created earlier.
  resize_and_rescale,
  data_augmentation,
  # Add the model layers
  layers.Conv2D(16, 3, padding='same', activation='relu'),
  layers.MaxPooling2D(),
  layers.Flatten(),
  layers.Dense(128, activation='relu'),
  layers.Dense(64, activation='relu'),
  layers.Dense(1,activation='sigmoid')
])Note: the data augmentation is inactive during the testing phase. It will only work for Model.fit, not for Model.evaluate or Model.predict.
The second method is to apply the data augmentation to the entire train set using Dataset.map.
aug_ds = train_ds.map(lambda x, y: (data_augmentation(x, training=True), y))We will create a data preprocessing function to process train, valid, and test sets.
The function will:
batch_size = 32
AUTOTUNE = tf.data.AUTOTUNE

def prepare(ds, shuffle=False, augment=False):
  # Resize and rescale all datasets.
  ds = ds.map(lambda x, y: (resize_and_rescale(x), y),
              num_parallel_calls=AUTOTUNE)

  if shuffle:
    ds = ds.shuffle(1000)

  # Batch all datasets.
  ds = ds.batch(batch_size)

  # Use data augmentation only on the training set.
  if augment:
    ds = ds.map(lambda x, y: (data_augmentation(x, training=True), y),
                num_parallel_calls=AUTOTUNE)

  # Use buffered prefetching on all datasets.
  return ds.prefetch(buffer_size=AUTOTUNE)


train_ds = prepare(train_ds, shuffle=True, augment=True)
val_ds = prepare(val_ds)
test_ds = prepare(test_ds)We will create a simple model with convolution and dense layers. Make sure the input shape is similar to the image shape.
model = keras.Sequential([
    layers.Conv2D(32, (3, 3), input_shape=(180,180,3), padding='same', activation='relu'),
    layers.MaxPooling2D(pool_size=(2, 2)),
    layers.Flatten(),
    layers.Dense(32, activation='relu'),
    layers.Dense(1,activation='softmax')
])We will now compile the model and train it for one epoch. The optimizer is Adam, the loss function is Binary Cross Entropy, and the metric is accuracy.
As we can observe, we got 51% validation accuracy on the single run. You can train it for multiple epochs and optimize hyper-parameters to get even better results.
The model building and training part is just to give you an idea of how you can augment the images and train the model.
model.compile(optimizer='adam',
              loss='binary_crossentropy',
              metrics=['accuracy'])
epochs=1
history = model.fit(
  train_ds,
  validation_data=val_ds,
  epochs=epochs
)
582/582 [==============================] - 98s 147ms/step - loss: 0.6993 - accuracy: 0.4961 - val_loss: 0.6934 - val_accuracy: 0.5185loss, acc = model.evaluate(test_ds)73/73 [==============================] - 4s 48ms/step - loss: 0.6932 - accuracy: 0.5013Learn to conduct image analysis, and construct, train, and evaluate convolution networks by taking the Image Processing with Keras course.
In this section, we will learn to augment images using TensorFlow to have finer control of data augmentation.
We will load the cats_vs_dogs dataset again with labels and metadata.
%%capture
(train_ds, val_ds, test_ds), metadata = tfds.load(
    'cats_vs_dogs',
    split=['train[:80%]', 'train[80%:90%]', 'train[90%:]'],
    with_info=True,
    as_supervised=True,
)
Instead of a cat image, we will be using the dog image and applying various augmentation techniques.
image, label = next(iter(train_ds))
plt.imshow(image)
plt.title(get_label_name(label));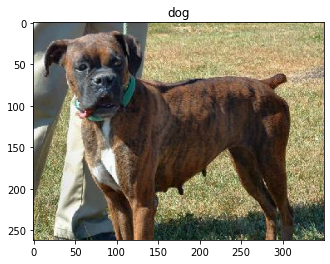
1
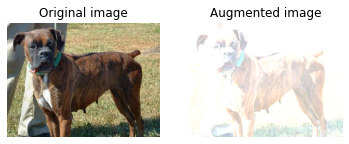
We will create the visualize() function to display the difference between the original and augmented image.
The function is pretty straightforward. It takes the original image and the augmentation function as input and displays the difference using matplotlib.
def visualize(original, augmented):
    fig = plt.figure()
    plt.subplot(1,2,1)
    plt.title('Original image')
    plt.imshow(original)
    plt.axis("off")

    plt.subplot(1,2,2)
    plt.title('Augmented image')
    plt.imshow(augmented)
    plt.axis("off")
As we can see, we have flipped the image from left to right using the tf.image function. It is much simpler than keras.Sequential().
flipped = tf.image.flip_left_right(image)
visualize(image, flipped)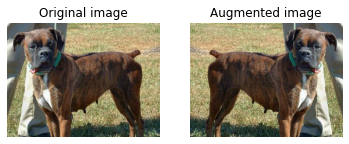
1
Let’s convert the image to grayscale using tf.image.rgb_to_grayscale().
grayscaled = tf.image.rgb_to_grayscale(image)
visualize(image,  tf.squeeze(grayscaled))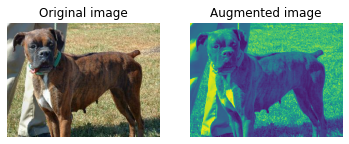
1
You can also adjust saturation by a factor of 3.
saturated = tf.image.adjust_saturation(image, 3)
visualize(image, saturated)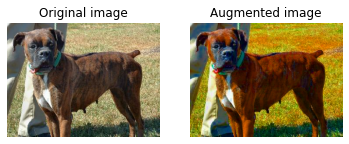
1
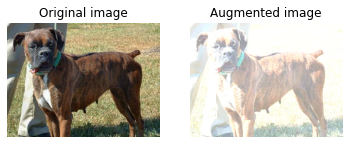
Adjust the brightness by providing a brightness factor.
bright = tf.image.adjust_brightness(image, 0.4)
visualize(image, bright)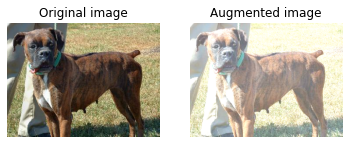
1
Crop the image from the center using a central fraction of 0.5.
cropped = tf.image.central_crop(image, central_fraction=0.5)
visualize(image, cropped)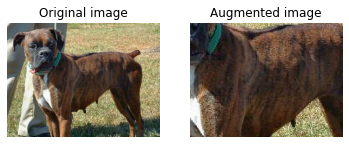
1
Rotate the image to 90 degrees using the tf.image.rot90() function.
rotated = tf.image.rot90(image)
visualize(image, rotated)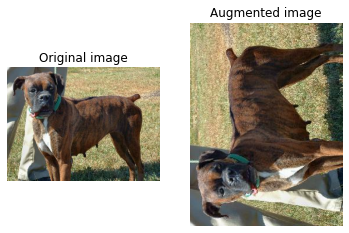
1
Just like Keras layers, tf.image() also has random augmentation functions. In the example below, we will apply the random brightness to the image and display multiple results.
As we can see, the first image is a bit darker, and the next two images are brighter.
for i in range(3):
  seed = (i, 0)  # tuple of size (2,)
  stateless_random_brightness = tf.image.stateless_random_brightness(
      image, max_delta=0.95, seed=seed)
  visualize(image, stateless_random_brightness)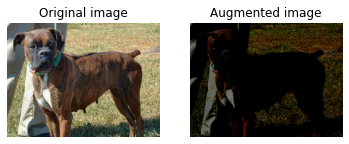
Just like keras, we can apply a data augmentation function to the entire dataset using Dataset.map().
def augment(image, label):
  image = tf.cast(image, tf.float32)
  image = tf.image.resize(image, [IMG_SIZE, IMG_SIZE])
  image = (image / 255.0)
  image = tf.image.random_crop(image, size=[IMG_SIZE, IMG_SIZE, 3])
  image = tf.image.random_brightness(image, max_delta=0.5)
  return image, label


train_ds = (
    train_ds
    .shuffle(1000)
    .map(augment, num_parallel_calls=AUTOTUNE)
    .batch(batch_size)
    .prefetch(AUTOTUNE)
)The Keras ImageDataGenerator() is even simpler. It works best when you are loading data from a local directory or CSV.
In the example, we will download and load a small CIFAR10 dataset from Keras default dataset library.
After that, we will apply augmentation using keras.preprocessing.image.ImageDataGenerator(). The function will randomly rotate, change the height and width, and horizontally flip the images.
Finally, we will fit ImageDataGenerator() to the training dataset and display six images with random augmentation.
Note: the image size is 32x32, so we have a low-resolution display.
(x_train, y_train), (x_test, y_test) = keras.datasets.cifar10.load_data()

datagen = keras.preprocessing.image.ImageDataGenerator(rotation_range=20,
    width_shift_range=0.2,
    height_shift_range=0.2,
    horizontal_flip=True,
    validation_split=0.2)

datagen.fit(x_train)

for X_batch, y_batch in datagen.flow(x_train,y_train, batch_size=6):
    for i in range(0, 6):
        plt.subplot(2,3,i+1)
        plt.imshow(X_batch[i]/255)
        plt.axis('off')
    break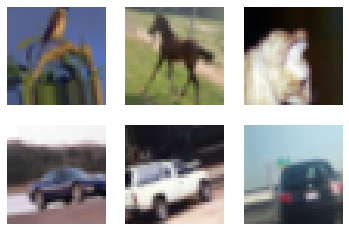
In this section, we will learn about other open-source tools that you can use to perform various data augmentation techniques and improve the model performance.
Image transformation is available in the torchvision.transforms module. Similar to Keras, you can add transform layers within torch.nn.Sequential or apply an augmentation function separately on the dataset.
Augmentor is a Python package for image augmentation and artificial image generation. You can perform Perspective Skewing, Elastic Distortions, Rotating, Shearing, Cropping, and Mirroring. Augmentor also comes with basic image pre-processing functionality.
Albumentations is a fast and flexible Python tool for image augmentation. It is widely used in machine learning competitions, industry, and research to improve the performance of deep convolutional neural networks.
Imgaug is an open-source tool for image augmentation. It supports a wide variety of augmentation techniques, such as Gaussian noise, contrast, sharpness, crop, affine, and flip. It has a simple yet powerful stochastic interface, and it comes with keypoints, bounding boxes, heatmaps, and segmentation maps.
OpenCV is a massive open-source library for computer vision, machine learning, and image processing. It is generally used in building real-time applications. You can use OpenCV to augment images and videos hassle-free.
Image augmentation functions provided by Tensorflow and Keras are convenient. You just have to add an augmentation layer, tf.image(), or ImageDataGenerator() to perform augmentation. Apart from deep learning frameworks, you can use standalone tools such as Augmentor, Albumentations, OpenCV, and Imgaug to perform data augmentation.
In this tutorial, we have learned about data augmentation advantages, limitations, applications, and techniques. Furthermore, we have learned to apply image augmentation on the cats_vs_dogs dataset using Keras and Tensorflow. If you are interested in learning more about image processing, check out our Image Processing with Python skill track. It will teach you the basics of image transformation and manipulation, medical image analysis, and advanced image processing using Keras.
Top Courses
Course
Course
Course
blog
Kurtis Pykes
10 min
Tutorial
Moez Ali
Tutorial
Karlijn Willems
Tutorial
Rajesh Kumar
Tutorial
Karlijn Willems
Tutorial
Abid Ali Awan