
Course
Introduction to Python
4 hr
6.9M
Every job includes repetitive tasks. Whether it's a support agent analyzing frequent help requests, a team leader monitoring performance metrics, or a software engineer checking business processes, these tasks often recur - daily, weekly, or even hourly.
Thankfully, you can automate much of this work with Python. It's a versatile language that's great for handling data and straightforward for scripting automation tasks. Imagine collecting performance metrics: manually, you might have to dig through several dashboards. With a Python script, you can automatically pull this data, highlight the key points, and send a compiled report to your boss. This not only saves time but also reduces the risk of errors.
In this tutorial, we’ll look at the specific case of running Python code to fetch a weather forecast for a specific location and send a summary of this forecast to Microsoft Teams, Microsoft’s team communication platform. We’ll cover all the necessary steps to configure a Teams webhook, a Python program that leverages the webhook to send messages, and set up a schedule so the Python script can run on a regular cadence. This specific example is about reporting on a weather forecast, but you can, of course, swap out this ‘business logic’ with anything you want; all the configuration and code to send the message to Teams will stay exactly the same.
We’ll use DataLab in this tutorial, as it has built-in functionality for securely storing secrets as environment variables (a feature we’ll use to store the Teams webhook) as well as for scheduling your Python code with a couple of clicks. To follow along, all you need is a Microsoft account (to post messages) and a DataCamp account (to use DataLab), both of which you can create for free!
You can also check out our separate guide on how to send Slack messages with Python.
Let’s dive in!
Inside Microsoft Teams, there are teams, which in turn have channels. It’s possible to add so-called ‘apps’ to these channels. You can think of a Teams app as an extension or add-on of MS Teams for a specific purpose. There are apps to integrate Jira, Zendesk, Salesforce, and countless others into Teams, so you can be notified inside Teams of things that happen, but you can also perform actions in those apps from within Teams. For our little project, we’ll need to install one of these apps, more specifically, the “Incoming Webhook” app, maintained by Microsoft itself.
To start, make sure you have a Microsoft account with access to Teams. Ensure you are a member of a team and have permission to add apps to channels in this team. If not, contact your IT department and send them this link.
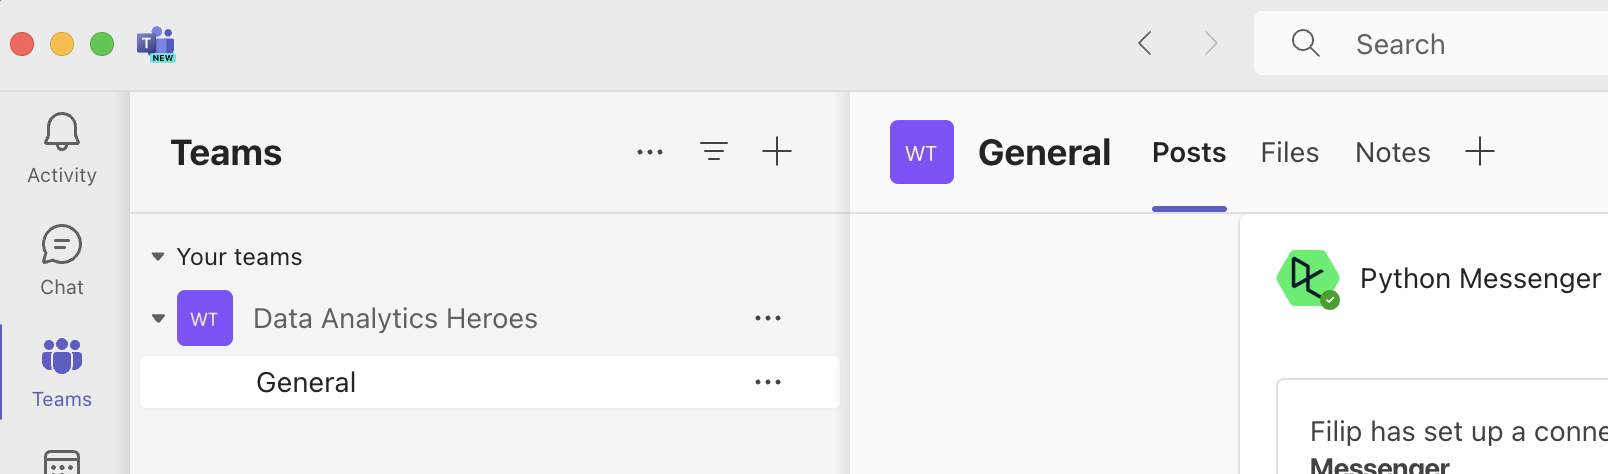
Next, head to the team channel that you’re looking to post messages to. In our example, this is the “General” channel inside the “Data Analytics Heroes” team:
Click on the + sign next to the channel name; you’ll see an overview of apps you can add to the channel:
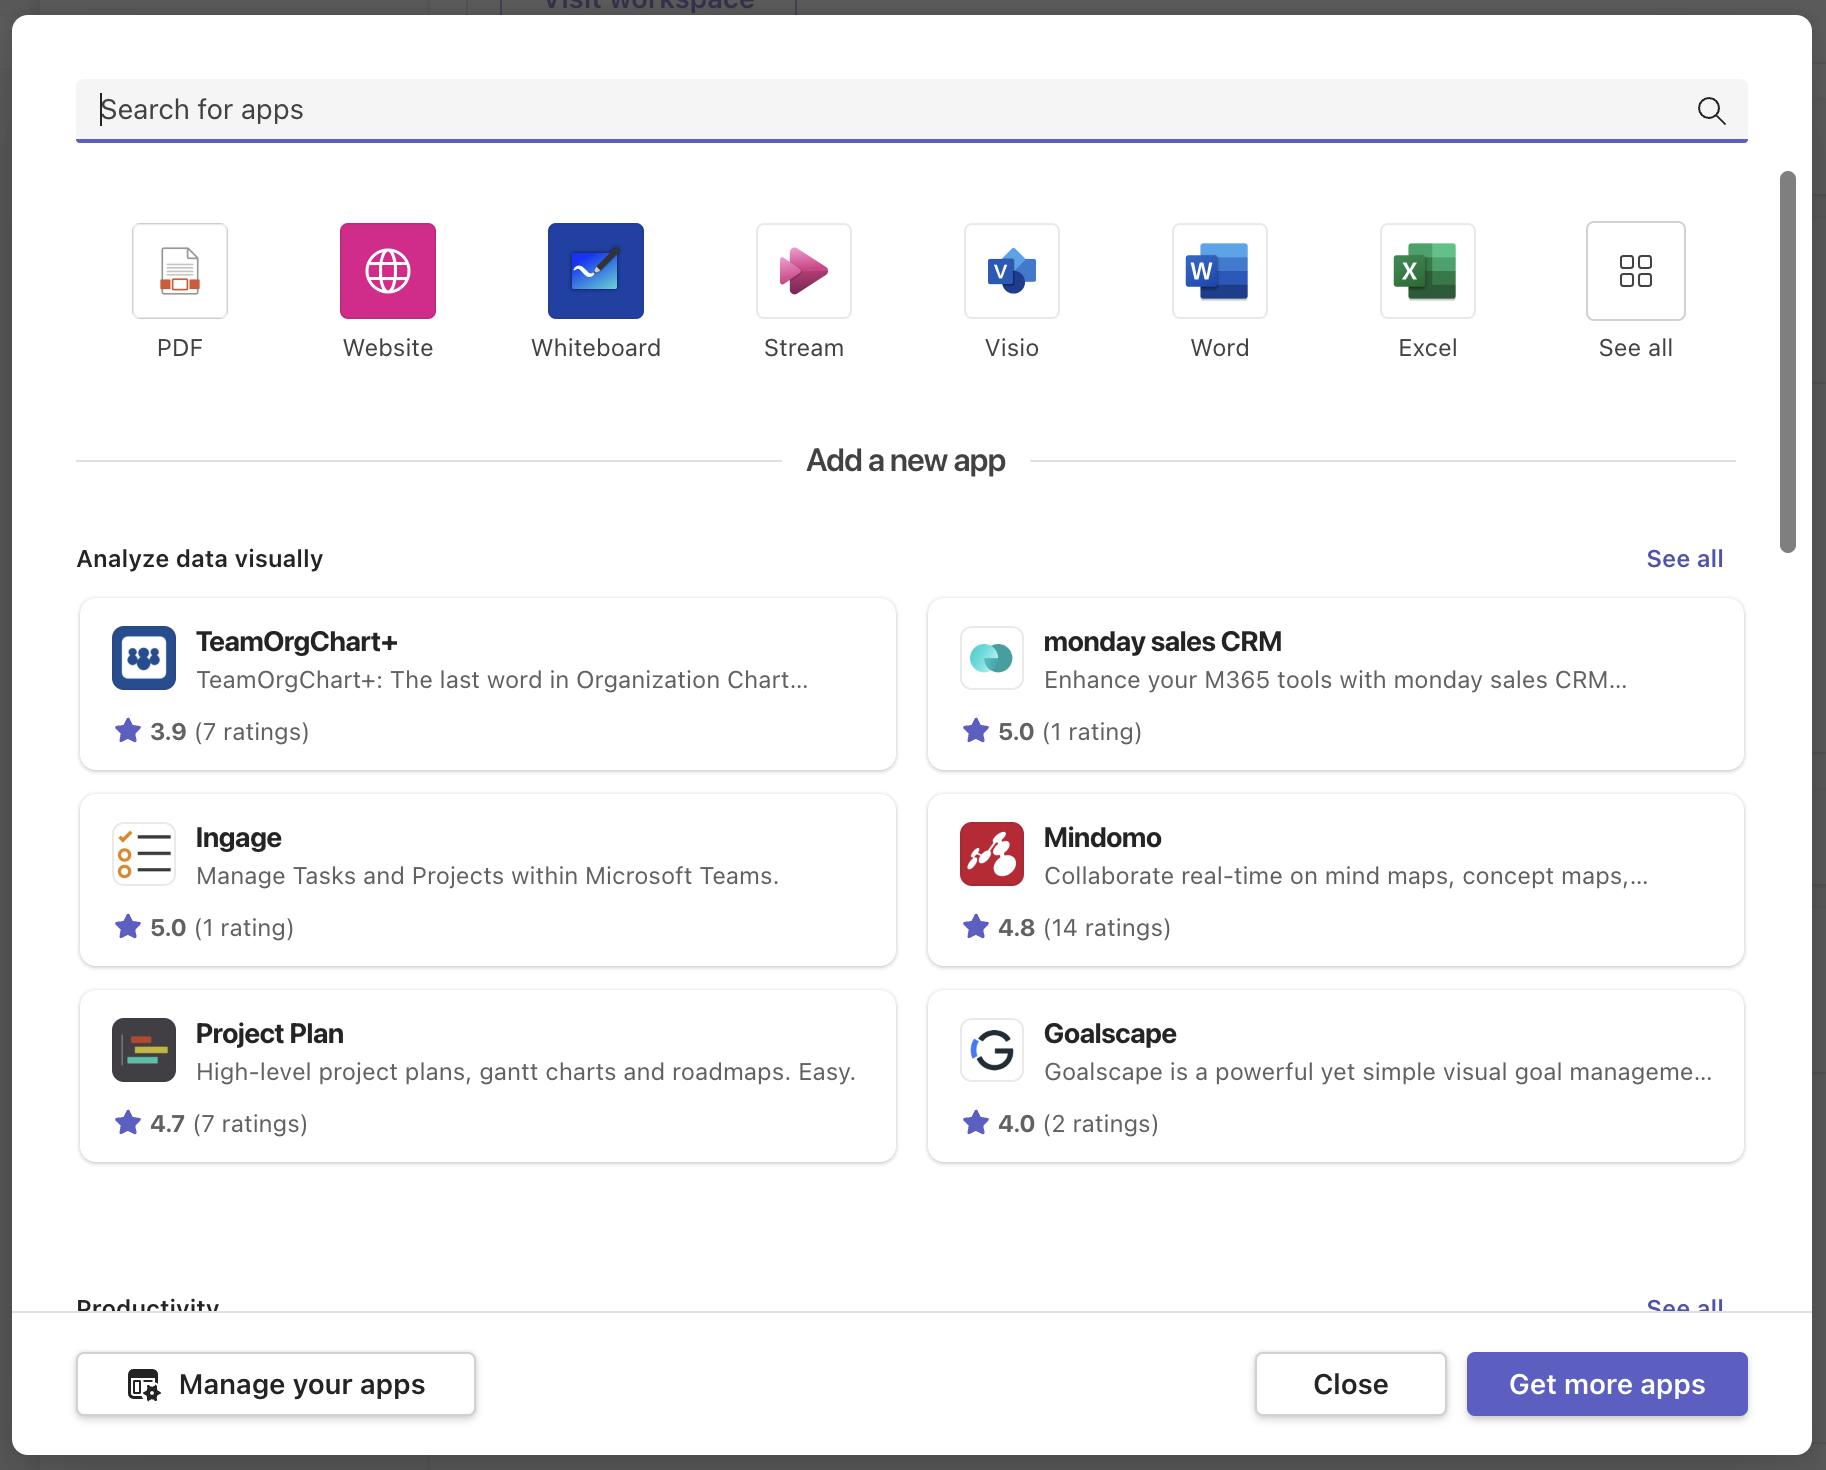
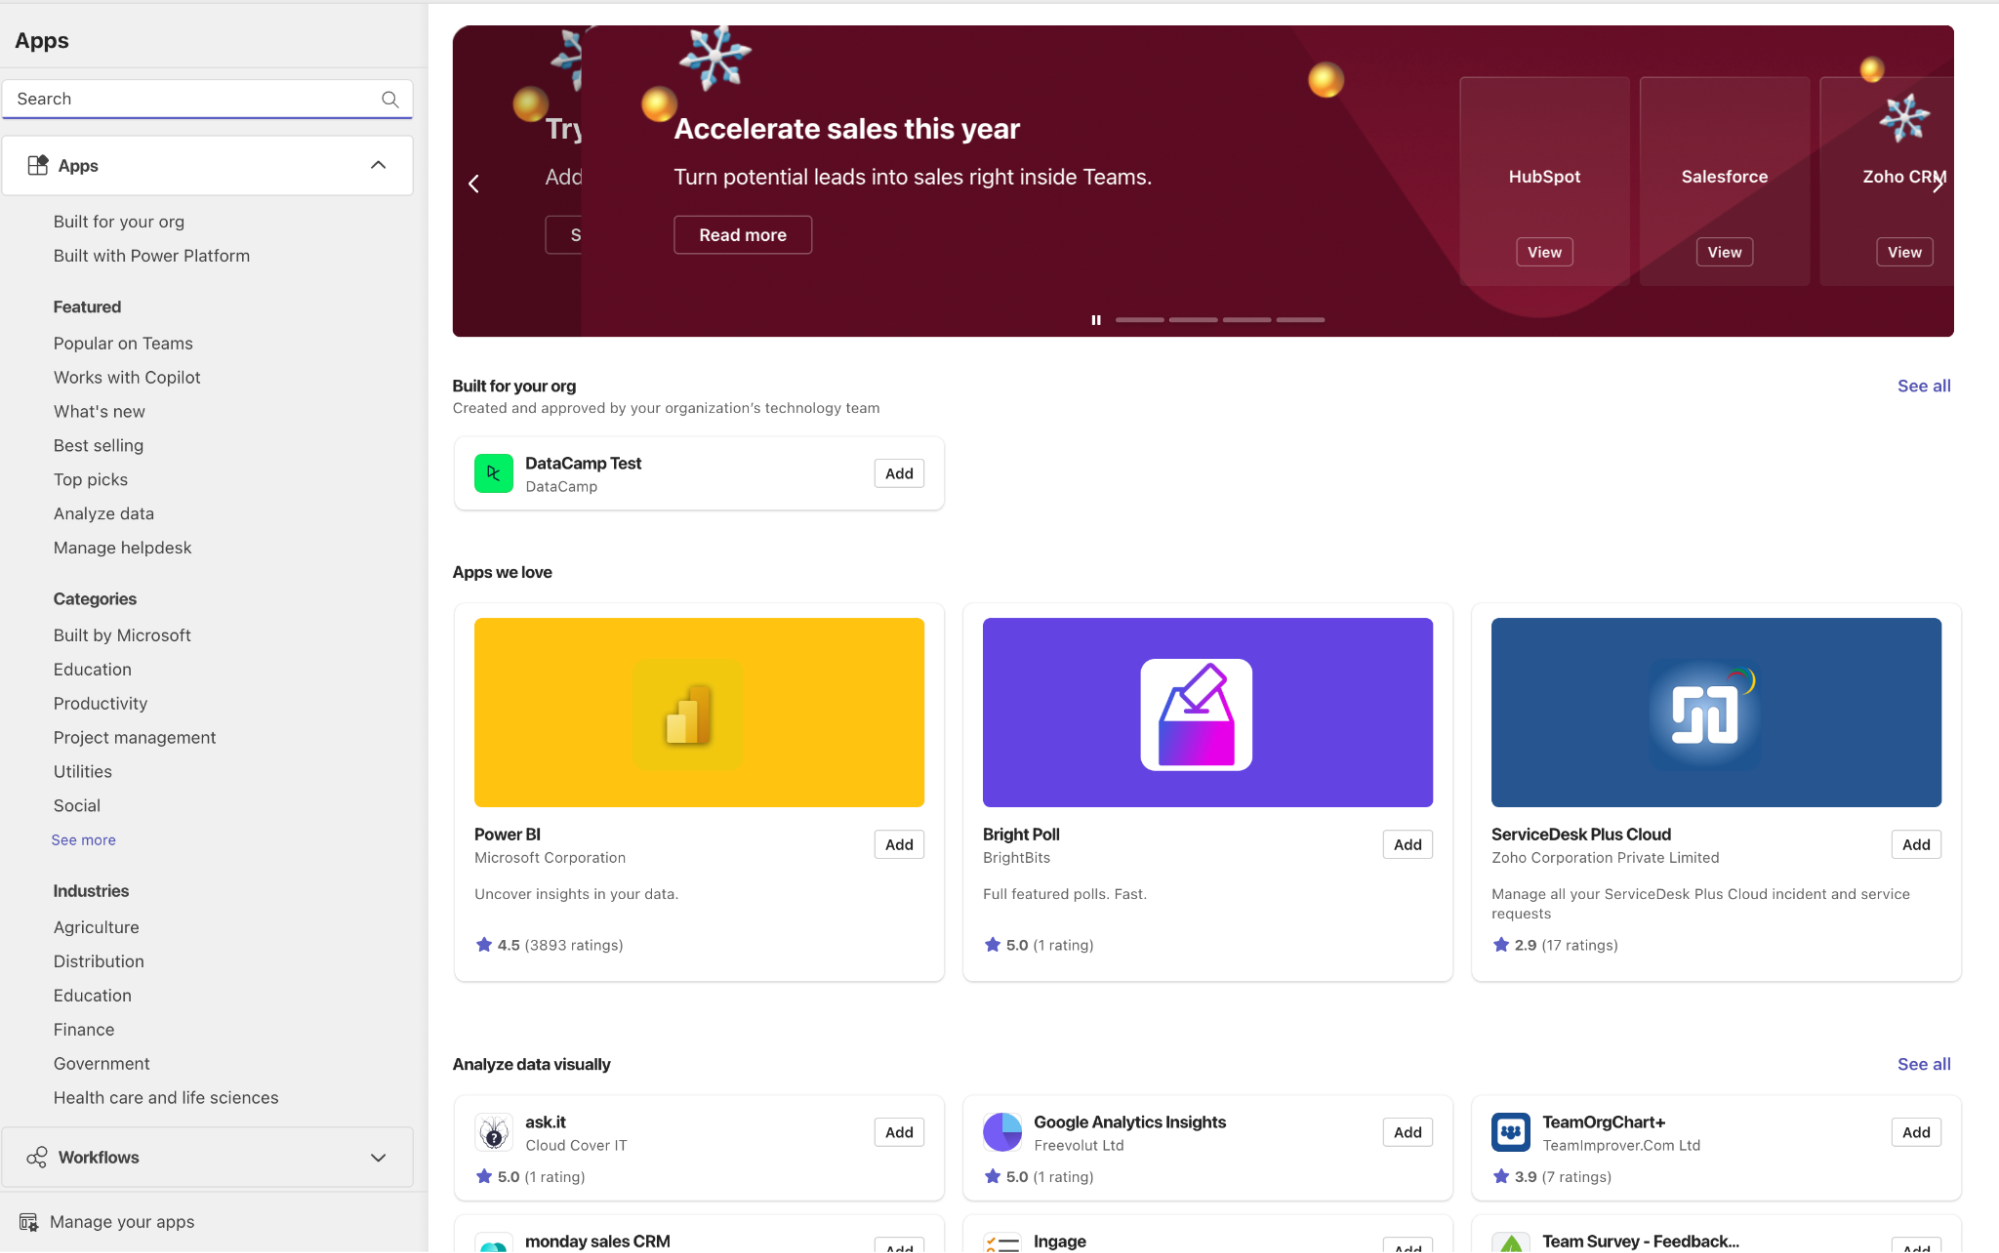
Click “Get more apps”. You’ll land in a full-blown marketplace of apps you can add to MS Teams:
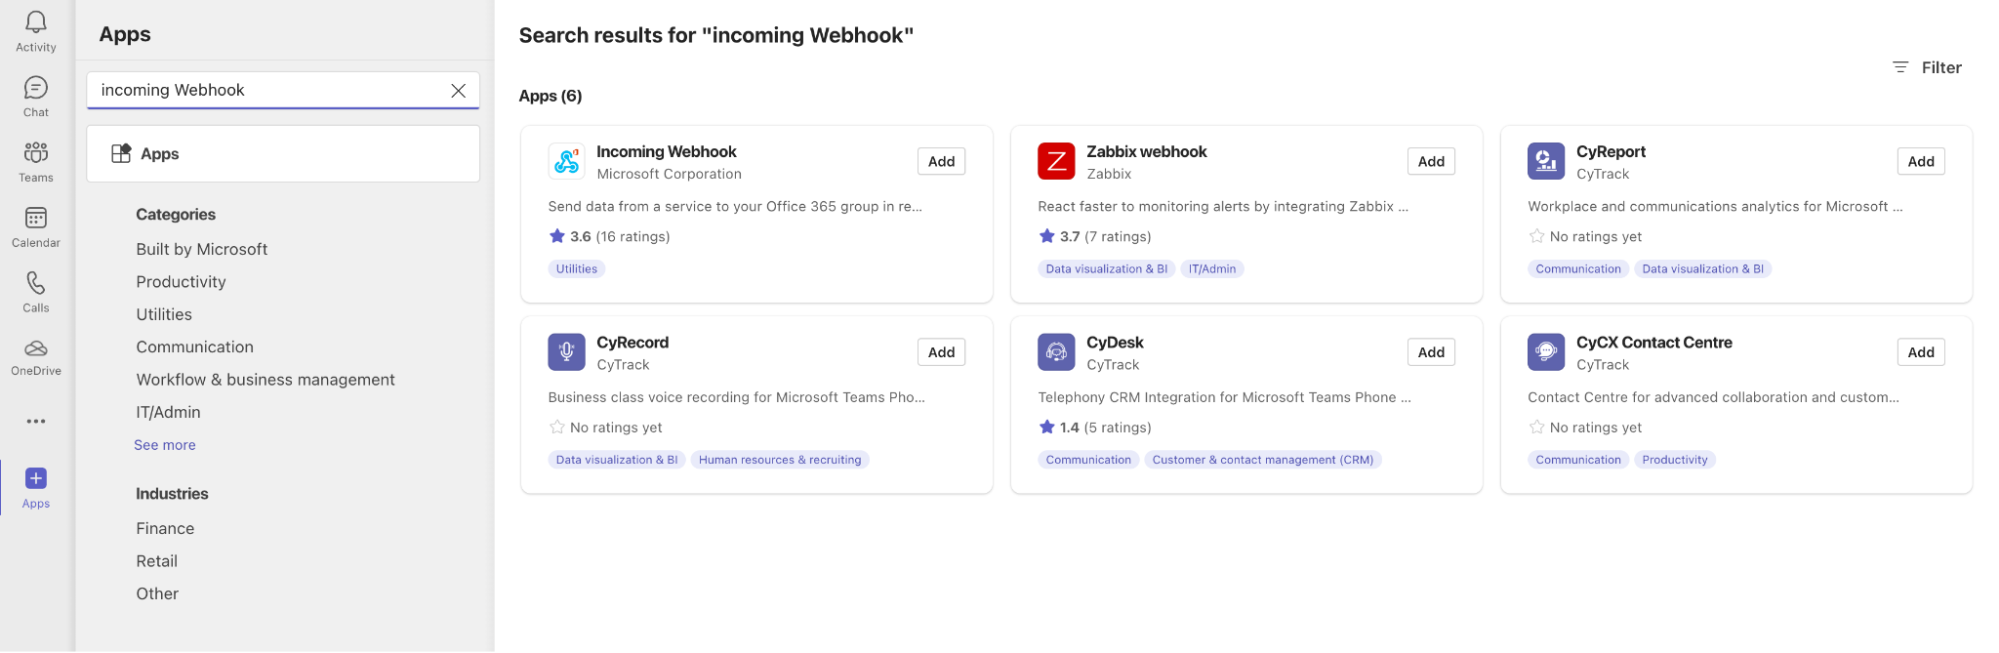
In the search box, type in “Incoming Webhook.” The app that shows up first is the one we need:
Click Add, and then “Add to a team.” You’re now prompted to specify to which team or channel you want to send messages:
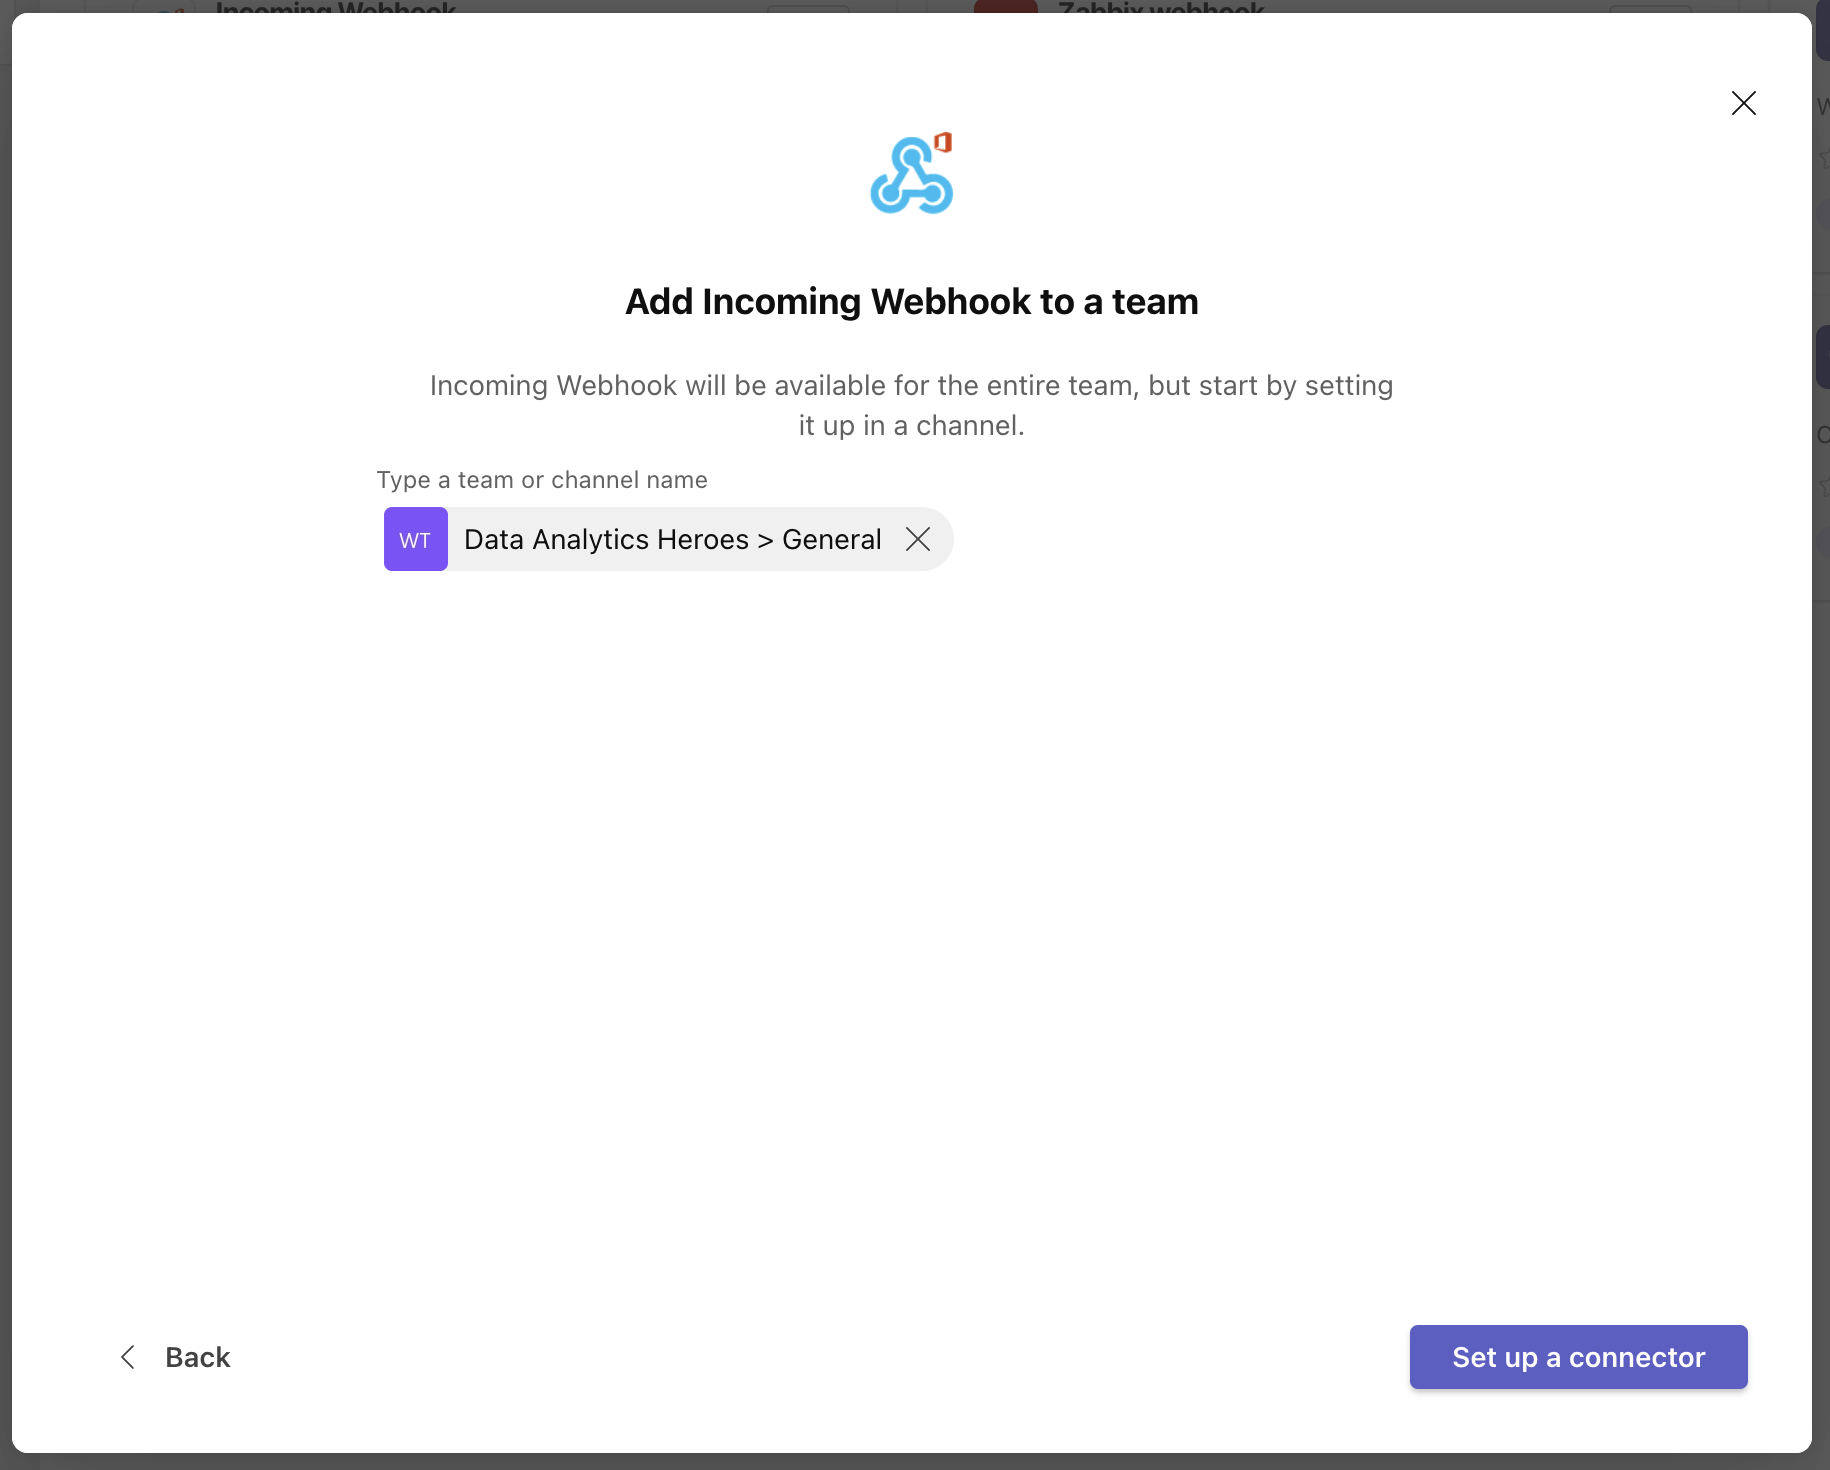
This tutorial’s example is the “General” channel in the “Data Analytics Heroes” team, but this will probably be different for you. Next, click on “Set up a connector.” Yet another screen appears to ask for some more webhook settings.
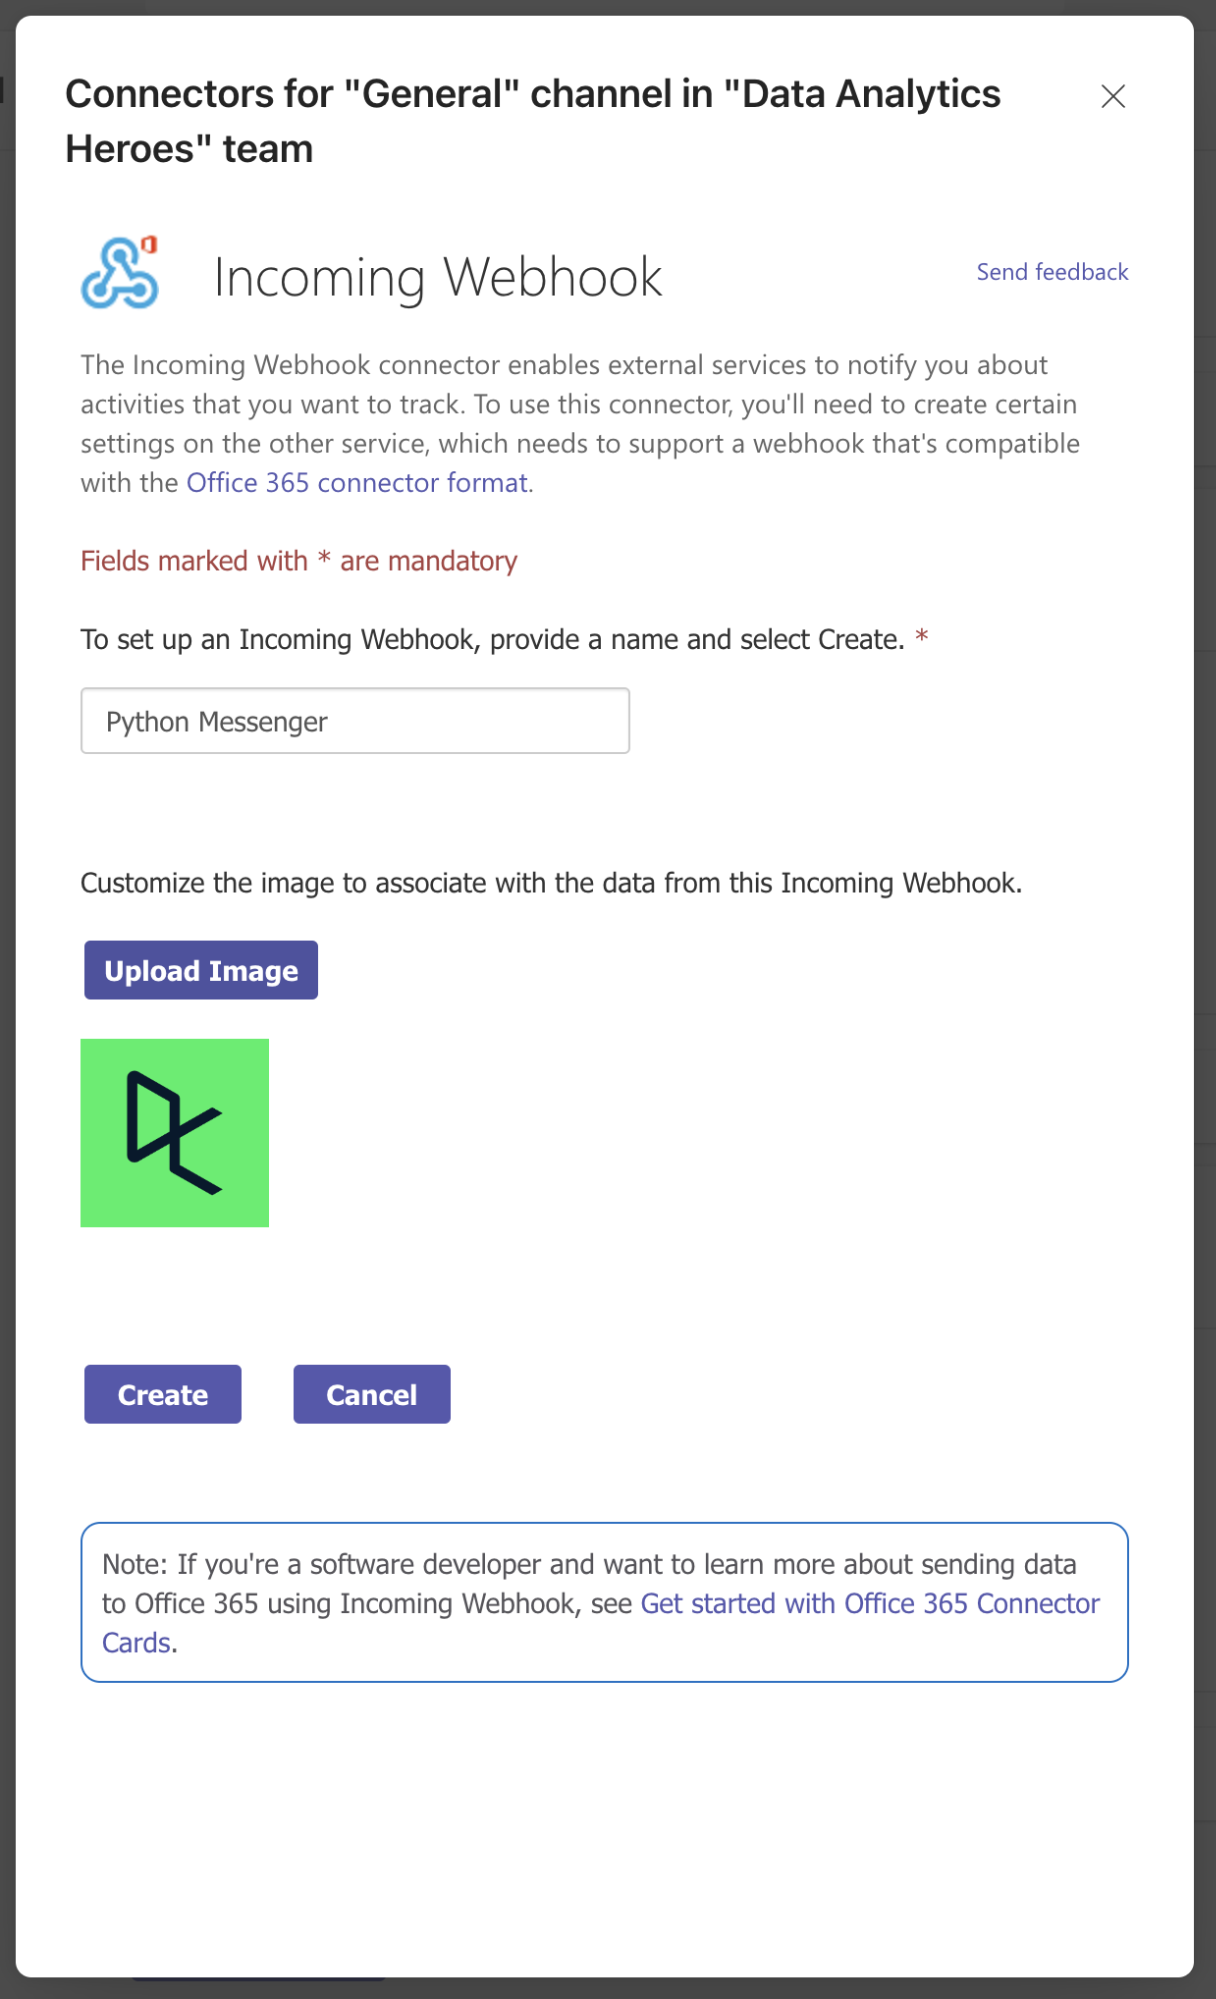
Specify a name for the incoming webhook; your messages will be sent as this name, so pick something that makes sense, e.g., “Python Messenger.” You can also upload a custom image, but this is optional. Finally, click on “Create”. A webhook URL appears!
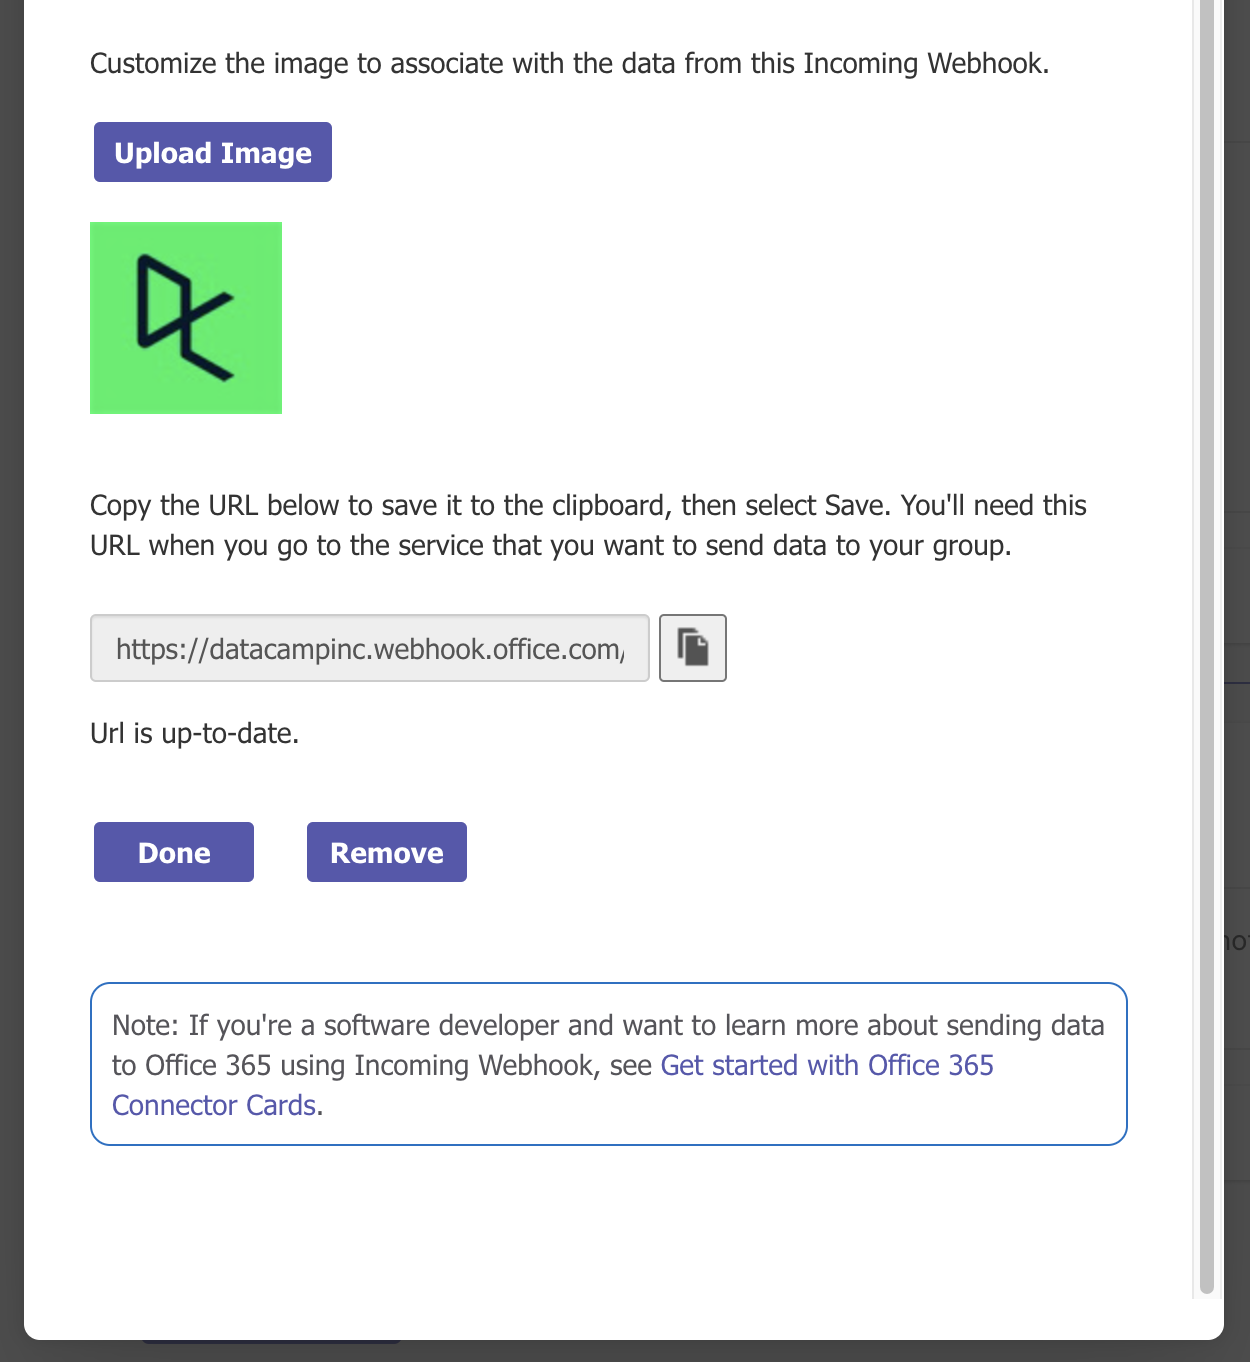
You’ll need this webhook URL in your Python program, so make sure to copy it to the clipboard and save it somewhere (e.g., in your notes app) for later use. Finally, click “Done”. In the overview that appears, you’ll see an overview of all connectors in the channel you selected.
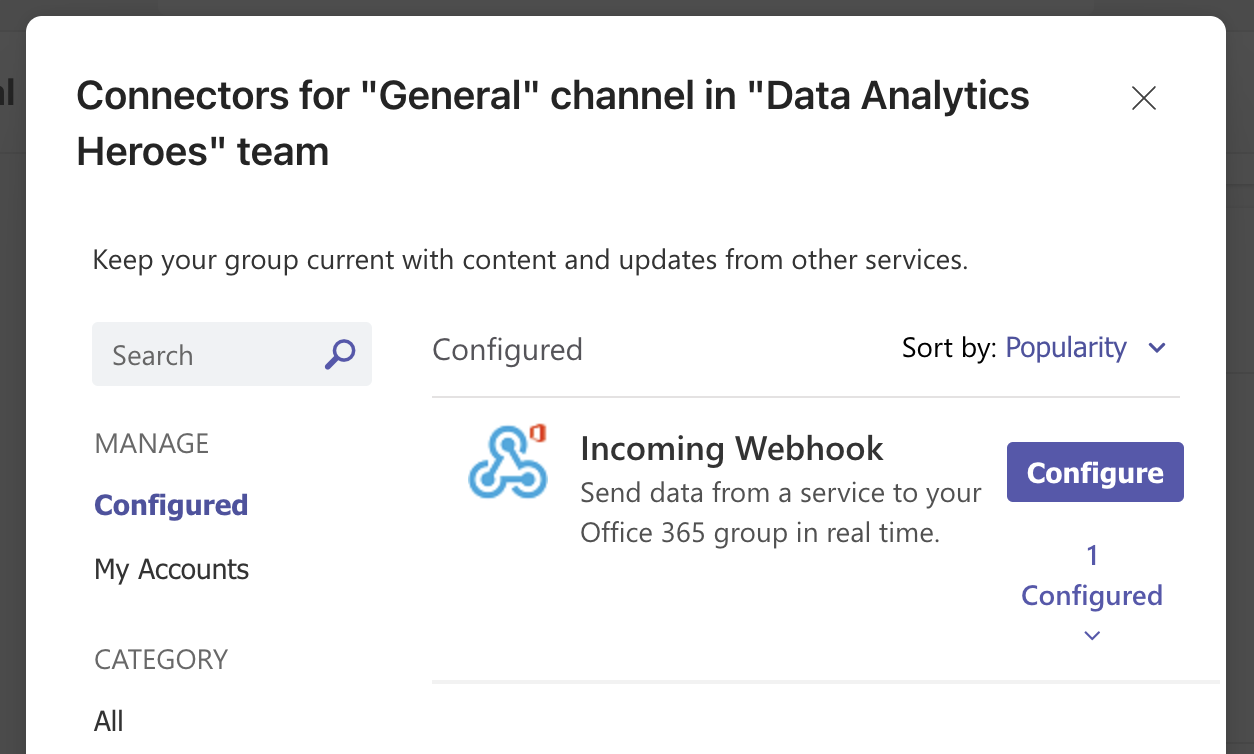
You can just close this screen. In the channel that you just configured the incoming webhook for, you should see a corresponding message confirming the setup:
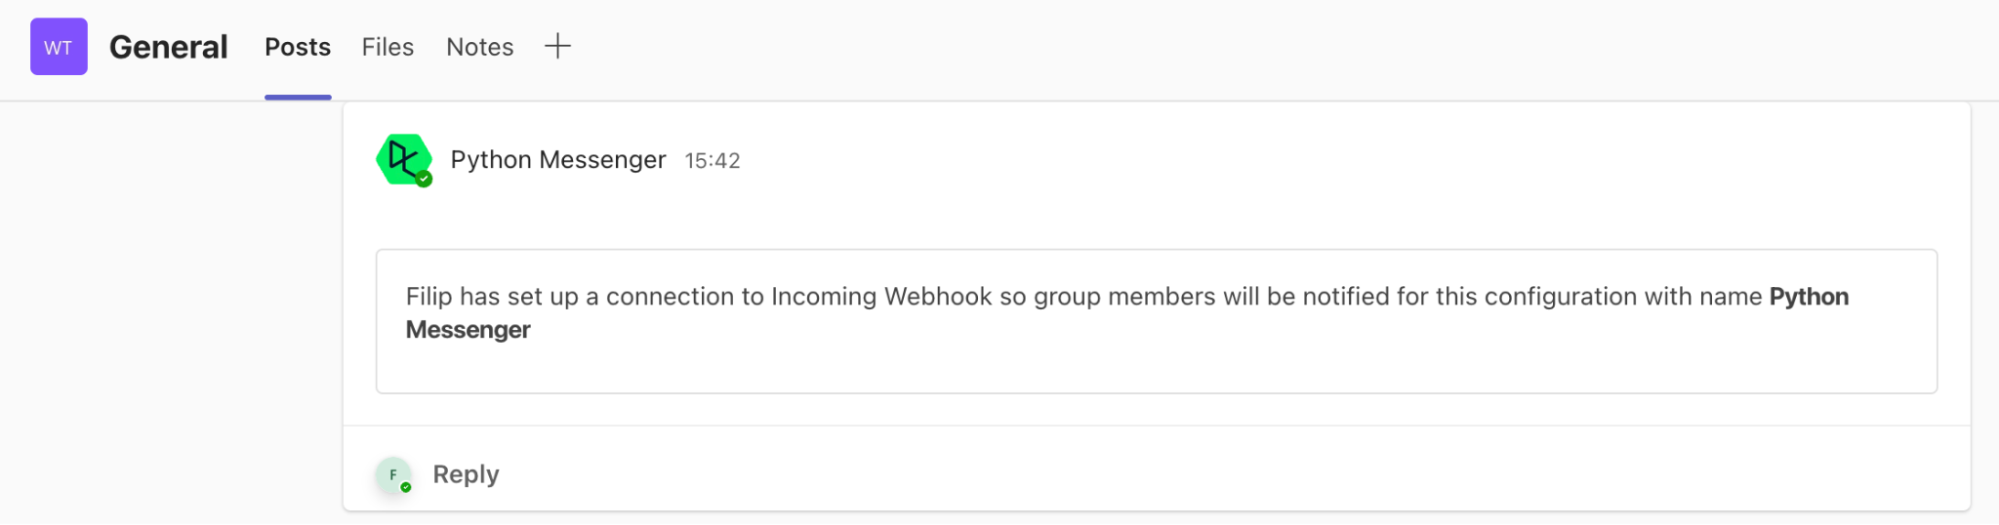
That’s it! Right now, your Microsoft Teams channel is ready to receive messages through the webhook.
Great job making it this far! With the Incoming Webhook in Teams configured, it’s time for the fun part: writing Python. We’ll start with writing some Python code for our ‘business logic’ to solve the task at hand.
If you need a refresher on writing Python code, our Introduction to Python course is the ideal place to start.
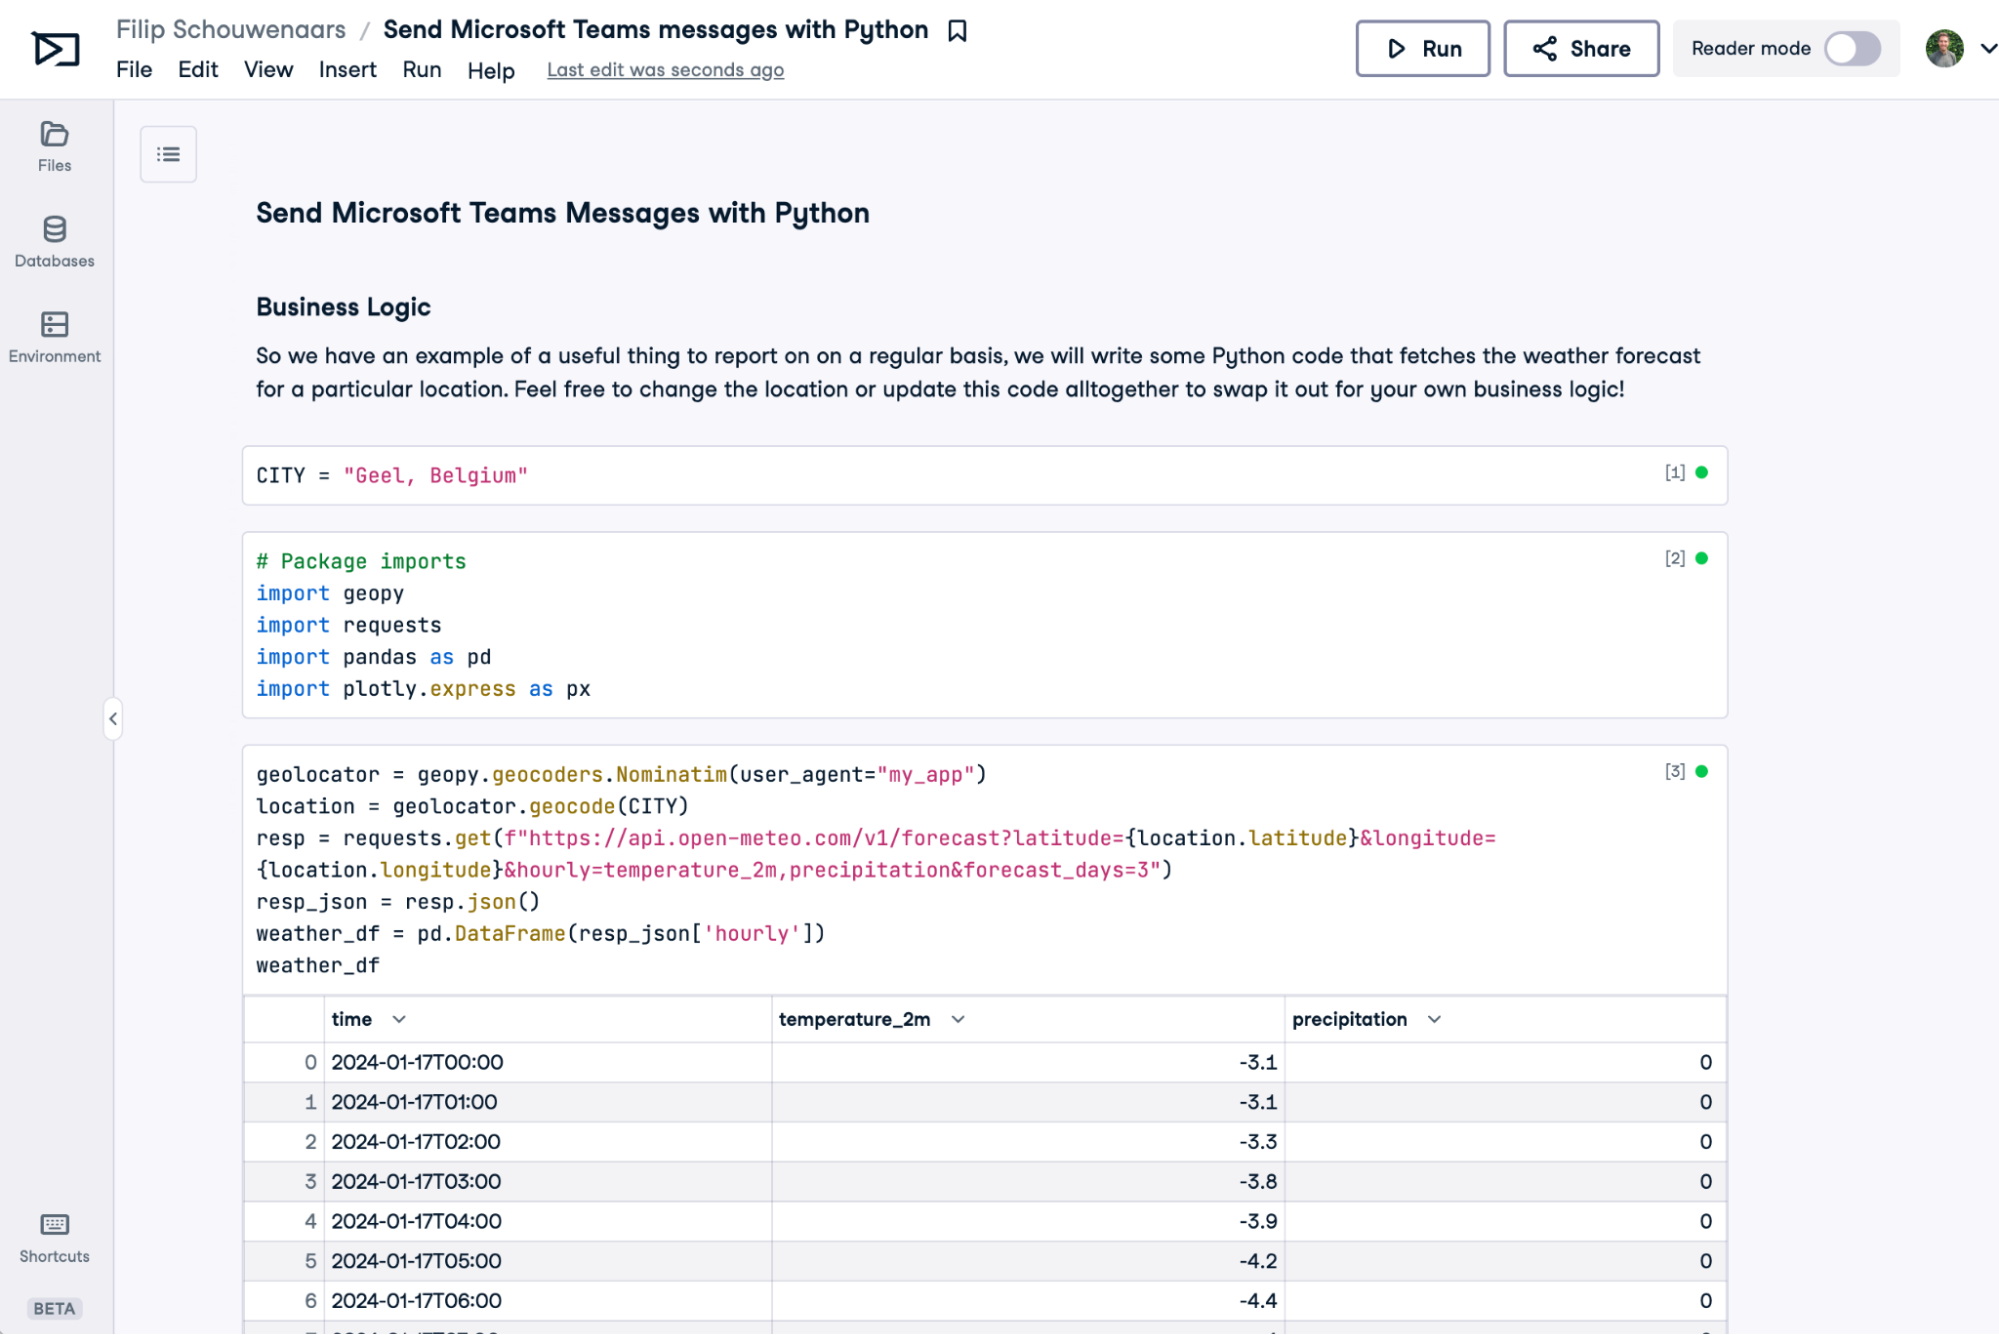
You can either create an empty workbook from scratch, which is useful if you already know what Python program you want to automate and integrate with Microsoft Teams.
If you’re here to learn about the concepts, you can start with a sample workbook that summarizes a weather forecast for a city you can specify. Every day, there will be new data, so this is a great candidate for daily reporting! Click the "Run Code" button below to create this workbook.
Run and edit the code from this tutorial online
Run codeIn both cases, you should end up with a DataLab workbook with your business logic all coded up:
So, Teams webhook: check. Business logic: check. To integrate the Python notebook with Microsoft Teams, we need to do two things: store the webhook URL in the DataLab workbook and write some Python code to send a message to the Teams channel.
Our Python notebook needs the webhook URL to send the message to the right Teams channel. You could just copy and paste this URL inside a code cell of your notebook. However, this is not a secure approach and is not recommended. The webhook URL is kind of secret. If you share your notebook with someone else, they can see the webhook URL, and they can spam your Teams channel!
This approach would also require you to repeat this copy-pasting in every workbook that you want to send Teams messages with. If you want to update the webhook URL for some reason, you’ll have to go through and edit every workbook.
A more secure and scalable approach is storing the webhook URL token in a so-called environment variable. When you connect this environment variable, it will become available in your Python session. In your workbook:
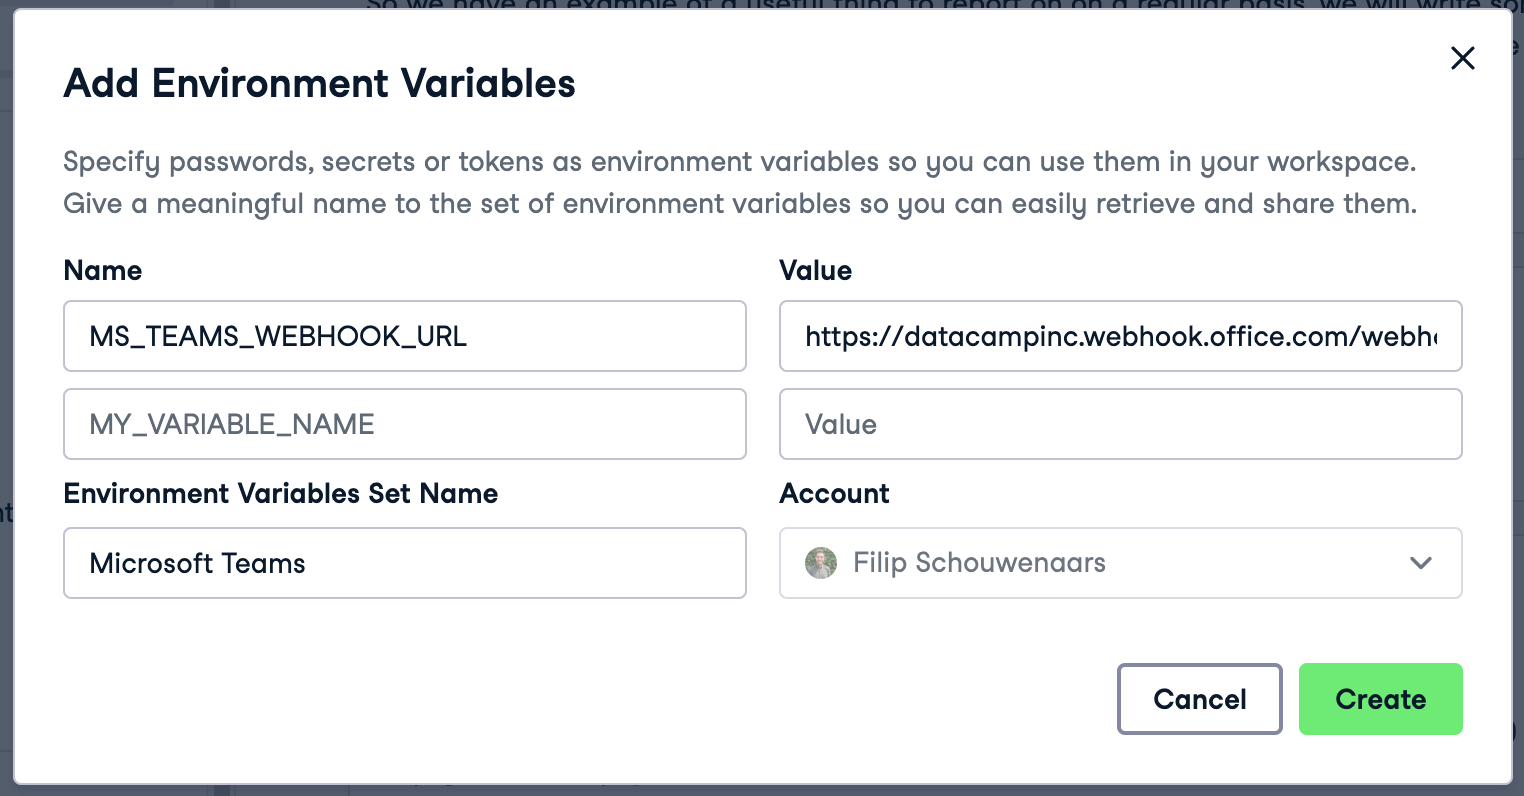
After filling in all fields, click “Create,” “Next,” and finally, “Connect.” Your workbook session will restart, and MS_TEAMS_WEBHOOK_URL will now be available as an environment variable in your workbook. You can verify this by creating a Python cell with the following code and running it:
import os
webhook_url = os.environ["MS_TEAMS_WEBHOOK_URL"]
print(webhook_url)
If you want to reuse the same services account credentials in another workbook, you don’t need to set up the environment variable again: you can reuse the environment variable in other workbooks.
With the MS_TEAMS_WEBHOOK_URL locked and loaded, we can now write Python code to send a message to Teams! For this, we’ll use the open-source pymsteams package, which provides a convenient wrapper for the pretty intricate API to send messages to Teams. Let’s install it and import it, along with the os package to read out environment variables:
!pip install pymsteams
import pymsteams
import os
Next, we can create a so-called ‘connector card’ – a fancy word for a rich text message in Teams –, add some text to it, and send it:
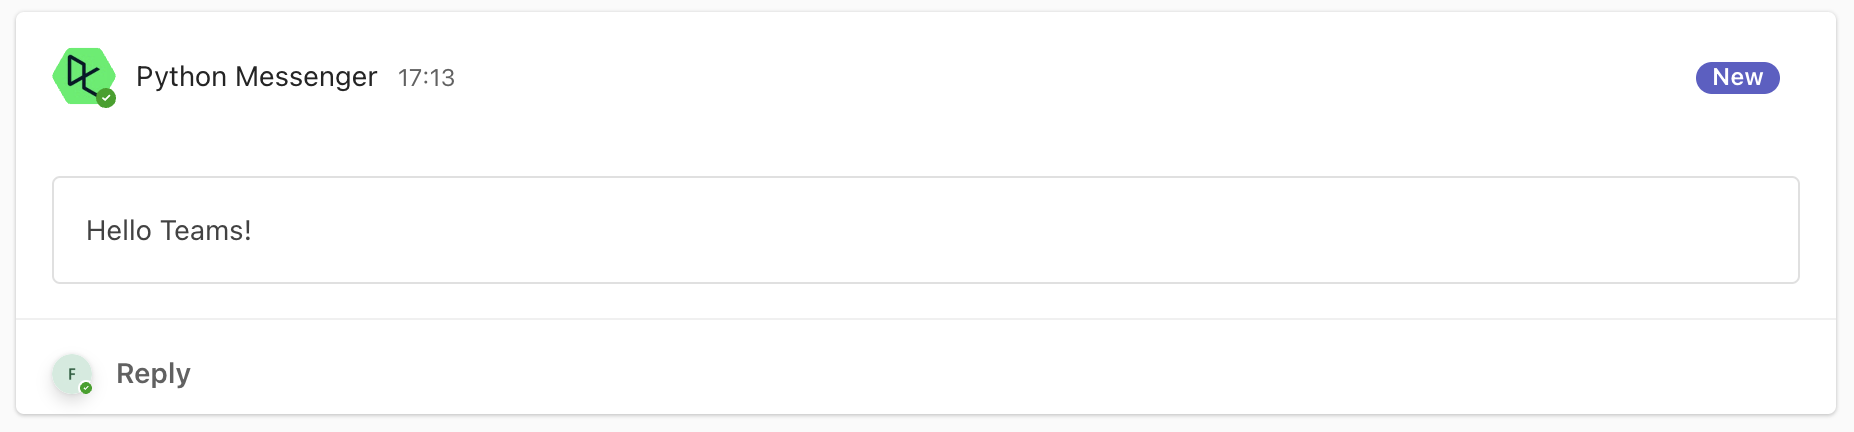
card = pymsteams.connectorcard(os.environ["MS_TEAMS_WEBHOOK_URL"])
card.text("Hello Teams!")
assert card.send()
Run this code! You should see this message appear in the channel:
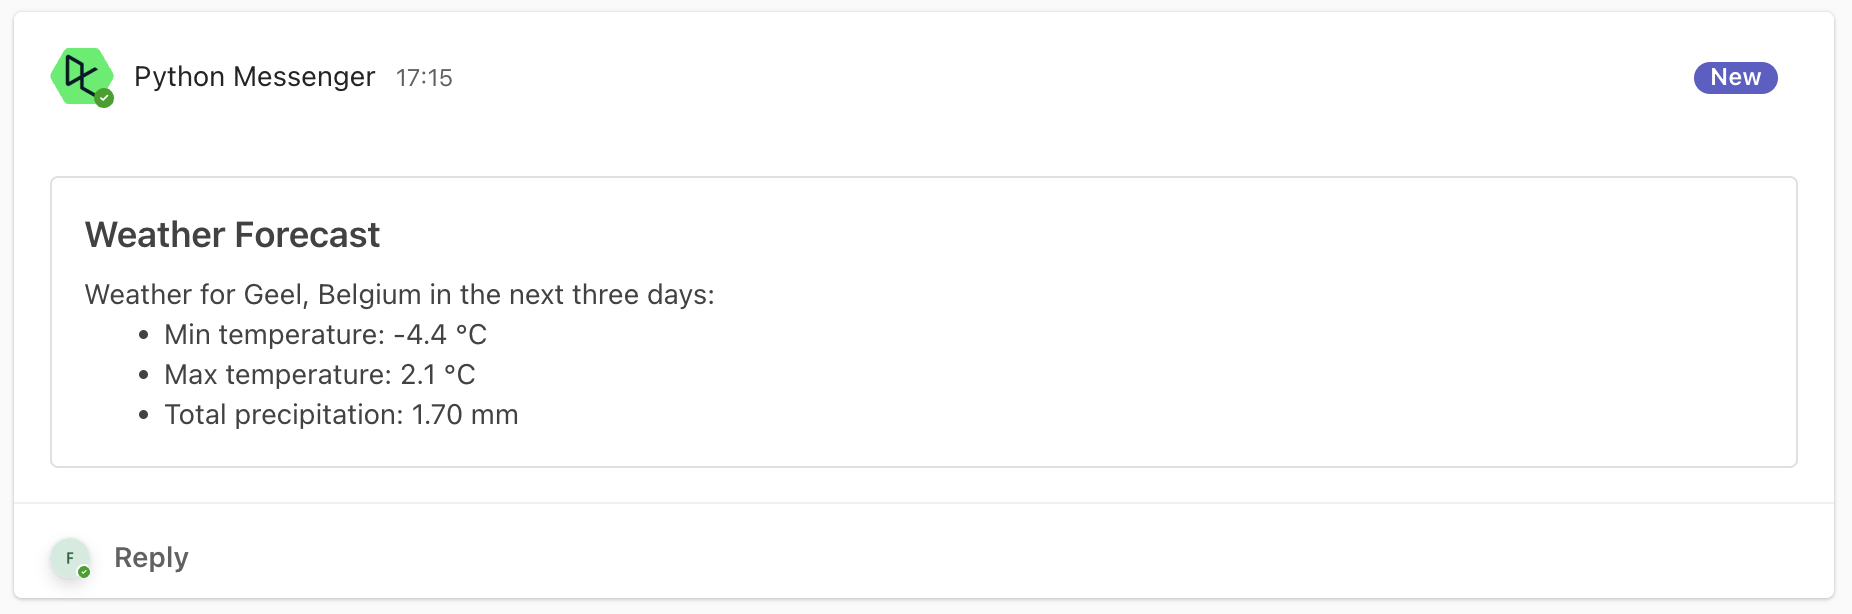
Awesome! This was a meaningless sample message, but you can also create a message based on the result of your business logic, as we did in the sample workbook:
card = pymsteams.connectorcard(os.environ["MS_TEAMS_WEBHOOK_URL"])
card.title("Weather Forecast")
card.text("\n".join([
    f"Weather for {CITY} in the next three days:",
    f"- Min temperature: {weather_df['temperature_2m'].min()} {unit_temperature}",
    f"- Max temperature: {weather_df['temperature_2m'].max()} {unit_temperature}",
    f"- Total precipitation: {weather_df['precipitation'].sum():.2f} {unit_prec}"
]))
assert card.send()
With the following result:
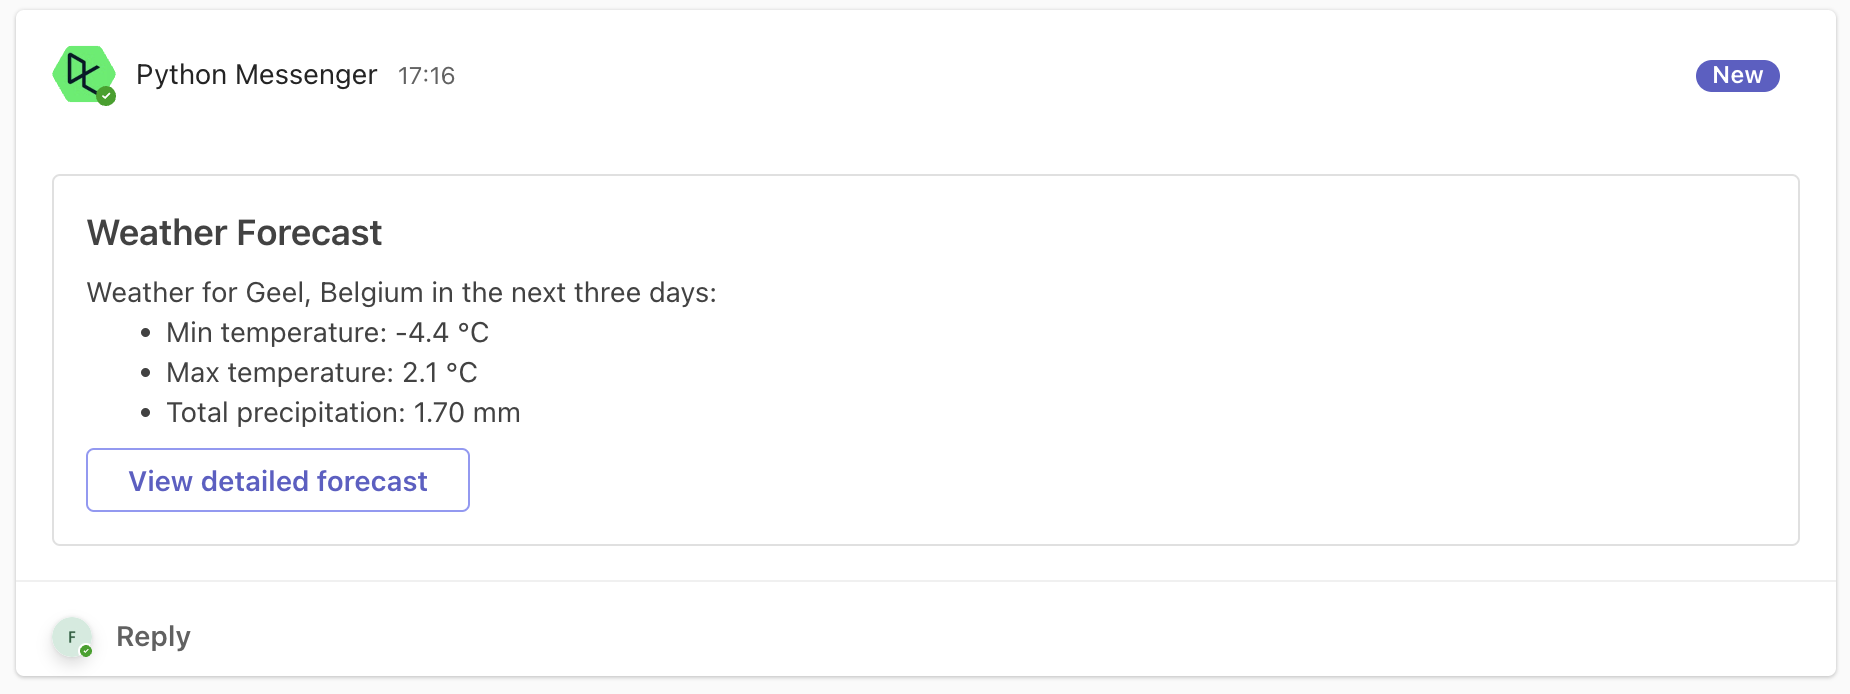
Finally, you can also leverage the DL_WORKBOOK_ID environment variable to include a button that links to your workbook case you want to include an easy way to go from Teams to the DataLab workbook that’s powering this message:
card = pymsteams.connectorcard(os.environ["MS_TEAMS_WEBHOOK_URL"])
card.title("Weather Forecast")
card.text("\n".join([
    f"Weather for {CITY} in the next three days:",
    f"- Min temperature: {weather_df['temperature_2m'].min()} {unit_temperature}",
    f"- Max temperature: {weather_df['temperature_2m'].max()} {unit_temperature}",
    f"- Total precipitation: {weather_df['precipitation'].sum():.2f} {unit_prec}"
]))
card.addLinkButton("View detailed forecast", f"https://www.datacamp.com/datalab/w/{os.environ.get('DL_WORKBOOK_ID', 'invalid')}/edit")
assert card.send()
With the following result:
Pretty neat, right?!
You've crafted a Python script that performs a useful analysis and dispatches a summary of this analysis to Teams, including a link back to the complete notebook for those interested in more details. Awesome! Now, imagine if you could set this notebook to execute automatically, daily or weekly, keeping you constantly updated with fresh results. Well, the great news is, you can! DataLab offers the feature of scheduled runs to make this possible.
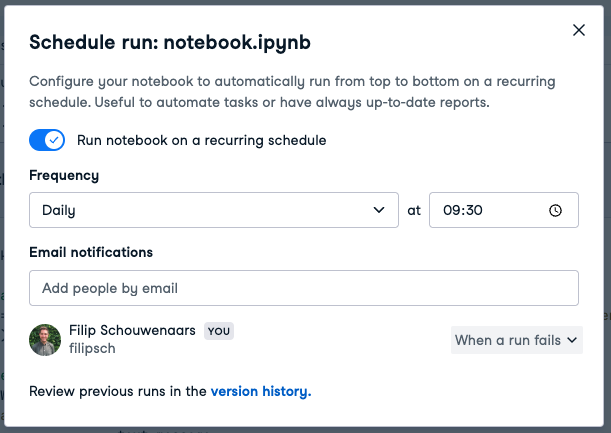
If configured like in the screenshot above, the notebook will now run at 9:30 AM local time every day, which means that a message will be posted in the specified Teams channel every morning.
Not every task is a good candidate for automation. It depends on how often you do it, how long it takes to do it manually, and the time it would take to create a Python script to automate it. For instance, consider a yearly report that takes 20 minutes to compile by hand. If it takes you half a day to write a script for it, it'll be many years before you break even on the time spent automating!
Here's a summary in table form:
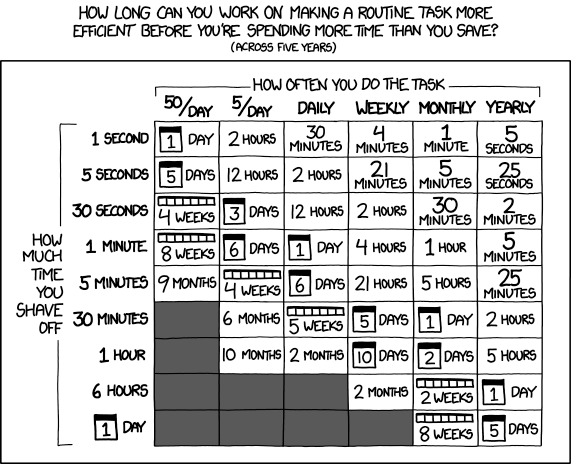
So if a task that you had to do daily took 5 minutes before, you can spend up to 6 days to try and automate that task. If you spend less time than that automating, you’ll have gained time (counted across five years).
Setting up DataLab to send messages to Microsoft Teams involves navigating through multiple screens initially. But once you've got it all set up with the webhook URL in DataLab, sending a message is just about adding a few lines of Python code – it's really straightforward! The best part? You can automate almost any Python script and directly notify your stakeholders right where they are: on Teams.
Gone are the days of setting reminders for repetitive, mundane tasks. Welcome to an era of efficient, automated workflows where you don't need to switch between tools. All it takes is embracing DataLab.
Remember, If you need a refresher on writing Python code, our Introduction to Python course is the ideal place to start.
Start Your Python Journey Today!
Course
Course
Course
Tutorial
Filip Schouwenaars
Tutorial
Alan Nichol
Tutorial
Matthew Przybyla
code-along
Filip Schouwenaars
code-along
Chris Ramakers
code-along
Justin Saddlemyer