
Track
Developing Large Language Models
16 hr
In the rapidly evolving field of artificial intelligence (AI) and machine learning (ML), image classification stands out as a foundational task that powers a wide range of applications, from facial recognition systems to medical image diagnostics.
Among the many tools and libraries available to data scientists and AI practitioners, Hugging Face has been a major player, particularly for those working with natural language processing (NLP) and, increasingly, with computer vision tasks like image classification.
This article will cover the essentials of using Hugging Face for image classification, including understanding the basics of image classification, preparing your data, training your model, deploying your model to the Hugging Face hub, and finally interacting with the deployed model through API and Hugging Face interface.
Whether you are a beginner or an experienced practitioner, this guide will provide valuable insights into leveraging Hugging Face for your image classification needs.
This section provides insights into the basics of image classification and the benefits of using Hugging Face.
Image classification refers to the categorizing of images into one of several predefined classes.
This task is performed using algorithms that analyze the visual content of an image and predict its category based on patterns learned from the training data set. Deep learning models, particularly convolutional neural networks (CNNs), have become the standard approach for this task due to their ability to capture relevant patterns in image data.
To learn more about CNNs, our article An Introduction to Convolutional Neural Networks (CNNs) provides a complete guide to understanding CNNs, their impact on image analysis, and some key strategies to combat overfitting for robust CNNs versus deep learning applications.
Furthermore, the Classification in Machine Learning: An Introduction article walks through a step-by-step process to learn about classification in machine learning, looking at what it is, how it is used, and some examples of classification algorithms.
Hugging Face offers an extensive ecosystem for machine learning, with easy-to-use interfaces, hosting a vast repository of pre-trained models, and comprehensive documentation.
Compared to other platforms, Hugging Face provides several advantages for image classification:

Three benefits of using Hugging Face (Image generated using GPT-4)
Additionally, Hugging Face facilitates model deployment across major cloud platforms like AWS, Azure, and Google Cloud Platform, along with multiple inference types.
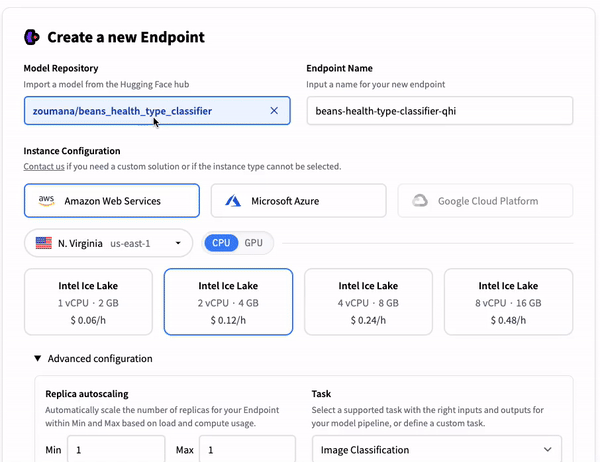
Model deployment options on Cloud platforms
The main task covered in this article is image classification, and we will use the beans data set from Hugging Face for our example. After loading the dataset, we will perform some visualizations before diving into the preprocessing for model training.
The notebook with the code is available to follow along in Google Colab.
The codes from this article are highly inspired by the Hugging Face official website.
Multiple libraries are used in the score of this article, and each one has a specific role. Some of the libraries require an installation. Those libraries are installed using the Python package manager “pip” as follows:
%%bash
pip -q install datasets
pip -q install transformers=='4.29.0'
pip -q install tensorflow=='2.15' # At least this tensorflow version is required to use the "evaluate module"
pip -q install evaluate
pip -q install --upgrade accelerate
It is important to restart the kernel after installing the libraries. After a successful installation, the necessary libraries can be imported the from and import statements:
import torch
import torchvision
import numpy as np
import evaluate
from datasets import load_dataset
from huggingface_hub import notebook_login
from torchvision import datasets, transforms
from torch.utils.data import DataLoader
from transformers import DefaultDataCollator
from transformers import AutoImageProcessor
from torchvision.transforms import RandomResizedCrop, Compose, Normalize, ToTensor
from transformers import AutoModelForImageClassification, TrainingArguments, Trainer
import matplotlib.pyplot as pltLoading the data from Hugging Face is straightforward using the load_dataset function.
beans_train = load_dataset("beans", split="train")beans is the name of the dataset being used.train corresponds to the subset of the whole data being used.Once the data is loaded, we can check its characteristics by simply printing the name of the above variable.
print(beans_train)This shows the result below:
Dataset({
    features: ['image_file_path', 'image', 'labels'],
    num_rows: 1034
})
There is a total of 1034 images, and each image has three fields:
image_path: the path to the actual image.image: a PIL object of the bean image.labels: the label of the image, which can be one of the following three types:The following helper function makes it easier to visualize a specific number of randomly chosen images and allocate the correct image type along with the existing labels (0, 1, and 2)
labels_names = {
   0: "angular_leaf_spot",
   1: "bean_rust",
   2: "healthy",
}

def display_random_images(dataset, num_images=4):

   num_rows = 2
   num_cols = np.ceil(num_images / num_rows).astype(int)

   plt.figure(figsize=(num_cols * 3, num_rows * 3))
   indices = np.random.choice(range(len(dataset)), size=num_images, replace=False)

   for i, idx in enumerate(indices, 1):
       idx = int(idx)
       image = dataset[idx]['image']
       label = dataset[idx]['labels']
       label_name = labels_names.get(label, "Unknown")

       plt.subplot(num_rows, num_cols, i)
       plt.imshow(image)
       plt.title(f"{label_name} ({label})")
       plt.axis('off')

   plt.tight_layout()
   plt.show()
In a nutshell, this function, display_random_images, selects a random subset of images from a given dataset and displays them in a grid, with each image labeled according to its classification (e.g., "angular_leaf_spot", "bean_rust", "healthy").
It dynamically arranges the images into two rows and calculates the necessary number of columns based on the total number of images to be displayed, ensuring no image duplication and that each is accompanied by its corresponding label name and numerical label.
We can then display six random images using the function as follows:
display_random_images(beans_train, num_images=6)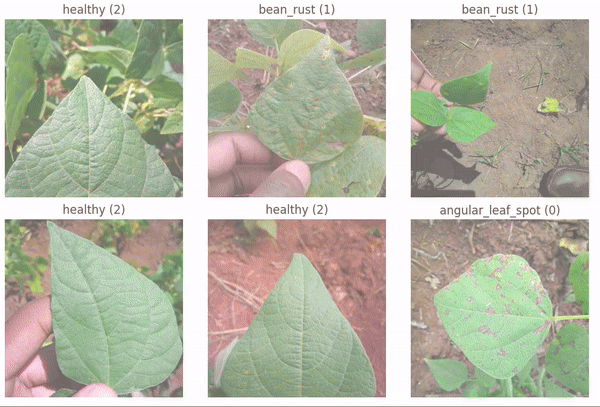
Six random images from the dataset
Before training the model, it is important to perform relevant preprocessing to make the data suitable for the model.
First, the original dataset is split into training and validation data, respectively 80% and 20%, and this is achieved using the train_test_split function.
beans_train = beans_train.train_test_split(test_size=0.2)Next, two dictionaries are created: label2id and id2label. This is critical for converting between human-readable label names and machine-understandable numeric identifiers.
This process facilitates both the training process and the interpretation of the final model’s predictions.
labels = beans_train["train"].features["labels"].names
label2id, id2label = dict(), dict()

for i, label in enumerate(labels):
   label2id[label] = str(i)
   id2label[str(i)] = label
Below is the result of the id2label variable:
print(id2label){'0': 'angular_leaf_spot', '1': 'bean_rust', '2': 'healthy'}Our classification model leverages the pre-trained model vision transformer (ViT) from Hugging Face.
This model was introduced in the paper, An Image is Worth 16x16 words: Transformers for Image Recognition at Scale, and it marks the first successful application of the transformer architecture to image recognition, trained on the ImageNet dataset.
The following code explains all the steps to load the pre-trained model, preprocess the data to meet the model’s requirement, and the intermediate steps to ensure that the images are correctly processed and ready to be fed into the pre-trained model for fine-tuning and evaluation.
checkpoint = "google/vit-base-patch16-224-in21k"
image_processor = AutoImageProcessor.from_pretrained(checkpoint)

normalize = Normalize(mean=image_processor.image_mean,
                  	std=image_processor.image_std)

size = (
	image_processor.size["shortest_edge"]
	if "shortest_edge" in image_processor.size
	else (image_processor.size["height"], image_processor.size["width"])
)

_transforms = Compose([RandomResizedCrop(size), ToTensor(), normalize])

def transforms(examples):

	examples["pixel_values"] = [_transforms(img.convert("RGB")) for img in examples["image"]]
	del examples["image"]
	return examples

beans_transformed = beans_train.with_transform(transforms)

data_collator = DefaultDataCollator()
Let’s understand what is happening in the above code:
google/vit-base-patch16-224-in21k._transforms) is composed, including random cropping, tensor conversion, and normalization.beans_train dataset is transformed using the transforms function, preparing it for model training.After these setups, the evaluation metric that is used to evaluate the model performance is the accuracy metric, which is implemented using the following helper function.
accuracy = evaluate.load("accuracy")
def compute_metrics(eval_pred):
   predictions, labels = eval_pred
   predictions = np.argmax(predictions, axis=1)

   return accuracy.compute(predictions=predictions,
references=labels)Before the model training process, the actual model is defined by leveraging the pre-trained model using the .from_pretrained function as follow
model = AutoModelForImageClassification.from_pretrained(
   checkpoint,
   num_labels=len(labels),
   id2label=id2label,
   label2id=label2id,
)The next step is to set up the model by configuring and initializing the training environment.
The setup includes specifying the necessary hyperparameters related to the mode training, evaluation, and optimization.
But before that, we need to log in to our Hugging Face account using our account credentials, which can be acquired as follows:
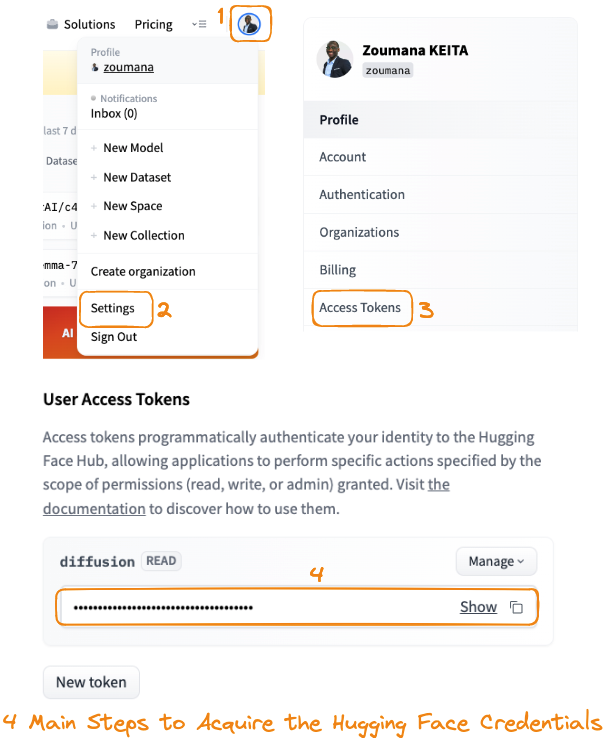
Main steps to acquire the Hugging Face credentials
By logging into our Hugging Face account, we can upload and share our trained models with the community. Next, the authentication process is triggered using the notebook_login function.
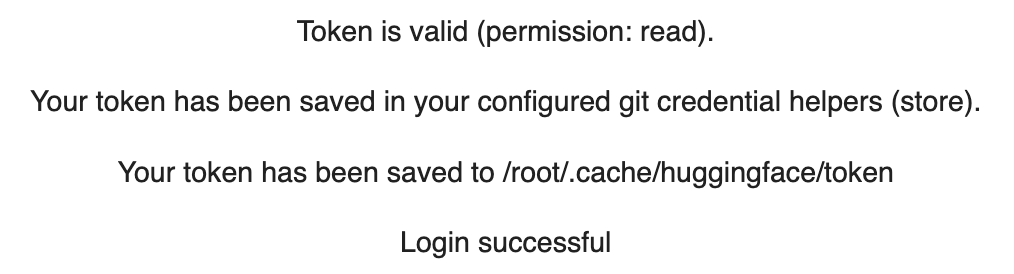
notebook_login()When prompted, provide the connection token, as copied in step 4 from the guide above.
After a successful login, the following message should be displayed:
The configuration and initialization code is provided below:
training_args = TrainingArguments(
	output_dir="./beans_health_type_classifier",
	remove_unused_columns=False,
	evaluation_strategy="epoch",
	save_strategy="epoch",
	learning_rate=5e-5,
	per_device_train_batch_size=16,
	gradient_accumulation_steps=4,
	per_device_eval_batch_size=16,
	num_train_epochs=3,
	warmup_ratio=0.1,
	logging_steps=10,
	load_best_model_at_end=True,
	metric_for_best_model="accuracy"
)

trainer = Trainer(
	model=model,
	args=training_args,
	data_collator=data_collator,
	train_dataset=beans_transformed["train"],
	eval_dataset=beans_transformed["test"],
	tokenizer=image_processor,
	compute_metrics=compute_metrics,
)
TrainingArguments are configured with specific parameters such as the output directory, evaluation and saving strategy per epoch, learning rate, batch size, gradient accumulation steps, and other settings aimed at optimizing the training process and model performance.Trainer object is initialized with the previously defined model, training arguments, data collator for batching, train and evaluation datasets, a tokenizer (or image processor in this case) for data preprocessing, and a function to compute metrics for evaluation.Now comes the training training phase, which is done using the .train function.
trainer.train()This specific training led to the following metrics:
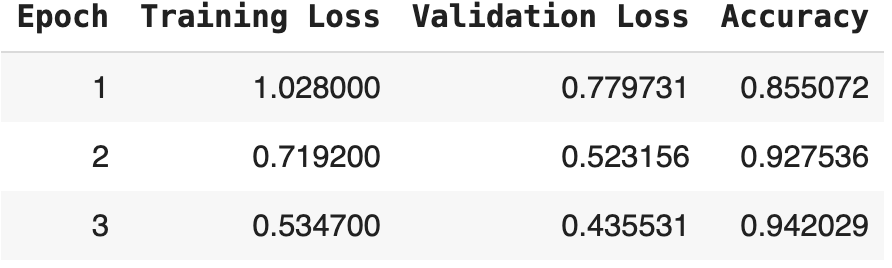
Model training result for three epochs
We can see that the table displays the progression of model training over three epochs on your beans dataset, showcasing three key metrics: training loss, validation loss, and accuracy.
When authenticating to the Hugging Face portal for the first time, the connection mode was Read only. However, we need a write credential to be able to push our model to the Hugging Face hub.
After that, we need to log in again using the notebook_login function by using the newly created credentials.
notebook_login()Pushing the model is performed using the push_to_hub function as follows:
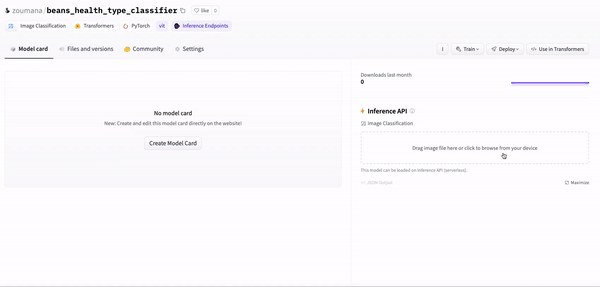
trainer.model.push_to_hub("zoumana/beans_health_type_classifier")This is going to push the model into the hub, and we can see the main properties of the actual model.

Model pushed to Hugging Face
Once the model is shared, it can be integrated into applications using REST API, or users can directly integrate it from the Hugging Face portal. Developers and researchers can also use the model by loading it using the Transformers library.
In this section, we cover the three main ways of using the model.
On the portal, users can directly upload an image and get the model predictions as illustrated in the following animation.
Using the model from the Hugging Face portal
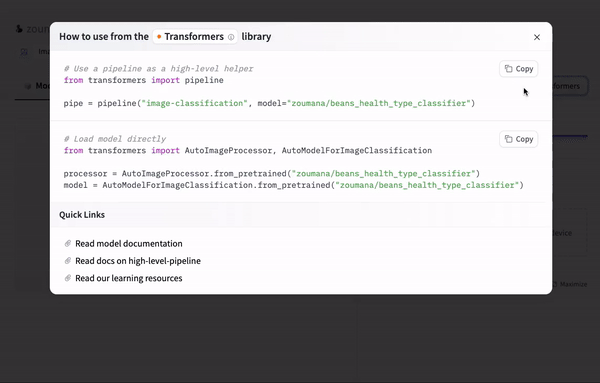
By selecting the “Use in Transformers” icon, the code to use the model is automatically provided as follows:
Using the model with Transformers
Finally, we can use the model as a REST API using the connection string provided automatically from the portal after clicking the “Deploy > Inference API (serverless)” icon.
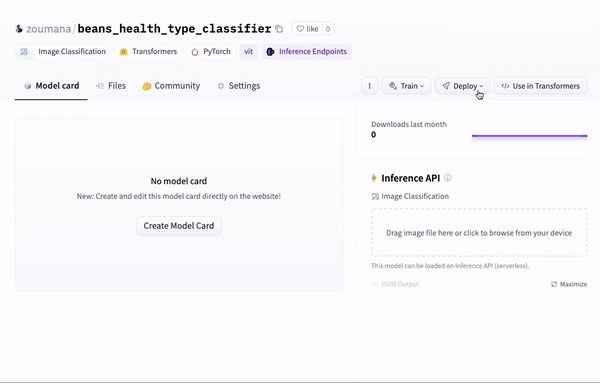
Using an API endpoint
The code snippet provided in the previous animation is the same as below and can be used to make predictions on a given image.
The image being used is the same one provided during the illustration from the Hugging Face portal.
Make sure to replace the “xxx” with the actual values.
import requests

API_URL = "https://api-inference.huggingface.co/models/zoumana/beans_health_type_classifier"
headers = {"Authorization": "Bearer xxxxxxxxxxxxxxxxx"}

def query(filename):
   with open(filename, "rb") as f:
       data = f.read()
   response = requests.post(API_URL, headers=headers, data=data)
   return response.json()
Next, we get the model’s response using the previous query function.
output = query("./inference_images/test_beans_leaf.jpg")The final result is a JSON response, as shown below. We can see the predicted label is the one with the highest probability score, and in this case, it is a healthy label, which is the exact same prediction from the Hugging Face portal.
print(output)[
{'label': 'healthy', 'score': 0.4799719452857971},
{'label': 'angular_leaf_spot', 'score': 0.27489492297172546},
{'label': 'bean_rust', 'score': 0.2451331913471222}
]This article provided a complete guide on how to perform image classification tasks using Hugging Face.
We started with the basics of image classification and talked about why Hugging Face is a great tool for this job, thanks to its extensive collection of models and its supportive community.
Then, we covered how to get training images ready for classification, including how to make sure the training data meets the fine-tuning requirements.
Furthermore, we dived into how to fine-tune a model with Hugging Face, choosing the right pre-trained model. We also discussed how to integrate the trained model into real-world applications using three main integration strategies.
There's always more to learn and explore in AI, and each step you take opens up new possibilities. So, for anyone wanting to learn more about AI and machine learning, especially about classifying images and more, here are some great resources to check out:
This guide is meant to help anyone start their own projects using Hugging Face for image classification, whether they are beginner, intermediate or advanced practitioners.
Start Your AI Journey Today!
Track
Course
Course
Tutorial
Josep Ferrer
Tutorial
Josep Ferrer
Tutorial
Zoumana Keita
code-along
Priyanka Asnani
code-along
Alara Dirik
code-along
Jacob Marquez