Track
AI for Software Engineering
7 hr
The open model race moved again on July 16, 2026, when Moonshot AI released Kimi K3, a 2.8 trillion parameter model with a 1-million-token context window and native vision. It is the largest open model Moonshot has shipped, well beyond Kimi K2 in size, and the first they describe as reaching the 3-trillion-parameter class.
If you want the launch story, the architecture deep dive, the benchmark charts, the comparisons with Claude, GPT, and the other Chinese labs, and Moonshot's own limitations list, our Kimi K3 blog post covers all of that. This tutorial is the hands-on side, including how to access it and how it behaves once you use it. I'll walk through five small examples, four through the API, where I show real token usage and cost, and two in the kimi.com web app. Together, they cover how K3 handles:
The four API examples ran on July 17, 2026, against the kimi-k3 model, and cost about 11 cents on a cold run, or a couple of cents once caching kicked in.
If you plan to use the model for browser automation work, I also recommend reading our Kimi browser extension tutorial.
The quickest way to try the model is kimi.com, where the web app and mobile apps run Kimi K3 for general agent tasks with no setup.
For heavier work like reports and dashboards, there is Kimi Work, a desktop app.
If you live in the terminal, Kimi Code is a coding agent you install from npm as @moonshot-ai/kimi-code, and you pick the model there with the /model command. Using K3 in Kimi Code requires a paid membership, and the full 1-million-token window requires a higher tier.
This tutorial focuses on the raw API and the web app, but the terminal agent is there if you want it.
K3 does not replace its siblings, though. The table below shows how the current lineup splits up.
|
Model |
Context window |
Best suited for |
|
|
1,048,576 tokens |
Flagship work: long coding, vision, knowledge tasks |
|
|
262,144 tokens |
Dedicated coding, with a faster high-speed option |
|
|
262,144 tokens |
General text, image, and video chat |
The short read is that K3 is the model to start with when a job mixes code, tools, documents, and images, or when you truly need the 1-million-token window. For pure code generation where speed matters more than context, kimi-k2.7-code is still the more sensible choice, so don't assume the newest model is always the right one.
The API is compatible with the OpenAI SDK, so if you have used that before, almost nothing here is new. You need Python 3.9 or later and an API key.
First, sign in to the Kimi platform and open the API Keys page in the console. Create a key, copy it once, and store it somewhere safe, because you will not see it again. You also need a small balance on the account to make calls, and for this whole tutorial a few dollars is plenty.
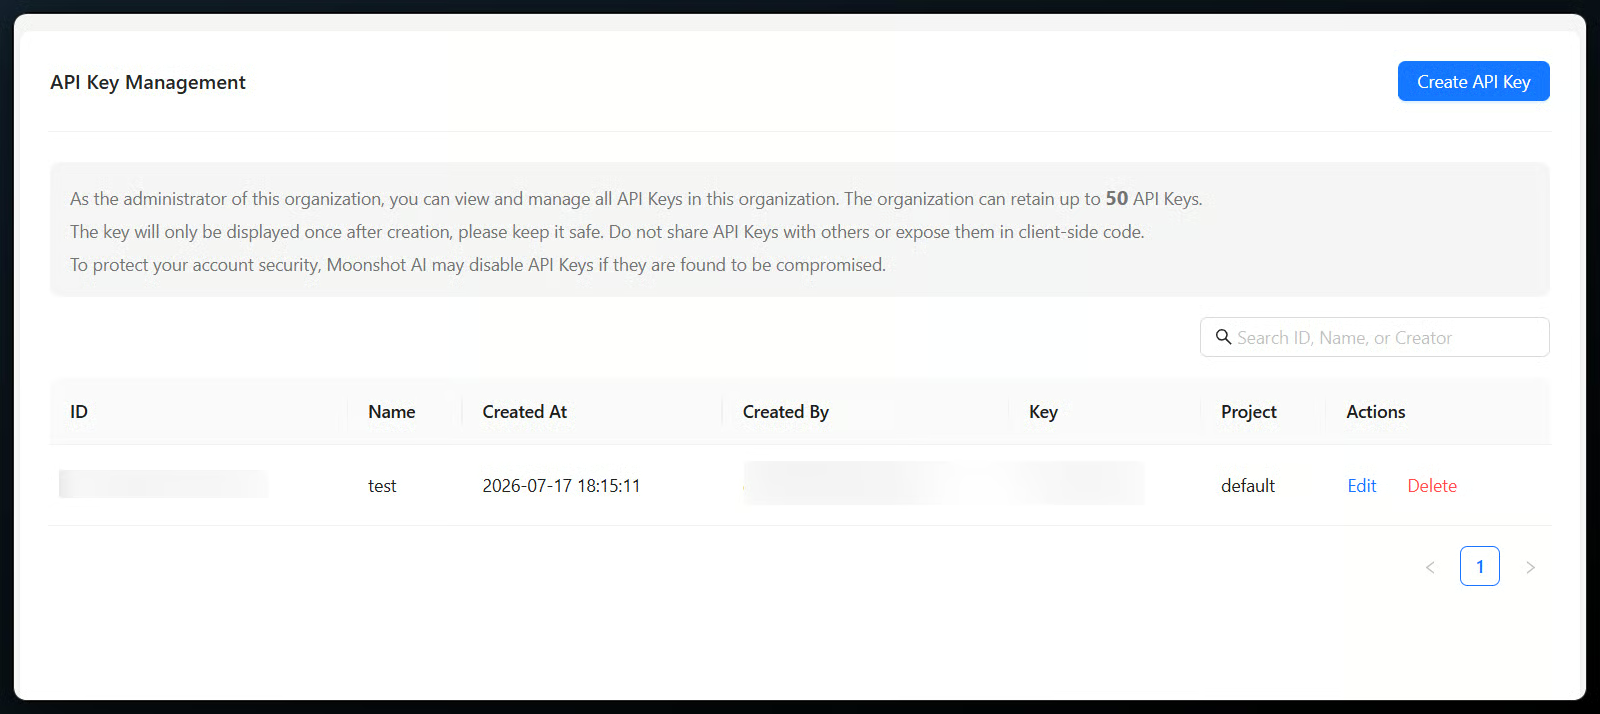
Creating a Kimi K3 API key. Image by Author.
Next, install the OpenAI SDK into your environment. A single command does it.
python -m pip install --upgrade "openai>=1.0"That pulls in the client library the rest of the examples use, and there is nothing Kimi-specific to install.
It is better to read the key from an environment variable than to paste it into your code. Set MOONSHOT_API_KEY in your shell or a .env file, then point the client at Moonshot's base URL.
import os
from openai import OpenAI

client = OpenAI(
    api_key=os.environ["MOONSHOT_API_KEY"],
    base_url="https://api.moonshot.ai/v1",
)
The only two things that differ from a standard OpenAI setup are the base_url and the model name, which is kimi-k3. With that in place, you are ready to make a call.
Now for a first request. I asked the model to introduce itself, which turned into an honest little moment.
completion = client.chat.completions.create(
    model="kimi-k3",
    messages=[{"role": "user", "content": "Introduce Kimi K3 in one sentence."}],
    max_completion_tokens=800,
)
print(completion.choices[0].message.content)
The reply was a polite refusal to guess: the model said it had no reliable information about Kimi K3, since it was trained before its own release, and pointed me to Moonshot's announcements instead. That is a useful reminder that a model does not know about itself. The API call I just made costs about seven tenths of a cent. Notice the max_completion_tokens cap, which I set on every call in this tutorial to keep the verbose output from running up the bill.

Kimi K3 first API call output. Image by Author.
K3 always reasons, and the API returns that reasoning on a separate channel from the answer. When you stream, each chunk can carry reasoning_content, final content, or both, so you can place the thinking and the answer separately.
stream = client.chat.completions.create(
    model="kimi-k3",
    messages=[{"role": "user", "content": "A bat and a ball cost $1.10 together. The bat costs $1.00 more than the ball. How much is the ball?"}],
    max_completion_tokens=1200,
    stream=True,
    stream_options={"include_usage": True},
)

for chunk in stream:
    if not chunk.choices:
        continue
    delta = chunk.choices[0].delta
    reasoning = getattr(delta, "reasoning_content", None)
    if reasoning:
        print(reasoning, end="", flush=True)
    if delta.content:
        print(delta.content, end="", flush=True)
The model streamed its working first: it recognized the bat-and-ball question as the classic Cognitive Reflection Test, flagged the intuitive wrong answer of $0.10, then worked the algebra to the ball costing $0.05 and checked that $1.05 plus $0.05 makes $1.10. The split is the useful part: in a real app you show content to users and keep reasoning_content for logs, since showing raw reasoning in production is rarely what you want. This call used 488 output tokens and cost under a cent.
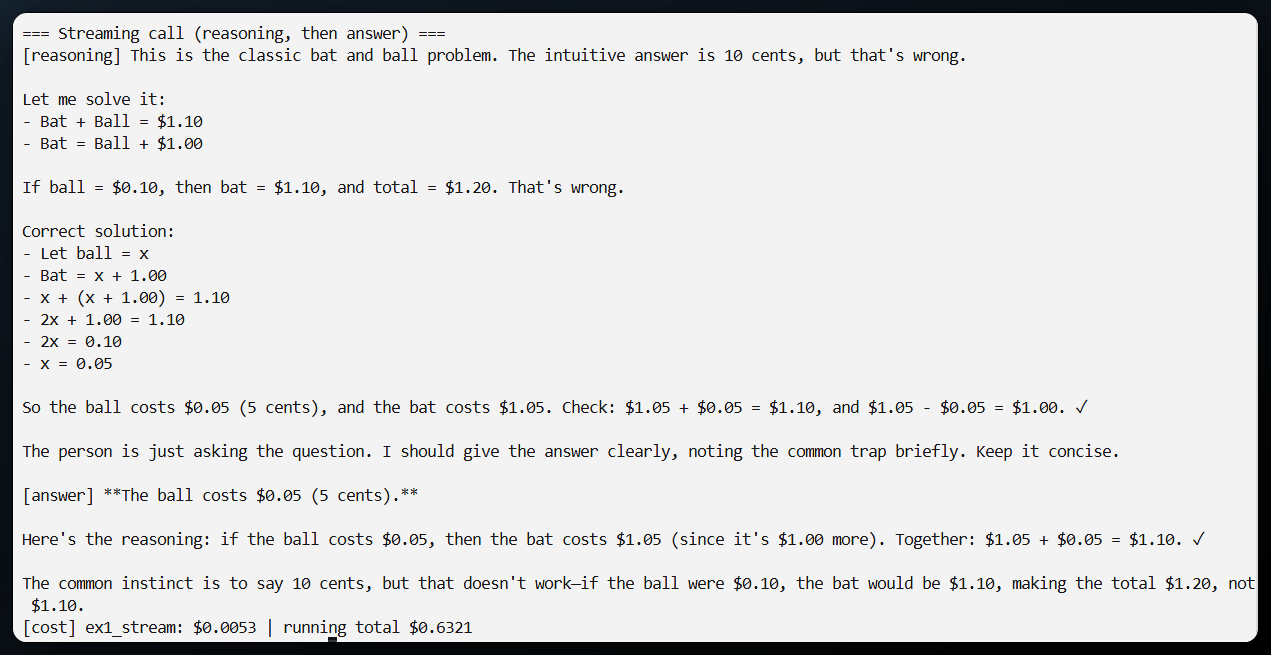
Streaming reasoning then the final answer. Image by Author.
Kimi K3 is the model in the lineup that supports tool_choice="required", which forces at least one tool call on a turn. That is useful when you want the model to fetch data before answering instead of guessing. Here I gave it two mock tools, a price lookup and a stock check, forced a tool call, ran the tools locally, and then asked for the result as strict JSON using response_format.
first = client.chat.completions.create(
    model="kimi-k3",
    messages=messages,
    tools=TOOLS,
    tool_choice="required",
    max_completion_tokens=2500,
)
assistant_message = first.choices[0].message
messages.append(assistant_message)

for tool_call in assistant_message.tool_calls or []:
    args = json.loads(tool_call.function.arguments)
    messages.append({"role": "tool", "tool_call_id": tool_call.id, "content": run_tool(tool_call.function.name, args)})
The model called both tools with the right product code, then returned a clean order summary as JSON: five mechanical keyboards at $89 each, a total of $445, and a stock flag set to true. Two details make this work in practice. You must append the complete assistant message back into the conversation before adding tool results, and you should parse only content for the JSON, never the reasoning field. The pair of calls cost under a cent combined.
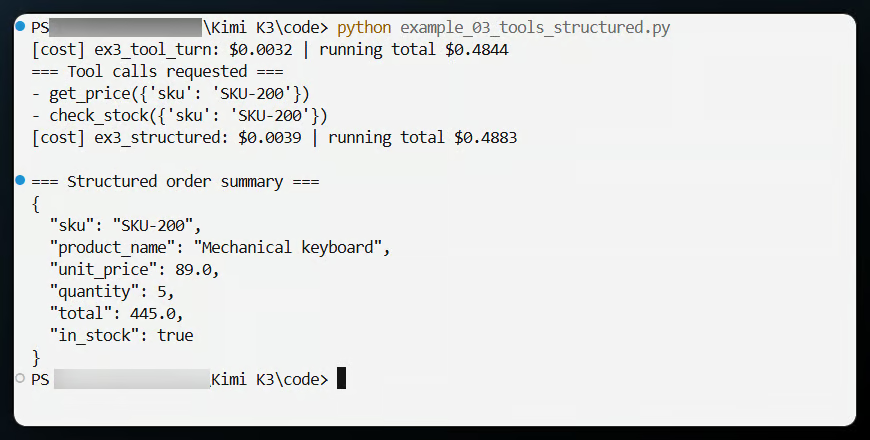
Tool calls and structured JSON output. Image by Author.
If you have dozens of tools, sending all their definitions on every request wastes tokens and clutters the prompt. Kimi K3 lets you inject a tool definition mid-conversation with a system message that carries a tools field and no content. The tool becomes available from that point forward, which keeps large tool catalogs out of your cached prefix until a tool is actually needed.
messages = [
    {"role": "user", "content": "Convert 100 US dollars to euros at a rate of 0.92."},
    {"role": "system", "tools": [{
        "type": "function",
        "function": {
            "name": "convert_currency",
            "description": "Convert an amount from one currency to another",
            "parameters": {
                "type": "object",
                "properties": {"amount": {"type": "number"}, "rate": {"type": "number"}},
                "required": ["amount", "rate"],
            },
        },
    }]},
]
completion = client.chat.completions.create(model="kimi-k3", messages=messages)
print(completion.choices[0].message.tool_calls)
K3 picked up the freshly loaded tool and called convert_currency with an amount of 100 and a rate of 0.92, exactly as intended. One thing to remember is that the server does not hold on to this definition for you, so you resend the system message in later requests if you want the tool to stay available. This was the cheapest call in the set at about two tenths of a cent.
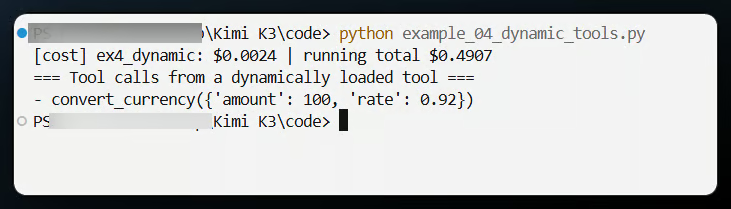
Calling a dynamically loaded currency tool. Image by Author.
This example is where the 1-million-token window gets practical. Context caching is automatic, with no cache ID and no time-to-live to manage. You send a large prefix, keep it byte-for-byte identical on later requests, and the repeated part bills at the cache-hit rate instead of the cache-miss rate. To make the difference visible I used a knowledge base of about 33,000 tokens and asked a question about it.
knowledge = Path("knowledge_base.md").read_text(encoding="utf-8")
completion = client.chat.completions.create(
    model="kimi-k3",
    messages=[
        {"role": "system", "content": knowledge},
        {"role": "user", "content": "What is the rated payload of the Atlas robot?"},
    ],
    max_completion_tokens=600,
)
The first time I sent that prefix, none of it was cached, and the request cost about 9.9 cents for roughly 33,000 input tokens. After the prefix had been seen, the same request hit the cache on all 32,512 prefix tokens and cost about 1.1 cents, close to a nine times drop. The reason is the price gap: cached input is $0.30 per million tokens versus $3.00 for uncached. One quirk I hit is that cache writes are asynchronous, so the hit does not show up on an instant back-to-back call. It lands on a later request, so running the script twice a minute apart shows the miss and then the hit.
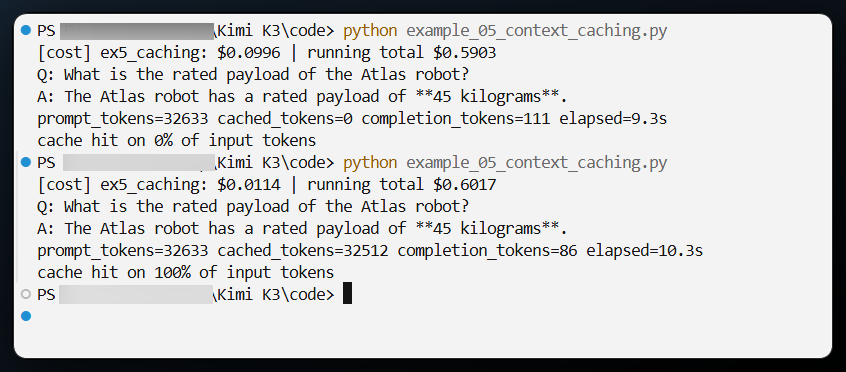
Cache miss versus cache hit cost. Image by Author.
Vision is native to K3, and the API is a clean way to use it, though it will not take a public image URL. You send the image as a base64 data URL and make the message content an array of objects, one part for the image and one for the text. I rendered a small dashboard with a few deliberate layout bugs, saved a screenshot, and asked K3 what was wrong.
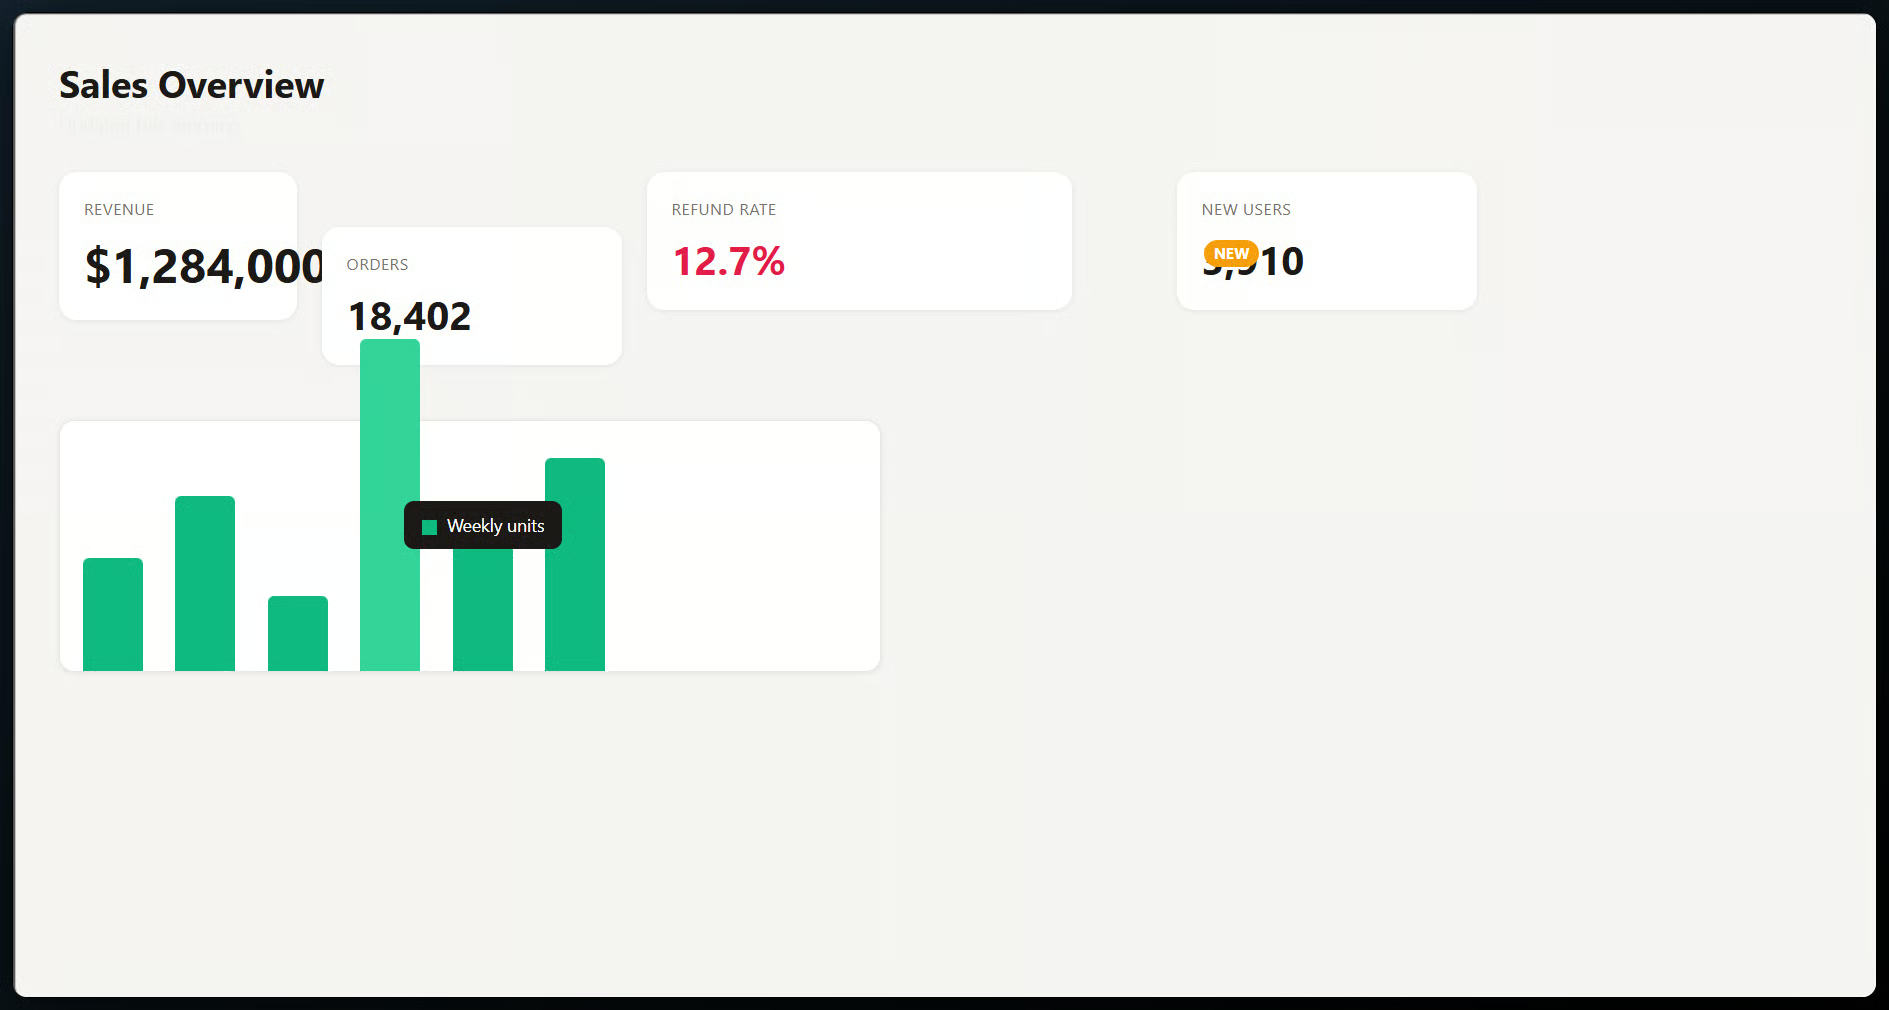
The dashboard with deliberate layout bugs. Image by Author.
import base64
from pathlib import Path

image_data = base64.b64encode(Path("broken_dashboard.png").read_bytes()).decode()
completion = client.chat.completions.create(
    model="kimi-k3",
    messages=[{
        "role": "user",
        "content": [
            {"type": "image_url", "image_url": {"url": f"data:image/png;base64,{image_data}"}},
            {"type": "text", "text": "List the layout and alignment problems you can see, and give a short CSS fix for each."},
        ],
    }],
    max_completion_tokens=3500,
)
print(completion.choices[0].message.content)
K3 read the image well. It caught the card that sits lower than the row and overlaps its neighbor, the badge parked on top of a number (it even misread the covered 3,910 as 5,910, which is the bug proving itself), the uneven gap before the last card, the bar bleeding up into the card above, and the tooltip sitting over the bars, and it gave a short CSS fix for each, like moving the cards into one grid. However, it skipped the almost-invisible low-contrast subtitle, so vision catches what stands out to the eye more than faint detail. The call cost about two cents.
The API examples went well, but a few rough edges are worth naming so you are not surprised. I ran into most of these directly.
Only reasoning_effort="max" is available for now, so you cannot dial the thinking down to save money yet.
The sampling settings are fixed. Values like temperature, top_p, and the penalties are locked, so omit them from requests instead of tuning them.
Output can get long and expensive. Cap max_completion_tokens, as in the examples, and validate any agent loop.
Public image URLs are not supported through the API, so plan on base64 or uploaded files for vision there.
None of these are dealbreakers, but they shape how you use the model. The output cost is the one I would watch most.
In my runs, two things stood out. The tool calling and structured output needed no retries, and caching mattered more than I expected, since reusing the same long prefix made a big request cheap to send again. So for repository-scale analysis, repeated long-context calls, or multimodal engineering, K3 is a reasonable default; for quick low-cost chat or precise sampling control, a smaller model is the easier call. The open-weight and license details, which I flagged earlier, should be clearer after the July 27 release.
For more background on the patterns these examples use, our Developing AI Systems with the OpenAI API course covers function calling and wiring models to external tools in Python.
Learn with DataCamp
Track
Course
Track
blog
Josef Waples
11 min
Tutorial
Aashi Dutt
8 min
Tutorial
Bexruz (Bex) Tuychiev
15 min
Tutorial
Aashi Dutt
10 min
Tutorial
Abid Ali Awan
11 min
Tutorial
Aashi Dutt
8 min