Course
Every complex system is the result of the orchestration of multiple subsystems. Building and maintaining such a system remains a common challenge, especially when dealing with cloud infrastructures.
Fortunately, a variety of tools have been developed to streamline the orchestration of workflows, regardless of complexity level. Among these tools, AWS Step Functions stands out for its utility and numerous benefits.
This article focuses on how to use Step Functions to orchestrate workflows within the AWS Cloud. It starts by exploring what step functions are, along with their benefits and key features.
Then, it guides through the steps of getting started with Step Function, from setting up one’s AWS environment to exploring the interface. Building on this foundation, it walks through the step-by-step process of creating and deploying a real-world workflow.
What are AWS Step Functions?
AWS Step Functions is a serverless orchestration service designed to facilitate the creation of visual workflows, enabling seamless coordination of AWS Lambda functions and other AWS resources.
Its integration capabilities are extensive, supporting connections with Amazon EC2, Amazon ECS, on-premise servers, Amazon API Gateway, and Amazon SQS queues, to name a few. This ensures that workflows can be comprehensive and interact with a broad ecosystem of AWS services.
The versatility of AWS Step Functions makes it suitable for a wide range of applications. Whether it's managing the fulfillment of orders, processing data, powering web applications, or orchestrating any complex sequence of tasks, Step Functions provides a robust solution for workflow automation and management.
Key Features and Benefits
Before diving into the technical aspects of AWS Step Functions, let’s explore its main features and benefits.
Key features
Step Functions provides a variety of features to streamline the creation and management of workflows, and the major ones are highlighted below:
- HTTPS Endpoints Integration: This allows workflows to invoke any web service that supports HTTPS to facilitate the integration of a variety of web APIs into user processes.
- Distributed Component Coordination: This feature makes it possible to coordinate the components of distributed systems, which is crucial for complex, multi-service applications.
- Built-in State Management: By meticulously monitoring the progress of each workflow execution, this capability preserves users’ applications’ state through their execution while managing the data transferred between the workflow steps.
- Human approval: Humans in the loop are crucial to any automation. This feature offers a mechanism to include human intervention in an automated workflow for manual approvals where necessary.
Benefits
The key features of AWS Step Functions provide developers and organizations with multiple benefits to improve their operational and development workflows.
|
For Developers |
For Organizations |
|
|
Real-world Examples and Case Studies
Based on the above features and benefits, there is no doubt that Step Functions can play a critical role across various domains, enabling businesses to design, automate, and efficiently scale their workflows.
This section focuses on exploring examples of how different industries use AWS Step Functions to be more competitive, innovative, and efficient.
Microservice Coordination
Organizations with architectures composed of microservices often leverage AWS Step Functions to manage the interactions between these services.
A retail company, for instance, might deploy Step Functions to orchestrate steps that process user authentication, stock management, payment processing, and order dispatching, ensuring a cohesive shopping experience.
Security and IT Operations
AWS Step Functions can be used to automate repetitive tasks such as security checks, system updates, and compliance verification.
For instance, in IT security, Step Functions can be used to design incident response workflows, thereby reducing human error and response times by systematically managing each phase from initial alert to issue resolution.
Data Workflow and ETL Processes
For data-heavy enterprises, AWS Step Functions can orchestrate data processing and ETL tasks. This could involve workflows for data extraction from multiple sources, transformation into a consistent format, and loading into analytical platforms or data lakes.
An analytics firm, for instance, may implement Step Functions to automate its data pipeline, ensuring efficient handling of data for making strategic decisions.
Machine Learning Operations
Step Functions is also beneficial in the operational aspect of machine learning, including processes such as data preparation, model training, evaluation, and deployment.
A healthcare technology firm might use Step Functions to manage the pipeline for periodic retraining of its diagnostic algorithms, maintaining its models' performance as new data becomes available.
Media Processing Pipelines
In media and entertainment, AWS Step Functions can be used to orchestrate complex media processing workflows, including video encoding, image processing, and content analysis.
A media company could apply Step Functions to ensure that new content, once uploaded, automatically triggers format conversion, thumbnail extraction, and metadata enrichment before being published.
Getting Started with AWS Step Functions
Later sections in this article cover the combination of Step Functions with other AWS services. It is then necessary to understand the basics of Step Functions before dealing with advanced concepts.
The goal of this section is to aid in getting started with AWS Step Functions, from understanding the building blocks to navigating the AWS Step Functions interface.
Building Blocks of Step Functions
Every system or module is a combination of multiple subcomponents, and so is Step Functions. Step Functions is based on the following blocks: (1) state machines, and (2) tasks.
Let’s understand these concepts through an example.
- State Machines: A workflow that defines the sequence of events, conditional logic, and the overall flow of execution of tasks. In a nutshell, a state machine could be defined as a workflow.
- Tasks: An action that performs a specific action. It takes an input and generates an output. An example can be querying a database, making an API call, or invoking a Lambda function, to name a few.
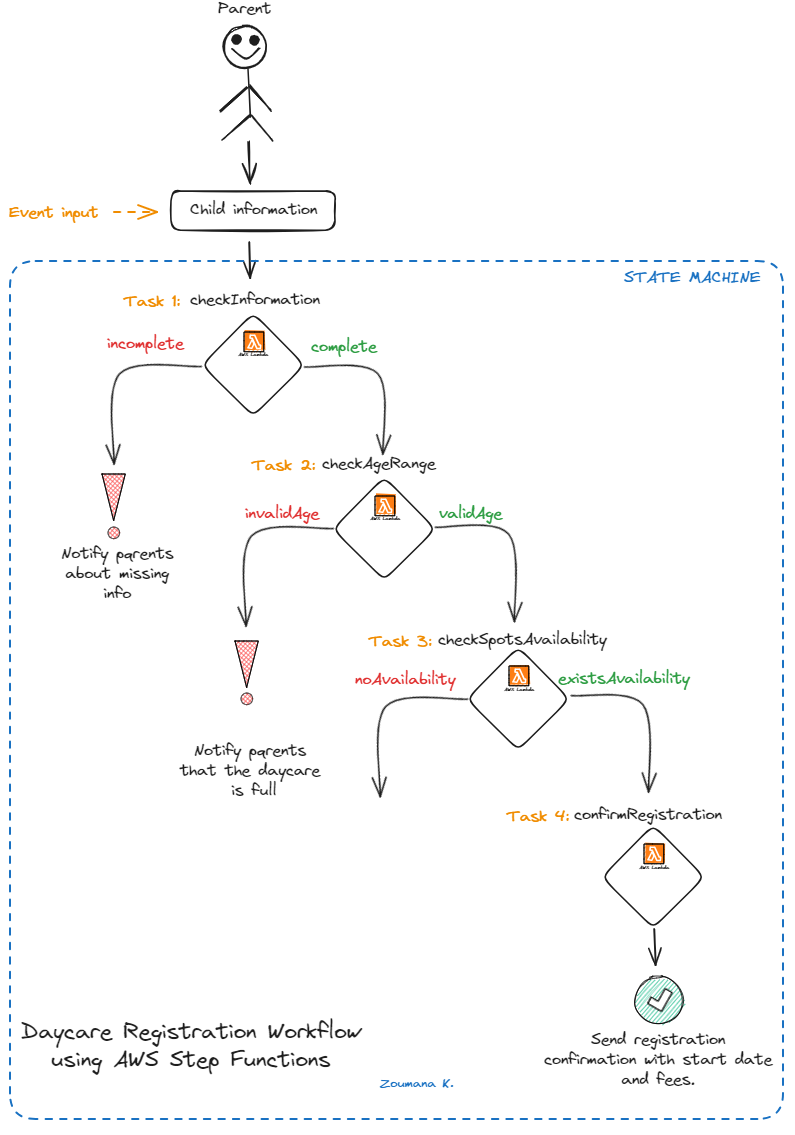
Consider a use case that performs a daycare registration process using AWS Step Functions. Before diving into the process of leveraging Step Functions, let’s understand the overall steps:
- Collect Registration Information: the first step in the process is to collect registration information from parents. This could be done through a web form, but we are using JSON in our use case. A Lambda function is triggered when submitted, the Lambda function then passes the registration information to the next step in the workflow.
- Verify Registration Information: The next step is to use a Lambda function that verifies the registration information. It checks that all required fields are filled out and that the child’s age is within the acceptable range for the daycare. If the verification is successful, the workflow proceeds to the next step. If not, an error message is returned to the parents.
- Check Availability: once the registration information is verified, another Lambda function checks the availability of spots in the daycare. If there is availability, the workflow proceeds to the next step. If not, a message is sent to the parents informing them that the daycare is full.
- Confirm Registration: the final step is a Lambda function that confirms the registration and sends a confirmation message to the parents. This includes details about the start date and fees.
This workflow has a State Machine with four main tasks, all self-explanatory.
checkInformationcheckAgeRangecheckSpotsAvailabilityconfirmRegistration
Daycare Registration workflow using AWS Step functions
Building Your First AWS Step Function
The above sections provided more theoretical knowledge, and this one dives into the technical aspects, starting from the prerequisites for using Step Functions, to implementing an end-to-end workflow and deploying it.
Prerequisites to Implementing Step Functions
Before diving into the details of the use case, let’s first go over the prerequisites required for a successful implementation:
- AWS account: needed to access AWS services, and one can be created from the AWS website.
- Basic knowledge of AWS Services: Familiarity with AWS Lambda and Amazon Simple Notification Service (SNS) is necessary for the scope of this use case.
- Knowledge of JSON: A basic understanding of JSON is required to understand the input and output data format.
- AWS IAM: An understanding of AWS Identity and Access Management (IAM) is necessary to set up the correct permissions for the Lambda functions being used.
- Coding Skills: Basic coding skills in Python are necessary to write the Lambda functions.
Navigating the AWS Step Functions Interface
Let’s start with the exploration of the Step Function interface. This is achieved by considering the following four main steps after logging into your AWS account:
- Type the “Step Functions” keyword in the search bar from the top.
- Choose the corresponding icon from the results.
- Hit the “Get Started” icon to start creating the first step function.
- Finally, since we want to create our own state machine, select the “Create your own” tab.
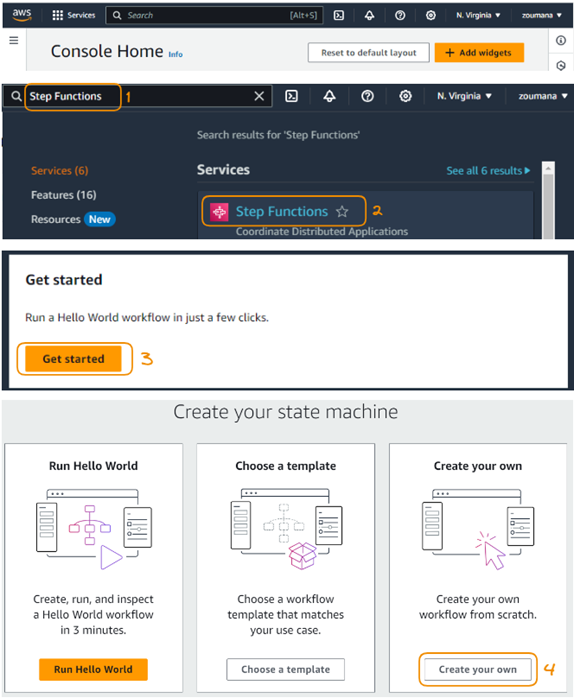
Four main steps to accessing a Step Function interface
After the fourth step, we can start designing the state machine with the help of the “Design” tab, which contains three main functionalities: “Actions”, “Flow”, and “Patterns.”
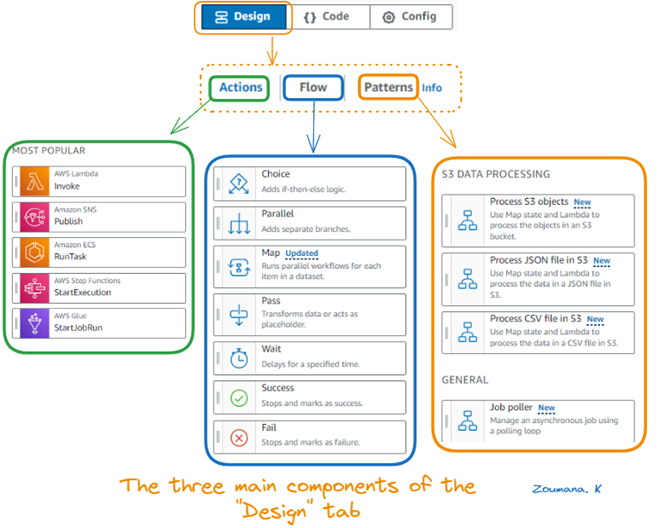
The three main components of the "Design" tab
- Actions: These correspond to individual operations that can be performed within a workflow, and they correspond to specific AWS services, such as invoking a Lambda function, publishing a message to SNS, running a task on ECS, or starting a job in AWS Glue.
- Flow: This represents the control flow constructs that dictate the execution path of the state machine. Elements like "Choice" for branching logic, "Parallel" for concurrent execution paths, "Map" for iterating over a collection, "Pass" as a no-operation or state data enricher, "Wait" for time delays, "success" to end a workflow successfully, and "Fail" to end it due to an error is all part of the workflow's flow control.
- Patterns: These are pre-defined templates or best practices for common workflow scenarios, making it easier to build complex state machines. Patterns could involve data processing tasks specific to handling S3 objects, JSON files, CSV files, or general-purpose patterns like a job Poller for orchestrating asynchronous job execution.
Creating the Workflow
The initial workflow aimed to provide a general overview of the main components of the state machine. This section reviews the implementation process.
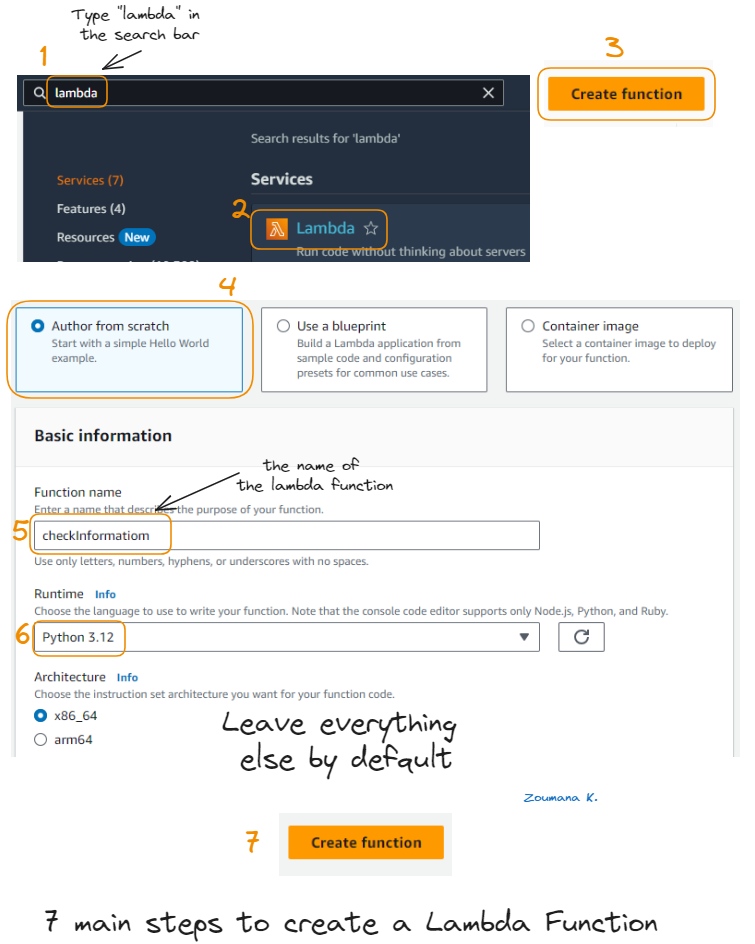
To do that, we need four lambda functions, each one corresponding to a specific task.
The following seven steps highlight all the necessary steps to create a lambda function. The creation process is the same for all four; the only difference remains in the content of those functions.
The overall code of the article is available on the GitHub page. Even though the code is easy to understand, it is highly recommended that you follow the whole content of this article for a better experience.
7 main steps to create a Lambda Function
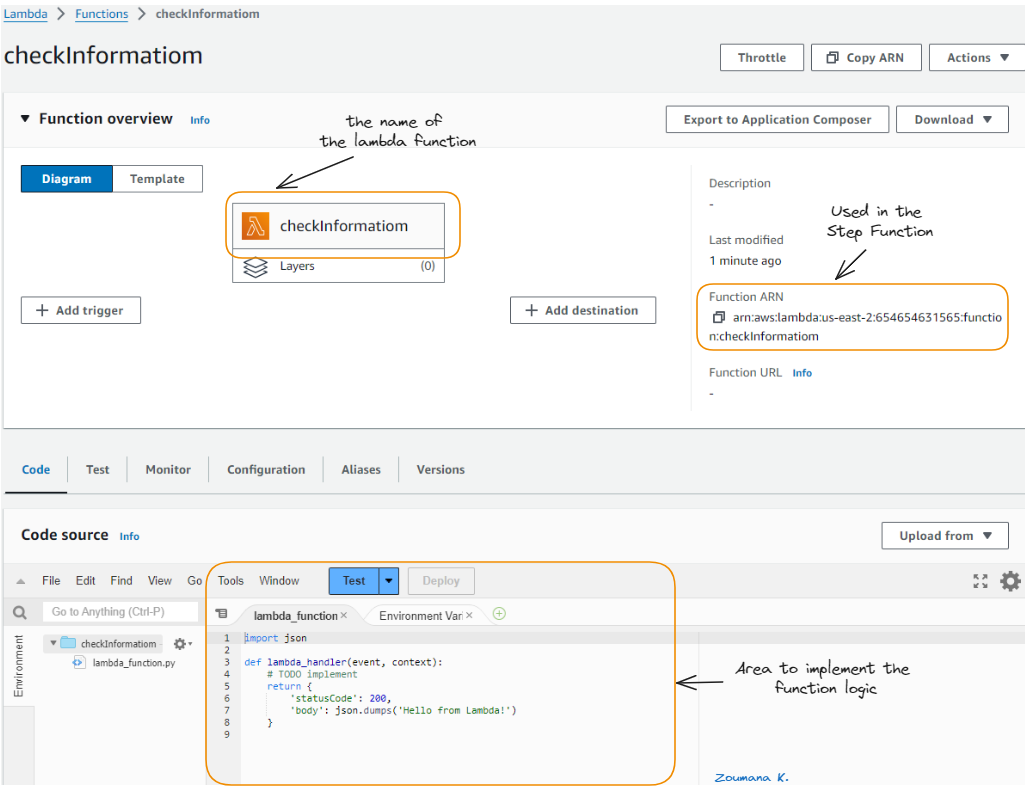
After the completion of the seven steps, the following window should appear, showing important information such as:
- The name of the function
- Its Amazon Resource Name (ARN) link, and
- The integrated area to implement the function’s logic.
Details of the checkInformation lambda function
Now, repeat the same process for the remaining three tasks (functions) checkAgeRange, checkSpotsAvailability, and confirmRegistration.
An example of the input JSON is given below. It’s important to understand it since it affects the way the functions are implemented.
- The JSON contains information about the child being registered, including its first name, last name, and date of birth.
- It also includes details about the parents, the days of the week the child will be attending the daycare, and any additional information.
{
  "registration_info": {
	"child": {
  	"firstName": "Mohamed",
  	"lastName": "Diallo",
  	"dateOfBirth": "2016-07-01"
	},
	"parents": {
  	"mother": {
    	"firstName": "Aicha",
    	"lastName": "Cisse",
    	"email": "aicha.cisse@example.com",
    	"phone": "123-456-7890"
  	},
  	"father": {
    	"firstName": "Ibrahim",
    	"lastName": "Diallo",
    	"email": "ibrahim.diallo@example.com",
    	"phone": "098-765-4321"
  	}
	},
	"daysOfWeek": [
  	"Monday",
  	"Tuesday",
  	"Wednesday",
  	"Thursday",
  	"Friday"
	],
	"specialInstructions": "Mohamed has a peanut allergy."
  }
}
Each lambda function is described below:
|
Function |
Description |
|
|
|
|
|
|
|
|
|
|
|
|
The underlying implementation of each function is provided below:
checkInformation function
 import json

 def checkInformation(event, context):
	 registration_info = event['registration_info']

	 required_fields = ['child', 'parents', 'daysOfWeek']
	 for field in required_fields:
    	if field not in registration_info:
        	return {
            	'statusCode': 400,
            	'body': f'Missing required field: {field}'
        	}

	 return {
    	'statusCode': 200,
    	'body': json.dumps(registration_info)
	 }
checkAgeRange function
 import json
 import datetime

 def checkAgeRange(event, context):

	registration_info = json.loads(event['body'])

	dob = registration_info['child']['dateOfBirth']

	today = datetime.date.today()
	dob_date = datetime.datetime.strptime(dob, '%Y-%m-%d').date()
	age = today.year - dob_date.year - ((today.month, today.day) < (dob_date.month, dob_date.day))

	if age < 2 or age > 5:
    	return {
        	'statusCode': 400,
        	'body': json.dumps('Child is not within the acceptable age range for this daycare.')
    	}


	registration_info['child']['age'] = age

	return {
    	'statusCode': 200,
    	'body': json.dumps(registration_info)
	}
checkSpotsAvailability function
import json

def checkSpotsAvailability(event, context):

	registration_info = json.loads(event['body'])

	spots_available = 20  # This should be dynamically determined, not hardcoded

	if spots_available <= 0:
    	return {
        	'statusCode': 400,
        	'body': json.dumps('No spots available in the daycare.')
    	}

	return {
    	'statusCode': 200,
    	'body': json.dumps(registration_info)
	}
confirmRegistration function
import json
import datetime

def confirmRegistration(event, context):

	registration_info = json.loads(event['body'])
	age = registration_info['child']['age']  # This was added in the checkAgeRange function

	if age >= 2 and age < 3:
    	fees = 800
	elif age >= 3 and age < 4:
    	fees = 750
	elif age >= 4 and age < 5:
    	fees = 700
	else:  # age >= 5
    	fees = 650

	start_date = datetime.date.today() + datetime.timedelta(weeks=2)

	confirmation_details = {
    	'fees': fees,
    	'start_date': start_date.isoformat()
	}

	response = {**registration_info, **confirmation_details}

	return {
    	'statusCode': 200,
    	'body': json.dumps(response)
	}
With all this in place, we can start creating our daycare state machine using the Step Functions graphical interface.
The final state machine is given below, and let’s understand the major steps that led to this workflow:
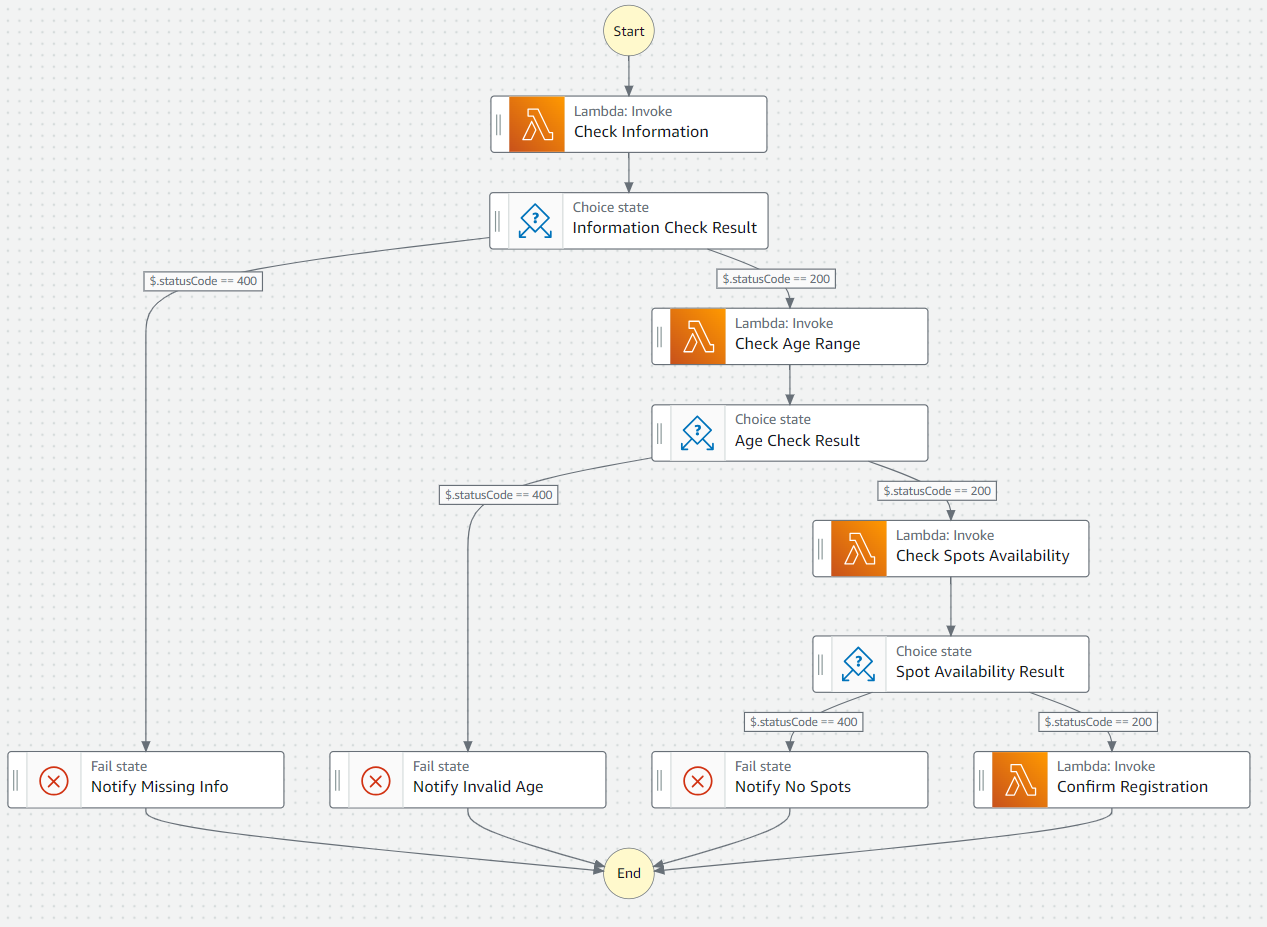
State machine workflow for the daycare use case
Before we dive in, it is important to note that the statusCode field from the output of a lambda function is used to determine the next state in the state machine.
- If the value is 200, it means that the check was successful, and we proceed to the next step.
- If the
statusCodeis 400, then the check failed, in which case we return the relevant message depending on the function that executed the underlying task.
Check Information
- The state machine starts at this step.
- A lambda function is invoked to check if all the required information is present in the registration form.
- If the information is complete, the process moves to the next step. If not, it ends with a fail state notifying that the information is incomplete.
Check Age Range
- This step is reached only if the information check is successful.
- Another lambda function is invoked to check if the child’s age falls within the acceptable range for the daycare.
- If the age is within the range, the process moves to the next step. If not, it ends with a fail state notifying that the age is invalid.
Check Spots Availability
- This step is reached only if the age check was successful.
- A lambda function is invoked to check if there are available spots in the daycare.
- If there are spots available, the process moves to the next step. If not, it ends with a fail state notifying that there are no spots available.
Confirm Registration
- This is the final step and is reached only if there are spots available in the daycare.
- A Lambda function is invoked to confirm the registration and calculate the fees based on the child’s age.
- The process ends after this step with a success state, confirming the registration.
To learn more about Lambda functions, Streaming Data with AWS Kinesis and Lambda teaches how to work with streaming data using serverless technologies on AWS.
Create IAM Roles
The next step is to define the IAM roles so that the step functions can invoke our lambda functions. This is done by following these steps:
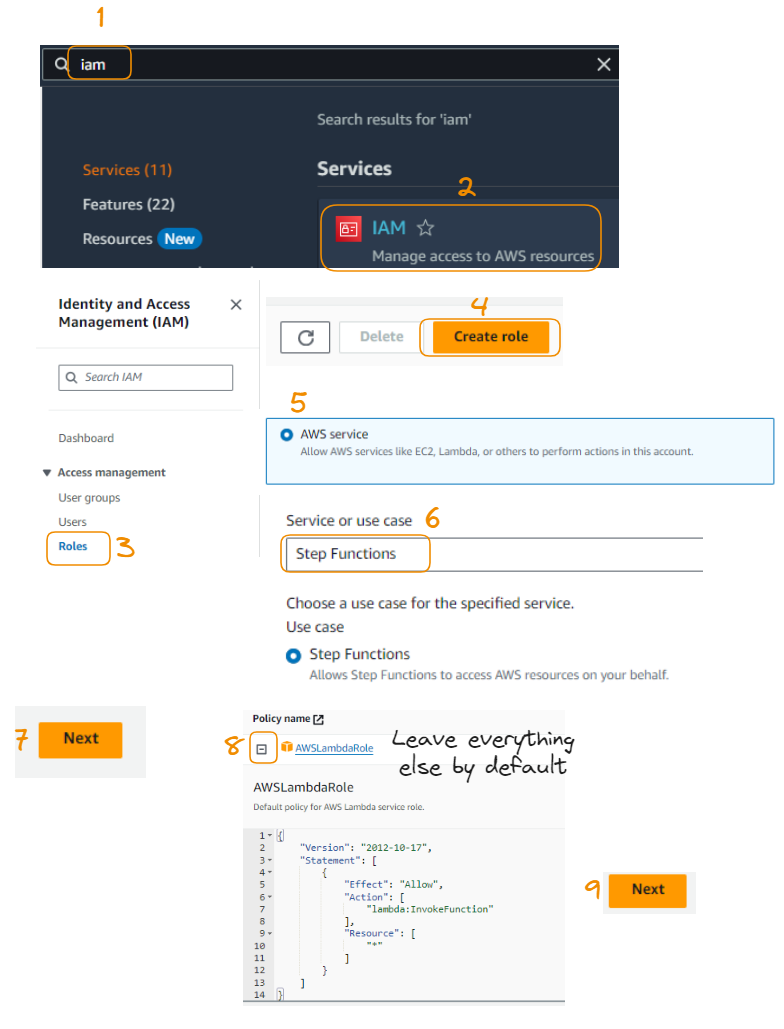
First nine steps to create an IAM role
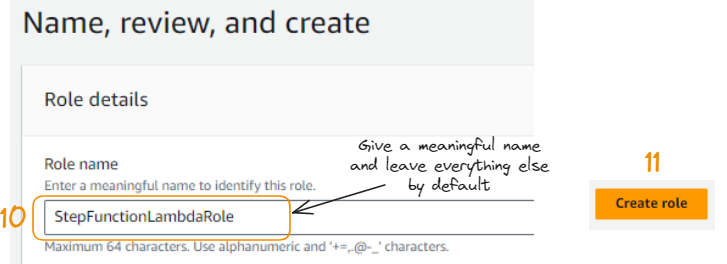
The 10th and 11th steps to create an IAM role
This IAM role can be assigned to the state machine as follows, starting from the “Config” tab.
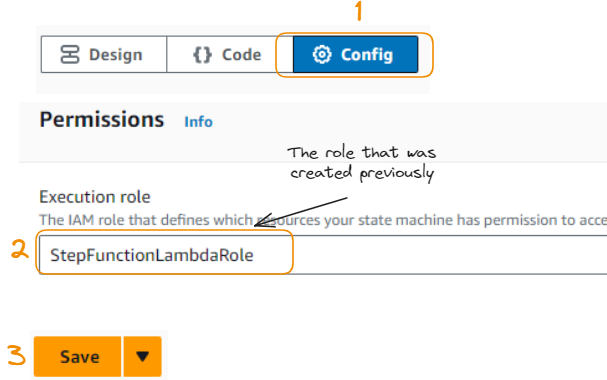
3 main steps to grant the IAM role
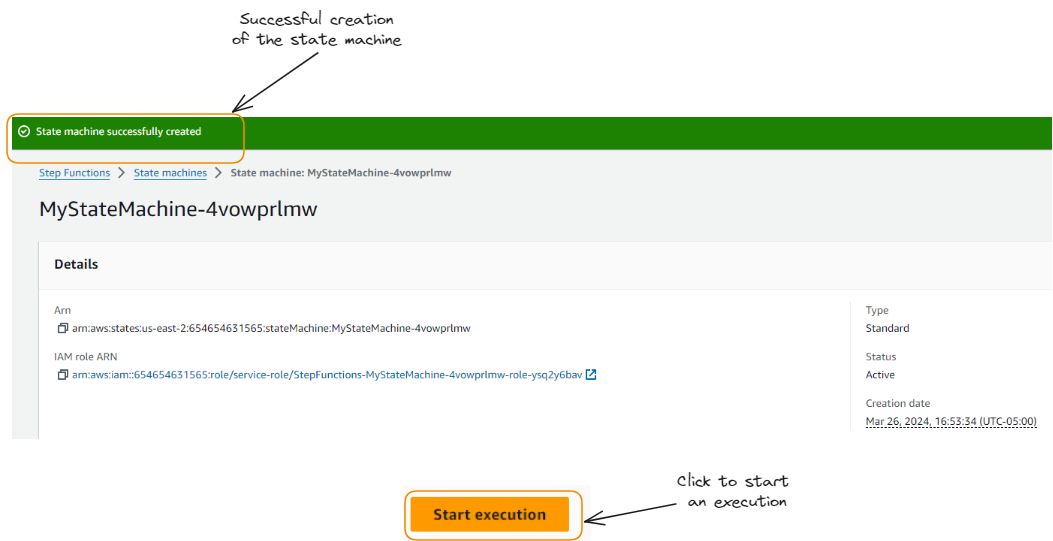
After saving, we should get the following message to see if everything went well.
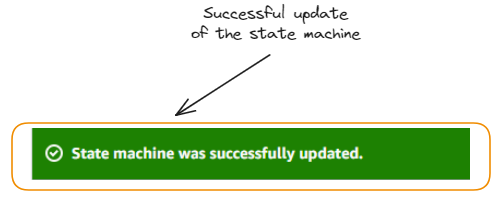
Success message for the state machine creation
Once we are satisfied with the state machine, the next step is to create it using the “Create” button located at the top on the right.
Illustration of the execution of the state machine
Deploying and Testing Your Workflow
Our workflow has been deployed, and now it is time to test the state machine. We will test two scenarios:
- A failure case with a valid age range, in which case the child we are trying to register is more than 5 years old. This corresponds to the initial JSON.
- A success case where the child is 3 years old.
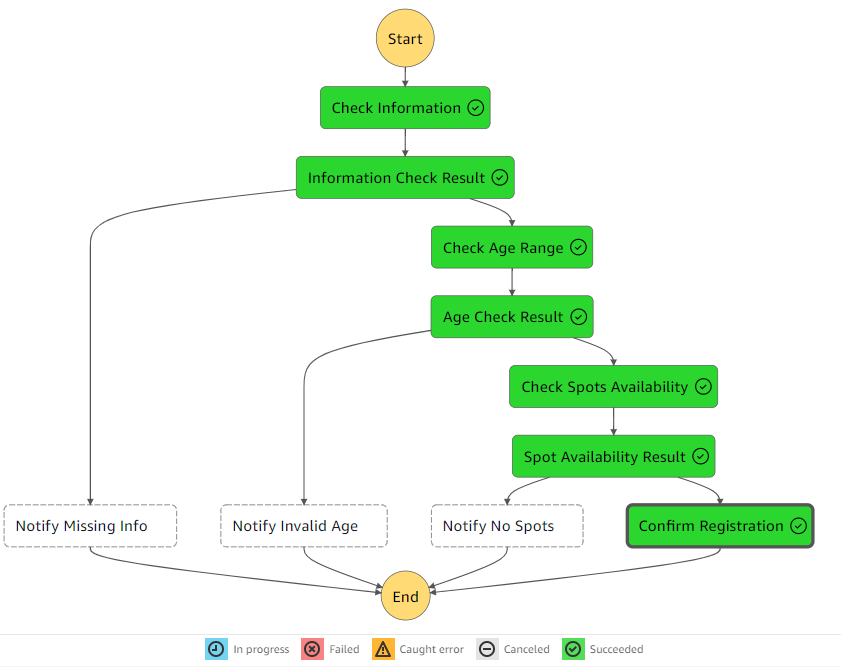
Result of a success case
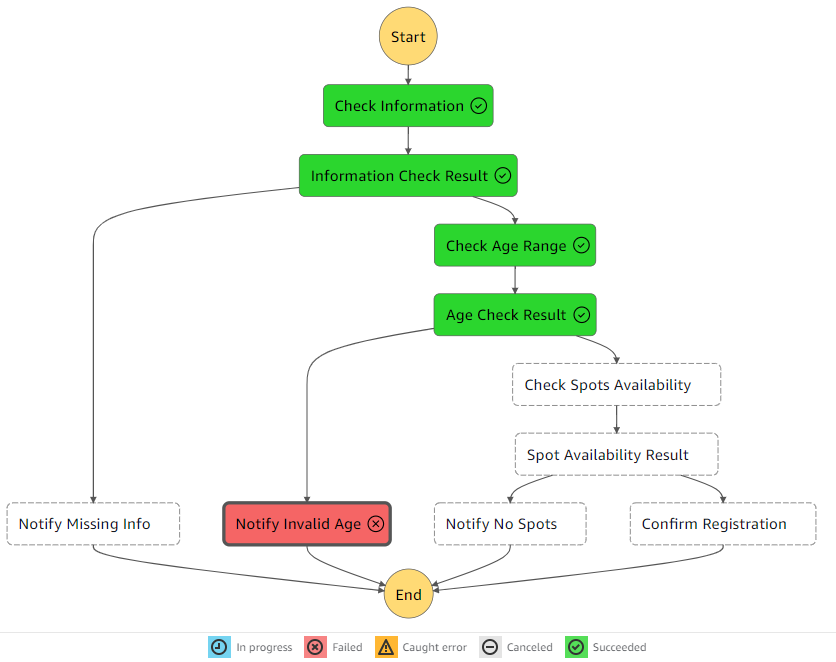
Result of a failure case
Optimizing Your Step Functions
The optimization of any process starts by adopting the best practices related to that process, which can lead to performance improvement and cost-effectiveness. The following best practices can help get the most out of any AWS Step Function.
- Performance Best Practices: These include strategies such as minimizing the number of state transitions, using appropriate timeout settings, and optimizing your AWS Lambda functions.
- Cost-Effectiveness Best Practices: These include strategies such as using the right type of state machine (Standard or Express), managing AWS Lambda costs, and understanding and managing Step Functions pricing.
Conclusion
This article has provided a comprehensive guide to understanding and utilizing AWS Step Functions. It began by introducing the reader to AWS Step Functions and their key features and benefits.
The article then guided the reader through the process of setting up their AWS environment and navigating the AWS Step Functions interface.
Furthermore, it walked through the process of building its first AWS Step Function, from creating a basic workflow to deploying and testing it. The article also explored the advanced features and use cases of AWS Step Functions, before discussing how to optimize them for maximum efficiency and cost-effectiveness.
Wrapping Up
Our articles AWS, Azure and GCP Service Comparison for Data Science & AI and Introduction to AWS Boto in Python could be excellent next steps for further learning.
The first one provides a comparison of the main services needed for data and AI-related work, from data engineering to data analysis and data science, to creating data applications. This cheat sheet can help understand the landscape of cloud services for data science and AI across the three major platforms.
The second article provides an easy introduction to AWS Boto in Python, teaching how to harness cloud technology to optimize data workflow. This can be a great resource for anyone looking to automate their AWS operations using Python.
There are many services on AWS, and the key to mastering AWS Step Functions is understanding the application's requirements and using the right combination of AWS services and features to meet those requirements.

A multi-talented data scientist who enjoys sharing his knowledge and giving back to others, Zoumana is a YouTube content creator and a top tech writer on Medium. He finds joy in speaking, coding, and teaching . Zoumana holds two master’s degrees. The first one in computer science with a focus in Machine Learning from Paris, France, and the second one in Data Science from Texas Tech University in the US. His career path started as a Software Developer at Groupe OPEN in France, before moving on to IBM as a Machine Learning Consultant, where he developed end-to-end AI solutions for insurance companies. Zoumana joined Axionable, the first Sustainable AI startup based in Paris and Montreal. There, he served as a Data Scientist and implemented AI products, mostly NLP use cases, for clients from France, Montreal, Singapore, and Switzerland. Additionally, 5% of his time was dedicated to Research and Development. As of now, he is working as a Senior Data Scientist at IFC-the world Bank Group.
