Course
Designing Machine Learning Workflows in Python
4 hr
12.6K
In this tutorial, we will delve into Prefect by exploring its key features, benefits, and components. We'll examine how to create tasks and flows, manage deployments, and execute flow runs. Finally, we will guide you through deploying your workflow on Prefect Cloud and running it using cloud infrastructure.
For those interested in how to automate machine learning pipelines using GitHub Actions and Data Version Control, consider taking our CI/CD for Machine Learning course.
Prefect is a powerful and open-source workflow orchestration tool that lets users design, monitor, and respond to data and machine learning pipelines using Python code.
Prefect comes equipped with a range of features, such as automatic retries, scheduling, and caching, to name a few. It is a powerful tool that ultimately allows you to construct resilient and dynamic workflows.
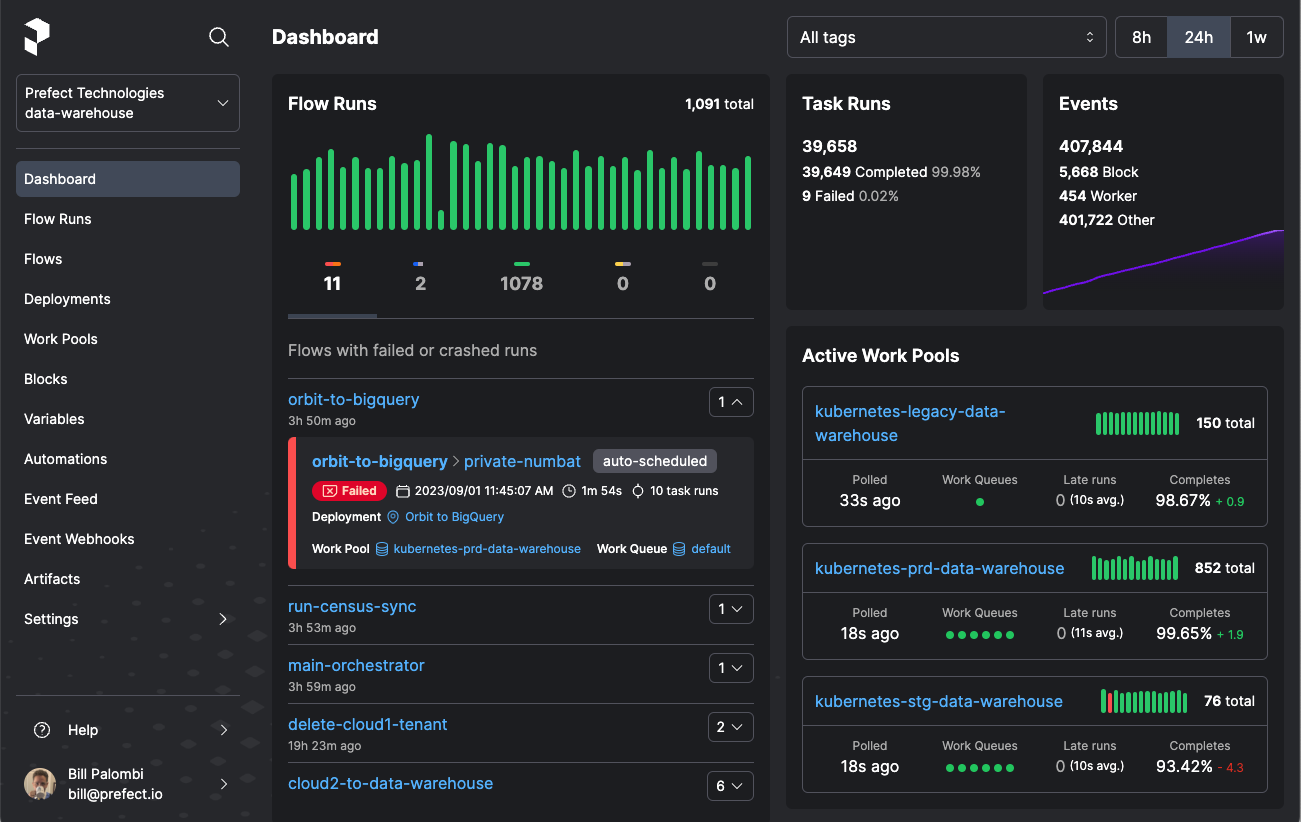
Image Source
With Prefect, you can easily transform any Python function into a unit of work that can be observed and orchestrated by simply adding a few decorators to your code.
Prefect is ideal for standardizing workflow development and deployment across organizations. It provides complete observability into workflows and allows users to manage their code without the need for strict DAGs or boilerplate code.
With a single command, users can effortlessly set up their own orchestration server for development purposes. This streamlined process simplifies local development and ensures smooth deployment to production environments.
Prefect provides a generally intuitive user interface, enhancing the user experience by offering a visually appealing and user-friendly way to run, monitor, debug, and manage workflows.
Prefect offers features like scheduling, retries, native secrets management, scaling capabilities, concurrency control, flexible infrastructure and storage configuration options, and robust logging functionality.
Users have the freedom to either self-host an open-source Prefect server or leverage advanced features, high availability, and enhanced security by utilizing Prefect Cloud.
Prefect Cloud provides all the capabilities of the open-source Prefect server along with additional features like automations, event feeds, events, webhooks, workspaces, organizations, and more, tailored for a hosted environment. You can either use Prefect Cloud for free or pay for more robust features.
Prefect allows users to initiate workflow orchestration with a single decorator, streamlining the process without unnecessary abstractions for efficient workflow management.
Send information about Prefect workflows and pipelines to multiple messaging services like Slack, Discord, emails, Microsoft Teams, and more. This can also alert you if the workflow fails.
This section will cover the key components used to build tasks and flows, deploy and execute them, and manage them. It is crucial to review these components before delving into the Python tutorial.
A Prefect Task is a Python function decorated with the @task decorator that represents discrete units of work within a Prefect workflow. We can also customize the task decorator with optional arguments like name, description, tags, cache settings, retries, and more.
In the code below, there are three machine learning tasks created with @task decorator that can be reused across flows.
@task
def train_model(X_train, X_test, y_train):
    # Selecting the best features
    ...

    # Train the model
    ...

    return model


@task
def get_prediction(X_test, model: LogisticRegression):
    ...
	return prediction

@task
def evaluate_model(y_test, prediction: pd.DataFrame):
...A Prefect Flow is a Python function decorated with the @flow decorator that encapsulates workflow logic. This makes it easier for users to define, configure, and execute complex data pipelines with flexibility and ease.
In the code below, we have created a Flow using the @flow decorator. The flow will run all the tasks sequentially, taking inputs from one to another.
@flow
def ml_workflow():
    model = train_model(X_train, X_test, y_train)
    predictions = get_prediction(X_test, model)
    evaluate_model(y_test, predictions)

if __name__ == "__main__":
ml_workflow()Deployments are flows stored on the local server or on the cloud and include important information for orchestrating your workflow remotely, such as scheduling and execution details.
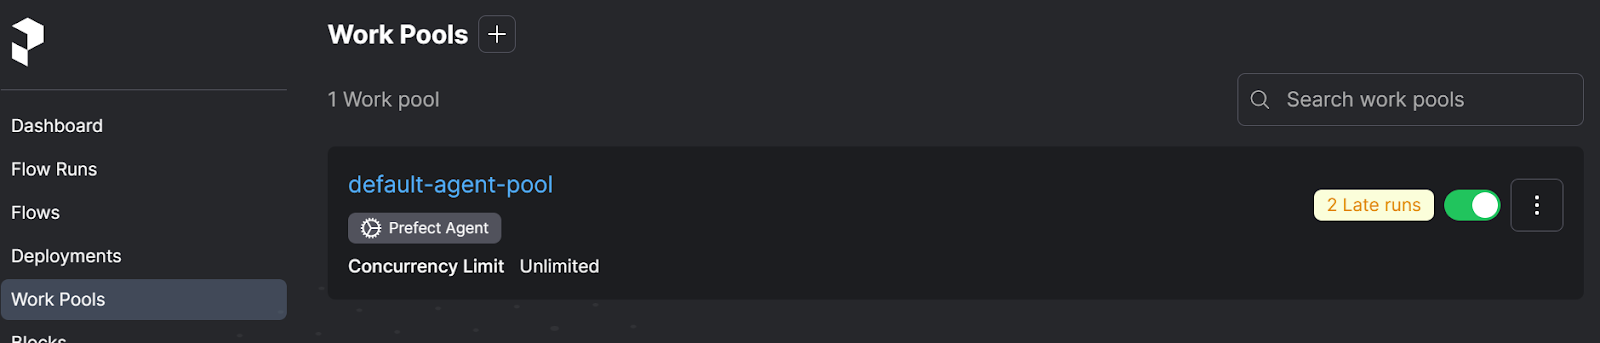
Work pools serve as a mediator between orchestration and execution environments, enabling efficient flow run scheduling and execution. Users can set up their Agents (worker) for running workflows locally or leverage cloud infrastructure for seamless workflow execution.
Similar to a dedicated compute instance, Work Pools efficiently manage work allocation and prioritize tasks, offering flexibility in choosing the execution environment for optimal workflow performance and scalability.
In this section, we will create, test, deploy, and execute a simple machine learning machine learning workflow using Prefect. We will also set up notifications so that we are notified on our Discord server about the status of the flow runs.
Install the Python package using PIP
pip install -U prefectIf you want to use the latest version of Prefect, you can get the code directly from GitHub.
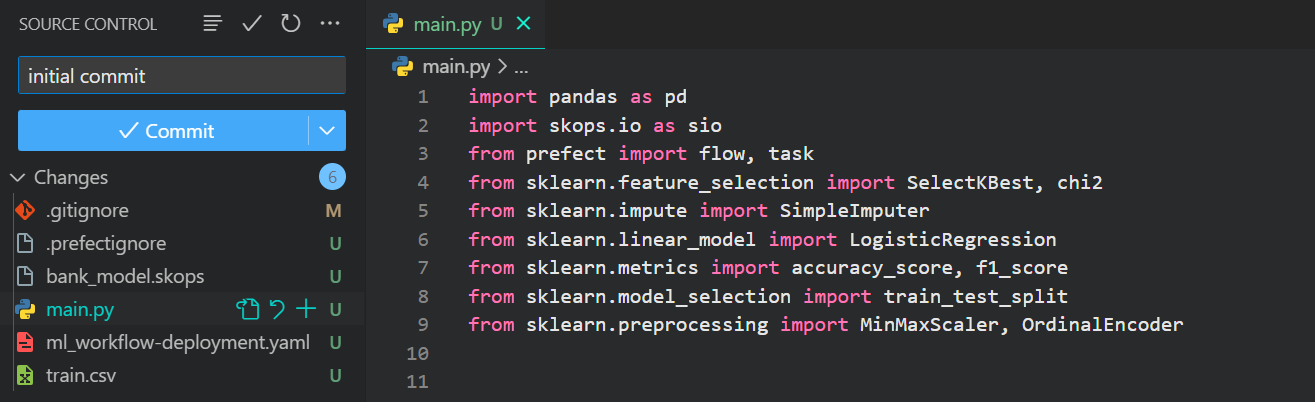
pip install -U git+https://github.com/PrefectHQ/prefectWe will preprocess the Bank Churn dataset from Kaggle, then use scikit-learn to train and evaluate the Random Forest Classifiers model.
The code we'll use is a modified version of the code from: Streamline Your Machine Learning Workflow with Scikit-learn Pipelines. Have a look at that tutorial if you’re interested in learning more about how the model was trained. Our machine learning Prefect Flow consists of seven tasks:
We have now assembled all the necessary tasks into a @flow function named ml_workflow. Additionally, we have included extra arguments in the decorator to enable detailed logging.
The ml_workflow function takes the data file location as input and then connects various tasks in a chain. We'll be able to better visualize this workflow when we deploy and execute it on the Prefect server.
You can also track our machine learning experiments using MLflow. Take the Introduction to MLflow course to learn about MLflow tracking, projects, models, and model registry.
import pandas as pd
import skops.io as sio
from prefect import flow, task
from sklearn.feature_selection import SelectKBest, chi2
from sklearn.impute import SimpleImputer
from sklearn.linear_model import LogisticRegression
from sklearn.metrics import accuracy_score, f1_score
from sklearn.model_selection import train_test_split
from sklearn.preprocessing import MinMaxScaler, OrdinalEncoder


@task
def load_data(filename: str):
    bank_df = pd.read_csv(filename, index_col="id", nrows=1000)
    bank_df = bank_df.drop(["CustomerId", "Surname"], axis=1)
    bank_df = bank_df.sample(frac=1)
    return bank_df


@task
def preprocessing(bank_df: pd.DataFrame):
    cat_col = [1, 2]
    num_col = [0, 3, 4, 5, 6, 7, 8, 9]

    # Filling missing categorical values
    cat_impute = SimpleImputer(strategy="most_frequent")
    bank_df.iloc[:, cat_col] = cat_impute.fit_transform(bank_df.iloc[:, cat_col])

    # Filling missing numerical values
    num_impute = SimpleImputer(strategy="median")
    bank_df.iloc[:, num_col] = num_impute.fit_transform(bank_df.iloc[:, num_col])

    # Encode categorical features as an integer array.
    cat_encode = OrdinalEncoder()
    bank_df.iloc[:, cat_col] = cat_encode.fit_transform(bank_df.iloc[:, cat_col])

    # Scaling numerical values.
    scaler = MinMaxScaler()
    bank_df.iloc[:, num_col] = scaler.fit_transform(bank_df.iloc[:, num_col])
    return bank_df


@task
def data_split(bank_df: pd.DataFrame):
    # Splitting data into training and testing sets
    X = bank_df.drop(["Exited"], axis=1)
    y = bank_df.Exited

    X_train, X_test, y_train, y_test = train_test_split(
        X, y, test_size=0.3, random_state=125
    )
    return X_train, X_test, y_train, y_test
    # Identify numerical and categorical columns


@task
def train_model(X_train, X_test, y_train):
    # Selecting the best features
    KBest = SelectKBest(chi2, k="all")
    X_train = KBest.fit_transform(X_train, y_train)
    X_test = KBest.transform(X_test)

    # Train the model
    model = LogisticRegression(max_iter=1000, random_state=125)
    model.fit(X_train, y_train)

    return model


@task
def get_prediction(X_test, model: LogisticRegression):
    return model.predict(X_test)


@task
def evaluate_model(y_test, prediction: pd.DataFrame):
    accuracy = accuracy_score(y_test, prediction)
    f1 = f1_score(y_test, prediction, average="macro")

    print("Accuracy:", str(round(accuracy, 2) * 100) + "%", "F1:", round(f1, 2))


@task
def save_model(model: LogisticRegression):
    sio.dump(model, "bank_model.skops")


@flow(log_prints=True)
def ml_workflow(filename: str = "train.csv"):
    data = load_data(filename)
    prep_data = preprocessing(data)
    X_train, X_test, y_train, y_test = data_split(prep_data)
    model = train_model(X_train, X_test, y_train)
    predictions = get_prediction(X_test, model)
    evaluate_model(y_test, predictions)
    save_model(model)


if __name__ == "__main__":
    ml_workflow()
To test our Prefect Flow, run the Python file in the terminal.
$ python main.pyThe flow has been successfully completed. It has displayed the model metrics and saved the model weights.
If you are new to machine learning and want to learn how to preprocess your data, train your model, optimize it, evaluate it, and save your model, then you should consider taking the Machine Learning Scientist with Python career track. This course will teach you everything you need to know from the very beginning.
Building and running a machine learning pipeline manually is a simple task that can be accomplished even with scikit-learn pipelines.
However, there are multiple benefits to using Prefect. These include:
Now, we will learn to automate our workflow by deploying it to the local Prefect server.
First, we must build the “Deployment” by providing the file and flow function names. We are also adding the tag “dev” to our Deployment.
Note: tags in Prefect can be used to categorize and organize flows, tasks, and deployments in the Prefect ecosystem.
$ prefect deployment build main.py:ml_workflow -n 'ml_workflow_bank_churn' -a --tag devDeployment has been successfully created. Now, it gives us instructions on how to execute the flow using the Prefect Agent.
Found flow 'ml-workflow'
Deployment YAML created at
'C:\Repository\GitHub\ML-Workflow-Orchestration-With-Prefect\ml_workflow-deployment.yaml'.
Deployment storage None does not have upload capabilities; no files uploaded.  Pass --skip-upload to
suppress this warning.
Deployment 'ml-workflow/ml_workflow_bank_churn' successfully created with id
'ce30d1c7-f454-4064-870c-429a8039c194'.

To execute flow runs from this deployment, start an agent that pulls work from the
'default-agent-pool' work pool:
$ prefect agent start -p 'default-agent-pool'Prefect agents are responsible for monitoring work pools to identify available flow runs and deploying them to the execution environment.
A single work pool can have multiple agents, with each agent having a unique ID to prevent overlap and ensure seamless scaling.
We will now initialize the Prefect agents in a new terminal with the default work pool name.
$ prefect agent start -p 'default-agent-pool'
Go to a new terminal and run the deployment by providing it with “flow_function/deployment name.” You can also just use the deployment name to execute the flow.
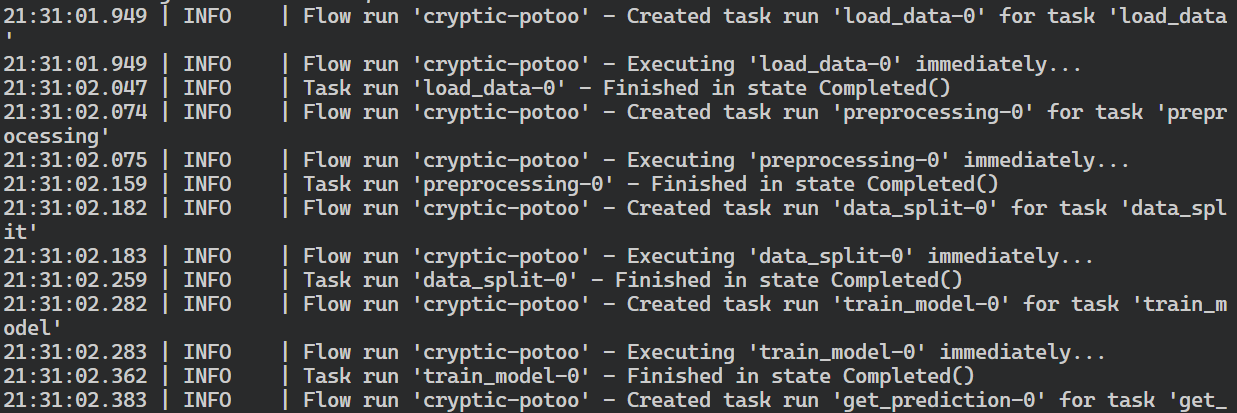
$ prefect deployment run 'ml-workflow/ml_workflow_bank_churn'It has created a flow run for the deployment that will check for workers and start running the workflow.
Creating flow run for deployment 'ml-workflow/ml_workflow_bank_churn'...
Created flow run 'cryptic-potoo'.
└── UUID: 77833ee3-0f7e-42f9-8002-0a562c7d3ed4
└── Parameters: {}
└── Scheduled start time: 2024-03-14 21:30:40 PKT (now)
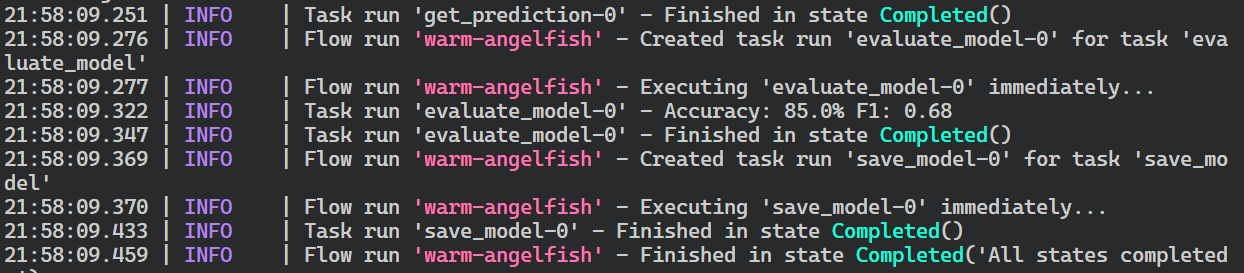
└── URL: <no dashboard available>Switch to the terminal where we initiated the agent to view logs of our flow run. The Prefect agent has successfully executed all tasks in the flow.
This is a simple example. We can also schedule or automate the workflow by providing additional arguments to our Deployment build.
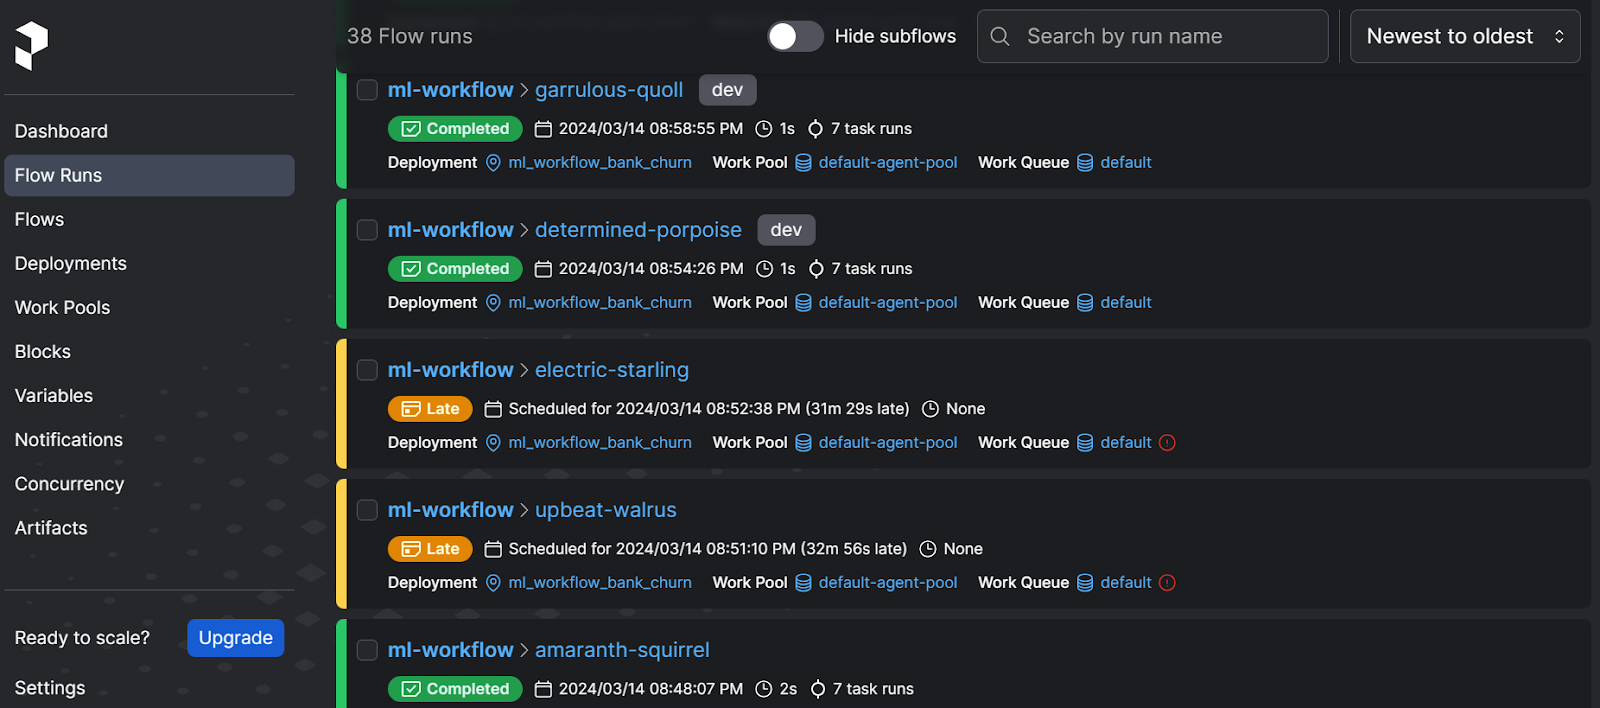
Up until now, we have been observing our workflow in terminals. Now, let's launch a Prefect dashboard where we can see all the flow runs, deployments, work pool, and notifications.
Start the Perfect server in a new terminal and click on the local link provided to access the dashboard.
$ prefect server start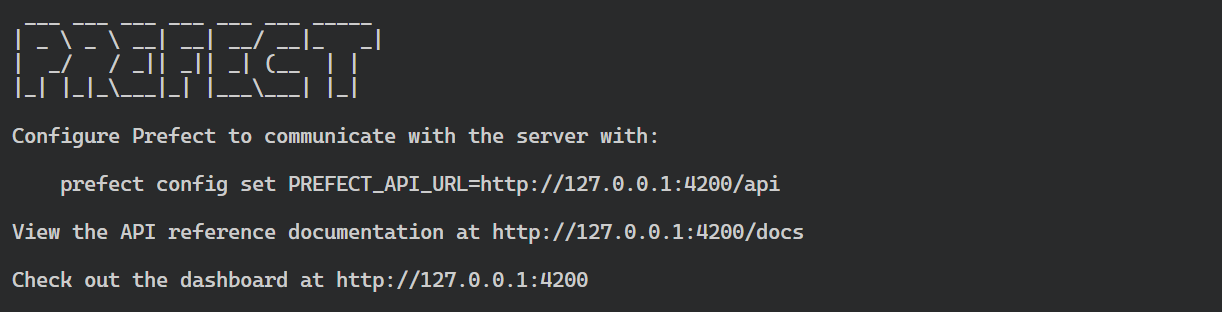
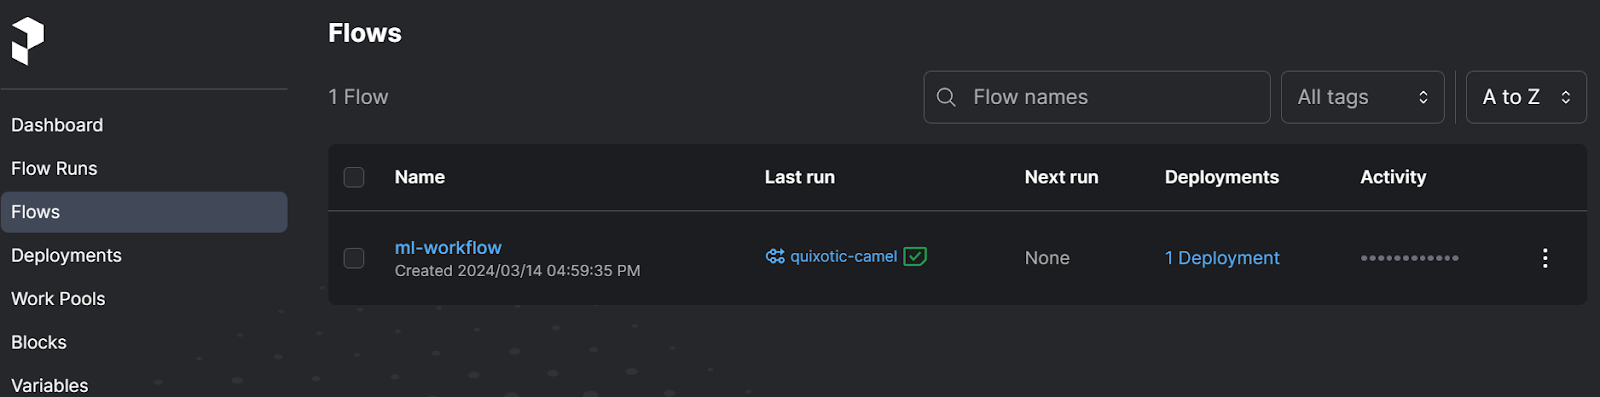
To view all the previous run flows, click on the "Flow" option in the left panel. You may notice that some flows were not executed due to a lack of work pools, while others were executed without the "dev" tag during the experimentation phase.
Clicking on the Flows option displays all available flows. Multiple flows can exist within a single deployment.
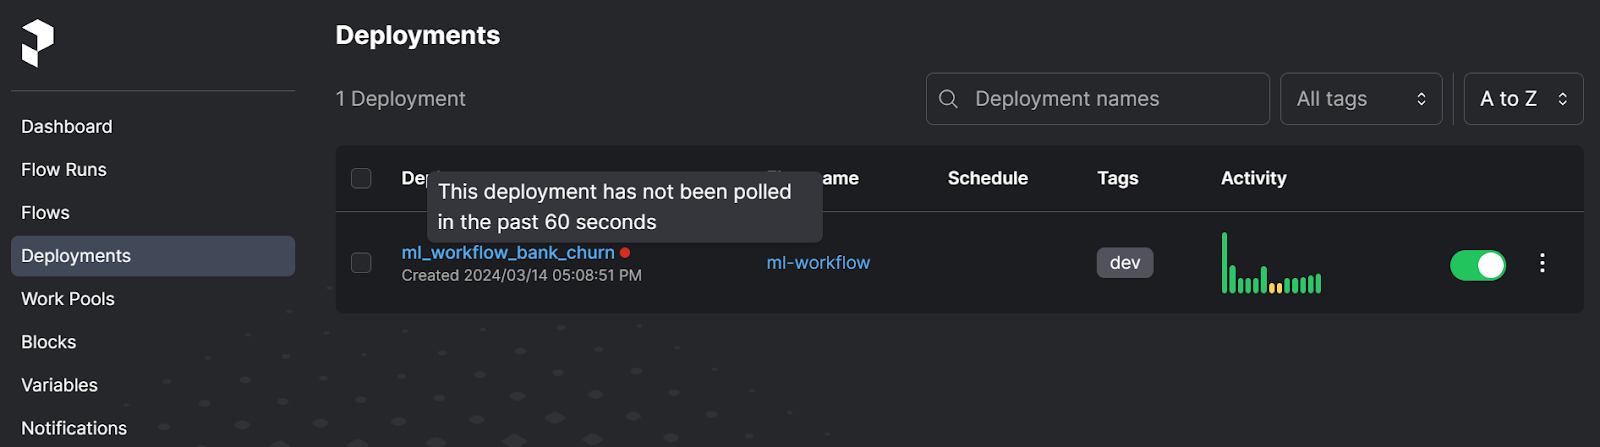
In the Deployment section, we can view our current Deployment along with its activity and tags. In this section, we can easily run the flow using either the quick run option or schedule the run using the user interface.
In the Work Pools, you will see our default Prefect Agent. You can even set up a cloud work pool too by using the Prefect CLI.
Let's begin with the interesting part.
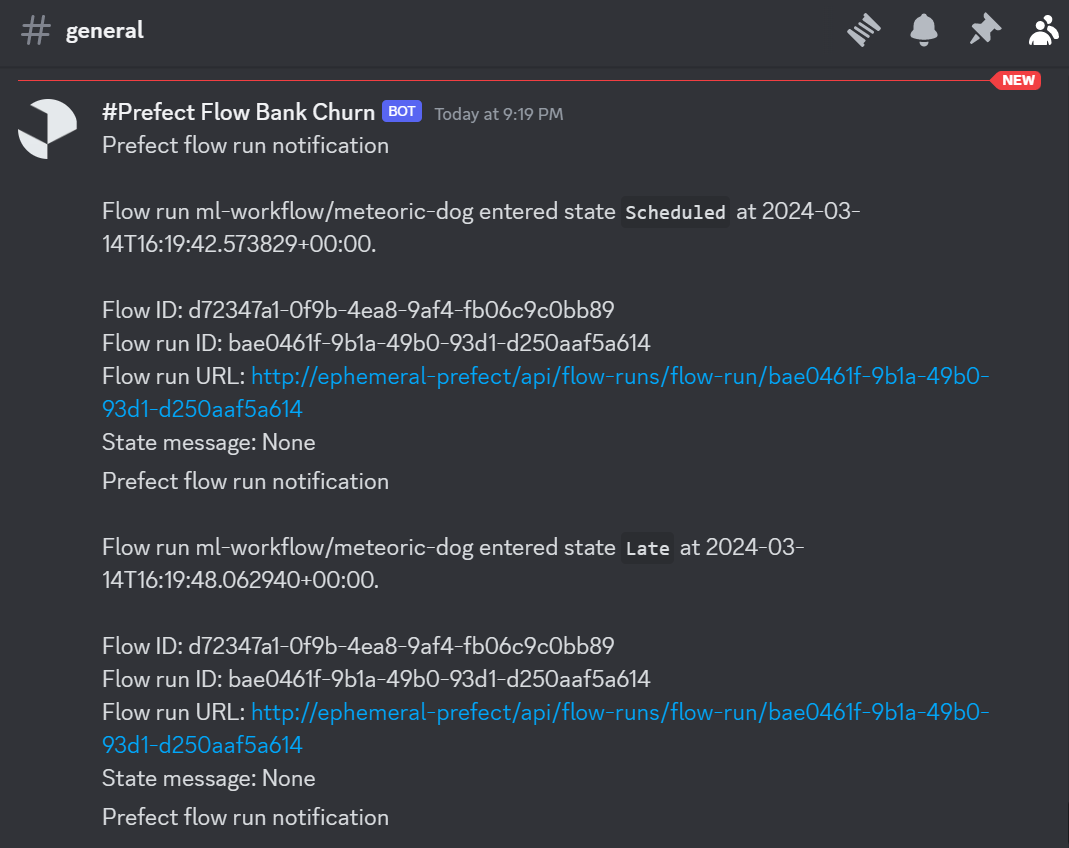
Nobody wants to monitor their workflow around the clock. Instead, we want to receive notifications about the workflow status of our preferred messaging application. This way, we can resolve any issues quickly.
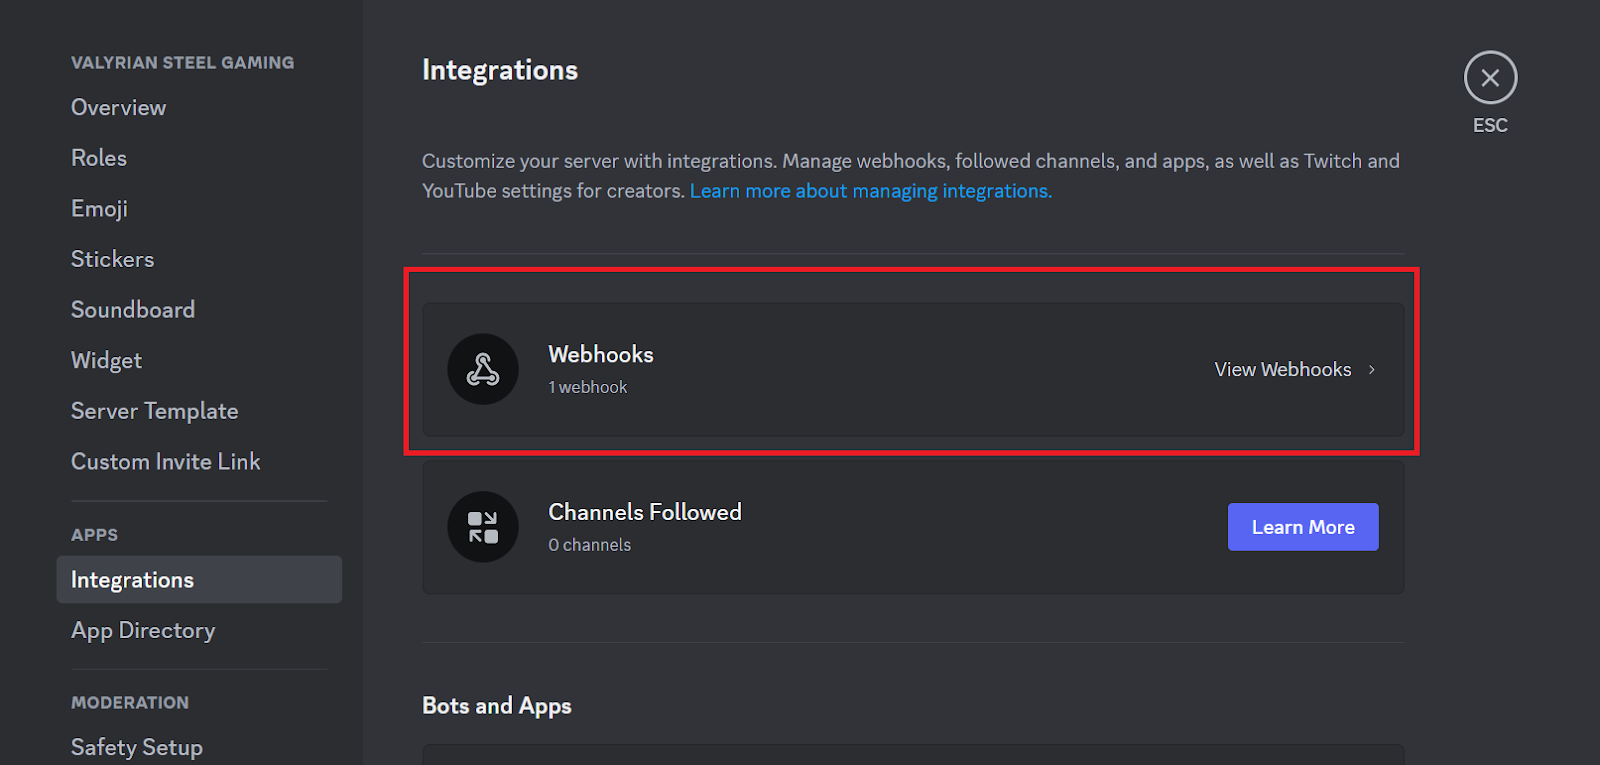
To achieve this, we will create a Discord webhook. Using the webhook ID and token, we will set up Prefect notification. It will send all the logging information to the Discord server.
To create a webhook, go to your Discord server settings, click "Integrations," and select "View Webhooks." Then, click on "New Webhook."
Change the display image, name, and channel. Then, copy the Webhook URL.
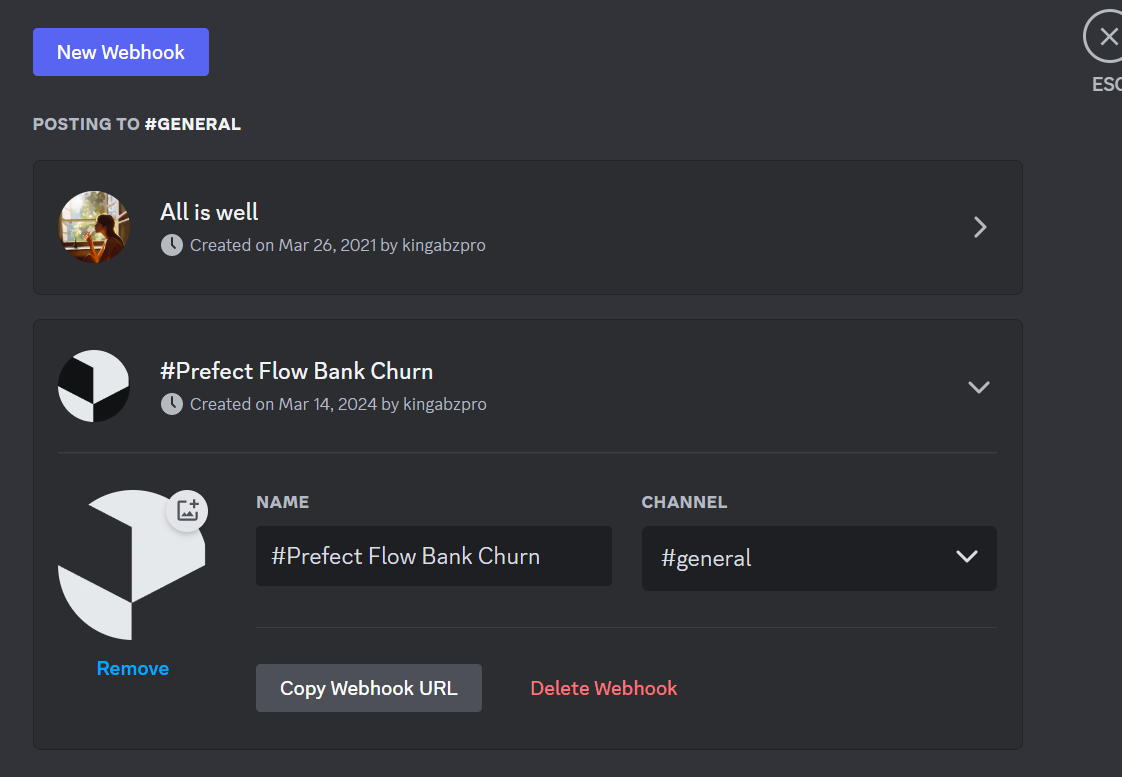
The webhook URL comprises two parts, namely, the Webhook Id and the Webhook token: https://discord.com/api/webhooks/<webhook_id>/<webhook_token>. To create a Prefect notification, we need to manually separate these two parts from the link.
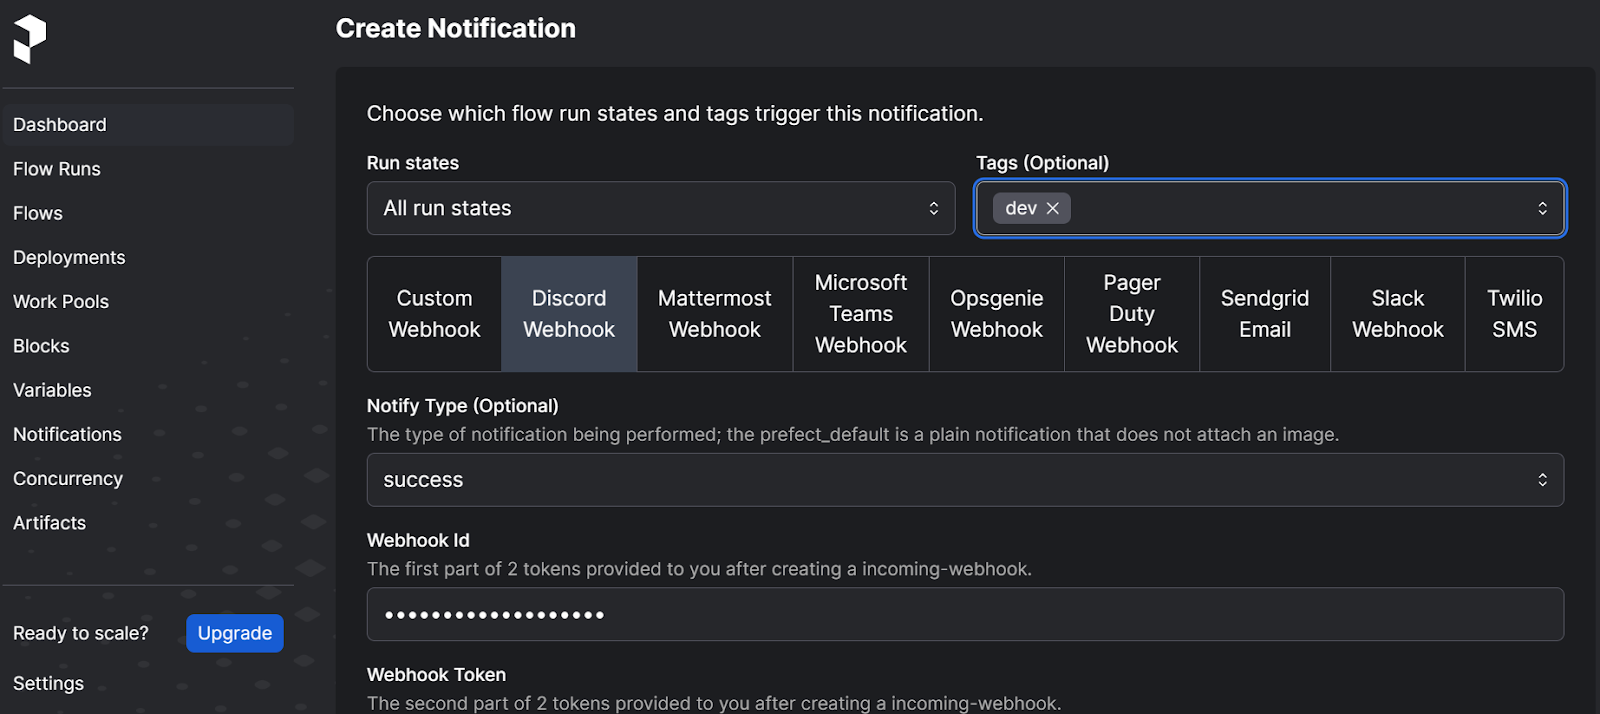
To create a Discord notification on the Prefect UI, go to the "Notifications" option and click the "+" button on the top. Then, select the desired run states, tags, Discord webhook, and notification type.
Next, provide the Webhook ID and Webhook token and click on the blue "Create" button.
We need to execute the deployment to see notifications on our Discord server's main channel.
$ prefect deployment run 'ml-workflow/ml_workflow_bank_churn'Amazing. Using the same method, we can set up various messaging services such as Microsoft Teams, Slack, SMS, and email, and we can even create our own custom webhook.
Take the Designing Machine Learning Workflows in Python course to learn how to build pipelines that stand the test of time.
After deploying our machine learning flow locally, it's time to deploy it on the Prefect Cloud. This is a much easier process than local deployments, as you don't have to start any servers or agents or execute the runs using the CLI tool. Everything is managed byPrefect.
Before deploying the current flow, it's important to note that it will throw an error as it attempts to access files and data from a local directory that isn't accessible in the cloud. To make these files available to Prefect Cloud, we must create and push our code to a public GitHub repository.
This can be done easily through the GitHub website or by using the VSCode Git extension to create the remote repository and push the code using the user interface.
Here is the project repository that we are going to use for our cloud deployments: kingabzpro/ML-Workflow-Orchestration-With-Prefect
Create your Prefect Cloud account by going to https://app.prefect.cloud/auth/login and then log in using the Prefect CLI tool.
$ prefect cloud loginSimply choose "Log in with a web browser" and follow the steps to authenticate the local client with the Prefect Cloud.

We will create a Prefect-managed work pool to fully utilize the infrastructure of Prefect Cloud instead of using our locally run agent.
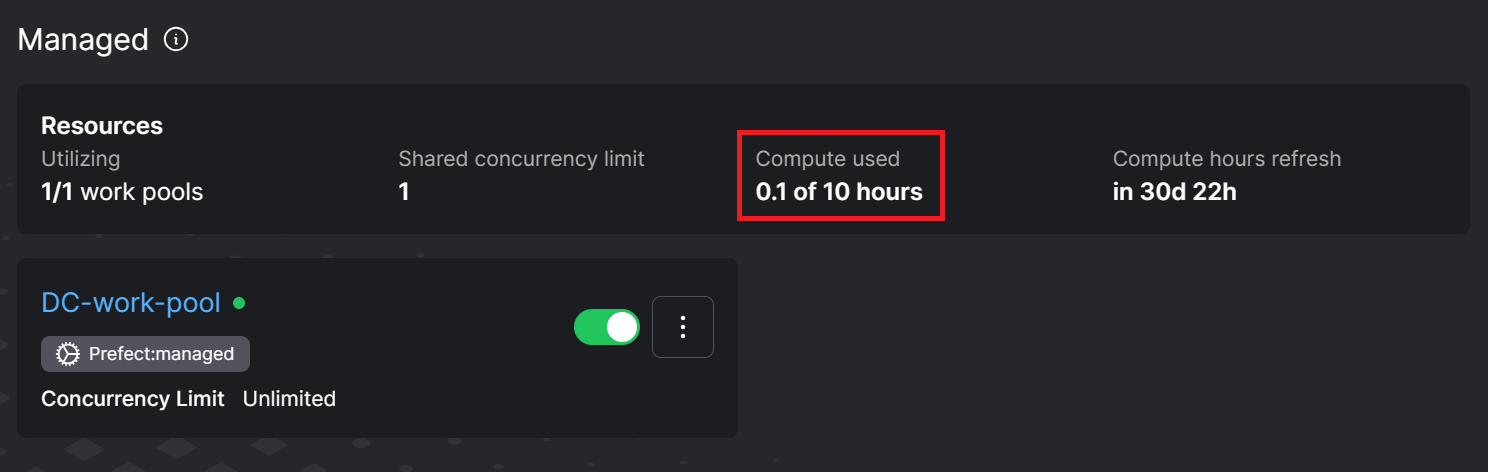
$ prefect work-pool create DC-work-pool --type prefect:managedFor a free account, Prefect provides 10 free computer hours per month that you can use to experiment and play around.
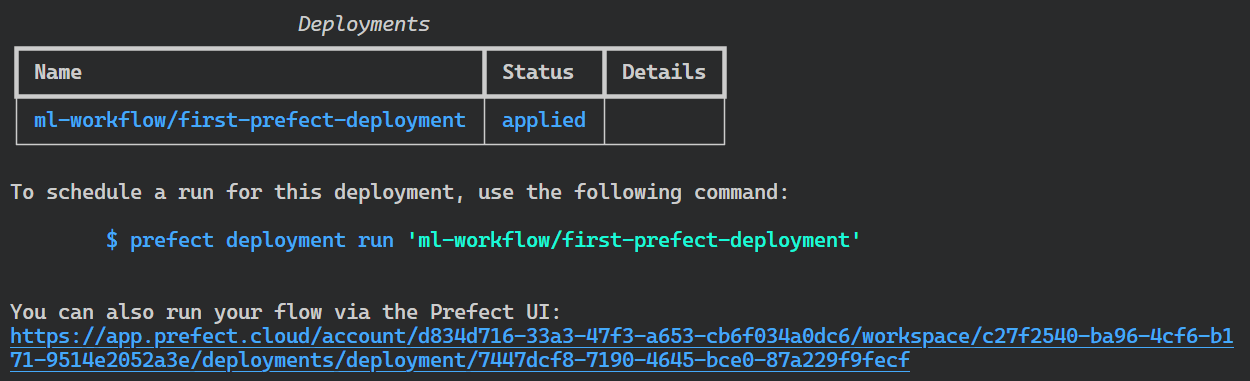
We will now programmatically deploy our flow to the Prefect Cloud.
Create a new file called deployment.py.
Set up arguments for Prefect flow function:
from prefect import flow

if __name__ == "__main__":
    flow.from_source(
        source="https://github.com/kingabzpro/ML-Workflow-Orchestration-With-Prefect.git",
        entrypoint="main.py:ml_workflow",
    ).deploy(
        name="first-prefect-deployment",
        work_pool_name="DC-work-pool",
        tags=["dev"],
        job_variables={"pip_packages": ["pandas", "skops", "scikit-learn"]},
    )
Run the Python code.
$ python deployment.pyThe flow is deployed on Prefect Cloud. It can be executed via CLI or the Prefect Cloud dashboard.
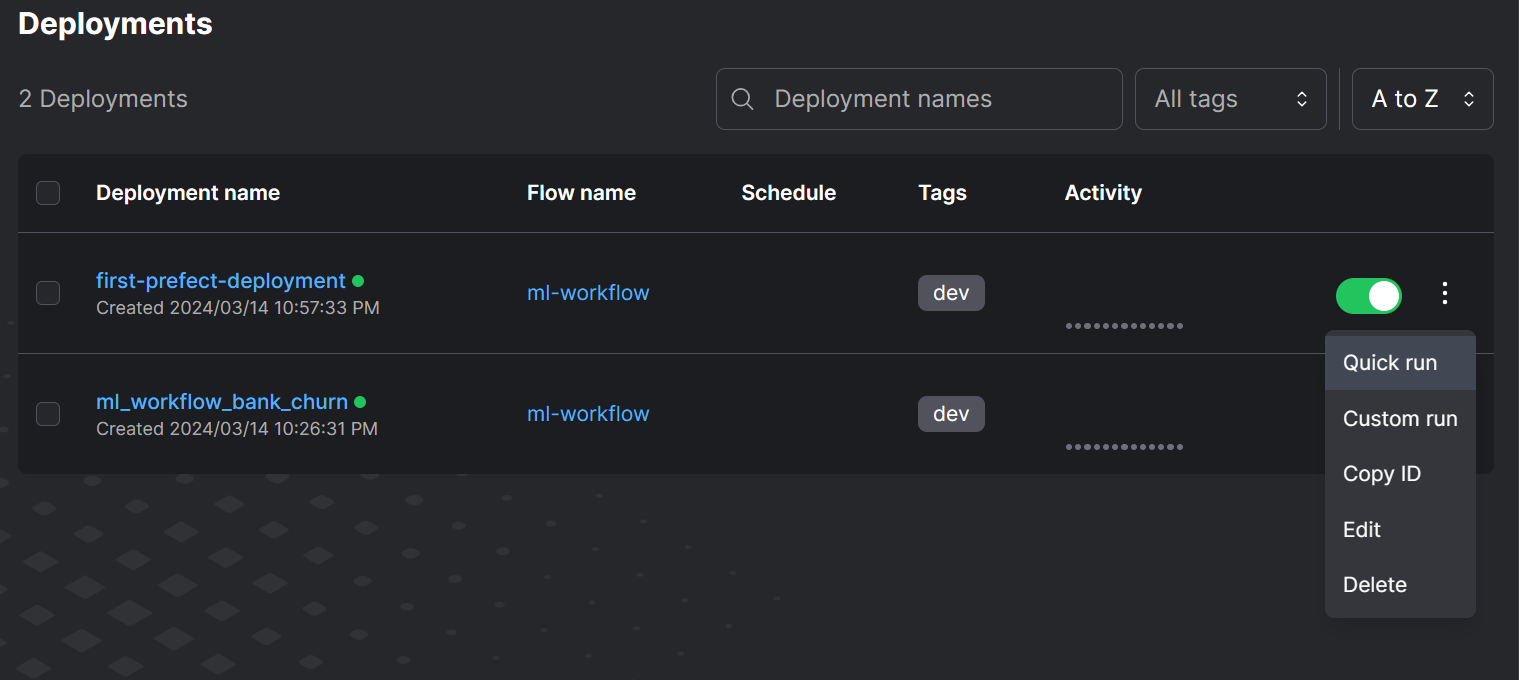
To run the flow, we have to go to the website: https://app.prefect.cloud/. After that, go to the “Deployments” section and click on the vertical three-dotted button on your deployment, and select the “Quick run” option.
To view how our run is performing, go to the “Flow Run” section and click on the most recent run to view the workflow graph.
The flow diagram presents an overview of the interconnection between the tasks and the time taken by each process.
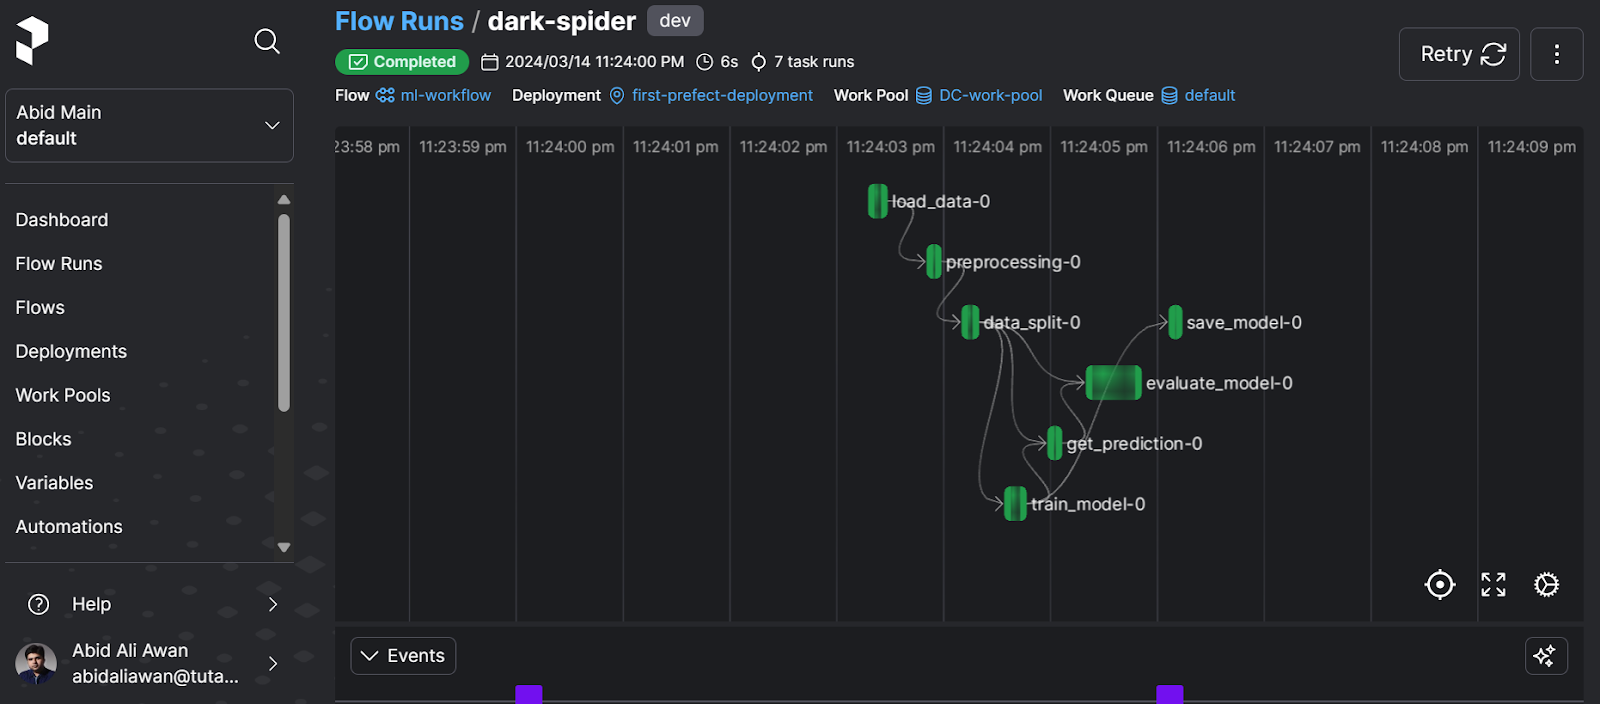
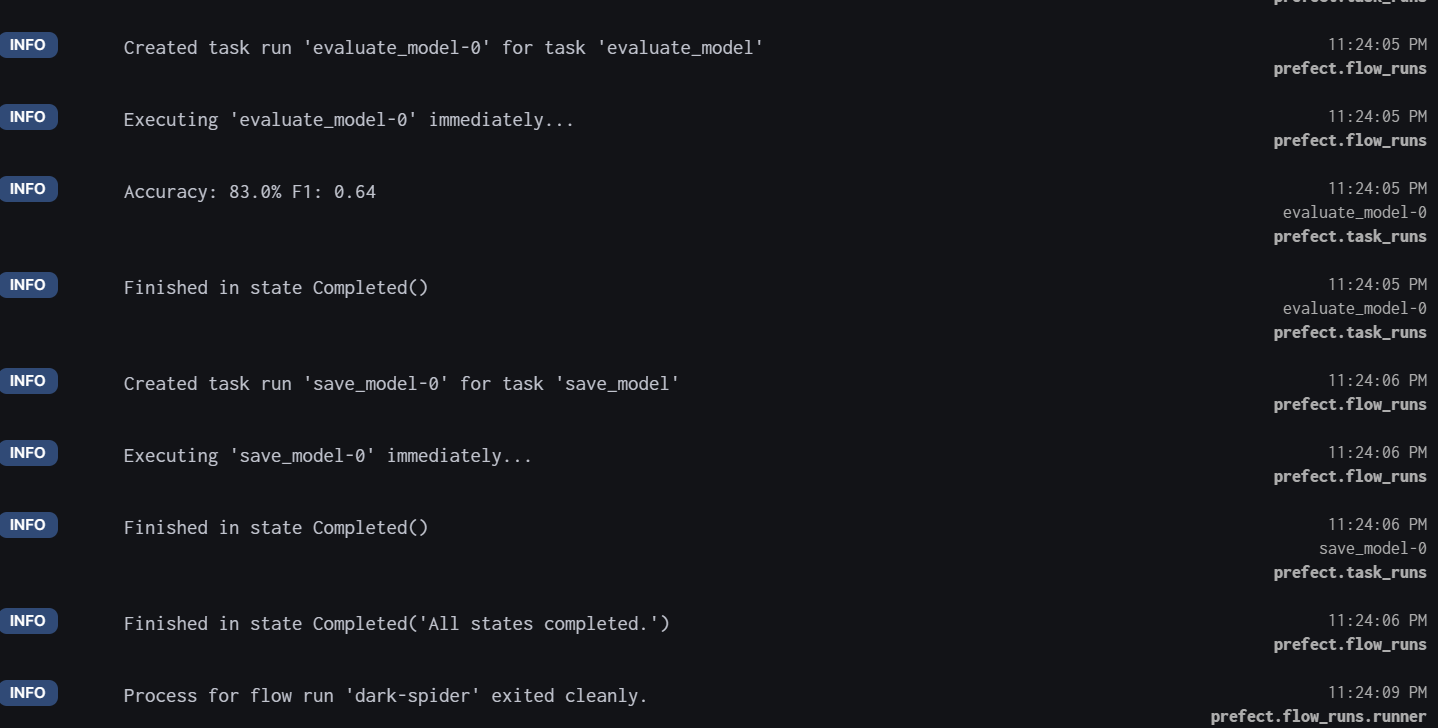
For detailed logs, scroll down and view all the tasks performed with the time stamp.
If we go to the “Work Pools” section, we can clearly see that we have used 0.1 hours from the 10-hour limit for free users.
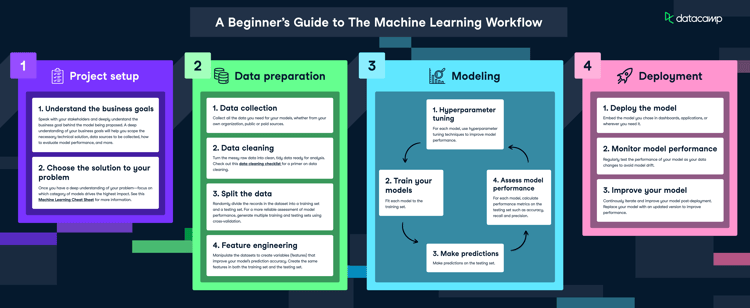
Take a look at the Machine Learning Workflow guide, which includes an infographic to help you understand the tasks involved in project setup, data preparation, modeling, and deployment.
Setting up a single machine-learning workflow was easy. You might need to run multiple machine learning and data workflows in real-world scenarios simultaneously. This is where Prefect stands out. It offers scalability and flexibility in terms of choosing whether to run it on a local or cloud environment for Prefect servers or work pools. It is a fantastic tool for scheduling, automating, and managing workflows.
In this tutorial, we have covered the main features and functionalities of the Prefect ecosystem. We also learned how to deploy a machine learning flow locally and on the cloud. To continue your MLOps journey, the next step is to learn how to build CI/CD for machine learning workflows by following "A Beginner's Guide to CI/CD for Machine Learning."
Prefect is just one tool in the MLOps field that is used for workflow orchestration. To learn about other important tools for data versioning, feature stores, model testing, model deployment and serving, model monitoring, runtime engines, and end-to-end MLOPs tools, read the article 25 Top MLOps Tools You Need to Know in 2024. You can also read our comparison of Prefect vs Airflow to see how the tools stack up.
Continue Your Machine Learning Journey Today!
Course
Course
Course
blog
DataCamp Team
2 min
Tutorial
Moez Ali
Tutorial
Abid Ali Awan
Tutorial
Moez Ali
Tutorial
Moez Ali
code-along
Weston Bassler