Course
Introduction to Data Visualization with Plotly in Python
4 hr
21.2K
Java is consistently one of the world's top three most popular languages. Its adoption in fields like enterprise software development, Android mobile apps, and large-scale web applications is unmatched. Its strong type system, extensive ecosystem, and “write once, run anywhere” capability make it particularly appealing for building robust, scalable systems. In this article, we’ll explore how Java’s object-oriented programming features enable developers to harness these capabilities effectively, allowing them to build maintainable and scalable applications through proper code organization and reuse.
Before we start writing any code, let’s do some setup.
Like with its syntax, Java has strict rules about code organization.
First, each public class must be in its own file, named exactly like the class but with a .java extension. So, if I want to write a Laptop class, the filename must be Laptop.java—case-sensitive. You can have non-public classes in the same file, but it's best to separate them. I know we are getting ahead—talking about organizing classes even before we write them—but getting a rough idea of where to put things beforehand is a good idea.
All Java projects must have a Main.java file with the Main class. This is where you test your classes by creating objects off of them.
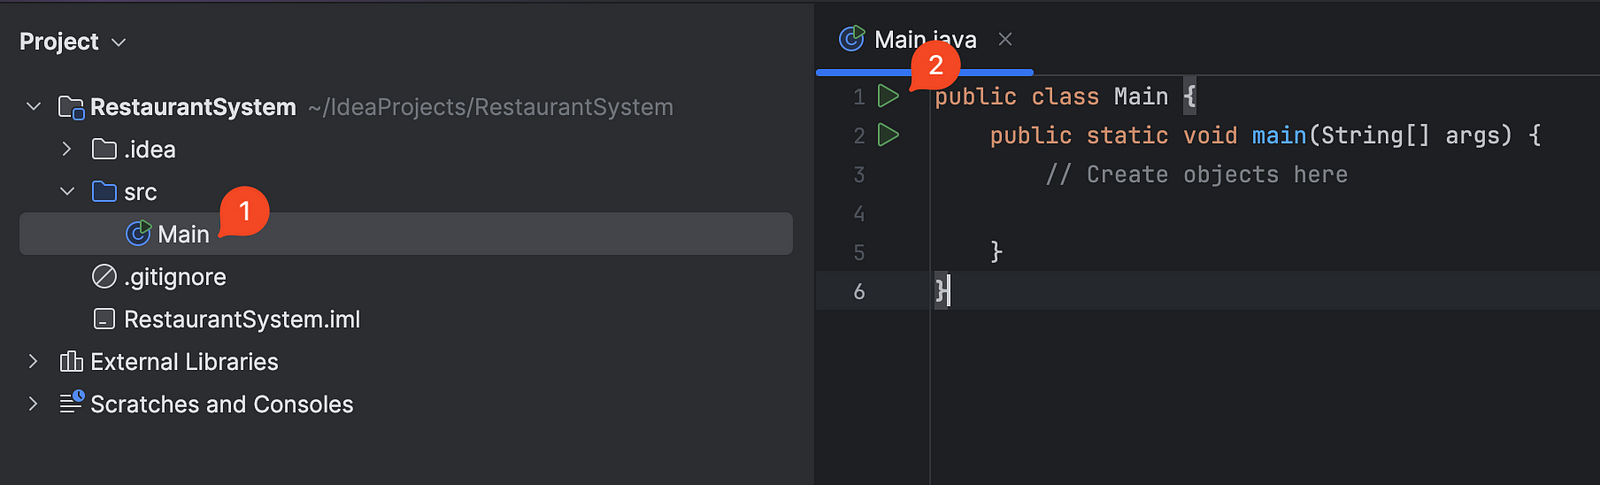
To run Java code, we’ll use IntelliJ IDEA, a popular Java IDE. After installing IntelliJ:
Main.java file and paste the following contents:public class Main {
public static void main(String[] args) {
// Create and tests objects here
}
}Whenever we are talking about classes, we write code in other files than the Main.java file. But if we are talking about creating and testing objects, we switch to Main.java.
To run the program, you can click the green play button next to the main method:
The output will be shown in the Run tool window at the bottom.
If you are completely new to Java, please check out our Introduction to Java course, which covers the fundamentals of Java data types and control flow before continuing.
Otherwise, let’s dive right in.
So, what are classes, exactly?
Classes are programming constructs in Java for representing real-world concepts. For example, consider this MenuItem class (create a file to write this class in your IDE):
public class MenuItem {
   public String name;
   public double price;
}
The class gives us a blueprint or a template to represent various menu items in a restaurant. By changing the class’s two attributes, name, and price, we can create countless menu objects like a burger or a salad.
So, to create a class in Java, you start a line that describes the access level of the class (private, public, or protected) followed by the class name. Immediately after the brackets, you outline the attributes of your class.
But how do we create objects that belong to this class? Java enables this through constructor methods:
public class MenuItem {
   public String name;
   public double price;

   // Constructor
   public MenuItem(String name, double price) {
       this.name = name;
       this.price = price;
   }
}
A constructor is a special method that gets called when we create a new object from a class. It initializes the object’s attributes with the values we provide. In the example above, the constructor takes a name and price parameter and assigns them to the object’s fields using the ‘this’ keyword to refer to a future object instance.
The syntax for the constructor is different than other class methods because it doesn’t require you to specify a return type. Also, the constructor must have the same name as the class, and it should have the same number of attributes you declared after the class definition. Above, the constructor is creating two attributes because we declared two after the class definition: name and price.
After you write your class and its constructor, you can create instances (objects) of it in your main method:
public class Main {
   public static void main(String[] args) {
       // Create objects here
       MenuItem burger = new MenuItem("Burger", 3.5);
       MenuItem salad = new MenuItem("Salad", 2.5);
       System.out.println(burger.name + ", " + burger.price);
   }
}
Output:
Burger, 3.5Above, we are creating two MenuItem objects into variables burger and salad. As required in Java, the type of the variable must be declared, which is MenuItem. Then, to create an instance of our class, we write the new keyword followed by invoking the constructor method.
Apart from the constructor, you can create regular methods that give your class behavior. For example, below, we add a method to calculate the total price after tax:
public class MenuItem {
   public String name;
   public double price;

   // Constructor
   public MenuItem(String name, double price) {
       this.name = name;
       this.price = price;
   }

   // Method to calculate price after tax
   public double getPriceAfterTax() {
       double taxRate = 0.08; // 8% tax rate
       return price + (price * taxRate);
   }
}
Now we can calculate the total price, including tax:
public class Main {
   public static void main(String[] args) {
       MenuItem burger = new MenuItem("Burger", 3.5);
       System.out.println("Price after tax: $" + burger.getPriceAfterTax());
   }
}
Output:
Price after tax: $3.78The purpose of classes is to provide a blueprint for creating objects. These objects will then be used by other scripts or programs. For example, our MenuItem objects can be used by a user interface that displays their name, price, and image on a screen.
For this reason, we must design our classes in such a way that their instances can only be used how we intended. Right now, our MenuItem class is very basic and error-prone. A person might create objects with ridiculous attributes, like a negatively priced apple pie or a million-dollar sandwich:
// Inside Main.java
MenuItem applePie = new MenuItem("Apple Pie", -5.99);  // Negative price!
MenuItem sandwich = new MenuItem("Sandwich", 1000000); // Unreasonably expensive

System.out.println("Apple pie price: $" + applePie.price);
System.out.println("Sandwich price: $" + sandwich.price);
So, the first order of business after writing a class is to protect its attributes by limiting how they are created and accessed. To start, we want to allow only positive values for price and set a maximum value to avoid displaying ridiculously expensive items accidentally.
Java lets us accomplish this by using setter methods:
public class MenuItem {
   private String name;
   private double price;
   private static final double MAX_PRICE = 100.0;

   public MenuItem(String name, double price) {
       this.name = name;
       setPrice(price);
   }

   public void setPrice(double price) {
       if (price < 0) {
           throw new IllegalArgumentException("Price cannot be negative");
       }
       if (price > MAX_PRICE) {
           throw new IllegalArgumentException("Price cannot exceed $" + MAX_PRICE);
       }
       this.price = price;
   }

}
Let’s examine what’s new in the code block above:
1. We made the attributes private by adding the private keyword. This means they can only be accessed within the MenuItem class. Encapsulation starts with this crucial step.
2. We added a new constant MAX_PRICE that is:
3. We added a setPrice() method that:
4. We modified the constructor to use setPrice() instead of directly assigning the price. This ensures price validation happens during object creation.
We just implemented one of the core pillars of good object-oriented design — encapsulation. This paradigm enforces data hiding and controlled access to object attributes, ensuring that internal implementation details are protected from external interference and can only be modified through well-defined interfaces.
Let’s drive the point home by applying encapsulation to the name attribute. Imagine we have a coffee shop that only serves lattes, cappuccinos, espressos, americanos, and mochas.
So, our menu item names can only be one of the items in this list. Here is how we can enforce this in code:
// Rest of the class here
...
private static final String[] VALID_NAMES = {"latte", "cappuccino", "espresso", "americano", "mocha"};
private String name;
public void setName(String name) {
   String lowercaseName = name.toLowerCase();
   for (String validName : VALID_NAMES) {
       if (validName.equals(lowercaseName)) {
           this.name = name;
           return;
       }
   }
   throw new IllegalArgumentException("Invalid drink name. Must be one of: " + String.join(", ", VALID_NAMES));
}
The code above implements name validation for menu items in a coffee shop. Let’s break it down:
1. First, it defines a private static final array VALID_NAMES that contains the only allowed drink names: latte, cappuccino, espresso, americano, and mocha. This array being:
2. It declares a private String name field to store the drink name
3. The setName() method implements the validation logic:
VALID_NAMES arrayHere is the full class so far:
public class MenuItem {
   private String name;
   private double price;

   private static final String[] VALID_NAMES = {"latte", "cappuccino", "espresso", "americano", "mocha"};

   private static final double MAX_PRICE = 100.0;

   public MenuItem(String name, double price) {
       setName(name);
       setPrice(price);
   }

   public void setName(String name) {
       String lowercaseName = name.toLowerCase();
       for (String validName : VALID_NAMES) {
           if (validName.equals(lowercaseName)) {
               this.name = name;
               return;
           }
       }
       throw new IllegalArgumentException("Invalid drink name. Must be one of: " + String.join(", ", VALID_NAMES));
   }

   public void setPrice(double price) {
       if (price < 0) {
           throw new IllegalArgumentException("Price cannot be negative");
       }
       if (price > MAX_PRICE) {
           throw new IllegalArgumentException("Price cannot exceed $" + MAX_PRICE);
       }
       this.price = price;
   }
}
After we protect the way attributes are created, we also want to protect how they are accessed. This is done by using getter methods:
public class MenuItem {
   // Rest of the code here
   ...
   public String getName() {
       return name;
   }
   public double getPrice() {
       return price;
   }
}
Getter methods provide controlled access to private attributes of a class. They solve the problem of direct attribute access which can lead to unwanted modifications and break encapsulation.
For example, without getters, we might access attributes directly:
MenuItem item = new MenuItem("Latte", 4.99);
String name = item.name; // Direct access to attribute
item.name = "INVALID"; // Can modify directly, bypassing validation
With getters, we enforce proper access:
MenuItem item = new MenuItem("Latte", 4.99);
String name = item.getName(); // Controlled access through getter
// item.name = "INVALID"; // Not allowed - must use setName() which validates
This encapsulation:
Our class is starting to look good but there are quite many problems with it. For example, for a large restaurant serving many types of dishes and drinks, the class is not flexible enough.
If we want to add different types of food items, we’ll run into several challenges. Some dishes can be prepared for takeout, while others need immediate consumption. Menu items may have varying prices and discounts. Dishes may need temperature tracking or special storage. Beverages can be hot or cold with customizable ingredients. Items may need allergen information and portion options. The current system doesn’t handle these varying requirements.
Inheritance provides an elegant solution to all these problems. It allows us to create specialized versions of menu items by defining a base MenuItem class with common attributes and then creating child classes that inherit these basics while adding unique features.
For example, we could have a Drink class for drinks with temperature options, a Food class for items needing immediate consumption, and a Dessert class for items with special storage needs — all inheriting core menu item functionality.
Let’s implement those ideas starting with Drink:
public class Drink extends MenuItem {
   private boolean isCold;

   public Drink(String name, double price, boolean isCold) {
       this.name = name;
       this.price = price;
       this.isCold = isCold;
   }

   public boolean getIsCold() {
       return isCold;
   }

   public void setIsCold(boolean isCold) {
       this.isCold = isCold;
   }
}
To define a child class that inherits from a parent, we use the extends keyword after the child class name followed by the parent class. After the class definition, we define any new attributes this child has and implement its constructor.
But notice how we have to repeat the initialization of name and price along with isCold. That is not ideal because the parent class might have 100s of attributes. Besides, the above code will throw an error when you compile it because that’s not the correct way of initializing attributes of the parent class. The correct way would be by using the super keyword:
public class Drink extends MenuItem {
   private boolean isCold;

   public Drink(String name, double price, boolean isCold) {
       super(name, price);
       this.isCold = isCold;
   }

   public boolean getIsCold() {
       return isCold;
   }

   public void setIsCold(boolean isCold) {
       this.isCold = isCold;
   }
}
The super keyword is used to call the parent class's constructor. In this case, super(name, price) calls MenuItem's constructor to initialize those attributes, avoiding code duplication. We only need to initialize the new isCold attribute specific to the Drink class.
The keyword is very flexible because you can use it to refer to the parent class in any portion of the child class. For example, to call a parent method, you use super.methodName() while super.attributeName is for attributes.
Now, let’s say we want to add a new method to our classes to calculate the total price after tax. Since different menu items may have different tax rates (for example, prepared food vs. packaged drinks), we can use method overriding to implement specific tax calculations in each child class while maintaining a common method name in the parent class.
Here is what this looks like:
public class MenuItem {
   // Rest of the MenuItem class

   public double calculateTotalPrice() {
       // Default tax rate of 10%
       return price * 1.10;
   }
}
public class Food extends MenuItem {
   private boolean isVegetarian;

   public Food(String name, double price, boolean isVegetarian) {
       super(name, price);
       this.isVegetarian = isVegetarian;
   }

   @Override
   public double calculateTotalPrice() {
       // Food has 15% tax
       return super.getPrice() * 1.15;
   }
}
public class Drink extends MenuItem {
   private boolean isCold;

   public Drink(String name, double price, boolean isCold) {
       super(name, price);
       this.isCold = isCold;
   }

   @Override
   public double calculateTotalPrice() {
       // Drinks have 8% tax
       return super.getPrice() * 1.08;
   }
}
In this example, method overriding allows each subclass to provide its own implementation of calculateTotalPrice():
The base MenuItem class defines a default tax calculation of 10%.
When Food and Drink classes extend MenuItem, they override this method to implement their own tax rates:
The @Override annotation is used to explicitly indicate that these methods are overriding the parent class method. This helps catch errors if the method signature doesn't match the parent class.
Each subclass can still access the parent class’s price using super.getPrice(), demonstrating how overridden methods can utilize parent class functionality while adding their behavior.
In short, method overriding is an integral part of inheritance that allows subclasses to provide their implementation of methods defined in the parent class, enabling more specific behavior while maintaining the same method signature.
Our MenuItem class hierarchy works, but there's a problem: should anyone be able to create a plain MenuItem object? After all, in our restaurant, every menu item is either a Food or a Drink - there's no such thing as just a "generic menu item."
We can prevent this by making MenuItem an abstract class. An abstract class provides only a base blueprint - it can only be used as a parent class for inheritance, not instantiated directly.
To make MenuItem abstract, we add the abstract keyword after its access modifier:
public abstract class MenuItem {
   private String name;
   private double price;

   public MenuItem(String name, double price) {
       setName(name);
       setPrice(price);
   }

   // Existing getters/setters remain the same

   // Make this method abstract - every subclass MUST implement it
   public abstract double calculateTotalPrice();
}
Abstract classes can also have abstract methods like calculateTotalPrice() above. These abstract methods serve as contracts that force subclasses to provide their implementations. In other words, any abstract method in an abstract class must be implemented by child classes.
So, let’s rewrite Food and Drink with these changes in mind:
public class Food extends MenuItem {
   private boolean isVegetarian;

   public Food(String name, double price, boolean isVegetarian) {
       super(name, price);
       this.isVegetarian = isVegetarian;
   }

   @Override
   public double calculateTotalPrice() {
       return getPrice() * 1.15;  // 15% tax
   }
}
public class Drink extends MenuItem {
   private boolean hasCaffeine;

   public Drink(String name, double price, boolean hasCaffeine) {
       super(name, price);
       this.hasCaffeine = hasCaffeine;
   }

   @Override
   public double calculateTotalPrice() {
       return getPrice() * 1.10;  // 10% tax
   }
}
Through this menu system implementation, we’ve seen how abstraction and inheritance work together to create flexible, maintainable code that can easily adapt to different business requirements.
Today, we have taken a glimpse into what Java is capable of as an object-oriented programming language. We’ve covered the basics of classes, objects, and a few key pillars of OOP: encapsulation, inheritance, and abstraction through a restaurant menu system.
To make this system production-ready, you still have so many things to learn, like interfaces (part of abstraction), polymorphism, and OOP design patterns. To learn more about these concepts, refer to our Introduction to OOP in Java course.
If you wish to test your knowledge of Java, try answering some of the questions in our Java Interview Questions article.
Top Java Courses
Course
Course
Course
blog
Samuel Shaibu
12 min
Tutorial
Olivia Smith
Tutorial
Théo Vanderheyden
Tutorial
Bex Tuychiev
Tutorial
Aditya Sharma
Tutorial
Derrick Mwiti