Course
Data Manipulation with pandas
4 hr
563.8K
Wide format is easy to read, but many analysis and visualization tasks work better with data in a long format.
The pandas.melt() function reshapes a DataFrame by turning one or more columns into rows while keeping selected identifier columns unchanged. This makes your data easier to filter, group, visualize, and analyze.

If you are getting started in Python, I recommend taking our Introduction to Python course, which covers skills like data types, lists, basic functions, and packages.
The pandas.melt() function converts a DataFrame from wide format to long format by transforming column headers into values in a new column.
Its syntax is as follows:
pandas.melt(
    frame,
    id_vars=None,
    value_vars=None,
    var_name=None,
    value_name="value",
    col_level=None,
    ignore_index=True
)
Where:
frame: The DataFrame to reshape. Only required when using pandas.melt().
id_vars: Column or list of columns to keep unchanged. These columns identify each row after reshaping.
value_vars: Column or list of columns to unpivot. If omitted, pandas melts all columns that are not in id_vars.
var_name: Name of the new column that stores the original column names. Defaults to ”variable” if not specified.
value_name: Name of the new column that stores the values. Defaults to ”value” if not specified.
col_level: Optional, specifies which level to melt when working with MultiIndex columns.
ignore_index: If True (default), creates a new sequential index. If False, preserves the original index.
Let me show you an example to illustrate how the syntax above reshapes data.
Suppose you have the dataset below, where the monthly sales for each product are stored in separate columns.
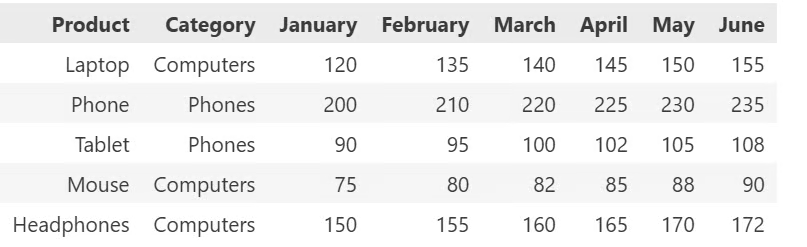
You can use pandas.melt() to convert the month columns into rows.
# Convert the DataFrame from wide format to long format
products_sales_2025_melted = products_sales_2025.melt(
    # Keep the Product and Category columns unchanged
    id_vars=["Product", "Category"],

    # Convert the month columns into rows
    value_vars=["January", "February", "March", "April", "May", "June"],

    # Name of the new column that stores the original column names
    var_name="Month",

    # Name of the new column that stores the corresponding sales values
    value_name="Sales"
)

# Display the reshaped DataFrame
products_sales_2025_melted.head(10)
The resulting DataFrame now stores each month as a separate row.
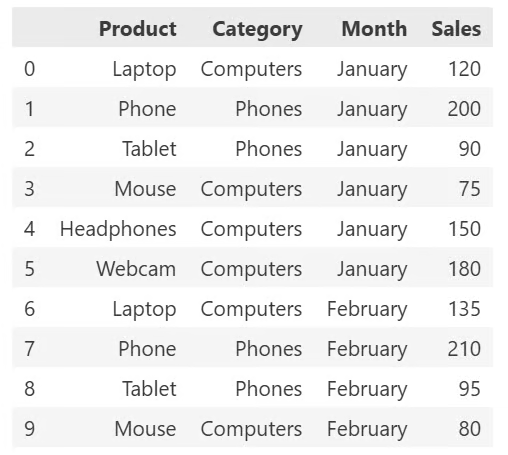
Now that you have understood how the pandas.melt() syntax works, let me show you how each parameter behaves on its own. We will use the tabove table in the following examples.
The value_vars parameter lets you specify which columns to unpivot. Instead of melting every month, you can convert only the columns you need.
In this example, only the January and February columns are melted. The remaining month columns are ignored.
# Convert only the January and February columns into rows
product_sales_3month = products_sales_2025.melt(
    id_vars="Product",
    value_vars=["January", "February",]
)

product_sales_3month.head(20)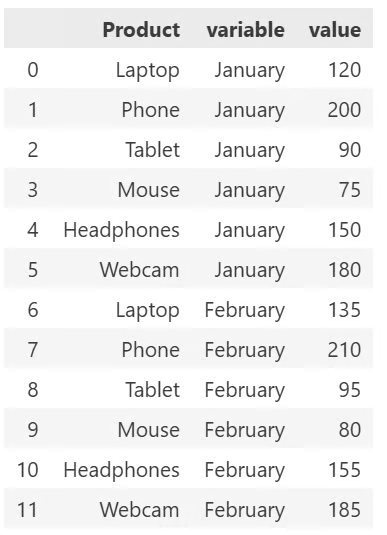
Use the id_vars parameter to keep one or more columns unchanged while the remaining columns are reshaped.
In the example below, the “Product” and “Category” remain unchanged, while the monthly sales columns are converted into rows.
# Keep the Product and Category columns while melting the monthly sales
product_sales_cat = products_sales_2025.melt(
    id_vars=["Product", "Category"]
)

product_sales_cat.head()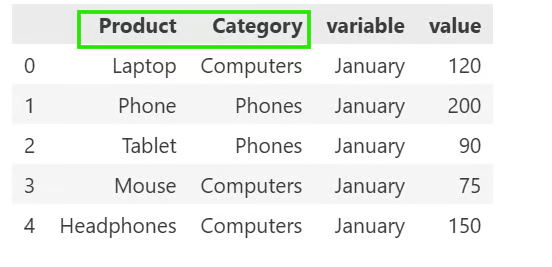
If you have noticed, the output columns are named variable and value by default. Use var_name and value_name arguments to give them descriptive names.
For example, we have renamed the variable column to “Month” and the value to “Sales” in the output below.
# Keep the Product and Category columns while melting the monthly sales
# Rename Month and Sales columns
product_sales_cat = products_sales_2025.melt(
    id_vars=["Product", "Category"],
    var_name="Month",
    value_name="Sales"
)

product_sales_cat.head()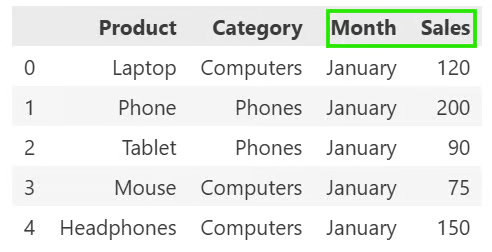
By default, pandas.melt() creates a new sequential index. Set ignore_index=False to keep the original row index.
# Keep the original row index after reshaping
product_sales_index = products_sales_2025.melt(
    id_vars=["Product", "Category"],
    var_name="Month",
    value_name="Sales",
    ignore_index=False
)

product_sales_index.head(10)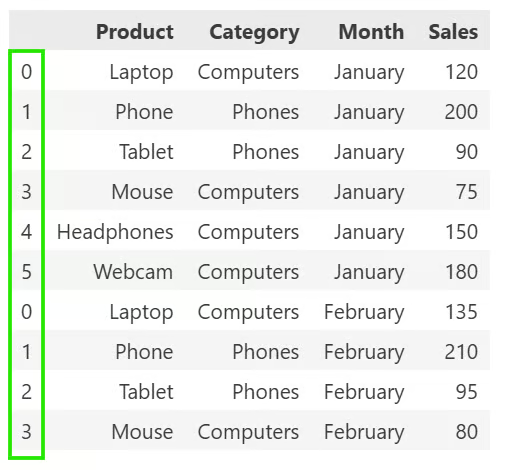
In the example above, the original row labels (0–5) are repeated for each month instead of being replaced with a new sequential index.
pandas.melt() is useful when your data is in a wide format and needs to be transformed into a long format for analysis or visualization. I also find the function important for the following use cases:
Convert wide data to long format: Many datasets store related values across multiple columns. While this format is easy to read, it can make analysis more difficult. pandas.melt() combines those columns into a single column while preserving identifier columns, creating a cleaner structure for further processing.
Prepare data for plotting: Many plotting libraries, such as Seaborn, work best with long-form data when creating charts. Instead of manually combining multiple columns, you can use pandas.melt() to reshape the data into the format these libraries expect.
Prepare data for statistical analysis: Many pandas operations, including groupby(), aggregations, filtering, and summary statistics, become simpler when measurements are stored in a single column rather than spread across multiple columns. If you reshape your data with pandas.melt(), it reduces the amount of code needed to analyze different variables.
Create tidy datasets: A tidy dataset stores each variable in its own column and each observation in its own row. If your dataset contains repeated measurements across several columns, pandas.melt() is often the quickest way to convert it into a tidy format.
I recommend taking our Introduction to Data Visualization with Seaborn course to learn how to create and customize various plots in Python, including scatter, count, bar, and box plots.
Pandas provides several functions for reshaping data, each serving a different purpose. Let’s explore the differences between each method.
The table below shows the difference between pandas.melt() and pivot() functions.
|
|
|
|
Converts wide data into long data. |
Converts long data into wide data. |
|
Turns columns into rows. |
Turns row values into columns. |
|
Useful for preparing data for analysis and visualization. |
Useful for summarizing or presenting data in a report. |
Therefore, choose melt() when your measurements are spread across multiple columns or pivot() when you want to spread row values across columns.
Although both functions reshape data, here is how they differ.
|
|
|
|
Reshapes regular columns into rows. |
Moves one or more column levels into the index. |
|
Produces a standard DataFrame. |
Produces a Series or DataFrame with a MultiIndex. |
|
Easier to read and use for most analysis tasks. |
Better suited for index-based reshaping operations. |
You can use stack() when you need to work with hierarchical indexes or MultiIndex objects.
Both functions convert wide data into long format, but they are designed for different situations, as shown below.
|
|
|
|
Flexible and works with almost any DataFrame. |
Designed for datasets with consistent column naming patterns. |
|
Suitable for general-purpose reshaping. |
Ideal for repeated measurements such as Sales_2023, Sales_2024, and Sales_2025. |
If your dataset has irregular column names, use melt(). If your columns follow a predictable naming convention, use wide_to_long() to reshape the data with less code.
Although pandas.melt() is straightforward to use, here are the most common pitfalls I have encountered and how you can fix them.
Forgetting id_vars: If you don't specify id_vars, pandas treats every column that isn't listed in value_vars as a value column. This can reshape columns you intended to keep as identifiers. To fix this, always identify the columns that uniquely describe each record and pass them to id_vars.
Melting unintended columns: If you omit value_vars, pandas melts all columns that are not included in id_vars. This may include columns you didn't intend to reshape. Therefore, always specify value_vars whenever you only want to melt a subset of columns.
Misunderstanding the output shape: After melting, the number of rows increases because each selected column becomes a separate row for every record. For example, a DataFrame with 10 rows and 12 month columns produces 120 rows after melting the month columns. Therefore, always check the shape before and after reshaping to confirm if the data melted properly.
Confusing wide and long formats: Always remember that for a wide format, similar values are stored across multiple columns. For long format, similar values are stored in a single column, with another column identifying the variable.
To make your reshaping code easier to understand and maintain, I recommend following these best practices when using the pandas.melt() function:
Identify the identifier columns first: Decide which columns should remain unchanged, then pass them to id_vars.
Rename the generated column: Use var_name and value_name instead of relying on the default variable and value column names.
Inspect the row count after melting: Verify that the number of rows matches your expectations, especially when melting many columns.
Use pivot() to reshape data back: If you need to restore the original wide format after analysis, use the pivot() function.
Take our Writing Efficient Python Code course to learn how to write efficient code that is easy to debug and maintain.
pandas.melt() is the standard pandas function for converting wide-format data into long-format data. And once you understand the roles of id_vars and value_vars, you can control which columns remain as identifiers and which are converted into rows.
For a thorough understanding of Python, you can learn more from our Python Data Fundamentals and Python Programming Fundamentals skill tracks.
Learn pandas with DataCamp
Course
Course
Course
cheat-sheet
Richie Cotton
cheat-sheet
Karlijn Willems
4 min
cheat-sheet
Karlijn Willems
4 min
Tutorial
DataCamp Team
15 min
Tutorial
Karlijn Willems
15 min
Tutorial
Adel Nehme
5 min