Track
AI Fundamentals
10 hr
Edo Liberty is a former research director at AWS and Yahoo. During this time, it didn’t take long for him to realize the tremendous power of combining artificial intelligence (AI) models with vector search to significantly improve applications like recommendation systems and spam detectors.
As he indulged deeper into his work with custom vector search systems at a massive scale, he noticed there was no packaged solution for people who didn’t have the same engineering and data science resources available to AWS and Yahoo. Thus, in 2019, he founded Pinecone, and the vector database was born.
The purpose of Pinecone was to provide critical storage and retrieval infrastructure necessary for developing and running state-of-the-art AI applications. According to Pinecone, its founding principle was to “make the solution accessible to engineering teams of all sizes and levels of AI expertise.”
This resulted in the easily useable, fully managed service that Pinecone is today. Fast forward four years, and we now have Pinecone Canopy, a framework that utilizes Retrieval Augmented Generation (RAG) to empower developers to create Generative AI applications effortlessly.
For the remainder of this tutorial, we’re going to be diving deeper into:
The Canopy documentation describes Canopy as “an open-source Retrieval Augmented Generation (RAG) framework and context built on top of the Pinecone vector database.”
Note RAG is an advanced AI framework introduced by Meta (then known as Facebook) AI Research in 2020. Using dynamic, domain-specific data, RAG helps to optimize the output of Large Language Models (LLMs) without needing to retrain the model.
Canopy handles all the labor-intensive tasks involved with developing RAG applications. This includes managing chat histories, chunking and embedding text data, query optimization, context retrieval (including prompt engineering), and augmented generation.
Thus, developers can quickly and easily experiment with and create RAG applications using Canopy. According to the release blog post in November 2023, “With Canopy, you can get a production-ready RAG-powered application up and running in under an hour. And because it’s built and backed by Pinecone, you get the same great developer experience and performance of our fully managed vector database.”
For developers who wish to experiment with RAG, Canopy offers a solution that is:
Users can store up to 100k embeddings using Pinecone without charge. This suffices approximately 15M words or 30k pages of writing. Additionally, the release blog post states, “Free options for embedding models and LLMs are coming soon.”
Text data can come in JSONL, Parquet, or plain text, and Canopy will take care of the rest. Note support for PDF will also be added in the future. Any OpenAI LLM, including GPT-4 Turbo, is compatible with Canopy. Support for other LLMs and embedding models, such as well-known open-source models from Anyscale Endpoints, will soon be added. Users who wish to have their text data in JSONL format can transform it using Pinecone’s notebook.
Production-ready GenAI applications backed by Pinecone’s vector database can be built swiftly, accurately, and reliably.
The Canopy library can be utilized to create unique applications. Users may also run Canopy as a web service or application through a simple REST API. It can also be added to existing OpenAI applications by replacing the Chat Completions API with Canopy’s server endpoint.
The Canopy CLI can communicate with text data with simple commands. This enables users to easily compare RAG against non-RAG workflows to interactively evaluate the augmented results prior to moving to production.
Getting started with Pinecone Canopy is relatively straightforward. Before you begin, you must sign up for a Standard or Enterprise. New users are given $100 in serverless credits to play around and get familiar with the tool.
Note if you don’t want to provide a credit card, you can create a free pod-based index.
Once you’ve registered an account, you’re ready to get started…
Install the Canopy package using:
pip install canopy-sdkIf you wish to do this in a virtual environment, run the following command before installing the package:
python3 -m venv canopy-env
source canopy-env/bin/activate
This creates a virtual environment and activates it. Check out our Virtual Environment in Python tutorial to learn more about how they work.
Next, you must set up your environment variables. To do this, you’ll need a few API keys.
To find your PINECONE_API_KEY, simply:
Other mandatory environment variables include:
OPENAI_API_KEY → This is used to authenticate to OpenAI’s services for embedding and chat API. Find it here. Note you may need to log in or register for OpenAI services beforehand.INDEX_NAME → This is the name of the Pinecone index Canopy will work with – more on this later in the tutorial.CANOPY_CONFIG_FILE → This is the path to the configuration yaml file that will be used by the Canopy server. If this is not provided, the default configuration will be used.Here’s how you set up your environment variables - run the following command from your terminal:
export PINECONE_API_KEY="<PINECONE_API_KEY>"
export OPENAI_API_KEY="<OPENAI_API_KEY>"
export CANOPY_CONFIG_FILE="<CANOPY_CONFIG_FILE >"
export INDEX_NAME="<INDEX_NAME>"If you’ve followed everything up to this step then Canopy should be installed on your system.
To be sure, run the following command:
canopy This should output something like:
Canopy: Ready

Usage: canopy [OPTIONS] COMMAND [ARGS]...
# rest of the help message
Now you’re ready to get started on your first Pinecone Canopy project.
In Pinecone, vector embeddings are stored in indexes – this is the highest-level organizational unit of vector data in the platform. Namely, they accept and store vectors, serve queries over the vectors they contain, and perform other vector operations over their contents.
When using Canopy, you must set up a new Pinecone index configured to work with Canopy. You do this by running:
canopy newOnce you’ve run that command, follow the CLI instructions.
The index created will have a prefix canopy--<INDEX_NAME>.
Note you only have to do this process once for every Canopy index you want to create.
Once you’ve created your index, you’re ready to load data into your Canopy index.
Here are a few examples of different ways you can do it, depending on your data:
canopy upsert /path/to/data_directory
# or
canopy upsert /path/to/data_directory/file.parquet
# or
canopy upsert /path/to/data_directory/file.jsonl
# or
canopy upsert /path/to/directory_of_txt_files/
# ...
According to the documentation, “Canopy supports files in jsonl, parquet and csv formats. Additionally, you can load plaintext data files in .txt format. In this case, each file will be treated as a single document. The document id will be the filename, and the source will be the full path of the file.”
Notice the use of the upsert command. The upsert operation simply writes records into an index namespace. If a record ID already exists, then the upsert operation will overwrite the entire record.
If you wish to make updates, then use the update operation to alter part of a record.
A REST API is used by the Canopy server to make its functionalities available. Specifically, it enables you to converse with your data, upload documents, and get relevant documents for a specific query. Any chat application can be readily linked with the server's /chat.completion endpoint.
To launch the server, run:
canopy startThis will prompt you with the standard Uvicorn message:
...

INFO:     Uvicorn running on http://0.0.0.0:8000 (Press CTRL+C to quit)
Once you get that message, you’re ready to start using the Canopy server with any chat application that supports a /chat.completion endpoint.
Canopy comes packaged as a web service (via the Canopy Server) and a library that may be used to create custom applications. The library consists of three components, or classes, that can be used separately or as a full package. Each component is responsible for a distinct portion of the RAG workflow:
Data is prepared for the RAG workflow using the Knowledge Base. Text input is automatically chunked and transformed into text embeddings before being upserted into the Pinecone vector database.
The “retrieval” portion of RAG is handled by the context engine. Using the Knowledge Base, Context Engine locates the most pertinent documents from Pinecone and organizes them into a context for use as an LLM prompt.
The entire RAG workflow is implemented by the Canopy Chat Engine. It understands prior chat history, recognizes multi-part questions, generates multiple relevant queries from a single prompt, and turns them into embeddings. When done, the end user is presented with a highly pertinent response by utilizing context generated for the LLM via the Context Engine.
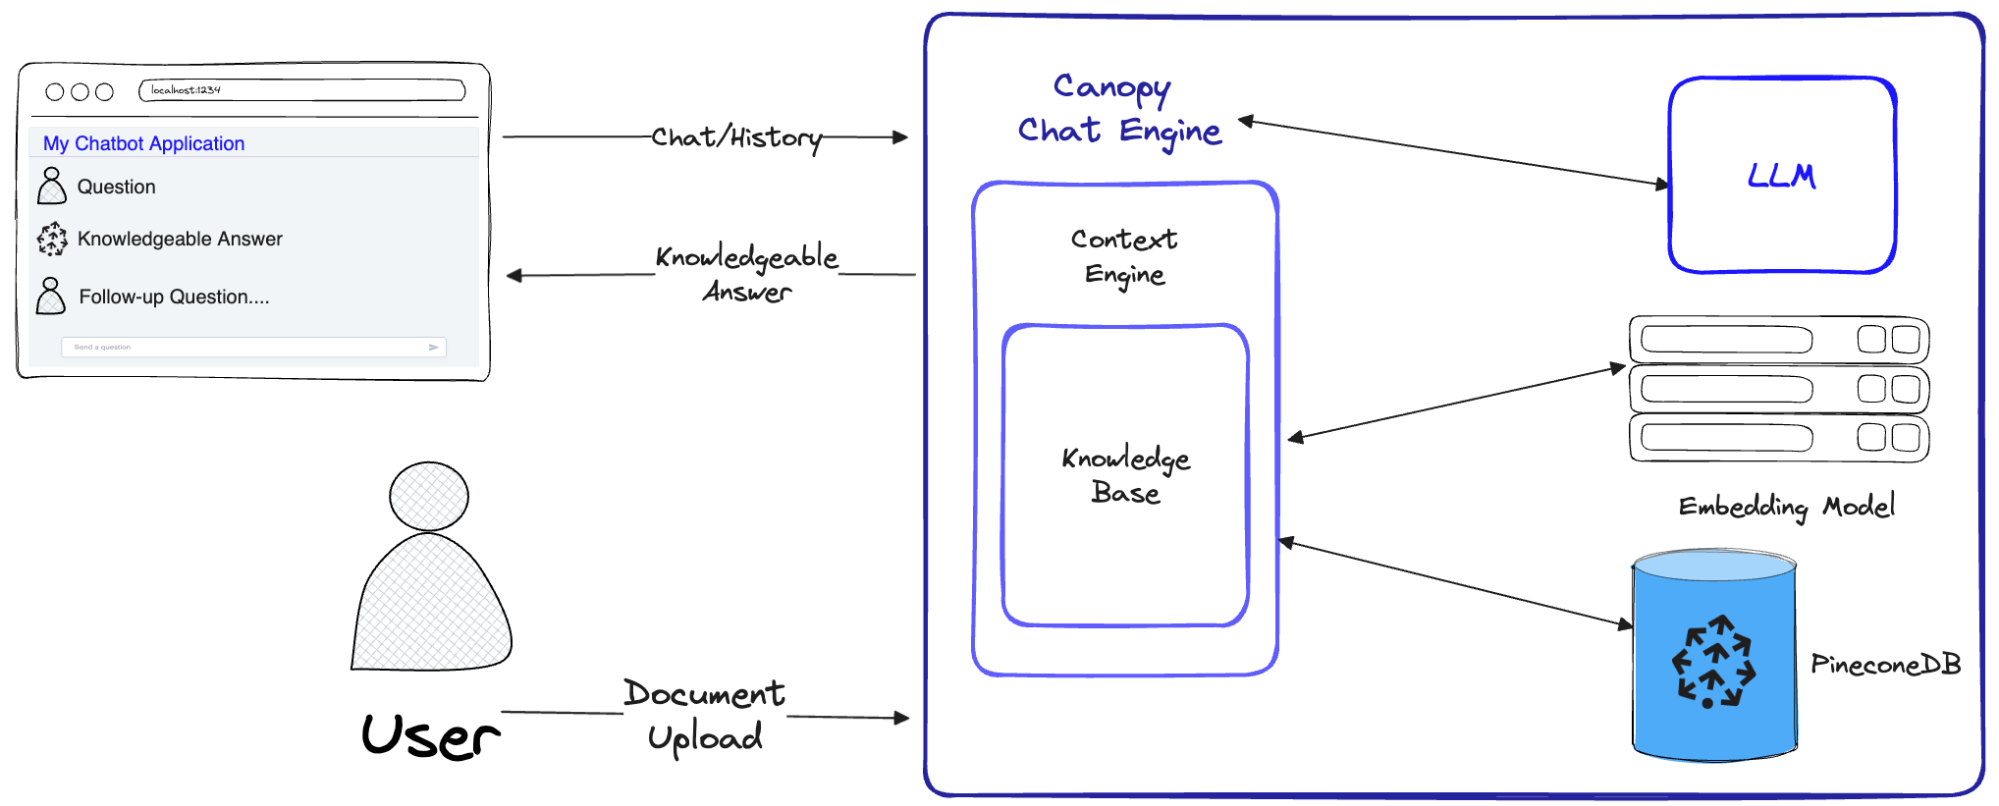
A diagram demonstrating how the Canopy Chat Engine implements the entire RAG workflow. Source - Introducing Canopy: An easy, free, and flexible RAG framework powered by Pinecone
Users of Canopy can leverage Pinecone to scale their indexes vertically or horizontally. Vertical scaling (a.k.a. Scaling up) makes more compute resources available, and horizontal scaling (a.k.a. Scaling out) makes more machines available that can be used to distribute loads.
Another advanced feature is partitioning records in an index into namespaces. This limits queries and other operations to one namespace, so different requests can search different subsets of your index.
For example, you may wish to define a namespace for indexing songs by genre and another for indexing songs by year of release. Here’s an in-depth tutorial on how to do it.
Last but not least, you’ve batch upsert. Note the upsert operation enables users to write a record into a namespace. However, when you’re upserting larger amounts of data, the documentation instructs users to “upsert records in batches of 100 or fewer over multiple upsert requests.”
Here’s an example:
# Source: https://docs.pinecone.io/docs/upsert-data
import random
import itertools
from pinecone import Pinecone

pc = Pinecone(api_key="YOUR_API_KEY")
index = pc.Index("pinecone-index")

def chunks(iterable, batch_size=100):
    """A helper function to break an iterable into chunks of size batch_size."""
    it = iter(iterable)
    chunk = tuple(itertools.islice(it, batch_size))
    while chunk:
        yield chunk
        chunk = tuple(itertools.islice(it, batch_size))

vector_dim = 128
vector_count = 10000

# Example generator that generates many (id, vector) pairs
example_data_generator = map(lambda i: (f'id-{i}', [random.random() for _ in range(vector_dim)]), range(vector_count))

# Upsert data with 100 vectors per upsert request
for ids_vectors_chunk in chunks(example_data_generator, batch_size=100):
index.upsert(vectors=ids_vectors_chunk) Although LLMs are a great invention, they have a major flaw: they fabricate things. RAG can be used to increase their usefulness by providing them with factual context to utilize when answering queries.
One technique you can try is chunking to optimize RAG workflows for performance and accuracy. This is a fundamental component when developing RAG systems, but frameworks like Canopy typically abstract this process away so users don’t have to think about it. However, chunk size matters, and you should consider it to improve your RAG performance – check out this Pinecone blog post to learn chunking methods.
Canopy by Pinecone simplifies the process of building RAG applications by handling all the labor-intensive tasks involved with developing RAG applications, such as managing chat histories, chunking and embedding text data, query optimization, context retrieval (including prompt engineering), and augmented generation. This makes it easier for anyone looking to build and experiment with RAG to get started.
In this tutorial, we walked through all you need to know to begin experimenting with and creating RAG applications. The promise of the developers of Canopy is that you can get a production-ready RAG-powered application up and running in under an hour. Try it out for yourself.
To continue your learning, check out:
Start Your AI Journey Today!
Track
Course
Course
Tutorial
Moez Ali
Tutorial
Moez Ali
Tutorial
Moez Ali
code-along
Vincent Vankrunkelsven
code-along
James Briggs
code-along
James Briggs