Course
Everybody is talking about cryptocurrencies now - thanks to the hype about Bitcoin. Much more interesting than whether there is a Bitcoin bubble or not is the question how this technology actually works and what it is capable of. The story of Bitcoin started with a whitepaper called "Bitcoin: A Peer-to-Peer Electronic Cash System" in 2008. In this paper the author by the name Satoshi Nakamoto (there is still a large debate over who Satoshi really is) introduces a new, revolutionary technology and idea: an decentralised electronic currency that runs on something called the blockchain. The idea spread from this point and can be applied to many other areas now.
I first got introduced to blockchains at a meeting of the BlockchainSociety at Oxford. Everybody there seemed very excited about the potential of this new technology. And to be fair, it does sound intriguing: A decentralised, incorruptible database of monetary transactions, contracts or whatever you like (for example, un-hackable voting machines). The promise of the blockchain to the crypto community is that it will disrupt entire industries by revolutionising trust in a way that we won't need any third parties like banks or lawyers anymore - we just need the power of cryptography.
While the basic idea is quite intuitive, the question how blockchains actually work on a technical level is a bit harder to understand. Last week I came across this article on R bloggers, where BigData Doc builds a blockchain entirely in R. A blockchain built in R might not be the most efficient and practical thing in the world but it is a great way to understand the programming and crypto principles behind it. I wanted to understand it as well and that's why I implemented a smaller version of the blockchain in R: "If you can code it, you certainly understand it".
What is a Blockchain?
Let's say your goal is to store some data in a secure way. To this end, you first store the data in a container - which you call a block. In the case of Bitcoin, each block contains several financial transactions. When there are new transactions (or there is new data) a new block will be created and will be added together with previous blocks to form a chain - the blockchain.
Let's take a look at how blockchains are making use of cryptography to become virtually un-hackable.
1. Blocks
    block_example <- list(index = 1,
                     timestamp = "2018-01-05 17.00 MST",
                     data = "some data",
                     previous_hash = 0,
                     proof = 9,
                     new_hash = NULL)
Before you can start building the blockchain - a.k.a. chaining different containers with data together - you need to get to know two more concepts: Hashing and Proof-of-Work-Algorithms.
2. Hash
A hash helps to ensure the integrity of a block by connecting it to the other blocks in the chain. A hash function takes something as an input and gives you a unique, encrypted output. An example would be the following: You give your friend a puzzle "Which is the better statistics program: Stata or R?" and you give her the hash of the correct solution: "71ec0b920622cf4358bbc21d6a8b41f903584808db53ec07a8aa79119304ce86". She can now check on her own if she has the correct answer by just inputting her answer into the Hash-function (in your case the SHA256 algorithm):
    library("digest")

    digest("Stata" ,"sha256") # first try
## [1] "3ac273f00d52dc9caf89cbd71e73e5915229a588117ca3441630089409ddb7bc"
digest("R", "sha256") # second try
## [1] "71ec0b920622cf4358bbc21d6a8b41f903584808db53ec07a8aa79119304ce86"
How does this help you?
In this case, you not only input information about the block (index,timestamp, data) to the hash function, but also the hash of the previous block. This means you can only calculate the valid hash if you know the hash of the previous block, which is created using the hash of the block before and so on and so forth. This provides you with an immutable, sequential chain of blocks. If you would alter one block afterwards you would have to calculate all the hashes for the sequential blocks again.
    #Function that creates a hashed "block"
    hash_block <- function(block){
      block$new_hash <- digest(c(block$index,
                                 block$timestamp,
                                 block$data,
                                 block$previous_hash), "sha256")
      return(block)
    }
3. Proof-of-Work
If there is a lot of information that must be stored in the blockchain, you will need to create a lot of new blocks. In many cases, you want to control how many new blocks are created. In the case of cryptocurrencies for example coins would lose their value if there is an infinite amount of coins that can be created every second.
Therefore, we add a so-called "Proof-of-Work" (PoW) algorithm which controls the difficulty of creating a new block. "Proof" means that the computer has performed a certain amount of work. In practice the goal is to create an item that is hard to create but easy to verify. I will use the following "task"as a PoW: find the next number that is divisible by 99 and divisable by the proof-number of the last block.
    ### Simple Proof of Work Alogrithm
    proof_of_work <- function(last_proof){
      proof <- last_proof + 1

      # Increment the proof number until a number is found that is divisable by 99 and by the proof of the previous block
      while (!(proof %% 99 == 0 & proof %% last_proof == 0 )){
        proof <- proof + 1
      }

      return(proof)
    }
For blockchains like Bitcoin or Ethereum the job of creating new blocks is done by so-called miners. When a new block has to be created, a computational problem is sent out to the network. The miner which solves the PoW problem first creates the new block and is rewarded in Bitcoins (this is the way new Bitcoins are actually created). This "lottery" of finding the new correct proof ensures that the power of creating new blocks is decentralised. When a new block is mined it is sent out to everybody so that every node in the network has a copy of the latest blockchain. The idea that the longest blockchain in the network (the one which "the most work was put into") is the valid version of the blockchain is called "decentralised consensus".
In the case of Bitcoin the PoW problem involves the problem of finding numbers that generate hashes with a certain amount of leading zeros (the best explanation I found is this video from Savjee). To account for increasing computational speed and varying numbers of miners in the network the difficulty of the PoW can be adjusted to hold the time to create a new block constant at around ten minutes.
4. Adding New Blocks
Now you know how a block looks like, how blocks are chained together using hashes and how the pace of creating new blocks is being regulated by PoWs. So let's put it together in a function:
    #A function that takes the previous block and normally some data (in our case the data is a string indicating which block in the chain it is)
    gen_new_block <- function(previous_block){

      #Proof-of-Work
      new_proof <- proof_of_work(previous_block$proof)

      #Create new Block
      new_block <- list(index = previous_block$index + 1,
                        timestamp = Sys.time(),
                        data = paste0("this is block ", previous_block$index +1),
                        previous_hash = previous_block$new_hash,
                        proof = new_proof)

      #Hash the new Block
      new_block_hashed <- hash_block(new_block)

      return(new_block_hashed)
    }
Before you start building your blockchain, you need to start the chain somewhere. This is done using a so-called Genesis Block. It contains no data and arbitrary values for proof and previous hash (as there is no previous block).
    # Define Genesis Block (index 1 and arbitrary previous hash)
    block_genesis <-  list(index = 1,
                           timestamp = Sys.time(),
                           data = "Genesis Block",
                           previous_hash = "0",
                           proof = 1)
5. Building the Blockchain
Now you can start building the blockchain. You start with the Genesis block and then add a few blocks using a loop.
    blockchain <- list(block_genesis)
    previous_block <- blockchain[[1]]

      # How many blocks should we add to the chain after the genesis block
      num_of_blocks_to_add <- 5

      # Add blocks to the chain
      for (i in 1: num_of_blocks_to_add){
        block_to_add <- gen_new_block(previous_block)
        blockchain[i+1] <- list(block_to_add)
        previous_block <- block_to_add

        print(cat(paste0("Block ", block_to_add$index, " has been added", "\n",
                   "\t", "Proof: ", block_to_add$proof, "\n",
                   "\t", "Hash: ", block_to_add$new_hash)))
      }
    ## Block 2 has been added
    ##  Proof: 99
    ##  Hash: 7d3dfbb58b410838769f6080dbc62a44a4c5d411a41048c4e597d26dccd1cd38NULL
    ## Block 3 has been added
    ##  Proof: 198
    ##  Hash: 4f8bdd79d751f9e9829c14c52a737f257285b61e54b29531dd59bf1a530f1097NULL
    ## Block 4 has been added
    ##  Proof: 396
    ##  Hash: 512b877c4ff92605d9fe10ac73ced20f748742964f306c211c4691f15425a26eNULL
    ## Block 5 has been added
    ##  Proof: 792
    ##  Hash: a3baaa025186c5bcb2238a888bc65e705ffe73c17dc5c8f26ee337fd62867993NULL
    ## Block 6 has been added
    ##  Proof: 1584
    ##  Hash: d12c3f54c14f3287a9f31ab542271197ba6a658cee561a9289819dd563fe4991NULL
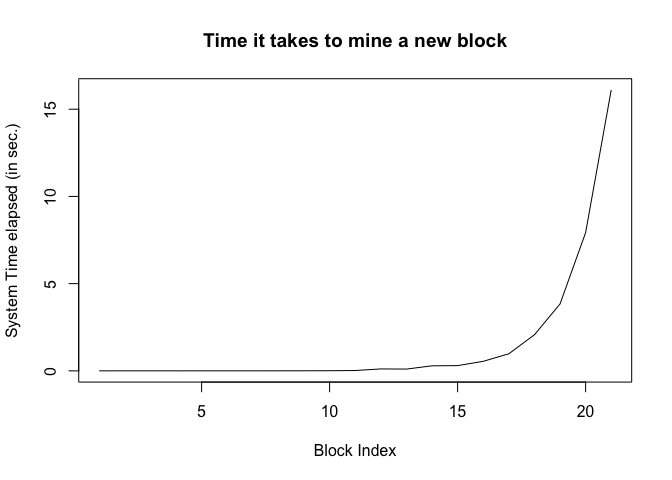
If you want to add many more blocks, you notice that it takes increasingly more time. The reason is that the proof number increases exponentially.

For cryptocurrencies like Bitcoin this would be a problem as the time to create a new block should me more or less constant (around 10 minutes in the case of Bitcoin). Therefore the difficulty of PoW has to be adjusted continuously to account for increasing computational speed and varying numbers of miners in the network at a given time.
Finally, this is how one block in your chain looks like:
blockchain[[5]]
    ## $index
    ## [1] 5
    ##
    ## $timestamp
    ## [1] "2018-02-08 12:02:56 GMT"
    ##
    ## $data
    ## [1] "this is block 5"
    ##
    ## $previous_hash
    ## [1] "26cdc16a4560df5fa2fd521dbca22670e2475c35d3dd90781872bee98a164eef"
    ##
    ## $proof
    ## [1] 792
    ##
    ## $new_hash
    ## [1] "2eef25bf0bc4ee81e8c7cd1dfda65855b4ba32aba218d8c525a03a72b3454d74"
Wrap Up
In this little post, you created the tiniest blockchain. The main goal was to introduce how a blockchain looks like and introduce some of the core concepts behind it. Understanding the genius application of cryptography really shows why people get so excited about the possibilities of the blockchain.
To put a blockchain into production much more work is needed: Set up an API, create wallets, digital signatures using public-private-key-pairs etc. I also only scratched the surface on the concept of decentralised consensus which is at the heart of the blockchain network.
This little introduction draws on the blog post of Gerald Nash who implemented the "tiniest blockchain" in Python. I implemented it in R and added the PoW implementation from Daniel van Flymen.
To dive deeper into the topic of blockchains I recommend the brilliant, orginial whitepaper on Bitcoin from Satoshi Nakamoto and the blog post from BigData Doc.
If you have any thoughts or responses to this blog post, feel free to reach out to me on Twitter: you can find me at @jj_mllr or check out @CorrelAid, a network of young data analysts that wants to change the world with a more inclusive, integrated and innovative approach to data analysis.


