Track
OpenCV is a computer vision library that supports programming languages like Python, C++, and Java. The package was initially created by Intel in 1999 and was later made open-source and released to the public.
OpenCV allows developers and non-mathematicians to build computer vision applications easily without having to code them from scratch. The library has over 2,500 algorithms that allow users to perform tasks like face recognition and object detection.
Developers and data practitioners at well-established organizations like Google, Microsoft, IBM, and Intel make extensive use of the OpenCV library, which is currently free for commercial use.
In this article, we will use OpenCV to perform face detection in Python.
By the end of this tutorial, you will know how to:
- Detect human faces in images with OpenCV in Python
- Perform real-time face detection in a live stream from a webcam
What Is Face Detection?
Face detection involves identifying a person’s face in an image or video. This is done by analyzing the visual input to determine whether a person’s facial features are present.
Since human faces are so diverse, face detection models typically need to be trained on large amounts of input data for them to be accurate. The training dataset must contain a sufficient representation of people who come from different backgrounds, genders, and cultures.
These algorithms also need to be fed many training samples comprising different lighting, angles, and orientations to make correct predictions in real-world scenarios.
These nuances make face detection a non-trivial, time-consuming task that requires hours of model training and millions of data samples.
Thankfully, the OpenCV package comes with pre-trained models for face detection, which means that we don’t have to train an algorithm from scratch. More specifically, the library employs a machine learning approach called Haar cascade to identify objects in visual data.
OpenCV for Face Detection Tutorial
In this section, we will learn to apply a popular face detection approach called Haar Cascade for face detection using OpenCV and Python.
Run and edit the code from this tutorial online
Run codeIntro to Haar Cascade Classifiers
This method was first introduced in the paper Rapid Object Detection Using a Boosted Cascade of Simple Features, written by Paul Viola and Michael Jones.
The idea behind this technique involves using a cascade of classifiers to detect different features in an image. These classifiers are then combined into one strong classifier that can accurately distinguish between samples that contain a human face from those that don’t.
The Haar Cascade classifier that is built into OpenCV has already been trained on a large dataset of human faces, so no further training is required. We just need to load the classifier from the library and use it to perform face detection on an input image.
Installing OpenCV for Python
To install the OpenCV library, simply open your command prompt or terminal window and run the following command:
pip install opencv-pythonThis command will only work if you already have pip installed on your device. If you’d like to learn more about the pip package manager, you can read our PIP Python Tutorial.
OpenCV for Face Detection in Images
We will build a detector to identify the human face in a photo from Unsplash. Make sure to save the picture to your working directory and rename it to input_image before coding along.
Step 1: Import the OpenCV Package
Now, let’s import OpenCV and enter the input image path with the following lines of code:
import cv2

imagePath = 'input_image.jpg'
Step 2: Read the Image
Then, we need to read the image with OpenCV’s imread() function:
img = cv2.imread(imagePath)This will load the image from the specified file path and return it in the form of a Numpy array.
Let’s print the dimensions of this array:
img.shape(4000, 2667, 3)Notice that this is a 3-dimensional array. The array’s values represent the picture’s height, width, and channels respectively. Since this is a color image, there are three channels used to depict it - blue, green, and red (BGR).
Note that while the conventional sequence used to represent images is RGB (Red, Blue, Green), the OpenCV library uses the opposite layout (Blue, Green, Red).
Step 3: Convert the Image to Grayscale
To improve computational efficiency, we first need to convert this image to grayscale before performing face detection on it:
gray_image = cv2.cvtColor(img, cv2.COLOR_BGR2GRAY)Let’s now examine the dimensions of this grayscale image:
gray_image.shape(4000, 2667)Notice that this array only has two values since the image is grayscale and no longer has the third color channel.
Step 4: Load the Classifier
Let’s load the pre-trained Haar Cascade classifier that is built into OpenCV:
face_classifier = cv2.CascadeClassifier(
    cv2.data.haarcascades + "haarcascade_frontalface_default.xml"
)
Notice that we are using a file called haarcascade_frontalface_default.xml. This classifier is designed specifically for detecting frontal faces in visual input.
OpenCV also provides other pre-trained models to detect different objects within an image - such as a person’s eyes, smile, upper body, and even a vehicle’s license plate. You can learn more about the different classifiers built into OpenCV by examining the library’s GitHub repository.
Step 5: Perform the Face Detection
We can now perform face detection on the grayscale image using the classifier we just loaded:
face = face_classifier.detectMultiScale(
    gray_image, scaleFactor=1.1, minNeighbors=5, minSize=(40, 40)
)
Let’s break down the methods and parameters specified in the above code:
- detectMultiScale():
The detectMultiScale() method is used to identify faces of different sizes in the input image.
grey_image:
The first parameter in this method is called grey_image, which is the grayscale image we created previously.
scaleFactor:
This parameter is used to scale down the size of the input image to make it easier for the algorithm to detect larger faces. In this case, we have specified a scale factor of 1.1, indicating that we want to reduce the image size by 10%.
minNeighbors:
The cascade classifier applies a sliding window through the image to detect faces in it. You can think of these windows as rectangles.
Initially, the classifier will capture a large number of false positives. These are eliminated using the minNeighbors parameter, which specifies the number of neighboring rectangles that need to be identified for an object to be considered a valid detection.
To summarize, passing a small value like 0 or 1 to this parameter would result in a high number of false positives, whereas a large number could lead to losing out on many true positives.
The trick here is to find a tradeoff that allows us to eliminate false positives while also accurately identifying true positives.
minSize:
Finally, the minSize parameter sets the minimum size of the object to be detected. The model will ignore faces that are smaller than the minimum size specified.
Step 6: Drawing a Bounding Box
Now that the model has detected the faces within the image, let’s run the following lines of code to create a bounding box around these faces:
for (x, y, w, h) in face:
    cv2.rectangle(img, (x, y), (x + w, y + h), (0, 255, 0), 4)
The face variable is an array with four values: the x and y axis in which the faces were detected, and their width and height. The above code iterates over the identified faces and creates a bounding box that spans across these measurements.
The parameter 0,255,0 represents the color of the bounding box, which is green, and 4 indicates its thickness.
Step 7: Displaying the Image
To display the image with the detected faces, we first need to convert the image from the BGR format to RGB:
img_rgb = cv2.cvtColor(img, cv2.COLOR_BGR2RGB)Now, let’s use the Matplotlib library to display the image:
import matplotlib.pyplot as plt


plt.figure(figsize=(20,10))
plt.imshow(img_rgb)
plt.axis('off')
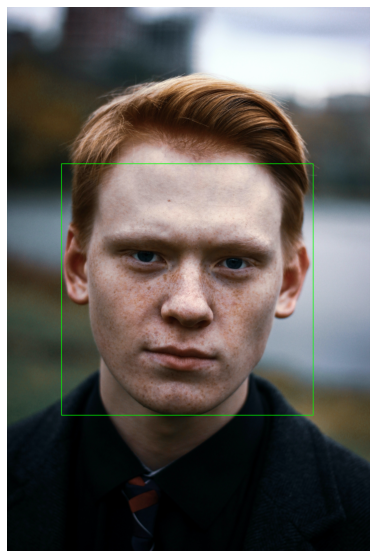
The above code should generate the following output:

Great!
The model has successfully detected the human face in this image and created a bounding box around it.
Real-Time Face Detection with OpenCV
Now that we have successfully performed face detection on a static image with OpenCV, let’s see how to do the same on a live video stream.
Step 1: Pre-Requisites
First, let’s go ahead and import the OpenCV library and load the Haar Cascade model just like we did in the previous section. You can skip this block of code if you already ran it previously:
import cv2

face_classifier = cv2.CascadeClassifier(
    cv2.data.haarcascades + "haarcascade_frontalface_default.xml"
)
Step 2: Access the Webcam
Now, we need to access our device’s camera to read a live stream of video data. This can be done with the following code:
video_capture = cv2.VideoCapture(0)Notice that we have passed the parameter 0 to the VideoCapture() function. This tells OpenCV to use the default camera on our device. If you have multiple cameras attached to your device, you can change this parameter value accordingly.
Step 3: Identifying Faces in the Video Stream
Now, let’s create a function to detect faces in the video stream and draw a bounding box around them:
def detect_bounding_box(vid):
    gray_image = cv2.cvtColor(vid, cv2.COLOR_BGR2GRAY)
    faces = face_classifier.detectMultiScale(gray_image, 1.1, 5, minSize=(40, 40))
    for (x, y, w, h) in faces:
        cv2.rectangle(vid, (x, y), (x + w, y + h), (0, 255, 0), 4)
    return faces
The detect_bounding_box function takes the video frame as input.
In this function, we are using the same codes as we did earlier to convert the frame into grayscale before performing face detection.
Then, we are also detecting the face in this image using the same parameter values for scaleFactor, minNeighbors, and minSize as we did previously.
Finally, we draw a green bounding box of thickness 4 around the frame.
Step 4: Creating a Loop for Real-Time Face Detection
Now, we need to create an indefinite while loop that will capture the video frame from our webcam and apply the face detection function to it:
while True:

    result, video_frame = video_capture.read()  # read frames from the video
    if result is False:
        break  # terminate the loop if the frame is not read successfully

    faces = detect_bounding_box(
        video_frame
    )  # apply the function we created to the video frame

    cv2.imshow(
        "My Face Detection Project", video_frame
    )  # display the processed frame in a window named "My Face Detection Project"

    if cv2.waitKey(1) & 0xFF == ord("q"):
        break

video_capture.release()
cv2.destroyAllWindows()
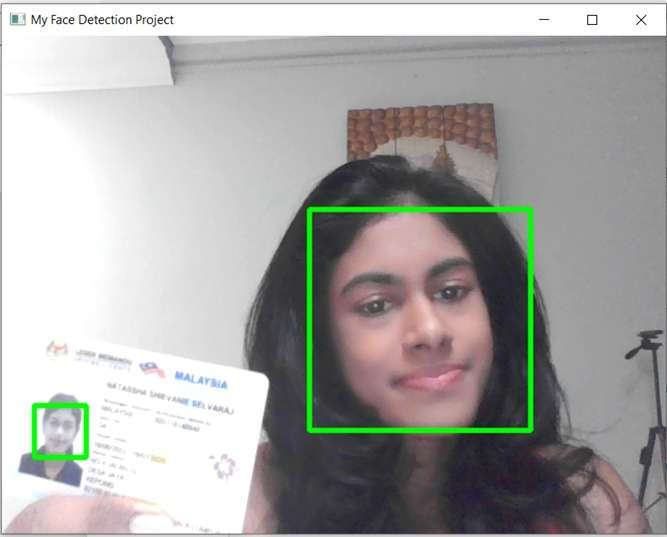
After running the above code, you should see a window called My Face Detection Project appear on the screen:

The algorithm should track your face and create a green bounding box around it regardless of where you move within the frame.
In the frame above, the model recognizes my face and my picture on the driving license I’m holding up.
You can also test the efficacy of this model by holding up multiple pictures or by getting different people to stand at various angles behind the camera. The model should be able to identify all human faces in different backgrounds or lighting settings.
If you’d like to exit the program, you can press the “q” key on your keyboard to break out of the loop.
Conclusion
In conclusion, OpenCV is a powerful and versatile library for building computer vision applications, offering a wide range of pre-trained models and tools to simplify complex tasks like face detection.
Whether you’re processing static images or live video streams, OpenCV provides an accessible entry point for developers to create efficient and scalable solutions.
By mastering the techniques covered in this tutorial, you’ll be well-equipped to explore more advanced applications of computer vision in your projects.

Natassha is a data consultant who works at the intersection of data science and marketing. She believes that data, when used wisely, can inspire tremendous growth for individuals and organizations. As a self-taught data professional, Natassha loves writing articles that help other data science aspirants break into the industry. Her articles on her personal blog, as well as external publications garner an average of 200K monthly views.
Looking to get started with Generative AI?
Learn how to work with LLMs in Python right in your browser

FAQs
Can OpenCV be used for detecting objects other than faces?
Yes, OpenCV supports object detection for various items such as eyes, smiles, vehicles, and even license plates using its pre-trained Haar Cascade classifiers. Additionally, OpenCV can be combined with modern object detection models like YOLO or SSD for more robust and accurate multi-object detection.
How can I handle multiple faces in a single image using OpenCV?
OpenCV’s detectMultiScale() method automatically detects all faces in an image by creating bounding boxes for each one. You can iterate through the returned bounding boxes to process or label each detected face individually. Example:
for (x, y, w, h) in faces:
    cv2.rectangle(img, (x, y), (x + w, y + h), (0, 255, 0), 4)  # Draw boxes for all detected faces
Can OpenCV work with deep learning models for face detection?
Yes, OpenCV supports deep learning models for face detection, such as using pre-trained DNN models like Caffe or TensorFlow. OpenCV’s cv2.dnn module allows integration with these models for more advanced and accurate face detection compared to Haar cascades. For instance, you can use the MobileNet-SSD model for real-time face detection:
net = cv2.dnn.readNetFromCaffe('deploy.prototxt', 'res10_300x300_ssd_iter_140000.caffemodel')

