
Track
Python Developer
28 hr
Renaming a local branch is a simple yet effective way to keep our project organized and ensure that branch names accurately reflect their contents or purpose.
Renaming a local branch doesn't rename it on the remote repository. If the branch is tracked remotely, we need to address it separately.
Before we start, we need to make sure that Git is installed and that we are in the repository directory on our local machine.
git --version in the terminal or command prompt. If it's not installed, read this tutorial on installing Git or visit the official Git website for download and installation instructions.Before we do anything to the branch, we first need to switch to that branch using the command:
git checkout <current_branch_name>Replace <current_branch_name> with the current name of the branch.
Once the branch is checked out, we rename the branch using:
git branch -m <new_branch_name>Replace <new_branch_name> with the new name of the branch.
We can verify that the name was changed by listing all branches with the git branch command. The current branch will have an asterisk (*) next to it.
Renaming a remote branch in Git is a task that involves a couple of additional steps to ensure that the changes are reflected in the remote repository.
Before renaming a remote branch, we should make sure that the local branch doesn’t contain work that isn’t in the remote branch yet. This prevents those changes from getting lost during the rename process. If you’re unsure about how to push changes, check out this Git Push and Pull Tutorial.
Before renaming the remote branch, we first need to rename the branch locally, as we learned above.
After renaming the branch locally, we can push that new branch to the remote repository using:
git push origin -u <new_branch_name>The -u option sets the pushed branch as the upstream for the local branch. This makes future pushes and pulls from this branch automatically reference the remote with the new name.
This process doesn’t rename a branch remote but instead creates a new copy of it with a new name. So after doing that, it’s recommended to clean up the repository by deleting the old branch using the following command:
git push origin --delete <old_branch_name>If you'd like to expand your knowledge on working with branches in Git, check out the Git Clone a Specific Branch tutorial.
When renaming a remote branch in Git, several critical aspects require our attention to ensure the process is smooth and does not disrupt the workflow of any project collaborators.
We should always inform others in our team about the branch rename. This communication prevents confusion, as they may encounter errors if trying to pull from or push to a branch that no longer exists under its original name.
Collaborators should rename their local copies of the branch by using the git branch -m <old_branch_name> <new_branch_name> command. Additionally, they'll need to reset their upstream branch with git push origin -u <new_branch_name> to ensure future pushes go to the correct branch.
If there are any open pull requests targeting the old branch name in the remote repository, these will need our attention. We may need to close them and create new ones targeting the newly named branch.
Most Git clients (e.g. GitHub, GitKraken, Sourcetree, GitLab, etc.) offer options to rename branches through their graphical user interfaces.
To rename a branch on GitHub, we start by navigating to the repository. Then we click the branch dropdown menu:
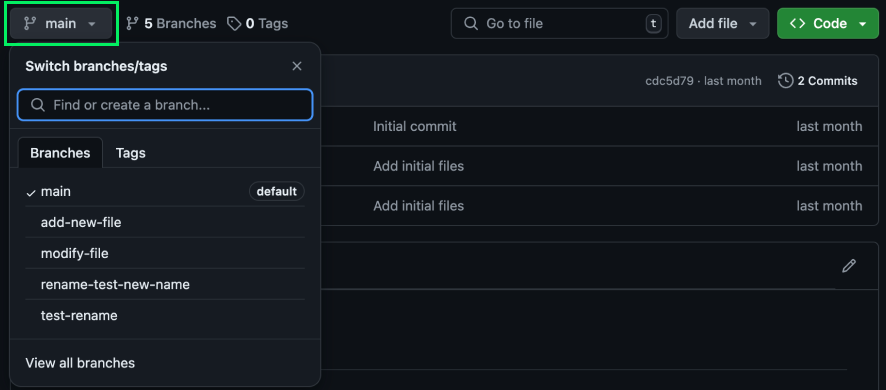
On the bottom of the menu, click View all branches:
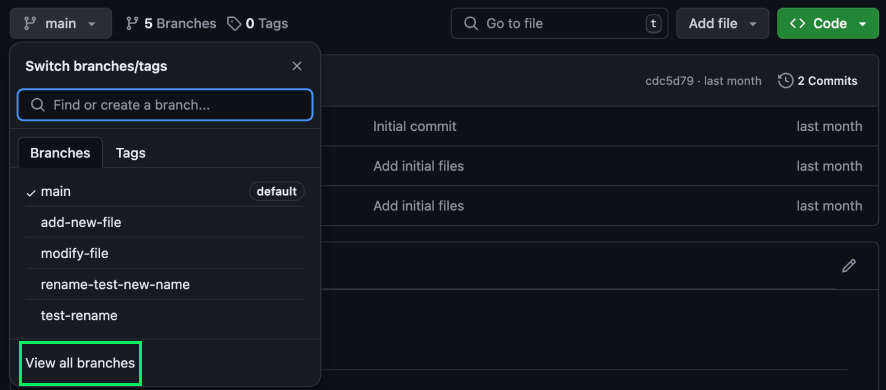
Next, we need to locate the branch we wish to rename and click the triple dot dropdown menu on the right:

Finally, we click the Rename branch option and rename the branch:

Renaming branches in Git plays a crucial part in maintaining an efficient and intuitive project structure.
It's essential to distinguish between renaming a branch locally versus remotely, as each has its own set of steps and implications on the workflow.
More critically, communication with the team is paramount. Keeping everyone in the loop ensures a seamless transition and prevents potential disruptions to the development cycle.
If you want to learn more about Git, I recommend this introductory course to Git.
Learn more about Git!
Track
Course
Tutorial
François Aubry
Tutorial
François Aubry
Tutorial
François Aubry
Tutorial
Olivia Smith
Tutorial
François Aubry
Tutorial
Bex Tuychiev