Track
Branches in Git represent independent lines of development, allowing developers to work on multiple features or versions of a project simultaneously.
Git branches provide a structured way to manage code changes, enabling a smooth integration of new features, bug fixes, and experimental ideas without disrupting the main codebase.
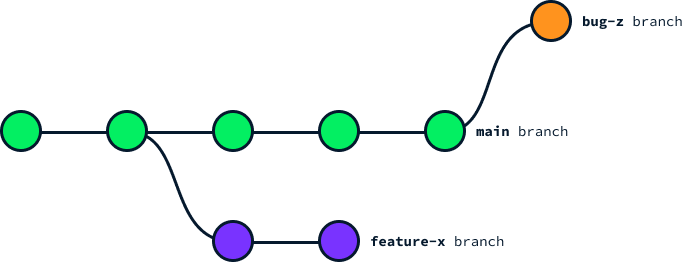
Traditionally, we used the git checkout command to move between branches. However, the checkout command allows us to do much more than simply changing branches, which causes some confusion and could lead to mistakes.
Introduced in Git 2.23 in August 2019, the git switch command provides a more intuitive way to switch and create new branches.
Switching and Creating Branches With Git Switch
In complex projects, priorities constantly change, and the workflow is often non-linear. Typically, each branch focuses on specific changes, allowing us to work on multiple new features or bug fixes simultaneously, each being implemented on its branch.
There are several reasons why we might need to pause work on one feature and shift our attention to another branch, such as:
- Waiting for a code review.
- Encountering a roadblock and needing assistance from a coworker.
- Addressing a hotfix that requires immediate attention.
Switching between branches efficiently is key to keeping development smooth and making sure changes end up where they’re supposed to. With multiple tasks and team collaboration, having a simple and reliable way to switch branches is important.
To switch to an existing branch using the switch command, we do the following:
git switch <branch-name>In the above command, <branch_name> should be replaced with the branch name we want to switch to. Say we want to work on a new feature located in an existing branch named feature-x, then we would use the command:
git switch feature-xBecome a Data Engineer
Finding Out the Names of Existing Branches
If we want to list the available branches, we use the git branch command. The current branch will be shown with an asterisk next to it. For instance, if we have three local branches named main, feature-x, and bug-z, and we’re currently on the main branch, the output would be:
* main
feature-x
bug-z
Switching to a Remote Branch
The previous command allows us to change to a branch we already have on our local machine. To switch to a branch from the remote repository, we need to create a local version of it using the following command:
git switch -c <local-branch-name> origin/<remote-branch-name>Here, <local-branch-name> is the name we want the branch to have locally, while <remote-branch-name> is the name of the remote branch. Generally, we want to use the same name to avoid confusion. Say we don’t have the branch feature-x locally. Then we can create a local version and switch to it, like so:
git switch -c feature-x origin/feature-xWhen using the same name, Git provides a shorthand for the command using the --track option. So the above command is equivalent to:
git switch --track origin/feature-xTo list the remote branches, we can use the git branch -r command.
The local repository doesn’t automatically keep track of the remote branches. Therefore, before listing or switching to a remote branch, it’s important to update the local repository using git fetch.
Creating a New Branch and Switching to It
We want to create a brand new branch to start working on a new feature. In this case, we can use the -c flag:
git switch -c <new-branch-name>We replace <new-branch-name with the name of the branch. For instance, to create a branch named feature-y we do the following:
git switch -c feature-ySwitching Back to the Previous Branch
It’s often the case that after switching branches to do some work, we want to go back to the branch we were previously working on. Git provides a shorthand for this using the command:
git switch -Git Switch vs. Git Checkout
The git checkout command has been in Git from the beginning. Before the introduction of git switch in 2019, git checkout was the command that was used to change between branches. However, the scope of the git checkout command goes beyond simply navigating between branches. Here's a breakdown of the differences:
git switch: Its purpose is to provide a more intuitive way to switch and create new branches. It aims to simplify the command set and reduce confusion.git checkout: A more versatile command that can be used for switching branches, but also for checking out files and restoring content from different commits or branches.
The design of git switch makes it harder to accidentally overwrite changes. It has a more explicit syntax for switching branches and creating new branches.
Because git checkout does multiple things (switching branches, restoring files, etc.), there's a higher chance of making mistakes while using it.
Git Switch: Common Errors
When managing branches, you might run into a few common issues. One of them is attempting to create a branch that already exists locally. Another frequent issue occurs when trying to switch branches with uncommitted changes. Let’s start by explaining the first one.
The branch already exists locally
Each local branch needs a unique name. You can use git switch to create local branches in two ways:
1. To track a remote branch:
git switch --track origin/<branch-name>2. To create a new local branch:
git switch -c <branch-name>In both cases, if there’s already a local branch named <branch-name>, Git will throw an error saying:
fatal: a branch named '<branch-name>' already exists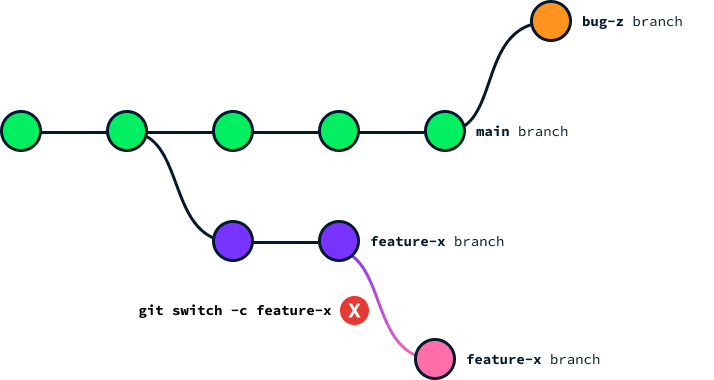
In this case, we can switch to the branch without creating it using git switch <branch-name>.
The current branch has uncommitted changes
Git won’t allow us to change branches if the current branch has uncommitted changes that would be overwritten by the switch. In this case, Git will throw an error saying:
Please commit your changes or stash them before you switch branches.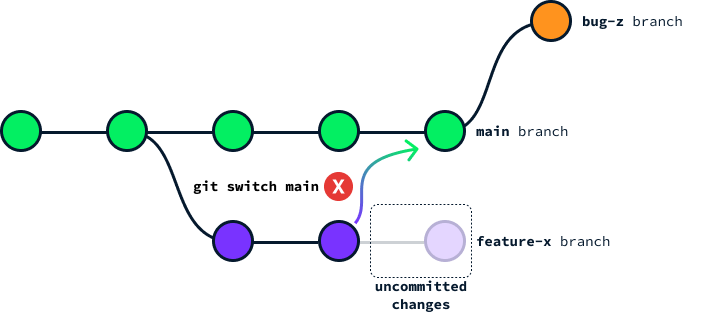
As the message indicates, to overcome this situation we need to either first commit our changes or stash them. If the changes are ready to be committed to the repository we should commit them using:
git commit -m "Commit message"If we want to keep the changes but are not ready to commit yet, we can temporarily save them using the git stash command:
git stashIf we stash the changes before switching branches and we want to reapply them when we go back to the original branch, we can use the git stash pop command.
Alternatively, we can also decide to discard the changes by using the --discard-changes flag:
git switch --discard-changes <branch-name>Be careful before using the latter option as the changes will be permanently deleted.
Git Switch Advanced Usage
When you need to create branches from specific points in your project’s history or handle special scenarios, git switch provides advanced functionality to meet these needs.
Branching from a specific point
By default, when creating a branch with git switch, the new branch will initial state will be the HEAD of the branch we’re currently on.
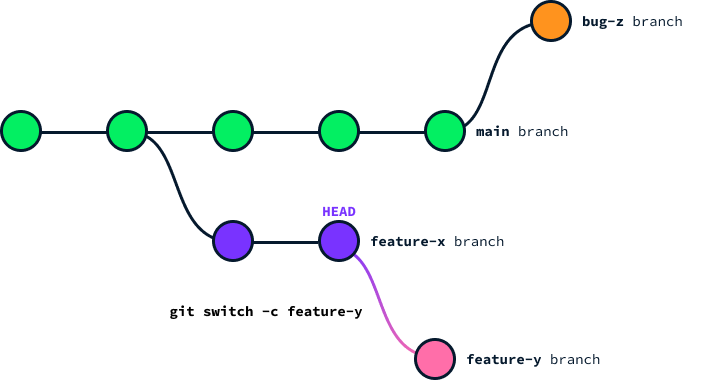
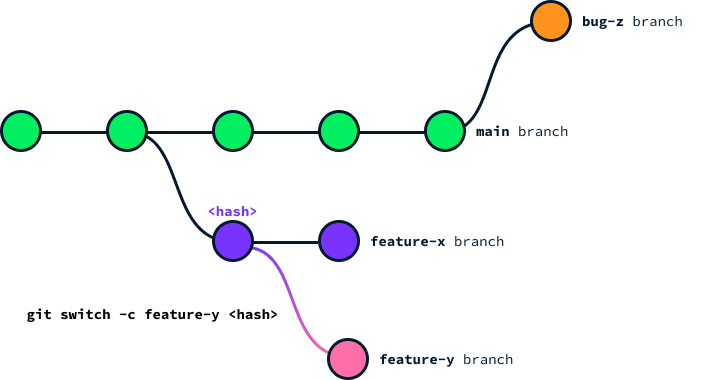
Imagine we want to start a new branch from a specific previous commit. Every commit is identified by a unique <hash>, which we can use with the git switch command to create a new branch from that commit. Here's how to do it:
switch -c feature-y <hash>Replace <hash> with the actual commit hash.
Switching to a detached head
If we want to explore or experiment with a particular commit without affecting the current branch or creating a new branch we can use a detached head with the command:
git switch --detach <hash>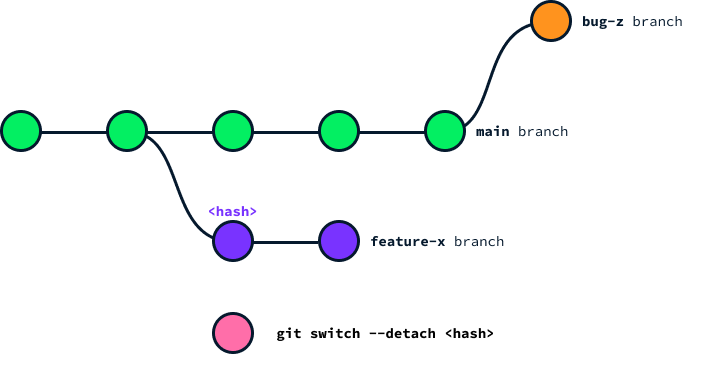
By detaching the head, we can safely inspect the state of the repository at a specific commit, run tests, or make temporary changes without the risk of those changes being accidentally committed to the current working branch. The most common use cases include:
- Viewing an old state: If we want to inspect or test an older commit without making changes to the current branch, we can switch to that commit in a detached state.
- Temporary changes: If we want to experiment with changes without affecting any branch, we can make those changes in a detached head state. Note that any new commits we make in this state will not belong to any branch, and we might need to create a new branch if we want to keep those commits.
- Build/test purposes: Sometimes, we need to build or test software at a specific commit. Switching to a detached HEAD state at that commit allows us to do so without any impact on the repository’s branch structure.
Forcing a switch
We learned that Git won’t allow us to switch branches if there are uncommitted changes that might conflict with the target branch. If we’re sure that we want to discard those changes and proceed with the switch, we can force it using the -f option, like so:
git switch -f <branch-name>There are important caveats to consider.
- Any uncommitted changes will be lost without warning, potentially resulting in lost work if those changes have not been saved elsewhere.
- Using
-findiscriminately can foster a lack of discipline, encouraging developers to bypass proper version control practices like stashing or committing WIP (work-in-progress) changes. This could lead to a chaotic repository history and complicate collaboration. Therefore, whilegit switch -foffers speed and convenience, it must be used judiciously and with a clear understanding of the risks to mitigate any potential drawbacks.
Conclusion
The git switch command makes it easier to switch and create branches compared to the older git checkout command.
It simplifies the process and helps reduce mistakes, making it easier for developers to manage their codebase.
This command helps avoid common issues, such as accidentally overwriting changes or confusing different functions of git checkout.
Adopting this command can make navigating Git branches more intuitive and enhance collaboration within development teams.
