
{count, plural, one {Course} other {Courses}}
Intermediate Deep Learning with PyTorch
{hours} hr
30.1K
Automatic speech recognition has improved significantly in recent years. Speech-to-text models that once required powerful GPUs and produced inconsistent results can now deliver accurate transcriptions on everyday computers.
At the same time, model sizes have become smaller, CPU inference has become faster, and multilingual support has expanded, giving users a better combination of transcription quality, speed, accessibility, and privacy.
Microsoft’s VibeVoice-ASR-BitNet is a good example of this progress.
Its optimized VibeASR.cpp runtime makes it possible to run multilingual speech-to-text locally on a Windows, Linux, or macOS computer without relying on a dedicated GPU or sending recordings to a cloud service.
In this guide, you will learn how to install and build VibeASR.cpp, download the quantized model, transcribe audio files from the command line, run its persistent streaming server, and use the Gradio web interface to upload or record speech.
VibeASR.cpp is Microsoft’s official C++ inference runtime for VibeVoice-ASR-BitNet, a compressed multilingual automatic speech recognition model designed for efficient local inference on CPUs.
Rather than being a separate speech model, VibeASR.cpp provides the optimized engine needed to run the model, enabling real-time transcription without a dedicated GPU or cloud-based speech service.
This makes it suitable for laptops, desktops, edge devices, and other systems with limited computing resources.
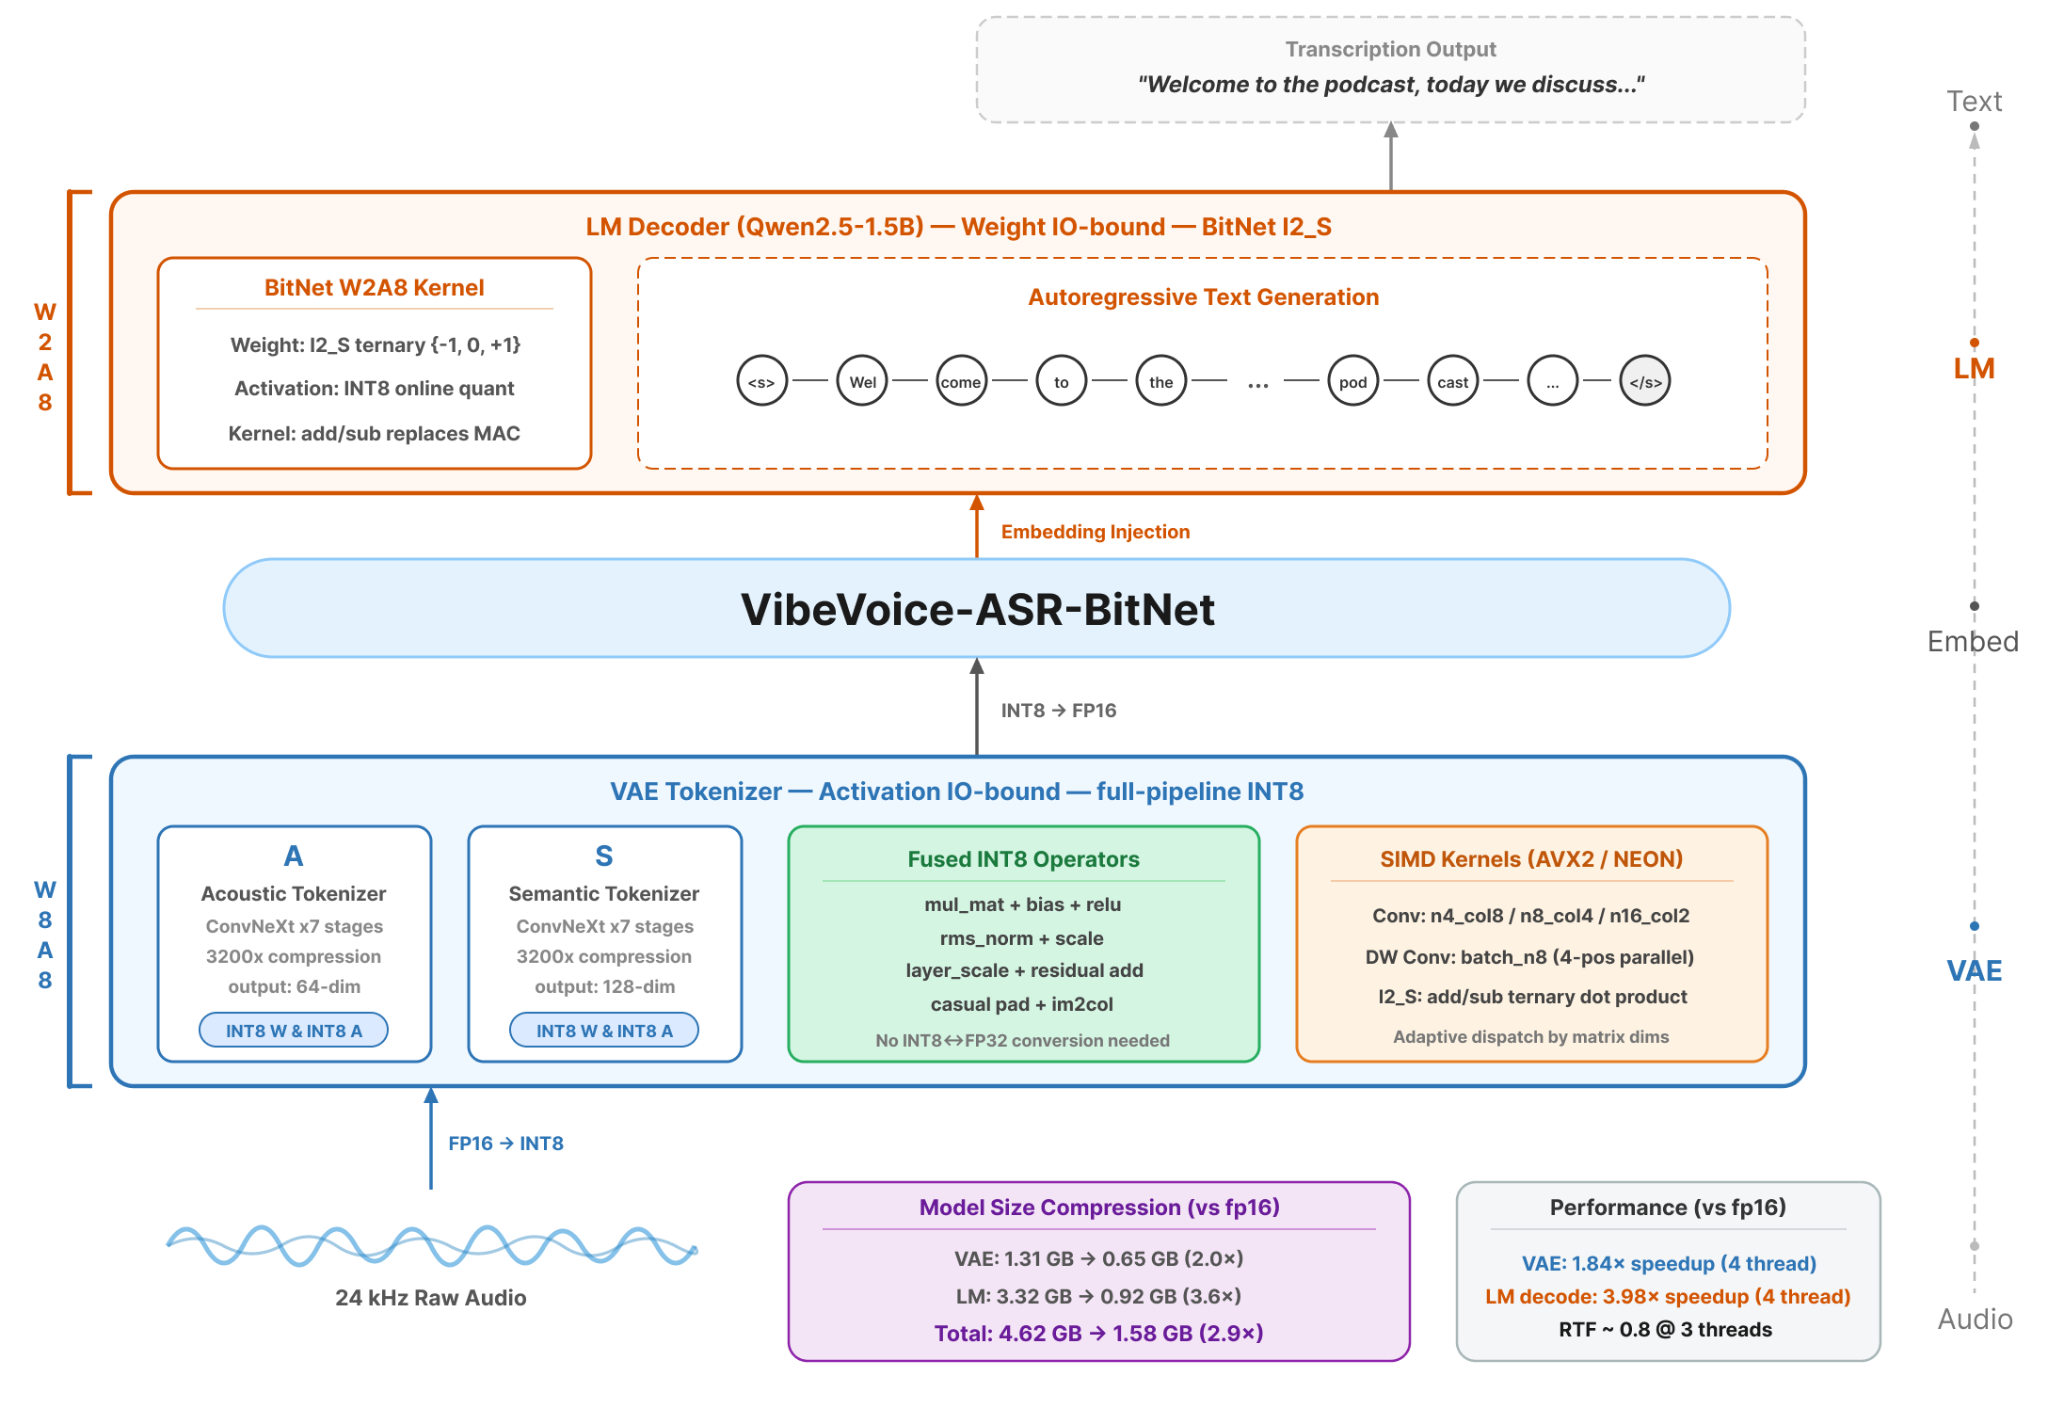
Source: microsoft/VibeVoice-ASR-BitNet
To make CPU deployment practical, Microsoft replaced the Qwen2.5-7B language-model component used by the original VibeVoice-ASR architecture with the much smaller Qwen2.5-1.5B model.
It also applies different quantization methods to the two main components:
I8_S for the VAE audio encoderI2_S for the language model, with higher-precision embeddingsThese optimizations reduce the total model size from approximately 4.62 GB to 1.58 GB, making it practical to run on laptops and desktop computers.
Despite the substantial reduction in size, the compressed model shows only a relatively small increase of around 1–4 percentage points in word error rate compared with the larger architecture.
VibeASR.cpp uses the ggml framework, custom CPU instructions, and operator fusion to improve inference speed.
According to Microsoft’s benchmarks, it can run 1.6–2.3 times faster than Whisper.cpp at comparable model sizes and can achieve faster-than-real-time transcription on supported CPUs when enough threads are used.
In Microsoft’s CPU benchmarks, the model reached an RTF of 0.63 with four threads and 0.42 with eight threads, equal to roughly 1.59× and 2.38× real-time speed.
Its reported WER includes 8.25% on MLC English, 21.36% on AMI headset audio, 25.87% on AMI distant-microphone audio, and 2.41% on LibriSpeech clean, showing a strong balance between transcription accuracy, model size, and CPU performance.
VibeASR.cpp runs entirely on the CPU, so you do not need a dedicated GPU. You only need a supported Windows, Linux, or macOS computer, Python 3.9 or newer, Git, a C++ compiler, and approximately 4 GB of free disk space for the source code, build files, and model.
The build process also requires CMake and Ninja.
On Windows, the easiest option is to use w64devkit, which provides the compiler and build tools in a preconfigured terminal.
On Linux, the required packages can be installed directly through the system package manager.
Download the latest x64 .exe file from the w64devkit releases page.
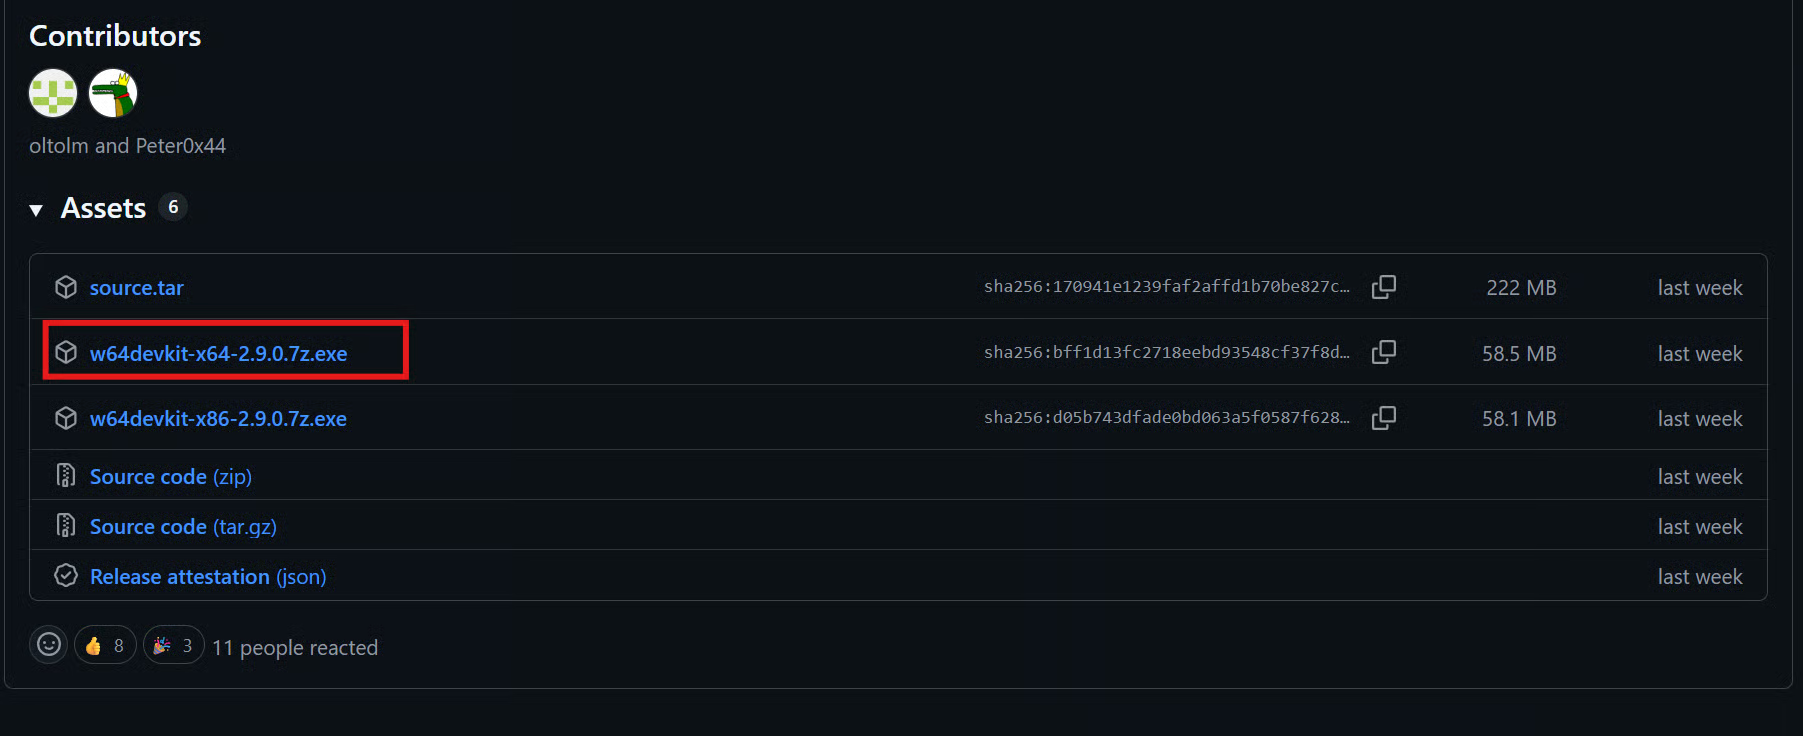
The downloaded file is a self-extracting archive. Run it and extract the folder somewhere simple, such as:
C:\w64devkitThen open:
C:\w64devkit\w64devkit.exeThis launches a ready-to-use terminal containing GCC, CMake, Make, and Ninja. You can use this terminal for the remaining Windows steps without manually configuring environment variables.
On Ubuntu, Debian, and related Linux distributions, the required compiler and build tools can be installed with a single command:
sudo apt update
sudo apt install build-essential cmake ninja-build git python3 python3-venv
This installs the GCC compiler, CMake, Ninja, Git, Python, and the package required to create a Python virtual environment.
On macOS, install Apple’s command-line development tools:
xcode-select --installYou will also need Git, Python 3.9 or newer, CMake, and Ninja. The easiest way to install the remaining tools is through Homebrew:
brew install git python cmake ninjaThe following setup process is the same for Windows, Linux, and macOS.
The only operating-system-specific step is the command used to activate the Python virtual environment.
Open your terminal, move to the folder where you want to store the project, and clone the VibeASR.cpp repository:
git clone --recursive https://github.com/microsoft/VibeASR.cpp.git
cd VibeASR.cpp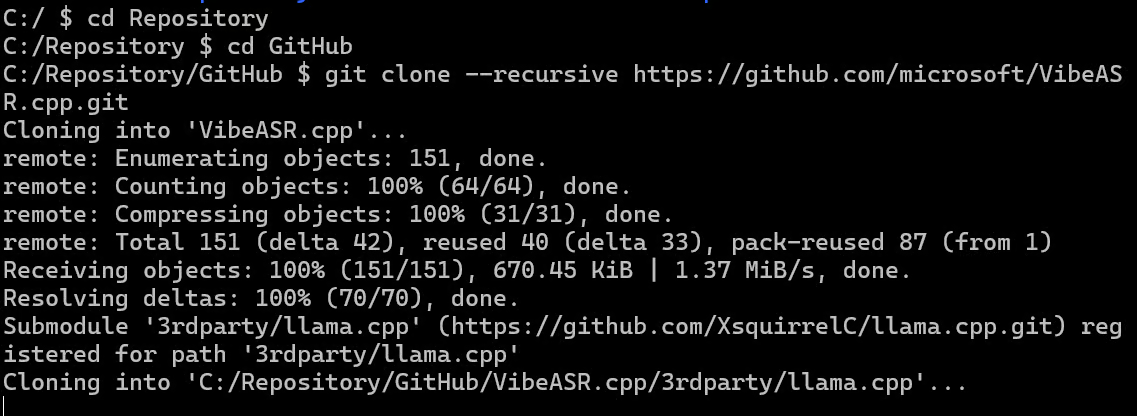
The --recursive option also downloads the required llama.cpp submodule. Without it, some of the files needed to build the inference runtime would be missing.
Create a Python virtual environment inside the project folder.
python -m venv .venvActivate it using the command for your operating system.
Windows using the w64devkit terminal:
. .venv/Scripts/activateLinux and macOS:
source .venv/bin/activateAfter activation, the terminal should display (.venv) before the command prompt. Confirm that Python is available:
python --versionUpgrade pip and install the project dependencies:
python -m pip install --upgrade pip

pip install -r requirements.txt
These dependencies include the Python packages used by the setup script, model-download process, and local Gradio web interface.
VibeASR.cpp includes a setup script that handles both the C++ build process and model download.
It compiles the command-line and streaming executables, installs the required GGUF package, and downloads the pre-quantized model files into the project directory.
Make sure the Python virtual environment is active before running the setup script.
On Linux and macOS, run:
python setup_env.pyOn Windows, run the following command inside the w64devkit terminal:
CMAKE_GENERATOR=Ninja python setup_env.pySetting CMAKE_GENERATOR=Ninja ensures that CMake uses the Ninja build system instead of attempting to use Microsoft Visual C++, which is not available inside the w64devkit environment.
The setup script will:
gguf Python package.models/vibeasr.After the process completes, the main inference executable will be available at the following location.
On Windows:
build/bin/asr_infer.exeOn Linux and macOS:
build/bin/asr_inferVerify that the executable was built successfully by displaying its available command-line options.
On Windows:
./build/bin/asr_infer.exe --helpOn Linux and macOS:
./build/bin/asr_infer --help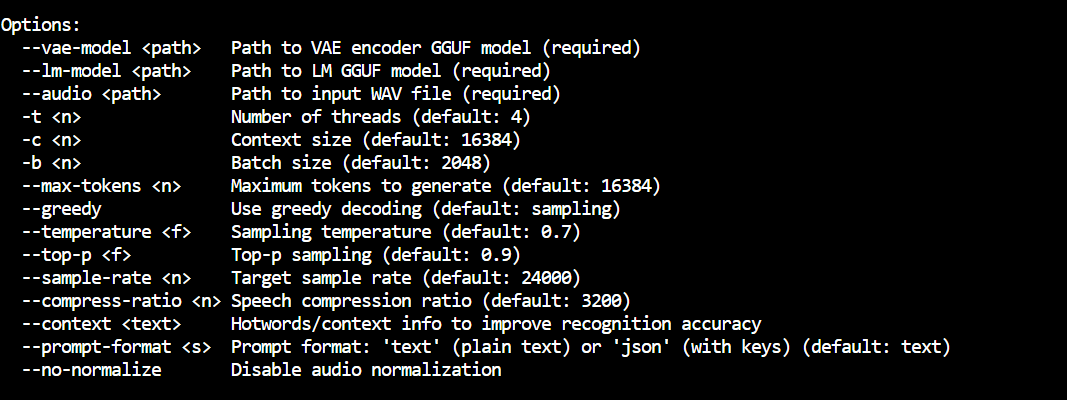
Now that the runtime and model are ready, you can test two transcription methods.
The standard inference executable processes one audio file and returns the completed transcript, while the streaming server keeps the model loaded and displays the transcription progressively as tokens are generated.
First, download a short sample recording from inside the VibeASR.cpp project folder:
curl -L "https://homepages.inf.ed.ac.uk/htang2/notes/speech-samples/103-1240-0000.wav" -o recording.wavThe audio file will be saved as recording.wav in the current project directory.
The standard inference command loads the audio encoder and language model, processes the recording, and prints the completed transcription.
On Windows, run:
./build/bin/asr_infer.exe \
  --vae-model models/vibeasr/vibeasr-vae-encoder-i8_s.gguf \
  --lm-model models/vibeasr/vibeasr-lm-i2_s-embed-q6_k.gguf \
  --audio recording.wav \
  -t 6 \
  --greedy
On Linux and macOS, use the same command without the .exe extension:
./build/bin/asr_infer \
  --vae-model models/vibeasr/vibeasr-vae-encoder-i8_s.gguf \
  --lm-model models/vibeasr/vibeasr-lm-i2_s-embed-q6_k.gguf \
  --audio recording.wav \
  -t 6 \
  --greedy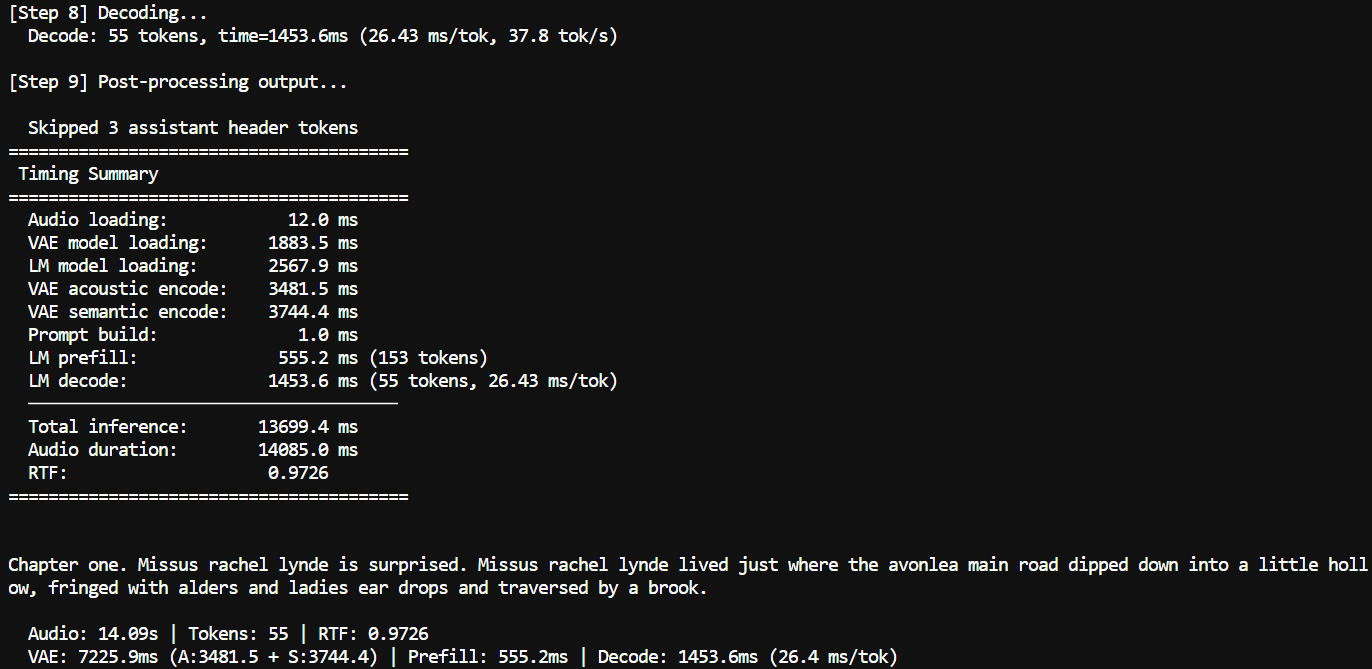
The -t 6 option assigns six CPU threads to inference. You can increase or decrease this number depending on your processor.
The --greedy option selects the most likely token at each decoding step, producing consistent transcription results.
On my computer, the 14.085-second recording took approximately 13.7 seconds to process:
RTF: 0.9726
Speed: approximately 1.03× real time
The real-time factor, or RTF, compares processing time with the duration of the audio.
An RTF below 1.0 means the recording was transcribed faster than its actual playback length. Performance will vary depending on the processor, operating system, thread count, and recording length.
VibeASR.cpp also includes a persistent streaming server. It loads the two model files once and remains active, allowing you to submit multiple recordings without restarting and reloading the model each time.
The output works similarly to streaming from a large language model.
Instead of waiting for the entire transcription to finish, you begin seeing text as the decoder generates each token.
Some tokens may represent complete words, while others may represent parts of words or punctuation, but they are displayed progressively until the transcript is complete.
On Windows, start the server with:
./build/bin/asr_stream_server.exe \
  --vae-model models/vibeasr/vibeasr-vae-encoder-i8_s.gguf \
  --lm-model models/vibeasr/vibeasr-lm-i2_s-embed-q6_k.gguf \
  -t 6 \
  --greedy
On Linux and macOS, run:
./build/bin/asr_stream_server \
  --vae-model models/vibeasr/vibeasr-vae-encoder-i8_s.gguf \
  --lm-model models/vibeasr/vibeasr-lm-i2_s-embed-q6_k.gguf \
  -t 6 \
  --greedy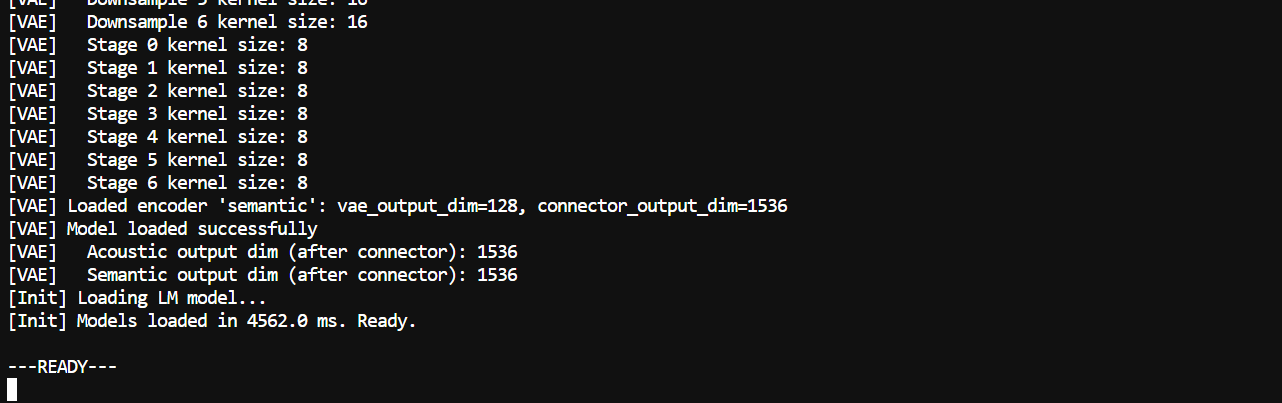
Wait until the server finishes loading the models and displays:
---READY---Enter the path to the audio file and press Enter:
recording.wavThe transcription will begin appearing token by token. When the recording has been fully processed, the server displays:
---END---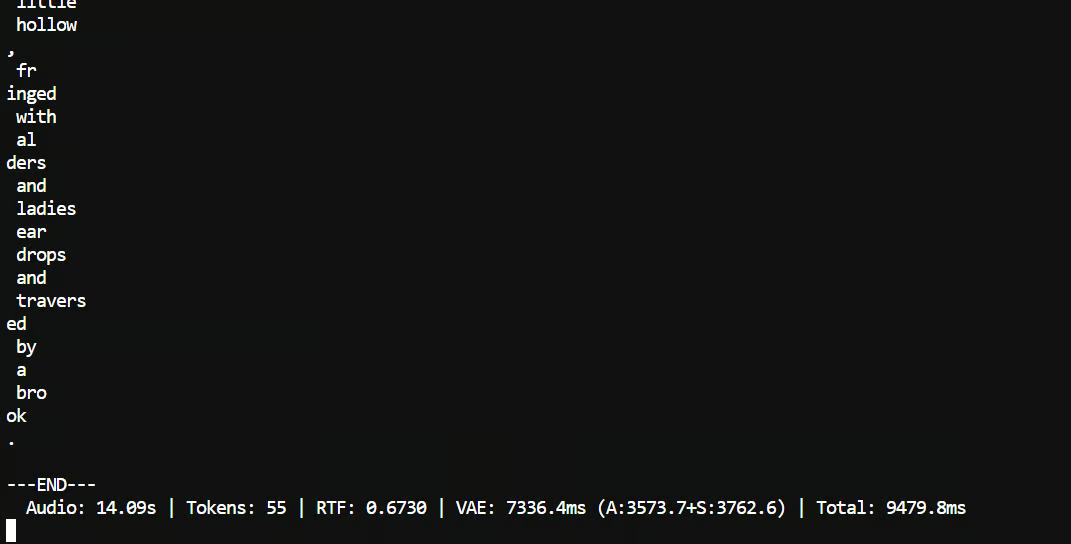
You can then enter another audio file path without reloading the models. To stop the server, type:
exitThis persistent workflow is especially useful when transcribing multiple recordings or connecting VibeASR.cpp to another application that needs progressive transcription output.
VibeASR.cpp includes a local Gradio web interface for uploading audio files or recording speech with your microphone. The process is the same on Windows, Linux, and macOS, although Windows uses executable files ending in .exe.
The dependencies needed for the interface, including Gradio, SoundFile, and NumPy, were already installed through requirements.txt.
First, make sure the virtual environment is active.
Windows using the w64devkit terminal:
. .venv/Scripts/activateLinux and macOS:
source .venv/bin/activateOn Windows, launch the interface with:
python demo/gradio_asr_demo.py \
  --port 7860 \
  --bin build/bin/asr_infer.exe \
  --server-bin build/bin/asr_stream_server.exe
On Linux and macOS, the default executable paths are detected automatically:
python demo/gradio_asr_demo.py --port 7860The model paths are already configured inside the Gradio script for all operating systems, so you do not need to include them in the command.
The script also supports separate paths for the standard inference executable and streaming server.
Open the following address in your browser:
http://127.0.0.1:7860The interface lets you:
Here, Online mode does not mean that your audio is sent to an online service.
It processes longer recordings progressively in chunks and uses asr_stream_server when available.
Offline mode processes the complete audio file before displaying the result.
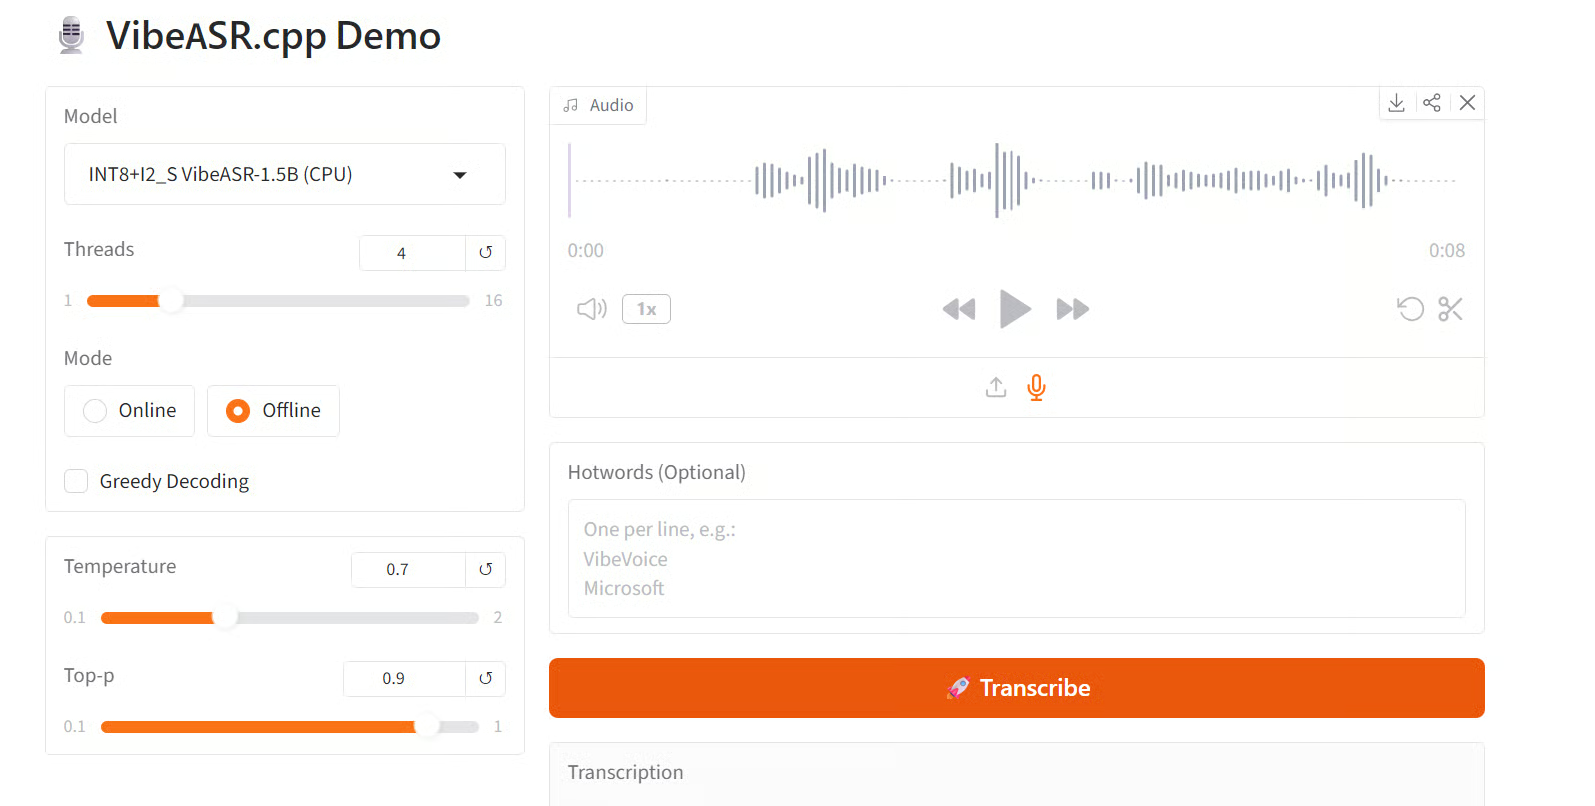
For the first test, I recorded a short sentence directly through the microphone and selected Offline mode with four CPU threads.
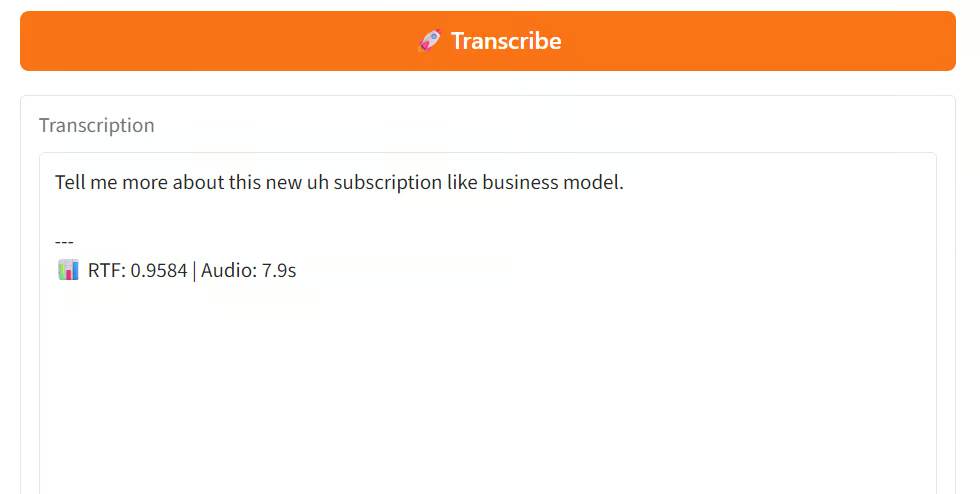
An RTF of 0.9584 means the model required about 0.96 seconds to process each second of audio.
This is approximately 1.04× real time, so the transcription completed slightly faster than the recording’s actual duration.
I also tested the interface with a longer recording containing about 109.7 seconds of speech. The model successfully produced the complete transcription and reported:
RTF: 0.5305
Audio: 109.7s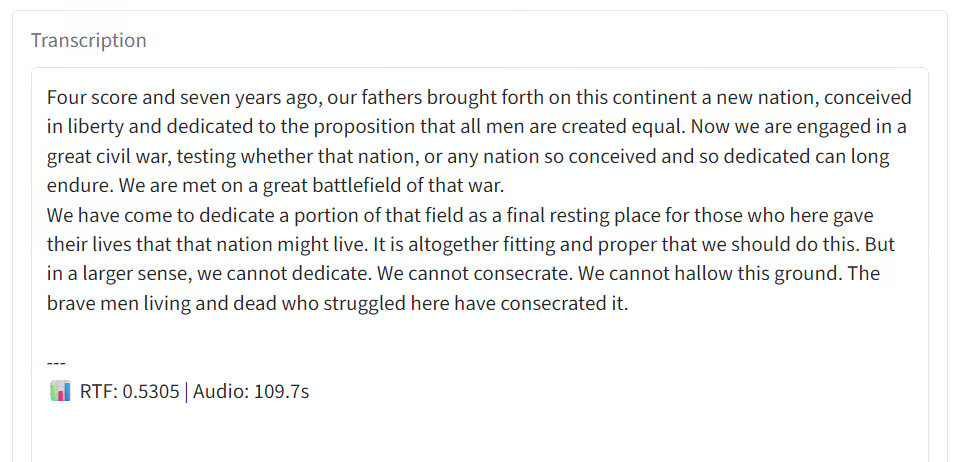
This means the model required approximately 0.53 seconds to process each second of audio. The full recording took around 58 seconds to transcribe, giving a speed of approximately 1.88× real time.
I was impressed by how practical local speech recognition has become.
Even on an older CPU, VibeASR.cpp can transcribe audio close to or faster than real time without requiring a GPU, large amounts of memory, or much storage.
The compiled executable can also be integrated into a Python application, wrapped in a FastAPI endpoint, or used as the transcription engine for a larger local tool.
The main setting to consider is the number of CPU threads assigned to the process.
You also need to choose between online mode, which streams the transcript progressively, and offline mode, which returns the complete transcription after processing the audio.
The setup could still be easier, especially on Windows, Linux, and macOS.
Since the project is still developing, I expect installation and prebuilt binary support to improve over time. Once a stable standalone binary is available, I can see myself using this model in many more local speech-to-text projects.
I also recommend checking out our GPT Live Transcribe API tutorial.
Top DataCamp Courses
{count, plural, one {Course} other {Courses}}
{count, plural, one {Course} other {Courses}}
{count, plural, one {Course} other {Courses}}
{count, plural, one {blog} other {blogs}}
Khalid Abdelaty
9 min
{count, plural, one {Tutorial} other {Tutorials}}
Abid Ali Awan
8 min
{count, plural, one {Tutorial} other {Tutorials}}
Abid Ali Awan
11 min
{count, plural, one {Tutorial} other {Tutorials}}
Abid Ali Awan
9 min
{count, plural, one {Tutorial} other {Tutorials}}
François Aubry
12 min
{count, plural, one {Tutorial} other {Tutorials}}
Abid Ali Awan
10 min