Course
Large Language Models (LLMs) Concepts
2 hr
99.8K
I recently found an AI platform that automatically generates flashcards from any type of media. Since I love memorizing concepts with spaced repetition, I immediately uploaded my XGBoost tutorial and asked the AI to create 50 flashcards on it.
But I was disappointed. Most of the questions were too easy, and very few of them were about code syntax. Even more strangely, 10% of the questions were identical and totally out-of-context — “What is the capital of France?”.
These types of mistakes suggest a lack of proper evaluation and validation of outputs produced by AI services. Maybe they didn’t know about LangSmith.
LangSmith is a full-fledged platform to test, debug, and evaluate LLM applications. Perhaps, its most important feature is LLM output evaluation and performance monitoring. In this tutorial, we will see the framework in action and learn techniques to apply it in your own projects.
Let’s get started!
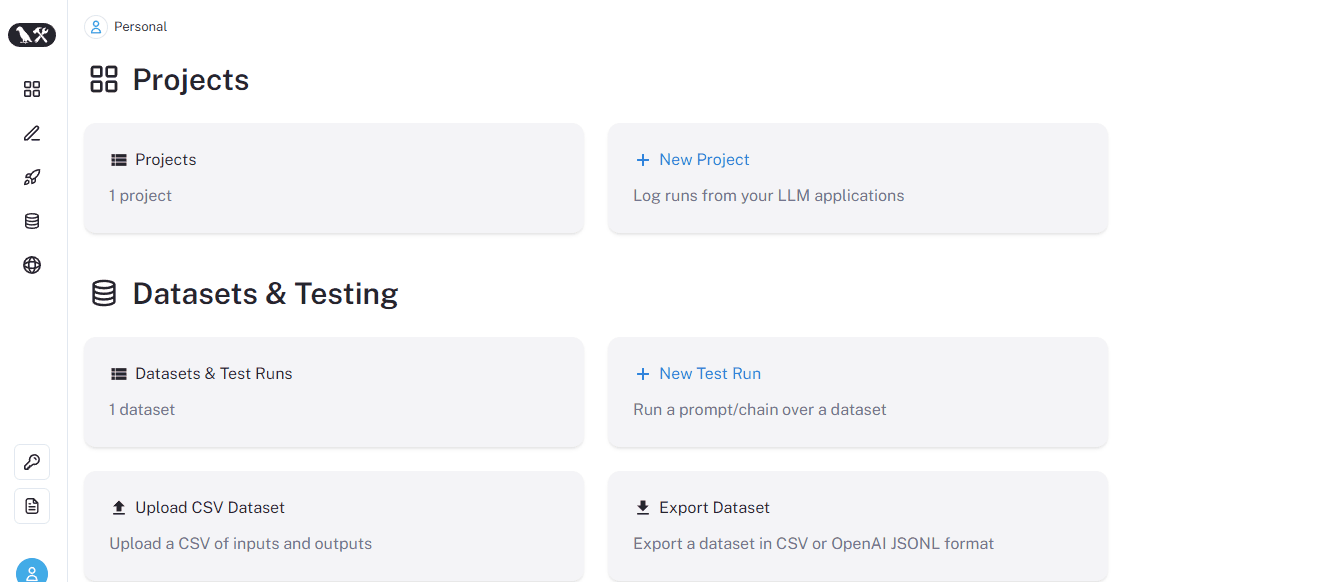
As I mentioned above, LangSmith is a comprehensive platform for evaluating large language applications. Here are some of its features and tangible real-world benefits they bring:
Programmers can start experimenting with LangSmith in minutes, not hours. This means a small team or a solo developer can prototype an AI application over a weekend and potentially ship a paid service by Monday.
With rigorous evaluation tools, companies can avoid the embarrassment and cost of faulty AI releases (like the example I gave in the introduction). LangSmith allows you to check the output of LLMs against built-in criteria such as helpfulness, coherence, misogyny, or even custom evaluations in natural language like “Is the content of the output cliche?” or, in the case of flashcards generation, “Does the card contain a coding question?”.
LangSmith uses traces to log almost every aspect of LLM runs. These include metrics such as latency, token count, price of runs, and all types of metadata. The Web UI allows you to quickly filter runs based on error percentage, latency, date, or even by text content using natural language. This means that if, for instance, an AI tutor starts glitching in its responses to actual students, you can push out a fix in a few hours.
LangChain is the parent framework of LangSmith focused specifically on the development phase of LLMs. It offers modular software design to chain multiple LLMs (agents) and integrate them with other APIs such as YouTube, Google Search and so on. LangSmith is the cherry on top, ensuring that prototypes built with LangChain perform as expected by using its powerful evaluation and monitoring tools.
Check out our LLM Applications with LangChain tutorial to learn more about LangChain.
Another great feature of LangSmith is datasets. They can be used to improve LangChain chains, agents or models against a set of standardized examples before deployment. For example, we may have a CSV file containing two columns — questions and answers for flashcards in a specific format.
By converting this file into a reference dataset, we can instruct LLMs to evaluate their own output using the quality assurance metrics mentioned earlier.
We will now see all these features through examples one-by-one.
In ML app development, you collect data, train, fine-tune, test, and deploy models - the steps are well-defined. With LLM apps, though, you often start with a ready-made model from a vendor. Fine-tuning? That can be expensive. So, you’ll focus a lot on crafting the right prompts — it’s all about asking your LLM app the right questions. Think of it as needing lots of prompts to test things out, just like you need lots of data for a good ML model.
However, with prompts, you’re dealing with texts coming in and out, not numbers. So, the usual ways to measure errors or accuracy, like MSE or cross-entropy, don’t work here. Plus, imagine reading every input and output for evaluation— that would take days if you have thousands of prompts to evaluate.
So, you need a workflow that’s all about efficiently creating and testing these prompts to see how well your LLM app is doing, without drowning in manual checks. Here is what that might look like:
In this stage, you will prototype the bedrock of your application using frameworks like LangChain. For a flashcard generator project, your prototype might include multiple components on top of your chosen LLM from a vendor. For example, you may need to chain it to:
and so on (see what kind of components you can add from this page of LangChain docs). But you may cut your development time drastically by using off-the-shelf chains offered by LangChain for common high-level tasks.
In this stage, you will test your application against as many scenarios as you can. This means you have to ensure every added component works well, chain together well, and produce consistent, high-quality outputs.
Given LLMs are non-deterministic (they don’t generate the same output for the same input) and the complexity of added components, you will spend most of your time in this stage. And LangSmith was developed with the sole purpose of making that time as short as possible. We will discuss this more throughout the tutorial.
Once you have a viable application, you can deploy it as a REST API. A REST API basically converts your existing LangChain chains or agents into HTTPS links others can send requests to interact with your AI model. Now, you will build the user interface of your service like a desktop application or, more commonly, a website.
Right now, there is no easy way to do this, but LangChain developers are about to release LangServe, which will be integrated into FastAPI (how awesome would that be?). Check out the sneak peak from this page of the documentation.
Now, let’s finally start tinkering with LangSmith.
We will begin with understanding the web UI. It is available through smith.langchain.com link. For access, you have to sign up and get cleared from the waitlist, as it is currently in closed beta.
But once you are in, the landing page will look like this:
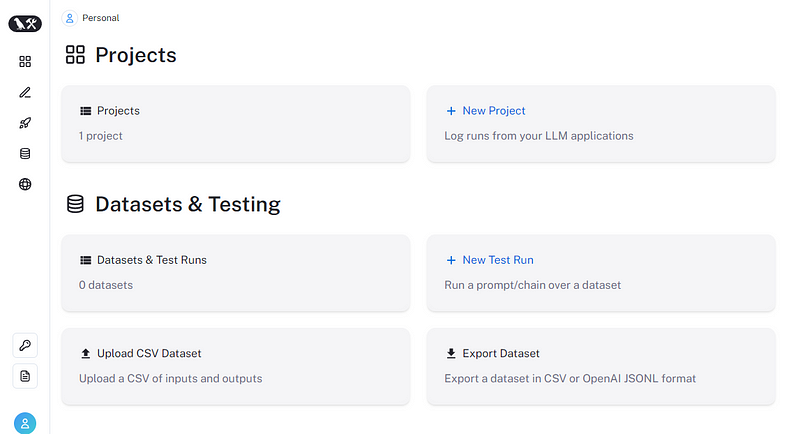
The two main sections are projects and datasets & testing, and both sections can be manipulated through Python SDK. The platform also has tabs for deployment and annotation queues, but they are beyond the scope of this article.
Managing projects in LangSmith is far easier with its Python SDK, which is connected to the platform through an API key.
To get a key, click on the key icon in the platform and save it somewhere safe. Then, in a new directory with a new virtual environment initialized, create a .env file. Inside, paste the following two lines:
LANGCHAIN_API_KEY="LangSmith-API-key"
OPENAI_API_KEY="Your-OPENAI-key"
Next, in your terminal, run the following commands to install LangSmith and python-dotenv to read environment variables:
python-dotenv to read environment variables:
pip install -U langsmith
pip install python-dotenv
Now, time to write code:
import warnings

from dotenv import find_dotenv, load_dotenv

warnings.filterwarnings("ignore")
We import find_dotenv and load_dotenv functions to read environment variables and set them up with os:
import os

load_dotenv(find_dotenv())
os.environ["LANGCHAIN_API_KEY"] = str(os.getenv("LANGCHAIN_API_KEY"))
os.environ["LANGCHAIN_TRACING_V2"] = "true"
os.environ["LANGCHAIN_ENDPOINT"] = "https://api.smith.langchain.com"
Setting LANGCHAIN_TRACING_V2 to True enables tracing (logging), which is essential to debugging LLMs. Afterwards, we initialize a client to talk to the LangSmith platform:
from langsmith import Client

# Initialize a client
client = Client()
client contains high-level commands to manipulate projects and assets in LangSmith. The first command of the client we will use is creating a new project:
import uuid

# Create id
uid = uuid.uuid4()
# Create a unique name
PROJECT_NAME = "flashcards-generator-" + str(uid)
# Create the project
session = client.create_project(
   project_name=PROJECT_NAME,
   description="A project that generates flashcards from user input",
)
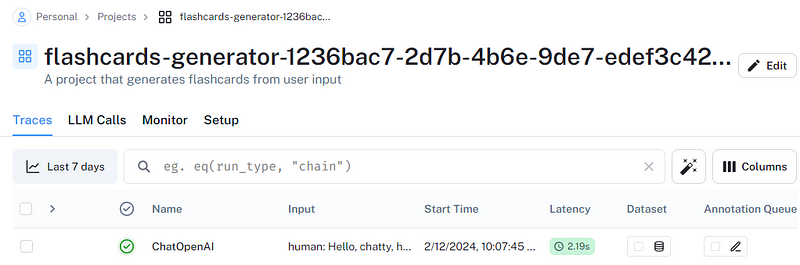
After create_project successfully runs, you can see the project listed in the Projects section of the web UI:
Next, we need to set the new project as default with another environment variable:
os.environ["LANGCHAIN_PROJECT"] = PROJECT_NAME
Now, we need an LLM for our project. We will go with GPT-3.5 turbo since it is cheaper, but you can use many other models available through langchain. OpenAI models are initialized through the ChatOpenAI class.
from langchain.chat_models import ChatOpenAI

llm = ChatOpenAI()  # Uses gpt-3.5-turbo by default
Let’s do our first run:
llm.invoke("Hello, chatty, how you doin' today?")

AIMessage(content="Hello! I'm an AI language model, so I don't have feelings, but I'm here to help you. How can I assist you today?")
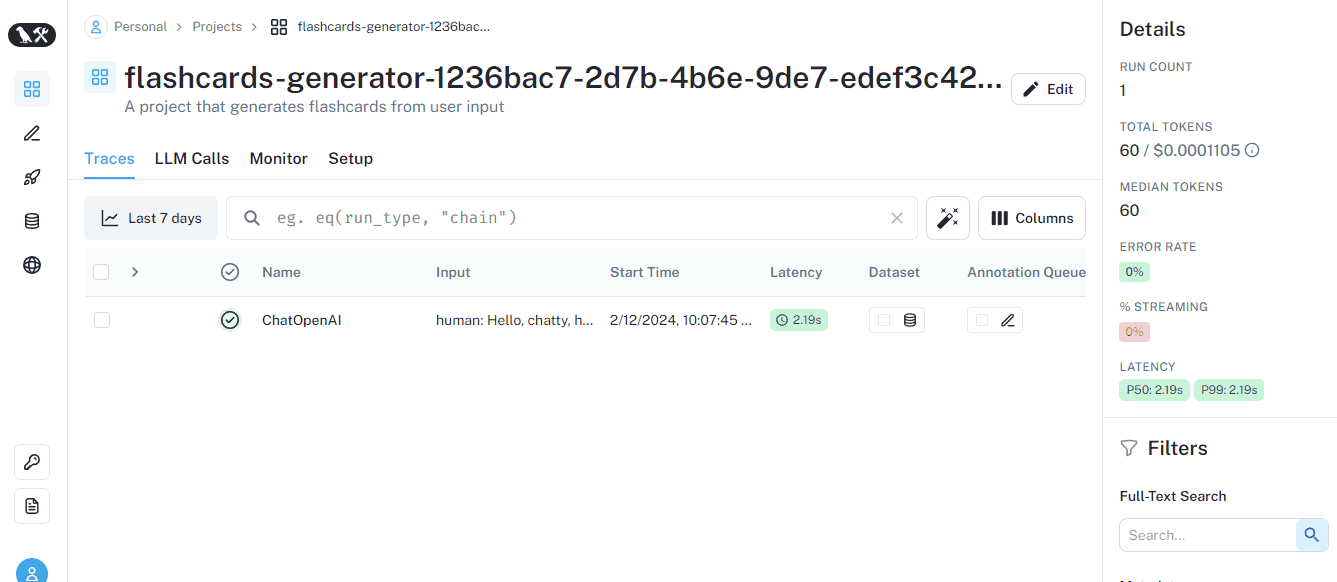
If you quickly check the project from the UI, you will see the above run traced (logged):
When we set up the environment variables and the client, we automatically enabled logging. As you can see, we already have a bunch of metadata about the run.
Let’s run a couple more prompts:
message = llm.invoke("Do you know how to generate flashcards?")

message.content[:50]

'Yes, I can help you generate flashcards. There are'
We can already build a basic text summarizer. Let’s summarize the output of the last run:
prompt = f"Summarize this text: {message.content}"

summary = llm.invoke(prompt)
summary.content

'The text explains different methods for creating flashcards. These methods include writing on small index cards, using online flashcard generators, utilizing flashcard apps on mobile devices, and using word processing software like Microsoft Word or Google Docs. It emphasizes the importance of consistency in format and organization for effective studying.'
Great, now it is time to create our first dataset.
As I mentioned in the “LLM application development workflow” section, you will likely need to create or collect thousands of prompts to evaluate your LLM model, chain, or agent. So, running those one-by-one as we did above isn’t best practice.
For this reason, LangSmith offers datasets in three types:
kv) - default: Defines inputs as arbitrary key-value pairs. They are useful when evaluating chains and agents that require multiple inputs or return multiple outputs.llm): Inputs and outputs are defined in "completion style" by LLMs - string in, string out.chat): These are datasets converted from LLM chats and defined using structured inputs and serialized messages.First, let’s see how to create a key-value dataset with no outputs. We will use the create_dataset function of the client:
create_dataset function of the client:
dataset_name = "deep_learning_fundamentals"

# Creating a blank dataset
dl_dataset = client.create_dataset(
   dataset_name=dataset_name,
   description="A deck containing flashcards on NNs and PyTorch",
   data_type="kv",  # default
)
Now, let’s add three inputs that each ask the LLM to create a single flashcard:
# Storing only inputs into a dataset
example_inputs = [
   "Generate a single flashcard on backpropagation",
   "Generate a single flashcard on the use of torch.no_grad",
   "Generate a single flashcard on how Adam optimizer",
]

for ex in example_inputs:
   # Each example input must be unique
   # The output is optional
   client.create_example(
       inputs={"input": ex},
       outputs=None,
       dataset_id=dl_dataset.id,
   )
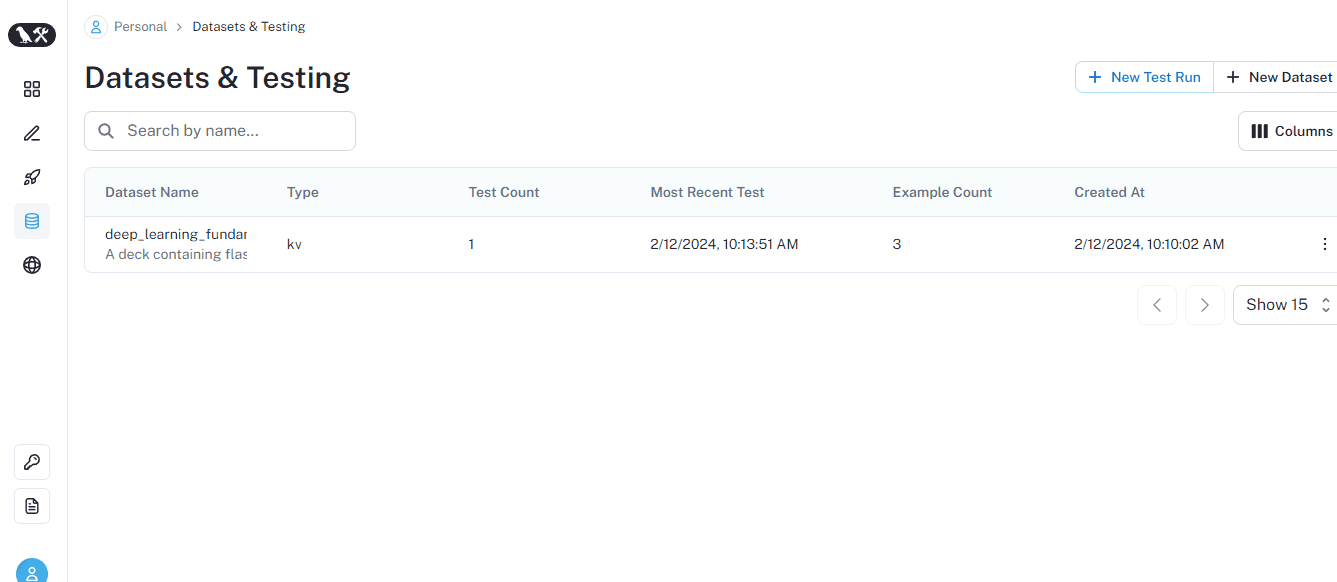
If you go over the dataset tab of the UI, you will see each prompt listed with NULL output:
Now, let’s run all the prompts in a single line of code using run_on_dataset function:
from langchain.smith import run_on_dataset

results = run_on_dataset(
   client=client,
   dataset_name=dataset_name,
   llm_or_chain_factory=llm,
   project_name="unlabeled_test",
)
Once the run finishes, it will be listed on the dataset page. Here is what it looks like:
We just did a test run on an unlabeled dataset — a dataset with example prompts but no example outputs. Our test simply produced a response to each prompt but didn’t evaluate anything. But we’d like to perform basic checks such as “Is the output helpful?” or “Is the response short or long”?
LangSmith allows us to perform such checks using built-in evaluators.
To run a conciseness and coherence evaluations using the three prompts we have in our dataset, we can use the RunEvalConfig class:
from langchain.smith import RunEvalConfig

# List the eval criteria
eval_config = RunEvalConfig(
   evaluators=[
       RunEvalConfig.Criteria("conciseness"),
       RunEvalConfig.Criteria("coherence"),
   ]
)
Above, we are defining two criteria in a list called evaluators. We pass these evaluators to the evaluation parameter of run_on_dataset function:
results = run_on_dataset(
   client=client,
   dataset_name=dataset_name,
   llm_or_chain_factory=llm,
   evaluation=eval_config,
   project_name="criteria_test",
)
run_on_dataset is a helpful function to run all prompts in a dataset using the provided LLM and perform any type of evaluation on the fly. Its results will be visible on the dedicated page of each dataset:
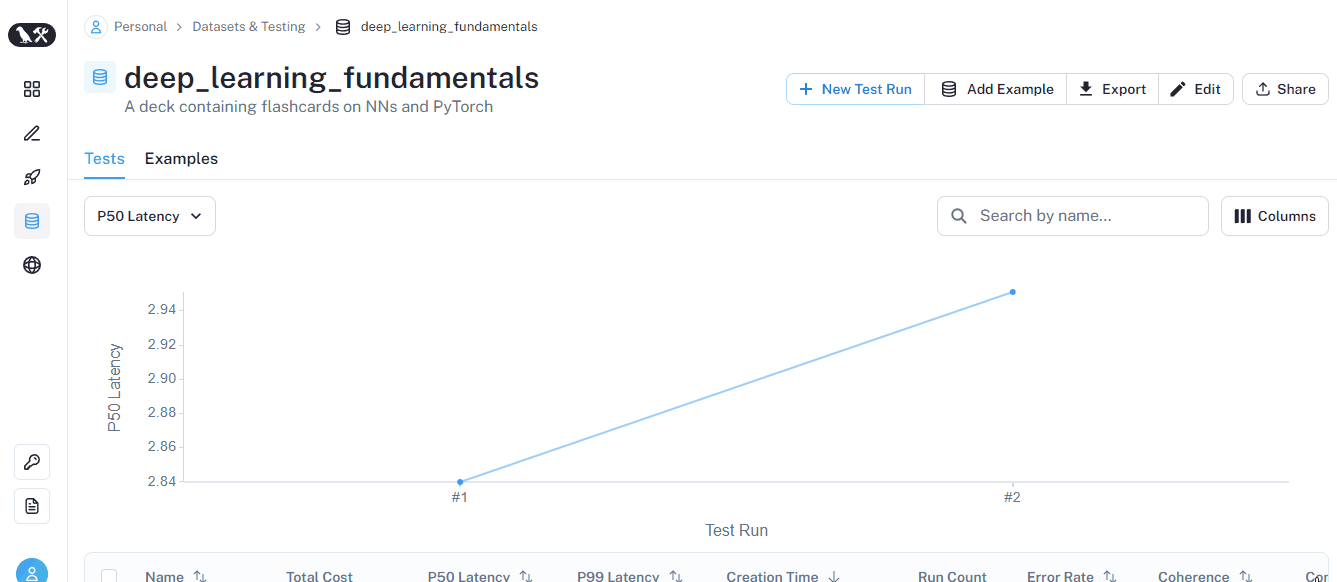
This time, the run has coherence and conciseness metrics for each prompt. At the bottom, you will also see an average score for each metric.
To see the list of all built-in criterion, run the below snippet:
from langchain.evaluation import Criteria

list(Criteria)

[<Criteria.CONCISENESS: 'conciseness'>,
<Criteria.RELEVANCE: 'relevance'>,
<Criteria.CORRECTNESS: 'correctness'>,
<Criteria.COHERENCE: 'coherence'>,
<Criteria.HARMFULNESS: 'harmfulness'>,
<Criteria.MALICIOUSNESS: 'maliciousness'>,
<Criteria.HELPFULNESS: 'helpfulness'>,
<Criteria.CONTROVERSIALITY: 'controversiality'>,
<Criteria.MISOGYNY: 'misogyny'>,
<Criteria.CRIMINALITY: 'criminality'>,
<Criteria.INSENSITIVITY: 'insensitivity'>,
<Criteria.DEPTH: 'depth'>,
<Criteria.CREATIVITY: 'creativity'>,
<Criteria.DETAIL: 'detail'>]
Of course, not all LLM use cases can be checked with basic evaluators. For example, there is no evaluator to check whether a flashcard contains a coding question or not. So, we better define it:
eval_config = RunEvalConfig(
   evaluators=[
       RunEvalConfig.Criteria(
           {"has_code": "Does the card contain a code syntax question?"}
       ),
       RunEvalConfig.Criteria(
           {
               "is_vague": "Is the front of the flashcard vague, meaning it hasn't enough context to answer?"
           }
       ),
   ]
)
To pass a custom criteria with natural language, we simply pass {“criteria_name”: “Condition to check”} to the Criteria class. Above, we are creating two extra evaluators, so LangSmith will run two additional prompts on top of the output produced by the prompts in our dataset:
# Run the evaluation
results = run_on_dataset(
   client,
   dataset_name,
   llm,
   evaluation=eval_config,
   project_name="custom_criteria_test",
)
If you check out the run, you will see the custom criteria we’ve defined under each prompt. If you hover over, you will get the reasoning of the LLM after:
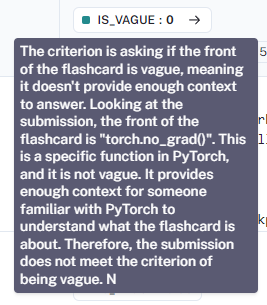
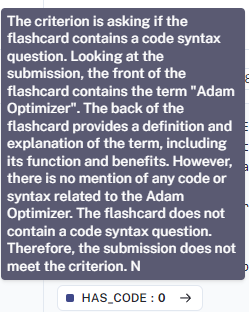
By checking the evaluation results for all prompts, you will see that our criteria aren’t evaluating as expected. So, here is something to consider — you also need to prompt-engineer your criteria to ensure they check the right things.
Sometimes, you may decide to create a dataset of prompts with expected outputs, e.g., labeled datasets. You can create labeled datasets in various formats, but perhaps the most common one is a CSV file. For example, here is a file I generated with ChatGPT that contains five questions on PyTorch syntax:
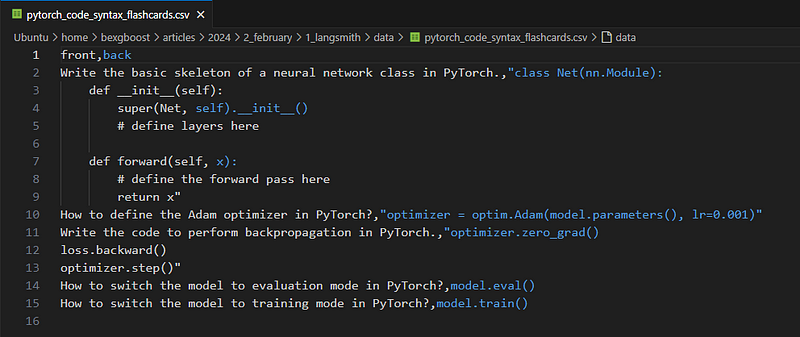
To create a dataset from this, we can use the upload_csv function:
dataset_name = "PyTorch code syntax"

csv_path = "data/pytorch_code_syntax_flashcards.csv"
input_keys = ["front"]
output_keys = ["back"]

csv_dataset = client.upload_csv(
   csv_file=csv_path,
   input_keys=input_keys,
   output_keys=output_keys,
   name=dataset_name,
   data_type="kv",
)
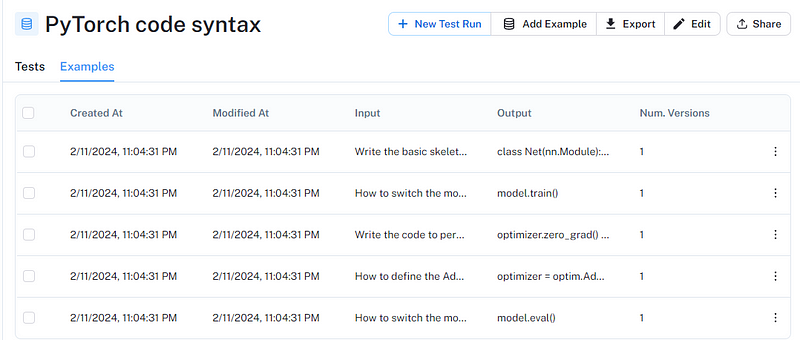
The function has three required parameters: CSV path and the names of input/output columns. Once the upload finishes, the dataset will appear in the UI:
Let’s run our custom criterion from the previous section on this dataset as well:
eval_config = RunEvalConfig(
   evaluators=[
       RunEvalConfig.Criteria(
           {"has_code": "Does the card contain a code syntax question?"}
       ),
       RunEvalConfig.Criteria(
           {
               "is_vague": "Is the front of the flashcard vague, meaning it hasn't enough context to answer?"
           }
       ),
   ]
)

# Run the evaluation
results = run_on_dataset(
   client,
   dataset_name,
   llm,
   evaluation=eval_config,
   project_name="custom_criteria_test_csv",
)
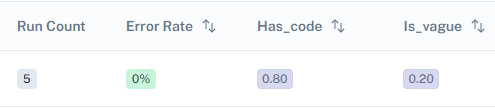
If you go to the dataset page and check out the run, we can see the average scores for each custom criteria:
Built-in and custom evaluators written in natural language are mostly for unlabeled datasets. For labeled datasets like the CSV dataset we uploaded, LangSmith offers more comprehensive evaluators for measuring the correctness of the response to a prompt:
context_qa (contextual Q&A): Uses the sample output as context while evaluating correctnessqa (Q&A): Instructs LLM to directly grade a response as "correct" or "incorrect" using the reference outputcot_qa (Chain-of-thought Q&A): Similar to context_qa but this evaluator forces the LLM to use chain-of-thought reasoning before reaching a verdict.Let’s try the last one on our examples:
eval_config = RunEvalConfig(evaluators=[RunEvalConfig.CoTQA()])

results = run_on_dataset(
   client,
   dataset_name,
   llm,
   evaluation=eval_config,
   project_name="cotqa_test",
)
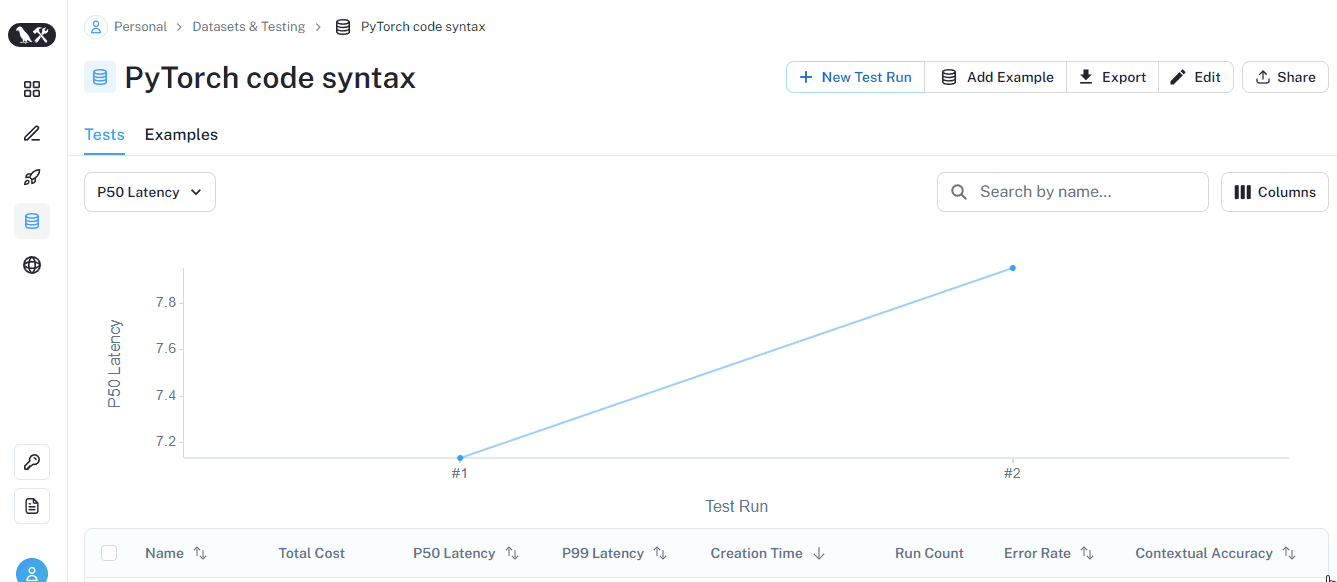
CoTQA criterion returns a score called Contextual accuracy, as depicted in the GIF below (also in the UI):
Please visit the LangChain evaluators section of LangSmith docs to learn much more about evaluators.
If you’ve got the impression after reading this tutorial that LangSmith is really just a complex tool for prompt engineering, you’d be correct! Right now, LangSmith is the best framework for ensuring the instructions and outputs of LLMs are actually what you want.
You must have also realized the effort it takes to build production-grade LLM applications. So, use LangSmith for a smoother experience while working on LLM projects.
If some of the concepts in LangSmith didn’t make sense, you may be lacking some fundamentals in LangChain. Here are some resources on it:
Start Your Langchain Journey Today
Course
Course
Course
blog
Javier Canales Luna
12 min
blog
Abid Ali Awan
8 min
Tutorial
Stanislav Karzhev
Tutorial
Moez Ali
Tutorial
Josep Ferrer
Tutorial
Zoumana Keita