In today's apps, users want immediate feedback, especially when tasks take a long time to complete. Python progress bars are a clear and easy way to show that something is happening in the background. A strong progress bar helps a program feel quicker, adds a professional touch, and improves user-friendliness.
In this article, you'll learn how to implement Python progress bars using popular libraries like tqdm, progress, progressbar2, alive-progress, and Tkinter, along with best practices to enhance user experience and application performance.
To learn more about Python concepts in a hands-on way, check out our Python Programming Fundamentals skill track.
TL;DR
-
For command-line tools, tqdm is the go-to choice — it's lightweight and works well with pandas. Use progress for simple scripts, progressbar2 when you need custom layouts, or alive-progress for animated visuals.
-
For desktop apps, Tkinter's built-in ttk.Progressbar handles both known-duration tasks (determinate) and open-ended ones (indeterminate).
-
Keep updates throttled in fast loops to avoid slowing things down, and pair visuals with text like percentages or counts so the bar stays useful for everyone.
What Are Progress Bars in Python?
Progress bars are ubiquitous. They are often used for file downloads, software installations, and ETL pipelines. They are also useful for tracking the progress of machine learning model training.
The progress bar displays how much of a task is complete and how much remains. It can appear as text in a command-line interface (CLI) or as a visual bar in a graphical user interface (GUI).
Progress bars improve user experience. They give real-time updates, showing users their progress in the process. If a delay occurs, users can decide whether to intervene or wait. This visibility cuts frustration and makes wait times seem shorter. Users won't stare at a static screen, wondering if anything is happening; they stay involved and feel reassured that progress is happening.
Developers use progress bars to track application performance. They help identify bottlenecks, benchmark code, and track task duration. Progress bars in scripts and workflows show clear status updates. They help users understand long-running processes better. They also enhance the usability of interactive tools and notebooks.
Progress bars can also serve as a simple form of performance monitoring. They show how long each task takes. This helps developers spot slow stages and measure efficiency. This allows for easy comparison of different implementations.
Command-Line Progress Bars
Command-line progress bars provide visual feedback for long-running tasks directly in the terminal, making scripts more informative and user-friendly. Python offers several libraries, each with strengths in speed, customization, and visual style. We will look at four of these: tqdm, progress, progressbar2, and alive-progress.
Tqdm: the standard for speed and simplicity
tqdm is a popular library in Python for creating progress bars. It provides fast and versatile progress indicators for loops and iterables. It tracks iterations and calculates both time remaining and elapsed time. This information updates the bar in real time. tqdm operates in the background. It predicts how much time remains and skips updates that aren't needed. It is simple to learn, lightweight in memory usage, and backed by a strong community.
Installation process
An easy way to install tqdm is to use the pip installer. Type the following command from the terminal.
Print the version number to ensure that the library is installed properly.
import tqdm
print(tqdm.__version__)
4.67.1
Basic usage of tqdm
tqdm is simple to use. Import the library. Wrap any iterable with tqdm(iterable) to display a progress bar.
Instead of writing tqdm(range(n)), you can use the shorthand trange(n) for convenience.
from tqdm import trange
import time
for _ in trange(100, desc="Processing"):
time.sleep(0.05)
This code produces a live progress bar during execution.

The progress bar shows
- Percentage completed (22%)
- Number of iterations completed out the total (224/1000)
- Elapsed time and estimated remaining time (12 seconds elapsed, 42 seconds remaining)
- Iterations per second (18.09 it/s).
To add a description to the progress bar, specify the desc option.
for i in trange(1000, desc='Processing'):
time.sleep(0.05)

Nested progress bars
Nested progress bars in tqdm help you track progress across multiple loops. They are also useful when you need to track multiple work stages. Examples include batch processing, nested loops, and model training.
Wrap each loop in a nested loop with tqdm. Use the position and leave arguments to control how they appear.
position: Sets the vertical position of each progress bar. position=0 is the topmost bar, position=1 appears below it, and so on.leave: If leave=True, the progress bar stays on screen after it finishes. If leave=False, it disappears to prevent clutter.
for i in trange(3, desc='Outer loop', leave=True):
    for j in trange(5, desc='Inner loop', leave=False):
        for j in trange(4, desc='Inner inner loop', leave=False):
            time.sleep(0.05)

Nested progress bars show a clear hierarchy. They help you visualize the different stages of a task. They provide detailed insights at various levels. This helps developers identify slowdowns or bottlenecks with ease.
Pandas integration
Tqdm integrates well with pandas. It provides a straightforward way to add progress bars to DataFrame and series tasks. It shows real-time progress for functions like apply, groupby, and map. These functions can be slow with large datasets.
To enable this feature, call tqdm.pandas(). Then, use progress_apply instead of pandas' regular apply method. This will show a progress bar as your function runs over rows or columns. You’ll see the operation's progress without rewriting your code.
In the following program, we create a DataFrame with a column named "numbers." This column holds integers ranging from 0 to 1000. We then generate a new column by applying a "slow" operation called slow_squared.
Instead of using the standard pandas apply function, we use progress_apply from tqdm. A progress bar shows up during the operation. It gives real-time updates on how much processing is complete.
import pandas as pd
from tqdm import tqdm
import time
def slow_square(x):
time.sleep(0.01)
return x**2
df = pd.DataFrame({'numbers': range(1000)})
tqdm.pandas(desc="Processing")
df['slow_squared'] = df['numbers'].progress_apply(slow_square)
print(df.head())
The output of the code is as follows.

We can use progress_apply for other DataFrame operations such as groupby.
grouped = df.groupby('numbers').progress_apply(lambda g: g.sum())
Customization options
Tqdm lets you customize progress bars to fit various environments and user needs. You can adjust the width with ncols. The bar_format argument gives you full control over the text layout. Also, setting dynamic_ncols=True makes the bar automatically resize to fit the terminal.
Tqdm is quick and light. It adds little overhead, even in fast loops. You can disable progress bars with disable=True. This is helpful in production settings where performance is key. For fast loops, updating the bar each time can be too much. So, tqdm lets you control how often it updates. You can use parameters like mininterval and maxinterval.
Progress: Customizable styles and spinners
The Progress library in Python lets you create easy text-based progress bars for the command line. It features a straightforward API. It supports both progress bars and spinners and allows for basic output customization. It's small, fast, and has no dependencies. This makes it great for quick scripts and simple setups.
The progress library includes seven built-in styles of progress bars: Bar, ChargingBar, FillingSquaresBar, FillingCirclesBar, IncrementalBar, PixelBar, and Shadybar.
To set up, use pip install.
To use, import the desired style, instantiate a variable, use .next() in the loop and .finish() after the process is done. For instance, to use a ChargingBar, use the following code.
import time
from progress.bar import ChargingBar
bar = ChargingBar('Processing', max=20)
for i in range(20):
time.sleep(0.5)
bar.next()
bar.finish()
`

Progress also includes spinners for tasks of unknown duration. The code to implement a spinner is straightforward.
import time
from progress.spinner import Spinner
spinner = Spinner('Processing... ')
for _ in range(50):
time.sleep(0.1)
spinner.next()
spinner.finish()
This code results in the description ("Processing…") followed by a spinner.
The progress library is simple and lightweight, but it has some limitations to consider. It doesn't support Jupyter notebooks, and it can't resize dynamically. Plus, it offers fewer customization options than libraries like tqdm. It works well for basic command-line tasks, but it may struggle with complex or high-performance jobs.
Progressbar2: Enhanced customization and compatibility
Progressbar2 is a powerful Python library. It helps you create flexible and customizable progress bars for command-line apps. It has many widgets, like percentage, ETA, animated markers, and counters. This makes it great for more complex or polished CLI tasks.
Progressbar2 offers more control and formatting options than simpler libraries like progress. It also works better with logging and multithreaded workflows.
To install, use pip install.
The ProgressBar class in progressbar2 shows the current progress state. It does this with a set of customizable widgets.
A widget is a modular part that updates based on the progress bar's state. This includes the percentage complete, elapsed time, and estimated time left.
You can choose from many types of widgets. These include text labels, progress markers, counters, timers, spinners, and custom formatters. This variety lets you customize the bar’s look and function for your app.
The basic usage of Progressbar2 is quite simple.
import time
import progressbar

for i in progressbar.progressbar(range(1000)):
    time.sleep(0.02)

The output displays the percentage completed, iterations complete/total iterations, elapsed time, and estimated time remaining.
Progress bar libraries typically rely on updating a single line in the terminal using carriage returns (\r). This means regular print() statements can interfere by pushing the bar down or corrupting its output. The progressbar2 library provides a way to safely print messages without interfering with the progress bar.
import time
import progressbar
bar = progressbar.ProgressBar(redirect_stdout=True)
for i in range(10):
time.sleep(0.1)
print(f'Loop #{i}')
bar.update(i)

The progressbar2 library offers extensive customization through its modular widget system. Widgets show details in the progress bar including percentage completed, elapsed time, estimated time left, counters, or bar animations. You can mix and match these widgets to make a custom progress bar. For instance, you can show the percentage and ETA. Or you can add more details like file names, timestamps, or spinners.
import time
import progressbar
widgets = [
'Progress: ',
progressbar.Percentage(),
' ',
progressbar.Bar(marker=':'),
' ',
progressbar.ETA(),
' | ',
progressbar.Timer(),
]
bar = progressbar.ProgressBar(widgets=widgets, max_value=50)
for i in range(50):
time.sleep(0.1)
bar.update(i + 1)

Alive-progress: dynamic animations for modern terminals
Alive-progress shows animated progress bars that change in real time. This gives command-line apps a modern and responsive look. The bar moves forward and shows helpful real-time metrics. It displays the percentage complete, elapsed time, estimated time left, and iteration speed. This makes it both attractive and informative.
To install the alive-progress library, pip install it.
pip install alive-progress
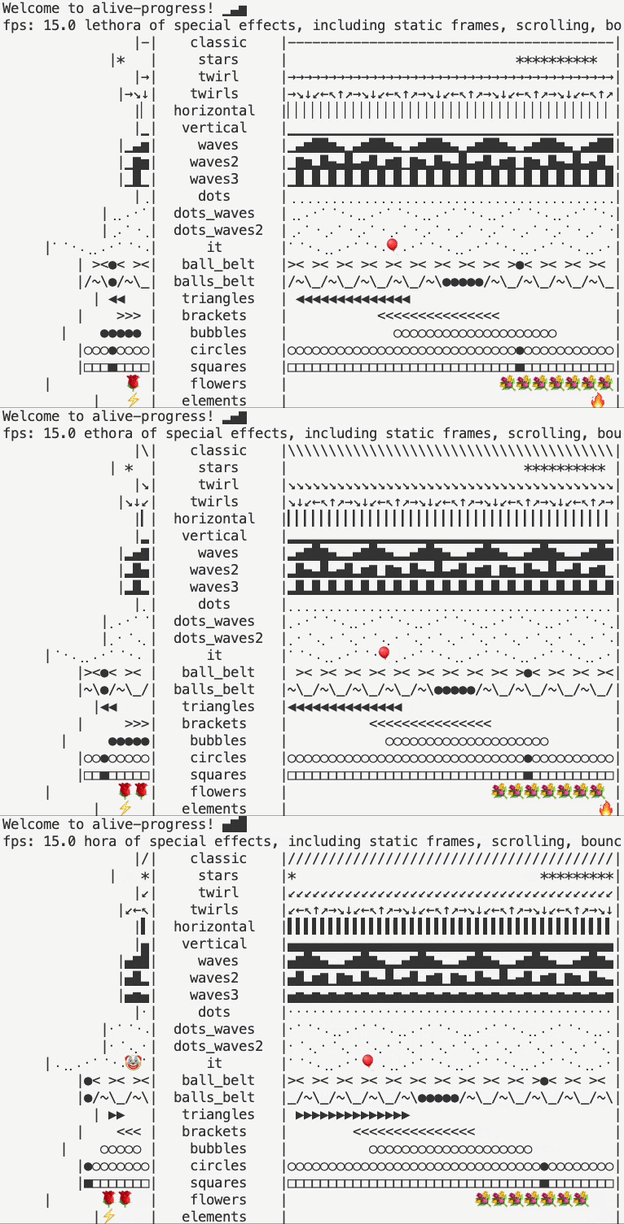
As shown on its GitHub page, to see a demo of its capabilities, use the following code.
from alive_progress.styles import showtime

showtime()
You'll see output similar to the following.
Alive-progress has the ability to display and manage multiple progress bars simultaneously.
from alive_progress import alive_bar
import time
import threading
def simulate_task(name, total):
with alive_bar(total, title=name) as bar:
for _ in range(total):
time.sleep(0.5)
bar()
threads = [
threading.Thread(target=simulate_task, args=('Task A', 50)),
threading.Thread(target=simulate_task, args=('Task B', 70)),
threading.Thread(target=simulate_task, args=('Task C', 40)),
]
for t in threads:
t.start()
for t in threads:
t.join()

The alive-progress library includes several built-in themes. Themes control elements such as the animation style, the characters used to fill the bar, and the overall movement effect. Common themes include classic, pulse, and brackets.
import time
from alive_progress import alive_bar
with alive_bar(100, bar='blocks') as bar:
for _ in range(100):
time.sleep(0.02)
bar()

Pause/resume – temporarily stop and resume progress without losing state
from alive_progress import alive_bar
import time
with alive_bar(100) as bar:
for i in range(50):
time.sleep(0.02)
bar()
bar.text('Temporarily pausing...')
time.sleep(1)
bar.text('Resuming...')
for i in range(50):
time.sleep(0.02)
bar()

GUI Progress Bars with Tkinter
Tkinter is Python’s standard GUI (Graphical User Interface) toolkit. The design includes built-in features and is ready to use, so you don’t need to install anything extra. You can create windows, buttons, text fields, menus, progress bars, and more. Tkinter is ideal for building simple desktop applications, interactive tools, and prototypes.
A basic progress bar can be created using the following code.
import tkinter as tk
from tkinter import ttk
import time
def start_progress():
progress["value"] = 0
root.update_idletasks()
for i in range(101):
time.sleep(0.02)
progress["value"] = i
root.update_idletasks()
root = tk.Tk()
root.title("Progress Bar")
root.geometry("300x100")
progress = ttk.Progressbar(root, orient="horizontal", length=250, mode="determinate")
progress.pack(pady=20)
start_button = ttk.Button(root, text="Start", command=start_progress)
start_button.pack()
root.mainloop()
Output on my Mac:
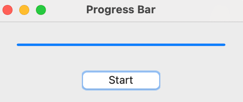
There are two modes available with ttk.Progressbar: determinate and indeterminate. The determinate mode is used when the duration or number of steps in a task is known. The indeterminate mode is used when the task duration is unknown or cannot be measured in steps.
The code above is for a determinate mode, since we knew the length of the task was 250 steps. An example of an indeterminate mode follows.
import tkinter as tk
from tkinter import ttk
import time
import threading
def start_indeterminate():
def run():
progress.start(10)
time.sleep(10)
progress.stop()
threading.Thread(target=run).start()
root = tk.Tk()
root.title("Indeterminate Progress Bar")
root.geometry("300x100")
progress = ttk.Progressbar(root, mode='indeterminate', length=250)
progress.pack(pady=20)
start_button = ttk.Button(root, text="Start", command=start_indeterminate)
start_button.pack()
root.mainloop()
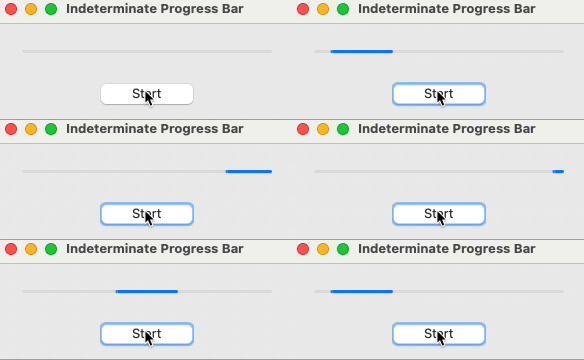
Note that the progress bar was run in a separate thread. If we used run() directly in the main thread, the the time.sleep() call would block the main Tkinter event loop and cause the entire GUI to freeze, including button clicks, window redraws, and the progress bar animation.
Which library should you use for your progress bar? Part of the decision depends on your overhead requirements and your use case.
|
Library
|
Overhead
|
Use Case
|
|
tqdm
|
Very low
|
Fast loops, data pipelines, minimal impact on performance
|
|
progress
|
Low
|
Simple CLI scripts, lightweight and no dependencies
|
|
progressbar2
|
Moderate
|
Custom layouts, ETA, and logging; slight slowdown in fast tasks
|
|
alive-progress
|
Moderate to high
|
Visually rich tasks, multi-bar output, smooth animations; best for longer tasks
|
To enhance performance, optimize update frequency. One method is to not update the bar with every iteration. This is especially important in fast or high-frequency loops. Use conditional logic to update every N steps, for example, every 100 iterations.
In critical performance settings or production code, disable progress bars. Visual feedback isn’t needed here. This saves resources while ensuring the logic stays the same for development or debugging.
Cutting down I/O operations is key for performance. Writing to the terminal, disk, or network can slow things down. Here are some strategies to reduce I/O in performance-critical tasks.
- Buffer output and write in batches instead of per iteration.
- Only update at fixed intervals or under specified conditions.
- Minimize or disable print() inside loops.
- Add flags to suppress unnecessary output in production.
- Separate I/O and computation using threads or multiprocessing.
- Compress or batch large writes to reduce disk I/O frequency.
Best Practices for Effective Progress Bars
Let’s take a look at some of the best practices to bear in mind when creating progress bars in Python.
Why use progress bars?
There are many good reasons to use progress bars in your applications. First, they provide real-time feedback, reassuring users that tasks are progressing and reducing uncertainty. This visibility enhances user experience, making wait times seem shorter and interactions more intuitive.
Second, by visually tracking task completion, progress bars allow for easy performance monitoring, enabling both users and developers to quickly spot bottlenecks or stalled processes during long-running operations. Finally, incorporating progress bars elevates the professionalism of your application’s interface, conveying clarity and a thoughtful, user-centric design approach.
Known vs unknown duration tasks
Use a determinate progress bar for tasks that have a set time. This includes file processing, loops, or machine learning training epochs. This type of bar fills based on measurable progress and gives users a clear sense of how much work remains.
For tasks with unknown lengths, like API calls or background checks, use a spinner or an indeterminate bar. These offer a visual cue that the process is ongoing, even if we can't predict how long it will take.
Which library should I use?
The library you use depends on the tasks you're trying to accomplish.
|
Task
|
Library
|
Notes
|
|
High-frequency loops
|
tqdm
|
Lightweight, efficient; use mininterval to reduce updates
|
|
Simple one-off scripts
|
progress
|
Minimal setup, no dependencies, ideal for quick tasks
|
|
Structured or custom output
|
progressbar2
|
Widget-based, supports ETA, timers, and layout control
|
|
Multi-stage or nested tasks
|
tqdm, alive-progress
|
Supports nested bars or multi-bar displays for layered tasks
|
|
CLI scripts with visual polish
|
alive-progress
|
Animated and modern visuals, smooth user experience
|
|
GUI applications
|
tkinter
|
Built-in GUI toolkit with determinate and indeterminate bars
|
Customization
When customizing progress bars, focus on clarity and useful information. Strive for a good balance between the two. A clear, simple bar with key metrics is usually better than one crowded with too much information.
You can use libraries like progressbar2 and alive-progress. They let you change the layout, color, and animation of your progress bars. Use themes or formatting to improve the user experience. Avoid cluttering the display with too many widgets or complex visuals. The goal is to give helpful feedback. We want to avoid distracting the user or making them feel overwhelmed.
Exception handling and compatibility testing
Wrap progress bar logic in try-except blocks. This helps avoid UI glitches or crashes if an error occurs during a task. This is key in scripts that run for a long time or when using uncertain external dependencies.
Also, test your progress bars in different environments. Check across various operating systems, terminal types, and display widths. This way, you can ensure their behavior remains consistent.
Some libraries behave differently in Jupyter notebooks, remote terminals, or GUI shells. Verifying compatibility early can help prevent unexpected issues. This way, users will have a smoother experience in production.
Accessibility considerations
When creating progress indicators, consider accessibility. This helps all users receive clear feedback. Some suggestions:
- Don't rely only on color or animation to show progress. Add text elements like percentages, step counts, or time estimates.
- Use clear, high-contrast visuals for better readability.
- Ensure your progress bars work well with screen readers in GUI applications.
- For command-line tools, consider verbosity options that print progress updates in plain text.
Making accessibility a priority boosts usability. It also makes your tools more inclusive and professional.
Conclusion
Progress bars are a simple yet strong feature for any Python app. They give instant feedback, improve user experience, and track performance and code clarity. Choosing the right progress bar library is key. It can enhance your software, whether you're making a quick script, a command-line tool, or a full GUI app. A thoughtful implementation can enhance your software's speed, professionalism, and user-friendliness. Prioritizing customization, performance, compatibility, and accessibility makes progress bars more than mere visuals. They become an important part of how users engage with your work.
To keep learning, check out these resources:










In today's apps, users want immediate feedback, especially when tasks take a long time to complete. Python progress bars are a clear and easy way to show that something is happening in the background. A strong progress bar helps a program feel quicker, adds a professional touch, and improves user-friendliness.
In this article, you'll learn how to implement Python progress bars using popular libraries like
tqdm,progress,progressbar2,alive-progress, andTkinter, along with best practices to enhance user experience and application performance.To learn more about Python concepts in a hands-on way, check out our Python Programming Fundamentals skill track.
TL;DR
For command-line tools,
tqdmis the go-to choice — it's lightweight and works well with pandas. Useprogressfor simple scripts,progressbar2when you need custom layouts, oralive-progressfor animated visuals.For desktop apps, Tkinter's built-in
ttk.Progressbarhandles both known-duration tasks (determinate) and open-ended ones (indeterminate).Keep updates throttled in fast loops to avoid slowing things down, and pair visuals with text like percentages or counts so the bar stays useful for everyone.
What Are Progress Bars in Python?
Progress bars are ubiquitous. They are often used for file downloads, software installations, and ETL pipelines. They are also useful for tracking the progress of machine learning model training.
The progress bar displays how much of a task is complete and how much remains. It can appear as text in a command-line interface (CLI) or as a visual bar in a graphical user interface (GUI).
Progress bars improve user experience. They give real-time updates, showing users their progress in the process. If a delay occurs, users can decide whether to intervene or wait. This visibility cuts frustration and makes wait times seem shorter. Users won't stare at a static screen, wondering if anything is happening; they stay involved and feel reassured that progress is happening.
Developers use progress bars to track application performance. They help identify bottlenecks, benchmark code, and track task duration. Progress bars in scripts and workflows show clear status updates. They help users understand long-running processes better. They also enhance the usability of interactive tools and notebooks.
Progress bars can also serve as a simple form of performance monitoring. They show how long each task takes. This helps developers spot slow stages and measure efficiency. This allows for easy comparison of different implementations.
Command-Line Progress Bars
Command-line progress bars provide visual feedback for long-running tasks directly in the terminal, making scripts more informative and user-friendly. Python offers several libraries, each with strengths in speed, customization, and visual style. We will look at four of these:
tqdm,progress,progressbar2, andalive-progress.Tqdm: the standard for speed and simplicity
tqdmis a popular library in Python for creating progress bars. It provides fast and versatile progress indicators for loops and iterables. It tracks iterations and calculates both time remaining and elapsed time. This information updates the bar in real time.tqdmoperates in the background. It predicts how much time remains and skips updates that aren't needed. It is simple to learn, lightweight in memory usage, and backed by a strong community.Installation process
An easy way to install
tqdmis to use thepipinstaller. Type the following command from the terminal.Print the version number to ensure that the library is installed properly.
4.67.1Basic usage of tqdm
tqdmis simple to use. Import the library. Wrap any iterable with tqdm(iterable) to display a progress bar.Instead of writing
tqdm(range(n)), you can use the shorthandtrange(n)for convenience.This code produces a live progress bar during execution.
The progress bar shows
To add a description to the progress bar, specify the
descoption.Nested progress bars
Nested progress bars in tqdm help you track progress across multiple loops. They are also useful when you need to track multiple work stages. Examples include batch processing, nested loops, and model training.
Wrap each loop in a nested loop with tqdm. Use the position and leave arguments to control how they appear.
position: Sets the vertical position of each progress bar. position=0 is the topmost bar, position=1 appears below it, and so on.leave: If leave=True, the progress bar stays on screen after it finishes. If leave=False, it disappears to prevent clutter.Nested progress bars show a clear hierarchy. They help you visualize the different stages of a task. They provide detailed insights at various levels. This helps developers identify slowdowns or bottlenecks with ease.
Pandas integration
Tqdm integrates well with pandas. It provides a straightforward way to add progress bars to DataFrame and series tasks. It shows real-time progress for functions like
apply,groupby, andmap. These functions can be slow with large datasets.To enable this feature, call tqdm.pandas(). Then, use
progress_applyinstead of pandas' regularapplymethod. This will show a progress bar as your function runs over rows or columns. You’ll see the operation's progress without rewriting your code.In the following program, we create a DataFrame with a column named "numbers." This column holds integers ranging from 0 to 1000. We then generate a new column by applying a "slow" operation called
slow_squared.Instead of using the standard pandas apply function, we use
progress_applyfrom tqdm. A progress bar shows up during the operation. It gives real-time updates on how much processing is complete.The output of the code is as follows.
We can use
progress_applyfor other DataFrame operations such asgroupby.Customization options
Tqdm lets you customize progress bars to fit various environments and user needs. You can adjust the width with
ncols. Thebar_format argumentgives you full control over the text layout. Also, settingdynamic_ncols=Truemakes the bar automatically resize to fit the terminal.Performance considerations specific to tqdm
Tqdm is quick and light. It adds little overhead, even in fast loops. You can disable progress bars with
disable=True. This is helpful in production settings where performance is key. For fast loops, updating the bar each time can be too much. So,tqdmlets you control how often it updates. You can use parameters likeminintervalandmaxinterval.Progress: Customizable styles and spinners
The Progress library in Python lets you create easy text-based progress bars for the command line. It features a straightforward API. It supports both progress bars and spinners and allows for basic output customization. It's small, fast, and has no dependencies. This makes it great for quick scripts and simple setups.
The
progresslibrary includes seven built-in styles of progress bars: Bar, ChargingBar, FillingSquaresBar, FillingCirclesBar, IncrementalBar, PixelBar, and Shadybar.To set up, use pip install.
To use, import the desired style, instantiate a variable, use
.next()in the loop and.finish()after the process is done. For instance, to use a ChargingBar, use the following code.Progressalso includes spinners for tasks of unknown duration. The code to implement a spinner is straightforward.This code results in the description ("Processing…") followed by a spinner.
The progress library is simple and lightweight, but it has some limitations to consider. It doesn't support Jupyter notebooks, and it can't resize dynamically. Plus, it offers fewer customization options than libraries like tqdm. It works well for basic command-line tasks, but it may struggle with complex or high-performance jobs.
Progressbar2: Enhanced customization and compatibility
Progressbar2 is a powerful Python library. It helps you create flexible and customizable progress bars for command-line apps. It has many widgets, like percentage, ETA, animated markers, and counters. This makes it great for more complex or polished CLI tasks.
Progressbar2 offers more control and formatting options than simpler libraries like progress. It also works better with logging and multithreaded workflows.
To install, use pip install.
The ProgressBar class in progressbar2 shows the current progress state. It does this with a set of customizable widgets.
A widget is a modular part that updates based on the progress bar's state. This includes the percentage complete, elapsed time, and estimated time left.
You can choose from many types of widgets. These include text labels, progress markers, counters, timers, spinners, and custom formatters. This variety lets you customize the bar’s look and function for your app.
The basic usage of Progressbar2 is quite simple.
The output displays the percentage completed, iterations complete/total iterations, elapsed time, and estimated time remaining.
Progress bar libraries typically rely on updating a single line in the terminal using carriage returns (
\r). This means regularprint()statements can interfere by pushing the bar down or corrupting its output. Theprogressbar2library provides a way to safely print messages without interfering with the progress bar.The progressbar2 library offers extensive customization through its modular widget system. Widgets show details in the progress bar including percentage completed, elapsed time, estimated time left, counters, or bar animations. You can mix and match these widgets to make a custom progress bar. For instance, you can show the percentage and ETA. Or you can add more details like file names, timestamps, or spinners.
Alive-progress: dynamic animations for modern terminals
Alive-progress shows animated progress bars that change in real time. This gives command-line apps a modern and responsive look. The bar moves forward and shows helpful real-time metrics. It displays the percentage complete, elapsed time, estimated time left, and iteration speed. This makes it both attractive and informative.
To install the alive-progress library, pip install it.
As shown on its GitHub page, to see a demo of its capabilities, use the following code.
You'll see output similar to the following.
Alive-progress has the ability to display and manage multiple progress bars simultaneously.
The
alive-progresslibrary includes several built-in themes. Themes control elements such as the animation style, the characters used to fill the bar, and the overall movement effect. Common themes includeclassic,pulse, andbrackets.Pause/resume – temporarily stop and resume progress without losing state
GUI Progress Bars with Tkinter
Tkinter is Python’s standard GUI (Graphical User Interface) toolkit. The design includes built-in features and is ready to use, so you don’t need to install anything extra. You can create windows, buttons, text fields, menus, progress bars, and more. Tkinter is ideal for building simple desktop applications, interactive tools, and prototypes.
A basic progress bar can be created using the following code.
Output on my Mac:
There are two modes available with ttk.Progressbar: determinate and indeterminate. The determinate mode is used when the duration or number of steps in a task is known. The indeterminate mode is used when the task duration is unknown or cannot be measured in steps.
The code above is for a determinate mode, since we knew the length of the task was 250 steps. An example of an indeterminate mode follows.
Note that the progress bar was run in a separate thread. If we used
run()directly in the main thread, the thetime.sleep()call would block the main Tkinter event loop and cause the entire GUI to freeze, including button clicks, window redraws, and the progress bar animation.Performance Considerations and Optimization
Which library should you use for your progress bar? Part of the decision depends on your overhead requirements and your use case.
Library
Overhead
Use Case
tqdm
Very low
Fast loops, data pipelines, minimal impact on performance
progress
Low
Simple CLI scripts, lightweight and no dependencies
progressbar2
Moderate
Custom layouts, ETA, and logging; slight slowdown in fast tasks
alive-progress
Moderate to high
Visually rich tasks, multi-bar output, smooth animations; best for longer tasks
To enhance performance, optimize update frequency. One method is to not update the bar with every iteration. This is especially important in fast or high-frequency loops. Use conditional logic to update every N steps, for example, every 100 iterations.
In critical performance settings or production code, disable progress bars. Visual feedback isn’t needed here. This saves resources while ensuring the logic stays the same for development or debugging.
Cutting down I/O operations is key for performance. Writing to the terminal, disk, or network can slow things down. Here are some strategies to reduce I/O in performance-critical tasks.
Best Practices for Effective Progress Bars
Let’s take a look at some of the best practices to bear in mind when creating progress bars in Python.
Why use progress bars?
There are many good reasons to use progress bars in your applications. First, they provide real-time feedback, reassuring users that tasks are progressing and reducing uncertainty. This visibility enhances user experience, making wait times seem shorter and interactions more intuitive.
Second, by visually tracking task completion, progress bars allow for easy performance monitoring, enabling both users and developers to quickly spot bottlenecks or stalled processes during long-running operations. Finally, incorporating progress bars elevates the professionalism of your application’s interface, conveying clarity and a thoughtful, user-centric design approach.
Known vs unknown duration tasks
Use a determinate progress bar for tasks that have a set time. This includes file processing, loops, or machine learning training epochs. This type of bar fills based on measurable progress and gives users a clear sense of how much work remains.
For tasks with unknown lengths, like API calls or background checks, use a spinner or an indeterminate bar. These offer a visual cue that the process is ongoing, even if we can't predict how long it will take.
Which library should I use?
The library you use depends on the tasks you're trying to accomplish.
Task
Library
Notes
High-frequency loops
tqdm
Lightweight, efficient; use mininterval to reduce updates
Simple one-off scripts
progress
Minimal setup, no dependencies, ideal for quick tasks
Structured or custom output
progressbar2
Widget-based, supports ETA, timers, and layout control
Multi-stage or nested tasks
tqdm, alive-progress
Supports nested bars or multi-bar displays for layered tasks
CLI scripts with visual polish
alive-progress
Animated and modern visuals, smooth user experience
GUI applications
tkinter
Built-in GUI toolkit with determinate and indeterminate bars
Customization
When customizing progress bars, focus on clarity and useful information. Strive for a good balance between the two. A clear, simple bar with key metrics is usually better than one crowded with too much information.
You can use libraries like progressbar2 and alive-progress. They let you change the layout, color, and animation of your progress bars. Use themes or formatting to improve the user experience. Avoid cluttering the display with too many widgets or complex visuals. The goal is to give helpful feedback. We want to avoid distracting the user or making them feel overwhelmed.
Exception handling and compatibility testing
Wrap progress bar logic in try-except blocks. This helps avoid UI glitches or crashes if an error occurs during a task. This is key in scripts that run for a long time or when using uncertain external dependencies.
Also, test your progress bars in different environments. Check across various operating systems, terminal types, and display widths. This way, you can ensure their behavior remains consistent.
Some libraries behave differently in Jupyter notebooks, remote terminals, or GUI shells. Verifying compatibility early can help prevent unexpected issues. This way, users will have a smoother experience in production.
Accessibility considerations
When creating progress indicators, consider accessibility. This helps all users receive clear feedback. Some suggestions:
Making accessibility a priority boosts usability. It also makes your tools more inclusive and professional.
Conclusion
Progress bars are a simple yet strong feature for any Python app. They give instant feedback, improve user experience, and track performance and code clarity. Choosing the right progress bar library is key. It can enhance your software, whether you're making a quick script, a command-line tool, or a full GUI app. A thoughtful implementation can enhance your software's speed, professionalism, and user-friendliness. Prioritizing customization, performance, compatibility, and accessibility makes progress bars more than mere visuals. They become an important part of how users engage with your work.
To keep learning, check out these resources: