Course
Introduction to Python
4 hr
6.9M
Before you begin, you should be familiar with Python to learn Tkinter. If you're new to Python, check out DataCamp's Introduction to Python course and our guide on how to learn Python.
Most of you write a code and run it in a command-line terminal or an IDE (Integrated Development Environment), and the code produces an output based on what you expect out of it either on the terminal or on the IDE itself. However, what if you want your system to have a fancy looking user-interface or maybe your application (use-case) requires you to have a GUI.
GUI is nothing but a desktop app that provides you with an interface that helps you to interact with the computers and enriches your experience of giving a command (command-line input) to your code. They are used to perform different tasks in desktops, laptops, and other electronic devices, etc.
Some of the applications where the power of GUI is utilized are:
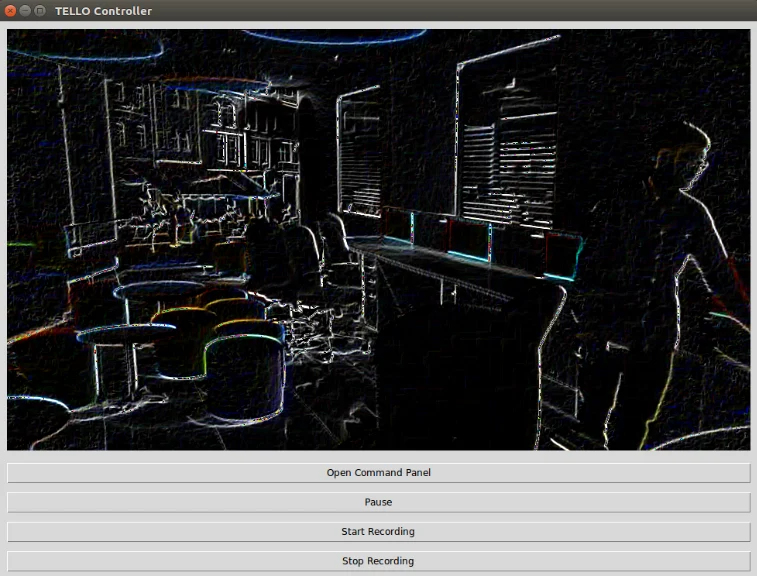
Another interesting use-case would be - A GUI for controlling a Drone from your laptop, and the GUI would probably have buttons to maneuver the Drone along with a screen that would show the camera feed captured by the Drone in a real-time.
Let's see some of the frameworks that Python provides to develop a GUI:
And finally, the framework that is the discussion for today's tutorial Tkinter!
Note: Tkinter comes pre-installed with Python3, and you need not bother about installing it.
Now, let's build a very simple GUI with the help of Tkinter and understand it with the help of a flow diagram.
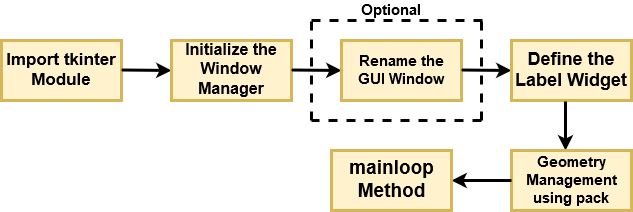
Let's break down the above flow diagram and understand what each component is handling!
Tkinter module.tkinter.Tk() method and assign it to a variable. This method creates a blank window with close, maximize, and minimize buttons on the top as a usual GUI should have.Rename the title of the window as you like with window.title(title_of_the_window).widget called Label, which is used to insert some text into the window.geometry management attribute called pack() to display the widget in size it requires.import tkinter
window = tkinter.Tk()
# to rename the title of the window
window.title("GUI")
# pack is used to show the object in the window
label = tkinter.Label(window, text = "Welcome to DataCamp's Tutorial on Tkinter!").pack()
window.mainloop()
After running the above code in a terminal, you shall see a similar output, as shown below.

Similarly, you could have a widget Button, and the GUI will display a button instead of some text (Label).
import tkinter
window = tkinter.Tk()
window.title("Button GUI")
button_widget = tkinter.Button(window,text="Welcome to DataCamp's Tutorial on Tkinter")
button_widget.pack()
tkinter.mainloop()

Though you have already learned to use Widgets in Tkinter but let's find out which other widgets are available in Tkinter and the functioning of each of them.
More than 10 million people learn Python, R, SQL, and other tech skills using our hands-on courses crafted by industry experts.

Widgets are similar in spirit to elements in HTML. You will find different types of widgets for different types of elements in the Tkinter. They are standard GUI elements and provide the user with controls like buttons, text, menus, and text boxes.
Let's understand all of these widgets in Tkinter, along with an example (Source).
Button: Button widget has a property for switching on/off. When a user clicks the button, an event is triggered in the Tkinter.
Syntax: button_widget = tk.Button(widget, option=placeholder) where widget is the argument for the parent window/frame while option is a placeholder that can have various values like foreground & background color, font, command (for function call), image, height, and width of button.
Canvas: Canvas is used to draw shapes in your GUI and supports various drawing methods.
Syntax: canvas_widget = tk.Canvas(widget, option=placeholder) where widget is the parameter for the parent window/frame while option is a placeholder that can have various values like border-width, background color, height and width of widget.
Checkbutton: Checkbutton records on-off or true-false state. It lets you can select more than one option at a time and even leave it unchecked.
Syntax: checkbutton_widget = tk.CheckButton(widget, option=placeholder) where widget is the parameter for the parent window/frame while option is a placeholder that can have various values like title, text, background & foreground color while widget is under the cursor, font, image, etc.
Entry: Entry widget is used to create input fields or to get input text from the user within the GUI.
Syntax: entry_widget = tk.Entry(widget, option=placeholder) where widget is the parameter for the parent window/frame while option is a placeholder that can have various values like border-width, background color, width & height of button etc.
Frame: Frame is used as containers in the Tkinter for grouping and adequately organizing the widgets.
Syntax: frame_widget = tk.Frame(widget, option=placeholder) where widget is the parameter for the parent window/frame while option is a placeholder that can have various values like border-width, height & width of widget, highlightcolor (color when widget has to be focused).
Label: Label is used to create a single line widgets like text, images, etc.
Syntax: label_widget = tk.Label(widget, option=placeholder) where widget is the parameter for the parent window/frame while option is a placeholder that can have various values like the font of a button, background color, image, width, and height of button.
You can find the complete list of widgets at the official Python documentation.
All widgets in Tkinter have some geometry measurements. These geometry measurements allow you to organize the widgets and throughout the parent frames or parent widget area.
One of the geometry management classes, i.e., pack(), has already been covered here.
For this purpose, Tkinter provides you with three main geometry manager classes:
In this section of the tutorial, you will make use of both geometry and widgets, and let's see the magic of Tkinter.
To arrange the layout in the window, you will use a Frame widget class. Let's create a simple program to see how the Frame works.
You will define two frames - top and bottom with the help of the pack class. The Frame class will help in creating a division between the window. Basically, a single-window will be replicated twice as top and bottom in the form of a Frame.
Finally, you will create four buttons in the window, two for each frame. You can name and color your buttons as you like as a parameter.
import tkinter

# Let's create the Tkinter window.
window = tkinter.Tk()
window.title("GUI")

# You will first create a division with the help of Frame class and align them on TOP and BOTTOM with pack() method.
top_frame = tkinter.Frame(window).pack()
bottom_frame = tkinter.Frame(window).pack(side = "bottom")

# Once the frames are created then you are all set to add widgets in both the frames.
btn1 = tkinter.Button(top_frame, text = "Button1", fg = "red").pack() #'fg or foreground' is for coloring the contents (buttons)

btn2 = tkinter.Button(top_frame, text = "Button2", fg = "green").pack()

btn3 = tkinter.Button(bottom_frame, text = "Button3", fg = "purple").pack(side = "left") #'side' is used to left or right align the widgets

btn4 = tkinter.Button(bottom_frame, text = "Button4", fg = "orange").pack(side = "left")

window.mainloop()
Let's run the above code and see the output.

Much like a Frame, a grid is another way to organize the widgets. It uses the Matrix row-column concept. Let's draw some analogy between the grid class and the row-column idea with the help of the below diagram.

Grid primarily takes two parameters row and column. As shown in the above figure, imagine 00 corresponds to the first button while 01 to the second. And to place two buttons side-by-side, grid will take row and column parameters as 00 and 01, respectively.
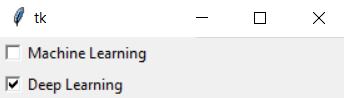
Let's make use of checkbutton to understand how grid class works. You will define two checkbuttons and specify some text for both the buttons. The state of the check buttons will be decided by the onvalue and offvalue while the current state of the checkbutton will be tracked by IntVar(), which will be stored in a separate variable. When the offvalue=1 and the onvalue=0 corresponding checkbutton will be ticked.
Now coming to grid class, you will pass a parameter row, which will position the button in the first row if row=0 and in the second row if row=1.
import tkinter
from tkinter import *
top = tkinter.Tk()
CheckVar1 = IntVar()
CheckVar2 = IntVar()
tkinter.Checkbutton(top, text = "Machine Learning",variable = CheckVar1,onvalue = 1, offvalue=0).grid(row=0,sticky=W)
tkinter.Checkbutton(top, text = "Deep Learning", variable = CheckVar2, onvalue = 0, offvalue =1).grid(row=1,sticky=W)
top.mainloop()
Let's run this code and see the output.
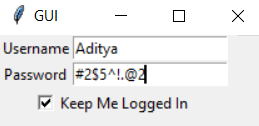
Let's take another example to understand the grid. In this example, you will also pass a column as a parameter along with the row.
import tkinter
# Let's create the Tkinter window
window = tkinter.Tk()
window.title("GUI")

# You will create two text labels namely 'username' and 'password' and and two input labels for them

tkinter.Label(window, text = "Username").grid(row = 0) #'username' is placed on position 00 (row - 0 and column - 0)

# 'Entry' class is used to display the input-field for 'username' text label
tkinter.Entry(window).grid(row = 0, column = 1) # first input-field is placed on position 01 (row - 0 and column - 1)

tkinter.Label(window, text = "Password").grid(row = 1) #'password' is placed on position 10 (row - 1 and column - 0)

tkinter.Entry(window).grid(row = 1, column = 1) #second input-field is placed on position 11 (row - 1 and column - 1)

# 'Checkbutton' class is for creating a checkbutton which will take a 'columnspan' of width two (covers two columns)
tkinter.Checkbutton(window, text = "Keep Me Logged In").grid(columnspan = 2)

window.mainloop()
Let's look at the output of the above code!
Isn't this amazing? How simple it was, and it looks identical to one written with HTML.
Binding or Command functions are those who are called whenever an event occurs or is triggered.
Let's take an example to understand binding functions.
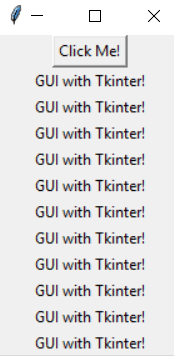
You will define a button which, when clicked, calls a function called DataCamp_Tutorial. Further, the function DataCamp_Tutorial will create a new label with the text GUI with Tkinter!.
import tkinter
# Let's create the Tkinter window
window = tkinter.Tk()
window.title("GUI")

# creating a function called DataCamp_Tutorial()
def DataCamp_Tutorial():
    tkinter.Label(window, text = "GUI with Tkinter!").pack()

tkinter.Button(window, text = "Click Me!", command = DataCamp_Tutorial).pack()
window.mainloop()
Let's run the code and observe the output.
Apart from invoking binding functions with a mouse click, the events can be invoked with a mouse-move, mouse-over, clicking, scrolling, etc.
Let's now look at the bind function, which provides you the same functionality as above.
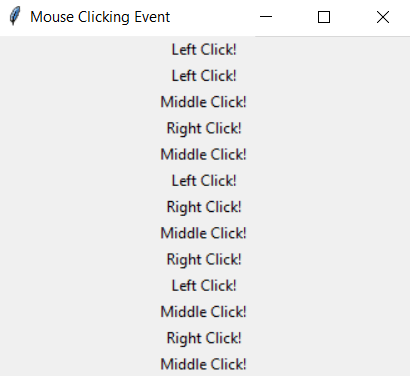
The Bind method provides you with a very simplistic approach to implementing the mouse clicking events. Let's look at the three pre-defined functions which can be used out of the box with the bind method.
Clicking events are of three types leftClick, middleClick, and rightClick.
<Button-1> parameter of the bind method is the left-clicking event, i.e., when you click the left button, the bind method will call the function specified as a second parameter to it.<Button-2> for middle-click <Button-3> for right-clickNow, you will learn how to call a particular function based on the event that occurs.
import tkinter
# Let's create the Tkinter window
window = tkinter.Tk()
window.title("GUI")

#You will create three different functions for three different events
def left_click(event):
    tkinter.Label(window, text = "Left Click!").pack()

def middle_click(event):
    tkinter.Label(window, text = "Middle Click!").pack()

def right_click(event):
    tkinter.Label(window, text = "Right Click!").pack()

window.bind("<Button-1>", left_click)
window.bind("<Button-2>", middle_click)
window.bind("<Button-3>", right_click)

window.mainloop()
Let's run the above code.
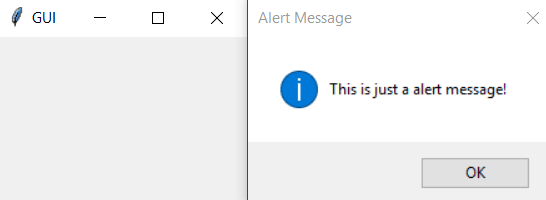
You can create alert boxes in the Tkinter using the messagebox method. You can also create questions using the messasgebox method.
Here you will create a simple alert-box and also create a question. For generating an alert, you will use messagebox function showinfo. For creating a question, you will use the askquestion method, and based on the response to the question, you will output a Label on the GUI.
import tkinter
import tkinter.messagebox
# Let's create the Tkinter window
window = tkinter.Tk()
window.title("GUI")
# Let's create a alert box with 'messagebox' function
tkinter.messagebox.showinfo("Alert Message", "This is just a alert message!")
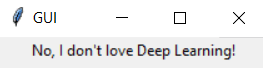
# Let's also create a question for the user and based upon the response [Yes or No Question] display a message.
response = tkinter.messagebox.askquestion("Tricky Question", "Do you love Deep Learning?")
# A basic 'if/else' block where if user clicks on 'Yes' then it returns 1 else it returns 0. For each response you will display a message with the help of 'Label' method.
if response == 1:
tkinter.Label(window, text = "Yes, offcourse I love Deep Learning!").pack()
else:
tkinter.Label(window, text = "No, I don't love Deep Learning!").pack()
window.mainloop()
Let's quickly run the above code and see the output.
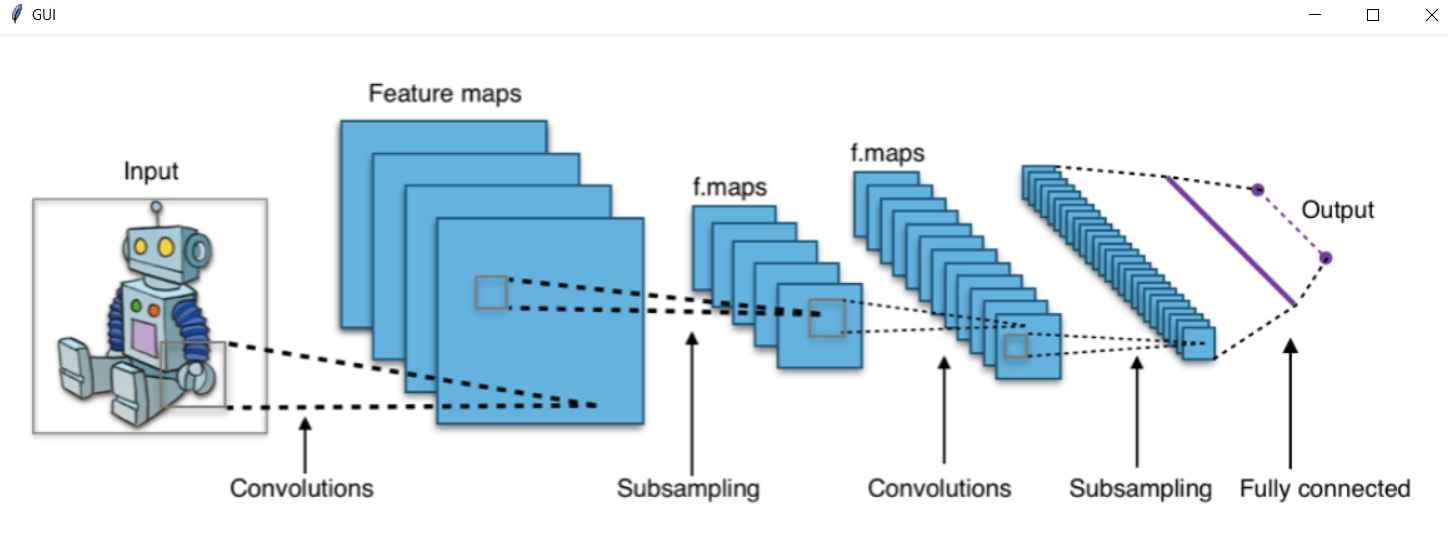
If you have been able to follow along until here, then, adding images and icons to the GUI should be a piece of cake. All you need to do is use the PhotoImage method of Tkinter and pass the file_path as the parameter to it.
So, without any further ado, let's quickly write a code for displaying an image on the GUI.
import tkinter

# Let's create the Tkinter window
window = tkinter.Tk()
window.title("GUI")

# In order to display the image in a GUI, you will use the 'PhotoImage' method of Tkinter. It will an image from the directory (specified path) and store the image in a variable.
icon = tkinter.PhotoImage(file = "CNN.png")

# Finally, to display the image you will make use of the 'Label' method and pass the 'image' variriable as a parameter and use the pack() method to display inside the GUI.
label = tkinter.Label(window, image = icon)
label.pack()

window.mainloop()
Well done if you were able to follow along till here!
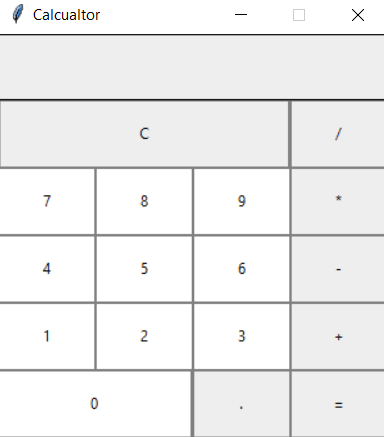
As a bonus, you will create a Calculator using all the knowledge that you gained up till now. So, let's finish this tutorial on a fantastic note.
Every GUI apps include two steps.
Let's start creating the calculator. Most of the code is self-explanatory, and some lines of code are commented with explanations.
from tkinter import *

# Let's create the Tkinter window
window = Tk()

# Then, you will define the size of the window in width(312) and height(324) using the 'geometry' method
window.geometry("312x324")

# In order to prevent the window from getting resized you will call 'resizable' method on the window
window.resizable(0, 0)

#Finally, define the title of the window
window.title("Calcualtor")


# Let's now define the required functions for the Calculator to function properly.

# 1. First is the button click 'btn_click' function which will continuously update the input field whenever a number is entered or any button is pressed it will act as a button click update.
def btn_click(item):
    global expression
    expression = expression + str(item)
    input_text.set(expression)

# 2. Second is the button clear 'btn_clear' function clears the input field or previous calculations using the button "C"
def btn_clear():
    global expression
    expression = ""
    input_text.set("")

# 3. Third and the final function is button equal ("=") 'btn_equal' function which will calculate the expression present in input field. For example: User clicks button 2, + and 3 then clicks "=" will result in an output 5.
def btn_equal():
    global expression
    result = str(eval(expression)) # 'eval' function is used for evaluating the string expressions directly
    # you can also implement your own function to evalute the expression istead of 'eval' function
    input_text.set(result)
    expression = ""

expression = ""
# In order to get the instance of the input field 'StringVar()' is used
input_text = StringVar()

# Once all the functions are defined then comes the main section where you will start defining the structure of the calculator inside the GUI.

# The first thing is to create a frame for the input field
input_frame = Frame(window, width = 312, height = 50, bd = 0, highlightbackground = "black", highlightcolor = "black", highlightthickness = 1)
input_frame.pack(side = TOP)


# Then you will create an input field inside the 'Frame' that was created in the previous step. Here the digits or the output will be displayed as 'right' aligned
input_field = Entry(input_frame, font = ('arial', 18, 'bold'), textvariable = input_text, width = 50, bg = "#eee", bd = 0, justify = RIGHT)
input_field.grid(row = 0, column = 0)
input_field.pack(ipady = 10) # 'ipady' is an internal padding to increase the height of input field


# Once you have the input field defined then you need a separate frame which will incorporate all the buttons inside it below the 'input field'
btns_frame = Frame(window, width = 312, height = 272.5, bg = "grey")
btns_frame.pack()


# The first row will comprise of the buttons 'Clear (C)' and 'Divide (/)'
clear = Button(btns_frame, text = "C", fg = "black", width = 32, height = 3, bd = 0, bg = "#eee", cursor = "hand2", command = lambda: btn_clear()).grid(row = 0, column = 0, columnspan = 3, padx = 1, pady = 1)
divide = Button(btns_frame, text = "", fg = "black", width = 10, height = 3, bd = 0, bg = "#eee", cursor = "hand2", command = lambda: btn_click("")).grid(row = 0, column = 3, padx = 1, pady = 1)


# The second row will comprise of the buttons '7', '8', '9' and 'Multiply (*)'
seven = Button(btns_frame, text = "7", fg = "black", width = 10, height = 3, bd = 0, bg = "#fff", cursor = "hand2", command = lambda: btn_click(7)).grid(row = 1, column = 0, padx = 1, pady = 1)
eight = Button(btns_frame, text = "8", fg = "black", width = 10, height = 3, bd = 0, bg = "#fff", cursor = "hand2", command = lambda: btn_click(8)).grid(row = 1, column = 1, padx = 1, pady = 1)
nine = Button(btns_frame, text = "9", fg = "black", width = 10, height = 3, bd = 0, bg = "#fff", cursor = "hand2", command = lambda: btn_click(9)).grid(row = 1, column = 2, padx = 1, pady = 1)
multiply = Button(btns_frame, text = "*", fg = "black", width = 10, height = 3, bd = 0, bg = "#eee", cursor = "hand2", command = lambda: btn_click("*")).grid(row = 1, column = 3, padx = 1, pady = 1)


# The third row will comprise of the buttons '4', '5', '6' and 'Subtract (-)'
four = Button(btns_frame, text = "4", fg = "black", width = 10, height = 3, bd = 0, bg = "#fff", cursor = "hand2", command = lambda: btn_click(4)).grid(row = 2, column = 0, padx = 1, pady = 1)
five = Button(btns_frame, text = "5", fg = "black", width = 10, height = 3, bd = 0, bg = "#fff", cursor = "hand2", command = lambda: btn_click(5)).grid(row = 2, column = 1, padx = 1, pady = 1)
six = Button(btns_frame, text = "6", fg = "black", width = 10, height = 3, bd = 0, bg = "#fff", cursor = "hand2", command = lambda: btn_click(6)).grid(row = 2, column = 2, padx = 1, pady = 1)
minus = Button(btns_frame, text = "-", fg = "black", width = 10, height = 3, bd = 0, bg = "#eee", cursor = "hand2", command = lambda: btn_click("-")).grid(row = 2, column = 3, padx = 1, pady = 1)


# The fourth row will comprise of the buttons '1', '2', '3' and 'Addition (+)'
one = Button(btns_frame, text = "1", fg = "black", width = 10, height = 3, bd = 0, bg = "#fff", cursor = "hand2", command = lambda: btn_click(1)).grid(row = 3, column = 0, padx = 1, pady = 1)
two = Button(btns_frame, text = "2", fg = "black", width = 10, height = 3, bd = 0, bg = "#fff", cursor = "hand2", command = lambda: btn_click(2)).grid(row = 3, column = 1, padx = 1, pady = 1)
three = Button(btns_frame, text = "3", fg = "black", width = 10, height = 3, bd = 0, bg = "#fff", cursor = "hand2", command = lambda: btn_click(3)).grid(row = 3, column = 2, padx = 1, pady = 1)
plus = Button(btns_frame, text = "+", fg = "black", width = 10, height = 3, bd = 0, bg = "#eee", cursor = "hand2", command = lambda: btn_click("+")).grid(row = 3, column = 3, padx = 1, pady = 1)


# Finally, the fifth row will comprise of the buttons '0', 'Decimal (.)', and 'Equal To (=)'
zero = Button(btns_frame, text = "0", fg = "black", width = 21, height = 3, bd = 0, bg = "#fff", cursor = "hand2", command = lambda: btn_click(0)).grid(row = 4, column = 0, columnspan = 2, padx = 1, pady = 1)
point = Button(btns_frame, text = ".", fg = "black", width = 10, height = 3, bd = 0, bg = "#eee", cursor = "hand2", command = lambda: btn_click(".")).grid(row = 4, column = 2, padx = 1, pady = 1)
equals = Button(btns_frame, text = "=", fg = "black", width = 10, height = 3, bd = 0, bg = "#eee", cursor = "hand2", command = lambda: btn_equal()).grid(row = 4, column = 3, padx = 1, pady = 1)


window.mainloop()
Congratulations on finishing this tutorial!
Based on your learnings from this tutorial, you are ready to make some simple GUI apps. You have to learn more methods for styling and interaction with the objects in a GUI.
One useful exercise would be to try developing applications similar to creating a calculator that will help boost your confidence and give you a much more holistic idea of what all is possible with Tkinter.
There is still a lot to cover, and you might want to explore the concept of Classes in Tkinter for which you can refer to this documentation.
Please feel free to ask any questions related to this tutorial in the comments section below.
Learn more about Python
Course
Course
Course
Tutorial
Laiba Siddiqui
Tutorial
Arunn Thevapalan
Tutorial
Oluseye Jeremiah
Tutorial
Olivia Smith
Tutorial
Derrick Mwiti
Tutorial
Avinash Navlani