Track
AWS Cloud Practitioner (CLF-C02)
10 hr
Have you ever felt overwhelmed setting up a machine learning environment that you can use for your experiments or your learning journey?
Amazon SageMaker Studio Lab might be precisely what you need. It’s a free, browser-based development environment built by AWS to make machine learning more accessible. No AWS account required. No billing setup. Just sign in and start coding.
As someone who regularly works with ML tools, I’ve found Studio Lab especially useful for quick experiments, building demos, or running lightweight models without having to set up complex infrastructures. It’s ideal for students, developers, and educators who want to focus on learning and prototyping rather than configuration.
In this article, you’ll get a practical overview of Studio Lab. I will demonstrate what it is, how it works, and how to utilize it effectively for real-world machine learning projects.
This guide will show you everything you need to get you started.
Amazon SageMaker Studio Lab is a free, cloud-based platform that lets you develop machine learning models in a familiar JupyterLab environment without requiring an AWS account or a credit card.
AWS launched it at re:Invent 2021 with the clear mission to make machine learning more accessible to everyone. It is a lightweight version of Amazon SageMaker Studio, which is AWS’s full-featured ML development platform.
Studio Lab streamlines the process of setting up an experiment environment and provides a no-cost option tailored for learners, educators, and developers who wish to build, test, and share machine learning (ML) models without requiring them to set up their own infrastructure.
Here’s why Studio Lab is amazing:
I’ve used it personally to prototype small models, run quick experiments, and test course materials. If you’re someone who wants to focus on learning or teaching machine learning without cloud setup headaches, Studio Lab is a good fit for you.
If you want to learn more about AWS, I recommend the Introduction to AWS or AWS Cloud Technology and Services courses.
SageMaker Studio Lab may feel lightweight, but under the hood, it offers sufficient power and flexibility for real-world machine learning workflows. Whether you're training a regression model, experimenting with image data, or building a student project, knowing what resources you’re working with helps you get the most out of them.
Let’s take a closer look at its key components in this section.
Every Studio Lab user has access to a T3.xlarge CPU instance by default. That means:
The CPU runtime is ideal for model prototyping, data exploration, and working with structured datasets or time-series forecasting.
In my experience, you can stay with the CPU runtime if you’re using libraries like scikit-learn, XGBoost, and pandas without any issues.
If you’re working with deep learning tasks, such as computer vision or transformers, you should consider the GPU runtime, which provides access to a G4dn.xlarge instance (NVIDIA T4), which is ideal for PyTorch or TensorFlow.
You can only have one GPU session per day, lasting up to four hours.
I’ve used it to train small convolutional networks, and for beginner-to-intermediate deep learning models, it gets the job done, especially for coursework or proof-of-concept demos.
As a helpful hint: If you need GPUs regularly, consider dividing your work into short training sessions and providing your models with checkpoints. This way, progress will not be lost when the session ends.
Studio Lab gives you 15 GB of persistent storage, which:
Just keep in mind that large model checkpoints, pre-trained weights, or large datasets can fill your storage fast.
I recommend linking to external datasets (from S3, Hugging Face, or GitHub) and loading the data in batches, when possible.
One of the best things about Studio Lab is its familiar JupyterLab interface. It’s a browser-based coding environment with:
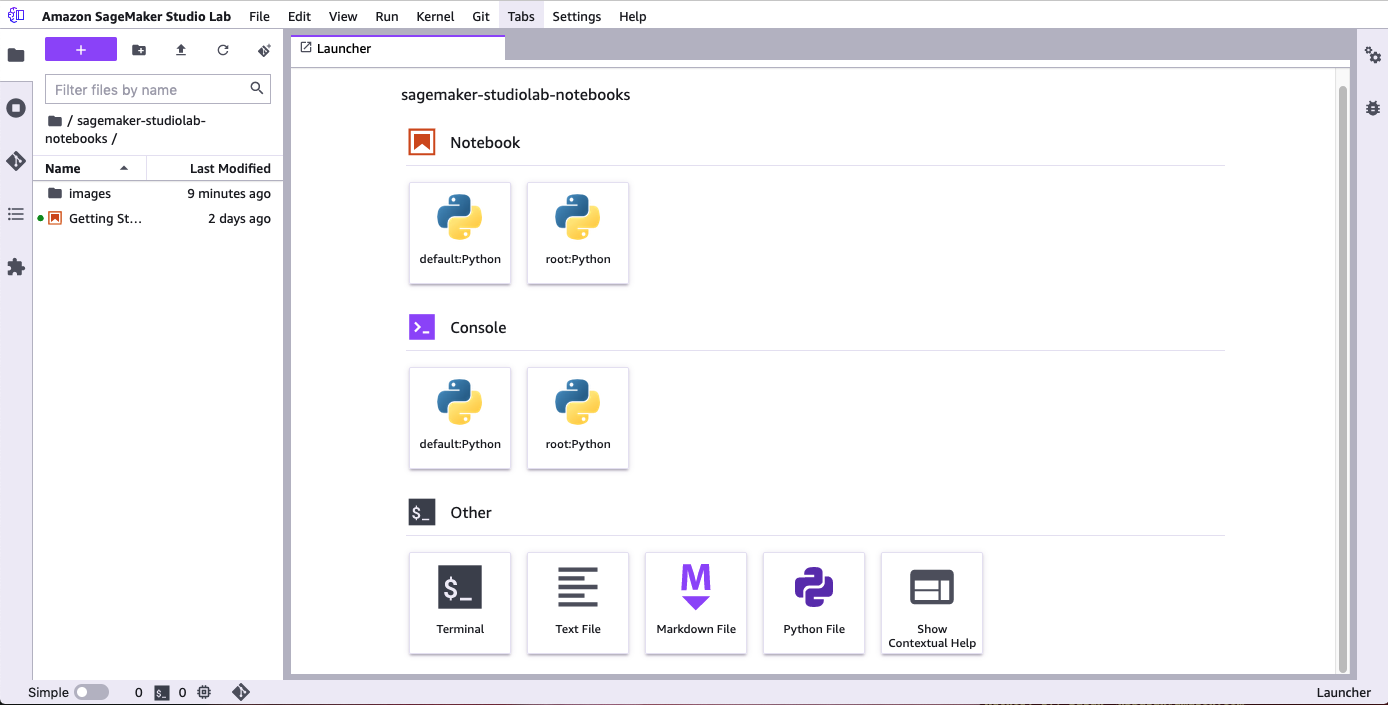
The SageMaker Studio Lab user interface. Image source: AWS docs.
If you're coming from Jupyter Notebooks or Colab, the learning curve here is minimal, and the experience is smooth. I especially like the Git integration and extension support, which makes collaboration much easier.
Want to improve your ML workflow skills? Try the Designing Machine Learning Workflows in Python course for a hands-on guide.
Getting started with SageMaker Studio Lab is quite simple, especially compared to setting up a whole AWS environment.
In the following sections, I’ll show you what to do to get up and running.
To use Studio Lab, you first need to request access. Here’s the process:
In my case, I received approval within 24 hours.
Once in, you can select your compute type and then click on “Start runtime”.
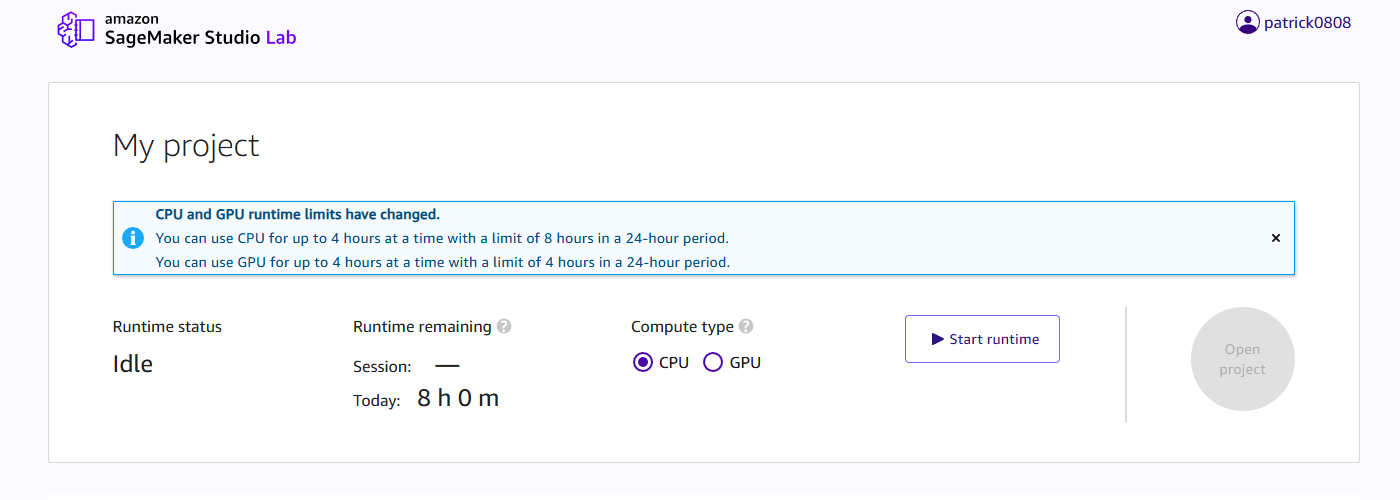
SageMaker Studio Lab landing page. Image by author.
When starting for the first time, you will also be prompted to enter your mobile phone number, and a six-digit verification code will be sent to this number.
Once your environment is up and running, you’ll land in a JupyterLab environment, and you should see the Getting Started.ipynb notebook.
Studio Lab comes with a Python base image and only a few pre-installed libraries to save space for libraries that you want to install.
In addition to the default conda environment, Studio Lab also supports the SageMaker Distribution, which is a more powerful, curated environment designed by AWS to match the configuration of Amazon SageMaker Studio. It contains packages such as PyTorch, TensorFlow, NumPy, scikit-learn, and Pandas.
You can always install your packages into the existing Conda environment running %conda install <package> or %pip install <package> directly from within a notebook cell.
You can also use requirements.txt or environment.yml to replicate complete environments. This makes it easy to follow tutorials.
But keep in mind that you only have 15GB of storage, so it’s best to avoid installing heavy packages when not required.
Your installed packages are also persisted throughout different sessions.
Studio Lab integrates well with GitHub, which means you can:
If you're teaching or learning, this makes it incredibly easy to distribute starter code or submit work for review, especially in classrooms, bootcamps, or self-paced study groups.
Do you want to go beyond GitHub and work with real-world ML workflows? Try the End-to-End Machine Learning course to see how to structure complete projects.
SageMaker Studio Lab is a perfect place to test ideas, follow tutorials, or build small projects from scratch. Whether you’re learning about regression or playing with image data, the platform supports most beginner-to-intermediate tasks smoothly.
I will now walk with you through practical examples that you can try right away.
You can find the example notebooks in my GitHub repository. Simply clone that repo into your Studio Lab session.
Alternatively, you can directly click on the Open Studio Lab badges in my README.md file, as this will open the notebook in Studio Lab for you directly.
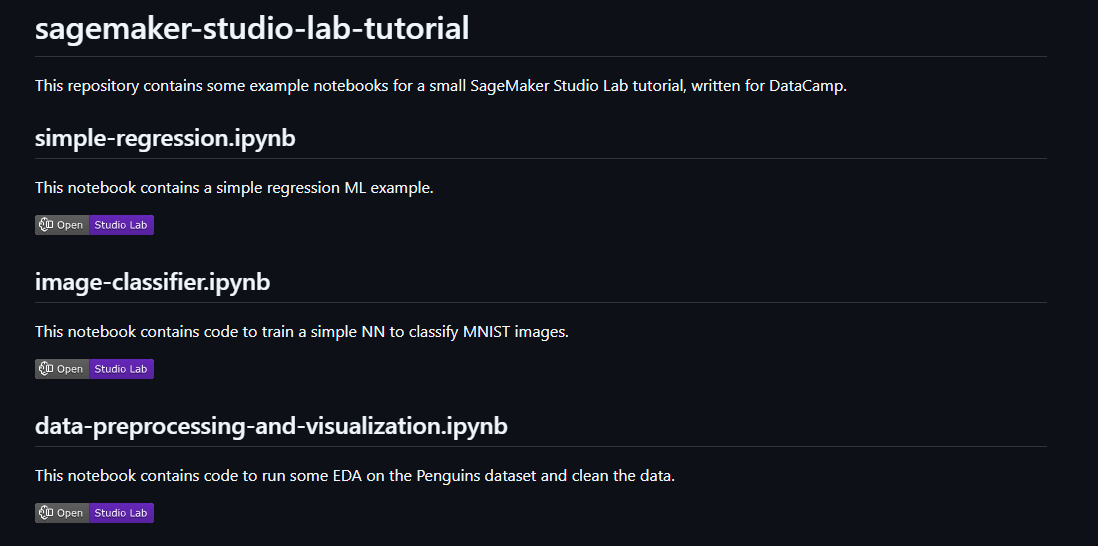
Screenshot of the README file with Open in Studio Lab badges. Image by author.
This is the Hello World of machine learning: Training a simple regression model.
What you’ll do in this small example:
seaborn.scikit-learn.The code for this example is in the simple-regression.ipynb notebook.
Open the notebook and as kernel, select sagemaker-distribution:Python.
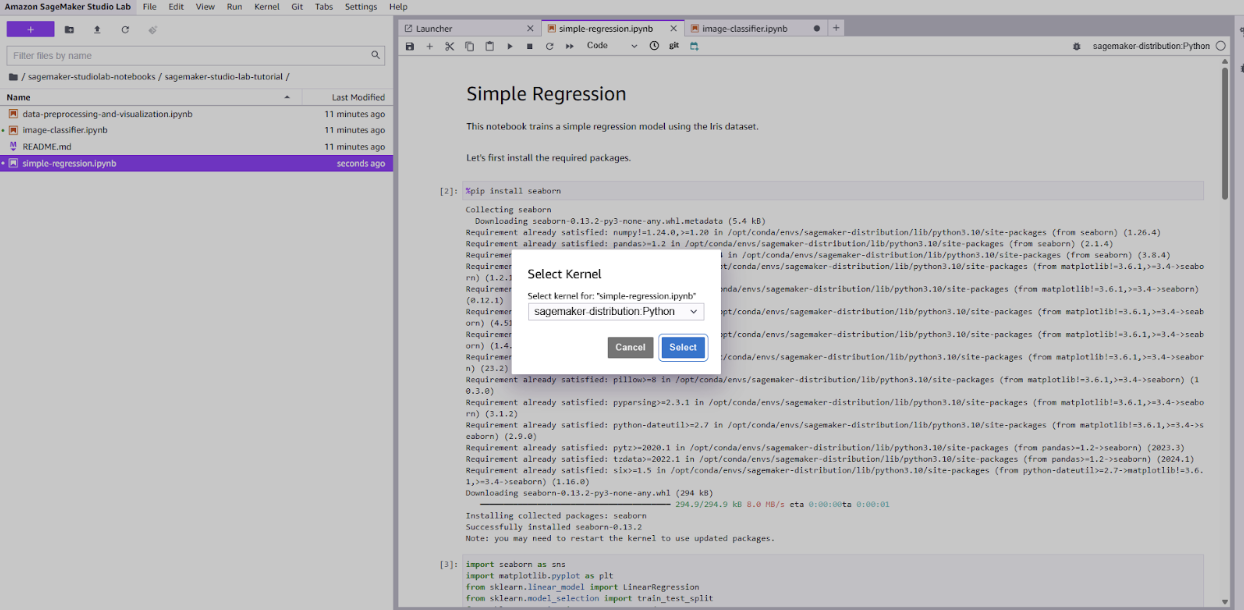
Kernel selection for simple-regression.ipynb notebook in Studio Lab. Image by author.
The goal of this ML task is to predict petal length based on sepal length from the well-known Iris dataset.
Simply run through all the cells in the notebook to follow through with this example.
Below you can find the full code for that example:
import seaborn as sns
import matplotlib.pyplot as plt
from sklearn.linear_model import LinearRegression
from sklearn.model_selection import train_test_split
from sklearn.metrics import mean_squared_error, r2_score

# Load dataset
df = sns.load_dataset("iris")

# Visualize the relationship
sns.scatterplot(data=df, x="sepal_length", y="petal_length", hue="species")
plt.title("Sepal Length vs Petal Length")
plt.show()

# Select features
X = df[["sepal_length"]]
y = df["petal_length"]

# Train/test split
X_train, X_test, y_train, y_test = train_test_split(X, y, test_size=0.2, random_state=42)

# Fit model
model = LinearRegression()
model.fit(X_train, y_train)
y_pred = model.predict(X_test)

# Evaluation
print("MSE:", mean_squared_error(y_test, y_pred))
print("R² Score:", r2_score(y_test, y_pred))

# Plot regression line
plt.figure(figsize=(8, 5))
sns.regplot(x=X_test["sepal_length"], y=y_test, ci=None, label="Actual", scatter_kws={"s": 50})
plt.plot(X_test["sepal_length"], y_pred, color="red", label="Predicted", linewidth=2)
plt.title("Linear Regression: Predicting Petal Length")
plt.xlabel("Sepal Length")
plt.ylabel("Petal Length")
plt.legend()
plt.show()
This example trains in seconds on Studio Lab’s CPU runtime, and the plots help visualize model performance. While it’s a simple start, this pattern forms the core of many real-world regression tasks.
MNIST is a great starting point for learning image classification. It’s small, clean, and works well even in resource-limited environments like Studio Lab.
In this example, you’ll:
tensorflow.keras.datasetsYou can run this example in the CPU runtime environment, or, if you want to have even better performance, in the GPU environment (which sometimes can be harder to get).
The code for this example can be found in the notebook image-classifier.ipynb or below:
import tensorflow as tf
import matplotlib.pyplot as plt
import numpy as np

# Load dataset
(X_train, y_train), (X_test, y_test) = tf.keras.datasets.mnist.load_data()

# Normalize pixel values
X_train = X_train / 255.0
X_test = X_test / 255.0

# Visualize an example image
plt.imshow(X_train[0], cmap="gray")
plt.title(f"Label: {y_train[0]}")
plt.axis("off")
plt.show()

# Build the model
model = tf.keras.Sequential([
    tf.keras.layers.Flatten(input_shape=(28, 28)),
    tf.keras.layers.Dense(128, activation='relu'),
    tf.keras.layers.Dense(10, activation='softmax')
])

# Compile the model
model.compile(optimizer='adam',
              loss='sparse_categorical_crossentropy',
              metrics=['accuracy'])

# Train the model
history = model.fit(X_train, y_train, epochs=3, validation_split=0.1)

# Evaluate the model
test_loss, test_acc = model.evaluate(X_test, y_test)
print("Test accuracy:", test_acc)

# Predict on test set
predictions = model.predict(X_test)

# Show example prediction
index = 0
plt.imshow(X_test[index], cmap="gray")
plt.title(f"Predicted: {np.argmax(predictions[index])}, Actual: {y_test[index]}")
plt.axis("off")
plt.show()
Open the notebook and as kernel, select sagemaker-distribution:Python.
This example runs smoothly on the CPU and is much faster with the GPU enabled. You can expand on it by adding convolutional layers, increasing epochs, or visualizing misclassified digits.
If you want to take this further, the Developing AI Applications track walks you through real-world deep learning use cases.
Let’s now come to the third example, which is quite essential for real-world ML applications: Data preprocessing and visualization.
Most real-world datasets are messy and require extensive cleaning and manual inspection to be usable. Therefore, being able to plot the data and preprocess it is crucial for developing practical machine learning applications.
To showcase data preprocessing and visualization, we will use the Palmer Penguins dataset.
Palmer Penguins is one of the best beginner-friendly datasets for learning data cleaning and visualization. It’s like the Iris dataset, but with more interesting variables and a clearer real-world context.
The code for this example is available in the notebook data-preprocessing-and-visualization.ipynb.
Again, select the kernel sagemaker-distribution:Python to follow this example.
You can find the complete code below:
import seaborn as sns
import pandas as pd
import matplotlib.pyplot as plt

# Load the dataset
df = sns.load_dataset("penguins")

# Quick overview
print(df.head())

# Check for datatypes and NaN values
print(df.info())

# Check missing values
print(df.isnull().sum())

# Drop rows with missing values (simplest option for this example)
df_clean = df.dropna()

# Histogram of bill length
plt.hist(df_clean["bill_length_mm"], bins=20, color="skyblue", edgecolor="black")
plt.title("Distribution of Bill Length")
plt.xlabel("Bill Length (mm)")
plt.ylabel("Frequency")
plt.show()

# Box plot of body mass by species
sns.boxplot(data=df_clean, x="species", y="body_mass_g", palette="pastel")
plt.title("Body Mass Distribution by Species")
plt.ylabel("Body Mass (g)")
plt.show()

# Scatterplot to explore relationships
sns.scatterplot(data=df_clean, x="bill_length_mm", y="bill_depth_mm", hue="species", style="sex")
plt.title("Bill Length vs. Depth by Species and Sex")
plt.xlabel("Bill Length (mm)")
plt.ylabel("Bill Depth (mm)")
plt.legend()
plt.show()
These simple plots already reveal some interesting patterns, like species-level clusters and differences between male and female penguins.
Once your notebook is ready, sharing is simple:
.ipynb file directly into a GitHub repositoryYou can even add an Open in Studio Lab badge to your README.md file or notebooks in your public GitHub repo.
Simply add the following to your README.md file:
[](https://studiolab.sagemaker.aws/import/github/org/repo/blob/master/path/to/notebook.ipynb)You can check out the README.md file in my repo to see how that works in action.
If you're working with teammates or instructors, this approach makes peer review, feedback, and reproducibility incredibly smooth. You can even include requirements.txt to ensure they install the same dependencies.
SageMaker Studio Lab can be used not only as a playground for machine learning but also as a practical tool for education, rapid experimentation, and lightweight prototyping. Because it’s free, easy to access, and runs in the browser, it opens up a wide range of use cases for learners, instructors, and developers.
Studio Lab is already being utilized in university classrooms, online courses, and coding boot camps as a teaching tool.
The advantages:
As an instructor, you can easily:
As a student or self-learner, Studio Lab gives you a space to:
Studio Lab isn’t built for enterprise workloads, but it works pretty well for prototyping.
You can use it if you want to:
It is therefore ideal for:
I used it when I wanted to test some code quickly that I found somewhere, or when I prepared a demo for one of my articles.
SageMaker Studio Lab is often compared to tools like Google Colab, JupyterHub, and even full SageMaker Studio. However, while these platforms may appear similar on the surface, their strengths, limitations, and ideal use cases differ significantly.
Let’s compare Studio Lab with Google Colab.
|
Feature |
Studio Lab |
Google Colab |
|
CPU session limit |
4 hrs/session, 8 hrs/day |
~12 hrs/session |
|
CPU spec |
4 vCPUs, 16GB RAM |
2 vCPUs, 13GB RAM |
|
GPU access |
4 hrs/day, Tesla T4 |
Tesla P100 or Tesla K80 |
|
Storage |
15 GB persistent |
Temporary, resets per session (Google Drive can be mounted) |
In practice:
Do you want to work with AWS tools long-term? Studio Lab serves as a more effective stepping stone to SageMaker Studio and cloud-based workflows.
Studio Lab runs on JupyterLab, while Colab is based on classic Jupyter Notebooks.
This means that Studio Lab offers tabbed layouts, terminals, file explorers, and custom conda environments.
Colab, in turn, feels more lightweight but lacks environment isolation and reproducibility out of the box.
If you're used to JupyterLab (or want a more IDE-like experience), Studio Lab feels more structured and extensible.
Both platforms are free, but with some key differences:
Studio Lab is ideal for learners or instructors who want a reliable and predictable platform for teaching or experimentation. Colab can offer more power, but often at the cost of instability or needing to upgrade.
As Studio Lab is free, it also has some drawbacks.
Let’s look at what you should be aware of.
Studio Lab comes with the following resource constraints:
For small and medium-sized projects, this remains manageable. However, take the above limitations into account when deciding how to structure your work and store data.
Studio Lab doesn’t support:
But you can at least work around some of these gaps:
If you're building production-grade pipelines or need full cloud integration, consider switching to Amazon SageMaker Studio or a managed environment with cloud IAM access.
Amazon SageMaker Studio Lab is great if you need easy accessibility, flexibility, and free machine learning development. It removes common entry barriers, like cloud setup or billing. This allows you to focus on learning, experimenting, and prototyping.
For students, self-learners, and educators, Studio Lab is an excellent environment to:
Are there limitations? Definitely! You’re working with session timeouts, no direct AWS integrations, and a 15 GB storage limit. But for lightweight experimentation and hands-on learning, those trade-offs are reasonable and also acceptable for a free-tier tool.
If you’re just starting your machine learning journey or looking for a straightforward, reproducible way to test ideas, Studio Lab is more than enough to get you started.
Want to take your ML skills to the next level? Explore AWS Cloud Technology and Services to begin creating production-ready environments.
Learn more about AWS with these courses!
Track
Course
Course
blog
Joleen Bothma
12 min
Tutorial
Bex Tuychiev
Tutorial
Moez Ali
Tutorial
Don Kaluarachchi
Tutorial
Don Kaluarachchi
code-along
Suman Debnath