Pictures and videos are everywhere. As humans, we rely on our vision for a number of tasks, like driving, recognizing our friends, and diagnosing problems. As computers become more involved in our day-to-day tasks, it is ever more important for them to be able to use images too. Image analysis is the means by which computers can “see” and understand an image. When image analysis is powered by machine learning, we call it computer vision.
This tutorial will walk you through how computers “see” images, cover the basics of image manipulation, and finally, discuss how machine learning and generative AI can be applied to images. Let’s get started!
If you're interested in learning more about image classification, check out our code-along on Image Classification with Hugging Face.
What is Computer Vision?
Computer Vision is a field of artificial intelligence that enables computers and systems to derive meaningful information from digital images, videos, and other visual inputs. It is the science and technology of machines that can see. As a scientific discipline, computer vision seeks to apply its theories and models to the construction of computer vision systems.
At its core, computer vision is all about interpreting visual data. It involves acquiring, processing, analyzing, and understanding digital images to extract high-dimensional data from the real world in order to produce numerical or symbolic information that can be used by a machine. It employs various methods and techniques from a broad range of disciplines, such as physics, mathematics, electrical engineering, and computer science.
Introduction to Image Analysis
At the lowest level, computers operate with 1’s and 0’s. This is no different when working with images. Computers can represent an image as a matrix of 1’s and 0’s. When a computer displays an image, it displays a grid of pixels, each filled with one color. Consider a very simple shape, such as the black triangle below.
![]()
Figure 1: A simple, low-resolution triangle made up of 28 pixels.
This shape is made up of 28 pixels: 16 black pixels, and 12 white pixels. You can see each of the pixels outlined in the image below.
![]()
Figure 2: Black triangle with each pixel outlined.
But this image is just a representation of the matrix of numbers stored by the computer.
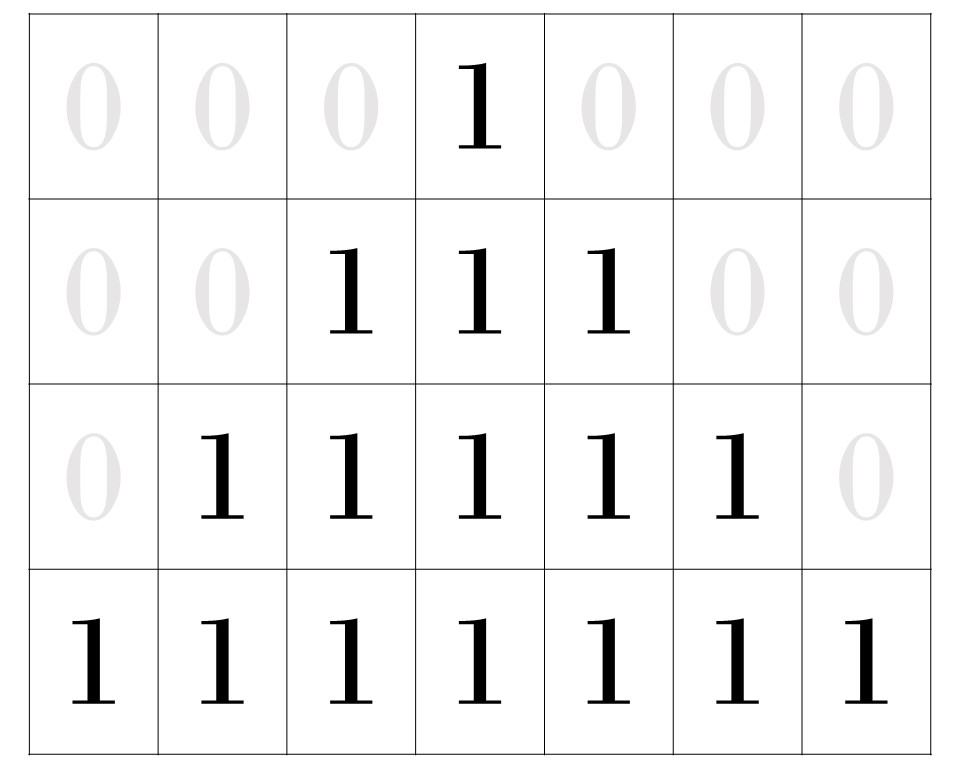
Figure 3: A demonstration of the 1's and 0's in the matrix that makes up the triangle image.
This is pretty simple for images with only two colors: black and white. If your image is in shades of gray, you need to add more nuance. You may end up with numbers like 0.015 in the boxes instead. This number essentially tells the computer what luminance to give each pixel on the screen. It defines a value between black (1) and white (0).
Analyzing color images
But images are rarely so dull. What do computers do with colorful images? Let’s turn this triangle green!
![]()
Figure 4: The same 28-pixel triangle as before, but with a splash of color!
In this case, you can’t use a number between zero and one to describe this color. There are too many colors available to practically assign them each a single number that would be intuitive.
Instead, a few systems have been developed to break apart the individual components of a color and assign numbers to each component.
For example, you may have heard of RGB. This is a color model that breaks each color into the amount of red, green, and blue, respectively, that combine to create the color you’re aiming for.
The RGB model stems from the use of screens that have red, green, and blue pixels, such as televisions. This model allows for the type of additive color mixing used by light in these devices.
In this system, red, blue, and green are called “channels.” For an 8-bit image, each channel is assigned a value between 0 and 255 (which is the maximum value an 8-digit binary number can be).
Let’s examine what this means for our simple green triangle.
The RGB values for this shade of green are 154, 205, and 50, respectively. Note that if this were a pure green, the red and blue channels would each be 0. This RGB representation shows us that there is a lot of red and a little blue mixed into the green to create this shade. Each pixel has three channels of values describing it. Every green pixel is represented by 154, 205, 50, and every white pixel is represented by 0, 0, 0.
That means this simple 28-pixel green triangle is represented by three 7x4 matrices.
You can imagine these three matrices stacking on top of one another to create this image.
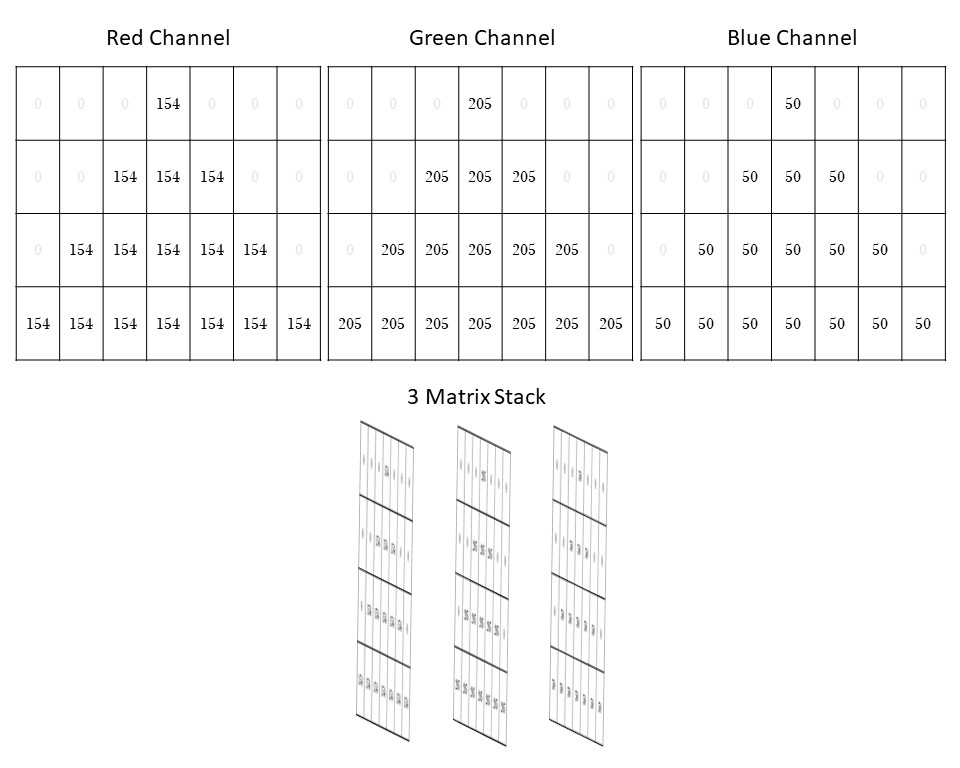
Figure 5: For this simple green triangle, each color channel in the RGB color system contains a matrix of pixel values representing the image. When combined, these three matrices stack up to create this one image!
You can see how images can quickly start to fill up a lot of space in a computer if every pixel requires three numbers to define it. Take a moment to consider how many numbers make up a high-resolution image, say a 4K image (which has 4,000 pixels).
RGB is not the only system used to assign colors to images. You may have heard of CYMK, which uses four numbers to describe each color. This model uses four colors, cyan, magenta, yellow, and black. This is helpful in situations where you need a subtractive color model, for example in printing.
Each color system has advantages and disadvantages, and it can be worth your time to investigate a few if you are running into memory issues while analyzing images. For the purposes of this tutorial, we’ll stick with RGB.
So what can you do with these matrices of pixel values?
Manual Image Analysis Techniques
Isolating Objects with Thresholding
How does a computer determine which pixels represent a face or other object? These days, a lot of that identifying work is done using machine learning models. But in order to understand those, it’s helpful to first understand how to manually isolate a figure in an image.
Imagine you have a video of two lizards against a light background. For simplicity, you turn the video grayscale, so there’s only one channel to consider. You are interested in tracking the lizard’s movement during the video.
A video is just a series of photos (or frames) stacked together. So the first thing you’ll need to do is break apart that stack and take each photo one at a time. Now that you have one grayscale photo, you need to show the computer which part of the photo is a lizard and which is not.
Theoretically, you could use your mouse to point to each and every pixel that makes up the lizard and label it “lizard.” But given the resolution of most photos and the fact you have many photos that make up your video, that’s an unreasonable proposition.
Instead, you can come up with a rule that tells the computer what is part of the lizard and what is not. The simplest way to do this is with thresholding.
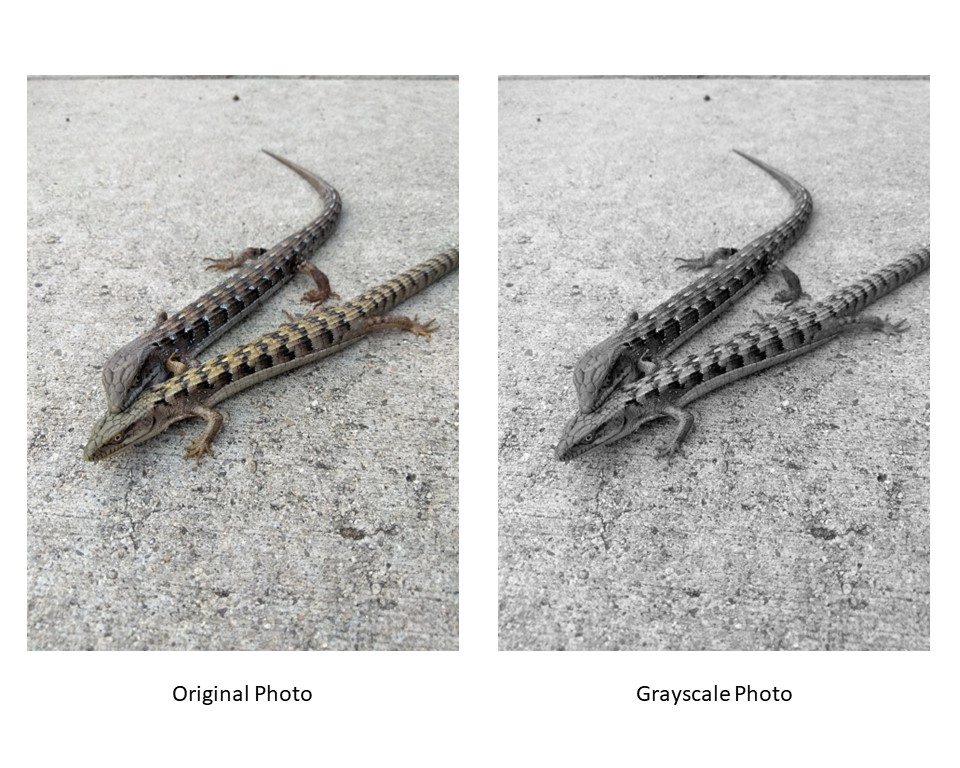
Figure 6: To simplify things, we'll work with this photo in grayscale.
What is thresholding?
Thresholding is the process of segmenting an image based on the numerical value assigned to each pixel. Look again at the grayscale image of the lizards. Notice how the lizards appear darker than the background. In many images, there will be a difference in luminance between the object we want to isolate and its background.
Thresholding is the process of finding the edge of the object, in this case the lizards, using this difference in luminance. This technique aims to define a threshold luminance that separates light and dark pixels.
Creating a binary image
Imagine the matrix of numbers that defines this grayscale image. Each pixel is defined by a number between 0 and 255.
With thresholding, you can define a rule that anything sufficiently dark is a lizard. For example, you could say that any pixel with a value of 130 or above is a lizard, and anything lower than 130 is not a lizard.
Technically, you’d set anything with our threshold value or above to 255 and everything else to 0. This creates a binary image with black and white pixels. If you’ve chosen a good threshold value, the lizards will be black against a white background.
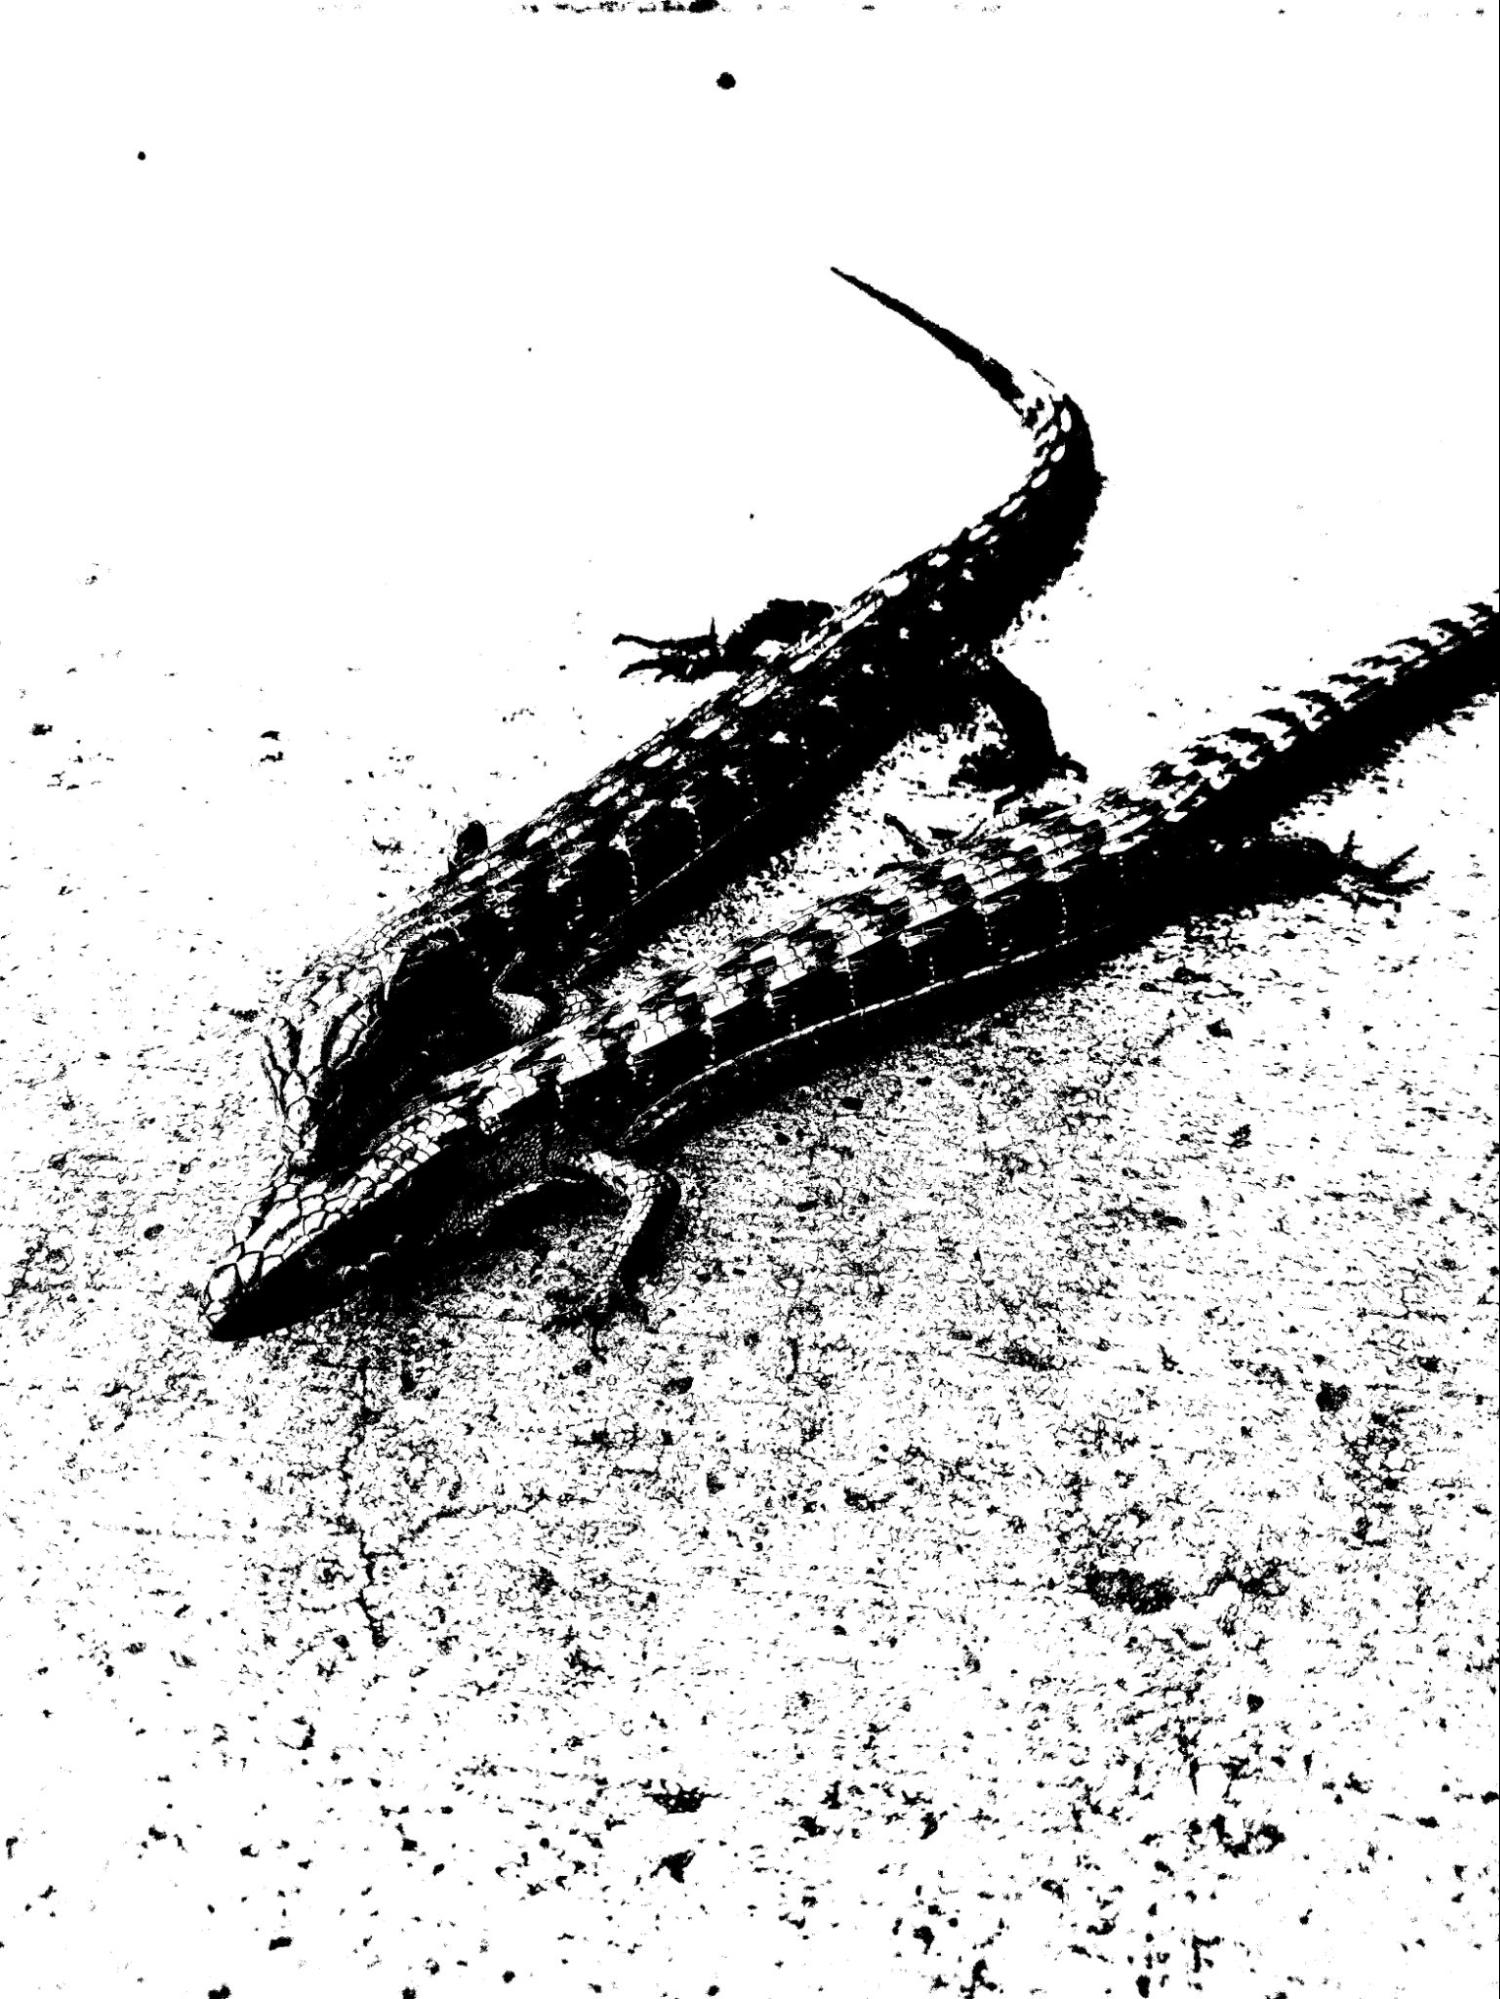
Figure 7: Binary image generated by setting a threshold of 130.
In this example, we just picked an arbitrary number as our threshold: 130. However, to accurately isolate our lizards, you’d want to pick a number that would capture the vast majority of the lizards while minimizing any pixels that are not part of the lizards.
This process of picking one threshold value for the whole image is called global thresholding. It’s a crude way to isolate your target and is often highly imperfect. If you have a perfectly silhouetted lizard on a perfectly white background, global thresholding will work beautifully. But as you can see in this lizard example, real images are rarely so easy. You’ll likely need a more complex method of thresholding.
One such method is called local thresholding. In this technique, you choose different threshold values for different parts of your image. This is especially useful when you have a lighting gradient in the background. There are many other optimization methods that vary in complexity, and the one you choose will depend on your circumstances.
It is also possible to threshold color images. Doing so is much more complicated and outside the scope of this tutorial.
Morphological Analysis
While thresholding can get you pretty far with isolating these lizards, it isn’t perfect. You may still end up with parts of the background being defined as a lizard or parts of the lizard missing. You need another tool to isolate the animals further. With thresholding, you defined a rule based on color or illuminance. Now you’ll define a rule based on shape, using morphological operations.
Defining a shape with structuring elements
Morphological operations use structuring elements to determine the edges of shapes. A structuring element is a small matrix with a specific shape, usually a square, circle, or cross. You can also change the size of the structuring element to get different effects.
During a morphological operation, each pixel is compared to its neighbors within that shape. There are two basic morphological operations you can use to define the shape of our intended object: dilation and erosion.
Dilation
In dilation, if any neighboring pixels within the limits of the structuring element are dark (in this case, 1), then the target pixel is turned into a 1 to match.
Imagine going over a grid of numbers with a square-shaped magnifying glass. You put one of the numbers in the middle of the square and then look at the other numbers within that square. If any of them are 1, then you label the number in the middle a 1, regardless of what it was in the beginning.
In this way, dilation can expand the borders of objects or fill in holes.
Erosion
Erosion works the same way as dilation, but with the opposite effect. With erosion, if any of a pixel’s neighbors are a 0, then that pixel will be redefined as a 0. This can serve to separate objects, reduce noise, and refine boundaries.
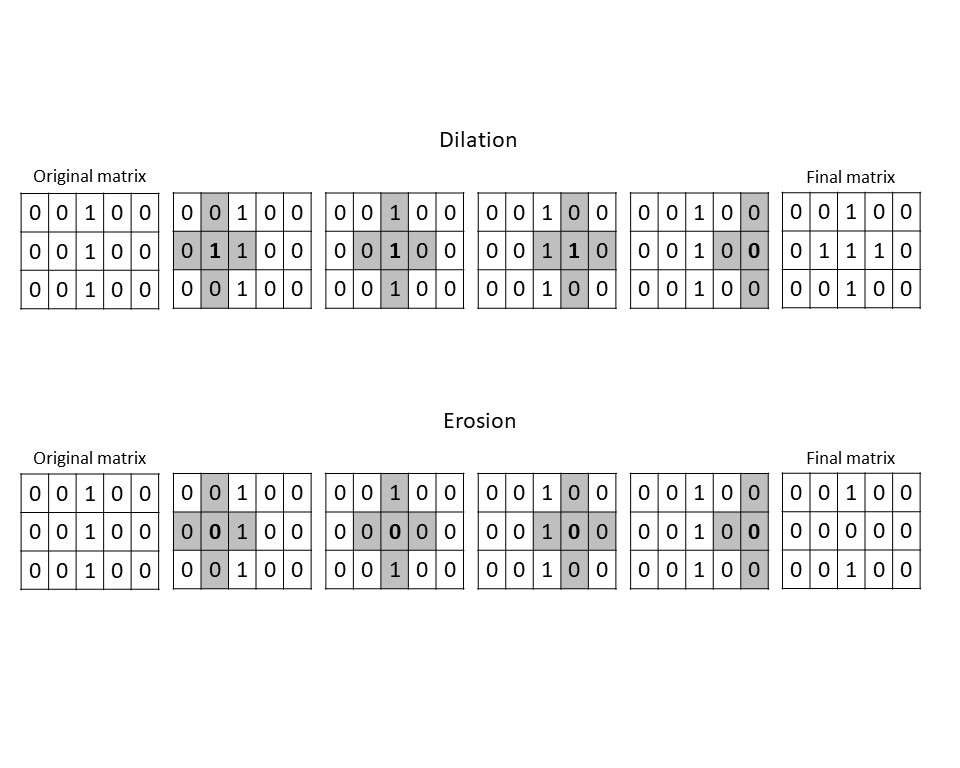
Figure 8: Visual example of dilation and erosion using a cross-shaped structuring element. In this example, we only performed the morphological operation on the second row of the matrix. In a real image, it would be applied to every pixel. But even with just this simple example, you can see how erosion separated the edges of the line while dilation thickened it.
You can see how dilation and erosion modify the binary lizard image.
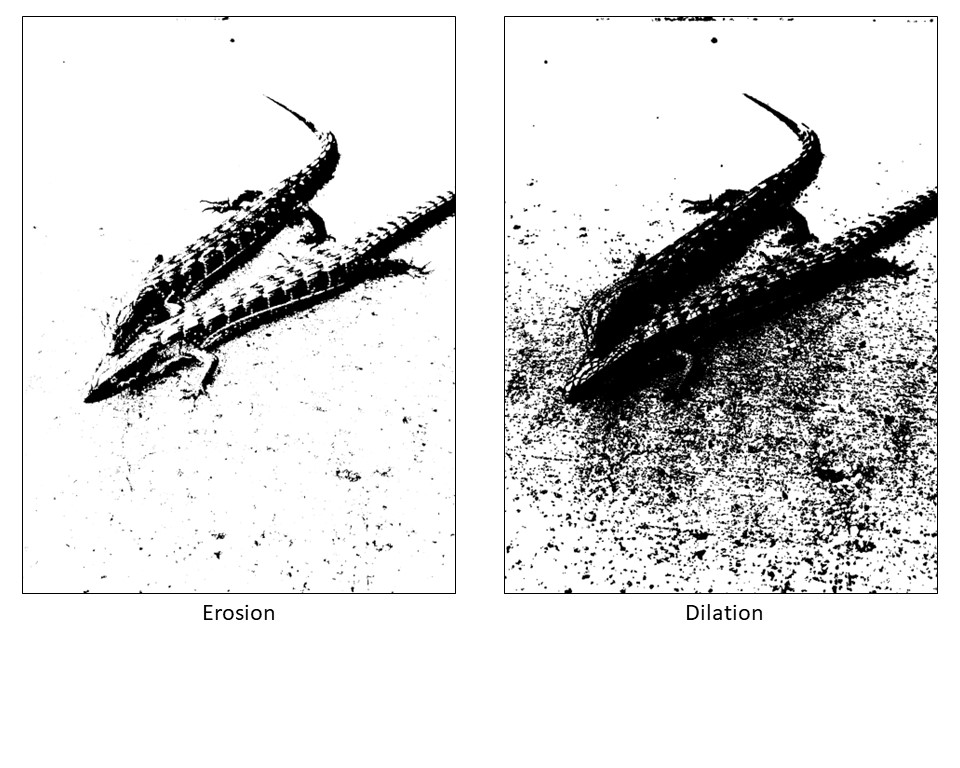
Figure 9: Example of erosion and dilation being applied to the lizard photo. The structuring element used here was a 6x6 square.
Combining dilation and erosion
Dilation and erosion can be used iteratively or sequentially to change the final product. It’s common practice to use both dilation and erosion to further define your isolated image.
When erosion is followed by dilation, small protrusions and noise are removed, and the remaining outline is strengthened. This technique is called opening.
When dilation is followed by erosion, small holes and gaps are filled, and the edges are tidied up. This technique is called closing.
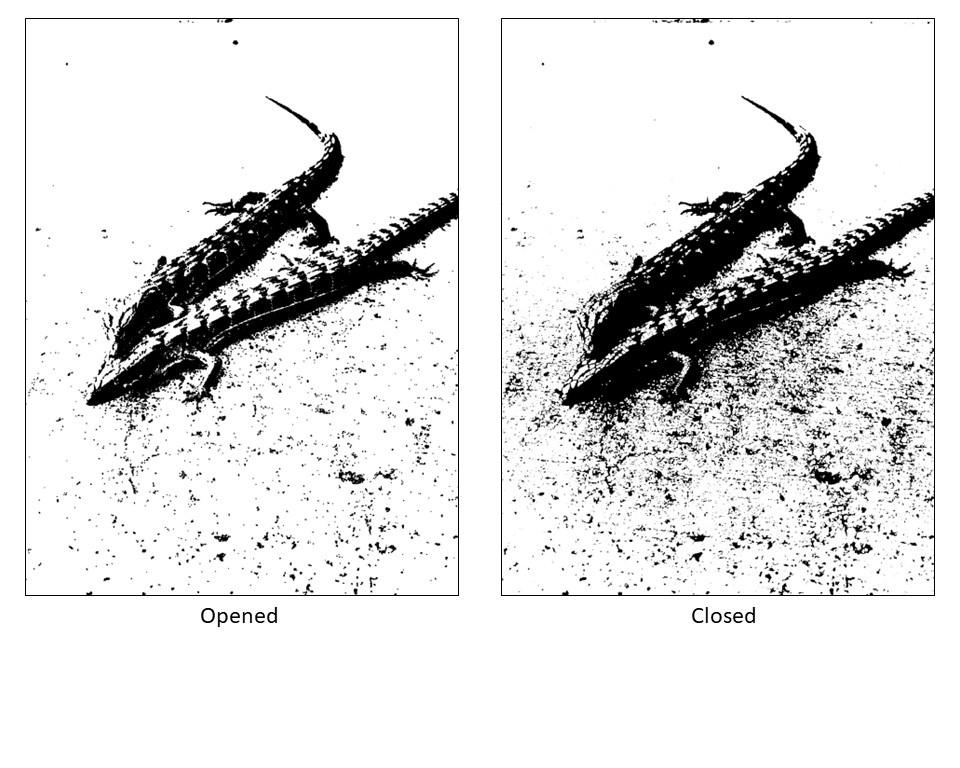
Figure 10: Demonstration of opening and closing techniques using a 6x6 square structuring element on the lizard photo.
You can see that none of these images quite isolates our lizards from the background. But with each tweak and iteration, you can get closer and closer.
With the next iteration, you could tell the computer to ignore anything outside a certain size range. This would remove most of the speckles and leave the lizards intact. Learn how to do this yourself in the Image Processing in Python Course on DataCamp!
For every image or series of images, you can set up a series of rules like these to tell the computer what your target looks like. Then the computer can use that information to make decisions.
These decisions influence everything from identifying galaxies to finding diseased tissue. But creating a series of rules for every picture individually is time-consuming and tedious. That’s where machine learning comes into play.
Supervised Machine Learning for Image Analysis
Training a Supervised ML Model
As you’ve seen, analyzing images by hand can be demanding, as there are an enormous number of variables at play. Fortunately, machine learning (ML) can help to automate this process. For an in-depth look at machine learning, you can check out Machine Learning Scientist with Python or Supervised Machine Learning. This tutorial will only briefly cover the machine learning aspects useful for understanding image processing.
There are two large categories of ML: supervised ML and unsupervised ML.
With supervised ML, you essentially give the computer a large number of images and label them ahead of time. It’s a little like teaching a baby what animals look like by pointing to them and saying, “This is an elephant.” It’s up to the baby to figure out a pattern for the things we call elephants and the things we call fish.
In supervised ML, the computer is doing similar work as that baby.
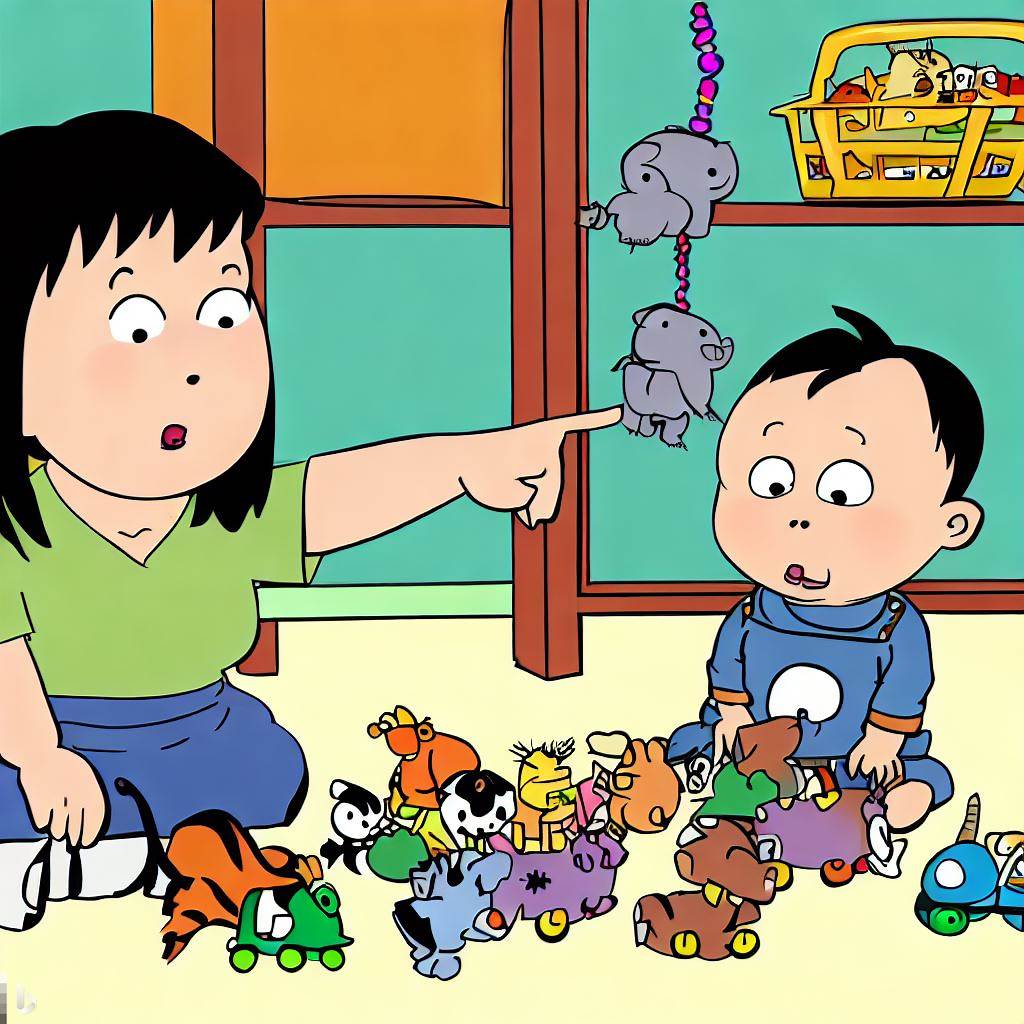
Figure 11: DALLE-E generated image of mother pointing to toy animals to teach baby what they look like. Supervised learning works in a similar way, where examples that have the correct answer are provided.
Annotation and feature extraction
Let’s assume you want to train a machine learning model to identify objects in an image it’s never encountered. The first step in training this supervised machine learning model is to annotate and label a collection of images, called a training dataset. Annotation involves manually identifying and marking the regions of interest in an image.
For example, if we want to train a model to classify different types of animals, we would annotate each image by outlining the animals present in the image and assigning them the corresponding class label, ‘cow,’ ‘cat,’ etc. This annotated dataset becomes the foundation for training the model. There are also many already labeled datasets that are publicly available for you to work with.
Once you have the labeled training dataset, you need to extract relevant features from the images. Feature extraction involves identifying and capturing important characteristics or patterns that distinguish one class from another.
In our animal example, you may define an important characteristic of cows as having four legs and spots.
Convolutional neural networks
There are various techniques available for feature extraction in image processing, ranging from simple methods like color histograms and texture descriptors to more advanced approaches like convolutional neural networks (CNNs).
CNNs are a popular supervised learning algorithm that automatically learns important characteristics and patterns from labeled images during training. They are made up of layers, with each layer performing specific operations on the image data.
Convolutional layers apply filters to capture local patterns, while pooling layers reduce spatial dimensions. Fully connected layers combine information from the previous layers. Through these sequential operations, the network extracts and combines features to make accurate predictions about what is in the image.
Choosing an architecture
The training process of a supervised ML model, like a CNN, involves several steps. First, the data needs to be preprocessed to ensure consistency and quality. This may involve resizing the images, normalizing pixel values, and augmenting the dataset by applying transformations like rotations or flips to increase its diversity.
Next, you will design the architecture of the CNN model. Essentially, the architecture is just the number and type of layers you use and the configurations you use them in. The architecture should be carefully chosen to balance complexity and simplicity, allowing the model to capture the essential features while avoiding overfitting. It may be helpful to start with an established architecture and tweak it for your needs. You can find a helpful list of architectures in an external resource.
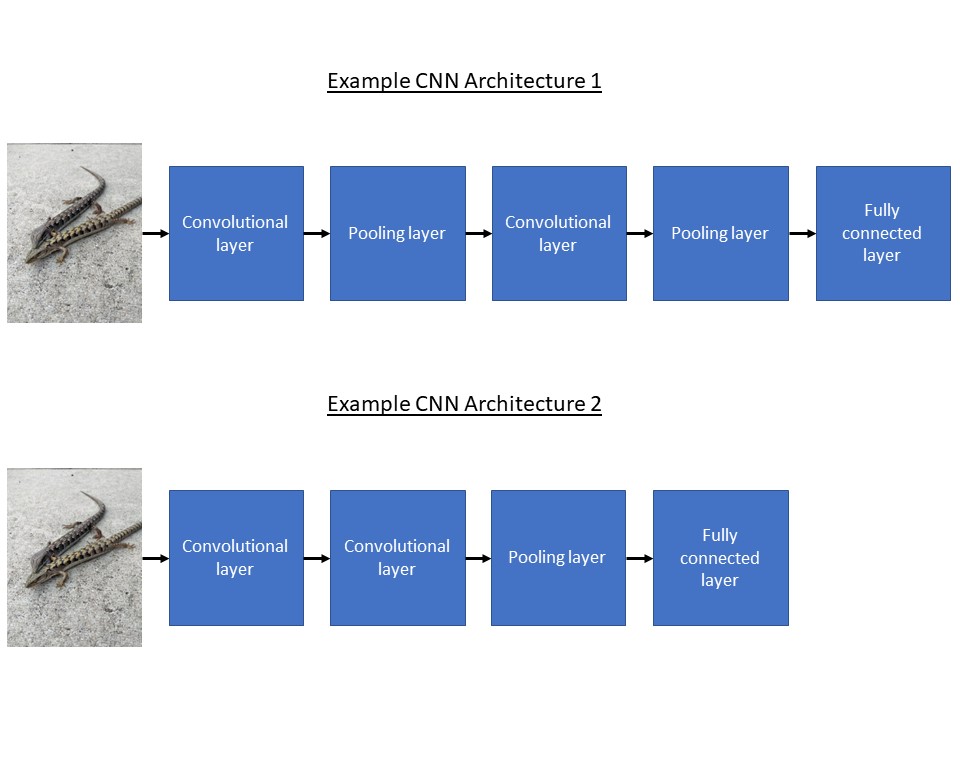
Figure 12: Simple example CNN architectures.
Overfitting
Overfitting is when the computer gets really good at labeling the images in the training dataset but then can’t identify images accurately that are not within the training set.
This overfitting usually occurs because the computer has detected some bias we humans accidentally introduced in the training set that doesn’t represent real life (like most cat pictures having a blue background, for example). There are many techniques to help prevent the model from memorizing the training data and instead encourage it to learn more generalizable patterns.
Training a supervised ML model
Once the model architecture is defined, you need to initialize the model's parameters and start the training process.
During training, the model iteratively adjusts its parameters using optimization techniques like gradient descent to minimize the difference between its predictions and the ground truth labels that you previously defined.
This process involves computing the loss function, which quantifies the model's prediction error, and updating the parameters accordingly.
Training a supervised ML model for image analysis is an iterative process. You train the model using the labeled dataset, evaluate its performance on a validation set, and make adjustments to improve its accuracy. This iterative loop continues until the model achieves satisfactory results.
Application of Supervised ML Models in Image Analysis
Once the supervised ML model has been trained on labeled image data, it can be applied to various tasks in image analysis. Below are some common applications that highlight the effectiveness of supervised ML models in image processing tasks.
Image classification
Image classification is a fundamental task where the goal is to assign a label or class to an input image.
For instance, a supervised ML model can be trained to classify images of animals into different categories, such as ‘fish,’ ‘lizard,’ or ‘beetle.’
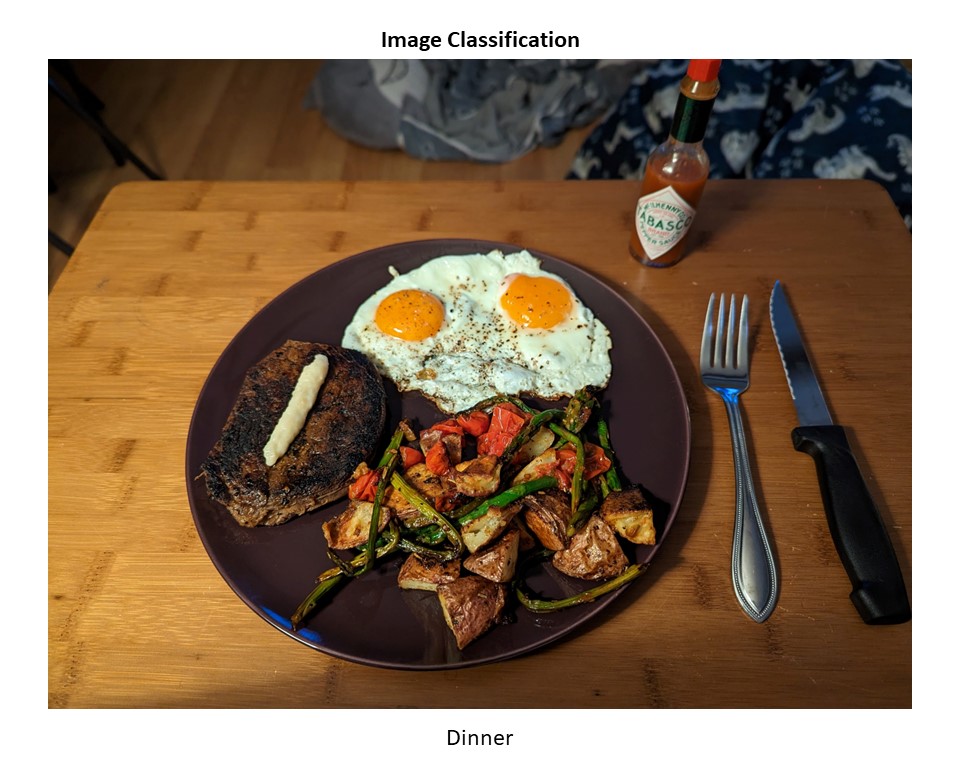
Figure 13: An example of image classification. This image has been classified as “Dinner.”
By learning from a diverse dataset with labeled examples, the model can generalize and accurately classify images with a high level of accuracy. This technique can be used for tasks like identifying diseases in medical images, recognizing objects in satellite imagery, and even classifying emotions from facial expressions. Check out this DataCamp webinar on the subject for more details.
Object detection
Object detection is another important application of supervised ML models in image analysis. Unlike image classification, object detection involves not only identifying the objects present in an image but also locating them by drawing bounding boxes around them.
This process allows the model to identify multiple objects of interest within an image.
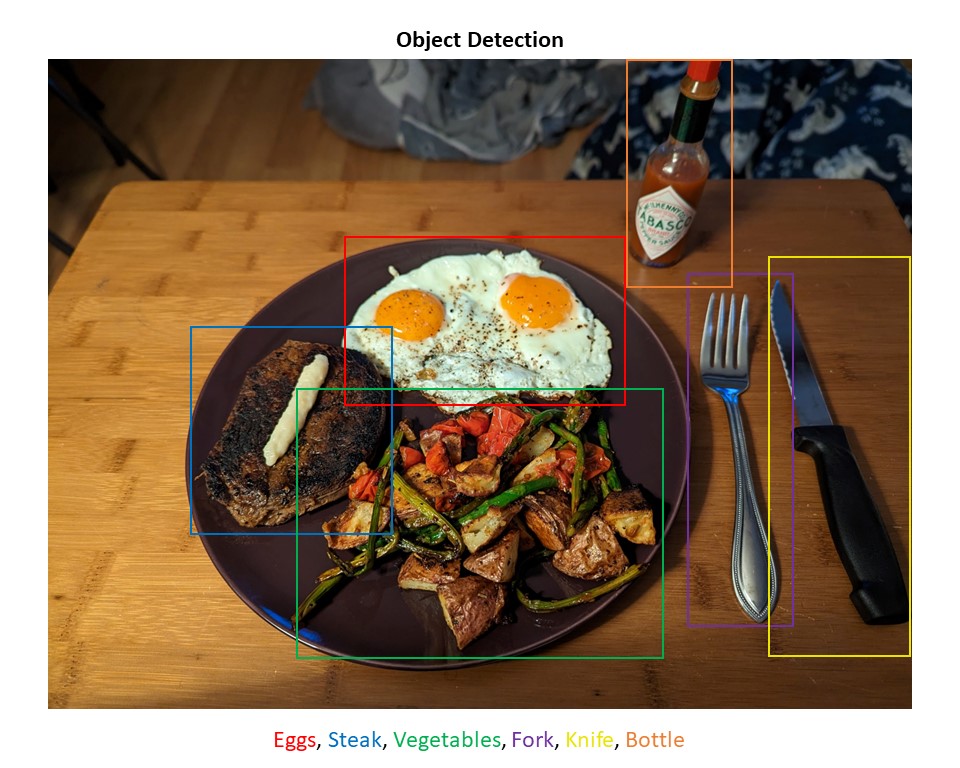
Figure 14: An example of object detection. Various objects within this image have been identified.
Applications of object detection include autonomous driving, where models can detect and track pedestrians, vehicles, and traffic signs, as well as surveillance systems to identify and track individuals or objects of interest. Facebook and Instagram also use this method when they find your face in photos.
Challenges of supervised ML models
Although the capabilities of supervised ML models in image analysis are impressive, there are limitations and challenges to be aware of.
One major challenge is the need for large amounts of labeled training data. The process of annotating and labeling images can be time-consuming and resource-intensive.
Supervised ML models are also sensitive to biases present in the training data, which can lead to biased predictions or unfair outcomes. Adapting the models to new domains or novel image categories may require additional training or fine-tuning.
And interpreting the learned representations and decision-making processes of complex models like CNNs can be challenging, making it harder to understand why a model made a particular prediction.
Despite these challenges, supervised ML models continue to push the boundaries of image analysis, enabling remarkable advancements in fields such as healthcare, agriculture, and security.
As research and development in the field progress, addressing these challenges and refining the models will pave the way for even more accurate and reliable image-processing solutions.
Unsupervised Machine Learning for Image Analysis
Using Unsupervised Learning
An alternative to supervised learning is unsupervised machine learning. Unlike supervised learning, unsupervised learning does not rely on labeled data but instead aims to discover hidden patterns, structures, or relationships within the data itself.
The purpose of unsupervised learning in image analysis is to uncover meaningful structures and insights from unlabeled image data. By utilizing unsupervised learning techniques, you can extract valuable information and gain a deeper understanding of the underlying characteristics of images.
Unsupervised learning can help identify clusters of similar images, discover patterns or textures that are characteristic of certain image classes, and detect anomalies or outliers within the data.
How unsupervised learning is different
If supervised learning is like telling a baby what a cow is and what a fish is, then unsupervised learning is like giving a baby a bunch of animals and letting them sort them however they see fit. They may sort the animals into categories by size, number of legs, texture, or color.
The end result may look similar to what you would have gotten by separating them by species, or it may look very different! But examining the characteristics of the resulting categories can give you useful information nonetheless.
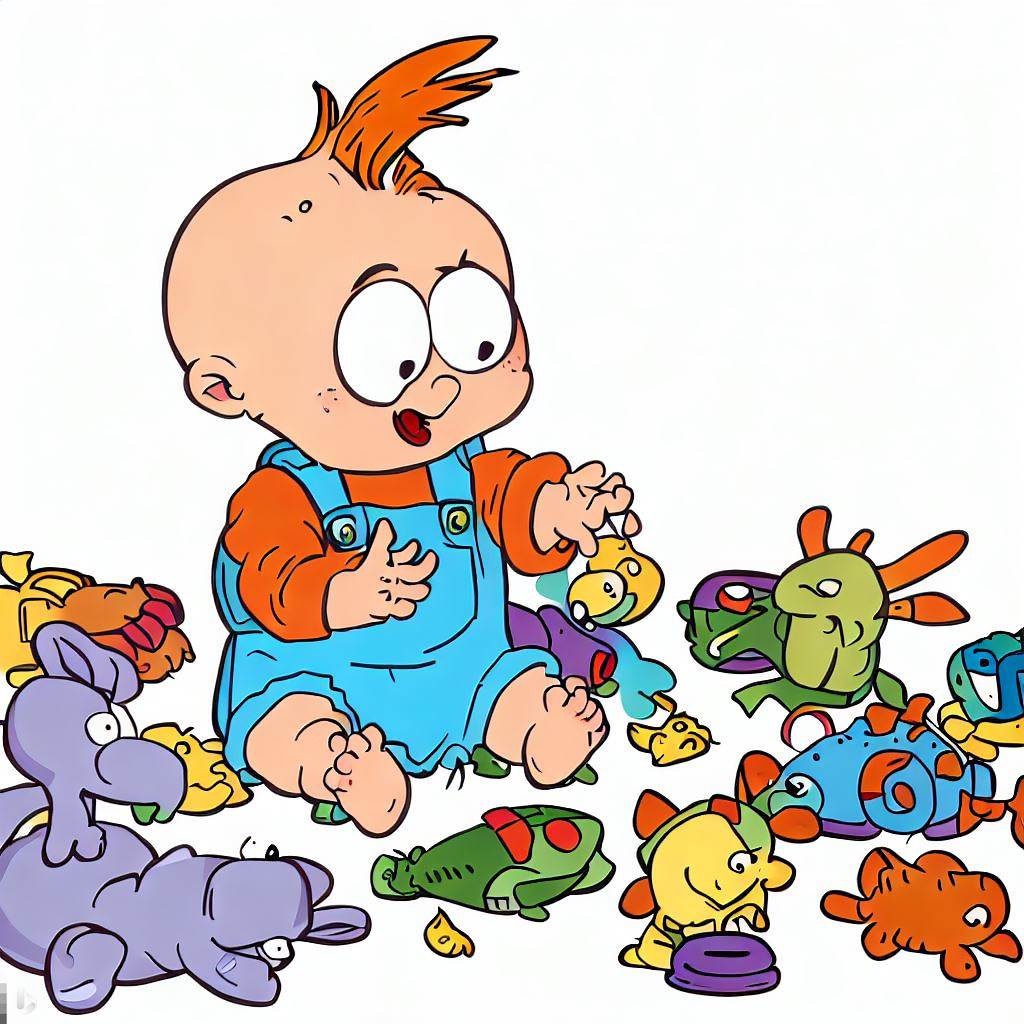
Figure 15: DALL-E generated image of a baby sorting animal toys in an unsupervised learning environment.
Image Analysis with Unsupervised ML Models
Unsupervised machine learning models offer exciting possibilities for image analysis by enabling the sorting of images into bins or categories without the need for labeled data.
Imagine having a vast collection of images and wanting to organize them into meaningful groups. Unsupervised ML models can analyze the visual features of the images and group them based on shared characteristics, like color or shape. This provides valuable insights and simplifies image analysis tasks.
Clustering algorithms
Clustering algorithms group similar images together based on their shared characteristics. One widely used clustering algorithm is k-means clustering, which partitions the data into a predetermined number of clusters by iteratively minimizing the mathematical distance between each image in a set.
Hierarchical clustering is another approach that creates a hierarchical structure of image sets by recursively merging or splitting sets based on their similarity. These clustering algorithms allow us to discover natural groupings within unlabeled image datasets, providing insights into image similarity and diversity.
Image segmentation
Unsupervised learning is particularly valuable for image segmentation, which involves partitioning an image into meaningful regions or objects.
By applying clustering techniques or other unsupervised learning methods, you can separate an image into distinct regions based on color, texture, or other characteristics.
This technique can be useful in medical imaging for finding tumors, in satellite imagery for land cover classification, or in computer graphics for extracting foreground and background elements.
Pattern recognition
Pattern recognition is another area where unsupervised learning excels.
Unsupervised learning algorithms can learn representations or features that capture the underlying patterns or structures present in the data. By extracting these learned features, images can be classified or grouped based on their shared patterns or visual similarities. This makes tasks such as image retrieval or image synthesis possible.
Anomaly detection
Unsupervised learning is also used in detecting anomalies. By learning the normal patterns or characteristics of a dataset, unsupervised algorithms can identify images or regions that are different from the rest. This is particularly useful in areas such as surveillance, where detecting unusual or suspicious activities can help in security monitoring.
Challenges of unsupervised ML models
Unsupervised learning faces its own set of challenges. One major challenge is understanding the results since there is no ground truth or labeled data to compare against.
Going back to the animal sorting example, you may end up with a category that contains a horse, beetle, and octopus that are all brown, while another category contains a white horse, rabbit, and flower. Because you didn’t specify how to sort the animals, you may end up with groups that are not that meaningful.
It can be challenging to assess the quality and accuracy of the discovered clusters or patterns the unsupervised ML model comes up with.
Benefits of unsupervised ML models
Unsupervised ML models offer several benefits in image processing. Most importantly, they remove the need for extensive manual labeling, making it easier and more cost-effective to work with large-scale image datasets.
Imagine manually sorting through and labeling every image on Instagram. Unsupervised machine learning models eliminate the need for such a long, labor-intensive effort.
Unsupervised ML models can also reveal hidden patterns and structures within the data, allowing people to uncover novel insights and discover visual relationships that may not be immediately apparent.
This exploratory nature of unsupervised learning opens up new avenues for image analysis and can lead to breakthroughs in various domains, including space exploration, robotics, and medicine.
|
Supervised ML |
Unsupervised ML |
|
|
Tasks |
|
|
|
Advantages |
|
|
|
Disadvantages |
|
|
Figure 16: Comparison of supervised and unsupervised machine learning in image processing.
Generating new images with generative AI
Once a model has determined what characteristics define different objects in images, they can use that information to create new images.
DALL-E and Midjourney are notable examples of unsupervised ML models that leverage the power of generative modeling to generate new images. By training on massive datasets, these models have learned the components necessary to create images with certain classifiers.
So if you ask DALL-E to create an image of a robot panda, the model will go to its internal definition of what makes up robots and pandas and will put those pieces together to create your requested image.
For example, it may determine that robots have metal and gears, while pandas are black and white. It will use this information to create for you a metal, black and white panda robot with gears.
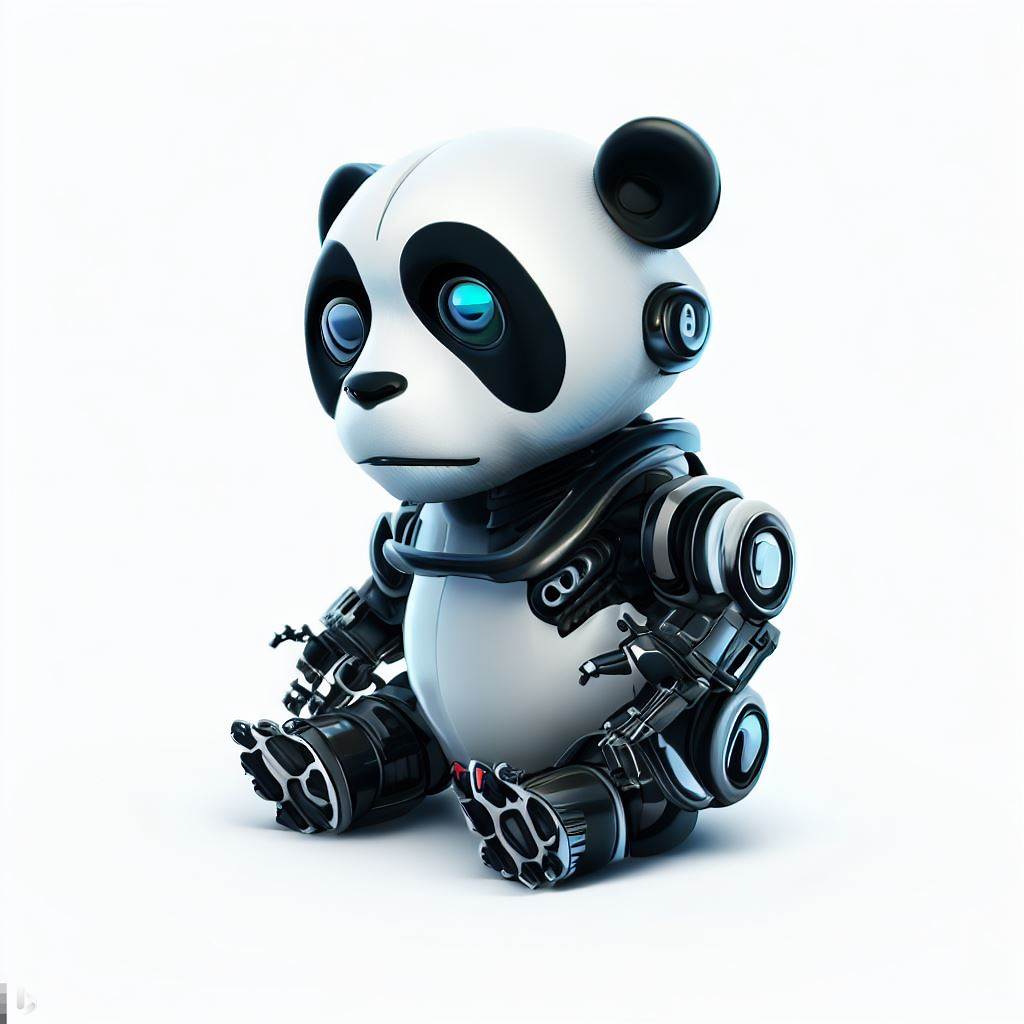
Figure 17: DALL-E generated image using the prompt 'Panda Robot'.
Conclusion
This tutorial is a high-level exploration of image analysis with the goal of better understanding its role in machine learning. You should have a better intuition for how computers ‘see’ and manipulate images and have a basic understanding of key machine learning concepts such as preprocessing, feature extraction, and classification algorithms.
Image processing plays a huge role in our lives, from social media to medical imaging to space exploration to surveillance. If you are interested in delving further into this fascinating topic, check out Image Processing with Python , Image Processing with Keras in Python, and Deep Learning for Images with PyTorch on DataCamp.