Track
Snowflake Foundations
7 hr
The Snowflake DATEADD function is a relatively simple yet powerful method of performing any type of date arithmetic, which allows data professionals to add or subtract the specific interval of time from a date, time, or timestamp value.
Understanding how to use DATEADD will enable data analysts and/or engineers to conduct useful analysis by calculating subscription time periods, build projections for any future date, and even generate time-series datasets for further analysis.
In this tutorial, you will learn about the function's syntax, how it can be applied in practice, and the overall potential of the DATEADD function in your date manipulation arsenal in Snowflake SQL.
If you’re just getting started with Snowflake, make sure to check out our Snowflake Foundations skill track.
Before we dive into DATEADD details, let's create a sample database with date-rich data to make our examples more practical and hands-on. Working with actual data will help reinforce the concepts as we learn the function's capabilities.
If you’re new to Snowflake, you’ll need to create a free trial account that provides credits for 30 days. For a comprehensive introduction to the platform, check out this Introduction to Snowflake course, which covers the basics and fundamentals.
In Snowflake, SQL queries are executed in “Worksheets” (similar to notebooks). To create a new worksheet:
If you’re completely new to the Snowflake interface, this Snowflake Tutorial For Beginners provides a helpful walkthrough of the platform.
For this tutorial, we will just use the Snowflake Learning database and public schema:
-- Create database and schema
USE DATABASE SNOWFLAKE_LEARNING_DB;
USE SCHEMA PUBLIC;We’ll create three tables with date-related data to demonstrate ‘DATEADD’ in various scenarios:
Note: Use the “Command + Shift + Enter”/”Ctrl + Shift + Enter” to run the following commands all at once in your worksheet:
-- Create subscription table
CREATE OR REPLACE TABLE subscriptions (
   subscription_id INTEGER,
   customer_id INTEGER,
   plan_name VARCHAR(50),
   start_date DATE,
   end_date DATE,
   billing_cycle VARCHAR(20)
);

-- Create orders table with timestamps
CREATE OR REPLACE TABLE orders (
   order_id INTEGER,
   customer_id INTEGER,
   order_timestamp TIMESTAMP_NTZ,
   delivery_estimate TIMESTAMP_NTZ,
   total_amount DECIMAL(10,2)
);

-- Create events table with time zones
CREATE OR REPLACE TABLE events (
   event_id INTEGER,
   event_name VARCHAR(100),
   event_timestamp TIMESTAMP_TZ,
   duration_minutes INTEGER
);
For more details on creating tables, including different table types and best practices, refer to Creating Tables in Snowflake.
Hint: You should delete all existing queries from your worksheet after they are successfully executed.
Let’s insert sample data with a variety of date and time values:
-- Insert subscription data
INSERT INTO subscriptions VALUES
   (1001, 5001, 'Basic', '2023-01-15', '2023-07-15', 'Monthly'),
   (1002, 5002, 'Premium', '2023-02-28', '2024-02-28', 'Annual'),
   (1003, 5003, 'Premium', '2023-01-31', '2023-04-30', 'Quarterly'),
   (1004, 5001, 'Pro', '2022-12-15', '2023-12-15', 'Annual'),
   (1005, 5004, 'Basic', '2023-03-15', NULL, 'Monthly');

-- Insert orders with timestamps
INSERT INTO orders VALUES
   (10001, 5001, '2023-03-10 08:30:00', '2023-03-12 14:00:00', 125.99),
   (10002, 5002, '2023-03-10 12:15:30', '2023-03-11 09:00:00', 89.50),
   (10003, 5003, '2023-03-09 17:45:20', '2023-03-15 13:30:00', 245.00),
   (10004, 5001, '2023-02-28 23:59:59', '2023-03-05 10:00:00', 49.99),
   (10005, 5004, '2023-03-01 00:00:01', '2023-03-02 12:00:00', 175.25);

-- Insert events
INSERT INTO events VALUES
   (101, 'System Update', '2023-03-15 01:00:00'::TIMESTAMP_TZ, 120),
   (102, 'Maintenance', '2023-03-20 22:00:00'::TIMESTAMP_TZ, 60),
   (103, 'Data Migration', '2023-03-18 15:30:00'::TIMESTAMP_TZ, 180),
   (104, 'Backup', '2023-03-10 03:00:00'::TIMESTAMP_TZ, 45),
(105, 'Security Audit', '2023-03-12 09:15:00'::TIMESTAMP_TZ, 90);Let’s run some basic queries to verify our data is correctly loaded:
-- Check subscription data
SELECT * FROM subscriptions;

-- Check orders data
SELECT * FROM orders;

-- Check events data
SELECT * FROM events;
Now we have a functional sample database with three tables containing different date and timestamp formats. This dataset will serve as our foundation for exploring the DATEADD function throughout the rest of this tutorial.
The DATEADD function is essential for date arithmetic operations in Snowflake. It allows you to add or subtract specific time intervals from date, time, or timestamp values. Let's break down how this function works, starting with its syntax and parameters.
The basic syntax for the DATEADD function is:
DATEADD(date_part, value, date_or_timestamp_expression)Let’s examine each parameter:
-- Basic DATEADD example
SELECT
DATEADD(MONTH, 3, '2023-01-15') AS three_months_later;Explanation: This query adds 3 months to January 15, 2023. The parameters work as follows:
date_part (MONTH): Specifies the time unit we're adding or subtractingvalue (3): The number of units to add (positive) or subtract (negative)date_or_timestamp_expression ('2023-01-15'): The starting date to modifyOutput:
THREE_MONTHS_LATER

-----------------

2023-04-15Snowflake supports various date parts that can be used with DATEADD:
-- Examples of different date parts
SELECT
   DATEADD(YEAR, 1, '2023-02-28') AS add_one_year,
   DATEADD(QUARTER, 2, '2023-01-31') AS add_two_quarters,
   DATEADD(MONTH, 3, '2023-01-31') AS add_three_months,
   DATEADD(WEEK, 2, '2023-03-15') AS add_two_weeks,
   DATEADD(DAY, 10, '2023-03-21') AS add_ten_days,
   DATEADD(HOUR, 12, '2023-03-10 08:30:00') AS add_twelve_hours,
   DATEADD(MINUTE, 45, '2023-03-10 08:30:00') AS add_forty_five_minutes,
   DATEADD(SECOND, 30, '2023-03-10 08:30:00') AS add_thirty_seconds;
Additional supported date parts include MILLISECOND, MICROSECOND, NANOSECOND, and CENTURY.
Note that in leap years and for month-end dates, Snowflake makes appropriate adjustments. For example, adding one year to February 28, 2023 results in February 29, 2024 (leap year).
The DATEADD function can also subtract time intervals by using negative values:
-- Subtracting time intervals with negative values
SELECT
   DATEADD(MONTH, -3, '2023-03-15') AS three_months_ago,
   DATEADD(DAY, -7, CURRENT_DATE()) AS one_week_ago,
DATEADD(HOUR, -48, CURRENT_TIMESTAMP()) AS two_days_ago_time;Explanation:
Output:
THREE_MONTHS_AGO    ONE_WEEK_AGO    TWO_DAYS_AGO_TIME

----------------    ------------    -----------------

2025-02-10 2025-05-03 2025-05-08 07:22:30.183 -0700The return type of DATEADD depends on the input expression type:
DATE, it returns a DATETIMESTAMP, it returns a TIMESTAMPTIME, it returns a TIMEDATEADD preserves the original data type of your input. This behavior is important to understand because it affects how you can use the result in subsequent operations.
For example, if you add hours to a DATE value, the result will still be a DATE (meaning the time portion is truncated), while adding hours to a TIMESTAMP will maintain both the date and time components.
Understanding these core parameters and behaviors of the DATEADD function will provide the foundation for the more advanced use cases we'll explore in subsequent sections.
Now that we understand the syntax and behavior of DATEADD, let's explore practical applications using our sample data. In this section, we'll demonstrate how DATEADD can solve real business problems and enhance data analysis capabilities.
One common business requirement is determining when subscriptions will renew based on their billing cycle:
-- Calculate subscription renewal dates
SELECT
   subscription_id,
   customer_id,
   plan_name,
   start_date,
   billing_cycle,
   CASE
       WHEN billing_cycle = 'Monthly' THEN DATEADD(MONTH, 1, start_date)
       WHEN billing_cycle = 'Quarterly' THEN DATEADD(MONTH, 3, start_date)
       WHEN billing_cycle = 'Annual' THEN DATEADD(YEAR, 1, start_date)
   END AS first_renewal_date
FROM subscriptions;
Explanation: This query calculates the first renewal date for each subscription based on its billing cycle. We use DATEADD with different date parts (MONTH or YEAR) and values (1, 3, or 1) depending on the billing cycle.
Output:
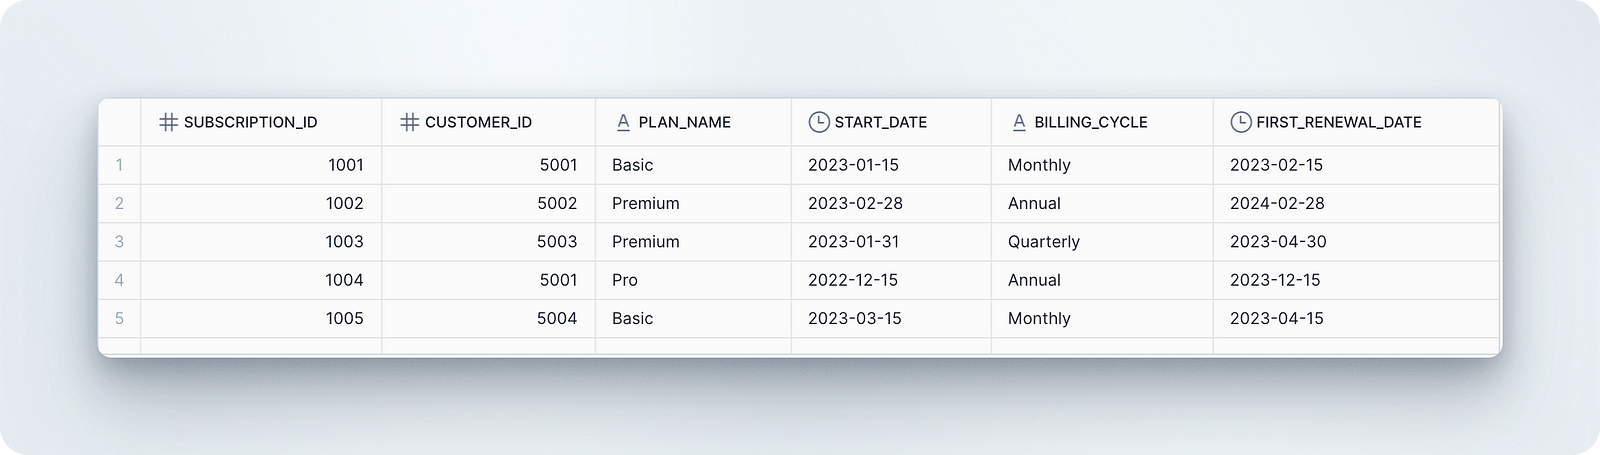
Notice how Snowflake correctly handles the February 28 to February 28 (leap year) transition.
Let’s use DATEADD to calculate estimated delivery windows for orders:
-- Calculate delivery windows based on order timestamps
SELECT
   order_id,
   customer_id,
   order_timestamp,
   delivery_estimate,
   DATEADD(HOUR, -12, delivery_estimate) AS delivery_window_start,
   delivery_estimate AS delivery_window_end,
   DATEDIFF('HOUR', order_timestamp, delivery_estimate) AS estimated_hours_to_delivery
FROM orders
ORDER BY order_id;Explanation: This query:
Output:

Time-series analysis often requires a date dimension table. Let’s create one using DATEADD:
-- Generate a date dimension table for analysis
WITH date_dimension AS (
   SELECT
       DATEADD(DAY, seq4(), '2023-01-01') AS calendar_date
   FROM TABLE(GENERATOR(ROWCOUNT => 365))
)
SELECT
   calendar_date,
   YEAR(calendar_date) AS year,
   MONTH(calendar_date) AS month,
   MONTHNAME(calendar_date) AS month_name,
   DAY(calendar_date) AS day,
   DAYOFWEEK(calendar_date) AS day_of_week,
   DAYNAME(calendar_date) AS day_name,
   CASE
       WHEN DAYOFWEEK(calendar_date) IN (0, 6) THEN TRUE
       ELSE FALSE
   END AS is_weekend,
   QUARTER(calendar_date) AS quarter
FROM date_dimension
WHERE calendar_date <= '2023-03-31'
ORDER BY calendar_date
LIMIT 10;Explanation: This query:
DATEADD with a sequence generator to create a series of dates for 2023Output:
Date dimension tables significantly improve analytics performance by pre-calculating date attributes rather than computing them repeatedly in queries. They standardize date logic across an organization, ensuring consistent definitions of quarters, weekends, and other time periods.
This approach reduces errors and makes complex time-based analysis more accessible to business users. Date dimensions also enable efficient filtering and grouping by various time hierarchies like year, quarter, month, and day.
The DATEADD function with sequence generation offers a simple method to populate these dimension tables without manual data entry.
This technique can be extended to create multi-year calendars or specialized time dimensions like fiscal calendars or business day calculations. Additional columns could include holiday flags, week numbers, or custom business period designations critical for accurate reporting.
Once created, this dimension table can join with fact tables to enable powerful time intelligence capabilities in dashboards and reports.
Let’s use DATEADD to analyze upcoming scheduled maintenance events:
-- Find upcoming events and calculate preparation time
SELECT
   event_id,
   event_name,
   event_timestamp,
   duration_minutes,
   DATEADD(DAY, -3, event_timestamp) AS preparation_start,
   DATEADD(MINUTE, duration_minutes, event_timestamp) AS event_end,
   DATEDIFF('MINUTE', CURRENT_TIMESTAMP(), event_timestamp) AS minutes_until_event
FROM events
WHERE event_timestamp > CURRENT_TIMESTAMP()
ORDER BY event_timestamp;Explanation: This query:
Since all our sample data is from 2023, this query would typically show no results in 2025, but conceptually demonstrates how to analyze scheduled events.
For subscription-based businesses, calculating precise billing periods is essential:
-- Generate next 6 billing periods for monthly subscriptions
WITH billing_periods AS (
   SELECT
       subscription_id,
       customer_id,
       plan_name,
       start_date,
       seq AS billing_period_number,
       DATEADD(MONTH, seq, start_date) AS billing_period_start,
       DATEADD(DAY, -1, DATEADD(MONTH, seq + 1, start_date)) AS billing_period_end
   FROM subscriptions
   CROSS JOIN (SELECT seq4() AS seq FROM TABLE(GENERATOR(ROWCOUNT => 6)))
   WHERE billing_cycle = 'Monthly'
)
SELECT
   subscription_id,
   customer_id,
   plan_name,
   billing_period_number,
   billing_period_start,
   billing_period_end,
   DATEDIFF('DAY', billing_period_start, billing_period_end) + 1 AS days_in_period
FROM billing_periods
ORDER BY subscription_id, billing_period_number;Explanation: This query:
seq4())DATEADD(MONTH, seq, start_date)DATEADD(DAY, -1, DATEADD(MONTH, seq + 1, start_date)) This ensures proper handling of varying month lengths (28/29/30/31 days)DATEDIFF('DAY', billing_period_start, billing_period_end) + 1 The +1 is necessary because DATEDIFF returns the difference between dates, not including the end datesubscription_id and billing period for a logical presentationOutput:
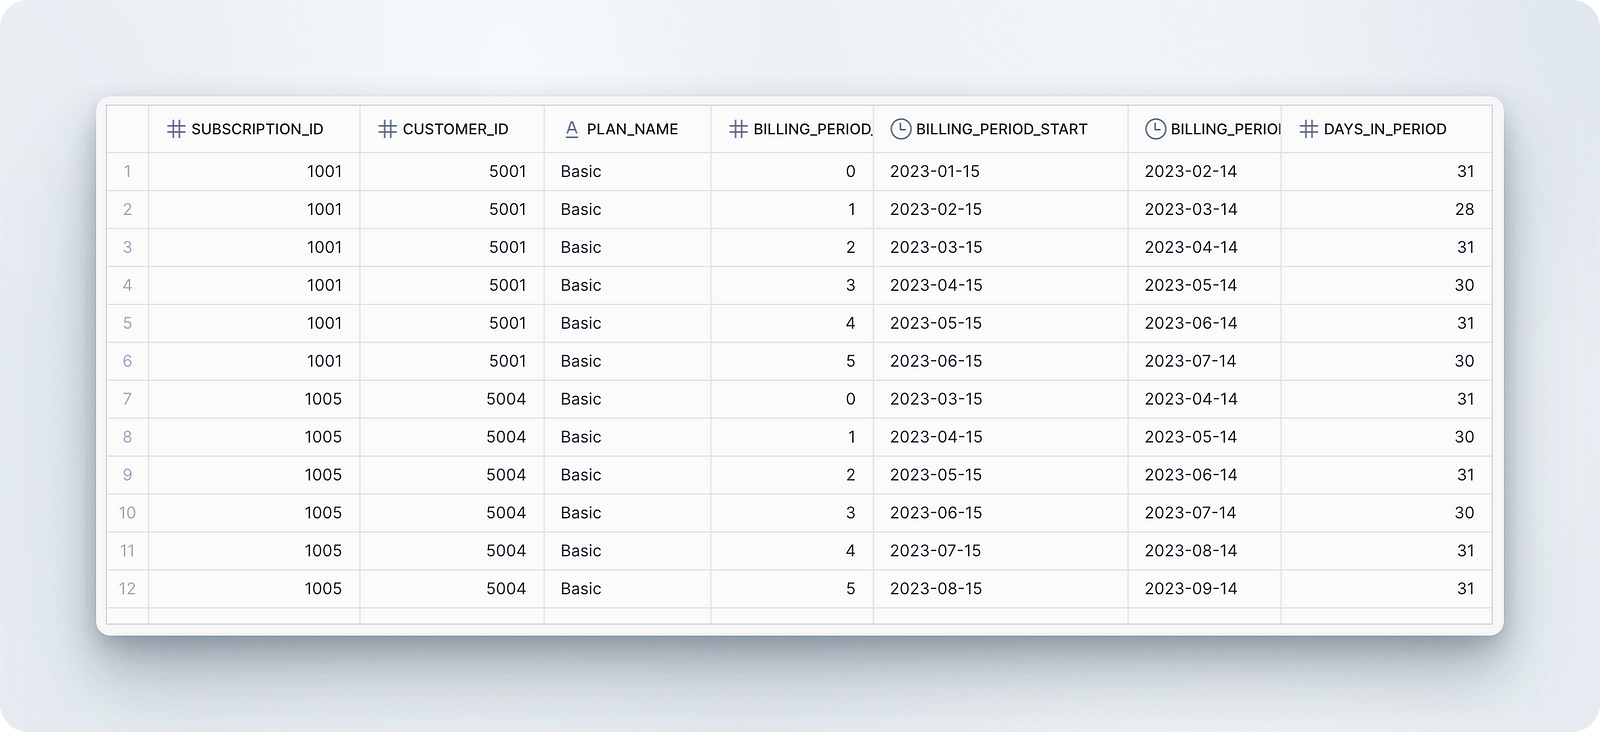
Notice how DATEADD properly handles different month lengths, ensuring accurate billing period calculations.
These examples demonstrate how DATEADD can be applied to solve common business problems involving date manipulation. By combining DATEADD with other SQL functions, you can create powerful queries for time-based analysis and data processing in Snowflake.
Let’s now examine how the DATEADDfunction compares to some of Snowflake’s other functions.
While DATEADD adds or subtracts a specific time interval to a date, DATEDIFF calculates the difference between two dates in a specified unit. DATEDIFF returns an integer representing the number of complete units between dates, making it ideal for calculating durations like subscription lengths or days since order placement.
DATE_TRUNC, by contrast, removes precision from a date/time value by setting smaller date parts to their default values, effectively rounding down to a specified unit.
-- Comparing the three functions
SELECT
   DATEADD(MONTH, 3, '2023-01-15'::DATE) AS added_three_months,
   DATEDIFF(DAY, '2023-01-15'::DATE, '2023-04-15'::DATE) AS days_between,
DATE_TRUNC(MONTH, '2023-01-15'::DATE) AS truncated_to_month;Output:

Use DATEADD when you need to shift dates forward or backward by specific time intervals, such as calculating future renewal dates, delivery windows, or payment schedules.
Choose DATEDIFF when measuring elapsed time between two dates, like calculating age, duration, or time-based metrics for reporting.
DATE_TRUNC is most appropriate when you need to group data by time periods (daily, monthly, quarterly), standardize timestamps to a consistent level of precision, or create time-based hierarchies for analysis.
-- Function usage by scenario
SELECT
   -- Scenario: Calculate next month's billing date
   DATEADD(MONTH, 1, start_date) AS next_billing_date,

   -- Scenario: Find how many days the subscription has been active
   DATEDIFF(DAY, start_date, CURRENT_DATE()) AS subscription_age_days,

   -- Scenario: Group by month for analysis
   DATE_TRUNC(MONTH, start_date) AS billing_month
FROM subscriptions
LIMIT 3;
If you find yourself having issues when using the function, here are some tips that can help you out of trouble.
Snowflake intelligently handles month-end dates when using DATEADD. When adding months to a month-end date, Snowflake returns the last day of the resulting month, regardless of the number of days. This behavior preserves the "end-of-month" concept even when months have different lengths.
-- Month-end handling examples
SELECT
   DATEADD(MONTH, 1, '2023-01-31') AS jan_to_feb,   -- January 31 + 1 month = February 28
   DATEADD(MONTH, 1, '2023-02-28') AS feb_to_mar,   -- February 28 + 1 month = March 31
   DATEADD(MONTH, 1, '2024-01-31') AS jan_to_feb_leap, -- January 31 + 1 month in leap year = February 29
DATEADD(YEAR, 1, '2023-02-28') AS normal_to_leap; -- February 28, 2023 + 1 year = February 29, 2024When working with timestamp data that includes time zones (TIMESTAMP_TZ), DATEADD automatically accounts for daylight saving time transitions. This ensures calculations remain accurate across time changes, but can sometimes produce unexpected results when adding specific intervals around DST boundaries.
-- Time zone handling with DST transition
SELECT
   event_timestamp,
   DATEADD(HOUR, 24, event_timestamp) AS add_24h,
   DATEADD(DAY, 1, event_timestamp) AS add_1d
FROM (
   SELECT CONVERT_TIMEZONE('America/Los_Angeles', '2023-03-12 01:30:00')::TIMESTAMP_TZ AS event_timestamp
); -- During spring forward DST transition
When working with timestamps around DST transitions, be aware that adding 24 hours might not equal adding 1 day. The “add_1d" approach generally produces more intuitive results in business applications.
DATEADD errors typically stem from type mismatches or invalid inputs. Here are common issues and solutions:
-- Common error: Invalid date part
-- Error: "Invalid date part 'DATE'"
SELECT DATEADD(DATE, 1, '2023-01-15'); -- Incorrect: 'DATE' is not a valid date part
SELECT DATEADD(DAY, 1, '2023-01-15');  -- Correct: use 'DAY' instead

-- Common error: Type mismatch
-- Error: "Numeric value 'abc' is not recognized"
SELECT DATEADD(DAY, 'abc', '2023-01-15'); -- Incorrect: second parameter must be numeric
SELECT DATEADD(DAY, 10, '2023-01-15');    -- Correct: use numeric value

-- Common error: Invalid date format
-- Error: "Date 'January 15, 2023' is not recognized"
SELECT DATEADD(DAY, 1, 'January 15, 2023'); -- Incorrect: unrecognized date format
SELECT DATEADD(DAY, 1, '2023-01-15'); -- Correct: use YYYY-MM-DD formatFor best performance when using DATEADD in large-scale operations:
DATEADD in transformation rather than filtering stages when possible.DATEADD for range-based calculations to improve index usage.-- Inefficient pattern (calculating same value repeatedly)
SELECT *
FROM large_table
WHERE DATEADD(MONTH, 1, event_date) < CURRENT_DATE();
-- More efficient approach (calculate once)
WITH calc_dates AS (
SELECT *, DATEADD(MONTH, 1, event_date) AS next_month_date
FROM large_table
)
SELECT *
FROM calc_dates
WHERE next_month_date < CURRENT_DATE();Understanding these edge cases and optimization techniques will help you write more robust date manipulation logic in Snowflake, avoiding common pitfalls while maximizing performance.
The Snowflake DATEADD function is an essential tool for date manipulation that allows data professionals to perform time arithmetic across various date parts. It handles month-end dates, leap years, time zones, and Daylight Saving Time transitions with predictable behavior. We've seen how DATEADD can be applied to subscription management, delivery tracking, date dimension creation, and billing calculations. When used alongside DATEDIFF and DATE_TRUNC, it becomes a core component for time-based analytics in Snowflake.
For more Snowflake knowledge, check out the Snowflake Foundations skill track or explore Creating Tables in Snowflake to build your data modeling skills. The Using Snowflake Time Travel guide complements your understanding of temporal operations. Beginners should start with the Snowflake Tutorial for Beginners.
Top DataCamp Courses
Track
Track
Course
blog
Bex Tuychiev
14 min
Tutorial
Travis Tang
Tutorial
Bex Tuychiev
Tutorial
Tim Lu
Tutorial
Tim Lu
Tutorial
Bex Tuychiev