
Cours
Développement d'applications LLM avec LangChain
3 h
46.2K
La génération augmentée par la récupération (RAG) est actuellement l'une des techniques les plus prometteuses dans le domaine de l'IA. Il combine la précision de la récupération d'informations réelles à partir d'ensembles de données massifs avec la capacité de raisonnement des grands modèles linguistiques. Le résultat ? Des réponses non seulement précises, mais également pertinentes. C'est pourquoi RAG alimente tout, des chatbots et moteurs de recherche au contenu personnalisé.
Cependant, il y a un hic : la construction d'un prototype ne représente que la moitié du travail. Le véritable défi réside dansle déploiement de l' : transformer votre idée en un produit fiable et évolutif.
Dans cet article, je vais vous expliquer comment créer et déployer un système RAG à l'aide de LangChain et FastAPI. Vous apprendrez comment passer d'un prototype fonctionnel à une application à grande échelle prête à être utilisée par de véritables utilisateurs.
Commençons sans plus attendre.
Comme nous l'expliquons dans un guide distinct, la génération augmentée par la récupération, ou RAG, est une méthode assez avancée dans le traitement du langage naturel qui améliore considérablement les capacités des modèles linguistiques.
Au lieu de se contenter de s'appuyer sur les connaissances existantes du modèle, RAG va plus loin en intégrant de nouvelles informations pertinentes provenant de sources externes avant de générer une réponse.
Voici comment cela fonctionne :. Lorsqu'un utilisateur pose une question, le système ne se base pas uniquement sur les données pré-apprises du modèle. Il commence par rechercher dans un vaste ensemble de documents ou de sources de données, sélectionne les éléments les plus pertinents, puis les intègre au modèle linguistique. Grâce à ses connaissances intégrées et à ces nouvelles informations, le modèle est en mesure de générer une réponse beaucoup plus précise et actualisée.
RAG combine la récupération et la génération, de sorte que les réponses ne sont pas seulement intelligentes, elles sont également fondées sur des informations réelles et factuelles. Cela le rend idéal pour répondre à des questions, pour les chatbots ou même pour générer du contenu où il est essentiel de vérifier les faits et de comprendre le contexte.
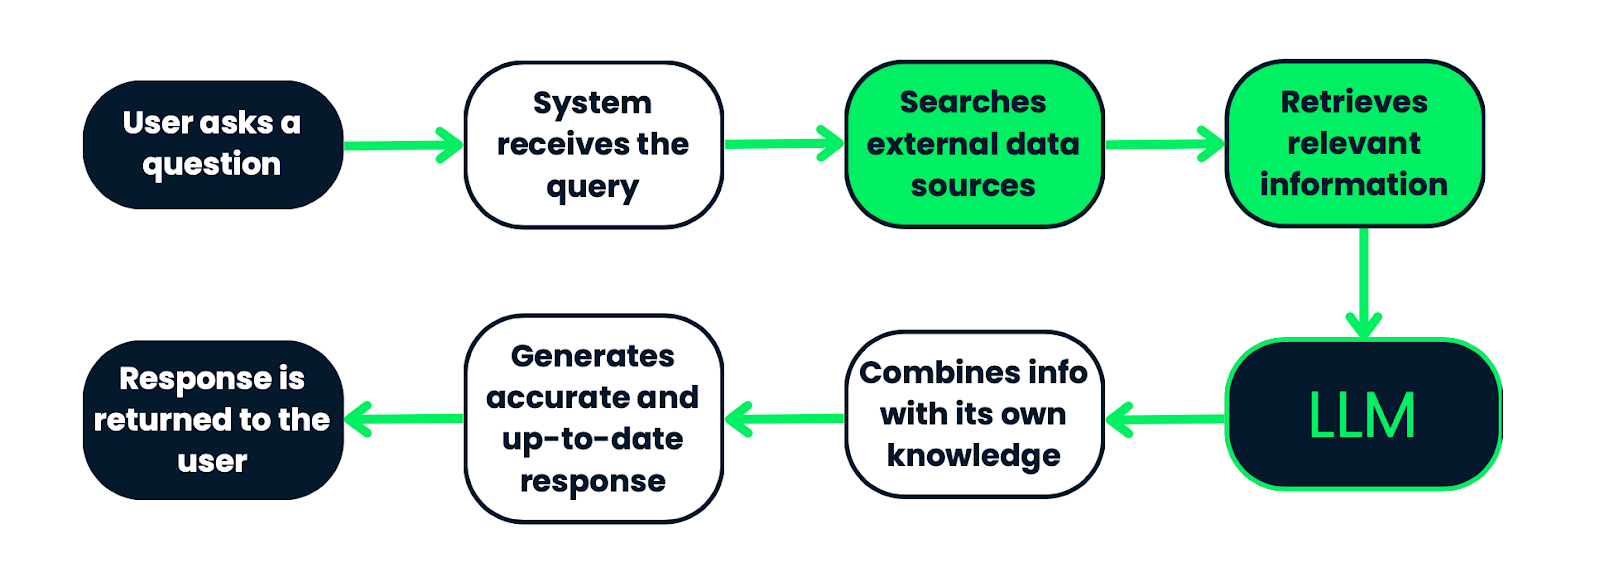
Flux de travail d'un système RAG. Le processus commence par une requête de l'utilisateur, qui est traitée par le système afin de rechercher des informations pertinentes dans des sources de données externes. Les informations récupérées sont ensuite transmises à un LLM, qui les combine avec ses connaissances préexistantes afin de générer une réponse précise et actualisée. Enfin, la réponse est renvoyée à l'utilisateur. Ce processus garantit que les réponses sont fondées sur des données factuelles et pertinentes dans leur contexte.
Lorsque vous développez un système RAG, plusieurs éléments essentiels sont nécessaires à son fonctionnement : des chargeurs de documents, le fractionnement de texte, l'indexation, des modèles de recherche et des modèles génératifs. Analysons cela :
La première étape consiste à préparer vos données. C'est ce que font les chargeurs de documents, le fractionnement de texte et l'indexation :
Ce sont les éléments essentiels du système RAG. Ils sont chargés d'examiner toutes les données indexées afin de trouver ce dont vous avez besoin.
C'est ici que la magie opère. Une fois les données pertinentes récupérées, les modèles génératifs prennent le relais et produisent une réponse finale.
|
Composant |
Description |
|
Chargeurs de documents |
Importez des données provenant de sources telles que des fichiers texte, des PDF ou des bases de données, en convertissant les informations dans un format utilisable par le système. |
|
Division de texte |
Chops divise les données en segments plus petits, ce qui facilite la recherche et le traitement dans les limites des modèles linguistiques. |
|
Indexation |
Organise les données fractionnées en représentations vectorielles, permettant des recherches rapides et efficaces pour trouver les informations pertinentes pour une requête. |
|
Magasins de vecteurs |
Bases de données spécialisées qui stockent des représentations vectorielles, utilisant la recherche par similarité vectorielle pour récupérer les informations les plus pertinentes en fonction de la requête. |
|
Retrievers |
Recherchez les composants qui convertissent la requête en vecteur, effectuez une recherche dans le magasin de vecteurs et récupérez les blocs de données les plus pertinents pour l'étape suivante. |
|
Modèles linguistiques |
Générer des réponses cohérentes et adaptées au contexte en utilisant à la fois les données récupérées et les connaissances internes. |
|
Génération de réponses contextuelles |
Combine la question de l'utilisateur avec les données récupérées afin de créer une réponse détaillée qui répond à la question tout en intégrant les informations pertinentes. |
Avant de développer notre système RAG, il est nécessaire de s'assurer que notre environnement de développement est correctement configuré. Voici ce dont vous aurez besoin :
python --versionpython3 -m venv ragenv
source ragenv/bin/activate # For Linux/Mac
ragenv\Scripts\activate # For WindowsVeuillez installer les dépendances suivantes : Veuillez maintenant installer les paquets requis à l'aide de pip.
pip install fastapi uvicorn langchain langchain-community openai langchain-openai faiss-cpu|
FastAPI |
Uvicorn |
LangChain |
API OpenAI |
|
Un cadre web moderne pour la création d'API. |
Un serveur ASGI pour héberger votre application FastAPI. |
La bibliothèque principale qui alimente le système RAG. |
Pour utiliser les modèles GPT pour la génération de réponses. |
Conseil de professionnel: Veuillez créer un fichier requirements.txt afin de spécifier les paquets nécessaires à votre projet. Si vous utilisez : pip freeze > requirements.txt
Cette commande générera un fichier requirements.txt contenant tous les paquets installés et leurs versions, que vous pouvez utiliser pour le déploiement ou le partage de l'environnement avec d'autres personnes.
Veuillez ajouter votre clé API OpenAI : Pour intégrer le modèle linguistique OpenAI à votre système RAG, vous devrez fournir votre clé API OpenAI :
OPENAI_API_KEY=your-openai-api-keypip install python-dotenvfrom dotenv import load_dotenv
import os
load_dotenv()
openai_api_key = os.getenv("OPENAI_API_KEY")Votre clé API OpenAI est désormais chargée en toute sécurité à partir de l'environnement, et vous êtes prêt à l'utiliser dans votre système RAG.
PostgreSQL et PGVector (facultatif): Si vous envisagez d'utiliser PGVector pour le stockage vectoriel, veuillez vous assurer d'installer et de configurer PostgreSQL sur votre ordinateur. Vous pouvez utiliser FAISS (que nous utiliserons dans cet article) ou d'autres bases de données vectorielles prises en charge par LangChain.
Docker (facultatif): Docker peut vous aider à conteneuriser votre application afin de garantir un déploiement cohérent dans tous les environnements. Si vous envisagez d'utiliser Docker, veuillez vous assurer qu'il est également installé sur votre ordinateur.
La première étape dans la construction d'un système RAG consiste à préparer les données que le système utilisera pour récupérer les informations pertinentes. Cela implique de charger les documents dans le système, de les traiter, puis de s'assurer qu'ils sont dans un format facilement indexable et récupérable.
LangChain propose divers chargeurs de documents pour traiter différentes sources de données, telles que des fichiers texte, des PDF ou des pages web. Vous pouvez utiliser ces chargeurs pour importer vos documents dans le système.
Je suis fasciné par les ours polaires, c'est pourquoi j'ai décidé de télécharger le fichier texte suivant (mon_document.txt) contenant les informations suivantes :« Les ours polaires : Les géants de l'Arctique
Les ours polaires (Ursus maritimus) sont les plus grands carnivores terrestres de la planète et se sont parfaitement adaptés à la vie dans le froid extrême de l'Arctique. Réputés pour leur épaisse fourrure blanche qui leur permet de se fondre dans le paysage enneigé, les ours polaires sont de puissants chasseurs qui dépendent de la banquise pour chasser les phoques, leur principale source de nourriture.
Ce qui est fascinant chez les ours polaires, c'est leur incroyable capacité d'adaptation à leur environnement. Sous cette fourrure épaisse se trouve une couche de graisse pouvant atteindre 11 cm d'épaisseur, qui assure l'isolation thermique et constitue une réserve d'énergie pendant les mois d'hiver rigoureux. Leurs grandes pattes leur permettent de marcher sur la glace et dans les eaux libres, ce qui en fait d'excellents nageurs, capables de parcourir de longues distances à la recherche de nourriture ou de nouveaux territoires.
Malheureusement, les ours polaires sont confrontés à de graves menaces liées au changement climatique. À mesure que l'Arctique se réchauffe, la glace de mer fond plus tôt dans l'année et se forme plus tard, réduisant ainsi le temps dont disposent les ours polaires pour chasser les phoques. Sans nourriture suffisante, de nombreux ours ont des difficultés à survivre, et leur population diminue dans certaines régions.
Les ours polaires jouent un rôle crucial dans le maintien de la santé de l'écosystème arctique, et leur situation difficile nous rappelle avec force les répercussions plus larges du changement climatique sur la faune sauvage mondiale. Des efforts de conservation sont actuellement déployés afin de protéger leur habitat et de garantir que ces créatures majestueuses continuent de prospérer dans la nature.
from langchain_community.document_loaders import TextLoader
loader = TextLoader('data/my_document.txt')
documents = loader.load()
Voici un fichier texte simple chargé dans le système, à titre d'exemple pédagogique, mais vous pouvez ajouter tout type de document de votre choix. Par exemple, vous pouvez ajouter de la documentation interne provenant de votre organisation. La variable documents contient désormais le contenu du fichier, prêt à être traité.
Les documents volumineux sont souvent divisés en plusieurs parties afin de faciliter leur indexation et leur recherche. Ce processus est extrêmement important, car les segments plus courts sont plus faciles à gérer pour le modèle linguistique et permettent une recherche plus précise. Vous pouvez en savoir plus en consultant notre guide sur les stratégies de segmentation pour l'IA et le RAG.
from langchain.text_splitter import RecursiveCharacterTextSplitter
splitter = RecursiveCharacterTextSplitter(chunk_size=500, chunk_overlap=50)
document_chunks = splitter.split_documents(documents)
Ici, le texte est divisé en segments de 500 caractères avec un chevauchement de 50 caractères entre les segments. Ce chevauchement contribue à préserver le contexte entre les segments lors de la récupération.
Une fois les données préparées, l'étape suivante consiste à les indexer pour permettre une recherche efficace. L'indexation consiste à convertir les segments de texte en représentations vectorielles et à les stocker dans un magasin vectoriel.
LangChain prend en charge la création d'intégrations vectorielles à l'aide de divers modèles, tels que les modèles OpenAI ou HuggingFace. Ces intégrations représentent la signification sémantique des segments de texte, ce qui les rend adaptées aux recherches par similarité.
En termes simples, les intégrations constituent essentiellement un moyen de prendre du texte, tel qu'un paragraphe d'un document, et de le convertir en chiffres compréhensibles par un modèle d'IA. Ces nombres, ou vecteurs, représentent la signification du texte d'une manière qui facilite son traitement par les systèmes d'IA.
from langchain_openai.embeddings import OpenAIEmbeddings
embeddings = OpenAIEmbeddings()
Nous utilisons les intégrations d'OpenAI pour gérer cette transformation. Tout d'abord, nous intégrons l'outil d'intégration d'OpenAI, puis nous l'initialisons afin qu'il soit prêt à l'emploi.
Après avoir généré les intégrations, l'étape suivante consiste à les stocker dans un magasin de vecteurs tel que PGVector, FAISS ou tout autre magasin pris en charge par LangChain. Cela permet une recherche rapide et précise des documents pertinents lorsqu'une requête est effectuée.
from langchain_community.vectorstores import FAISS
vector_store = FAISS.from_documents(document_chunks, embeddings)
Dans ce cas, nous utilisons FAISS, un excellent outil conçu pour effectuer des recherches dans de grands ensembles de vecteurs. FAISS nous aide à trouver très rapidement les vecteurs les plus similaires.
Voici donc ce qui se passe : Nous intégrons FAISS à LangChain et l'utilisons pour créer ce que l'on appelle un magasin de vecteurs. Il s'agit d'une base de données spéciale conçue pour stocker et rechercher efficacement des vecteurs.
L'avantage de cette configuration est que, lorsque nous effectuerons une recherche ultérieurement, FAISS pourra examiner tous ces vecteurs, trouver ceux qui sont les plus similaires à une requête donnée et renvoyer les fragments de document correspondants.
Une fois les données indexées, vous pouvez maintenant mettre en œuvre le composant de récupération, qui est chargé de récupérer les informations pertinentes en fonction des requêtes des utilisateurs.
Nous sommes actuellement en train de configurer un programme de récupération. Il s'agit du composant qui parcourt les documents indexés et identifie ceux qui sont les plus pertinents par rapport à la requête d'un utilisateur.
Ce qui est remarquable, c'est que vous n'effectuez pas une recherche aléatoire, mais une recherche intelligente grâce à la puissance des intégrations, de sorte que les résultats obtenus sont sémantiquement similaires à ce que l'utilisateur recherche. Examinons la ligne de code :
retriever = vector_store.as_retriever(
	 search_type="similarity",
	 search_kwargs={"k": 5}
	)
Tout d'abord, nous convertissons le magasin de vecteurs en un système de récupération. Vous savez que vous disposez déjà de ce magasin vectoriel FAISS rempli d'intégrations de documents ? À présent, nous lui indiquons : « Veuillez utiliser cela pour effectuer des recherches lorsque l'utilisateur me pose une question. »
C'est dans search_type que la magie opère. Le moteur de recherche peut effectuer des recherches de différentes manières, et plusieurs options s'offrent à vous ici. La recherche par similarité est un élément essentiel de la recherche documentaire. Il vérifie quels documents sont les plus proches de la requête en termes de signification.
Ainsi, lorsque vous indiquez « search_type=similarity », vous demandez au moteur de recherche de « trouver les documents les plus similaires à la requête en fonction des intégrations que nous avons générées ».
Avec search_kwargs={« k » : 5} vous affinez les détails. La valeur k indique au récupérateur le nombre de documents à extraire du magasin de vecteurs. Dans ce cas, k=5 signifie « Veuillez me fournir les 5 documents les plus pertinents. »
Ceci est extrêmement efficace car cela contribue à réduire le bruit. Au lieu d'obtenir une multitude de résultats qui sont peut-être plus ou moins pertinents, vous ne retenez que les informations les plus importantes.
Dans cette partie du code, nous configurons le moteur central de votre système RAG à l'aide de LangChain. Vous disposez déjà de votre outil de recherche, qui peut extraire les documents pertinents en fonction d'une requête.
À présent, nous intégrons le LLM et l'utilisons pour générer la réponse en fonction des documents récupérés.
from langchain_openai import OpenAI  # Updated import
from langchain.chains import RetrievalQA
Ici, nous importons deux éléments clés :
llm = OpenAI(openai_api_key=openai_api_key)Cette ligne initialise le LLM à l'aide de votre clé API OpenAI. Considérez cela comme le chargement du cerveau de votre système : c'est le modèle qui va absorber le texte, le comprendre et générer des réponses.
qa_chain = RetrievalQA.from_chain_type(
    llm=llm,
    chain_type="stuff",
    retriever=retriever
)
C'est ici que les choses commencent à devenir vraiment intéressantes. Nous mettons en place la chaîne d'assurance qualité, qui relie tous les éléments entre eux. La méthode RetrievalQA.from_chain_type() crée une chaîne de questions-réponses, ce qui revient à dire : « Combiner le récupérateur et le LLM pour créer un système qui répond aux questions en se basant sur les documents récupérés. »
Ensuite, nous demandons à la chaîne d'utiliser le LLM OpenAI que nous venons d'initialiser pour générer des réponses. Ensuite, nous connectons le récupérateur que vous avez construit précédemment. Le récupérateur est chargé de trouver les documents pertinents en fonction de la requête de l'utilisateur.
Ensuite, nous définissons chain_type = « stuff » : Veuillez m'expliquer ce que signifie « stuff » dans ce contexte. Il s'agit en réalité d'un type de chaîne dans LangChain. « Éléments » signifie que nous chargeons tous les documents pertinents récupérés dans le LLM et lui demandons de générer une réponse basée sur l'ensemble de ces éléments.
C'est comme déposer un ensemble de notes sur le bureau du juriste et lui indiquer : « Veuillez utiliser toutes ces informations pour répondre à la question. »
Il existe également d'autres types de chaînes (telles que « map_reduce » ou « refine »), mais « stuff » est la plus simple et la plus directe.
query = "Are polar bears in danger?"
response = qa_chain.invoke({"query": query})
C'est ici que nous posons une question au système et obtenons une réponse. La méthode invoke() déclenche l'ensemble du pipeline.
Il reçoit votre requête, l'envoie au moteur de recherche pour récupérer les documents pertinents, puis transmet ces documents au LLM, qui génère la réponse finale.
print(response)Ce dernier imprime la réponse générée par le LLM. À partir des documents récupérés, le système génère une réponse complète et bien documentée à la requête, qui est ensuite imprimée.
Le script final se présente comme suit :
from dotenv import load_dotenv
import os
from langchain_community.document_loaders import TextLoader
from langchain.text_splitter import RecursiveCharacterTextSplitter
from langchain_openai.embeddings import OpenAIEmbeddings
from langchain_community.vectorstores import FAISS
from langchain.chains import RetrievalQA
from langchain_openai import OpenAI

# Load environment variables
load_dotenv()
openai_api_key = os.getenv("OPENAI_API_KEY")

# Load the document
loader = TextLoader('data/my_document.txt')
documents = loader.load()

# Split the document into chunks
splitter = RecursiveCharacterTextSplitter(chunk_size=500, chunk_overlap=50)
document_chunks = splitter.split_documents(documents)

# Initialize embeddings with OpenAI API key
embeddings = OpenAIEmbeddings(openai_api_key=openai_api_key)

# FAISS expects document objects and the embedding model
vector_store = FAISS.from_documents(document_chunks, embeddings)

# Use the vector store's retriever
retriever = vector_store.as_retriever()

# Initialize the LLM (using OpenAI)
llm = OpenAI(openai_api_key=openai_api_key)

# Set up the retrieval-based QA chain
qa_chain = RetrievalQA.from_chain_type(
   llm=llm,
   chain_type="stuff",
   retriever=retriever
)

# Example query
query = "Are polar bears in danger?"
response = qa_chain.invoke({"query": query})

# Print the response
print(response)Il est maintenant temps de créer une API pour interagir avec votre système RAG. Cependant, pourquoi cette étape est-elle nécessaire dans le déploiement ?
Imaginez que vous ayez suivi ce tutoriel et que vous disposiez désormais d'un système RAG exceptionnel, personnalisé en fonction de vos documents et de vos besoins. Il collecte des informations pertinentes, traite les requêtes et génère des réponses intelligentes. Cependant, comment permettez-vous aux utilisateurs ou à d'autres systèmes d'interagir avec ce système ?
FastAPI agit en tant qu'intermédiaire. Il offre aux utilisateurs ou aux applications un moyen simple et structuré de poser des questions à votre système RAG et d'obtenir des réponses.
FastAPI est asynchrone et hautement performant. Cela signifie qu'il peut traiter de nombreuses requêtes simultanément sans ralentir, ce qui est extrêmement important lorsqu'il s'agit de systèmes d'IA qui peuvent être amenés à récupérer de grandes quantités de données ou à exécuter des requêtes complexes.
Dans cette section, nous allons modifier le script précédent et en créer d'autres afin de garantir que votre système RAG soit accessible, évolutif et prêt à gérer le trafic réel.Commençons par créer les routes qui traiteront les requêtes entrantes vers le système RAG.
Dans votre répertoire de travail, veuillez créer un fichier main.py. Ceci est votre point d'entrée pour l'application FastAPI. Ce fichier constituera le cœur de votre FastAPI : il regroupera toutes les routes API, les dépendances et le système RAG.
from fastapi import FastAPI
from endpoints import router
app = FastAPI()
app.include_router(router)
Il s'agit d'une configuration relativement simple, mais elle est claire. Nous procédons ici à la configuration d'une instance FastAPI, puis nous récupérons toutes les routes (ou chemins API) à partir d'un autre fichier, que nous créerons ensuite.
C'est ici que tout se concrétise. Nous allons créer une fonction qui exécute votre système RAG lorsqu'un utilisateur soumet une requête.
async def get_rag_response(query: str):Cette fonction est marquée comme asynchrone, ce qui signifie qu'elle est d'async. Cela signifie qu'il peut traiter d'autres tâches pendant qu'il attend une réponse.
Cette fonctionnalité est particulièrement utile lorsque vous utilisez des systèmes basés sur la récupération, où l'extraction de documents ou l'interrogation d'un LLM peut prendre un certain temps. De cette manière, FastAPI peut traiter d'autres requêtes pendant que celle-ci s'exécute en arrière-plan.
retriever = setup_rag_system()Nous appelons ici la fonction ` setup_rag_system() `, qui, comme nous l'avons mentionné précédemment, initialise l'ensemble du pipeline de récupération. Cela signifie :
Ce récupérateur sera chargé de récupérer les extraits de texte pertinents en fonction de la requête de l'utilisateur.
Désormais, lorsqu'un utilisateur pose une question, le moteur de recherche examine tous les documents stockés dans le magasin vectoriel et sélectionne ceux qui sont les plus pertinents par rapport à la requête.
retrieved_docs = retriever.get_relevant_documents(query)Cette méthode d'invoke(query) récupère les documents pertinents. En arrière-plan, le système associe la requête aux vecteurs d'intégration et extrait les correspondances les plus pertinentes en fonction de leur similitude.
Maintenant que nous disposons des documents pertinents, nous devons les formater pour le LLM.
context = "\n".join([doc.page_content for doc in retrieved_docs])Ici, nous prenons tous les documents récupérés et combinons leur contenu en une seule chaîne. Ceci est important car le LLM a besoin d'un bloc de texte cohérent pour fonctionner, et non d'un ensemble de fragments séparés.
Nous utilisons la fonction Python « join() » pour assembler ces fragments de documents en un bloc d'informations cohérent. Le contenu de chaque document est stocké dans le champ « doc.page_content » (Contenu du document), et nous les joignons avec de nouvelles lignes (\n).
Nous sommes actuellement en train de créer l'invite pour le LLM.
prompt = [f"Use the following information to answer the question:\n\n{context}\n\nQuestion: {query}"]La requête est structurée de manière à indiquer au LLM d'utiliser les informations récupérées pour répondre à la question de l'utilisateur.
Le moment est venu de susciter une réaction.
generated_response = llm.generate(prompt) # Pass as a list of stringsIci, le modèle OpenAI est désormais chargé de prendre la requête et de générer une réponse contextuelle basée à la fois sur la question et sur les documents pertinents.
Enfin, nous renvoyons la réponse générée à celui qui a appelé la fonction (qu'il s'agisse d'un utilisateur, d'une application frontale ou d'un autre système).
return generated_responseCette réponse est entièrement formulée, contextualisée et prête à être utilisée dans des applications concrètes.
En résumé, cette fonction effectue la boucle complète de récupération et de génération. Voici un bref récapitulatif du déroulement :
1. Il configure le récupérateur pour qu'il recherche les documents pertinents.
2. Ces documents sont extraits en fonction de la requête.
3. Le contexte de ces documents est préparé pour le LLM.
4. Le LLM génère une réponse finale en utilisant ce contexte.
5. La réponse est renvoyée à l'utilisateur.
from dotenv import load_dotenv
import os

from langchain_community.document_loaders import TextLoader
from langchain.text_splitter import RecursiveCharacterTextSplitter
from langchain_openai.embeddings import OpenAIEmbeddings
from langchain_community.vectorstores import FAISS
from langchain_openai import OpenAI

# Load environment variables
load_dotenv()
openai_api_key = os.getenv("OPENAI_API_KEY")

# Initialize the LLM (using OpenAI)
llm = OpenAI(openai_api_key=openai_api_key)

# Function to set up the RAG system
def setup_rag_system():
   # Load the document
   loader = TextLoader('data/my_document.txt')
   documents = loader.load()

   # Split the document into chunks
   splitter = RecursiveCharacterTextSplitter(chunk_size=500, chunk_overlap=50)
   document_chunks = splitter.split_documents(documents)

   # Initialize embeddings with OpenAI API key
   embeddings = OpenAIEmbeddings(openai_api_key=openai_api_key)

   # Create FAISS vector store from document chunks and embeddings
   vector_store = FAISS.from_documents(document_chunks, embeddings)

   # Return the retriever for document retrieval with specified search_type
   retriever = vector_store.as_retriever(
       search_type="similarity",  # or "mmr" or "similarity_score_threshold"
       search_kwargs={"k": 5}  # Adjust the number of results if needed
   )
   return retriever

# Function to get the response from the RAG system
async def get_rag_response(query: str):
   retriever = setup_rag_system()

   # Retrieve the relevant documents using 'get_relevant_documents' method
   retrieved_docs = retriever.get_relevant_documents(query)

   # Prepare the input for the LLM: Combine the query and the retrieved documents into a single string
   context = "\n".join([doc.page_content for doc in retrieved_docs])

   # LLM expects a list of strings (prompts), so we create one by combining the query with the retrieved context
   prompt = [f"Use the following information to answer the question:\n\n{context}\n\nQuestion: {query}"]

   # Generate the final response using the language model (LLM)
   generated_response = llm.generate(prompt)

return generated_responseendpoints.pyEnsuite, nous allons créer notre fichier endpoints.py. C'est ici que nous définirons les chemins d'accès réels que les utilisateurs emprunteront pour interagir avec votre système RAG.
from fastapi import APIRouter, HTTPException
from rag import get_rag_response
router = APIRouter()
@router.get("/query/")
async def query_rag_system(query: str):
    try:
        # Pass the query string to your RAG system and return the response
        response = await get_rag_response(query)
        return {"query": query, "response": response}
    except Exception as e:
        raise HTTPException(status_code=500, detail=str(e))
APIRouter Nous créons une interface pour gérer nos routes API. Le point de terminaison /query/ est configuré pour accepter une requête **GET** avec une chaîne de requête. Il appelle la fonction get_rag_response à partir de votre fichier rag.py, qui gère l'ensemble du pipeline RAG (récupération de documents + génération de langage). En cas de problème, nous générons une erreur HTTP 500 accompagnée d'un message détaillé.
Une fois tous ces éléments configurés, vous pouvez désormais exécuter votre application FastAPI à l'aide d'Uvicorn. Il s'agit du serveur web qui permettra aux utilisateurs d'accéder à votre API.
Veuillez vous rendre dans le terminal et exécuter :
uvicorn app.main:app --reloadapp.main:app indique à Uvicorn de rechercher l'instance app dans le fichier main.py et --reload active le rechargement automatique si vous apportez des modifications à votre code.
Une fois le serveur lancé, veuillez ouvrir votre navigateur et vous rendre sur http://127.0.0.1:8000/docs. FastAPI génère automatiquement la documentation Swagger UI pour votre API, vous permettant ainsi de la tester directement depuis votre navigateur.
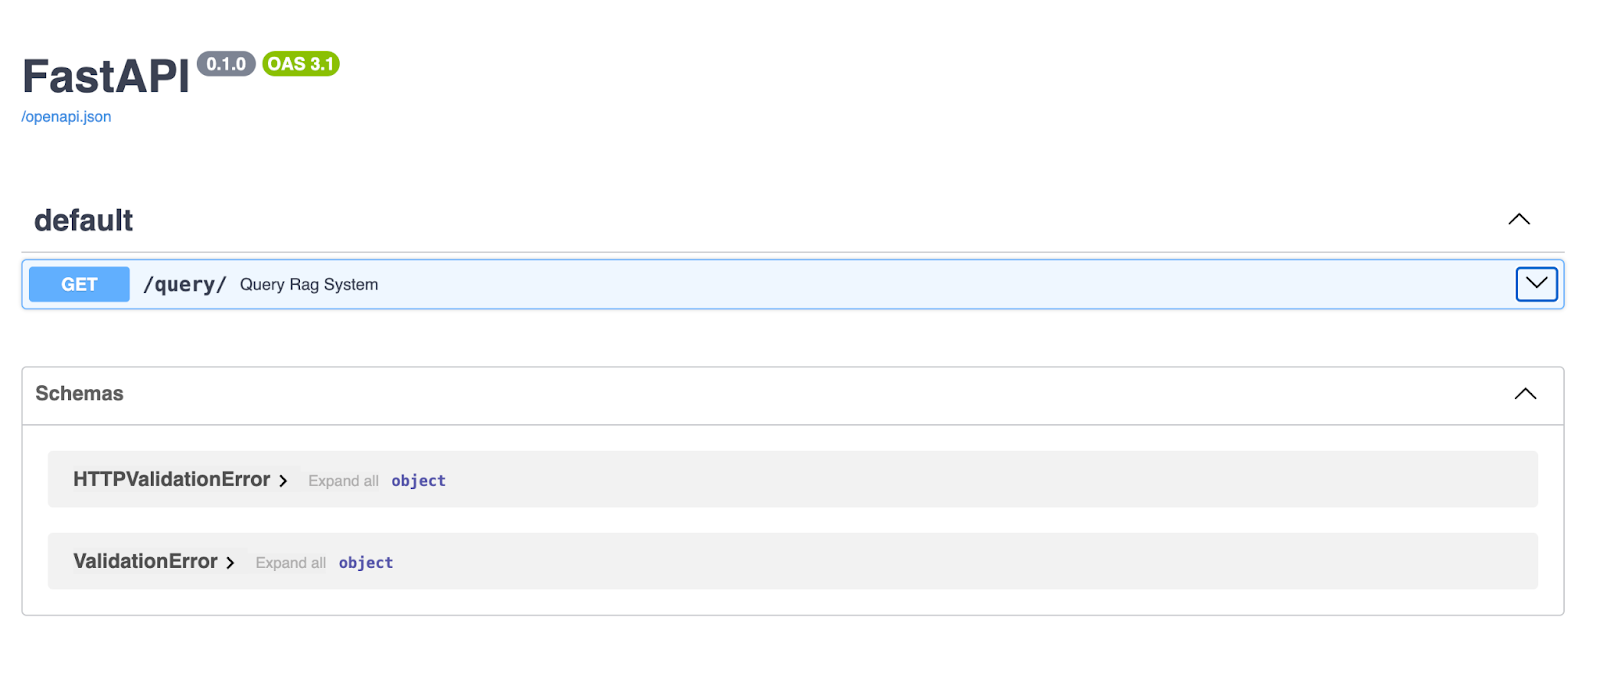
L'interface utilisateur Swagger de FastAPI offre une interface claire et interactive pour explorer et tester vos points de terminaison API. Ici, le point de terminaison /query/ permet aux utilisateurs de saisir une chaîne de requête et de recevoir une réponse générée par le pipeline RAG.
Une fois votre serveur FastAPI opérationnel, veuillez vous rendre sur votre navigateur ou utiliser Postman ou Curl pour effectuer une requête GET vers votre point de terminaison /query/.
Dans votre navigateur, via Swagger :
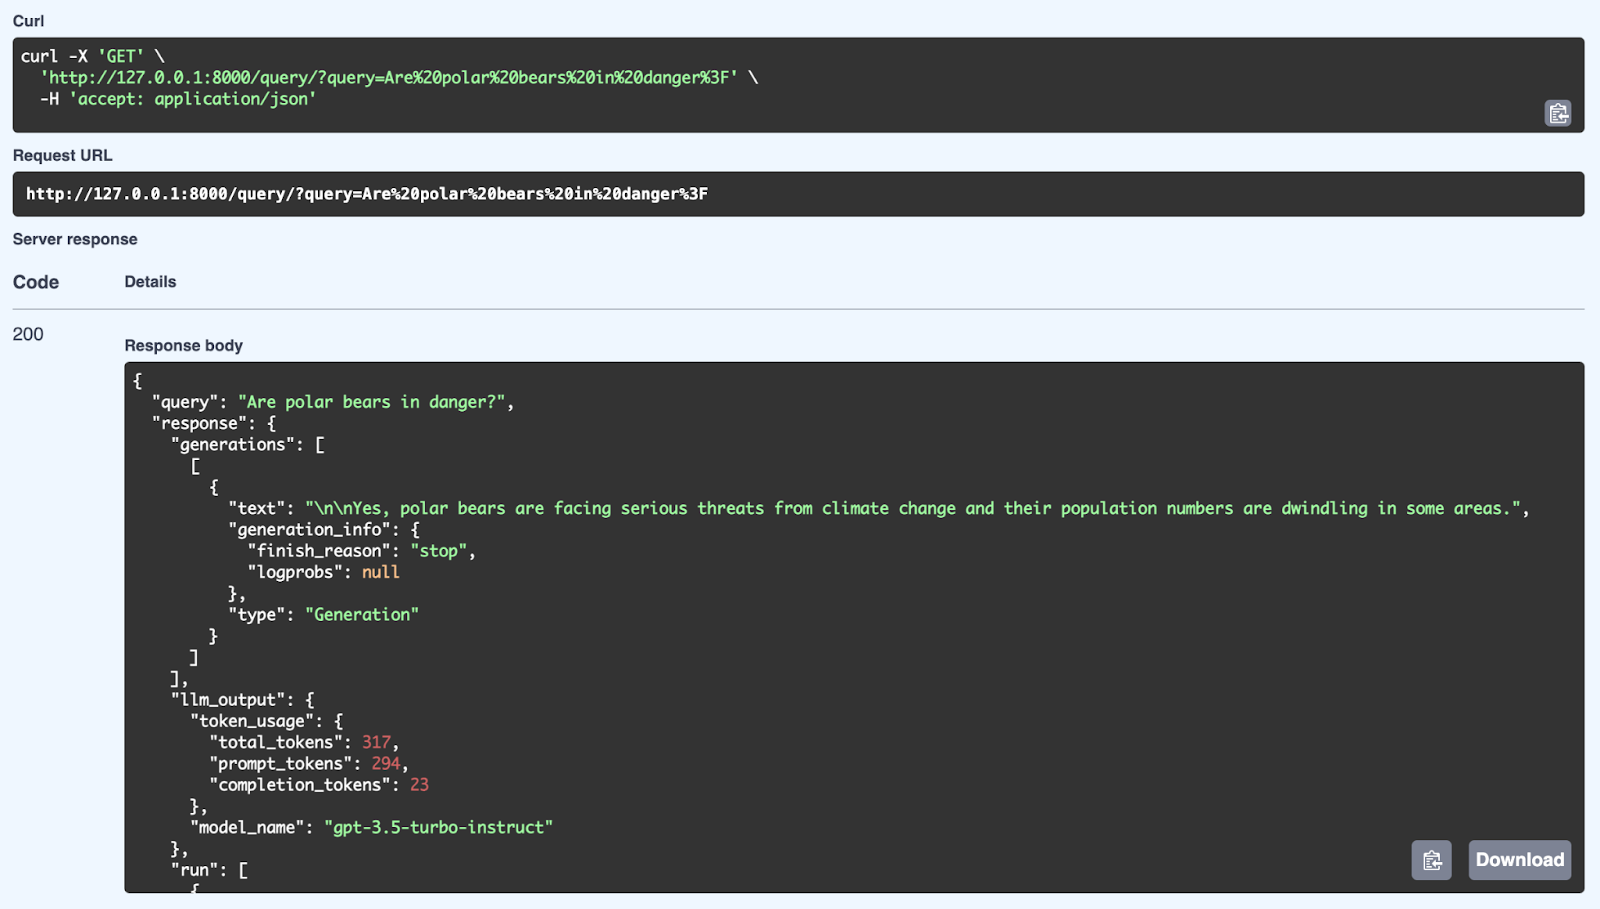
Nous pouvons observer ici une réponse réussie du système RAG à l'aide d'une requête : « Les ours polaires sont-ils menacés ? ». Le système récupère les informations pertinentes dans sa base de connaissances et génère une réponse cohérente à l'aide du modèle GPT-3.5 Turbo-Instruct. La réponse détaillée comprend non seulement la réponse (Oui, les ours polaires sont confrontés à de graves menaces liées au changement climatique et leur population diminue), mais également des métadonnées telles que l'utilisation des jetons (nombre de jetons traités) et le modèle utilisé pour la génération. L'API est en mesure de fournir des réponses bien structurées et adaptées au contexte en utilisant à la fois des mécanismes de recherche et de génération via FastAPI.
Examinons maintenant les avantages du traitement asynchrone dans FastAPI et pourquoi il fait une telle différence dans la gestion des requêtes API réelles.
Votre système RAG est désormais opérationnel. L'API reçoit les questions, récupère les informations pertinentes dans sa base de connaissances, puis génère des réponses à l'aide d'un modèle linguistique.
Si l'ensemble de ce processus était synchrone, le système resterait inactif, attendant que chaque tâche soit terminée avant de passer à la suivante. Par exemple, pendant qu'il récupère des documents, il ne serait pas en mesure de traiter de nouvelles demandes.
|
E/S non bloquantes |
Amélioration des performances |
Meilleure expérience utilisateur |
|
Les fonctions asynchrones permettent au serveur de traiter plusieurs requêtes simultanément, plutôt que d'attendre la fin d'une requête avant d'en commencer une autre. |
Pour des tâches telles que la récupération de documents à partir d'un magasin vectoriel ou la génération de texte, le traitement asynchrone garantit que l'API peut gérer efficacement des charges élevées. |
Les clients obtiennent des réponses plus rapides et votre API reste réactive même en cas d'utilisation intensive. |
Discutons des stratégies de déploiement, une étape cruciale pour transformer votre système RAG de prototype en produit pleinement opérationnel. L'objectif ici est de s'assurer que votre système est packagé, déployé et prêt à évoluer afin de pouvoir gérer les utilisateurs réels.
Tout d'abord, parlons de Docker. Docker est comparable à une boîte magique qui regroupe tout ce dont votre système RAG a besoin (son code, ses dépendances, ses configurations) et les rassemble dans un petit conteneur bien organisé.
Cela garantit que, quel que soit l'endroit où vous déployez votre application, elle se comporte exactement de la même manière. Vous pouvez exécuter votre application dans différents environnements, mais comme elle se trouve dans un conteneur, vous n'avez pas à vous soucier du problème « ça fonctionne sur ma machine ».
Vous créez un fichier Dockerfile, qui est un ensemble d'instructions indiquant à Docker comment configurer l'environnement de votre application, installer les paquets nécessaires et démarrer l'exécution. Une fois cela en place, vous pouvez créer une image Docker à partir de celle-ci et exécuter votre application dans un conteneur. Il est efficace, reproductible et extrêmement portable.
Une fois votre système emballé et prêt à être utilisé, vous souhaiterez probablement le déployer dans le cloud. C'est là que cela devient intéressant, car le déploiement de votre système RAG dans le cloud signifie qu'il est accessible depuis n'importe où dans le monde. De plus, cela vous offre une évolutivité, une fiabilité et un accès à d'autres services cloud qui peuvent améliorer votre système.
Examinons quelques autres plateformes cloud populaires, notamment Azure et Google Cloud :
AWS propose des outils tels qu'Elastic Beanstalk, qui simplifient considérablement le déploiement. Vous transmettez simplement votre conteneur Docker, et AWS se charge du dimensionnement, de l'équilibrage de charge et de la surveillance. Si vous avez besoin d'un contrôle accru, vous pouvez utiliser Amazon ECS, qui vous permet d'exécuter vos conteneurs Docker sur un cluster de serveurs et de les dimensionner à la hausse ou à la baisse en fonction de vos besoins.
Heroku est une autre option qui simplifie le déploiement. Il vous suffit de soumettre votre code, et Heroku se charge de l'infrastructure pour vous. C'est un excellent choix si vous ne souhaitez pas vous plonger dans les détails techniques de la gestion des ressources cloud.
Azure propose Azure App Service, qui vous permet de déployer et de gérer facilement votre système RAG, en fournissant une prise en charge intégrée pour l'auto-scaling, l'équilibrage de charge et le déploiement continu.
Pour plus de flexibilité, vous pouvez utiliser Azure Kubernetes Service (AKS) afin de gérer vos conteneurs Docker à grande échelle, garantissant ainsi que votre système peut gérer un trafic élevé grâce à la possibilité d'ajuster dynamiquement les ressources selon les besoins.
GCP dispose de Google Cloud Run, une plateforme entièrement gérée qui vous permet de déployer vos conteneurs et de les dimensionner automatiquement en fonction du trafic.
Si vous souhaitez bénéficier d'un contrôle accru sur votre infrastructure, vous pouvez opter pour Google Kubernetes Engine (GKE), qui vous permet de gérer et de dimensionner vos conteneurs Docker sur plusieurs nœuds, avec l'avantage supplémentaire d'une intégration approfondie avec les services cloud de Google, tels que les API d'IA et d'apprentissage automatique.
Chaque plateforme présente ses avantages, que vous recherchiez la simplicité et l'automatisation ou un contrôle plus précis de votre déploiement.
Nous avons abordé de nombreux aspects dans cet article, en décrivant le processus de création d'un système RAG à l'aide de LangChain et FastAPI. Les systèmes RAG constituent une avancée majeure dans le traitement du langage naturel, car ils intègrent des informations externes, permettant ainsi à l'IA de générer des réponses plus précises, pertinentes et adaptées au contexte.
Avec LangChain, nous disposons d'un cadre solide qui gère tout, du chargement des documents à la création d'intégrations, en passant par le fractionnement du texte et la récupération d'informations en fonction des requêtes des utilisateurs.
Ensuite, FastAPI intervient pour nous fournir un framework web rapide et prêt pour l'asynchrone, nous aidant à déployer le système RAG en tant qu'API évolutive.
Ensemble, ces outils facilitent la création d'applications d'IA capables de traiter des requêtes complexes, de fournir des réponses précises et, au final, d'offrir une meilleure expérience utilisateur.
Il est maintenant temps pour vous de mettre en pratique ce que vous avez appris et de l'appliquer à vos propres projets. de les appliquer à vos propres projets.
Considérez les possibilités : interroger la base de connaissances interne de votre entreprise, automatiser les processus de révision de documents ou créer des chatbots intelligents pour l'assistance à la clientèle.
N'oubliez pas qu'il existe de nombreuses façons d'étendre cette configuration. Vous pourriez envisager d'utiliser des requêtes POST pour envoyer des structures de données plus complexes, ou même explorer les connexions WebSocket pour des interactions en temps réel.
Je vous encourage à approfondir vos recherches, à expérimenter et à découvrir où cela peut vous mener. Ceci n'est qu'un aperçu de ce que vous pouvez accomplir avec LangChain, FastAPI et les outils d'IA modernes. Voici quelques ressources que je recommande :
Meilleurs cours DataCamp
Cours
Cours
Cours
blog
Kurtis Pykes
15 min
Tutoriel
Stephen Gruppetta
Tutoriel
Moez Ali
Tutoriel
Laiba Siddiqui
Tutoriel
Mark Pedigo
Tutoriel
Samuel Shaibu