
Track
Developing AI Applications
21 hr
Let me walk you through what we’re building step by step. It’s all about creating a RAG pipeline based on the architecture shown here:
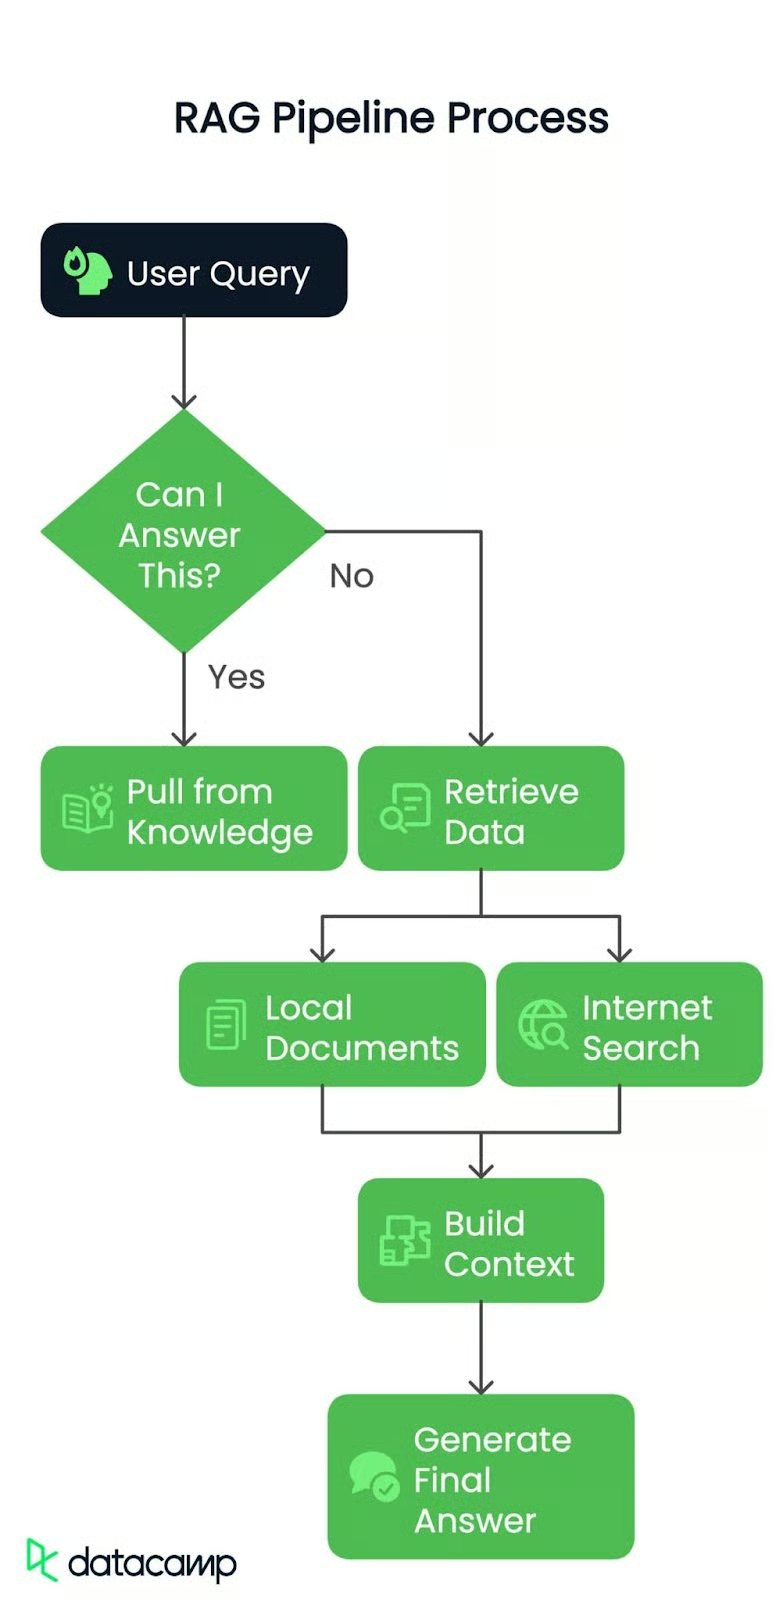
Whether it’s a simple query or a complex problem, it all starts with a question from the user. This is the spark that sets our pipeline in motion.
Next, the system checks: Can I answer this?
Yes? It pulls from existing knowledge and delivers the response immediately.
No? Time to dig deeper! The query gets routed to the next step.
If the answer isn’t readily available, the pipeline dives into two possible sources:
The retrieved data whether from the PDF or the web, is then compiled into a coherent, retrieved context. Think of it as gathering all the puzzle pieces before putting them together.
Finally, this context is passed to a large language model (LLM) to craft a clear and accurate answer. It’s not just about retrieving data, it’s about understanding and presenting it in the best possible way.
By the end of this, we’ll have a smart, efficient RAG pipeline that can dynamically respond to queries with real-world context.
To begin, I am going to use a real-world document as our local data source. The document we’ll work with is none other than Generative AI Principles. It’s packed with valuable insights, so it’ll be the perfect test case for our pipeline. You would also need a summary of the file which I am using for routing purposes. You can get the summary file from here.
Here’s everything you need to get started, step by step.
Before we dive in, there are a couple of things you’ll need to have in place:
Let’s make sure we’ve got the right tools installed. Open your terminal and run the following commands to install the necessary Python packages:
pip install langchain-groq faiss-cpu crewai serper pypdf2 python-dotenv setuptools sentence-transformers huggingface distutils`Once you’ve got the keys and packages ready, you’re good to go! I recommend saving your API keys in an.env file or securely in your codebase. Here’s an example of how your .env file might look:
import os from dotenv
import load_dotenv from langchain.vectorstores
import FAISS from langchain.document_loaders
import PyPDFLoader
from langchain.text_splitter import RecursiveCharacterTextSplitter
from langchain_huggingface.embeddings import HuggingFaceEmbeddings
from langchain_groq import ChatGroq
from crewai_tools import SerperDevTool
from crewai import Agent, Task, Crew, LLM

load_dotenv()
GROQ_API_KEY = os.getenv("GROQ_API_KEY")
SERPER_API_KEY = os.getenv("SERPER_API_KEY")
GEMINI=os.getenv("GEMINI")
I loaded environment variables so I could safely manage API keys and sensitive data without hardcoding them. This ensures the script stays secure, and I can change keys in one place (.env file) if needed.
In a nutshell, here’s what these imported packages and functions will do:
.env files.We start by initializing two language models:
llm: For general tasks like routing and generating answers. We’ll use the llama-3.3-70b-specdec model.crew_llm: Specifically for the web-scraping agent, as it needs a slightly different configuration (like temperature for more creative outputs). We’ll use the gemini/gemini-1.5-flash model.# Initialize LLM
llm = ChatGroq(
model="llama-3.3-70b-specdec",
temperature=0,
max_tokens=500,
timeout=None,
max_retries=2,
)
crew_llm = LLM(
model="gemini/gemini-1.5-flash",
api_key=GEMINI,
max_tokens=500,
temperature=0.7
)This check_local_knowledge() function below acts as a decision-maker. I created a prompt where I passed the user query and some local context (from the PDF). The model responds with either "Yes" or "No", telling me if it has enough information locally to answer the query. If not, we’ll resort to web scraping.
def check_local_knowledge(query, context):
    """Router function to determine if we can answer from local knowledge"""
    prompt = '''Role: Question-Answering Assistant
Task: Determine whether the system can answer the user's question based on the provided text.
Instructions:
    - Analyze the text and identify if it contains the necessary information to answer the user's question.
    - Provide a clear and concise response indicating whether the system can answer the question or not.
    - Your response should include only a single word. Nothing else, no other text, information, header/footer.
Output Format:
    - Answer: Yes/No
Study the below examples and based on that, respond to the last question.
Examples:
    Input:
        Text: The capital of France is Paris.
        User Question: What is the capital of France?
    Expected Output:
        Answer: Yes
    Input:
        Text: The population of the United States is over 330 million.
        User Question: What is the population of China?
    Expected Output:
        Answer: No
    Input:
        User Question: {query}
        Text: {text}
'''
    formatted_prompt = prompt.format(text=context, query=query)
    response = llm.invoke(formatted_prompt)
return response.content.strip().lower() == "yes"Next, we set up a web searching and scraping agent using the crewai library. This agent uses a search tool (SerperDevTool) to find articles related to the user’s query. The task description ensures the agent knows what to retrieve, and it summarizes the relevant web content. It’s like sending a specialized worker to fetch data from the internet.
Then, the get_web_content() function runs the web scraping agent. It sends the query as input and retrieves a concise summary of the most relevant article. It returns the raw result, which becomes our context if the router decides we don’t have enough local information.
def setup_web_scraping_agent():
    """Setup the web scraping agent and related components"""
    search_tool = SerperDevTool()  # Tool for performing web searches
    scrape_website = ScrapeWebsiteTool()  # Tool for extracting data from websites

    # Define the web search agent
    web_search_agent = Agent(
        role="Expert Web Search Agent",
        goal="Identify and retrieve relevant web data for user queries",
        backstory="An expert in identifying valuable web sources for the user's needs",
        allow_delegation=False,
        verbose=True,
        llm=crew_llm
    )

    # Define the web scraping agent
    web_scraper_agent = Agent(
        role="Expert Web Scraper Agent",
        goal="Extract and analyze content from specific web pages identified by the search agent",
        backstory="A highly skilled web scraper, capable of analyzing and summarizing website content accurately",
        allow_delegation=False,
        verbose=True,
        llm=crew_llm
    )

    # Define the web search task
    search_task = Task(
        description=(
            "Identify the most relevant web page or article for the topic: '{topic}'. "
            "Use all available tools to search for and provide a link to a web page "
            "that contains valuable information about the topic. Keep your response concise."
        ),
        expected_output=(
            "A concise summary of the most relevant web page or article for '{topic}', "
            "including the link to the source and key points from the content."
        ),
        tools=[search_tool],
        agent=web_search_agent,
    )

    # Define the web scraping task
    scraping_task = Task(
        description=(
            "Extract and analyze data from the given web page or website. Focus on the key sections "
            "that provide insights into the topic: '{topic}'. Use all available tools to retrieve the content, "
            "and summarize the key findings in a concise manner."
        ),
        expected_output=(
            "A detailed summary of the content from the given web page or website, highlighting the key insights "
            "and explaining their relevance to the topic: '{topic}'. Ensure clarity and conciseness."
        ),
        tools=[scrape_website],
        agent=web_scraper_agent,
    )

    # Define the crew to manage agents and tasks
    crew = Crew(
        agents=[web_search_agent, web_scraper_agent],
        tasks=[search_task, scraping_task],
        verbose=1,
        memory=False,
    )
    return crew

def get_web_content(query):
    """Get content from web scraping"""
    crew = setup_web_scraping_agent()
    result = crew.kickoff(inputs={"topic": query})
return result.rawThe setup_vector_db() function sets up the vector database from a PDF file. Here’s how I did it step by step:
PyPDFLoader to extract the content.RecursiveCharacterTextSplitter. This makes the data manageable and searchable.After that, the get_local_content() function queries the vector database for the top 5 most relevant chunks related to the user’s query. It combines these chunks into a single string of context.
def setup_vector_db(pdf_path):
    """Setup vector database from PDF"""
    # Load and chunk PDF
    loader = PyPDFLoader(pdf_path)
    documents = loader.load()

    text_splitter = RecursiveCharacterTextSplitter(
        chunk_size=1000,
        chunk_overlap=50
    )
    chunks = text_splitter.split_documents(documents)

    # Create vector database
    embeddings = HuggingFaceEmbeddings(
        model_name="sentence-transformers/all-mpnet-base-v2"
    )
    vector_db = FAISS.from_documents(chunks, embeddings)

    return vector_db

def get_local_content(vector_db, query):
    """Get content from vector database"""
    docs = vector_db.similarity_search(query, k=5)
return " ".join([doc.page_content for doc in docs])Once I have the context (from either local documents or web scraping), I pass it to the language model along with the user’s query. The LLM generates the final answer by combining both the context and query in a conversational format.
Here’s the flow of the main query processing:
check_local_knowledge() to decide if the local PDF content has enough data to answer the query.def generate_final_answer(context, query):
"""Generate final answer using LLM"""
messages = [
(
"system",
"You are a helpful assistant. Use the provided context to answer the query accurately.",
),
("system", f"Context: {context}"),
("human", query),
]
response = llm.invoke(messages)
return response.content
def process_query(query, vector_db, local_context):
"""Main function to process user query"""
print(f"Processing query: {query}")
# Step 1: Check if we can answer from local knowledge
can_answer_locally = check_local_knowledge(query, local_context)
print(f"Can answer locally: {can_answer_locally}")
# Step 2: Get context either from local DB or web
if can_answer_locally:
context = get_local_content(vector_db, query)
print("Retrieved context from local documents")
else:
context = get_web_content(query)
print("Retrieved context from web scraping")
# Step 3: Generate final answer
answer = generate_final_answer(context, query)
return answerLastly, we tie everything together with the main() function:
def main():
    # Setup
    pdf_path = "genai-principles.pdf"

    # Initialize vector database
    print("Setting up vector database...")
    vector_db = setup_vector_db(pdf_path)

    # Get initial context from PDF for routing
    local_context = get_local_content(vector_db, "")

    # Example usage
    query = "What is Agentic RAG?"
    result = process_query(query, vector_db, local_context)
    print("\nFinal Answer:")
    print(result)
if __name__ == "__main__":
    main()
Above, we:
"What is Agentic RAG?") and printed the final answer.This is the output of the program:
Agentic RAG is a technique for building Large Language Model (LLM) powered applications that incorporates AI agents. It is an extension of the traditional Retrieval-Augmented Generation (RAG) approach, which uses an external knowledge source to provide the LLM with relevant context and reduce hallucinations.
In traditional RAG pipelines, the retrieval component is typically composed of an embedding model and a vector database, and the generative component is an LLM. At inference time, the user query is used to run a similarity search over the indexed documents to retrieve the most similar documents to the query and provide the LLM with additional context.
Agentic RAG, on the other hand, introduces AI agents that are designed to interact with the user query and provide additional context to the LLM. These agents can be thought of as "virtual assistants" that help the LLM to better understand the user's intent and retrieve relevant documents.

The key components of Agentic RAG include:
1. AI agents: These are the virtual assistants that interact with the user query and provide additional context to the LLM.
2. Retrieval component: This is the component that retrieves the most similar documents to the user query.
3. Generative component: This is the component that uses the retrieved documents to generate the final output.

Agentic RAG has several benefits, including:
1. Improved accuracy: By providing additional context to the LLM, Agentic RAG can improve the accuracy of the generated output.
2. Enhanced user experience: Agentic RAG can help to reduce the complexity of the user interface and provide a more natural and intuitive experience.
3. Increased flexibility: Agentic RAG can be easily extended to support new use cases and applications.

However, Agentic RAG also has some limitations, including:
1. Increased complexity: Agentic RAG requires additional components and infrastructure, which can increase the complexity of the system.
2. Higher computational requirements: Agentic RAG requires more computational resources to handle the additional complexity of the AI agents and the retrieval component.
3. Training requirements: Agentic RAG requires more data and training to learn the behaviour of the AI agents and the retrieval component.When I asked the question, "What is Agentic RAG?" which was not explicitly available in the provided document, the system demonstrated its flexibility and intelligence. The crewAI agents routed the query correctly, making use of the router’s understanding that external context was necessary. The agents collaborated to scrape the most relevant article from the web, analyze its content, and generate a well-informed response.
The system provided a clear explanation of agentic RAG, its components (AI agents, retrieval, and generative elements), benefits (accuracy, user experience, and flexibility), and limitations (complexity, computational needs, and training requirements).
This highlights the pipeline's ability to fetch context dynamically and deliver precise, concise, and valuable insights, even when faced with queries beyond its initial dataset.
The pipeline we built is a dynamic, multi-step process that efficiently handles user queries by combining existing and external knowledge.
The system can dynamically adapt to diverse queries and provide accurate, user-friendly answers. With the integration of local data, live internet searches, and a seamless user interface, the RAG pipeline proves itself to be a robust and practical solution for real-world applications. As a next step, try to build something your own using the workflow we covered.
Learn AI with these courses!
Track
Course
Course
blog
Bhavishya Pandit
6 min
Tutorial
Abid Ali Awan
Tutorial
Josep Ferrer
Tutorial
Aashi Dutt
Tutorial
Dr Ana Rojo-Echeburúa
code-along
Abi Aryan