tracks
개발자를 위한 AI 엔지니어 보조
26
Google의 Gemini 3.8 Live는 실시간 스트리밍 및 인터랙티브 오디오 애플리케이션을 위해 특별히 설계된 네이티브 음성-대-음성 모델입니다. Gemini 3.8 Live는 지속적인 WebSocket 연결을 통해 멀티모달 입력을 직접 처리합니다.
이 양방향 스트리밍 기능으로, 사용자의 자연스러운 끼어들기와 실시간 음성 전사를 지원하면서 동시에 듣고 말할 수 있는 전이중 대화형 에이전트를 만들 수 있습니다.
애플리케이션 개발 측면에서는, Gemini 3.8 Live가 비동기 도구 호출과 백그라운드 추론을 도입하여, 에이전트가 사용자와의 대화를 유지하면서 외부 함수 호출을 실행하거나 데이터를 가져올 수 있게 합니다.
기능, 벤치마크, 가격에 대한 종합 개요는 Gemini 3.8 Live 가이드를 참고하세요.
코드로 들어가기 전에, 실시간 음성 비서가 내부적으로 어떻게 작동하는지 이해해 보겠습니다.
일반적인 Python 스크립트는 A 함수가 끝나면 B 함수가 실행되는 순차 방식입니다. 하지만 라이브 음성 대화에서는 기다림이 통하지 않습니다.
멈춤 없이 이를 달성하기 위해, Python의 asyncio를 사용해 두 개의 asyncio.Queue 버퍼(컨베이어 벨트라고 생각하세요)를 사이에 두고 통신하는 네 개의 가벼운 백그라운드 작업(“워커”)을 실행합니다.
input_queue):audio_recorder(): 마이크를 지속적으로 청취하고 오디오 조각을 벨트 위에 올립니다.
send_audio_loop(): 벨트에서 오디오 조각을 가져와 Gemini로 스트리밍합니다.
audio_queue):receive_loop(): Gemini를 청취합니다. 텍스트가 오면 출력하고, 음성이 오면 오디오 청크를 벨트 위에 올립니다.
audio_player(): 벨트에서 오디오 청크를 가져와 스피커나 헤드폰으로 재생합니다.
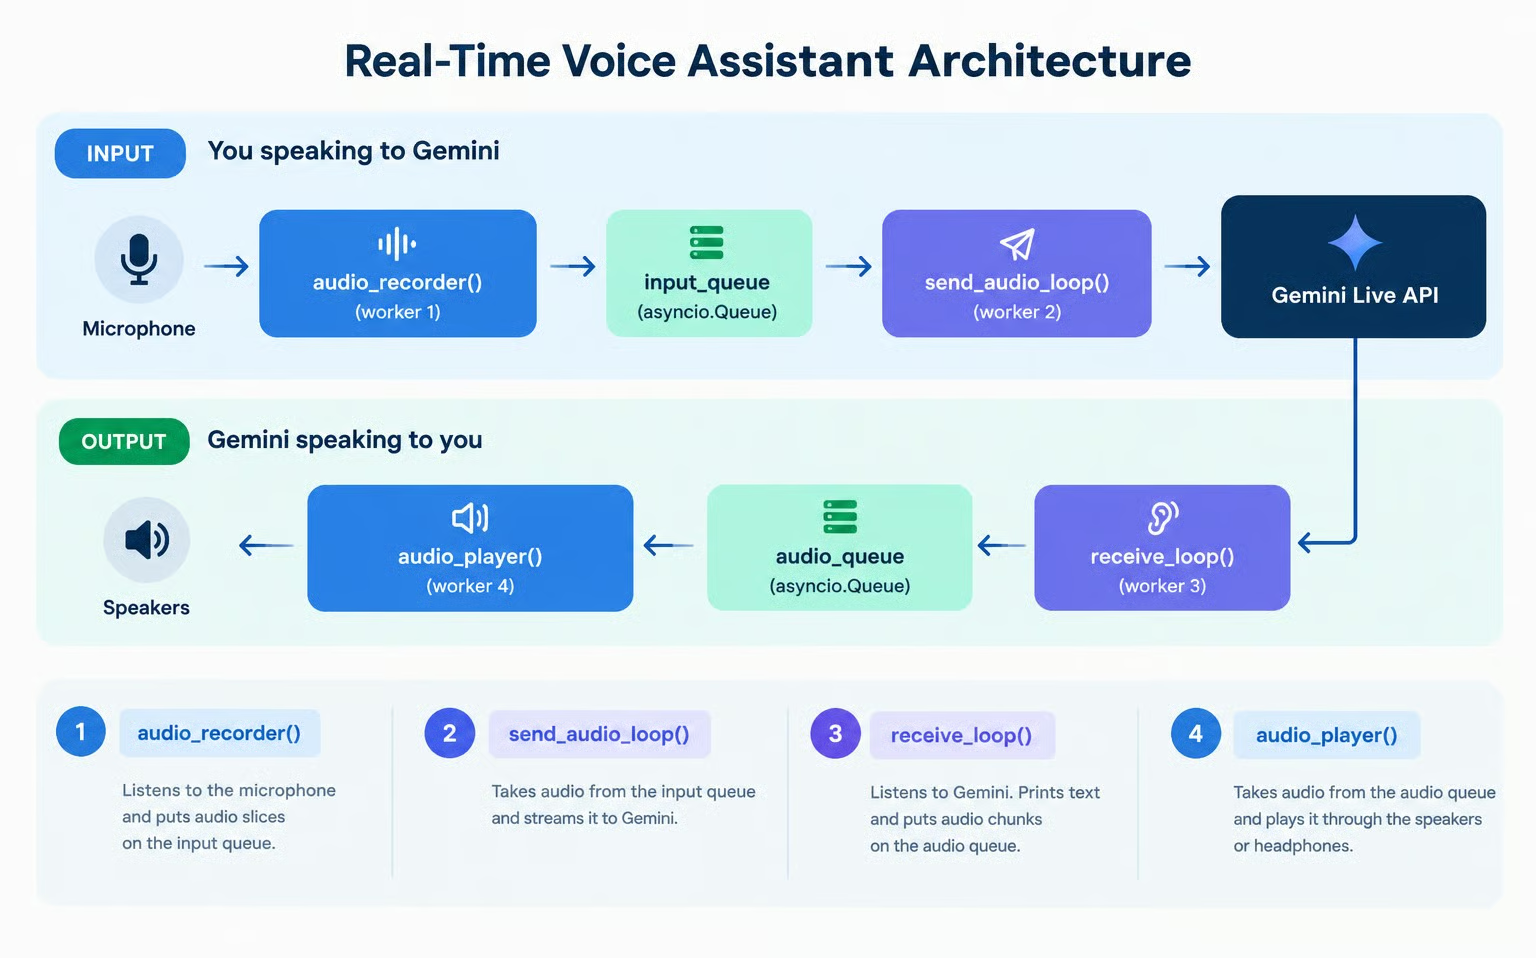
각 워커는 자신의 작은 일만 집중적으로 처리하므로, 네 개 모두가 Python 이벤트 루프에서 서로 간섭 없이 동시에 실행될 수 있습니다.
이 튜토리얼에서 사용한 전체 코드는 이 GitHub 저장소에서 확인할 수 있습니다.
Gemini API를 사용하려면, 코드가 API와 통신할 수 있도록 API 키를 생성하고 설정해야 합니다.
가장 간단한 방법은 다음과 같습니다.
Google의 AI Studio API 키 페이지를 방문해 로그인합니다.
오른쪽 상단의 Create API key 버튼을 클릭합니다.
API 키를 Python 코드가 있는 동일한 폴더의 .env 파일에 아래 형식으로 복사합니다.
GEMINI_API_KEY=replace_with_api_keyAPI 사용에는 일반적으로 비용이 발생합니다. 무료 등급은 두 Gemini 3.8 Live 모델에 대한 제한된 액세스를 제공하지만, 무료 등급 데이터는 Google 제품 개선에 사용됩니다. 프로덕션 사용 또는 더 높은 레이트 리밋이 필요하면 Google의 AI Studio 결제 페이지에서 결제 수단을 설정해야 합니다.
다음 단계는 로컬 Jupyter 노트북에서 실행하도록 설계되었으며, 각 코드 스니펫은 노트북의 하나의 코드 셀에 대응합니다. 마이크 및 스피커 액세스가 필요하므로 Google Colab 같은 온라인 노트북에서는 바로 동작하지 않습니다.
먼저 필요한 패키지가 설치되어 있는지 확인합니다.
pip install google-genai sounddevice python-dotenv각 패키지의 역할은 다음과 같습니다.
google-genai: Gemini 모델과 상호작용하는 공식 Google 패키지입니다.
sounddevice: 오디오 하드웨어를 제어해 마이크 녹음과 스피커 재생을 처리합니다.
python-dotenv: .env 파일에서 Gemini API 키를 로드하는 유틸리티 패키지입니다.
이제 환경 변수를 로드하고, API 키를 확인한 뒤 genai.Client를 초기화합니다.
import asyncio
import os
import sys
from dotenv import load_dotenv
from google import genai
from google.genai import types
import sounddevice as sd

# Load environment variables from .env file
load_dotenv()

api_key = os.getenv("GEMINI_API_KEY")
if not api_key:
    raise ValueError("GEMINI_API_KEY not found. Please set it in your .env file or environment.")

# Initialize the Gemini Client
client = genai.Client(api_key=api_key)
print("Gemini Client initialized successfully!")단일 텍스트 턴을 보내고 스트리밍 음성과 전사를 받으면서 핵심 Gemini Live 연결 수명 주기를 이해해 보겠습니다. 텍스트 프롬프트를 보내고 텍스트 및 오디오 응답을 받되, 아직 오디오는 재생하지 않습니다. 지금은 오디오 청크 수집에 집중합니다.
Gemini Live API는 client.aio.live.connect()를 통해 접근하는 지속적인 WebSocket 연결을 사용합니다. 음성 출력과 실시간 전사를 구성하려면 config 딕셔너리를 제공합니다.
# Session configuration
config = {
    "response_modalities": ["AUDIO"],
    "output_audio_transcription": {},
}response_modalities: ["AUDIO"]로 설정해 Gemini가 음성 오디오로 응답하도록 지시합니다.
output_audio_transcription: 값 {}는 Gemini가 말하는 내용을 텍스트 전사로 동시에 스트리밍하도록 합니다.
이제 session.send_client_content()로 텍스트 프롬프트를 보내고, 들어오는 텍스트 전사를 스트리밍으로 받아볼 수 있습니다.
print("Connecting to Gemini 3.8 Live API...")
async with client.aio.live.connect(model="gemini-3.8-live", config=config) as session:
    print("Connected! Sending text prompt...")

    await session.send_client_content(
        turns={"role": "user", "parts": [{"text": "Hello! In one short sentence, introduce yourself."}]},
        turn_complete=True,
    )

    print("\n[Gemini Transcription]: ", end="", flush=True)
    audio_chunks_received = 0
    total_audio_bytes = 0

    async for response in session.receive():
        server_content = response.server_content
        if server_content:
            # 1. Print real-time transcription as tokens arrive
            if server_content.output_transcription:
                print(server_content.output_transcription.text, end="", flush=True)

            # 2. Inspect audio chunks
            if server_content.model_turn:
                for part in server_content.model_turn.parts:
                    if part.inline_data and part.inline_data.data:
                        audio_chunks_received += 1
                        total_audio_bytes += len(part.inline_data.data)

    print(f"\n\nReceived {audio_chunks_received} audio chunks ({total_audio_bytes:,} bytes total).")
이 코드를 실행하면 다음과 같은 출력이 보일 것입니다.
Connecting to Gemini 3.8 Live API...
Connected! Sending text prompt...

[Gemini Transcription]: Hello, I am your helpful AI assistant designed to assist you with various tasks and answer your questions.

Received 22 audio chunks (304,800 bytes total).
코드는 오디오 청크를 캡처했지만 오디오 플레이어를 아직 설정하지 않았으므로 들을 수는 없습니다. 다음으로 오디오 플레이어를 정의하는 방법을 알아봅시다.
2단계에서 수천 바이트의 오디오 데이터를 받았지만 아무 소리도 들리지 않았습니다. 수신 루프 안에서 오디오 하드웨어로 직접 쓰면 네트워크 지연으로 재생이 끊기고, 재생 지연은 네트워크 수신을 막을 수 있습니다.
네트워크 수신이 오디오 재생으로 인해 막히지 않도록 첫 번째 워커인 audio_player()를 구현합니다.
저수준 오디오 구현 세부사항은 걱정하지 않으셔도 됩니다. 블랙박스로 다룬다고 생각하세요.
OUTPUT_SAMPLE_RATE = 24000
CHANNELS = 1

async def audio_player(audio_queue: asyncio.Queue):
    """Plays raw 24kHz audio chunks from audio_queue through the speakers."""
    loop = asyncio.get_running_loop()
    with sd.RawOutputStream(
        samplerate=OUTPUT_SAMPLE_RATE, channels=CHANNELS, dtype="int16"
    ) as stream:
        while True:
            chunk = await audio_queue.get()
            if chunk is None:  # Sentinel value signaling end of stream
                audio_queue.task_done()
                break
            await loop.run_in_executor(None, stream.write, chunk)
            audio_queue.task_done()

print("Audio player defined!")
테스트를 위해 audio_player()를 요청에 연결합니다. 이번에는 스트리밍 전사를 보면서 Gemini의 음성을 실시간으로 들을 수 있습니다.
audio_queue = asyncio.Queue()
player_task = asyncio.create_task(audio_player(audio_queue))

prompt_text = "Hello! In one short sentence, introduce yourself."
print(f"[User]: {prompt_text}")

async with client.aio.live.connect(model="gemini-3.8-live", config=config) as session:
    await session.send_client_content(
        turns={"role": "user", "parts": [{"text": prompt_text}]},
        turn_complete=True,
    )

    print("[Gemini]: ", end="", flush=True)
    async for response in session.receive():
        server_content = response.server_content
        if server_content:
            if server_content.output_transcription:
                print(server_content.output_transcription.text, end="", flush=True)

            if server_content.model_turn:
                for part in server_content.model_turn.parts:
                    if part.inline_data and part.inline_data.data:
                        await audio_queue.put(part.inline_data.data)

print()
# Signal the player to shut down and await completion
await audio_queue.put(None)
await player_task
print("Playback complete!")
이 스니펫을 실행하면 이제 Gemini의 응답을 들을 수 있습니다.
Gemini와 실시간으로 대화하려면 마이크에서 우리의 목소리를 지속적으로 캡처해야 합니다.
두 번째 워커는 audio_recorder()입니다. 백그라운드에서 마이크를 청취하여 들어오는 음성을 작은 청크로 분할하고 이를 input_queue에 올려둡니다. 표본화율은 Gemini가 기대하는 표준 음성 포맷인 16kHz로 설정합니다.
INPUT_SAMPLE_RATE = 16000  # Gemini Live expects 16kHz audio input
CHUNK_SIZE = 1024          # Number of samples per audio chunk

async def audio_recorder(input_queue: asyncio.Queue, stop_event: asyncio.Event):
    """Captures microphone input and puts raw audio chunks into the input queue."""
    loop = asyncio.get_running_loop()

    def record_loop():
        with sd.RawInputStream(
            samplerate=INPUT_SAMPLE_RATE,
            channels=CHANNELS,
            dtype="int16",
            blocksize=CHUNK_SIZE,
        ) as stream:
            while not stop_event.is_set():
                data, _ = stream.read(CHUNK_SIZE)
                loop.call_soon_threadsafe(input_queue.put_nowait, bytes(data))

    await asyncio.to_thread(record_loop)

print("Audio recorder defined!")2단계에서는 send_client_content()로 정적인 텍스트 턴을 보냈습니다. 연속 음성 스트리밍에는 Live API의 session.send_realtime_input()을 사용합니다.
세 번째 워커는 send_audio_loop()입니다. input_queue를 모니터링하고, 마이크에서 오디오 청크가 도착하자마자 열린 WebSocket을 통해 Gemini로 전달합니다.
우리가 말하기 시작하고 멈출 때를 수동으로 알려줄 필요는 없습니다. Gemini는 내장된 음성 활동 감지(VAD)로 자동으로 발화 시작과 종료를 감지합니다.
async def send_audio_loop(session, input_queue: asyncio.Queue, stop_event: asyncio.Event):
    """Continuously streams microphone chunks from input_queue to Gemini."""
    while not stop_event.is_set():
        try:
            chunk = await asyncio.wait_for(input_queue.get(), timeout=0.1)
            await session.send_realtime_input(
                audio=types.Blob(data=chunk, mime_type=f"audio/pcm;rate={INPUT_SAMPLE_RATE}")
            )
            input_queue.task_done()
        except asyncio.TimeoutError:
            continue

print("send_audio_loop defined!")
3단계에서 텍스트 프롬프트로 오디오 재생을 테스트했던 것처럼, 이제는 단일 음성 질문으로 마이크 스트리밍을 엔드 투 엔드로 테스트할 수 있습니다.
아래 셀을 실행하면 마이크에 대고 질문을 말합니다(예: "프랑스의 수도는 어디인가요?"). Gemini는 우리의 음성을 직접 처리해 합성 음성과 실시간 전사로 응답합니다.
audio_queue = asyncio.Queue()
input_queue = asyncio.Queue()
stop_event = asyncio.Event()

player_task = asyncio.create_task(audio_player(audio_queue))

print("Connecting to Gemini Live API...")
async with client.aio.live.connect(model="gemini-3.8-live", config=config) as session:
    print("Connected! Speak a question into your microphone (e.g. 'What is the capital of France?')...")
    recorder_task = asyncio.create_task(audio_recorder(input_queue, stop_event))
    sender_task = asyncio.create_task(send_audio_loop(session, input_queue, stop_event))

    print("\n[Gemini]: ", end="", flush=True)
    async for response in session.receive():
        server_content = response.server_content
        if server_content:
            # 1. As soon as Gemini starts replying, mute the microphone
            # so speaker audio cannot loop back into the mic and interrupt Gemini
            if not stop_event.is_set() and (server_content.output_transcription or server_content.model_turn):
                stop_event.set()

            # 2. Print transcription text as it streams
            if server_content.output_transcription:
                print(server_content.output_transcription.text, end="", flush=True)

            # 3. Queue audio parts for playback
            if server_content.model_turn:
                for part in server_content.model_turn.parts:
                    if part.inline_data and part.inline_data.data:
                        await audio_queue.put(part.inline_data.data)

            # 4. Turn complete
            if server_content.turn_complete:
                break

    # Clean up mic tasks cleanly
    stop_event.set()
    recorder_task.cancel()
    sender_task.cancel()
    await asyncio.gather(recorder_task, sender_task, return_exceptions=True)

# 5. Wait for playback queue to drain, then allow the soundcard buffer to finish playing
await audio_queue.join()
await asyncio.sleep(0.8)  # Prevents clipping the final syllables
await audio_queue.put(None)
await player_task

print("\nSingle-turn voice test complete!")위 테스트에서 일어난 일을 떠올려 보세요. 우리는 마이크로 질문했고, Gemini는 우리의 음성을 직접 이해해 소리 내어 답했습니다. 하지만 후속 질문을 하려고 하면 세션이 이미 종료되어 있습니다.
이를 해결하려면 실제 음성 비서를 구축할 때 중요한 두 가지 요소, 즉 멀티턴 지속성과 끼어들기를 처리해야 합니다.
google-genai SDK에서 session.receive()는 한 턴을 위한 비동기 제너레이터입니다. Gemini가 답변을 마치면 session.receive()도 종료됩니다. 외부 루프로 감싸지 않으면, 비서는 첫 응답 후 종료됩니다.
지속적인 멀티턴 대화를 지원하려면, session.receive()를 외부 while not stop_event.is_set(): 루프로 감쌉니다.
while not stop_event.is_set():
    async for response in session.receive():
...Gemini 3.8 Live는 네이티브 음성 활동 감지와 바지인 지원을 갖추고 있습니다. Gemini가 말하고 있을 때 우리가 말하기 시작하면, Gemini는 즉시 오디오 생성을 중단하고 플래그 메시지 server_content.interrupted == True를 보냅니다.
Gemini가 새 오디오 전송을 멈추더라도, 로컬 audio_queue에는 스피커에서 재생 대기 중인 오디오 청크가 남아 있을 수 있습니다. 이 큐를 비우지 않으면, 스피커는 이전 답변을 계속 재생합니다.
따라서 server_content.interrupted를 받는 즉시 큐를 비워 재생을 즉각 중단합니다.
if server_content.interrupted:
    print("\n[Interrupted!]")
    while not audio_queue.empty():
        audio_queue.get_nowait()
audio_queue.task_done()네 번째이자 마지막 워커 receive_loop()입니다. 멀티턴 지속성, 실시간 전사, 즉각적인 끼어들기를 결합합니다.
async def receive_loop(session, audio_queue: asyncio.Queue, stop_event: asyncio.Event):
    """Receives transcription and audio output from Gemini across multiple turns."""
    first_chunk_received = False
    try:
        while not stop_event.is_set():
            async for response in session.receive():
                if stop_event.is_set():
                    break

                server_content = response.server_content
                if server_content:
                    # 1. Handle user interruption (barge-in)
                    if server_content.interrupted:
                        print("\n[Interrupted!]")
                        # Flush remaining unplayed audio so speakers go silent immediately
                        while not audio_queue.empty():
                            try:
                                audio_queue.get_nowait()
                                audio_queue.task_done()
                            except asyncio.QueueEmpty:
                                break
                        first_chunk_received = False
                        print("\n[Listening... Speak now]")

                    # 2. Print real-time transcription
                    if server_content.output_transcription:
                        if not first_chunk_received:
                            print("\n[Gemini]: ", end="", flush=True)
                            first_chunk_received = True
                        print(server_content.output_transcription.text, end="", flush=True)

                    # 3. Enqueue synthesized audio for playback
                    if server_content.model_turn:
                        for part in server_content.model_turn.parts:
                            if part.inline_data and part.inline_data.data:
                                await audio_queue.put(part.inline_data.data)

                    # 4. Interaction complete: wait for audio to finish playing before prompt
                    # In Gemini 3.8, interaction_status tracks when the overall exchange is finished
                    is_done = False
                    if server_content.interaction_status is not None:
                        is_done = str(server_content.interaction_status).endswith("IDLE") or server_content.interaction_status == "IDLE"
                    elif server_content.turn_complete:
                        is_done = True

                    if is_done:
                        print()
                        await audio_queue.join()
                        first_chunk_received = False
                        print("\n[Listening... Speak now]")
    except asyncio.CancelledError:
        pass
    except Exception as e:
        print(f"\n[Receive Error]: {e}", file=sys.stderr)
        stop_event.set()

print("receive_loop defined!")이제 네 개의 동시 워커를 run_voice_assistant에서 오케스트레이션합니다.
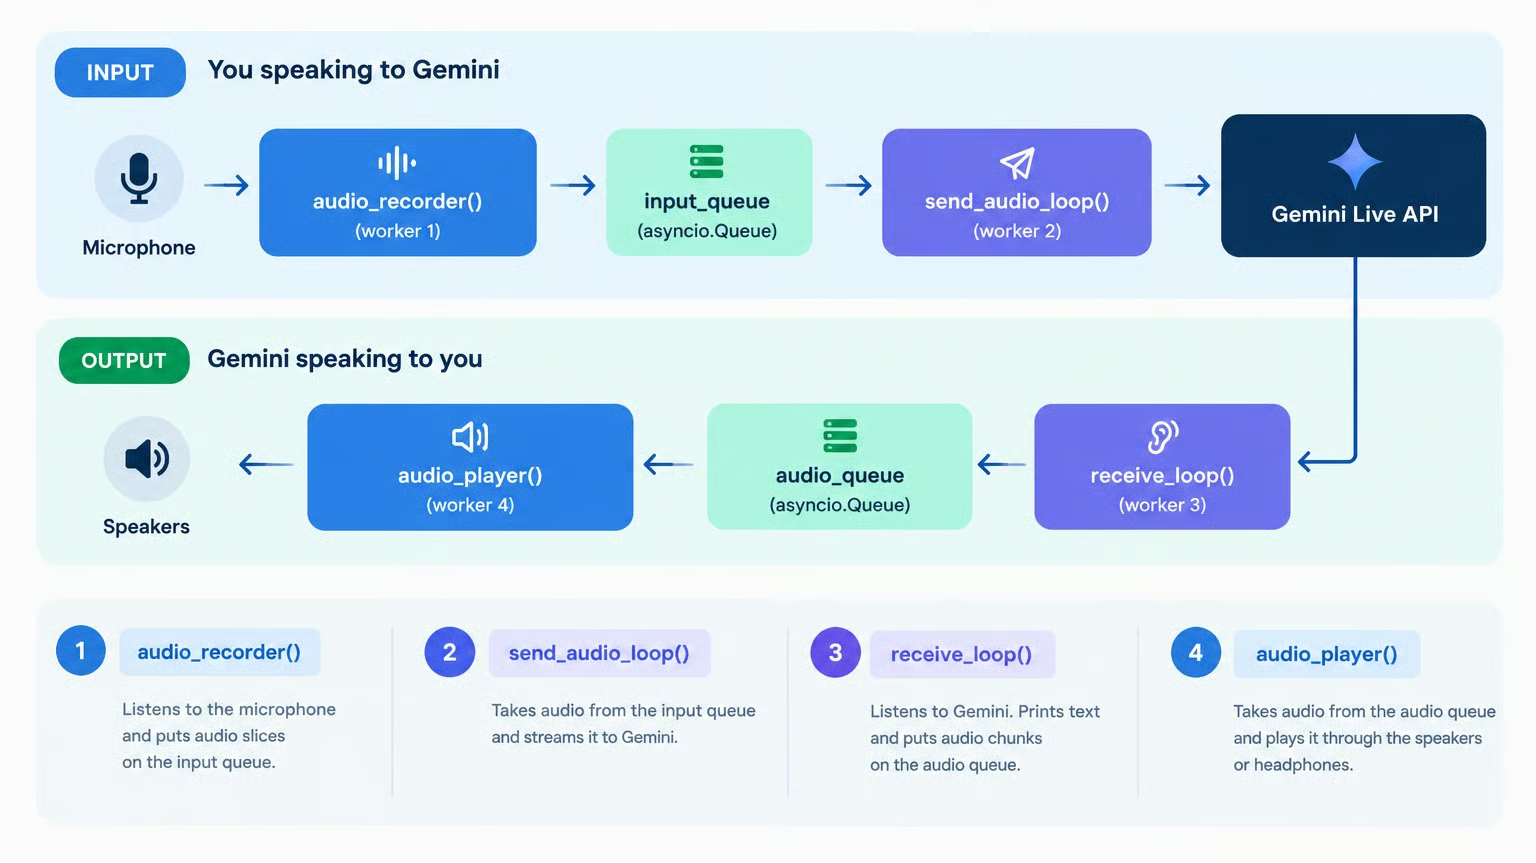
audio_player(): audio_queue에서 소비하고 스피커로 씁니다.
audio_recorder(): 마이크에서 읽어 input_queue로 오디오를 푸시합니다.
send_audio_loop(): input_queue에서 소비해 session.send_realtime_input()으로 Gemini에 스트리밍합니다.
receive_loop(): session.receive()로 Gemini의 출력을 소비하고, 전사를 출력하며 재생을 위해 audio_queue에 오디오를 푸시합니다.
async def run_voice_assistant():
    """Runs the full-duplex interactive voice assistant."""
    audio_queue: asyncio.Queue[bytes | None] = asyncio.Queue()
    input_queue: asyncio.Queue[bytes] = asyncio.Queue()
    stop_event = asyncio.Event()

    player_task = asyncio.create_task(audio_player(audio_queue))

    print("Connecting to Gemini Live API...")
    async with client.aio.live.connect(model="gemini-3.8-live", config=config) as session:
        print("[Listening... Speak now]")

        recorder_task = asyncio.create_task(audio_recorder(input_queue, stop_event))
        sender_task = asyncio.create_task(send_audio_loop(session, input_queue, stop_event))
        receiver_task = asyncio.create_task(receive_loop(session, audio_queue, stop_event))

        try:
            while not stop_event.is_set():
                await asyncio.sleep(0.5)
        except (asyncio.CancelledError, KeyboardInterrupt):
            print("\nStopping voice assistant...")
        finally:
            stop_event.set()
            recorder_task.cancel()
            sender_task.cancel()
            receiver_task.cancel()
            await asyncio.gather(recorder_task, sender_task, receiver_task, return_exceptions=True)

    # Terminate player
    await audio_queue.put(None)
    await player_task
    print("\nSession finished cleanly.")

print("run_voice_assistant is ready to run!")노트북에서 음성 비서를 실행하는 방법은 다음과 같습니다.
await run_voice_assistant()참고 사항:
Gemini 3.8 Live는 두 가지 버전으로 제공됩니다.
표준(gemini-3.8-live): 초저지연 음성-대-음성 대화에 최적화. 도구를 호출할 때는 응답 전까지 조용히 대기합니다.
Extended Thinking(gemini-3.8-live-extended-thinking): 백그라운드 추론과 병렬 대화 채우기(filler)를 제공합니다. 도구를 백그라운드에서 실행하는 동안에도 자연스러운 진행 멘트(예: "확인해 볼게요...")를 말할 수 있습니다.
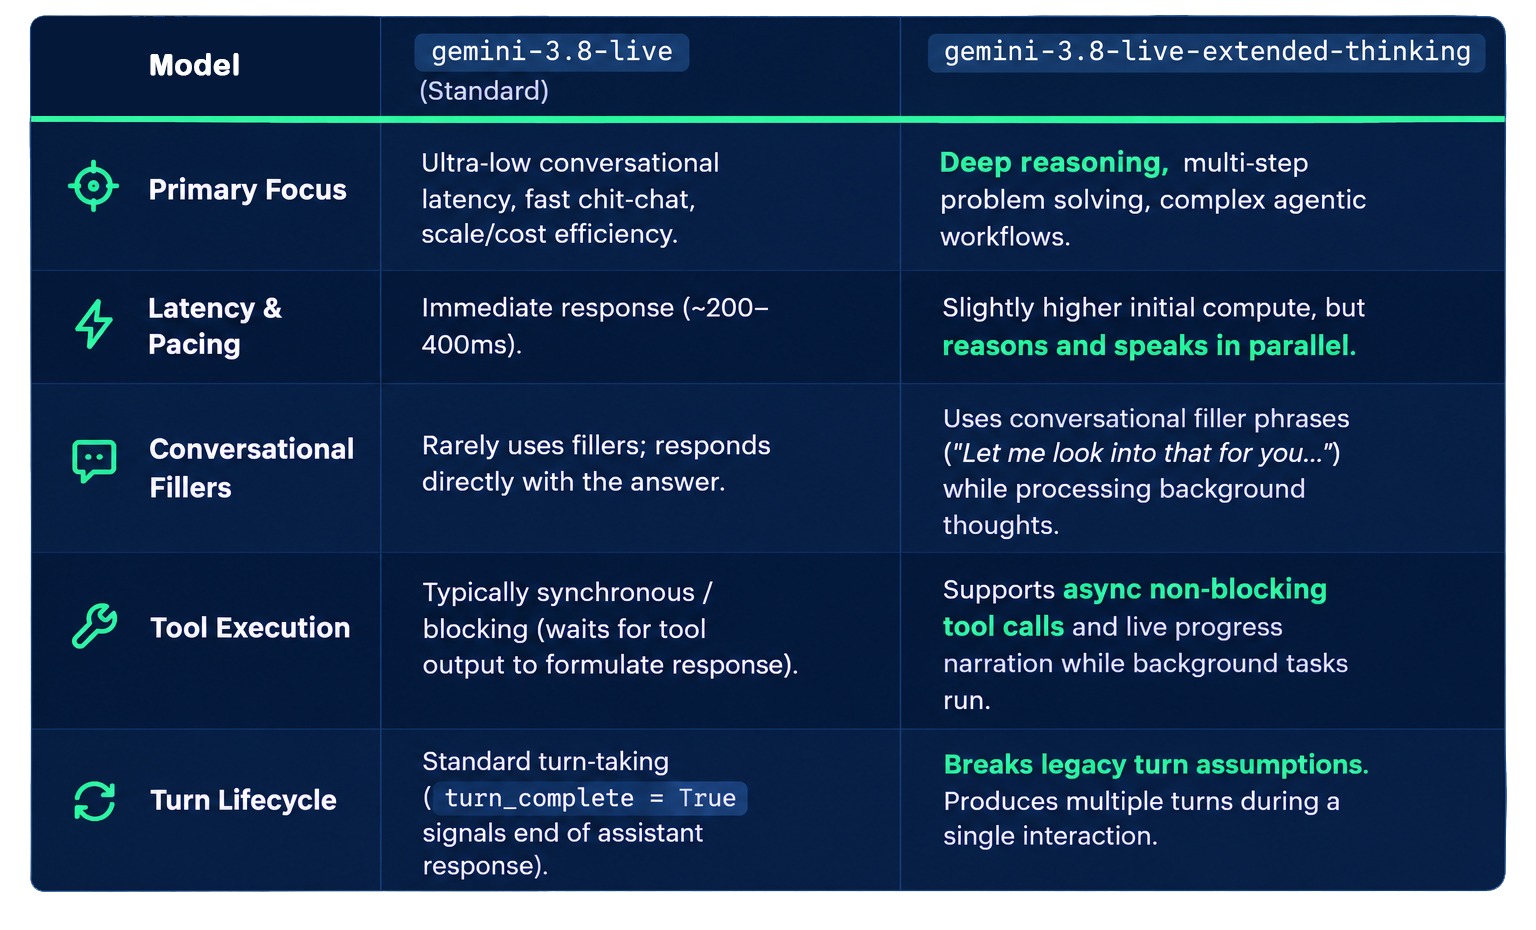
두 버전의 차이점을 정리하면 다음과 같습니다.
두 버전 중 어떤 것을 써야 할지 확신이 서지 않는다면, 제 의사결정 프레임워크는 다음과 같습니다. 대화형 에이전트를 만들 때:
gemini-3.8-live는 지연 최소화가 최우선인 직접 질의응답과 빠른 음성 명령에 사용하세요.
gemini-3.8-live-extended-thinking은 풍부한 대화형 비서와 다단계 추론, 외부 데이터 조회, API 호출을 수행하면서 사용자와 자연스러운 대화를 유지해야 하는 에이전트에 사용하세요.
Extended Thinking 버전의 강점 중 하나는 대화를 유지하면서 백그라운드에서 도구를 추론하고 실행할 수 있다는 점입니다.
코드로 들어가기 전에 실제 동작을 보겠습니다. 기본 모델에 날씨 확인 도구를 장착했습니다. 뉴욕의 날씨를 묻는 제 영상을 보시면, 모델이 답을 계산하는 동안 조용히 대기하는 것을 볼 수 있습니다.
DataCamp으로 AI를 배워보세요!
tracks
courses
courses