Programa
Recentemente, o campo dos modelos de linguagem de grande porte (LLMs) vem mudando rapidamente. Os LLMs mais novos estão sendo projetados para serem menores e mais inteligentes, tornando-os mais baratos e mais fáceis de usar em comparação com os modelos maiores.
Com o lançamento do Llama 3.2, agora temos acesso a modelos menores, como as variantes 1B e 3B. Embora esses modelos menores possam não corresponder à precisão de modelos maiores em tarefas gerais, eles podem ser ajustados para apresentar um desempenho excepcional em áreas específicas, como a classificação de emoções em interações de suporte ao cliente. Esse recurso permite que eles substituam potencialmente os modelos tradicionais nesses domínios.
Neste tutorial, exploraremos os recursos de visão e modelos leves do Llama 3.2. Aprenderemos como acessar o modelo Llama 3.2 3B, ajustá-lo em um conjunto de dados de suporte ao cliente e, posteriormente, mesclá-lo e exportá-lo para o hub Hugging Face. No final, converteremos o modelo para o formato GGUF e o usaremos localmente usando o aplicativo Jan.
Se você é novo em IA, é altamente recomendável que faça o curso Fundamentos de IA e você aprenda sobre os conceitos básicos do ChatGPT, modelos de linguagem grandes, IA generativa e muito mais.
Imagem do autor
Apresentando o Llama 3.2
A família de modelos de código aberto Llama 3.2 tem duas variações: os modeloslightweight e vision . Os modelos de visão se destacam no raciocínio de imagens e na ligação da visão com a linguagem, enquanto os modelos leves são bons na geração de textos multilíngues e na chamada de ferramentas para dispositivos de ponta.
Modelos leves
O modelo leve tem duas variantes menores: 1B e 3B. Esses modelos são bons em tarefas de geração de texto multilíngue e de chamada de ferramentas. Eles são pequenos, o que significa que podem ser executados em um dispositivo para garantir que os dados nunca saiam do dispositivo e fornecem geração de texto em alta velocidade a um baixo custo de computação.
Para criar esses modelos leves e eficientes, a Llama 3.2 usa técnicas de poda e destilação de conhecimento. A poda reduz o tamanho do modelo e, ao mesmo tempo, mantém o desempenho, e a destilação de conhecimento usa redes maiores para compartilhar conhecimento com redes menores, melhorando seu desempenho.
O modelo 3B supera o desempenho de outros modelos como Gemma 2 (2.6B) e Phi 3.5-mini em tarefas como seguimento de instruções, resumo, reescrita de avisos e uso de ferramentas.
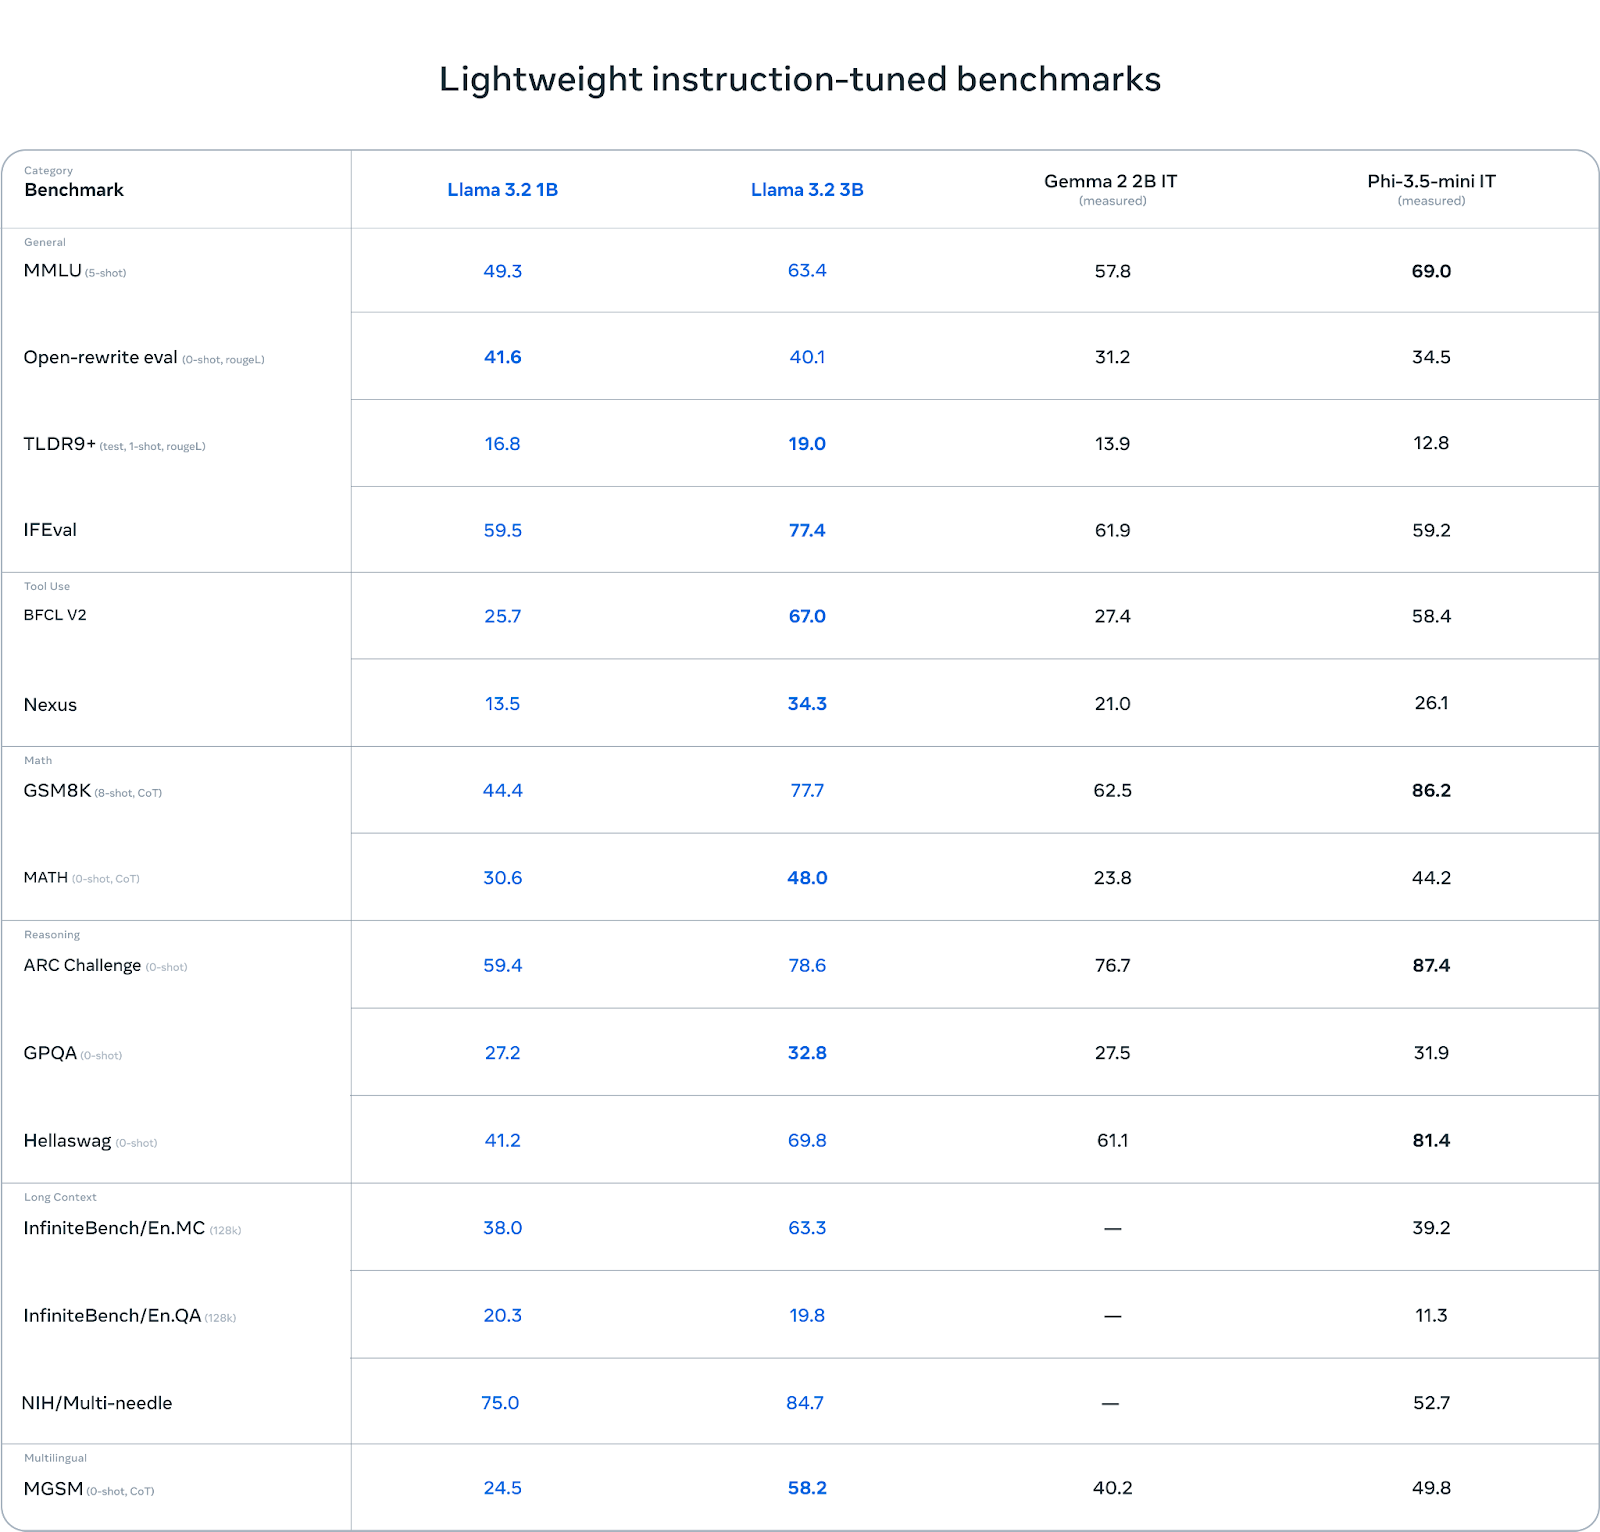
Fonte: Llama 3.2: Revolucionando a IA e a visão de ponta com modelos abertos e personalizáveis
Modelos de visão
Os modelos de visão vêm em duas variantes: 11B e 90B. Esses modelos são projetados para dar suporte ao raciocínio de imagens. O 11B e o 90B podem entender e interpretar documentos, tabelas e gráficos e executar tarefas como legendas de imagens e aterramento visual. Esses recursos avançados de visão foram possíveis graças à integração de codificadores de imagem pré-treinados com modelos de linguagem usando pesos adaptadores que consistem em camadas de atenção cruzada.
Em comparação com Claude 3 Haiku e GPT-4o minios modelos de visão Llama 3.2 se destacaram no reconhecimento de imagens e em várias tarefas de compreensão visual, tornando-os ferramentas robustas para aplicações de IA multimodal.
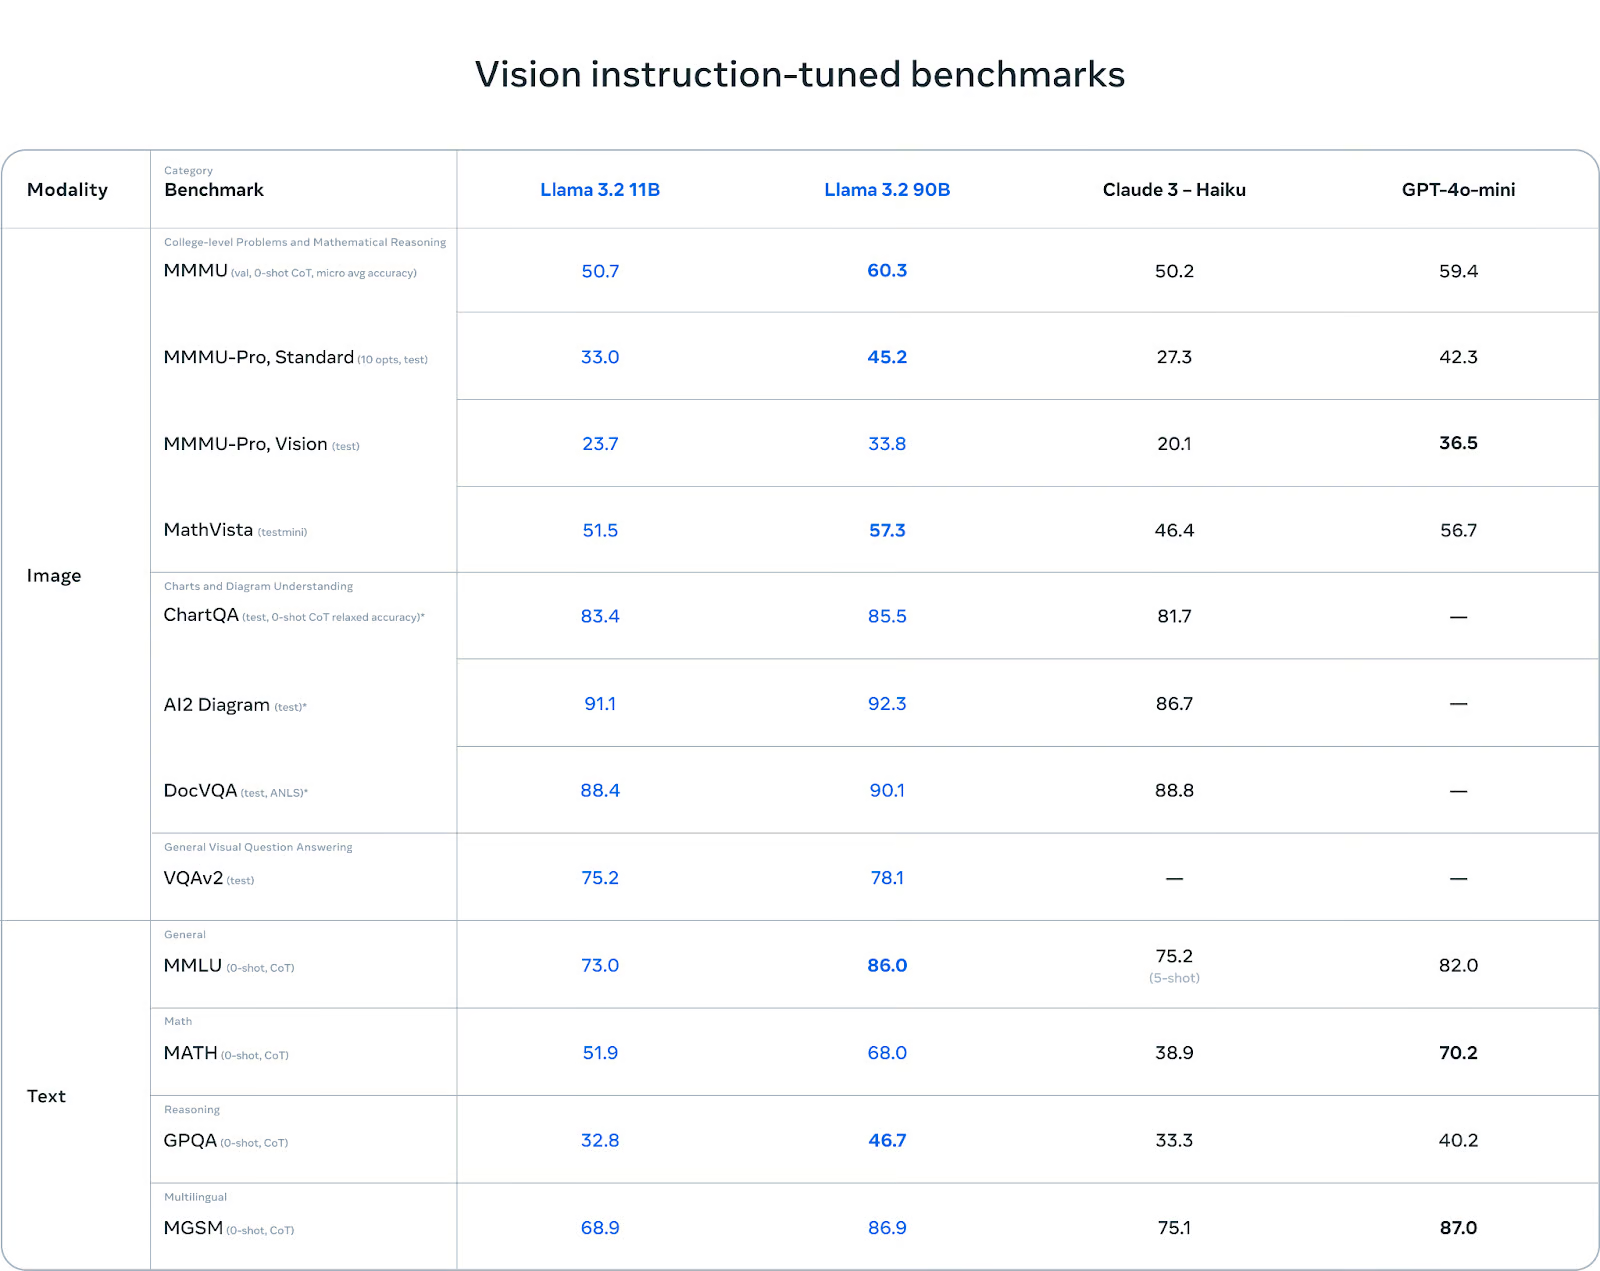
Fonte: Llama 3.2: Revolucionando a IA e a visão de ponta com modelos abertos e personalizáveis
Você pode saber mais sobre os casos de uso do Llama 3.2, benchmarks, Llama Guard 3 e arquitetura de modelos lendo nosso blog mais recente, Guia do Llama 3.2: Como funciona, casos de uso e muito mais.
Como acessar os modelos leves do Llama 3.2 no Kaggle
Embora o modelo Llama 3.2 esteja disponível gratuitamente e seja de código aberto, você ainda precisa aceitar os termos e condições e preencher o formulário no site.
Para que você tenha acesso ao modelo Llama 3.2 mais recente na plataforma Kaggle:
- Acesse o site llama.com e preencha o formulário com suas informações. Selecione modelos leves e de visão.
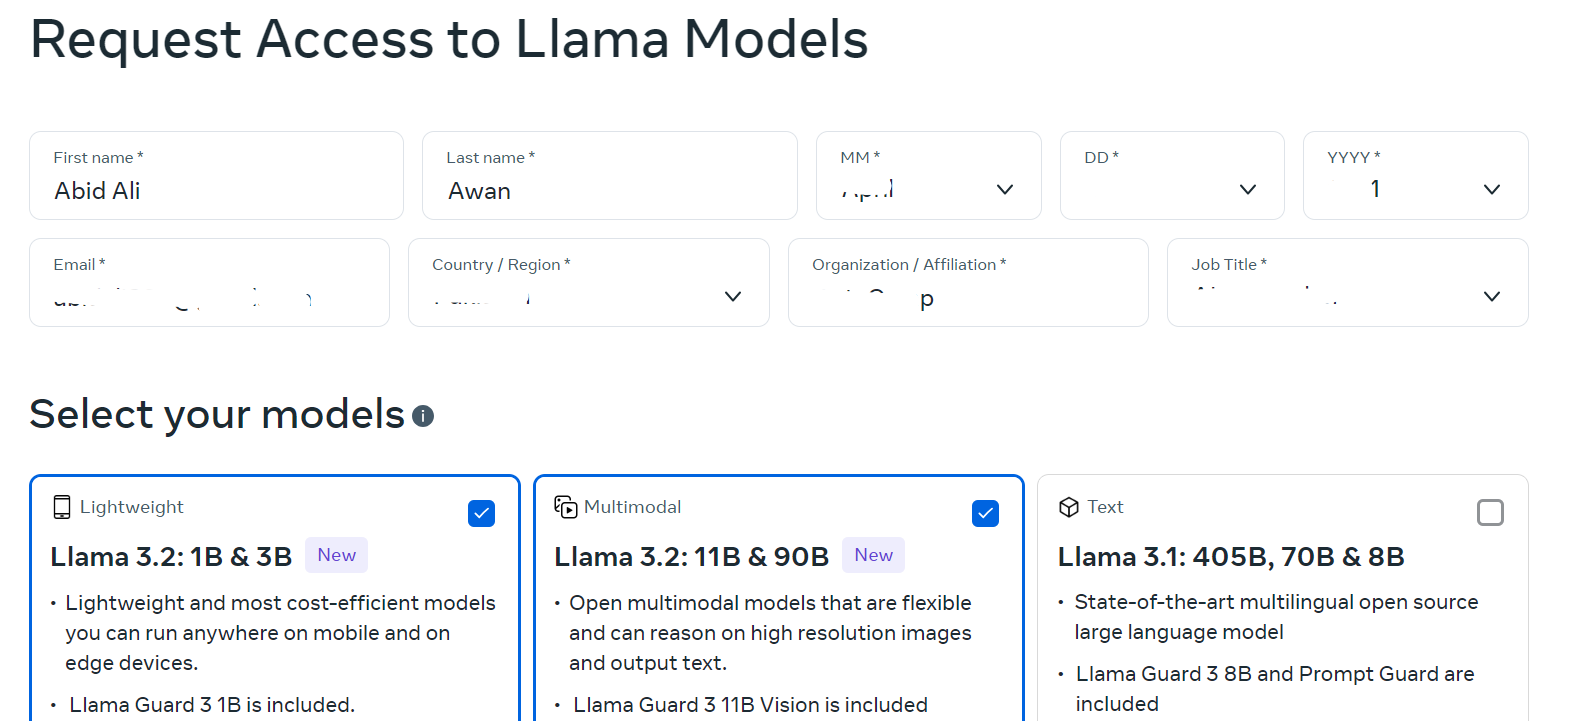
Fonte: Baixar Llama
- Vá para a seção Meta | Llama 3.2 e clique no botão "Submit Form" (Enviar formulário).
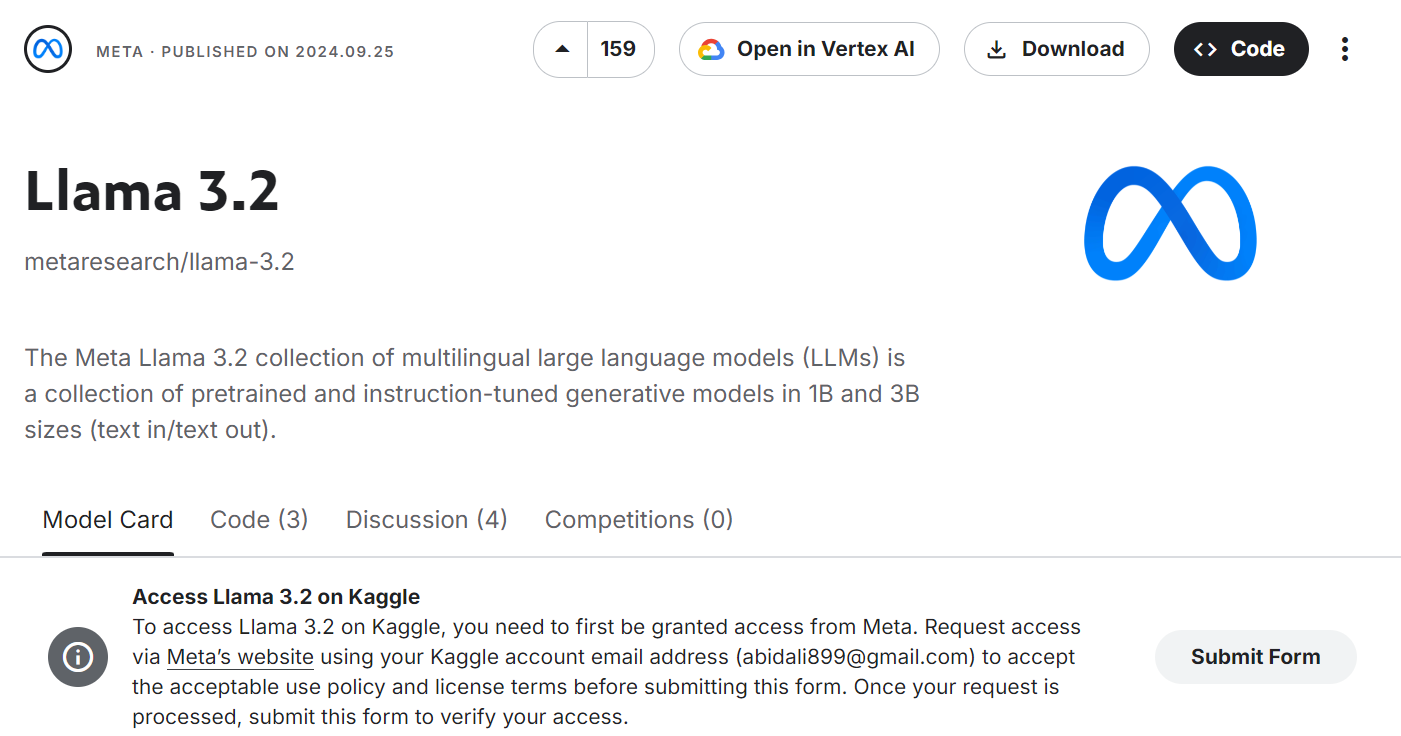
Fonte: Meta | Llama 3.2 | Kaggle
- Aceite todos os termos e condições e pressione o botão "Submit" (Enviar).
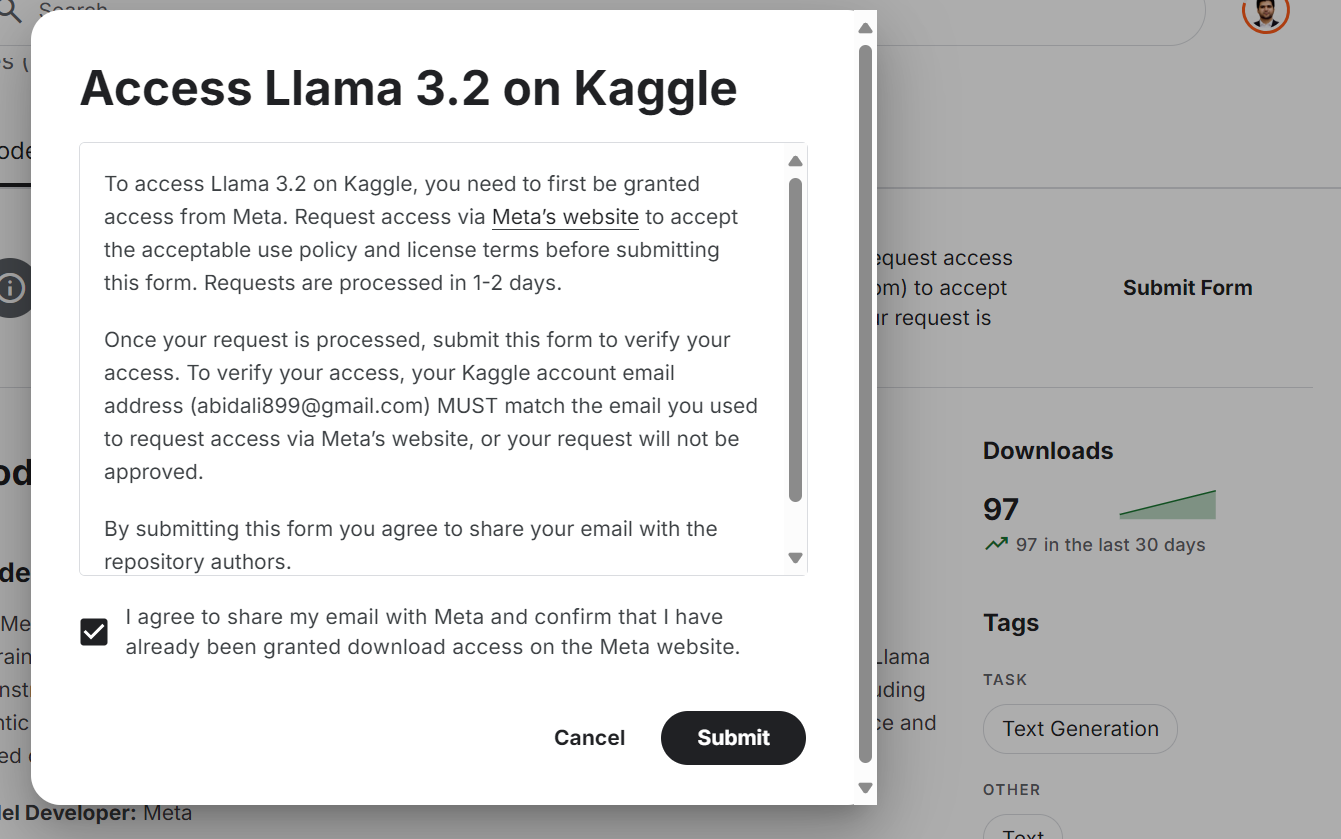
Fonte: Meta | Llama 3.2 | Kaggle
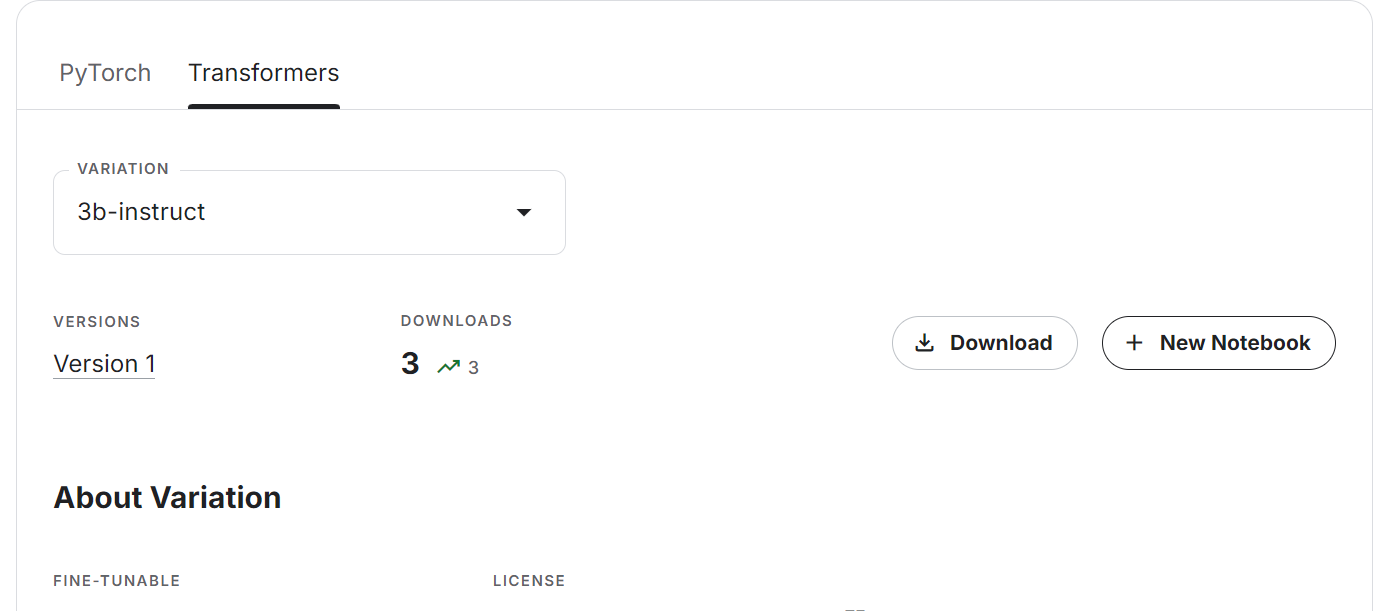
- Aguarde alguns minutos até que você veja a opção de baixar ou criar o novo notebook. Selecione a guia Transformers e a variação de modelo e, em seguida, clique no botão "+ New Notebook".
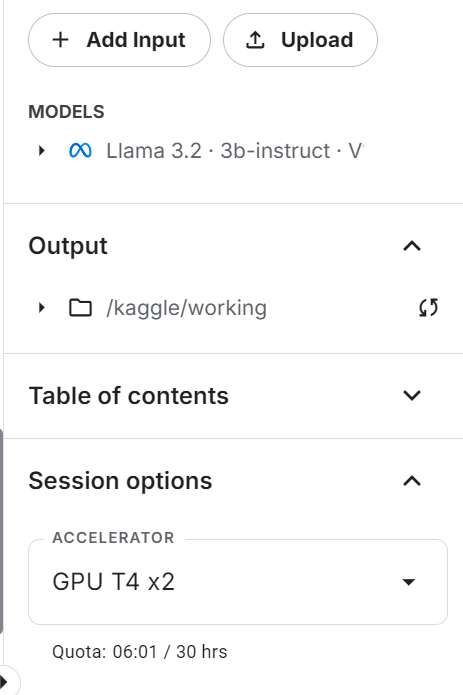
- O notebook da Kaggle será lançado com o modelo mais recente do Llama. Para que isso funcione, basta alterar o acelerador para "GPU T4 x2".
- Atualize os pacotes Transformers e Accelerate Python.
%%capture
%pip install -U transformers accelerate- Carregue o tokenizador e o modelo usando o pacote Transformers. Em vez de fornecer o link do repositório do modelo Hugging Face, estamos especificando o diretório local onde o nosso modelo está localizado.
from transformers import AutoTokenizer, AutoModelForCausalLM, pipeline, TextStreamer
import torch


base_model = "/kaggle/input/llama-3.2/transformers/3b-instruct/1"

tokenizer = AutoTokenizer.from_pretrained(base_model)

model = AutoModelForCausalLM.from_pretrained(
    base_model,
    return_dict=True,
    low_cpu_mem_usage=True,
    torch_dtype=torch.float16,
    device_map="auto",
    trust_remote_code=True,
)- Defina
pad_token_idpara evitar o recebimento de mensagens de aviso.
if tokenizer.pad_token_id is None:
    tokenizer.pad_token_id = tokenizer.eos_token_id
if model.config.pad_token_id is None:
model.config.pad_token_id = model.config.eos_token_id- Crie o pipeline de geração de texto com modelo e tokenizador.
pipe = pipeline(
    "text-generation",
    model=model,
    tokenizer=tokenizer,
    torch_dtype=torch.float16,
    device_map="auto",
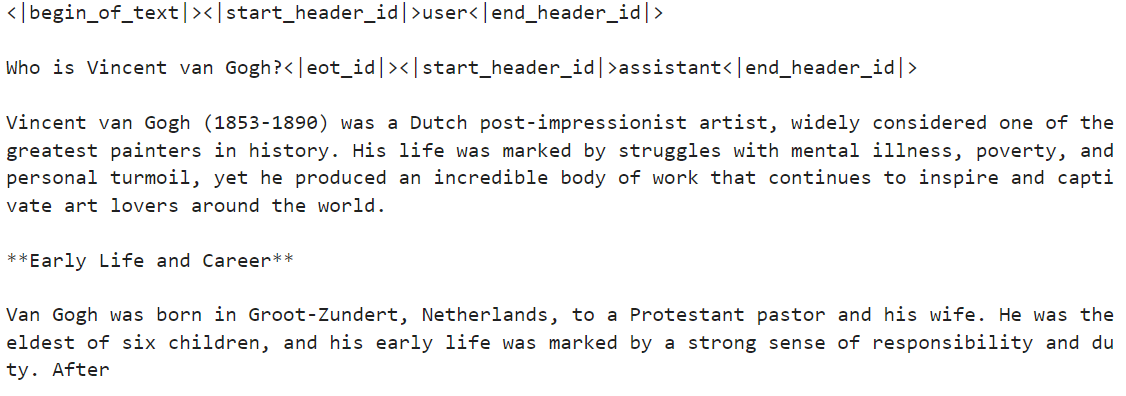
)- Execute o pipeline com o prompt personalizado. No nosso caso, estamos perguntando sobre Vincent van Gogh.
messages = [{"role": "user", "content": "Who is Vincent van Gogh?"}]

prompt = tokenizer.apply_chat_template(
    messages, tokenize=False, add_generation_prompt=True
)

outputs = pipe(prompt, max_new_tokens=120, do_sample=True)

print(outputs[0]["generated_text"])
A resposta é bastante precisa.
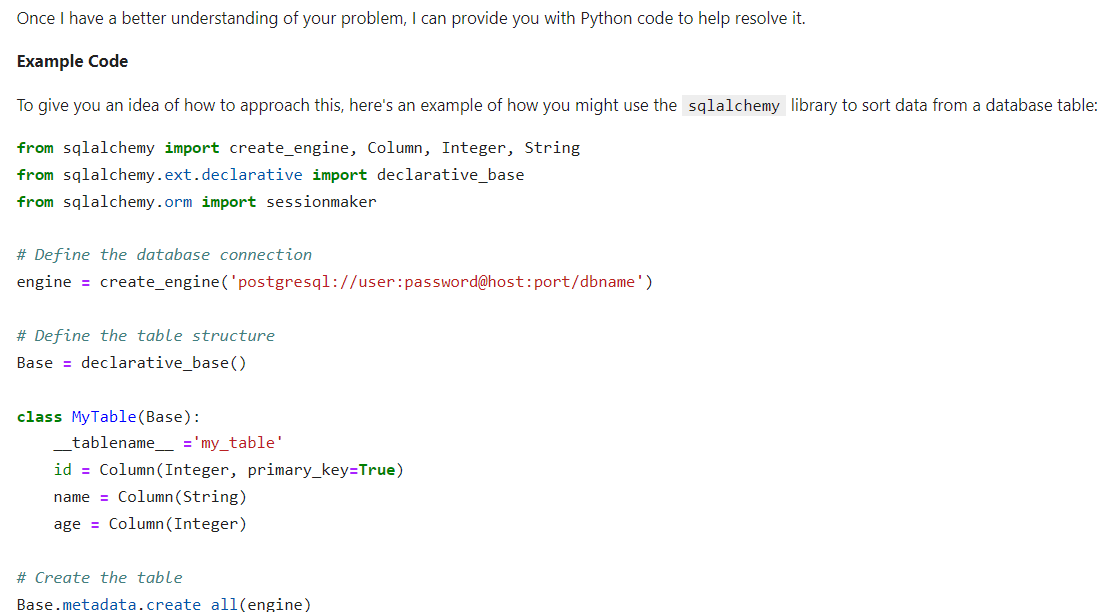
- Vamos fornecer instruções ao sistema para ver se ele consegue entender e seguir prompts complexos. Exibiremos os resultados como HTML mesclando o código Markdown.
from IPython.display import Markdown, display

messages = [
    {
        "role": "system",
        "content": "You are a skilled Python developer specializing in database management and optimization.",
    },
    {
        "role": "user",
        "content": "I'm experiencing a sorting issue in my database. Could you please provide Python code to help resolve this problem?",
    },
]

prompt = tokenizer.apply_chat_template(
    messages, tokenize=False, add_generation_prompt=True
)

outputs = pipe(prompt, max_new_tokens=512, do_sample=True)

display(
    Markdown(
            outputs[0]["generated_text"].split(
                "<|start_header_id|>assistant<|end_header_id|>"
            )[1]
        )
    )
O resultado é altamente preciso. O modelo tem um desempenho muito bom, apesar de ter apenas 3 bilhões de parâmetros.
Se você estiver com dificuldades para acessar os modelos leves da Llama 3.2, consulte o notebook, Como acessar os modelos leves da Llama 3.2.
Como acessar os modelos de visão do Llama 3.2 no Kaggle
Acessar o modelo do Vision é simples, e você não precisa se preocupar com a memória da GPU, pois usaremos várias GPUs neste guia.
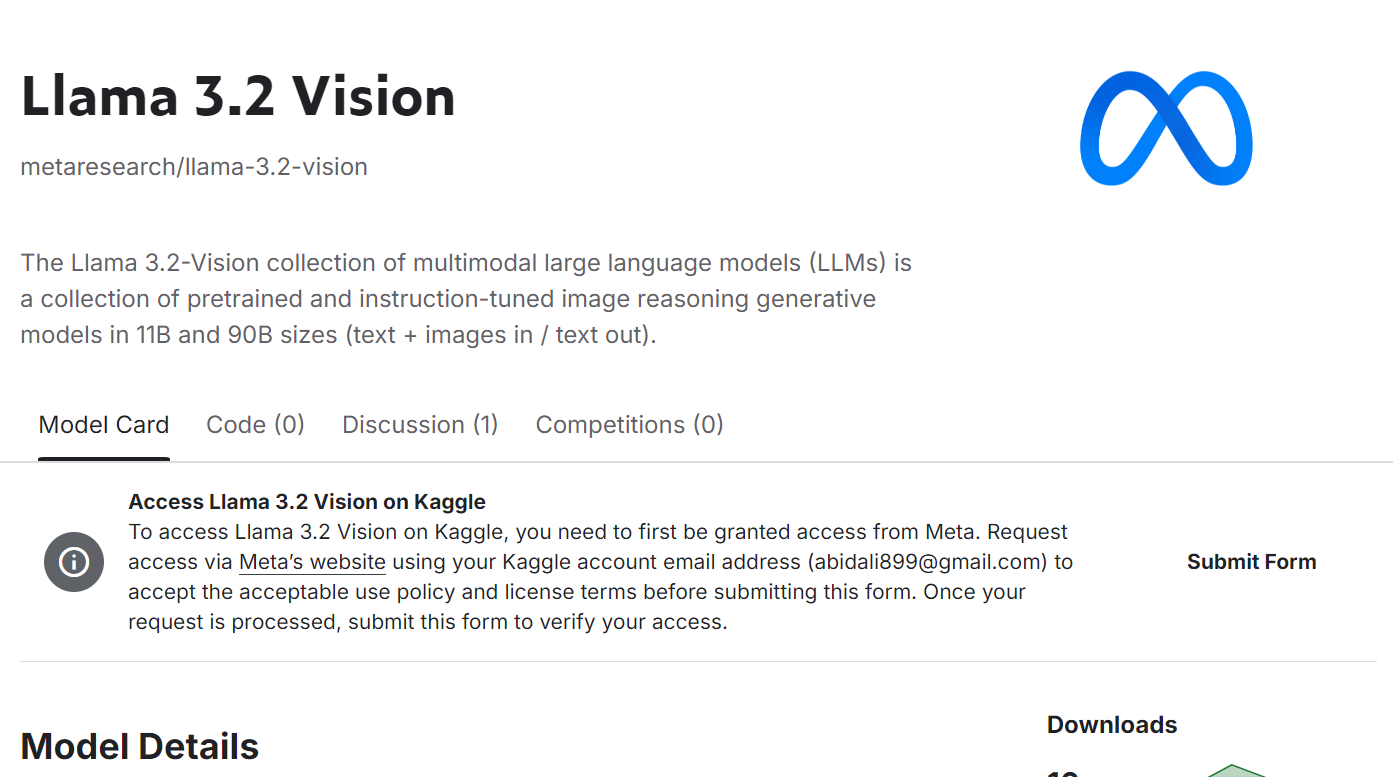
- Envie o formulário na seção Meta | Llama 3.2 Vision página do modelo. Aceite todos os termos e clique no botão "Submit" (Enviar).
Fonte: Meta | Llama 3.2 Visão | Kaggle
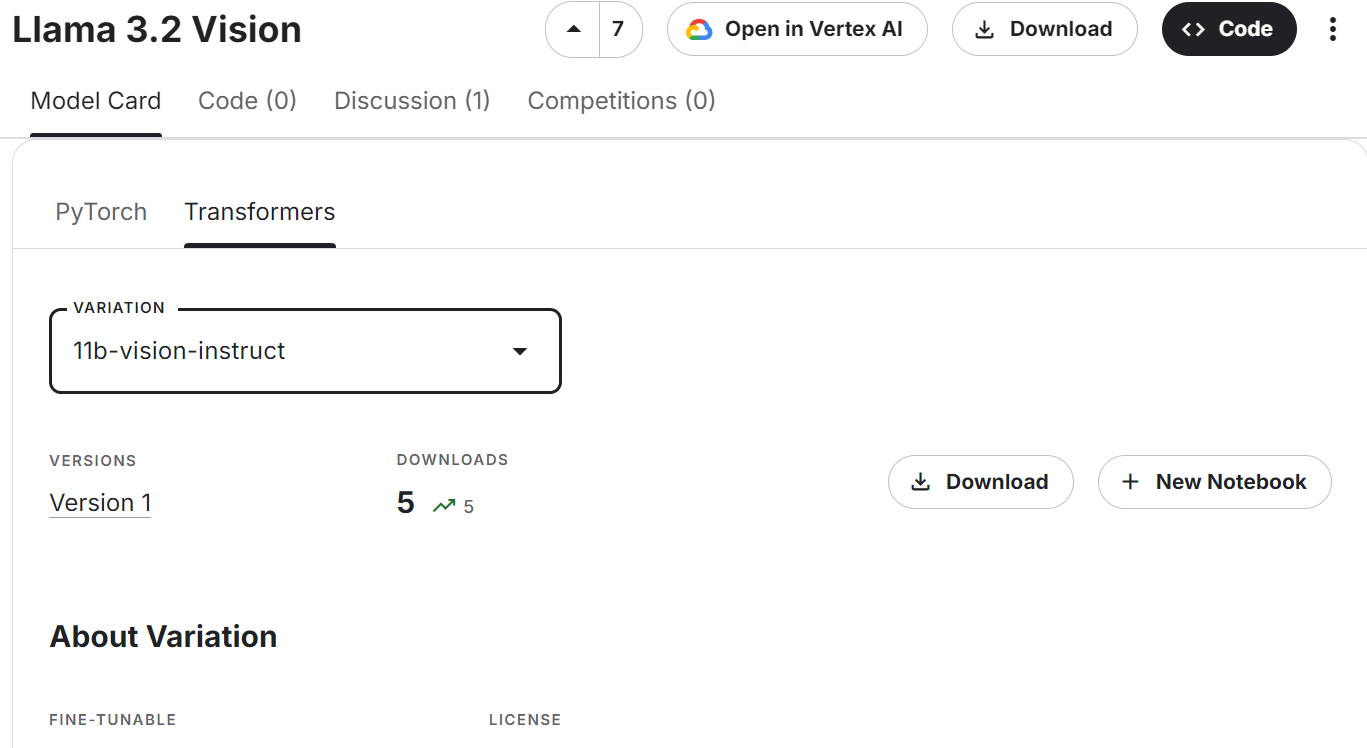
- Role para baixo, selecione a guia Transformer e a variante do modelo de visão, depois clique em "+ New Notebook".
Fonte: Meta | Llama 3.2 Visão | Kaggle
- Verifique se você está usando a "GPU T4 x2" como acelerador.
- Atualize os pacotes Transformers e Accelerate Python.
%%capture
%pip install -U transformers accelerate- Carregue o processador de imagens e o modelo de visão Llama 3.2.
import torch
from transformers import MllamaForConditionalGeneration, AutoProcessor

base_model = "/kaggle/input/llama-3.2-vision/transformers/11b-vision-instruct/1"

processor = AutoProcessor.from_pretrained(base_model)

model = MllamaForConditionalGeneration.from_pretrained(
    base_model,
    low_cpu_mem_usage=True,
    torch_dtype=torch.bfloat16,
    device_map="auto",
)
Como você pode ver, ele usa quase 25 GB de memória da GPU. Isso será impossível de ser executado em um laptop ou na versão gratuita do Google Colab.
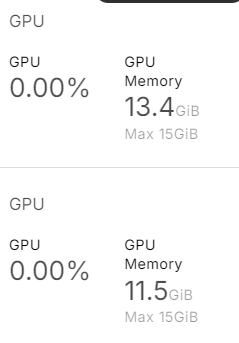
- Carregue a imagem. Fornecemos a ele a imagem em destaque do tutorial: Tutorial do OpenAI o1-preview: Criando um projeto de aprendizado de máquina.
- Escreva a mensagem e converta-a em um prompt usando um modelo de bate-papo. Escreva a mensagem e converta-a em um prompt usando um modelo de bate-papo.
- Processe a imagem e o texto e forneça-os ao modelo para gerar a resposta.
import requests
from PIL import Image

url = "https://media.datacamp.com/cms/google/ad_4nxcz-j3ir2begccslzay07rqfj5ttakp2emttn0x6nkygls5ywl0unospj2s0-mrwpdtmqjl1fagh6pvkkjekqey_kwzl6qnodf143yt66znq0epflvx6clfoqw41oeoymhpz6qrlb5ajer4aeniogbmtwtd.png"
image = Image.open(requests.get(url, stream=True).raw)

messages = [
    {"role": "user", "content": [
        {"type": "image"},
        {"type": "text", "text": "Describe the tutorial feature image."}
    ]}
]
input_text = processor.apply_chat_template(messages, add_generation_prompt=True)
inputs = processor(image, input_text, return_tensors="pt").to(model.device)

output = model.generate(**inputs, max_new_tokens=120)
print(processor.decode(output[0]))
Como resultado, obtemos uma descrição detalhada da imagem. É bastante preciso.

Se você encontrar problemas ao executar o código acima, consulte a seção Como acessar os modelos de visão do Llama 3.2 Caderno do Kaggle.
Ajuste fino do Llama 3.2 3B Instruct
Nesta seção, aprenderemos a fazer o ajuste fino do modelo Llama 3.2 3B Instruct usando a biblioteca Transformers no conjunto de dados de suporte ao cliente. Usaremos o Kaggle para acessar GPUs gratuitas e obter mais RAM do que o Colab.
1. Configuração
Inicie o novo notebook no Kaggle e defina as variáveis de ambiente. Usaremos a API Hugging Face para salvar o modelo e o Weights & Biases para monitorar seu desempenho.
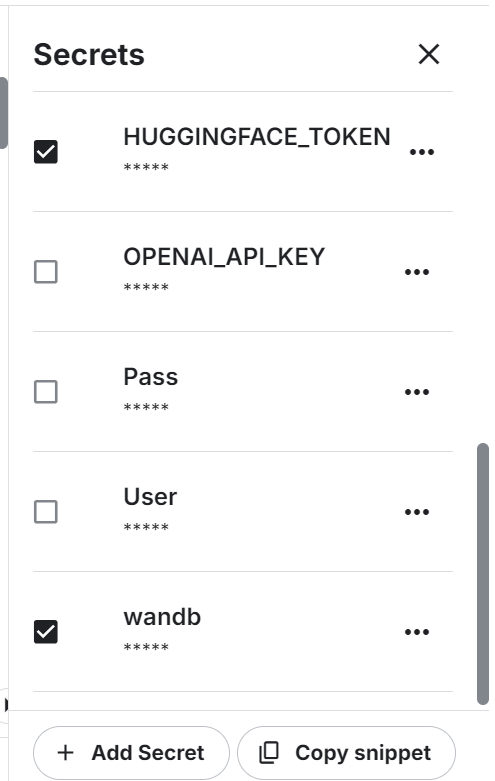
Instale e atualize todos os pacotes Python necessários.
%%capture
%pip install -U transformers
%pip install -U datasets
%pip install -U accelerate
%pip install -U peft
%pip install -U trl
%pip install -U bitsandbytes
%pip install -U wandb
Carregue os pacotes e as funções do Python que usaremos durante o processo de ajuste fino e avaliação.
from transformers import (
    AutoModelForCausalLM,
    AutoTokenizer,
    BitsAndBytesConfig,
    HfArgumentParser,
    TrainingArguments,
    pipeline,
    logging,
)
from peft import (
    LoraConfig,
    PeftModel,
    prepare_model_for_kbit_training,
    get_peft_model,
)
import os, torch, wandb
from datasets import load_dataset
from trl import SFTTrainer, setup_chat_format
Faça login na CLI do Hugging Face usando a chave de API.
from huggingface_hub import login
from kaggle_secrets import UserSecretsClient
user_secrets = UserSecretsClient()

hf_token = user_secrets.get_secret("HUGGINGFACE_TOKEN")
login(token = hf_token)
Faça login no Weights & Biases usando a chave da API e instancie o novo projeto.
wb_token = user_secrets.get_secret("wandb")

wandb.login(key=wb_token)
run = wandb.init(
    project='Fine-tune Llama 3.2 on Customer Support Dataset',
    job_type="training",
    anonymous="allow"
)
Defina as variáveis para o modo de base, conjunto de dados e nome do novo modelo. Nós os usaremos em vários lugares neste projeto, portanto, é melhor defini-los no início para evitar confusão.
base_model = "/kaggle/input/llama-3.2/transformers/3b-instruct/1"
new_model = "llama-3.2-3b-it-Ecommerce-ChatBot"
dataset_name = "bitext/Bitext-customer-support-llm-chatbot-training-dataset"
2. Carregando o modelo e o tokenizador
Defina o tipo de dados e a implementação de atenção.
# Set torch dtype and attention implementation
if torch.cuda.get_device_capability()[0] >= 8:
    !pip install -qqq flash-attn
    torch_dtype = torch.bfloat16
    attn_implementation = "flash_attention_2"
else:
    torch_dtype = torch.float16
    attn_implementation = "eager"
Carregue o modelo e o tokenizador fornecendo o diretório local do modelo. Embora nosso modelo seja pequeno, carregar o modelo completo e ajustá-lo levará algum tempo. Em vez disso, carregaremos o modelo em quantização de 4 bits.
# QLoRA config
bnb_config = BitsAndBytesConfig(
    load_in_4bit=True,
    bnb_4bit_quant_type="nf4",
    bnb_4bit_compute_dtype=torch_dtype,
    bnb_4bit_use_double_quant=True,
)
# Load model
model = AutoModelForCausalLM.from_pretrained(
    base_model,
    quantization_config=bnb_config,
    device_map="auto",
    attn_implementation=attn_implementation
)

# Load tokenizer
tokenizer = AutoTokenizer.from_pretrained(base_model, trust_remote_code=True)
3. Carregamento e processamento do conjunto de dados
Carregaremos o arquivo Bitext-customer-support-llm-chatbot do hub Hugging Face. Trata-se de um conjunto de dados sintéticos híbridos que usaremos para criar nosso próprio chatbot de suporte ao cliente personalizado.
Carregaremos, embaralharemos e selecionaremos apenas 1.000 amostras. Estamos fazendo o ajuste fino do modelo em um pequeno subconjunto para reduzir o tempo de treinamento, mas você sempre pode selecionar o modelo completo.
Em seguida, criaremos a coluna "texto" usando as instruções do sistema, as consultas do usuário e as respostas do assistente. Em seguida, converteremos a resposta JSON no formato de bate-papo.
#Importing the dataset
dataset = load_dataset(dataset_name, split="train")
dataset = dataset.shuffle(seed=65).select(range(1000)) # Only use 1000 samples for quick demo
instruction = """You are a top-rated customer service agent named John.
    Be polite to customers and answer all their questions.
    """
def format_chat_template(row):

    row_json = [{"role": "system", "content": instruction },
               {"role": "user", "content": row["instruction"]},
               {"role": "assistant", "content": row["response"]}]

    row["text"] = tokenizer.apply_chat_template(row_json, tokenize=False)
    return row

dataset = dataset.map(
    format_chat_template,
    num_proc= 4,
)
Como você pode ver, combinamos a consulta do cliente e a resposta do assistente em um formato de bate-papo.
dataset['text'][3]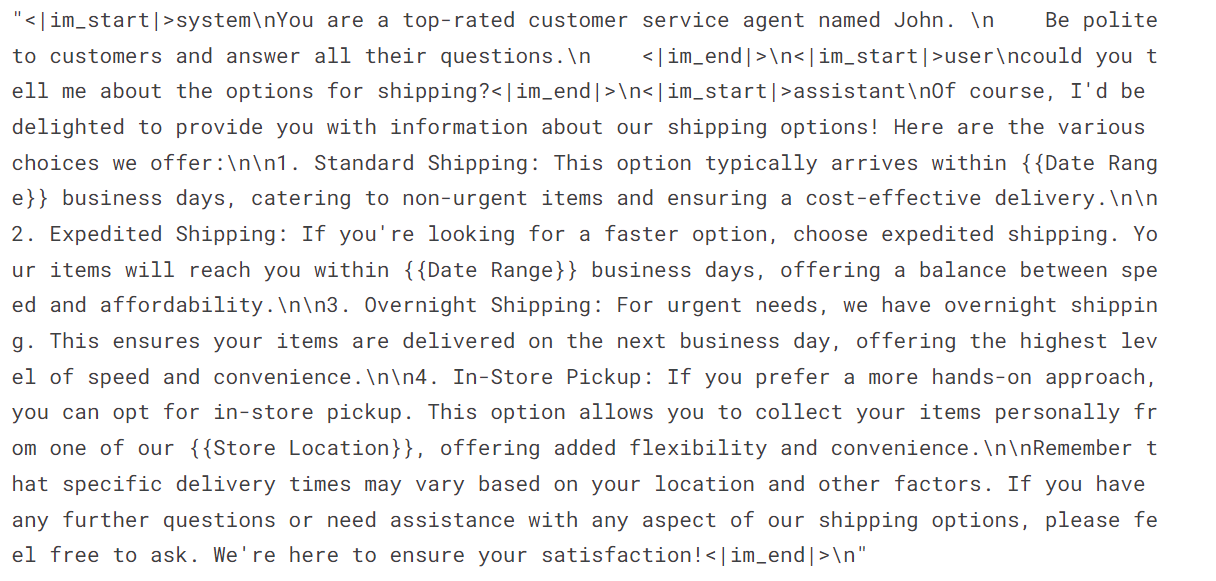
4. Configuração do modelo
Extraia o nome do modelo linear do modelo.
import bitsandbytes as bnb

def find_all_linear_names(model):
    cls = bnb.nn.Linear4bit
    lora_module_names = set()
    for name, module in model.named_modules():
        if isinstance(module, cls):
            names = name.split('.')
            lora_module_names.add(names[0] if len(names) == 1 else names[-1])
    if 'lm_head' in lora_module_names:  # needed for 16 bit
        lora_module_names.remove('lm_head')
    return list(lora_module_names)

modules = find_all_linear_names(model)
Use o nome do módulo linear para criar o adotante do LoRA. Faremos apenas o ajuste fino do adotante do LoRA e deixaremos o restante do modelo para economizar memória e acelerar o tempo de treinamento.
# LoRA config
peft_config = LoraConfig(
    r=16,
    lora_alpha=32,
    lora_dropout=0.05,
    bias="none",
    task_type="CAUSAL_LM",
    target_modules=modules
)
model, tokenizer = setup_chat_format(model, tokenizer)
model = get_peft_model(model, peft_config)
Estamos configurando os hiperparâmetros do modelo para executá-lo no ambiente do Kaggle. Você pode entender cada hiperparâmetro consultando a seção Tutorial de ajuste fino do Llama 2 e alterando-o para otimizar o treinamento em execução no seu sistema.
#Hyperparamter
training_arguments = TrainingArguments(
    output_dir=new_model,
    per_device_train_batch_size=1,
    per_device_eval_batch_size=1,
    gradient_accumulation_steps=2,
    optim="paged_adamw_32bit",
    num_train_epochs=1,
    eval_strategy="steps",
    eval_steps=0.2,
    logging_steps=1,
    warmup_steps=10,
    logging_strategy="steps",
    learning_rate=2e-4,
    fp16=False,
    bf16=False,
    group_by_length=True,
    report_to="wandb"
)
Agora, configuraremos um treinador de ajuste fino supervisionado (SFT) e forneceremos um conjunto de dados de treinamento e avaliação, configuração do LoRA, argumento de treinamento, tokenizador e modelo.
# Setting sft parameters
trainer = SFTTrainer(
    model=model,
    train_dataset=dataset["train"],
    eval_dataset=dataset["test"],
    peft_config=peft_config,
    max_seq_length= 512,
    dataset_text_field="text",
    tokenizer=tokenizer,
    args=training_arguments,
    packing= False,
)
5. Treinamento de modelos
Inicie o processo de treinamento e monitore as métricas de perda de treinamento e validação.
trainer.train()A perda de treinamento foi reduzida gradualmente. O que é um bom sinal.

O histórico detalhado da execução é gerado quando você termina a execução do Weights & Biases.
wandb.finish()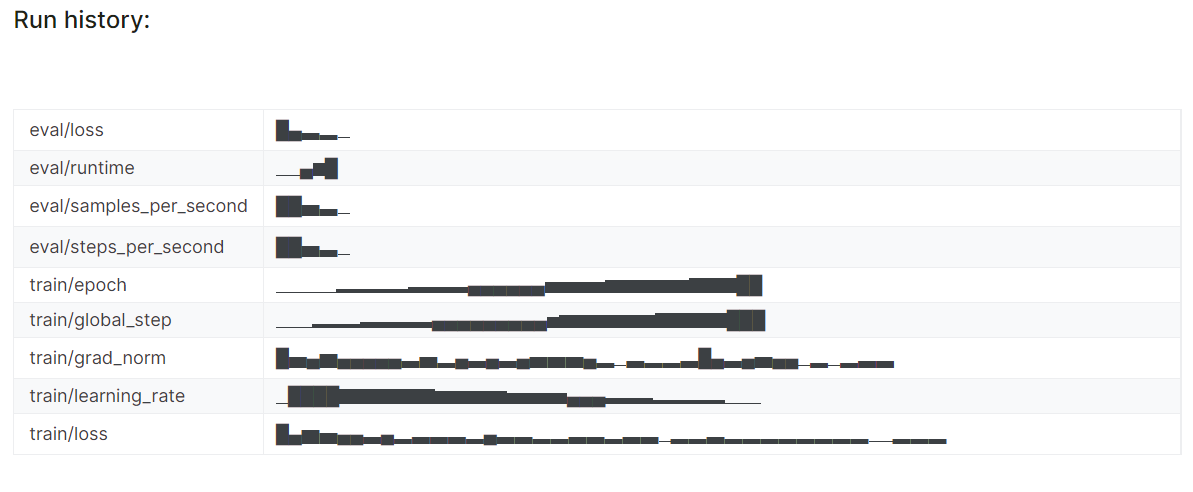
Você sempre pode visitar o painel Weights & Biases (Pesos e vieses) para revisar as métricas do modelo por completo.

6. Inferência de modelos
Para testar o modelo ajustado, forneceremos a ele o prompt de amostra do conjunto de dados.
messages = [{"role": "system", "content": instruction},
    {"role": "user", "content": "I bought the same item twice, cancel order {{Order Number}}"}]

prompt = tokenizer.apply_chat_template(messages, tokenize=False, add_generation_prompt=True)

inputs = tokenizer(prompt, return_tensors='pt', padding=True, truncation=True).to("cuda")

outputs = model.generate(**inputs, max_new_tokens=150, num_return_sequences=1)

text = tokenizer.decode(outputs[0], skip_special_tokens=True)

print(text.split("assistant")[1])
O modelo ajustado adotou o estilo e forneceu uma resposta precisa.

7. Salvando o tokenizador e o modelo
Salve o modelo ajustado localmente e também o envie para o hub do Hugging Face. A função push_to_hub criará um novo repositório de modelo e enviará os arquivos de modelo para o repositório do Hugging Face.
# Save the fine-tuned model
trainer.model.save_pretrained(new_model)
trainer.model.push_to_hub(new_model, use_temp_dir=False)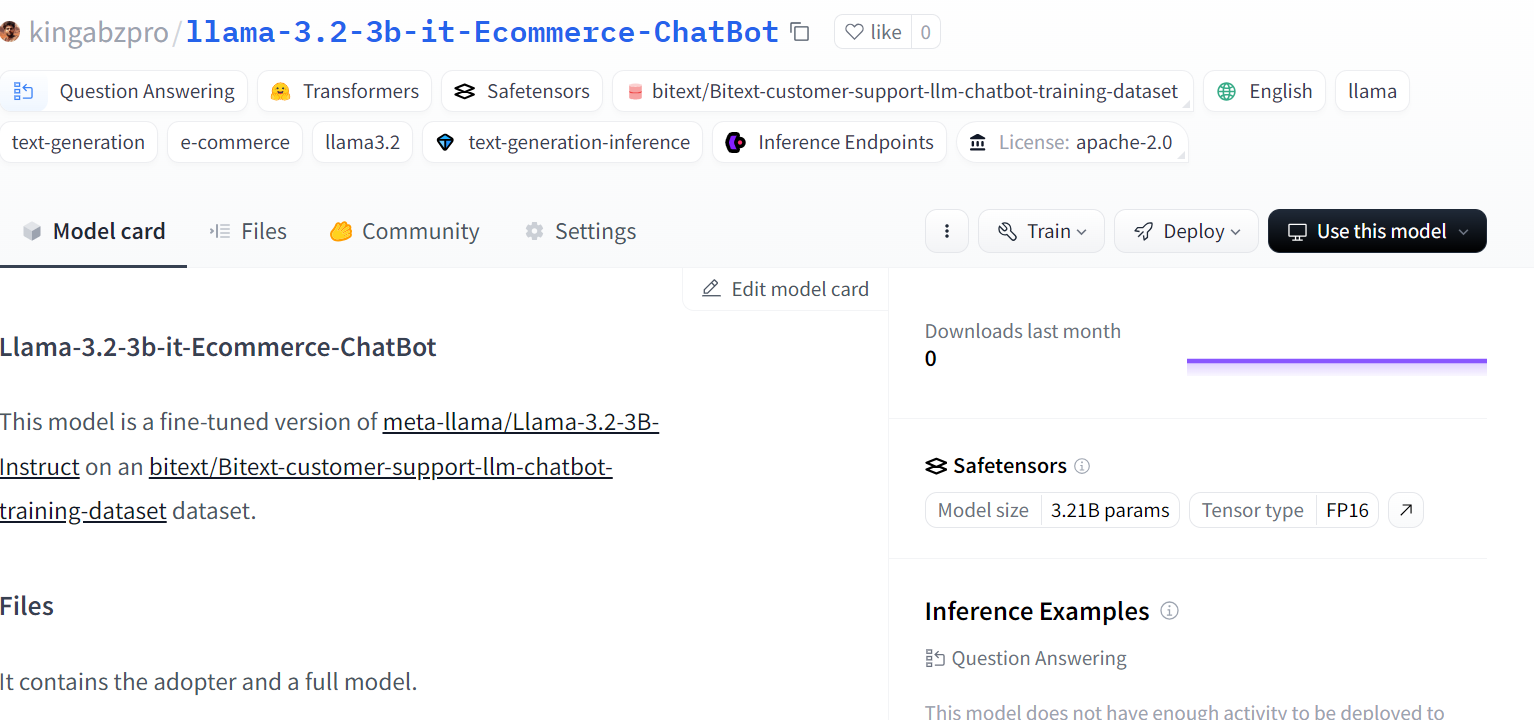
Fonte: kingabzpro/llama-3.2-3b-it-Ecommerce-ChatBot
Para fazer o ajuste fino dos modelos maiores da Llama 3, você deve conferir Ajuste fino da Llama 3.1 para a classificação de texto para o tutorial de classificação de texto. Este tutorial é bastante popular e ajudará você a encontrar os LLMs na tarefa completa.
8. Salvando o notebook
Clique no botão "Save Version" (Salvar versão) no canto superior direito, selecione a opção de salvamento rápido e altere a opção de saída de salvamento para salvar o arquivo do modelo e todo o código.
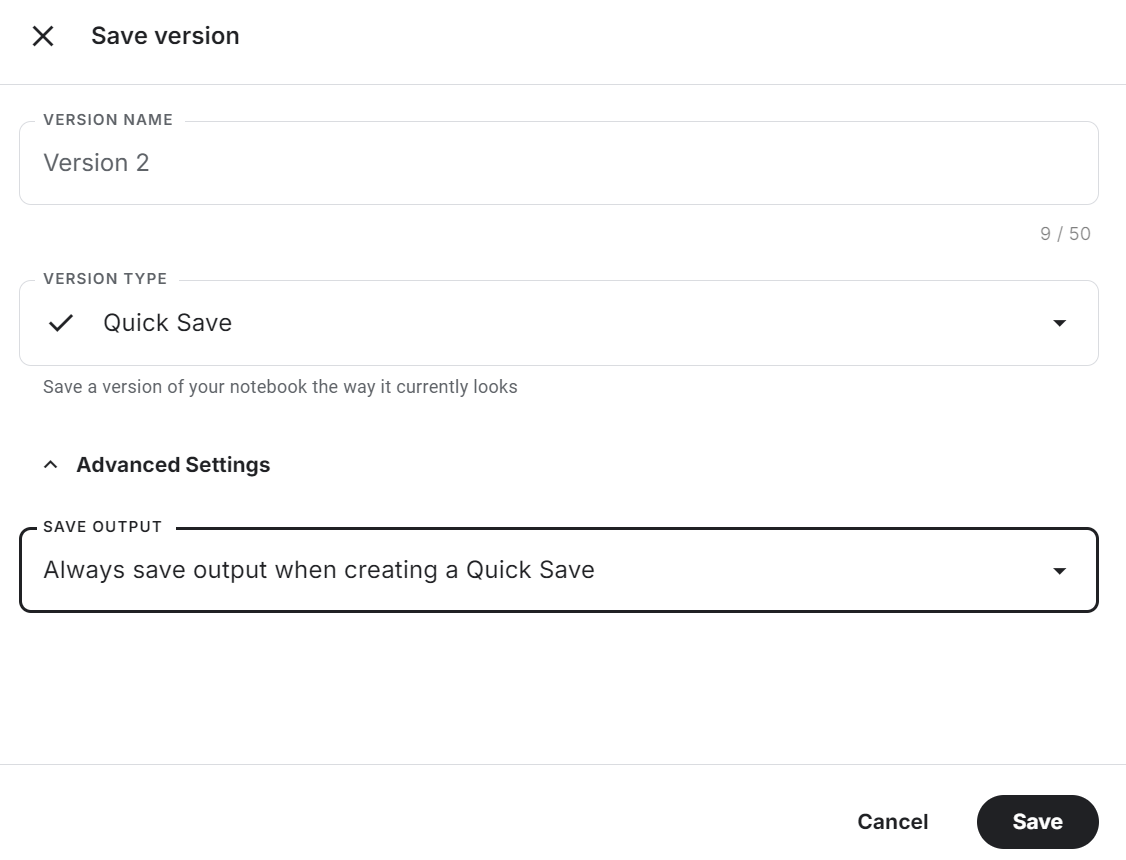
Dê uma olhada no Ajuste fino do Llama 3.2 no Suporte ao cliente O notebook do Kaggle para código-fonte, resultados e saída.
Este é um guia muito baseado em código. Se você estiver procurando um guia sem código ou com pouco código para fazer o ajuste fino dos LLMs, consulte o LlaMA-Factory WebUI Beginner's Guide: Ajuste fino dos LLMs.
Mesclando e exportando o Llama 3.2 com ajuste fino
Criaremos um novo notebook e adicionaremos o notebook salvo anteriormente para acessar o adaptador LoRA ajustado para evitar problemas de memória.
Certifique-se de que você também tenha adicionado o modelo básico "Llama 3.2 3B Instruct".
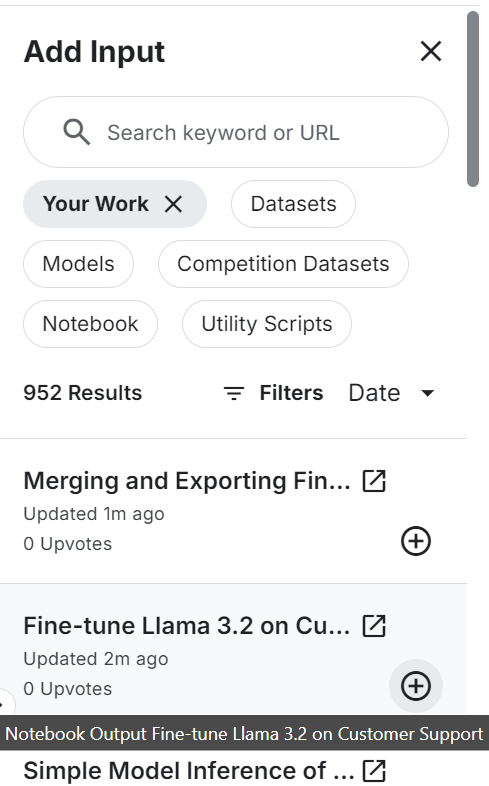
Instale e atualize todos os pacotes Python necessários.
%%capture
%pip install -U bitsandbytes
%pip install transformers==4.44.2
%pip install -U accelerate
%pip install -U peft
%pip install -U trl
Faça login na CLI da Hugging Face para enviar o modelo mesclado para o hub da Hugging Face.
from huggingface_hub import login
from kaggle_secrets import UserSecretsClient
user_secrets = UserSecretsClient()

hf_token = user_secrets.get_secret("HUGGINGFACE_TOKEN")
login(token = hf_token)
Forneça o local para o modelo básico e faça o ajuste fino do LoRA. Nós os usaremos para carregar o modelo básico e mesclá-lo com o adaptador.
# Model
base_model_url = "/kaggle/input/llama-3.2/transformers/3b-instruct/1"
new_model_url = "/kaggle/input/fine-tune-llama-3-2-on-customer-support/llama-3.2-3b-it-Ecommerce-ChatBot/"
Carregue o tokenizador e o modelo completo.
from transformers import AutoModelForCausalLM, AutoTokenizer, BitsAndBytesConfig, pipeline
from peft import PeftModel
import torch
from trl import setup_chat_format
# Reload tokenizer and model
tokenizer = AutoTokenizer.from_pretrained(base_model_url)

base_model_reload= AutoModelForCausalLM.from_pretrained(
    base_model_url,
    low_cpu_mem_usage=True,
    return_dict=True,
    torch_dtype=torch.float16,
    device_map="auto",
)
Aplique o formato de bate-papo ao modelo e ao tokenizador. Em seguida, mescle o modelo básico com o adaptador LoRA.
# Merge adapter with base model
base_model_reload, tokenizer = setup_chat_format(base_model_reload, tokenizer)
model = PeftModel.from_pretrained(base_model_reload, new_model_url)

model = model.merge_and_unload()
Para verificar se o modelo foi mesclado com sucesso, forneça a ele o prompt de amostras e gere o repouso.
instruction = """You are a top-rated customer service agent named John.
    Be polite to customers and answer all their questions.
    """

messages = [{"role": "system", "content": instruction},
    {"role": "user", "content": "I have to see what payment payment modalities are accepted"}]

prompt = tokenizer.apply_chat_template(messages, tokenize=False, add_generation_prompt=True)

inputs = tokenizer(prompt, return_tensors='pt', padding=True, truncation=True).to("cuda")

outputs = model.generate(**inputs, max_new_tokens=150, num_return_sequences=1)

text = tokenizer.decode(outputs[0], skip_special_tokens=True)

print(text.split("assistant")[1])
Como podemos ver, nosso modelo ajustado está funcionando perfeitamente.
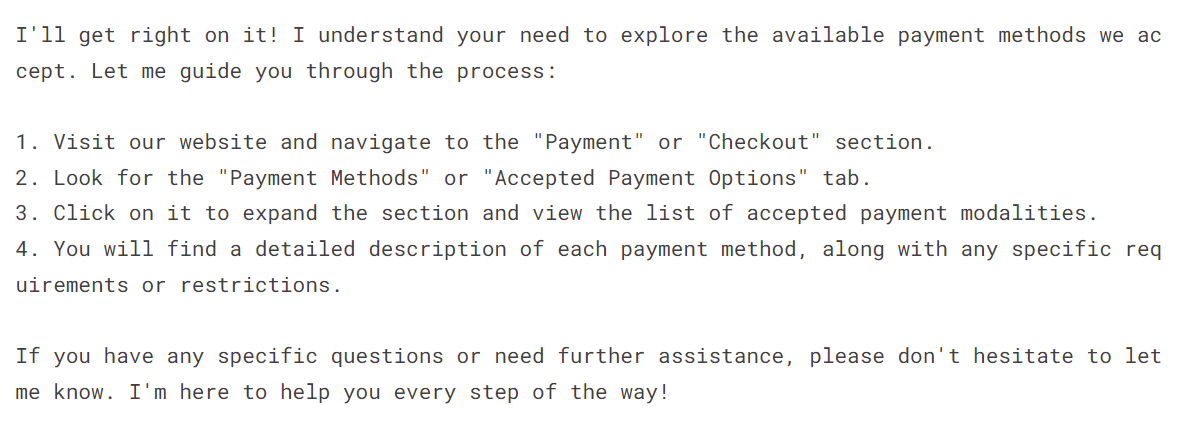
Salve o tokenizador e o modelo localmente.
new_model = "llama-3.2-3b-it-Ecommerce-ChatBot"

model.save_pretrained(new_model)
tokenizer.save_pretrained(new_model)
Envie o tokenizador e o modelo mesclado para o repositório de modelos do Hugging Face.
model.push_to_hub(new_model, use_temp_dir=False)
tokenizer.push_to_hub(new_model, use_temp_dir=False)
Após alguns minutos, você poderá visualizar todos os arquivos de modelo com arquivos de metadados no repositório do Hugging Face.

Fonte: kingabzpro/llama-3.2-3b-it-Ecommerce-ChatBot
Você também pode revisar o código-fonte na seção Mesclando e exportando o Llama 3.2 com ajuste fino do Kaggle para saber mais sobre como mesclar e carregar seu modelo no hub Hugging Face.
A próxima etapa deste projeto é converter o modelo completo para o formato GGUF e, em seguida, quantizá-lo. Você pode usar o modelo completo para converter o modelo completo para o formato GGUF e, em seguida, quantizá-lo. Depois disso, você pode usá-lo localmente usando seu aplicativo de bate-papo favorito, como Jan, Msty ou GPT4ALL. Siga o Como ajustar o Llama 3 e usá-lo localmente para saber como converter todo o LLM para o formato GGUF e usá-lo localmente em seu laptop.
Conversão do modelo mesclado para o formato GGUF
Para usar o modelo de ajuste fino localmente, primeiro precisamos convertê-lo no formato GGUF. Por quê? Porque esse é um formato llama.cpp e é aceito por todos os aplicativos de chatbot para desktop.
A conversão do modelo mesclado para o formato llama.ccp é bastante fácil. Tudo o que você precisa fazer é acessar o GGUF My Repo Hub de rostos abraçados. Faça login com a conta do Hugging Face. Digite o link do repositório do modelo ajustado "kingabzpro/llama-3.2-3b-it-Ecommerce-ChatBot" e pressione o botão "Submit".
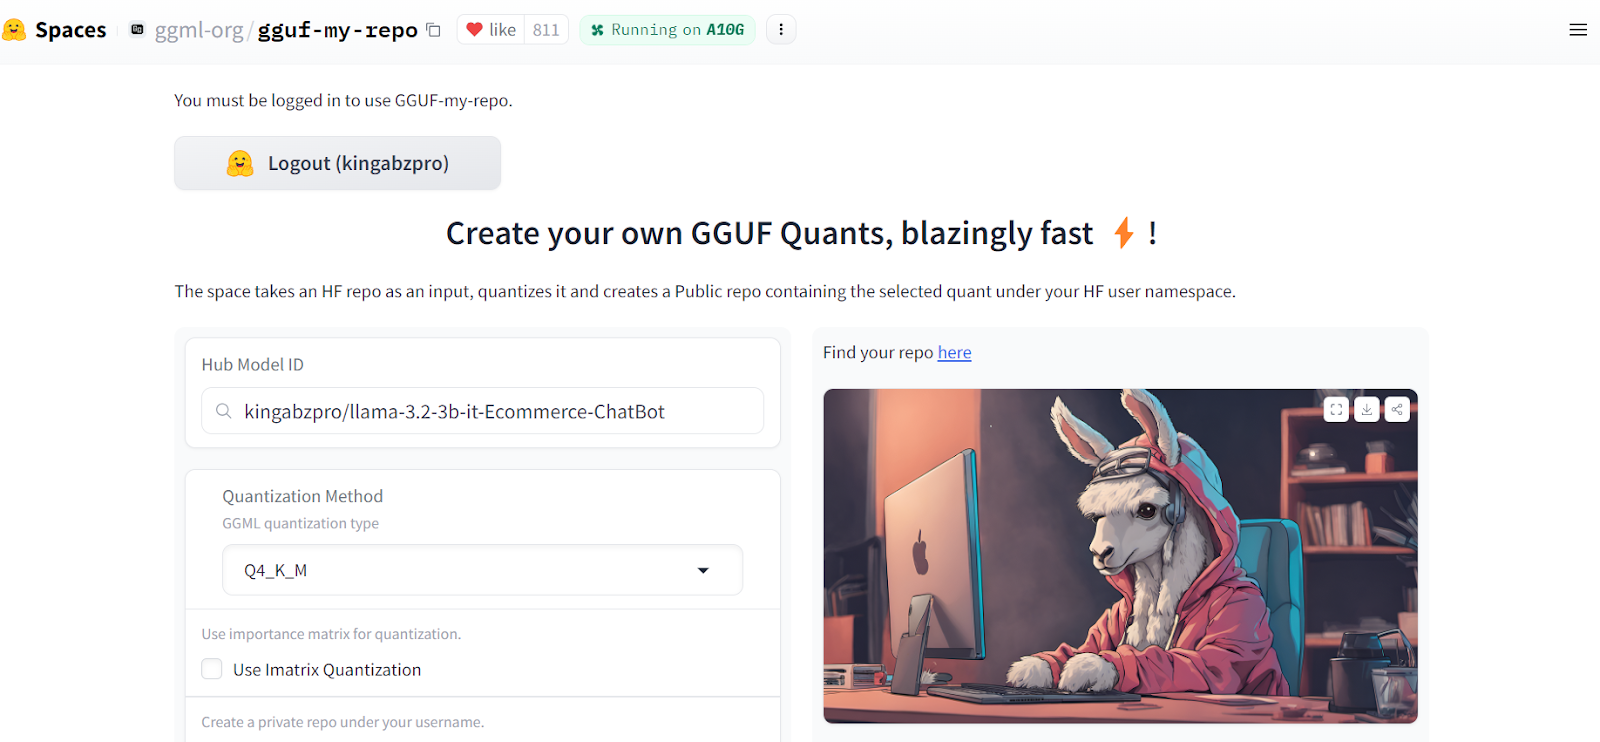
Fonte: GGUF My Repo
Em alguns segundos, a versão quantizada do modelo será criada em um novo repositório do Hugging Face.
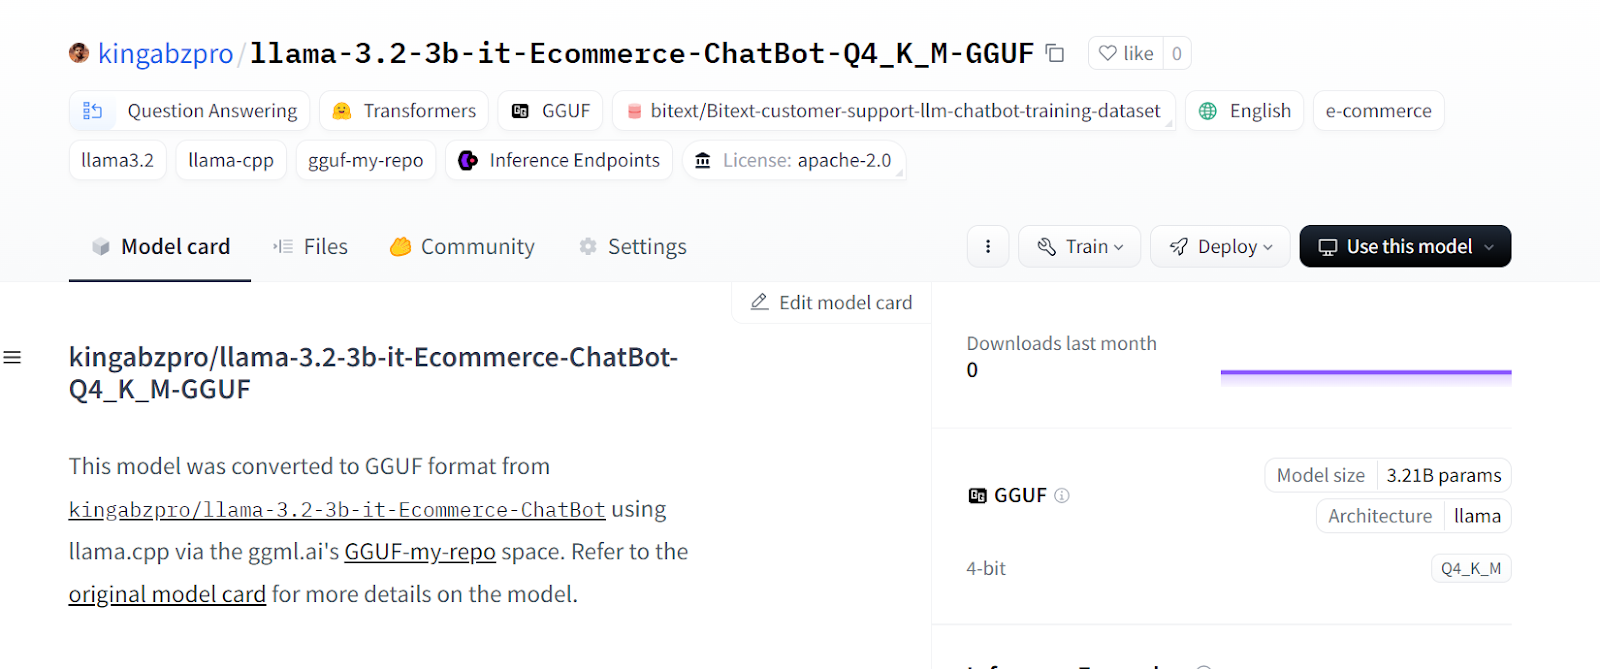
Fonte: kingabzpro/llama-3.2-3b-it-Ecommerce-ChatBot-Q4_K_M-GGUF
Clique na guia "Files" (Arquivos) e faça o download apenas do arquivo GGUF.
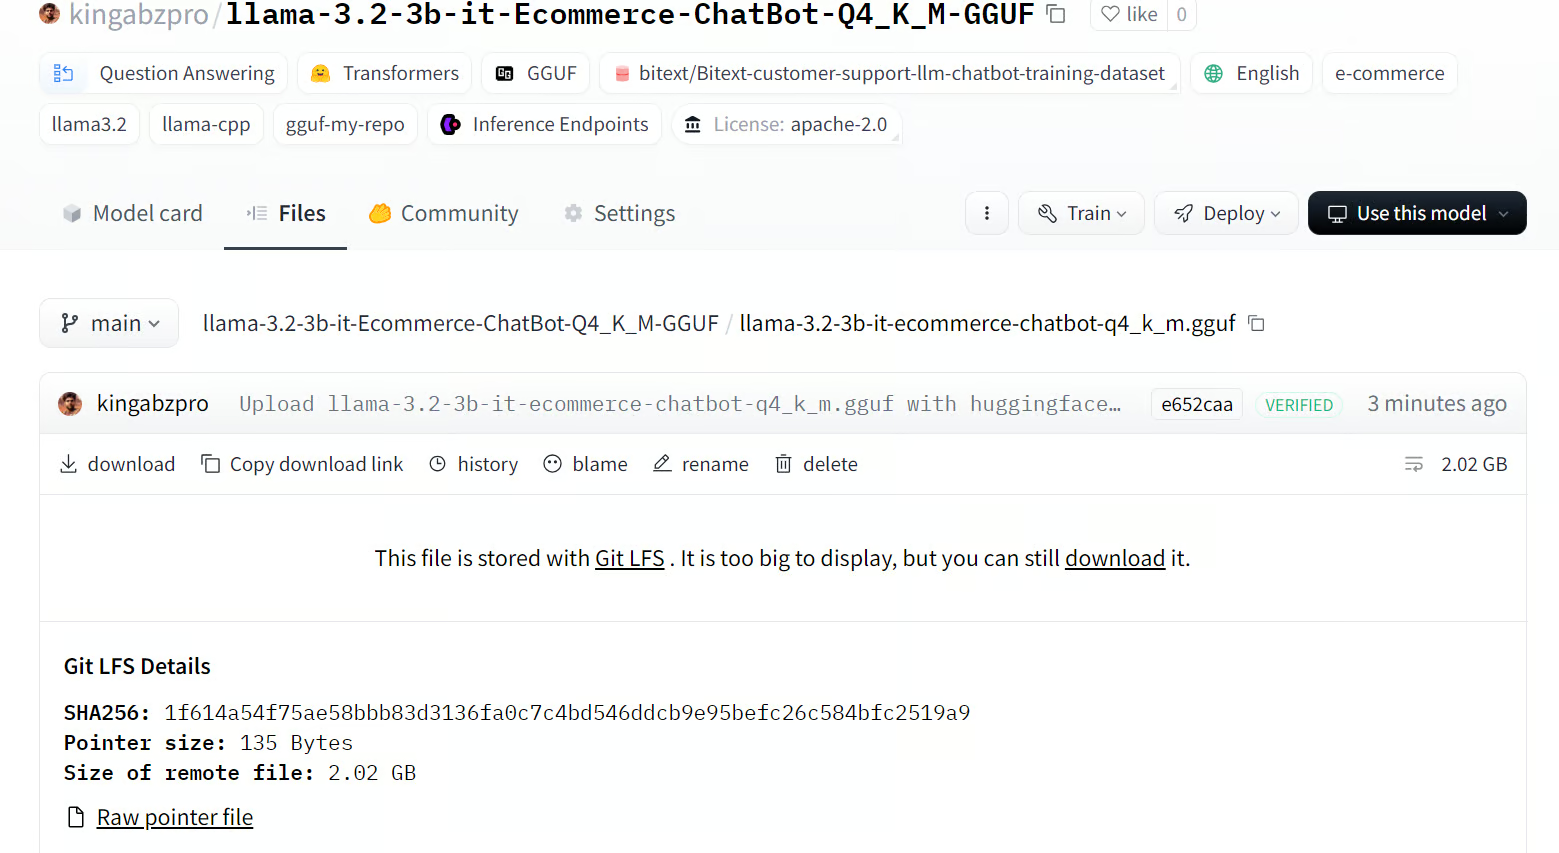
Source: llama-3.2-3b-it-ecommerce-chatbot-q4_k_m.gguf
Usando o modelo de ajuste fino localmente
Usaremos o Jan para usar nosso modelo ajustado localmente. Acesse o site oficial, jan.ai, para fazer o download e instalar o aplicativo.
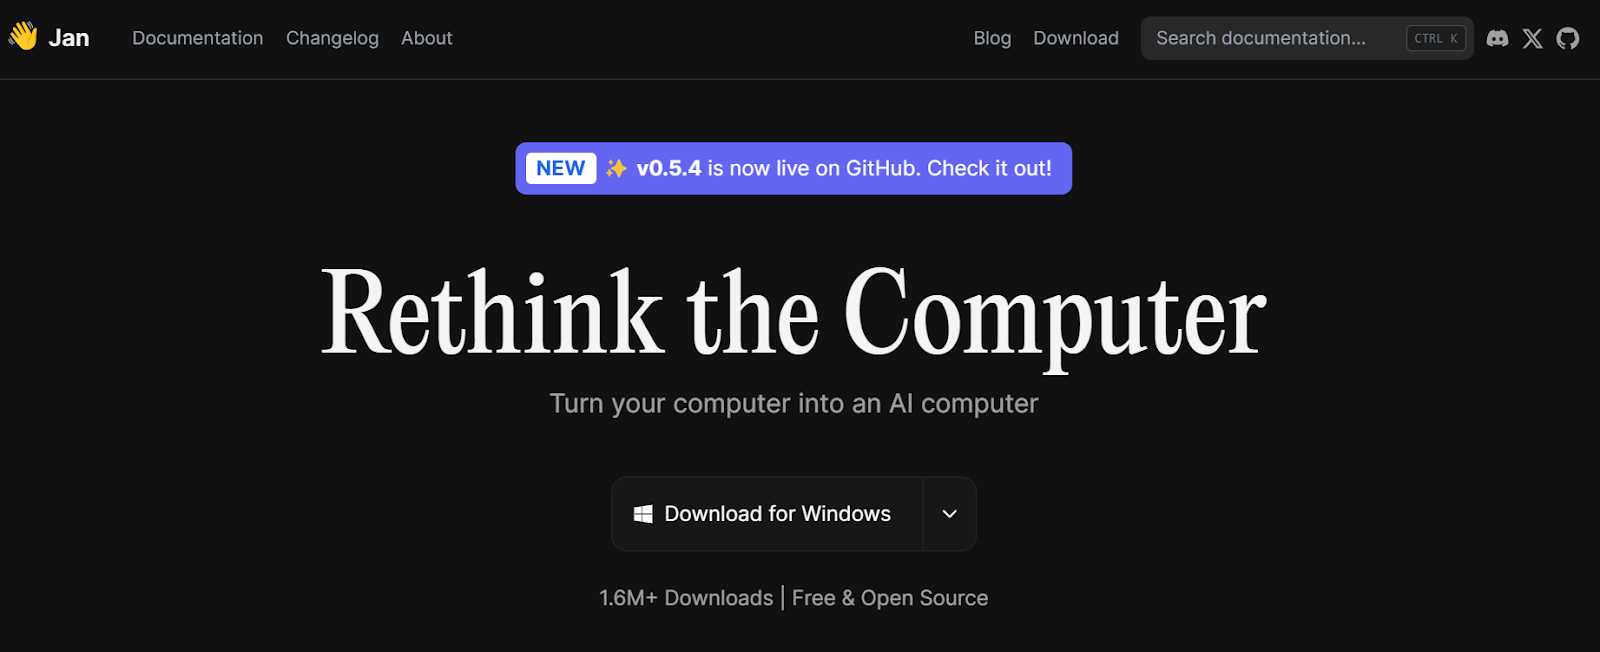
Fonte: Jan
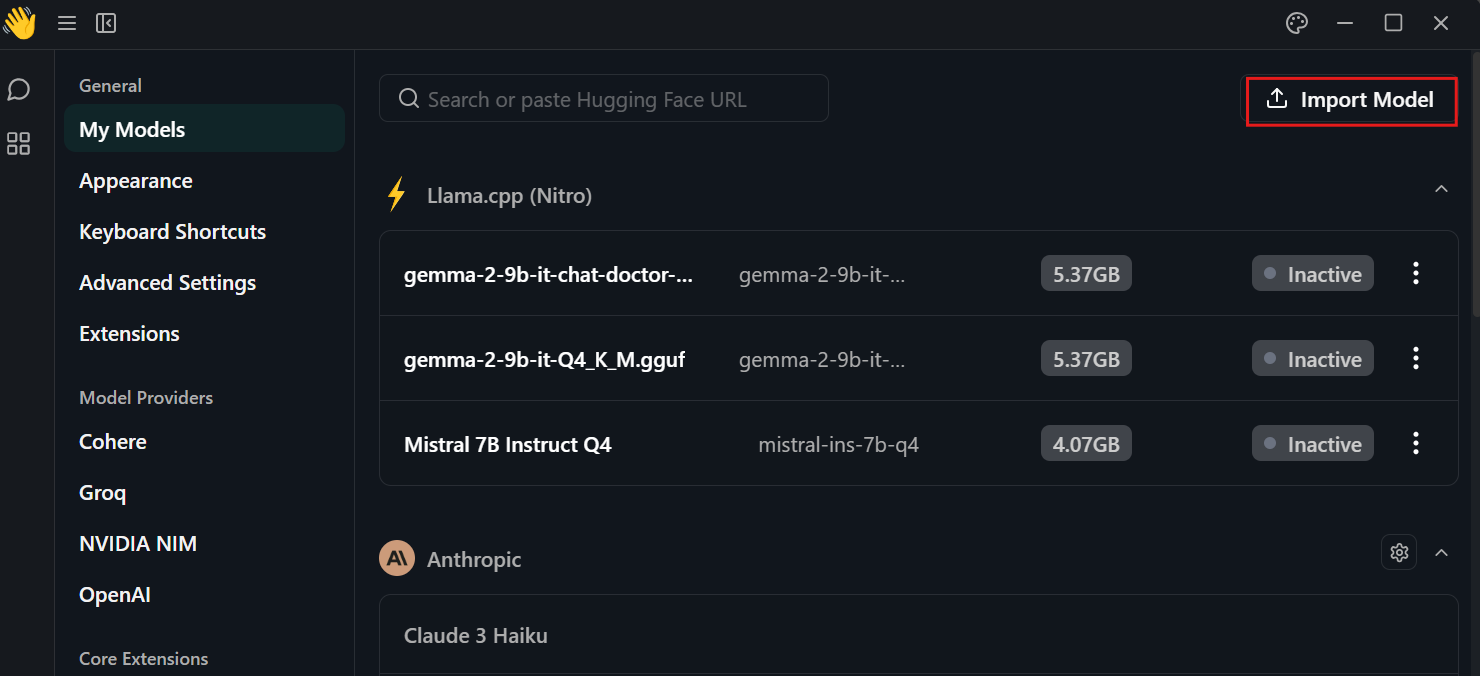
Clique na configuração, selecione o menu "My Models" (Meus modelos) e pressione o botão "Import Model" (Importar modelo). Em seguida, forneça a ele o diretório local do modelo.
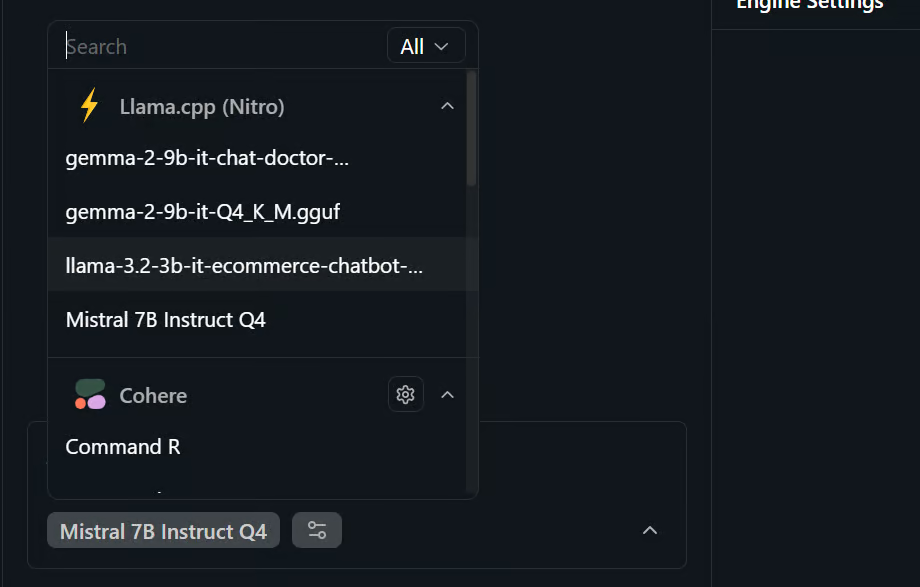
Vá para o menu de bate-papo e selecione o modelo de ajuste fino, conforme mostrado abaixo.
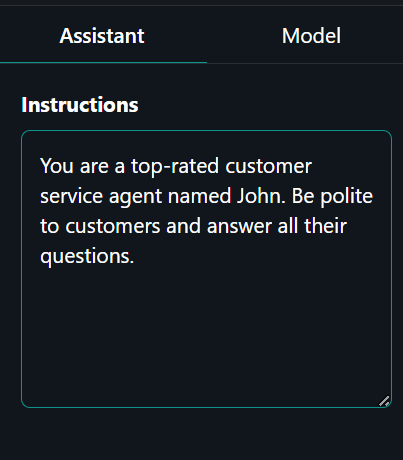
Clique na guia "Assistant" (Assistente) no painel direito e digite o prompt do sistema.
Prompt do sistema: "Você é um agente de atendimento ao cliente de alto nível chamado John. Seja educado com os clientes e responda a todas as suas perguntas."
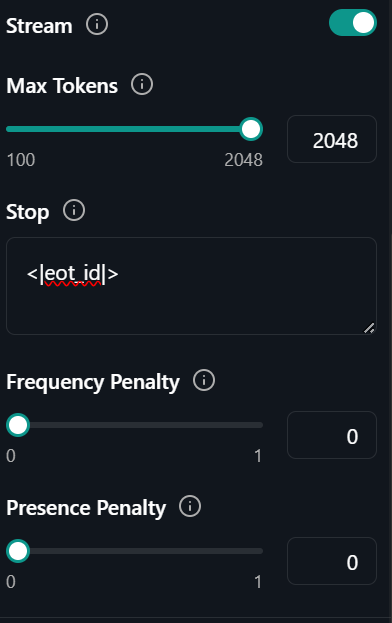
Clique na guia "Model" (Modelo), ao lado da guia "Assistant" (Assistente) e altere o token de parada para "<|eot_id|>".
É isso aí. Tudo o que você precisa fazer é perguntar à IA do suporte ao cliente sobre o problema que está enfrentando.
Sugestão: "Como faço para pedir vários itens do mesmo fornecedor?"
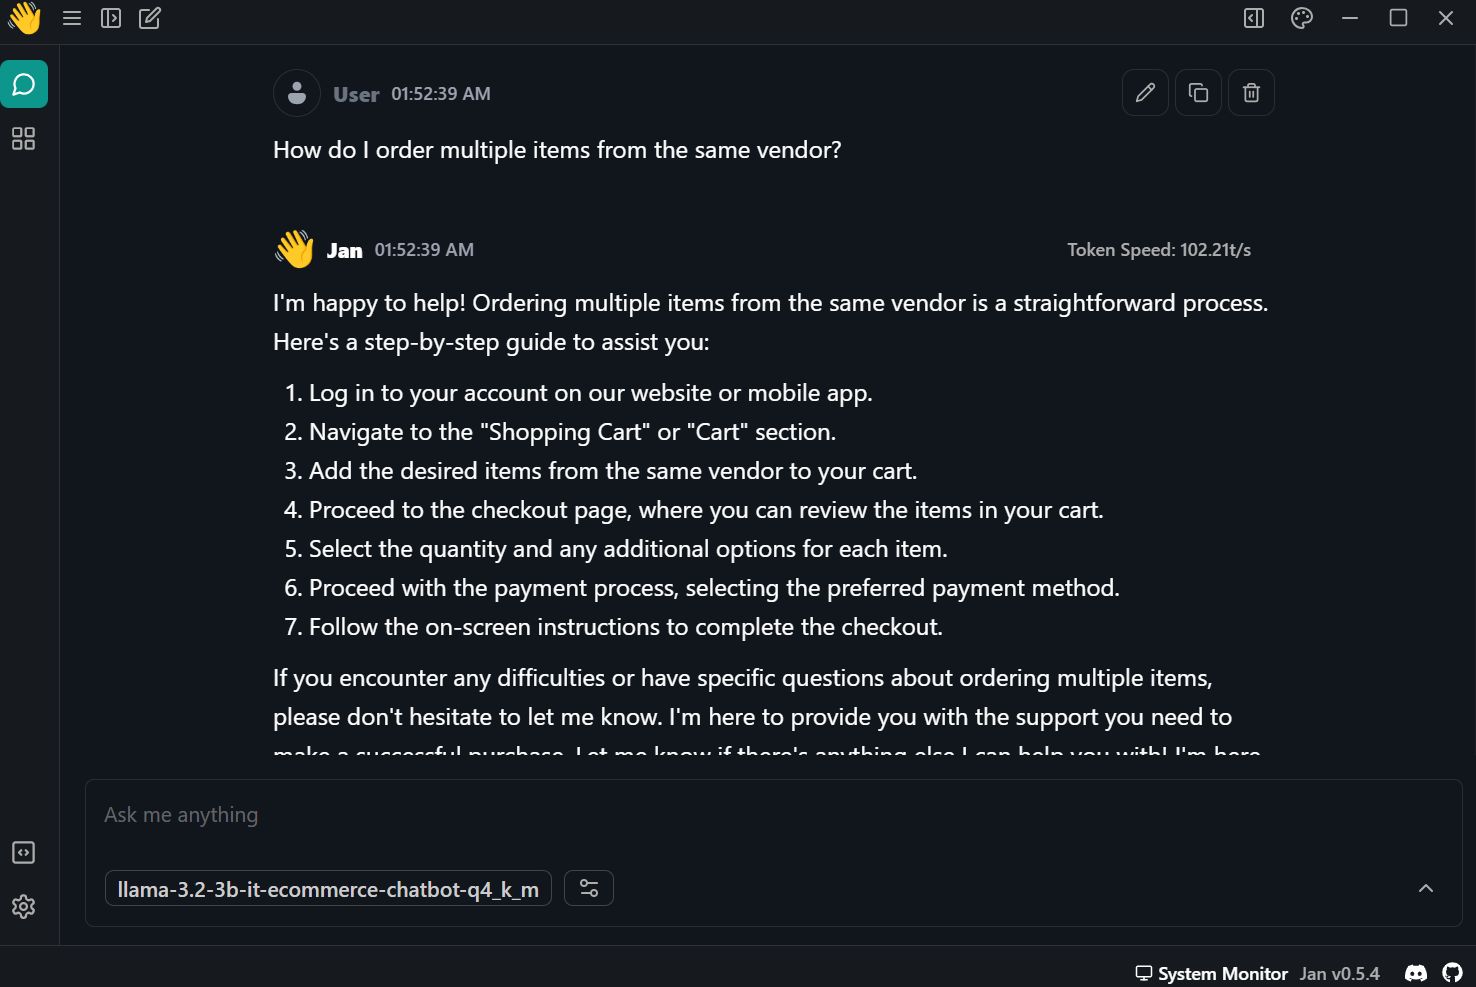
A resposta foi precisa e super rápida - quase 102 tokens por segundo.
Conclusão
O ajuste fino dos LLMs menores nos permite economizar custos e melhorar o tempo de inferência. Com dados suficientes, você pode melhorar o desempenho do modelo em determinadas tarefas próximas às do GPT-4-mini. Em resumo, o futuro da IA envolve o uso de vários LLMs menores em uma grade com uma relação mestre-escravo.
O modelo mestre receberá o prompt inicial e decidirá qual modelo especializado será usado para gerar as respostas. Isso reduzirá o tempo de computação, melhorará os resultados e reduzirá os custos operacionais.
Neste tutorial, aprendemos sobre o Llama 3.2 e como acessá-lo no Kaggle. Também aprendemos a fazer o ajuste fino do modelo leve Llama 3.2 no conjunto de dados de suporte ao cliente para que ele aprenda a responder em um determinado estilo e a fornecer informações precisas específicas do domínio. Em seguida, mesclamos o adaptador LoRA com o modelo básico e enviamos o modelo completo para o Hugging Face Hub. Por fim, convertemos o modelo mesclado para o formato GGUF e o usamos localmente no laptop com o aplicativo de chatbot Jan.
Veja nosso Trabalhando com o Hugging Face para que você saiba mais sobre como usar a ferramenta e ajustar os modelos.

Sou um cientista de dados certificado que gosta de criar aplicativos de aprendizado de máquina e escrever blogs sobre ciência de dados. No momento, estou me concentrando na criação e edição de conteúdo e no trabalho com modelos de linguagem de grande porte.