
Cofounder 2 Tutorial: How to Run a Company With AI Agents

Learn how to use Cofounder 2 to turn a rough idea into a structured company with a business plan, brand kit, engineering tasks, marketing campaigns, and sales workflows through specialized AI agents.
Jun 17, 2026  · 10 min read

On the way from an idea to a proper business, any founder has a thousand things to do: define the product, build the brand, write the landing page, generate the first marketing assets, identify customers, ship the MVP. Ideally, all this needs to be done without hiring a full team before validating the idea.

Cofounder 2 is an agent orchestration platform built around that problem. Instead of giving founders a single general-purpose assistant, it organizes work into departments such as Engineering, Marketing, Sales, Design, Operations, Finance, Legal, and Support, and assigns specialized agents to each. The central Cofounder agent coordinates across departments, serving as the operating layer for the company.

In this tutorial, we will walk through what Cofounder 2 is, how the agent system works, and how a solo founder can use it to move from idea to business plan, brand, landing page, MVP, launch campaign, and sales outreach. We will use a single example company to make each step concrete.

You can see the whole process at 2x speed in the following video:

What is Cofounder 2?

Cofounder 2 is a workspace for running a company with agents organized into departments. Each department contains agents with their own scope, tools, context, and skills. For example, an Engineering department may contain an engineer agent focused on product code, while a Marketing department may contain an agent focused on launch campaigns, positioning, and content. 

This tool is built around the idea of a superoptimizer because it has a manager agent that delegates work to other specialized agents and routes work across departments. Instead of asking one general-purpose assistant to handle everything, Cofounder acts as the coordination layer so that the right agent handles each part of the business.

This distinction matters because a normal AI assistant can help write copy or generate a code snippet. But Cofounder gives founders an operating layer for the company itself, where agents in Engineering, Marketing, Sales, and Design can work with shared context, managed infrastructure, and review workflows.

In practical terms, Cofounder 2 can help founders to:

  • Turn a rough idea into a structured company plan
  • Generate business plans, brand kits, and roadmaps
  • Build product and marketing websites using managed infrastructure
  • Create marketing campaigns and launch assets
  • Define ICPs and draft sales outreach
  • Set up payments, domains, and publishing workflows

Each department represents a different part of the business, and each contains agents with context relevant to that function. An Engineer Agent needs repository and deployment access. A Marketing Agent needs brand, positioning, and launch context. A Sales Agent needs ICP, outreach history, and pipeline context. This separation is what makes Cofounder different from a general-purpose chatbot.

Introduction to AI Agents

Learn the fundamentals of AI agents, their components, and real-world use—no coding required.
Explore Course

Cofounder 2 Pricing

Cofounder currently lists three pricing options: 

  • Free Trial
  • Cofounder Pro
  • Team Plan (coming soon)

1.png

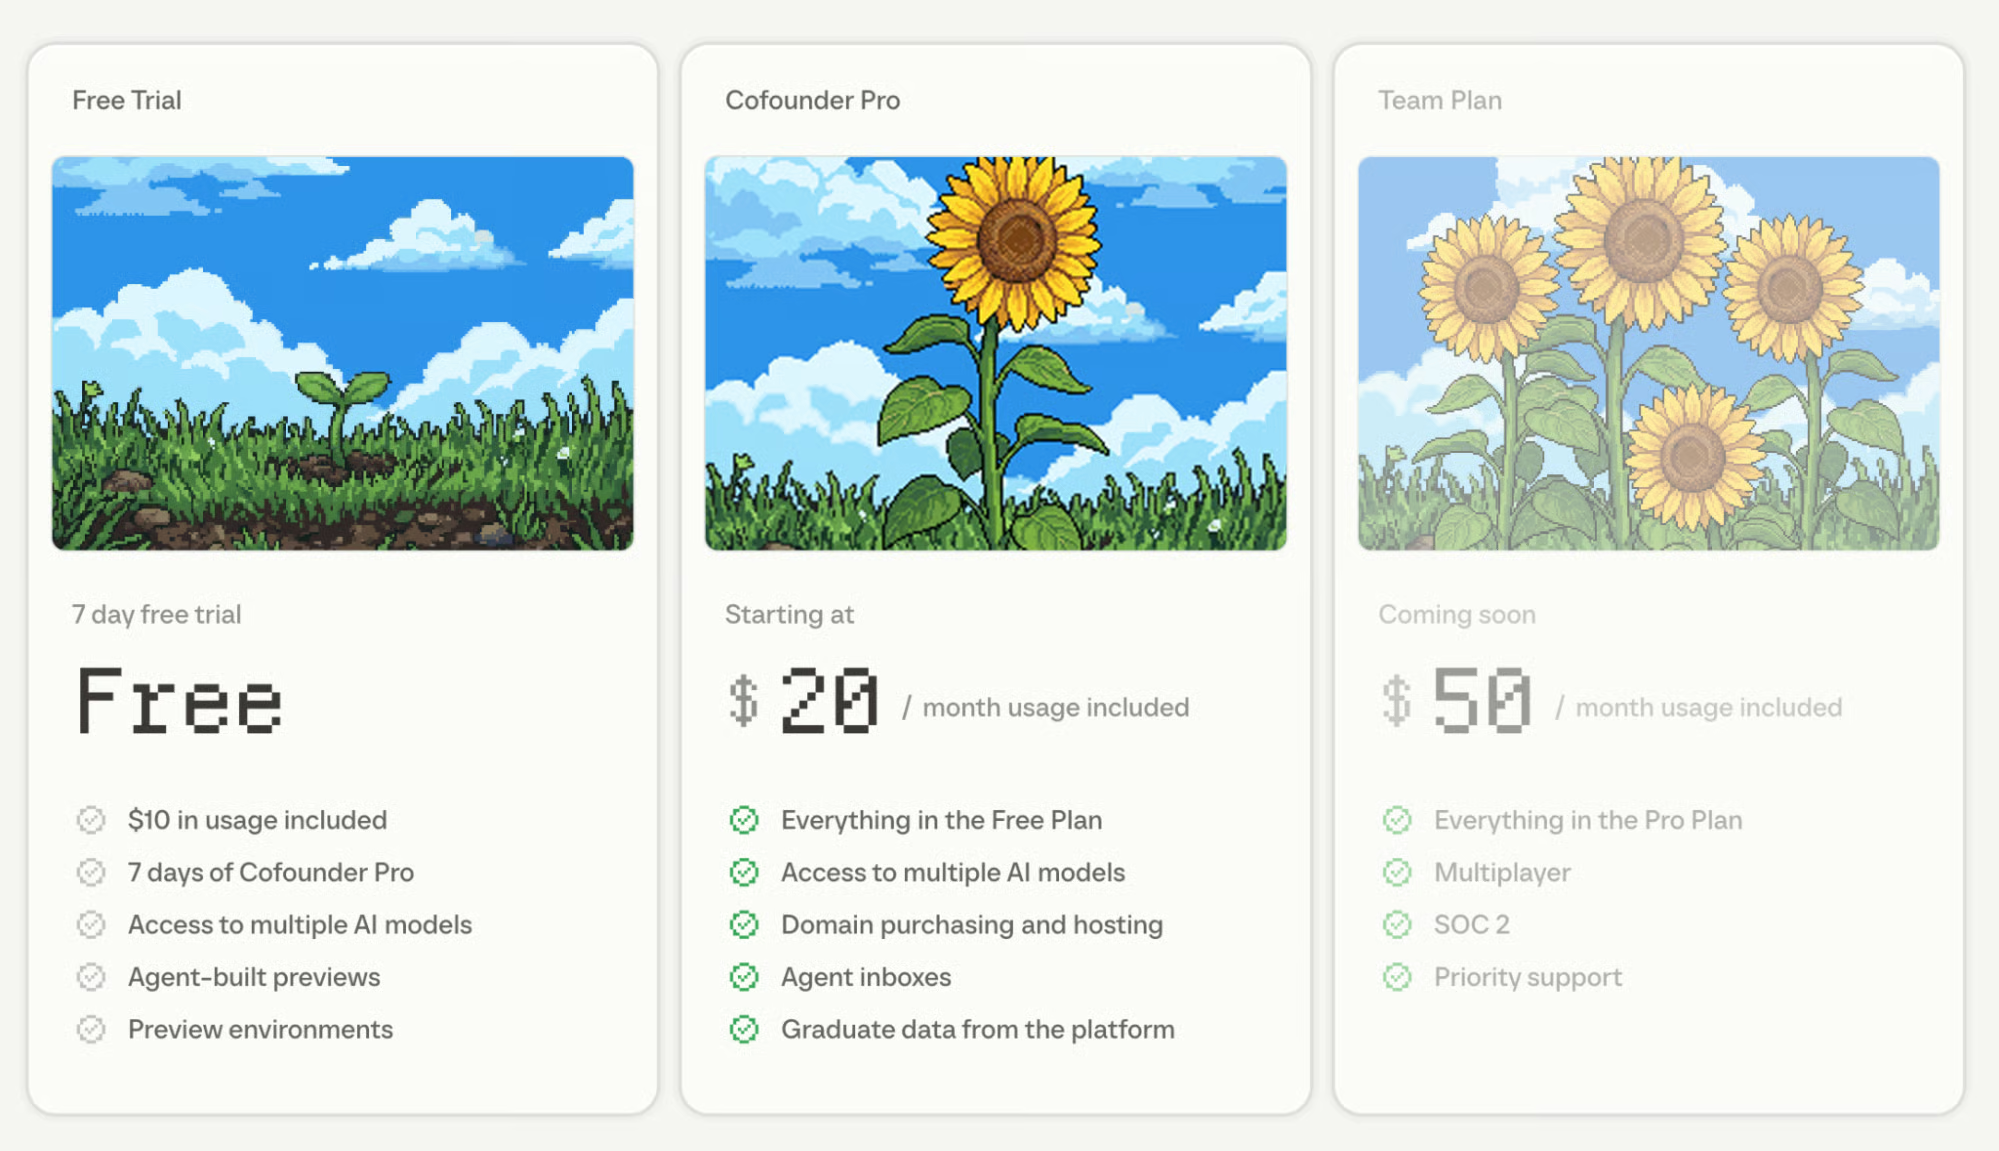
The Free Trial includes 7 days of Cofounder Pro, $10 in included usage, access to multiple AI models, agent-built previews, and preview environments. 

Cofounder Pro starts at $20/month and includes everything in the Free Trial, access to multiple AI models, domain purchasing and hosting, agent inboxes, and the ability to export data from the platform. 

Cofounder currently does not support bringing your own API key, Codex subscription, multiplayer, SOC 2, and priority support, but these are expected to be a part of their Team Plan.

Launching a Company With AI Agents

We will use one example company, “Compiled,” throughout this tutorial to show how each agent and workflow connect. Each section introduces a new part of the Cofounder platform through a concrete task, the prompt that drives it, and the expected output.

The workflow across the tutorial follows this sequence:

  • Create the company and generate a business plan
  • Build a brand kit with the Design Agent
  • Build a marketing website with the Engineer Agent
  • Build the MVP with the Engineer Agent

Let’s begin. 

Step 0: Cofounder 2 Prerequisites

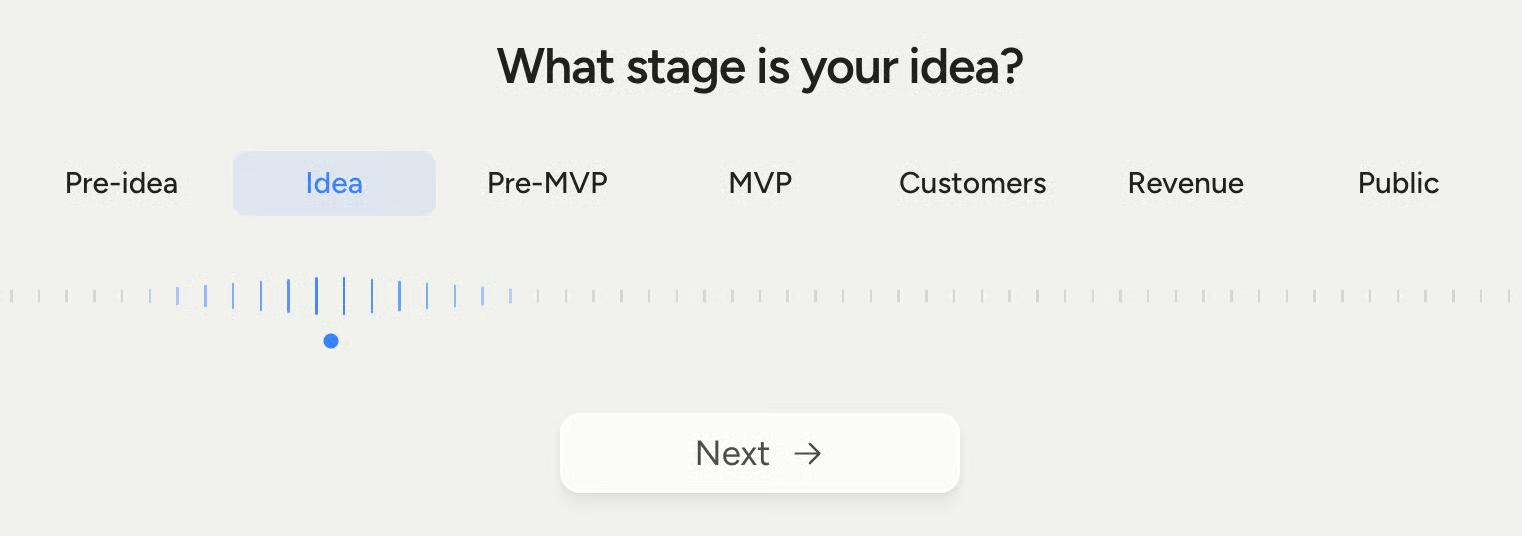
Before creating a company, Cofounder asks you to set your building context. This is not just account setup, but the answers directly shape how the platform configures the workspace and which agents it prioritizes for your situation.

2.png

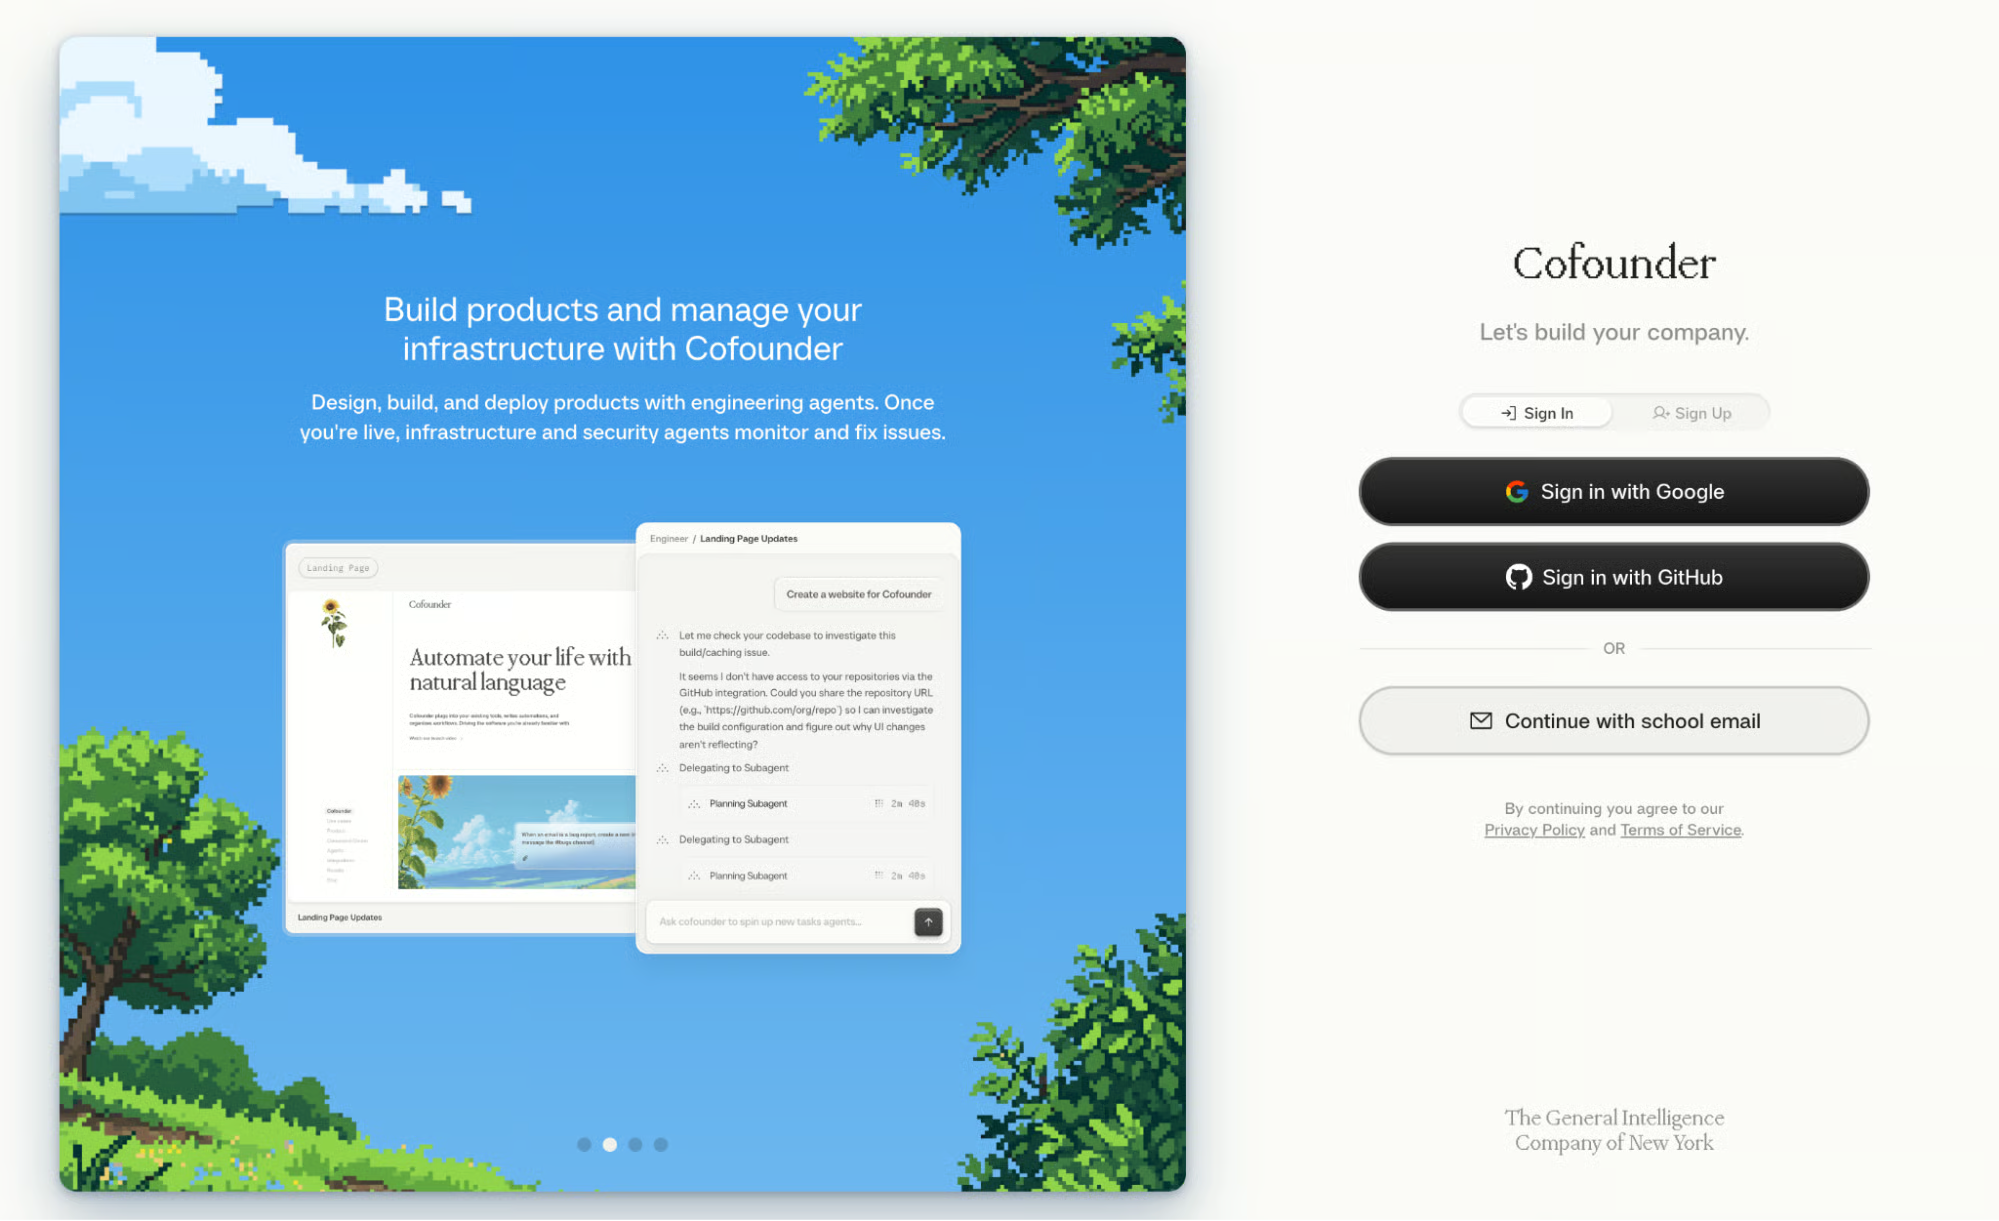
Start by signing up via your GitHub or Google account. 

Once signed in, Cofounder has a short onboarding flow that establishes who you are before you describe what you are building. It asks about:

  • Name: What should we call you?
  • Experience: What’s your experience building products?
  • Department: Which best describes you?
  • Maturity: What stage is your idea?

This allows the tool to tailor the experience to your role and stage, like a technical founder at the idea stage gets a different setup than a non-technical founder with an existing product.

Maturity Stages

Step 1: Generating a Business Plan

Once context is set, you are ready to name your company and describe the product. In this step, we:

  • Set the product context and role
  • Company name and describe the product
  • Answer strategic questions
  • Review the generated business plan
  • Activate the department canvas

Here is the prompt I used:

My company has a dashboard that allows user to add in details about a topic with
specifics to their company and we generate quick blog posts for multiple platforms
with images, infographics and videos. The user can customise the blogs further to
humanise with help of an editor/writer on a paid basis.

After this prompt, Cofounder asks you targeted questions, whose answers shape the business plan and act as context for every downstream agent. They depend on your initial description, but usually cover things such as:

  • Core target audience: Who are you building for first?
  • Monetization strategy: How do you plan to make money?
  • USP: Where do you have an edge over the competition?
  • Launching region: Where do you plan to launch first?

Next, Cofounder generates a structured business plan covering product vision, ICP, company values, and go-to-market strategy. 

The user then clicks Accept & activate departments, and the canvas animates to generate eight department nodes: Marketing, Finance, Operations, Sales, Engineering, Legal, Design, and Support.

Business plan

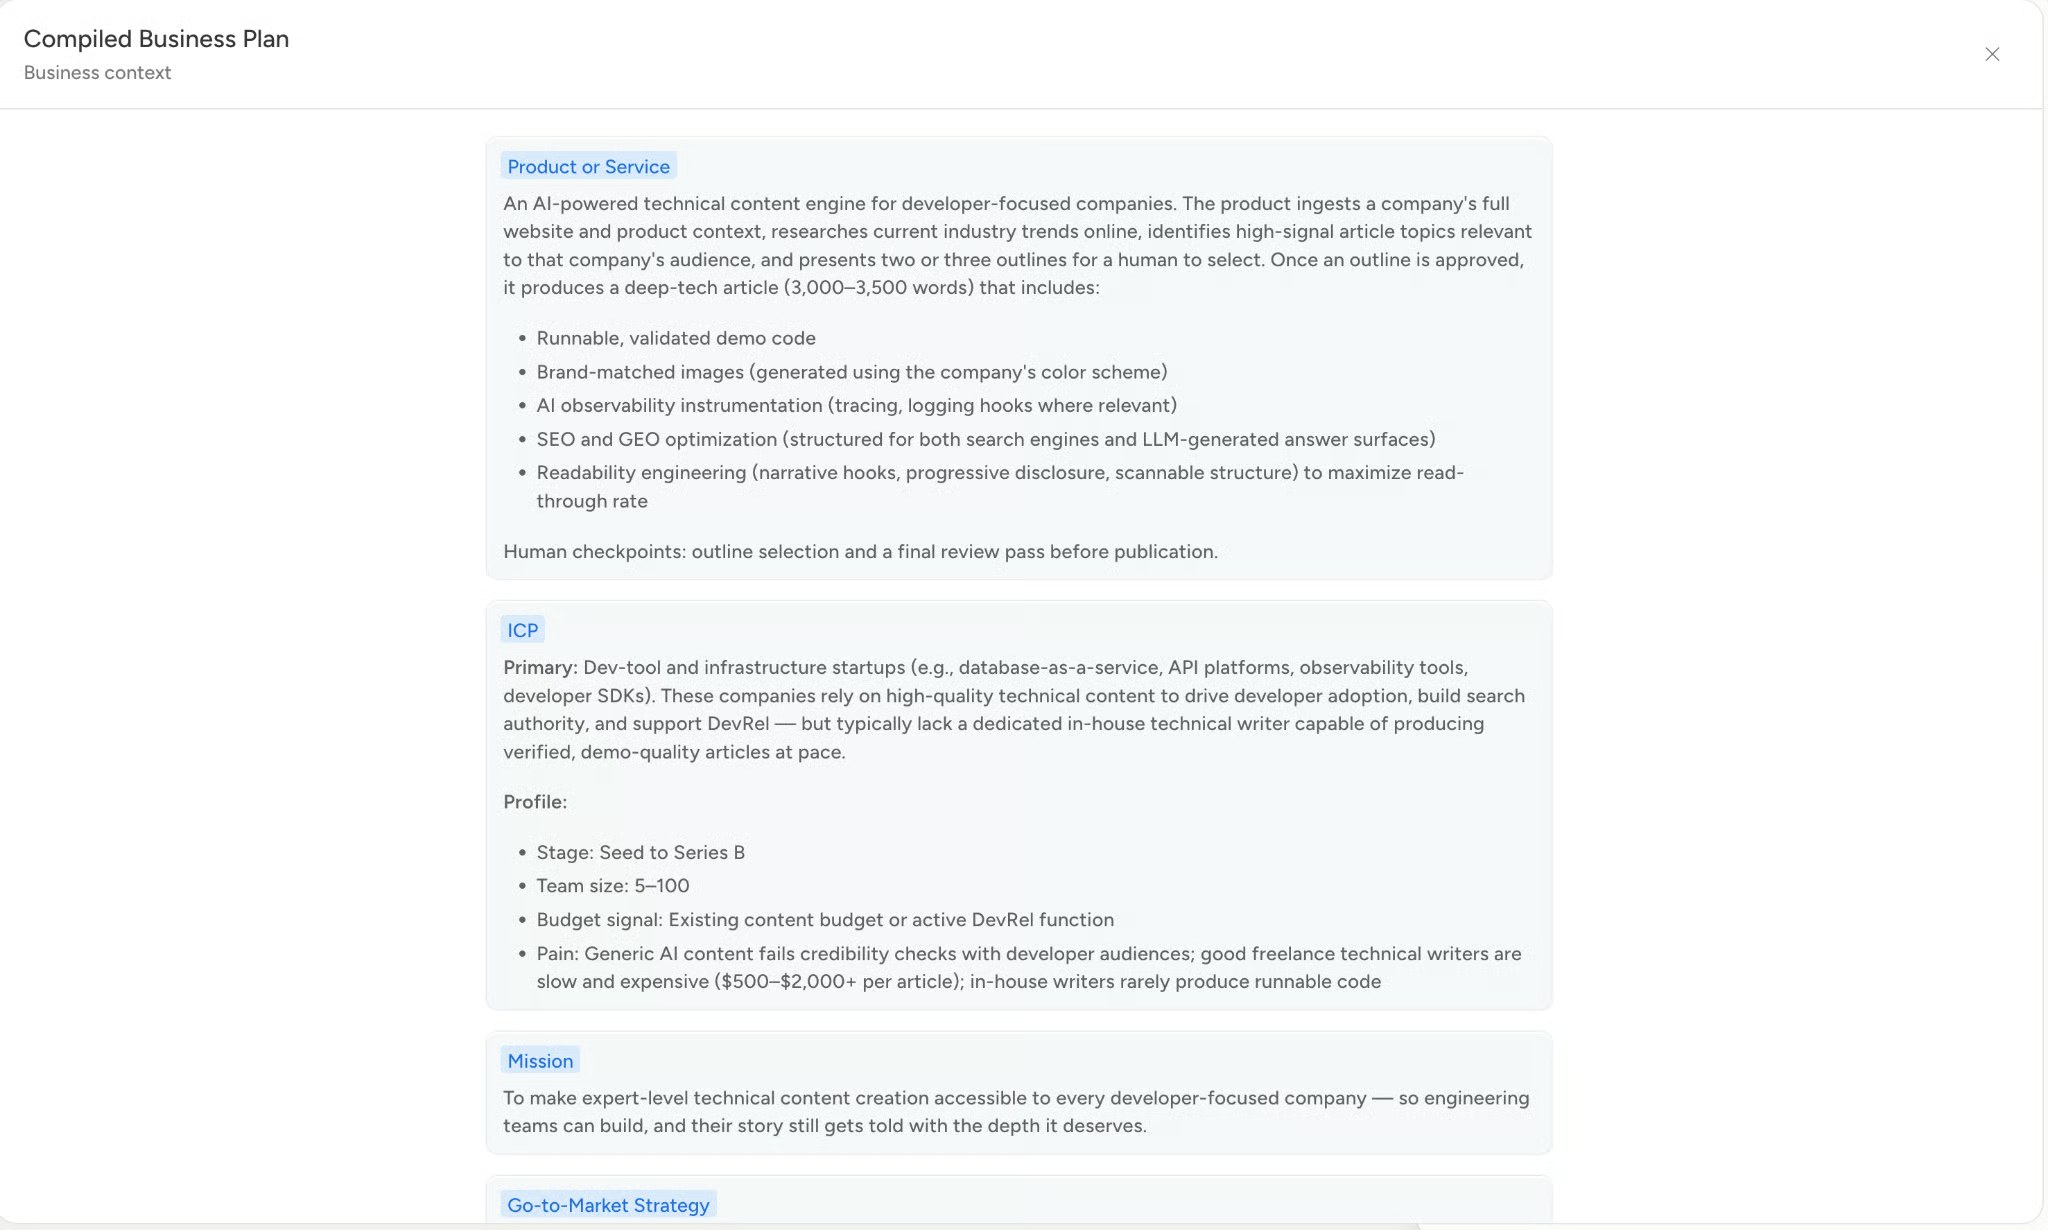
The goal at this stage is not to write code. It is to create a shared company context that flows into the brand kit, the engineering tasks, the marketing campaign, and the sales outreach in later steps.

In the next step, we will use the Design Agent, which Cofounder triggers automatically after the business plan to turn that context into a visual identity.

Step 2: Generating a Brand Kit with the Design Agent

After the business plan is accepted and departments are activated, Cofounder automatically surfaces a Design agent. It allows users to:

  • Select a foundational visual style
  • Generate the brand identity card
  • Review the output and accept it

I selected a Soft Pop theme characterized by warm gradients and friendly, rounded typography, and clicked Generate brand kit. The agent takes roughly two minutes and outputs a comprehensive Brand Identity Card covering color palettes, typography layout guidelines, UI component buttons, and sample logo marks. 

Note: You can also add your mood board references or design preferences, and it will render the brand kit accordingly. 

5.png

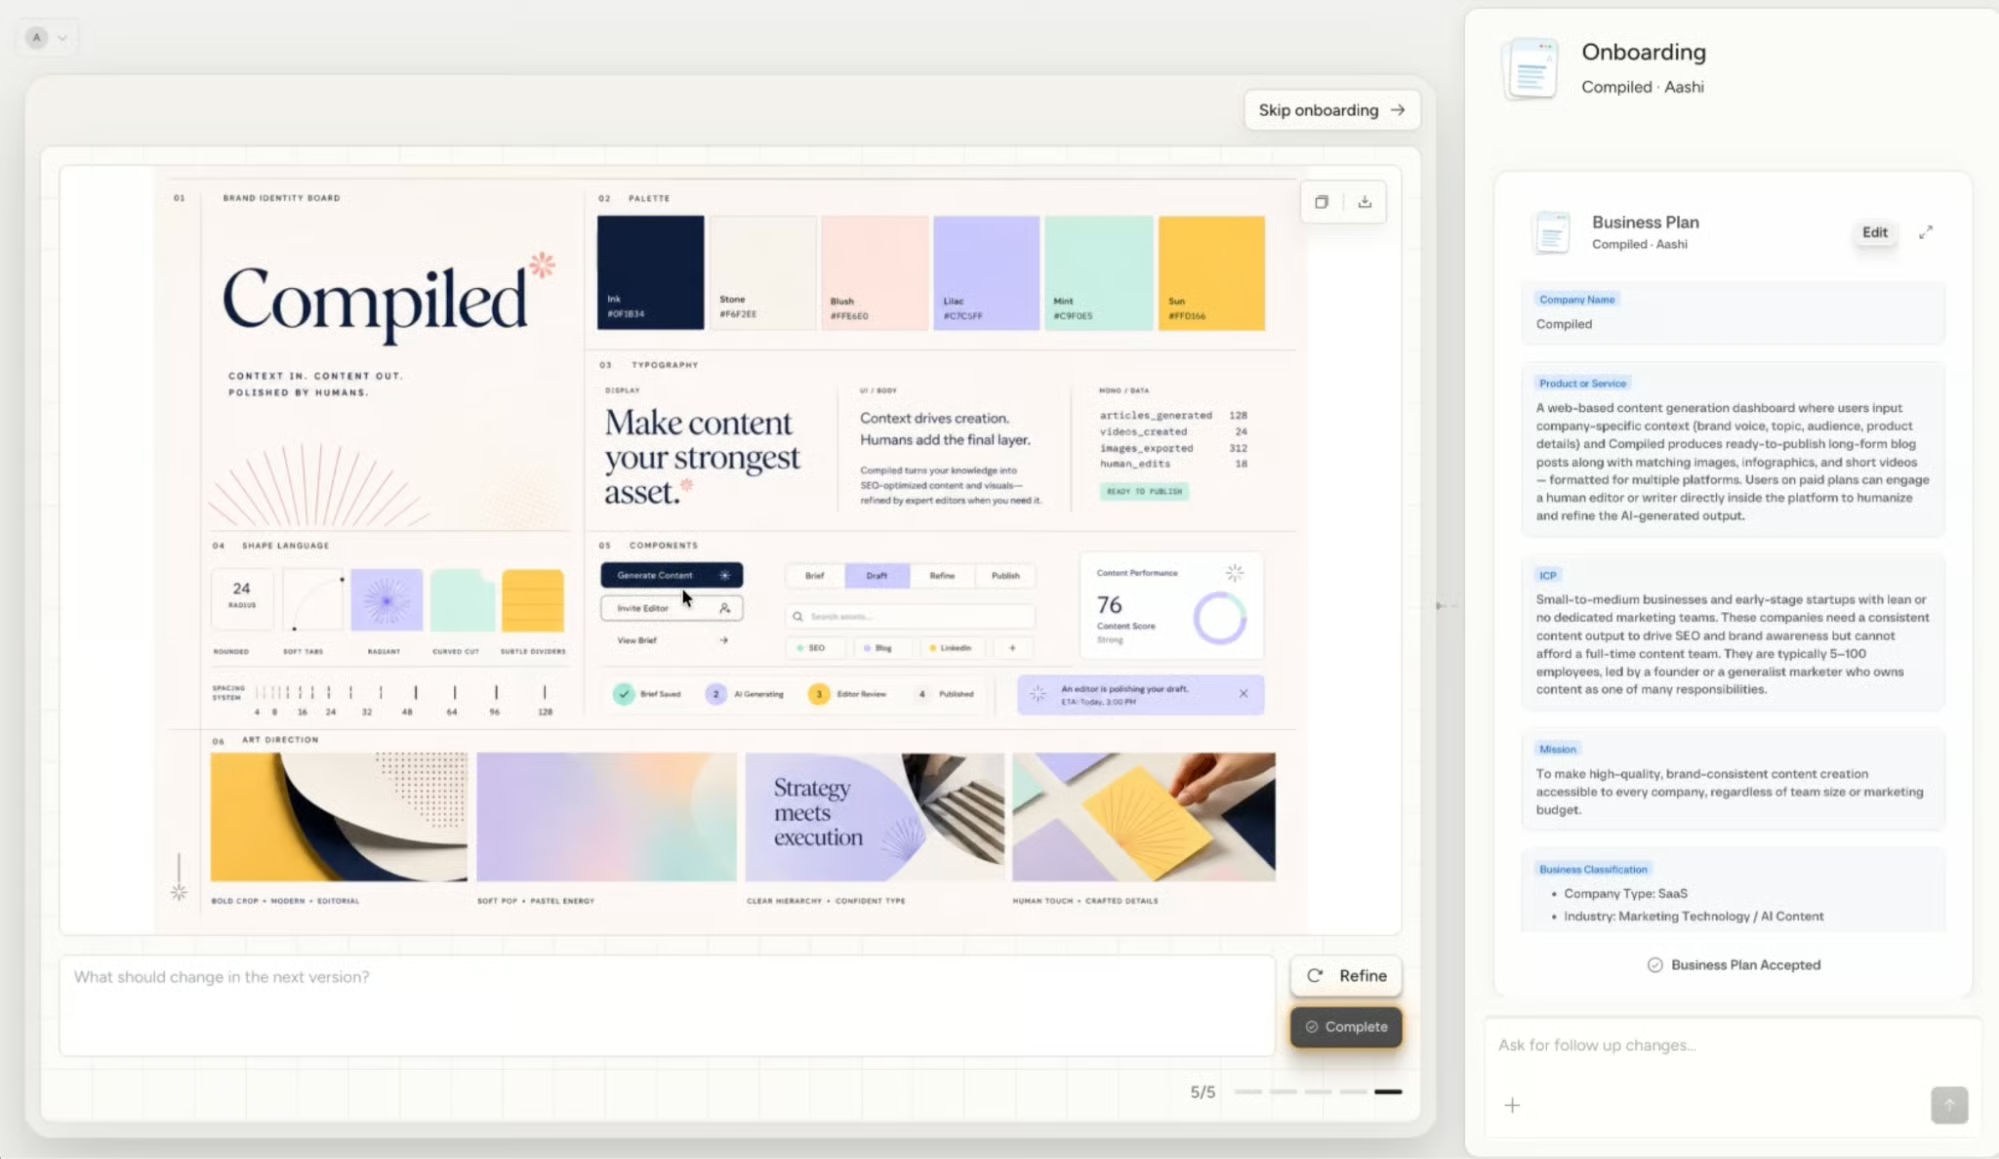
The brand identity card becomes a shared reference for every downstream agent. The Engineer Agent uses it for the marketing website, the Marketing Agent uses it for campaign assets, and the Design Agent can continue refining it as the product evolves. You can add more context via chat to make improvements and changes.

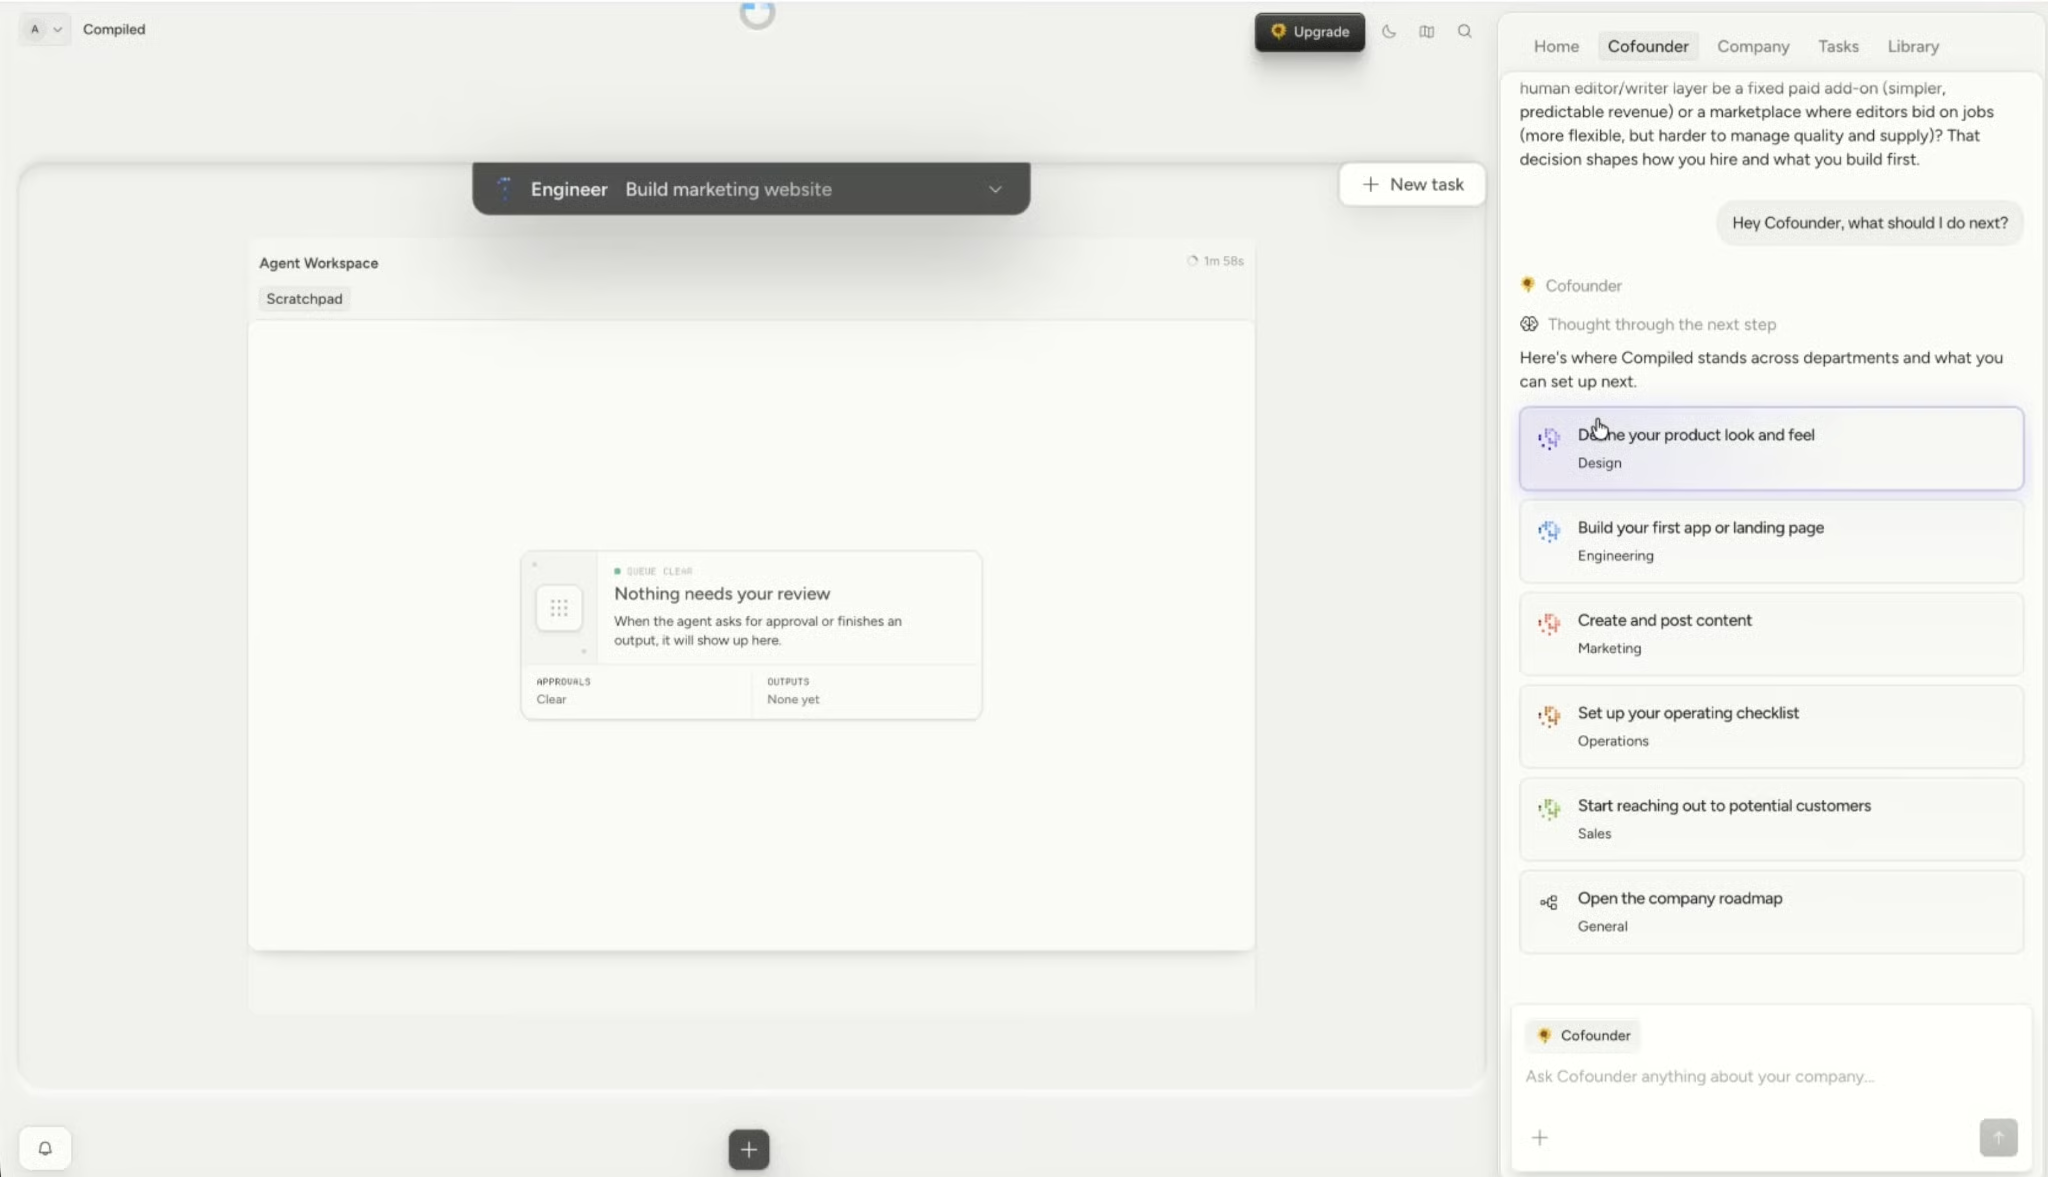
Next, we will launch the Engineer Agent to build the marketing website.

Step 3: Building a Marketing Website with the Engineer Agent

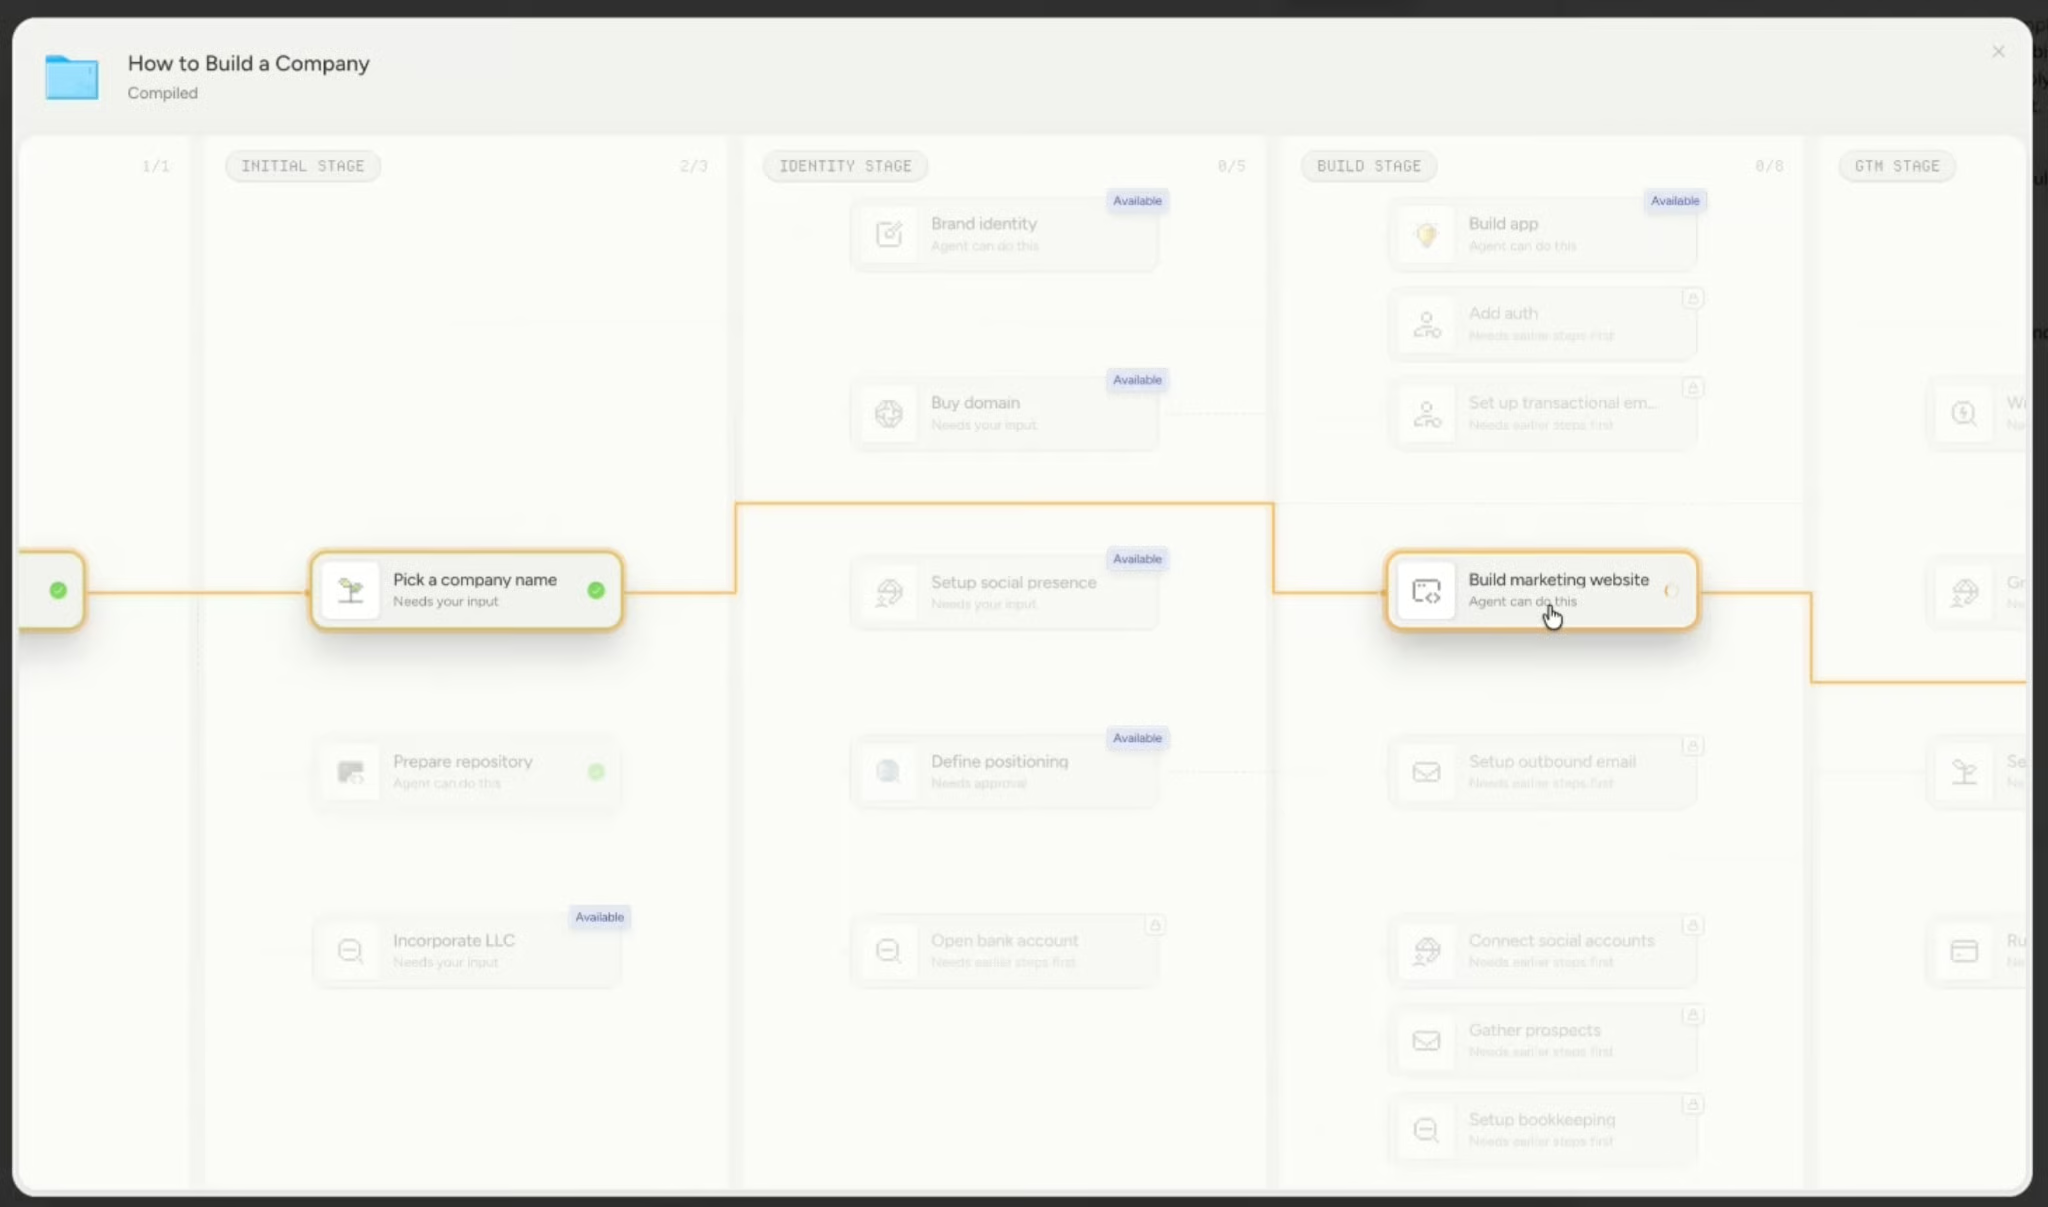
After the brand kit is accepted, the platform shows an interactive visual flowchart that categorizes company-building milestones across eight stages: 

Idea > Digital > Identity > Build > GTM > Launch > Scale > Mature 

Each stage contains task blocks covering everything from picking a company name and buying a domain to setting up Stripe, building the app, and running outbound.

In this step, we will:

  • Navigate the staged roadmap canvas
  • Launch the Engineer Agent on the marketing website task
  • Watch the agent inspect repositories and set up a local sandbox

Engineer agent

Task labels based on agent abilities

Each task block carries one of three labels:

  • Agent can do this: The agent completes it autonomously once you click Launch
  • Needs your input: This block requires user input. It mainly includes tasks like buying a domain, setting up a social presence, or picking a company name.
  • Needs earlier steps first: These blocks remain locked until prerequisite tasks are done. These may include adding auth, setting up transactional email, connecting social accounts, and gathering prospects.

This distinction is the core value of the roadmap. You do not need to manage a project board or figure out sequencing yourself; Cofounder does this for you. It shows what is done ready, what is blocked, and what you need to do.

Building a marketing website

Next, I clicked the Build marketing website task block marked as Agent can do this and clicked Launch Agent.

Cofounder task blocks

The right-hand panel showed a live task tracker as the Engineer Agent began executing, inspecting the marketing GitHub repository, parsing the directory structure, reading project dependencies, and initializing the sandbox environment.

The task tracker shows the agent doing real infrastructure work against an actual GitHub repository, not generating static suggestions. When you run this yourself, give the agent time to finish before reviewing. A strong prompt to start with can be:

Build the first marketing website for Compiled.
Goal: A landing page that explains what Compiled does and encourages visitors
to join the waitlist.

Sections: Hero, Problem, How it works, Example outputs, Who it is for,
Pricing teaser, FAQ, Waitlist CTA.

Brand: Use the approved Compiled brand kit.

Technical constraints:
- Use the managed marketing repository
- Spin up a local preview at localhost:3000
- Open a pull request once the preview is ready
- Include test notes and manual review steps

Once the agent finishes, open the local preview, test the waitlist form submission, check responsiveness, and verify the visual output against the brand kit before approving the pull request. Finally, click Publish.

Using the Agents to Get Further

With the marketing website underway, the natural next task on the roadmap is building the core product. The Engineer Agent can handle this the same way. You can give it a concrete prompt covering expected user behavior, database requirements, authentication, and a feature flag. 

It will then produce app code, migrations, a preview, and a pull request for your review. Follow-up tasks like Stripe checkout, a content type selector, and usage tracking can each be launched as separate agent tasks once the MVP foundation is stable.

Meanwhile, the Marketing Agent can generate a full launch campaign including positioning, homepage copy, LinkedIn and X posts, a Product Hunt description, an email announcement, and an SEO brief. 

The Sales Agent can define your first ICP, produce target account examples, and draft cold outreach and LinkedIn DMs. One important habit to build early: always include "do not send yet" in any outreach prompt. 

Beyond that, the roadmap surfaces tasks like: 

  • Buying a domain
  • Connecting social accounts
  • Setting up transactional email
  • Gathering prospects
  • Setting up bookkeeping

Each task is labeled as agent-ready or user-input, so you always know what you can hand off and what needs your attention. 

Final Thoughts

This tutorial covered the core of what Cofounder 2 can do: turning a rough idea into a structured business plan, a brand identity, and a working marketing website, all without switching between a dozen tools or managing a project board yourself.

What makes the platform interesting isn't that it has agents, since that's getting more common these days. It's the operating model underneath: departments with shared company context, managed infrastructure, and review workflows that hand you control of anything high-stakes before it ships. The roadmap does the sequencing work for you, surfacing what's ready to launch, what's blocked, and what still needs a human decision.

Cofounder won't replace your judgment as a founder. You still need to define the product, review outputs, and talk to customers. But it removes a lot of the operational friction that usually sits between an idea and the first version of it in the world. For a solo founder, that gap is often where momentum dies.

Cofounder 2 FAQs

What is Cofounder 2?

Cofounder 2 is an agent orchestration platform for running a company with AI agents. It organizes company work into departments such as Engineering, Sales, Marketing, Design, Support, Operations, Finance, and Legal, with specialized agents in each.

Can Cofounder 2 build an app?

Yes. The Engineer Agent can work on product code, app changes, debugging, tests, migrations, previews, and pull requests using Cofounder's managed GitHub and Vercel infrastructure.

What infrastructure does Cofounder 2 manage?

Cofounder's managed stack centers on GitHub, Vercel, and Supabase. It also supports Postmark for transactional email when the required email provider and domain configuration are in place.

Can I bring my own API key to Cofounder 2?

No. Cofounder currently does not support bringing your own API key, Codex subscription, or Claude Code subscription.

How much does Cofounder cost?

The Free Trial includes 7 days of Cofounder Pro and $10 in usage. Cofounder Pro starts at $20/month. The Team Plan is coming soon at $50/month usage included. Usage-based billing applies above the included amounts.


Aashi Dutt's photo
Author
Aashi Dutt
LinkedIn
Twitter

I am a Google Developers Expert in ML(Gen AI), a Kaggle 3x Expert, and a Women Techmakers Ambassador with 3+ years of experience in tech. I co-founded a health-tech startup in 2020 and am pursuing a master's in computer science at Georgia Tech, specializing in machine learning.

Topics

Learn Agentic AI with DataCamp!

Track

AI Agent Fundamentals

6 hr
Discover how AI agents can change how you work and deliver value for your organization!
See DetailsRight Arrow
Start Course
See MoreRight Arrow
Related

blog

AI in Decision-Making: Transform Your Business Strategy

Discover how AI is revolutionizing the way companies make their decisions and plan their business strategies.
Javier Canales Luna's photo

Javier Canales Luna

9 min

blog

OpenAI Frontier Explained: The Shift to Enterprise AI Agents

Explore OpenAI Frontier and the shift to AI coworkers. Learn how the platform integrates LLM agents into core enterprise workflows to scale AI infrastructure.
François Aubry's photo

François Aubry

10 min

Tutorial

OpenAI Agents SDK Tutorial: Building AI Systems That Take Action

Learn how to build intelligent AI applications with OpenAI's Agents SDK. This comprehensive guide covers creating agents, implementing tools, structured outputs, and coordinating multiple agents.
Bex Tuychiev's photo

Bex Tuychiev

Tutorial

Microsoft Copilot Studio: A Guide to Building Enterprise AI Agents

Learn how to build and deploy powerful AI agents in Microsoft Copilot Studio. Answer questions using RAG, SharePoint integration, LLM reasoning, and tool calls.
Josep Ferrer's photo

Josep Ferrer

Tutorial

Claude Cowork Tutorial: How to Use Anthropic's AI Desktop Agent

Learn what Claude Cowork is and how to use for file organization, document generation, and browser automation. Hands-on tutorial with real examples and limitations.
Bex Tuychiev's photo

Bex Tuychiev

Tutorial

Botpress Tutorial: Build and Deploy AI Chatbots

Learn how to build, deploy, and optimize AI chatbots using Botpress. This hands-on tutorial covers everything from setup to advanced workflows, integrations, and real-world applications.
Khalid Abdelaty's photo

Khalid Abdelaty

See MoreSee More