Course
Amazon DynamoDB is one of the most reliable and widely used NoSQL databases in the market. Migrating data from DynamoDB to Amazon Redshift is of considerable merit in gaining a greater understanding of the data stored in DynamoDB.
In this tutorial, I cover three methods for migrating data from DynamoDB to Redshift, offering step-by-step instructions for each approach. I will also delve into best practices for ensuring data integrity and discuss strategies for optimizing performance.
What Is DynamoDB?
DynamoDB is a fully managed serverless NoSQL database offered by AWS, designed to deliver high performance and seamless scalability. It excels at handling transactional workloads, supporting tables with terabytes of data while processing billions of requests per day.
Due to its tremendous capabilities, DynamoDB is integral in the finance, e-commerce, healthcare, media, and gaming sectors. It is often used to build and maintain user profile leaderboards, store and process IoT data, and other applications that require real-time data access.
If you’re interested in these types of databases, the NoSQL Concepts course teaches you about four popular NoSQL engines—including Redis, MongoDB, Apache Cassandra, and Neo4j.
What Is Redshift?
Redshift is AWS's fully managed cloud data warehouse, designed to handle large-scale data processing efficiently and quickly.
Leveraging Massively Parallel Processing (MPP) technology, Redshift can distribute and process high volumes of data across multiple nodes, enabling fast execution on complex SQL queries.
Furthermore, queries on Redshift are much more cost-effective than those in traditional data warehouses. Redshift’s analytical capabilities are integral to various use cases, including big data analytics, real-time dashboards, and machine learning applications.
Check the Introduction to Redshift course for a deeper understanding of this potent data warehouse.
Understanding the Use Case: Why Move Data from DynamoDB to Redshift?
While it is clear that DynamoDB excels at handling transactional workloads typical of Online Transaction Processing (OLTP) systems, it is not optimized for complex analytics. On the other hand, Redshift is specifically designed for Online Analytical Processing (OLAP) systems and is far more suited for this role.
As such, by migrating data from DynamoDB to Redshift, AWS users can perform advanced SQL-based analytics to gain deeper insights into their data.
Become a Data Engineer
Prerequisites and Setup
This tutorial assumes the participants have the following:
- Prior experience with AWS and other related tools and techniques.
- A foundational understanding of relational and NoSQL databases.
- Familiarity with SQL.
- Knowing at least one programming language would be beneficial.
The methods of data migration will incorporate a few core AWS services, including:
- Identity and Access Management (IAM)
- DynamoDB
- Redshift
- S3
- Glue
- Lambda
The AWS Cloud Technology and Services course should help you get started if you're new to AWS.
Most of the procedure will be carried out in the AWS Management console. However, the steps covered in the tutorial can also be executed with the AWS command line interface (CLI) or an AWS software development kit (SDK). You can perform the data migration in your chosen working environment.
Preparing DynamoDB for data migration
When preparing for data migration, it is important to consider the components of DynamoDB tables and how they differ from those of relational databases:
- The building blocks of DynamoDB tables are items (similar to rows in relational databases).
- The items contain one or many attributes, each representing one data element.
- Like relational tables, DynamoDB tables have primary keys, which serve as unique identifiers for each item. A primary key can consist of a single partition key or a combination of a partition key and a sort key.
- A key feature of DynamoDB tables is that they are schemaless, meaning each item can have unique attributes.
The tutorial will use a simple Products table to demonstrate the data migration. The following is the data in JSON format:
	{
    	"product_id": "P001",
    	"category": "Electronics",
    	"price": 700,
    	"product_name": "Phone"
	},
	{
    	"product_id": "P002",
    	"category": "Electronics",
    	"description": "The laptop is a Macbook.",
    	"price": 1000,
    	"product_name": "Laptop"
	}
There are two important facts to note:
- The
product_idwill serve as the primary key. - The attributes in the two items are unequal since the first item is missing the
descriptionattribute.
This data is added to a table in DynamoDB as part of the setup.

DynamoDB table items. Image by author
Setting up Amazon Redshift
The next step is to set up a table in Redshift that will receive the data in the DynamoDB table.
1. Go to the Redshift console and select “Create cluster.”
AWS allows users to define various parameters before spinning up the cluster. For the tutorial, the emphasis will be placed on the ones needed to facilitate the data migration.

Creating a Redshift cluster in the Redshift Console. Image by author
2. Select the node type and number of nodes that suit the volume of data that will be analyzed.
For migrating the Products table, you can utilize minimal CPU capacity and have only one node.
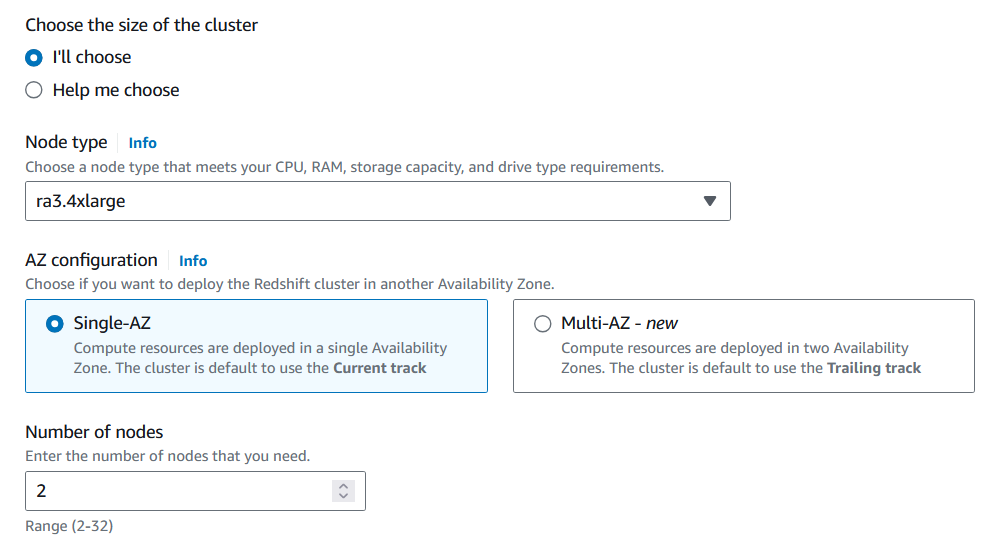
Customizing the Redshift cluster configuration. Image by author
3. Choose the admin username and password for this cluster.
Store the credentials in a safe place, since they will be needed to access this cluster via other AWS services.
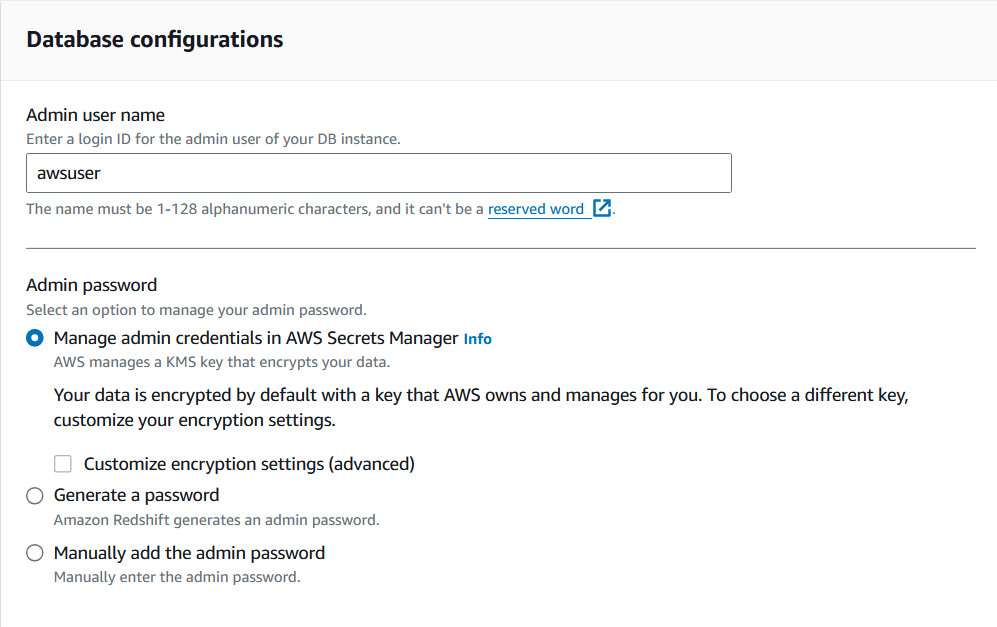
Customizing the Redshift cluster configuration. Image by author
4. Finally, assign an IAM role to the cluster.
The IAM role will need policies that allow the cluster to read DynamoDB tables and create tables in Redshift.

Assigning an IAM role to the Redshift cluster. Image by author
5. Once the cluster is created, go to the query editor and create the table that will house the data from the DynamoDB table using the CREATE command:
CREATE TABLE Products (
	product_id VARCHAR(50) PRIMARY KEY,
	category VARCHAR(50),
	description VARCHAR(100),
	price INT,
	product_name VARCHAR(50),
	stock_quantity INT
);
Modify the command above based on the data of interest and consider additional constraints that may need to be applied.
That’s it! You’re ready to start transferring data.
Method 1: Transferring Data from DynamoDB to Redshift Using the COPY Command
Amazon Redshift offers the COPY command, which inputs data from a given AWS data source to a table.
1. Execute the data migration using the COPY command.
The syntax of the command is as follows:
COPY <table_name>
FROM <dynamo_db_table_path>
IAM_ROLE 'arn:aws:iam::<aws-account-id>:role/<role-name>'
REGION <region_name>';
To add data from the Products table in DynamoDB to the Products table in Redshift, the command can be altered to the following:
COPY Products
FROM 'dynamodb://Products'
IAM_ROLE  'arn:aws:iam::<1234567890>:role/<dynamo_db_redshift_role>'
REGION ‘us-east-1’
Pros of using the COPY command
The COPY command is one of the most straightforward methods for moving data from DynamoDB to Redshift. It requires minimal setup, and its ease of use makes it particularly accessible to those with less experience building ETL pipelines.
Furthermore, since the data transfer is done directly, there is no need to incorporate other AWS services.
Cons of using the COPY command
The main drawback of this method is that users can not configure how the attributes in the DynamoDB table are mapped to the fields in the Redshift table. This lack of flexibility makes it possible for the COPY command to erroneously omit or inaccurately map fields in the Redshift table.
In addition, since the command transfers all of the data in one batch, this operation can be inefficient if some records have already been transferred to Redshift beforehand. This approach would yield redundant data transfers for such scenarios, increasing processing time and storage costs.
Method 2: Transferring Data from DynamoDB to Redshift Using AWS Glue
AWS Glue is a service designed for creating extract, transform, and load (ETL) pipelines. Users can transfer data from DynamoDB to Redshift by creating an ETL job.
If you’re new to Glue, consider following the Getting Started with AWS Glue tutorial.
In this guide, we will read the Products table in DynamoDB, store the results in an S3 bucket as a CSV file, and then send that data to the Products table in Redshift.
1. Go to the S3 console and create a bucket to house the CSV file.

AWS S3 console. Image by author
2. Navigate to the AWS Glue console, and from the left-hand panel, select “ETL jobs” to begin creating your job.

AWS Glue console. Image by author
3. Select the mode for creating an ETL job.
AWS offers three job creation modes: Visual ETL, Notebook, and Script editor. Each mode caters to different levels of expertise, allowing users to choose their preferred method—whether it's a drag-and-drop interface (Visual ETL), an interactive development environment (Notebook), or raw coding (Script Editor).
Glue jobs can be coded manually using Python or Spark. For those with less proficiency in these languages, Visual ETL is a fitting choice as it allows users to configure their jobs by clicking alone.
The Glue job in this tutorial will be written in a code editor in Python, but for those interested in the Visual ETL option, check out the AWS documentation.
4. Assign an IAM role to this job.
The IAM role will need access to DynamoDB, Redshift, and S3 for this tutorial to run successfully.
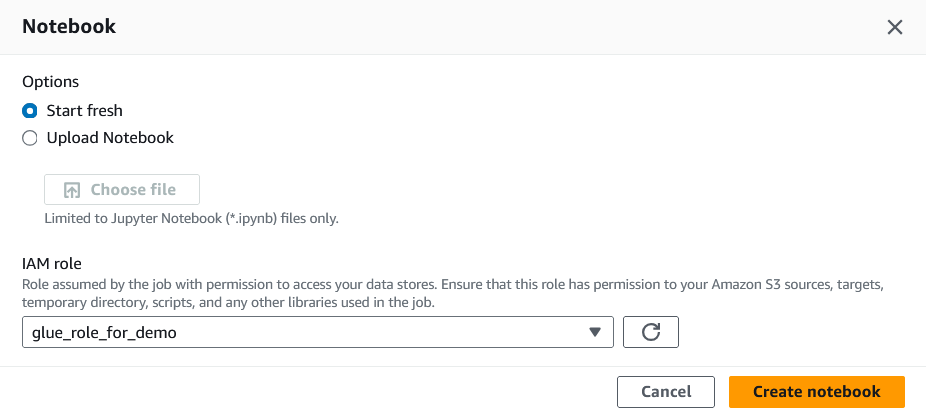
Assigning an IAM role to the Glue job. Image by author
5. After creating the job, switch to the “Job details” tab and fill in the basic properties.
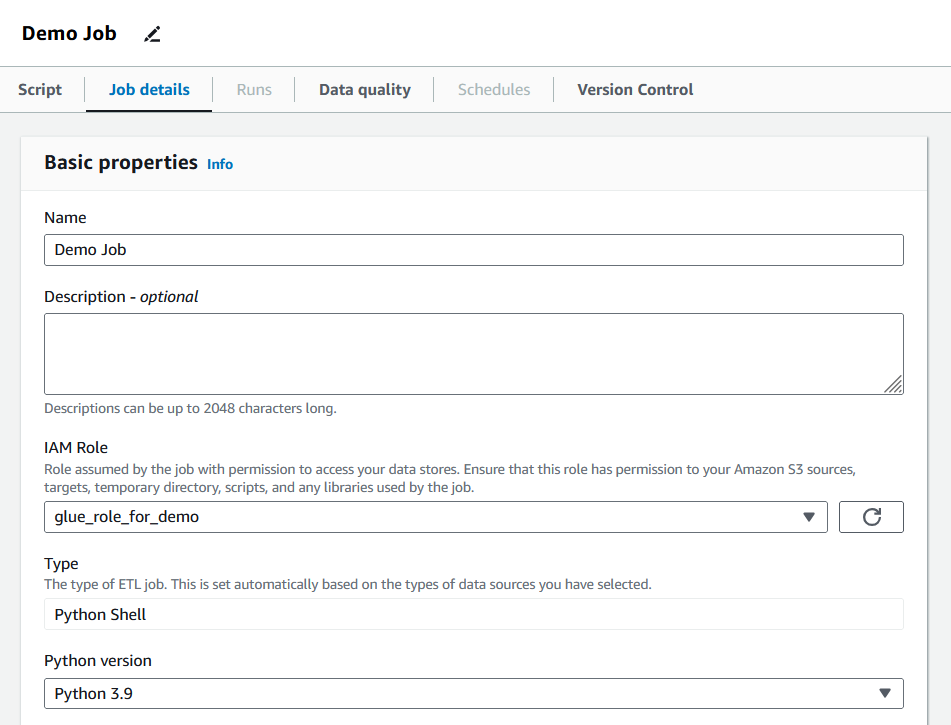
Filling Glue job details. Image by author
In this section, users can define the allocated data processing units (DPUs), the number of retries, and the timeout period for the job. The job for this tutorial will retain the default values, but it is recommended that users tweak these parameters to match the needs of the given job.
6. Switch to the “Script” tab and write your logic.
The ETL job that migrates the data in the Products table will execute the following code:
import boto3
import csv
import time
import os
from awsglue.context import GlueContext
from awsglue.job import Job
from pyspark.context import SparkContext
from awsglue.utils import getResolvedOptions
import sys
# initialize Glue context
args = getResolvedOptions(sys.argv, ["JOB_NAME"])
sc = SparkContext()
glueContext = GlueContext(sc)
job = Job(glueContext)
job.init(args["JOB_NAME"], args)
# initialize DynamoDB client and scan the table
dynamodb = boto3.client('dynamodb', region_name=os.getenv('AWS_REGION'))
response = dynamodb.scan(TableName=os.getenv('DYNAMODB_TABLE'))
# extract and write data to a CSV file
items = response['Items']
csv_file = '/tmp/products.csv'
# write each row in the table
with open(csv_file, mode='w', newline='') as file:
	writer = csv.writer(file)
	writer.writerow(['product_id', 'category', 'description', 'product_name', 'stock_quantity', 'price'])
	for item in items:
    	writer.writerow([
        	item.get('product_id', {}).get('S', ''),
        	item.get('category', {}).get('S', ''),
        	item.get('description', {}).get('S', ''),
        	item.get('product_name', {}).get('S', ''),
        	item.get('stock_quantity', {}).get('N', 0),
        	item.get('price', {}).get('N', 0)
    	])
# upload the csv file to S3
s3 = boto3.client('s3', region_name=os.getenv('AWS_REGION'))
bucket_name = os.getenv('S3_BUCKET_NAME')
s3_key = 'products/products.csv'
s3.upload_file(csv_file, bucket_name, s3_key)
# wait for the file to upload before continuing
time.sleep(10)
# load data into Redshift using the COPY command
redshift = boto3.client('redshift', region_name=os.getenv('AWS_REGION'))
copy_command = f"""
	COPY Products FROM 's3://{bucket_name}/{s3_key}'
	IAM_ROLE 'arn:aws:iam::{os.getenv('AWS_ACCOUNT_ID')}:role/{os.getenv('REDSHIFT_ROLE')}'
	FORMAT AS CSV
	IGNOREHEADER 1;
"""
cluster_id = os.getenv('REDSHIFT_CLUSTER_ID')
database = os.getenv('REDSHIFT_DATABASE')
db_user = os.getenv('REDSHIFT_DB_USER')
# execute the copy statement
response = redshift.execute_statement(
	ClusterIdentifier=cluster_id,
	Database=database,
	DbUser=db_user,
	Sql=copy_command
)
# Commit the job
job.commit()
Let's break down what this script accomplishes step by step:
- Use the
awsgluelibrary to set up the job for execution - Access the DynamoDB table with
boto3, the Python SDK for AWS - Write the table items in memory and export it as a CSV file to the created S3 bucket
- Access the Redshift cluster with
boto3 - Write and execute a
COPYcommand that inserts the data in the CSV file to the Redshift table
Note: The sample code snippet outlines one way to facilitate the data migration. AWS Glue promotes flexibility, offering multiple ways to build an ETL pipeline. Thus, users can create a job specifically tailored to their needs.
7. Once the code is written, save the changes and click the “Run” button to execute the job.

Script editor for the Glue job. Image by author
8. Monitor the job's progress in the “Runs” tab, where any errors or issues will be displayed.
Verify the job's status and review the logs to ensure everything executed as expected.

AWS Glue Runs tab showing a completed job. Image by author
Once the job is successful, it can run on demand or be scheduled as needed, making your data migration process more efficient and automated.
Pros of using Glue
AWS Glue offers extensive customization options, enabling users to tailor their jobs to meet their needs. It also offers to schedule these jobs at periodic intervals (e.g., daily), enabling automation. Furthermore, Glue is integrated with many other services, facilitating interactions with data sources other than DynamoDB if needed.
Cons of using Glue
Configuring an ETL job in Glue often demands effort and setup time. Although programming knowledge is not mandatory for using this service, it would be necessary to leverage certain features offered by Glue, such as the AWSGlue library and an SDK.
Moreover, Glue jobs are unlikely to run successfully on the first attempt, so users should be prepared to spend time troubleshooting. Lastly, Glue jobs can quickly accumulate costs if not managed properly, making it essential to only provision the needed resources.
Method 3: Transferring Data from DynamoDB to Redshift Using DynamoDB Streams
DynamoDB Streams is a feature that tracks changes made to the DynamoDB tables in real time. By leveraging DynamoDB Streams, users can automatically update their Redshift table whenever a change is made to the data source in DynamoDB.
Read the AWS documentation for more information on how to use DynamoDB Streams.
This solution will require access to AWS DynamoDB, Redshift, and Lambda. In this approach, a Lambda function will be triggered when an item is added or modified in the Products table in DynamoDB.
Here are the steps:
1. Go to the Lambda console and select “Create Function.”

AWS Lamba console. Image by author
2. Provide the basic information for the function, including the programming language and the IAM role.
The role must have access to Lambda, DynamoDB, and Redshift.
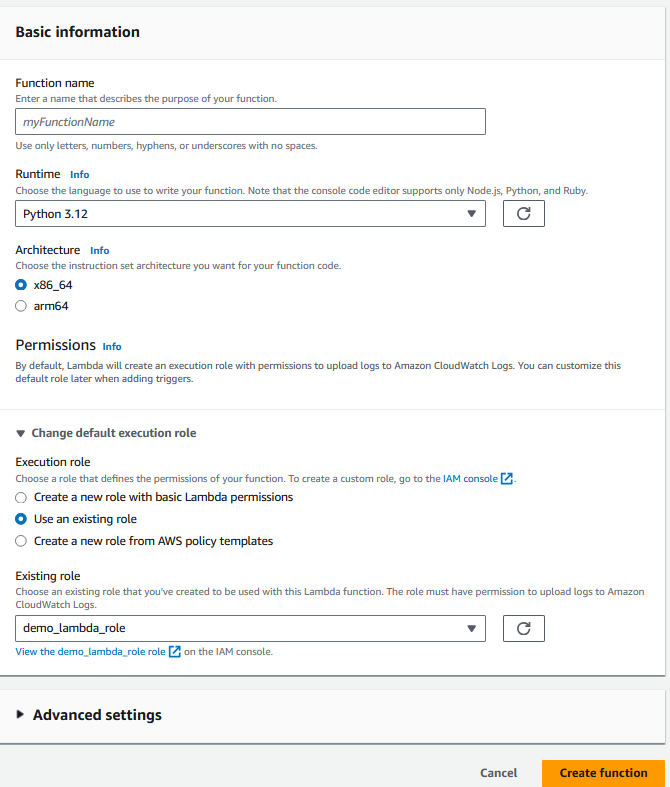
Configuring the Lambda function. Image by author
3. After creating the function, add the DynamoDB table (the Products table in our case) as a trigger.
The diagram should now look like the following:

Adding a trigger to the Lambda function. Image by author
4. Switch to the configuration tab and allocate the required amount of memory and run time for the function as the default values are often insufficient.

Configuring the trigger for the Lambda function. Image by author
5. In the “Code” tab, write the logic for the data migration in the language of your choosing.
The following snippet is an example of what a Lambda function in Python can look like:
import boto3
import os
import json
def lambda_handler(event, context):
	# Initialize the Redshift Data API client
	redshift_client = boto3.client('redshift-data')
	# Redshift cluster details
	cluster_id = os.environ['REDSHIFT_CLUSTER_ID']
	database = os.environ['REDSHIFT_DB_NAME']
	user = os.environ['REDSHIFT_USER']
	# IAM role ARN that has access to Redshift Data API
	role_arn = os.environ['REDSHIFT_ROLE_ARN']

	# Process DynamoDB stream records
	for record in event['Records']:
    	if record['eventName'] in ['INSERT', 'MODIFY']:
        	new_image = record['dynamodb']['NewImage']
        	product_id = new_image['product_id']['S']
        	category = new_image['category']['S']
        	description = new_image['description']['S']
        	price = float(new_image['price']['N'])
        	product_name = new_image['product_name']['S']
        	stock_quantity = int(new_image['stock_quantity']['N'])

        	# SQL query to insert data into Redshift
        	query = f"""
            	INSERT INTO products (product_id, category, description, price, product_name,   stock_quantity)
            	VALUES ('{product_id}', '{category}', '{description}', {price}, '{product_name}', {stock_quantity});
        	"""

        	# Execute the query using Redshift Data API
        	response = redshift_client.execute_statement(
            	ClusterIdentifier=cluster_id,
            	Database=database,
            	DbUser=user,
            	Sql=query
        	)

        	# Log the statement ID for tracking
        	print(f'Started SQL statement with ID: {response["Id"]}')

	return {
    	'statusCode': 200,
    	'body': 'SQL statements executed successfully'
	}
In simple terms, the function reads the log of added or modified items recorded by DynamoDB Streams and applies them to the Redshift table by executing a SQL query with a Redshift API client.
For security, key values (e.g., the Redshift cluster id) are stored in environmental variables instead of being hard coded in the script.
Learn more about using environmental variables in Lambda in the AWS documentation.
6. After finishing the code, deploy the function and test it to check for any errors.
Depending on the use case, it would be worth designing your own test cases for the function.
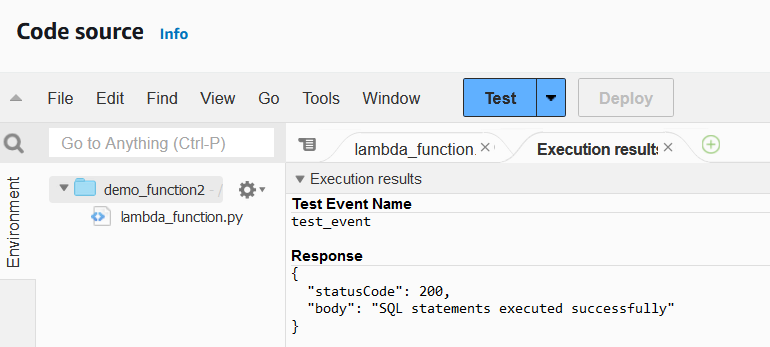
Lambda function executing results. Image by author
When the Lambda function is operational, we need to configure the DynamoDB table to run this function whenever an item in the table is added or modified.
7. Select the DynamoDB table and switch to the “Exports and streams” tab.

DynamoDB console Exports and streams tab. Image by author
8. Scroll down to DynamoDB stream details and select “Turn on.”

DynamoDB console Exports and streams tab. Image by author
9. When prompted, select the type of information that should be recorded in the DynamoDB Streams.
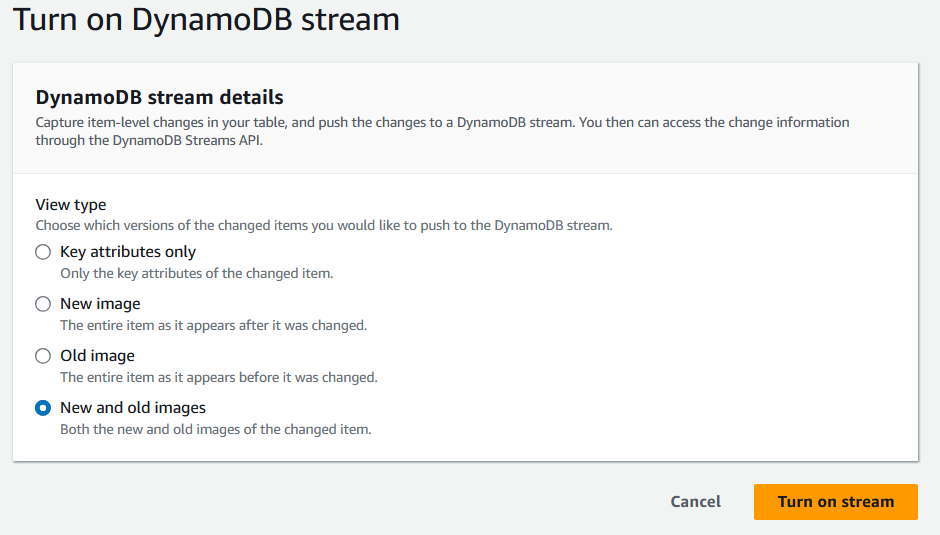
DynamoDB stream details screen. Image by author
10. After turning on the stream, scroll down on the same page to create the trigger.
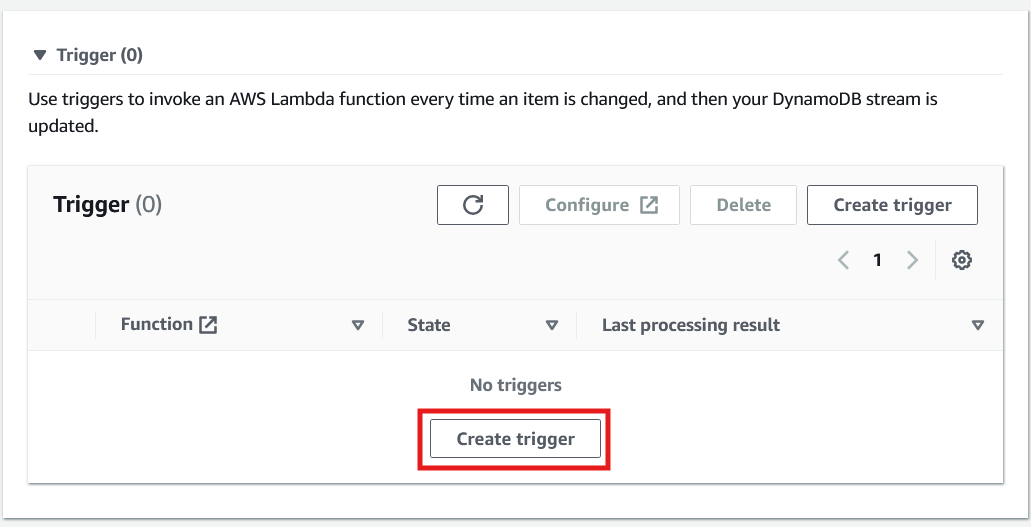
Creating a trigger to invoke a Lambda function in DynamoDB. Image by author
11. Finally, when configuring the trigger, select the Lambda function that has been created before selecting “Create trigger.”
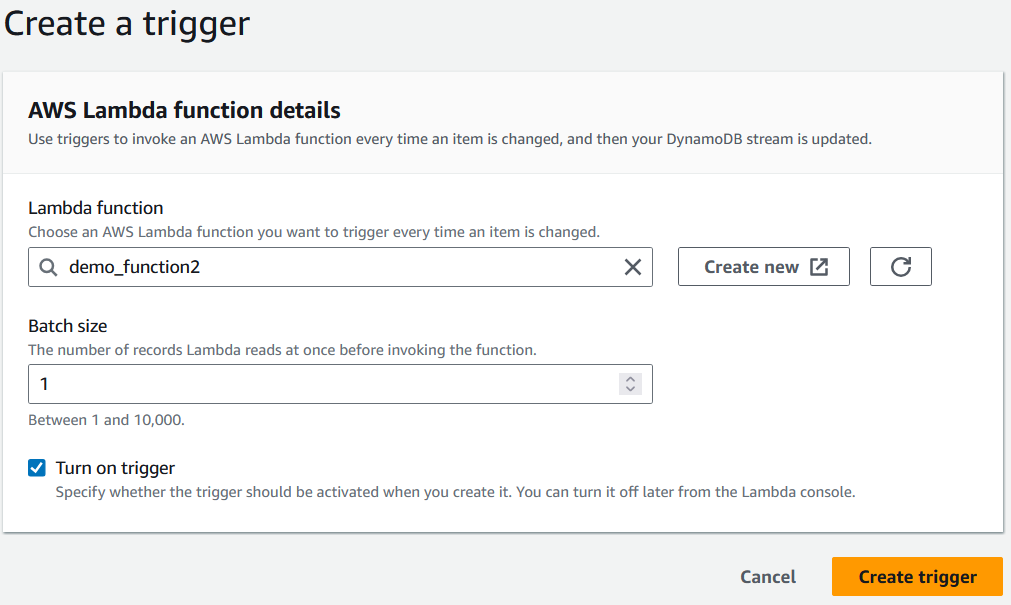
Selecting a Lambda function to trigger. Image by author
Implementing this solution will automatically apply any changes made to the DynamoDB table to the table in Redshift, ensuring real-time data consistency.
Pros of using DynamoDB Streams
DynamoDB streams create real-time synchronization between DynamoDB and Redshift. This allows users to keep their Redshift tables up to date without manual intervention.
Thus, Redshift tables can be updated frequently, which can, in turn, power applications that require high data throughput (e.g., real-time dashboards). This solution also reduces the risk of human error in each iteration.
Cons of using DynamoDB Streams
Setting up this solution requires configuring a number of AWS services, which can be time-consuming.
Since Lambda is a Function as a Service (FaaS) tool, users will need a strong grasp of one programming language. Moreover, since each iteration of data synchronization requires a number of API calls, the overall cost can accumulate quickly, especially with frequent updates. Finally, this solution is more viable for smaller changes to Redshift tables than full-table migrations.
Verifying Data Migration
Data validation is an essential step after building the data migration solution. Even when the AWS services run without issue, there could still be errors in the migration process that are unaccounted for. These issues can stem from logical discrepancies, incorrect mapping of attributes, or incomplete data transfers.
The migrated data must be free of any of these errors in order for any subsequent analyses in Redshift to be successful.
This section explores some checks and techniques for examining migrated data, using the Products table as an example.
Validate column structure and data type
Ensure that all of the columns in the DynamoDB table are present in the Redshift table and that they have been assigned the correct data types.
SELECT column_name, data_type
FROM information_schema.columns
WHERE table_name = Products;
Verify the row count
Confirm that the data transfer has been completed by comparing the count of rows in the Redshift table to that of the data source.
SELECT COUNT(*) FROM your_table_name;Preview the data
An alternative to identifying the columns and data types would be to simply preview the data. Users can skim the preview to spot any discrepancies or anomalies.
SELECT product_id, category, price FROM your_table_name LIMIT 5;Validate complex business logic
Validating data by creating previews or performing counts is not sufficient for all datasets. When there is a need to evaluate data based on more complex criteria, users can create views.
For instance, suppose that the Products table should never have a low stock of electronics. This outcome can be monitored using the following query.
CREATE OR REPLACE VIEW low_stock_electronics AS
SELECT
	Product_id, product_name, category, stock_quantity, price,
FROM
	your_table_name
WHERE
	stock_quantity < 50 AND
	Category = ‘Electronics;
Optimizing Performance in Redshift
Optimizing query performance is essential to extract insights from insights efficiently and at a low cost. Writing queries that conserve memory and reduce run time will be especially important as the dataset grows larger with each migration.
This section explores some methods for improving query optimization, using the Products table as a reference.
Select a distribution key
In Redshift, distribution keys determine how data is distributed across notes in a cluster. Selecting the right distribution key in a table can reduce run time of queries.
For instance, if the Products table is to be joined with other tables on the product_id field, it would be beneficial to use product_id as a distribution key when creating the table.
CREATE TABLE products (
	product_id VARCHAR(100),
	category VARCHAR(100),
	description VARCHAR(100),
	price INT,
	stock_quantity INT
)
DISTKEY(product_id);
Select a sort key
Selecting the right sort key bolsters common SQL operations, such as filters and joins. In Redshift, users can manually select a sort key or have a sort key selected for them. Sort keys call in two categories: compound sort keys and interleaved sort keys. The best sort key depends on the queries that need to be run on the data.
CREATE TABLE products (
	product_id VARCHAR(100),
	category VARCHAR(100),
	description VARCHAR(100),
	price INT,
	stock_quantity INT
)
COMPOUND SORTKEY(category, product_id);
For more information on the sort keys, visit the AWS documentation.
Use compression
Compression entails encoding the given data with fewer bits. This results in a table that uses less storage but still retains all of the information.
For those unsure of what type of compression is best for their data, Redshift can perform compression analysis to find the best encoding for each field with the following command:
ANALYZE COMPRESSION <table_name>;Conclusion and Next Steps
Migrating data from DynamoDB to Redshift allows users to take advantage of Redshift's OLAP capabilities for more complex data analyses.
This tutorial explored three different migration methods, each with unique benefits and drawbacks.When selecting the best approach, carefully evaluate your analysis needs, data limitations, and budget considerations to ensure the most effective solution for your specific use case.
A great next step is to start the Introduction to Redshift course, to either learn or refresh basic concepts. The AWS Security and Cost Management course is another great alternative to learning concepts that anyone working with AWS should master.
Get certified in your dream Data Engineer role
Our certification programs help you stand out and prove your skills are job-ready to potential employers.
FAQs
Can I automate the migration process using the methods described?
Yes, both AWS Glue and DynamoDB Streams allow for automation. Glue jobs can be scheduled to run at specific intervals, while DynamoDB Streams can be set to trigger real-time data synchronization using Lambda.
Which method is the most efficient for large datasets?
The AWS Glue method is typically the best option for handling large datasets. It provides extensive customization and scalability, making it ideal for complex ETL tasks, though it might require more setup time.
What are the cost considerations when using these methods?
The COPY command is the most cost-effective for straightforward, one-time migrations. However, Glue and DynamoDB Streams can accumulate higher costs due to ongoing resource usage, so it’s important to monitor and optimize your AWS service consumption.
Can I selectively transfer specific data instead of migrating the entire table?
Yes, AWS Glue and DynamoDB Streams offer flexibility to filter and transfer specific items or attributes. The COPY command, on the other hand, transfers the entire dataset without filtering capabilities.
Can I handle schema changes in DynamoDB when migrating to Redshift?
Yes, Redshift requires a defined schema, while DynamoDB is schema-less. You must manually account for any schema changes by updating the Redshift table structure to accommodate new attributes or fields before migration. AWS Glue offers the most flexibility for handling schema differences.
As an aspiring data scientist, I excel at transforming raw data into actionable strategies. I specialize in harnessing Python, SQL, and machine learning techniques to derive impactful solutions in data analysis and architecting robust ETL pipelines that ingest and process vast quantities of data.


